# Remove Widget and Notification Features
URL: https://easyapp.site/en/docs/FQA/removeWidgetNoti
Remove all widget and notification features
***
title: Remove Widget and Notification Features
description: Remove all widget and notification features
icon: FileQuestionIcon
----------------------
If you temporarily don't need widget and notification features, you can follow the steps below to remove related code and configurations
### Remove Widgets
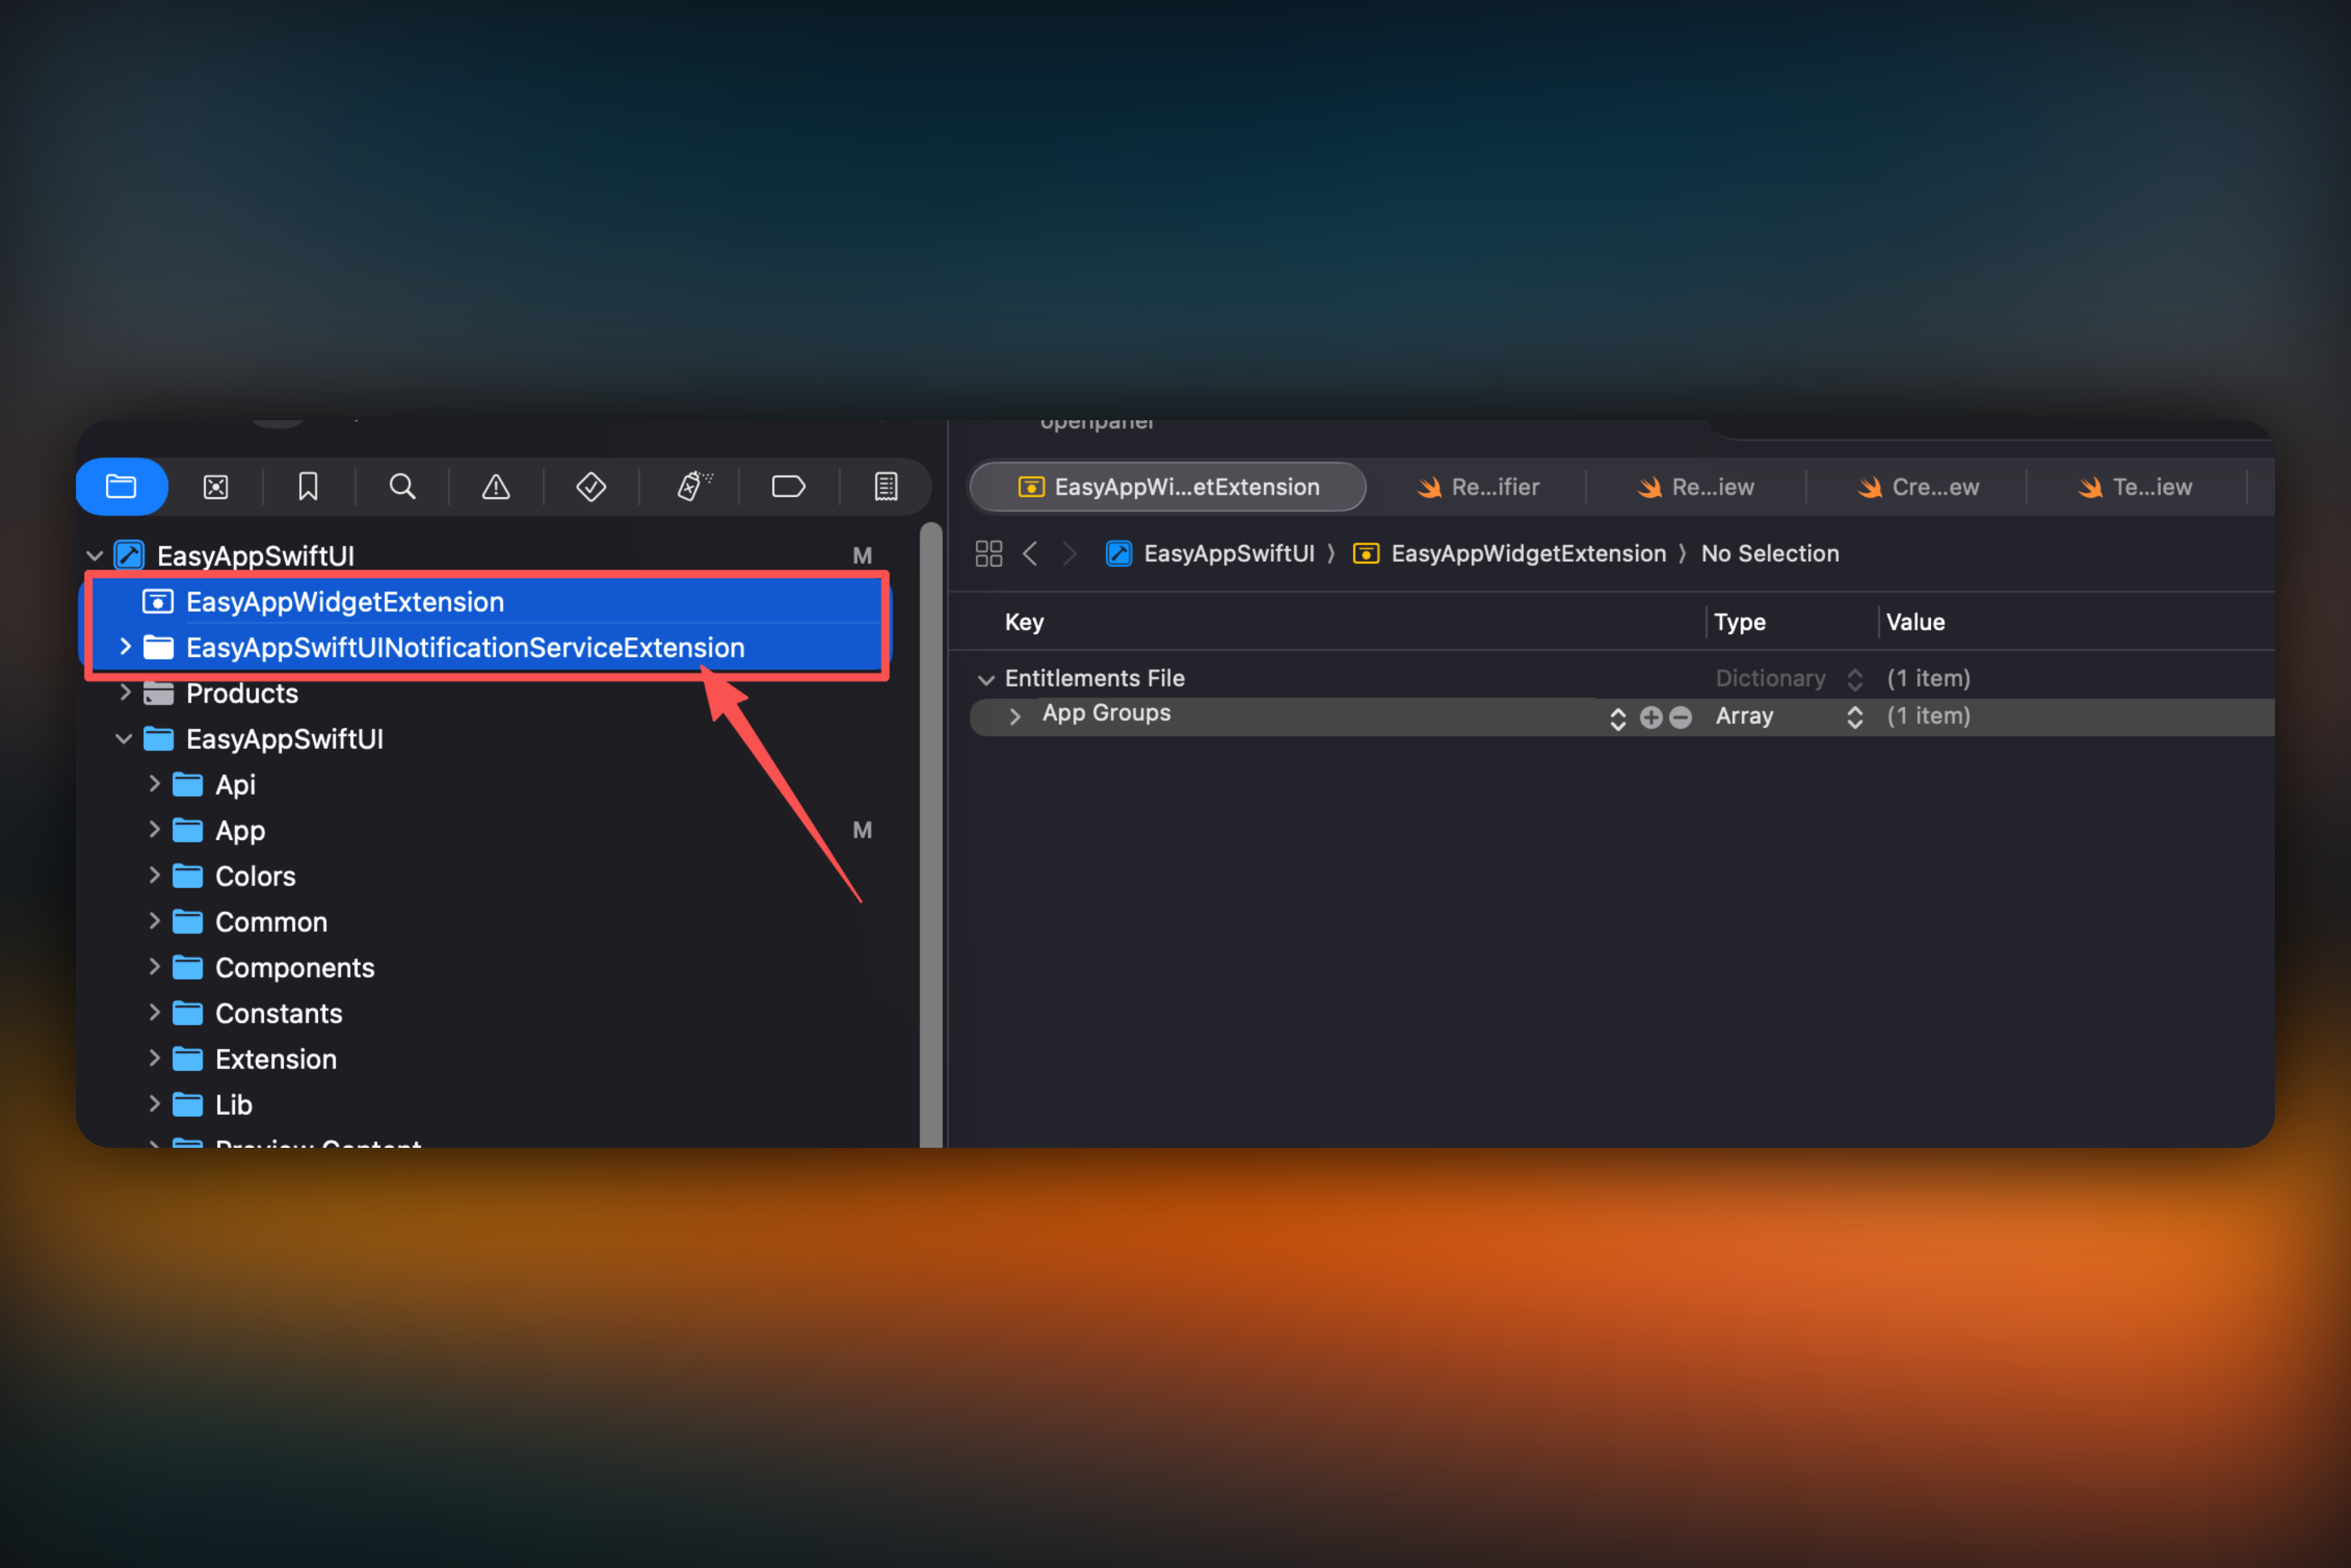
* Delete the `EasyAppWidget` folder, select `Move to Trash`
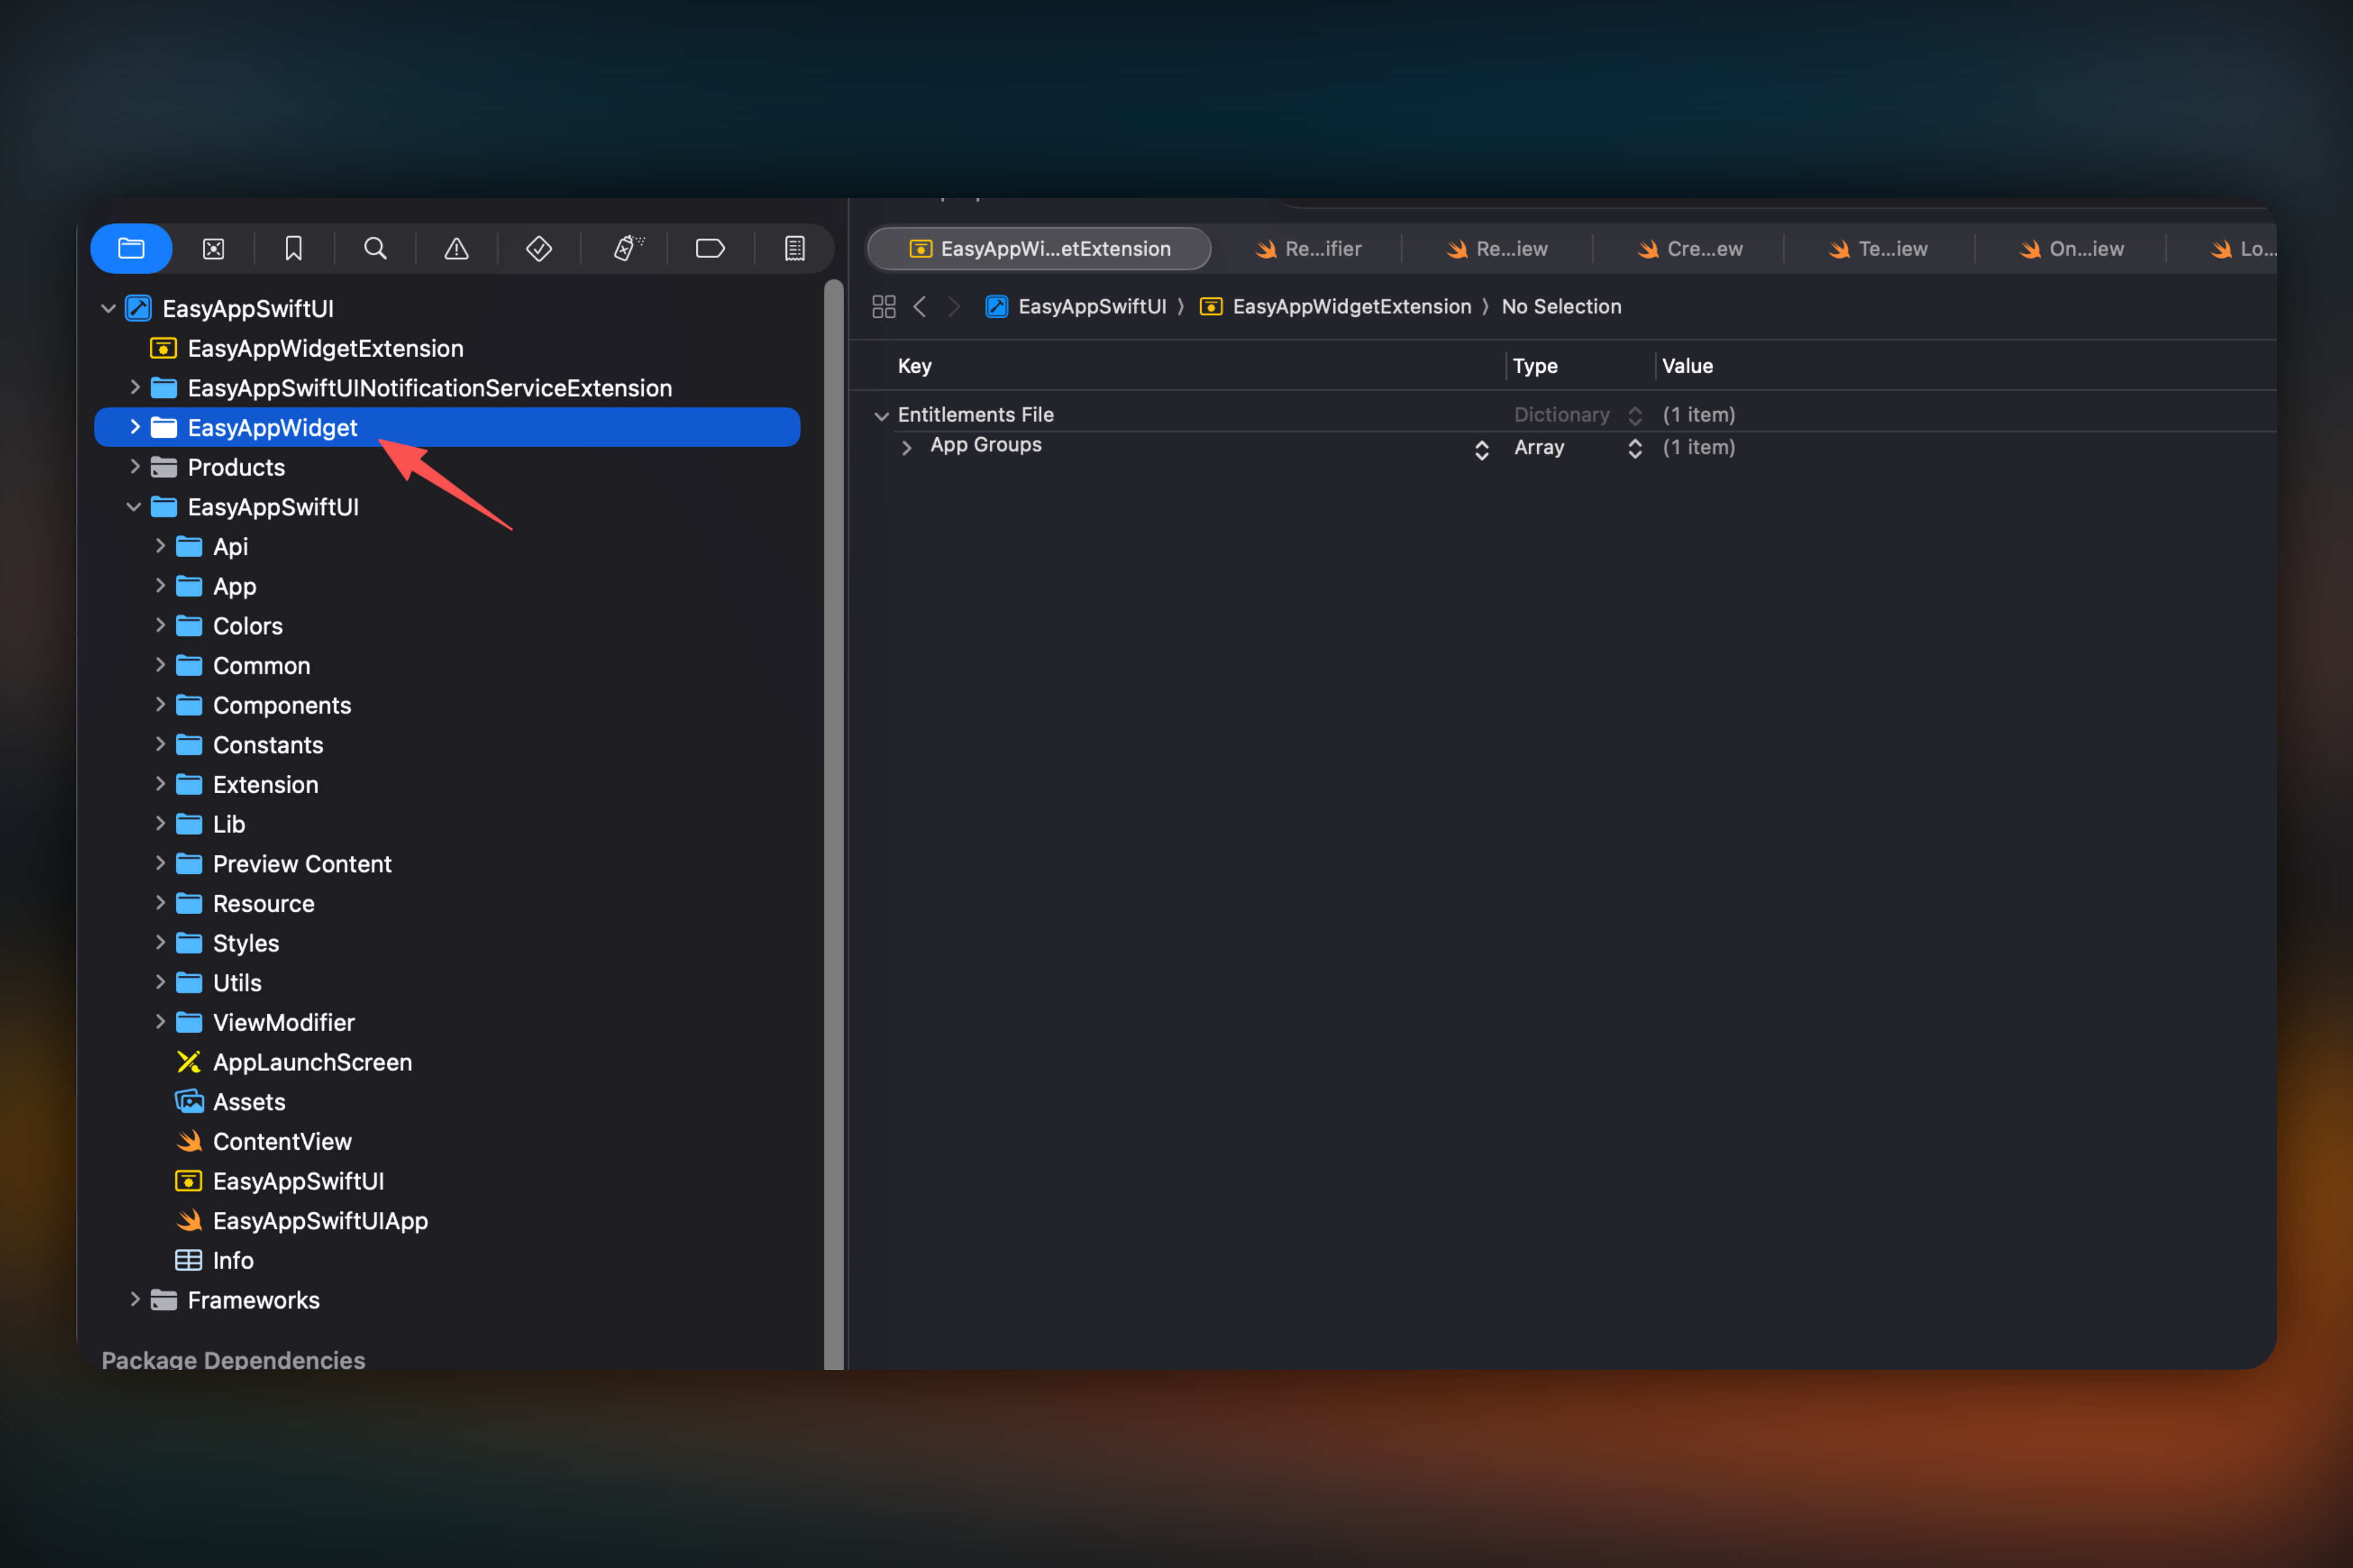
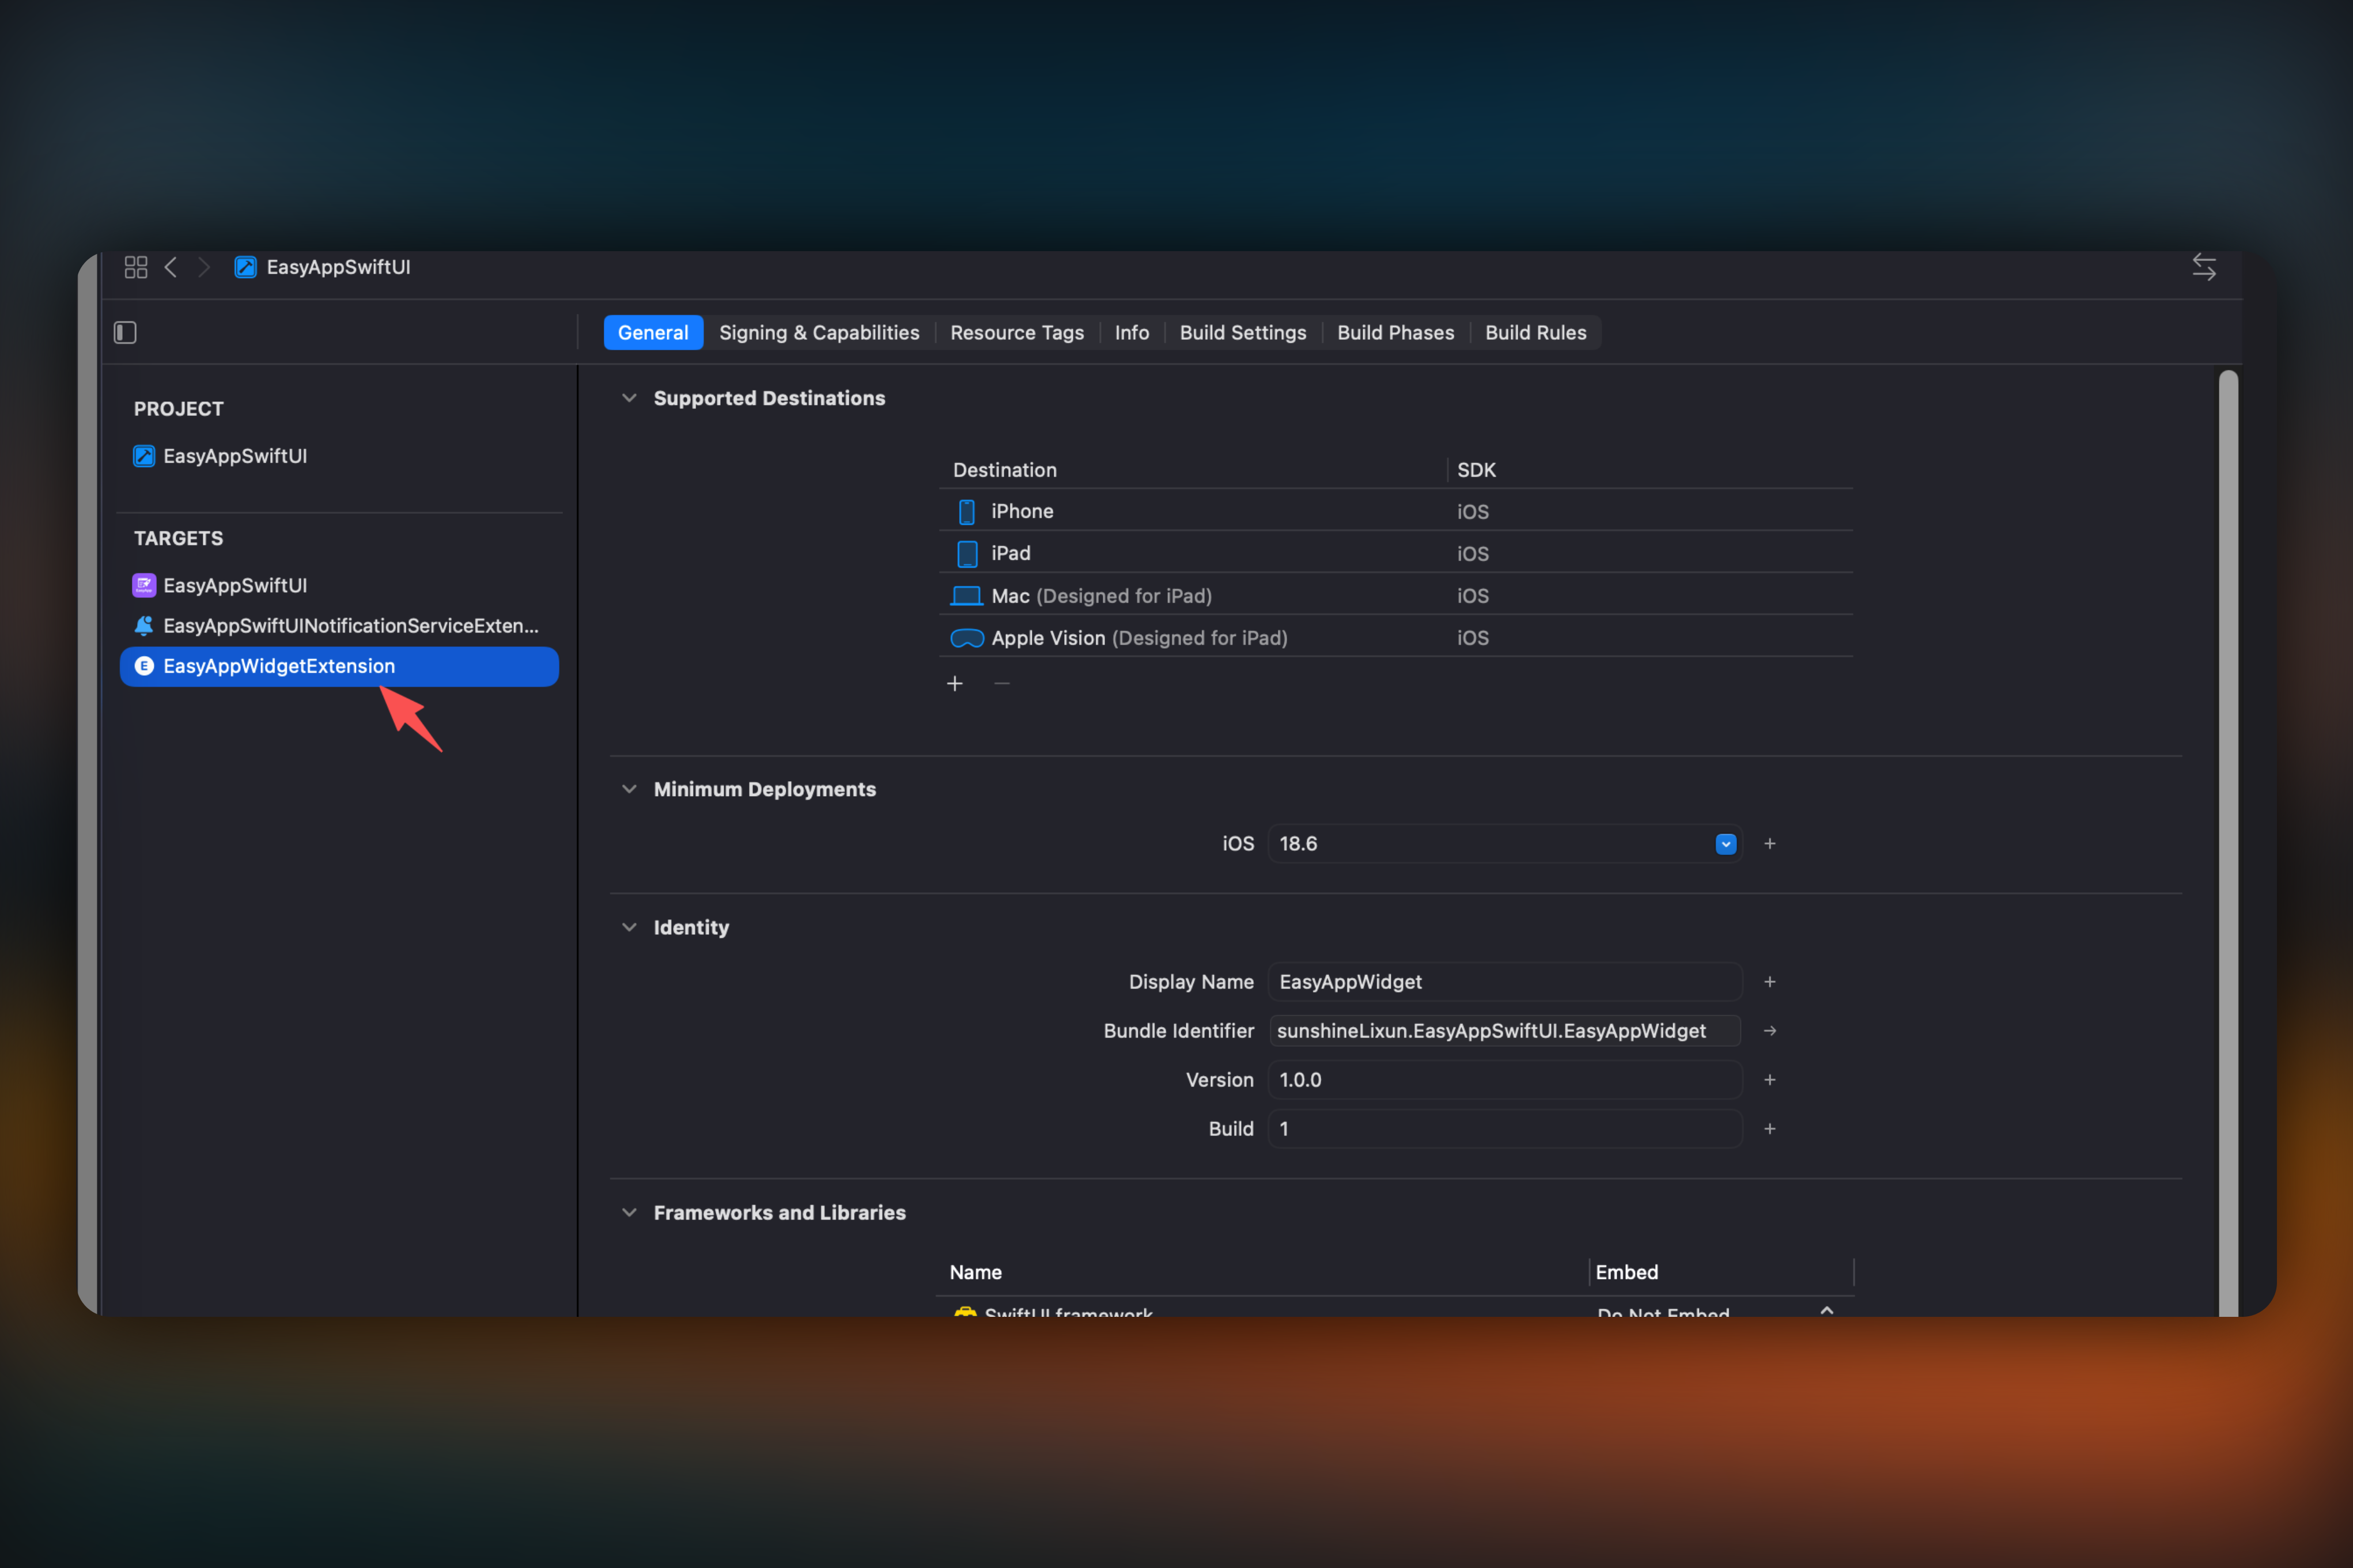
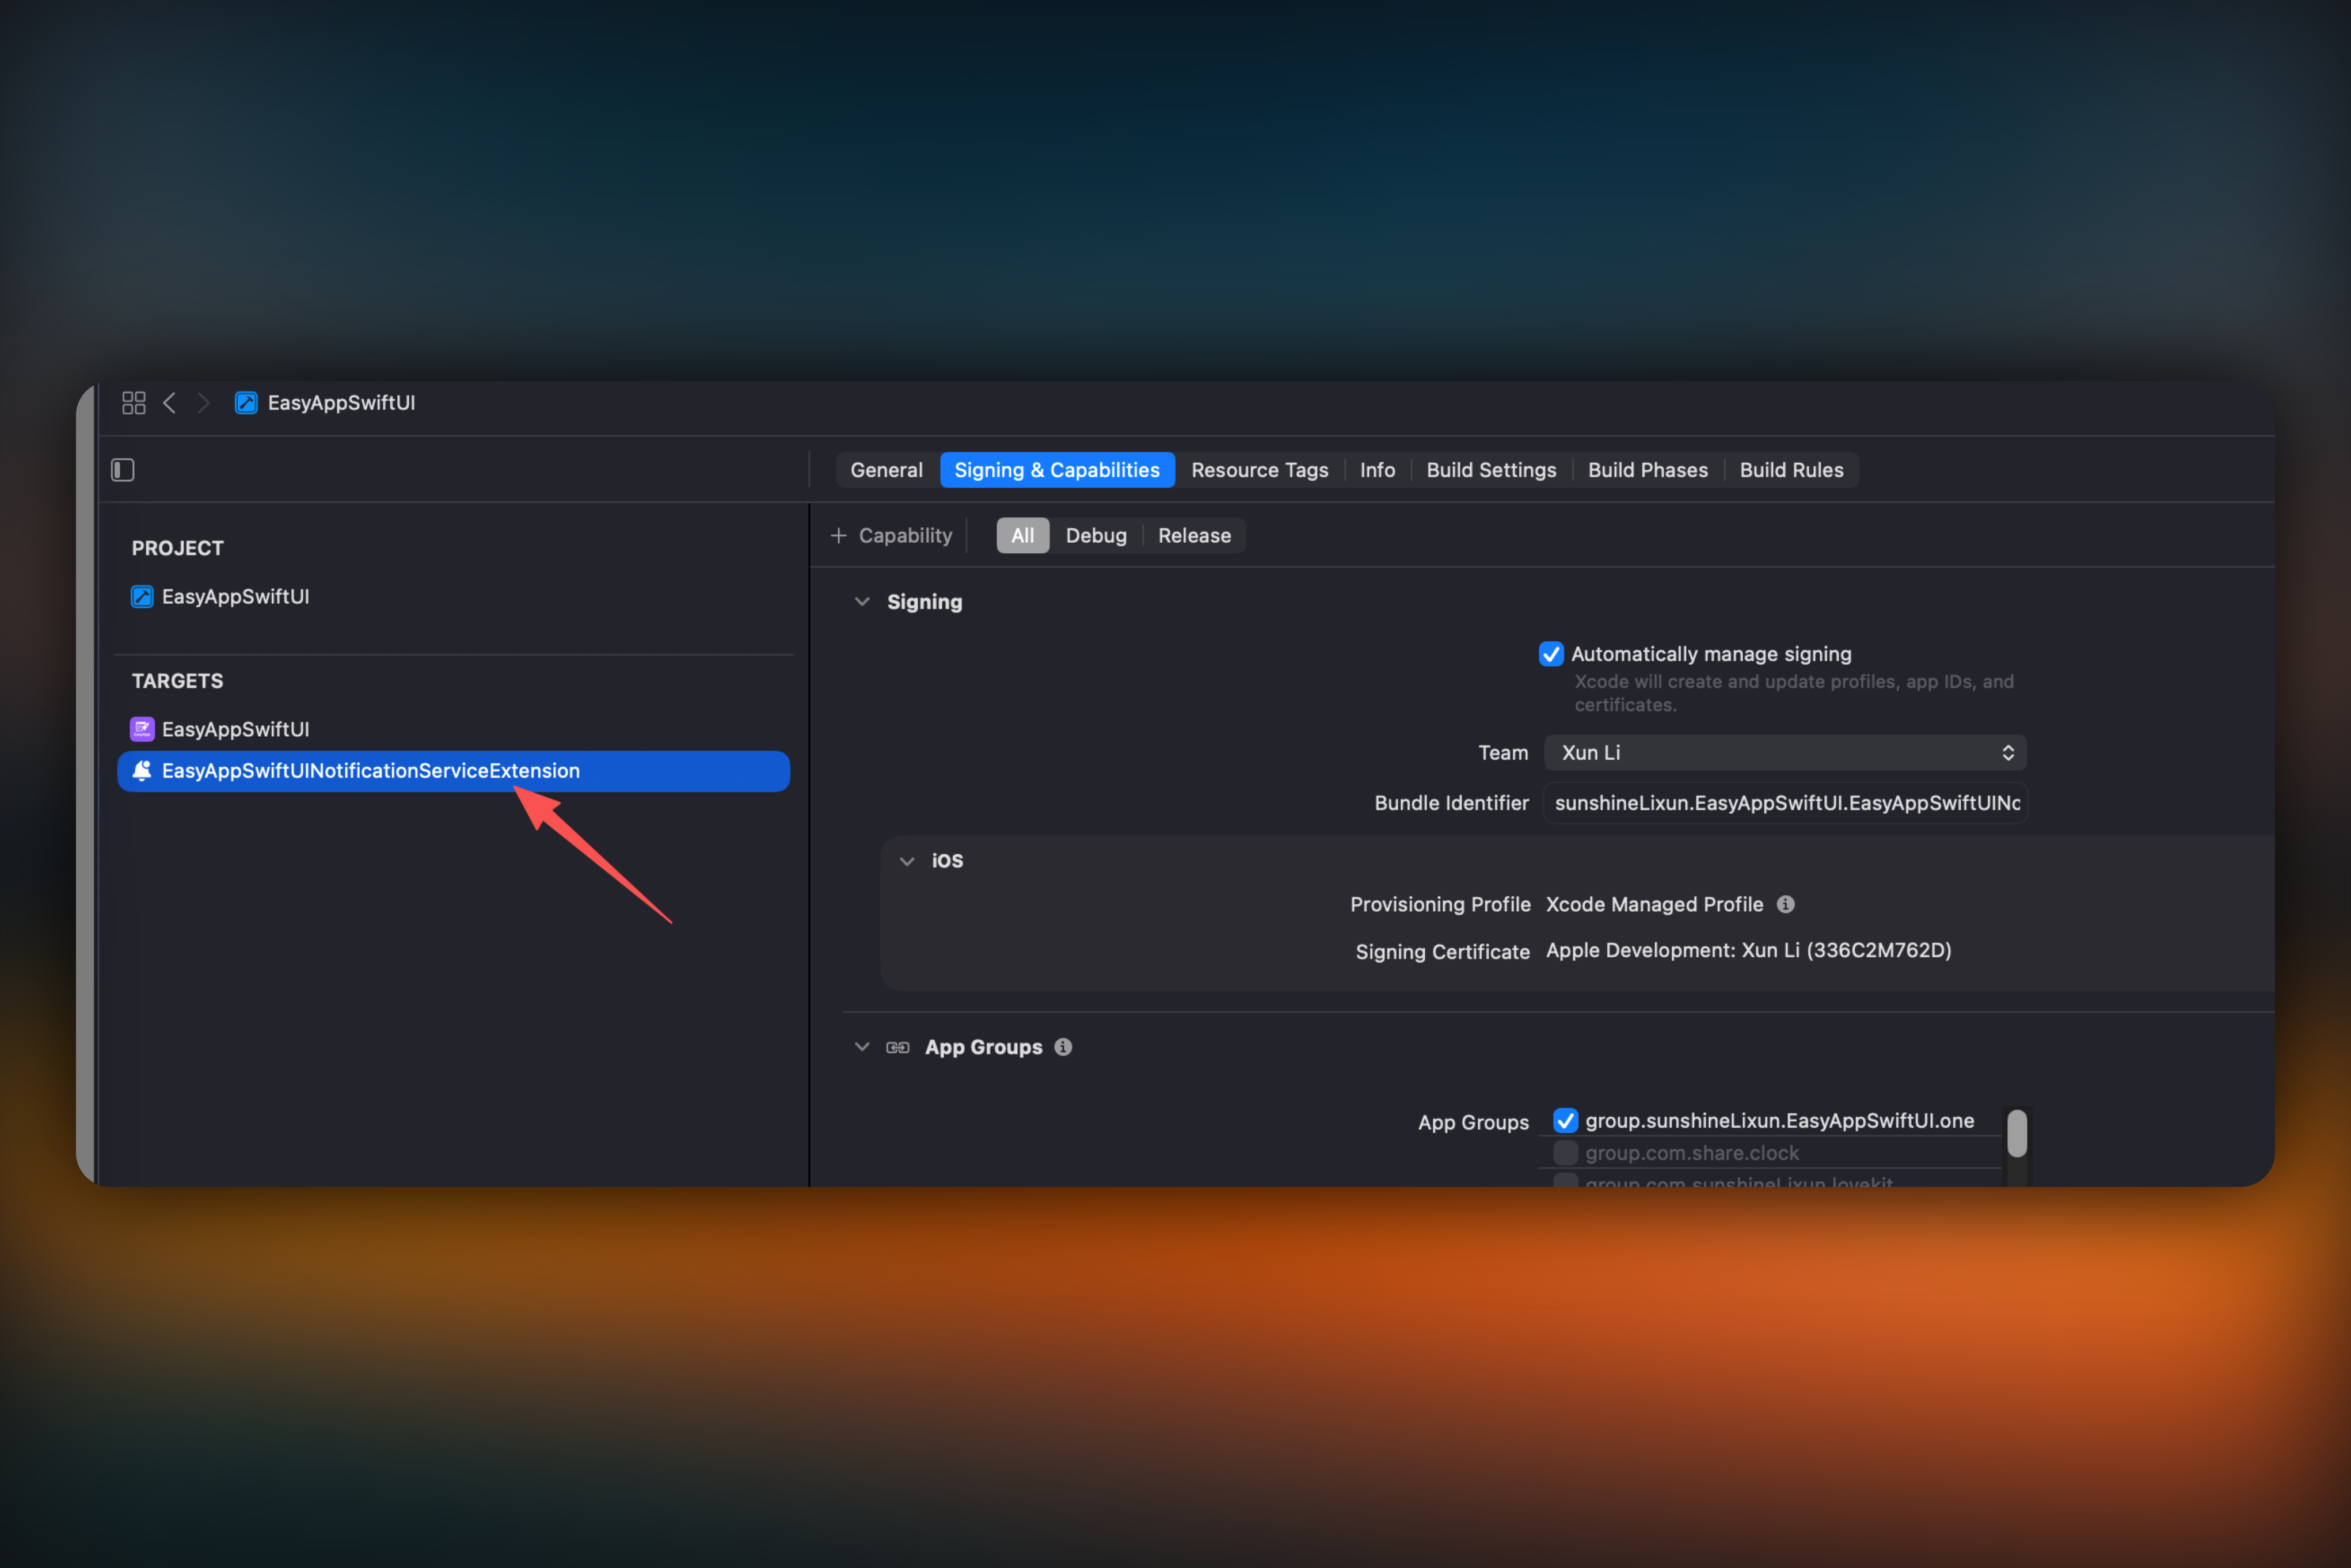
* Right-click to delete `EasyAppWidgetExtension`
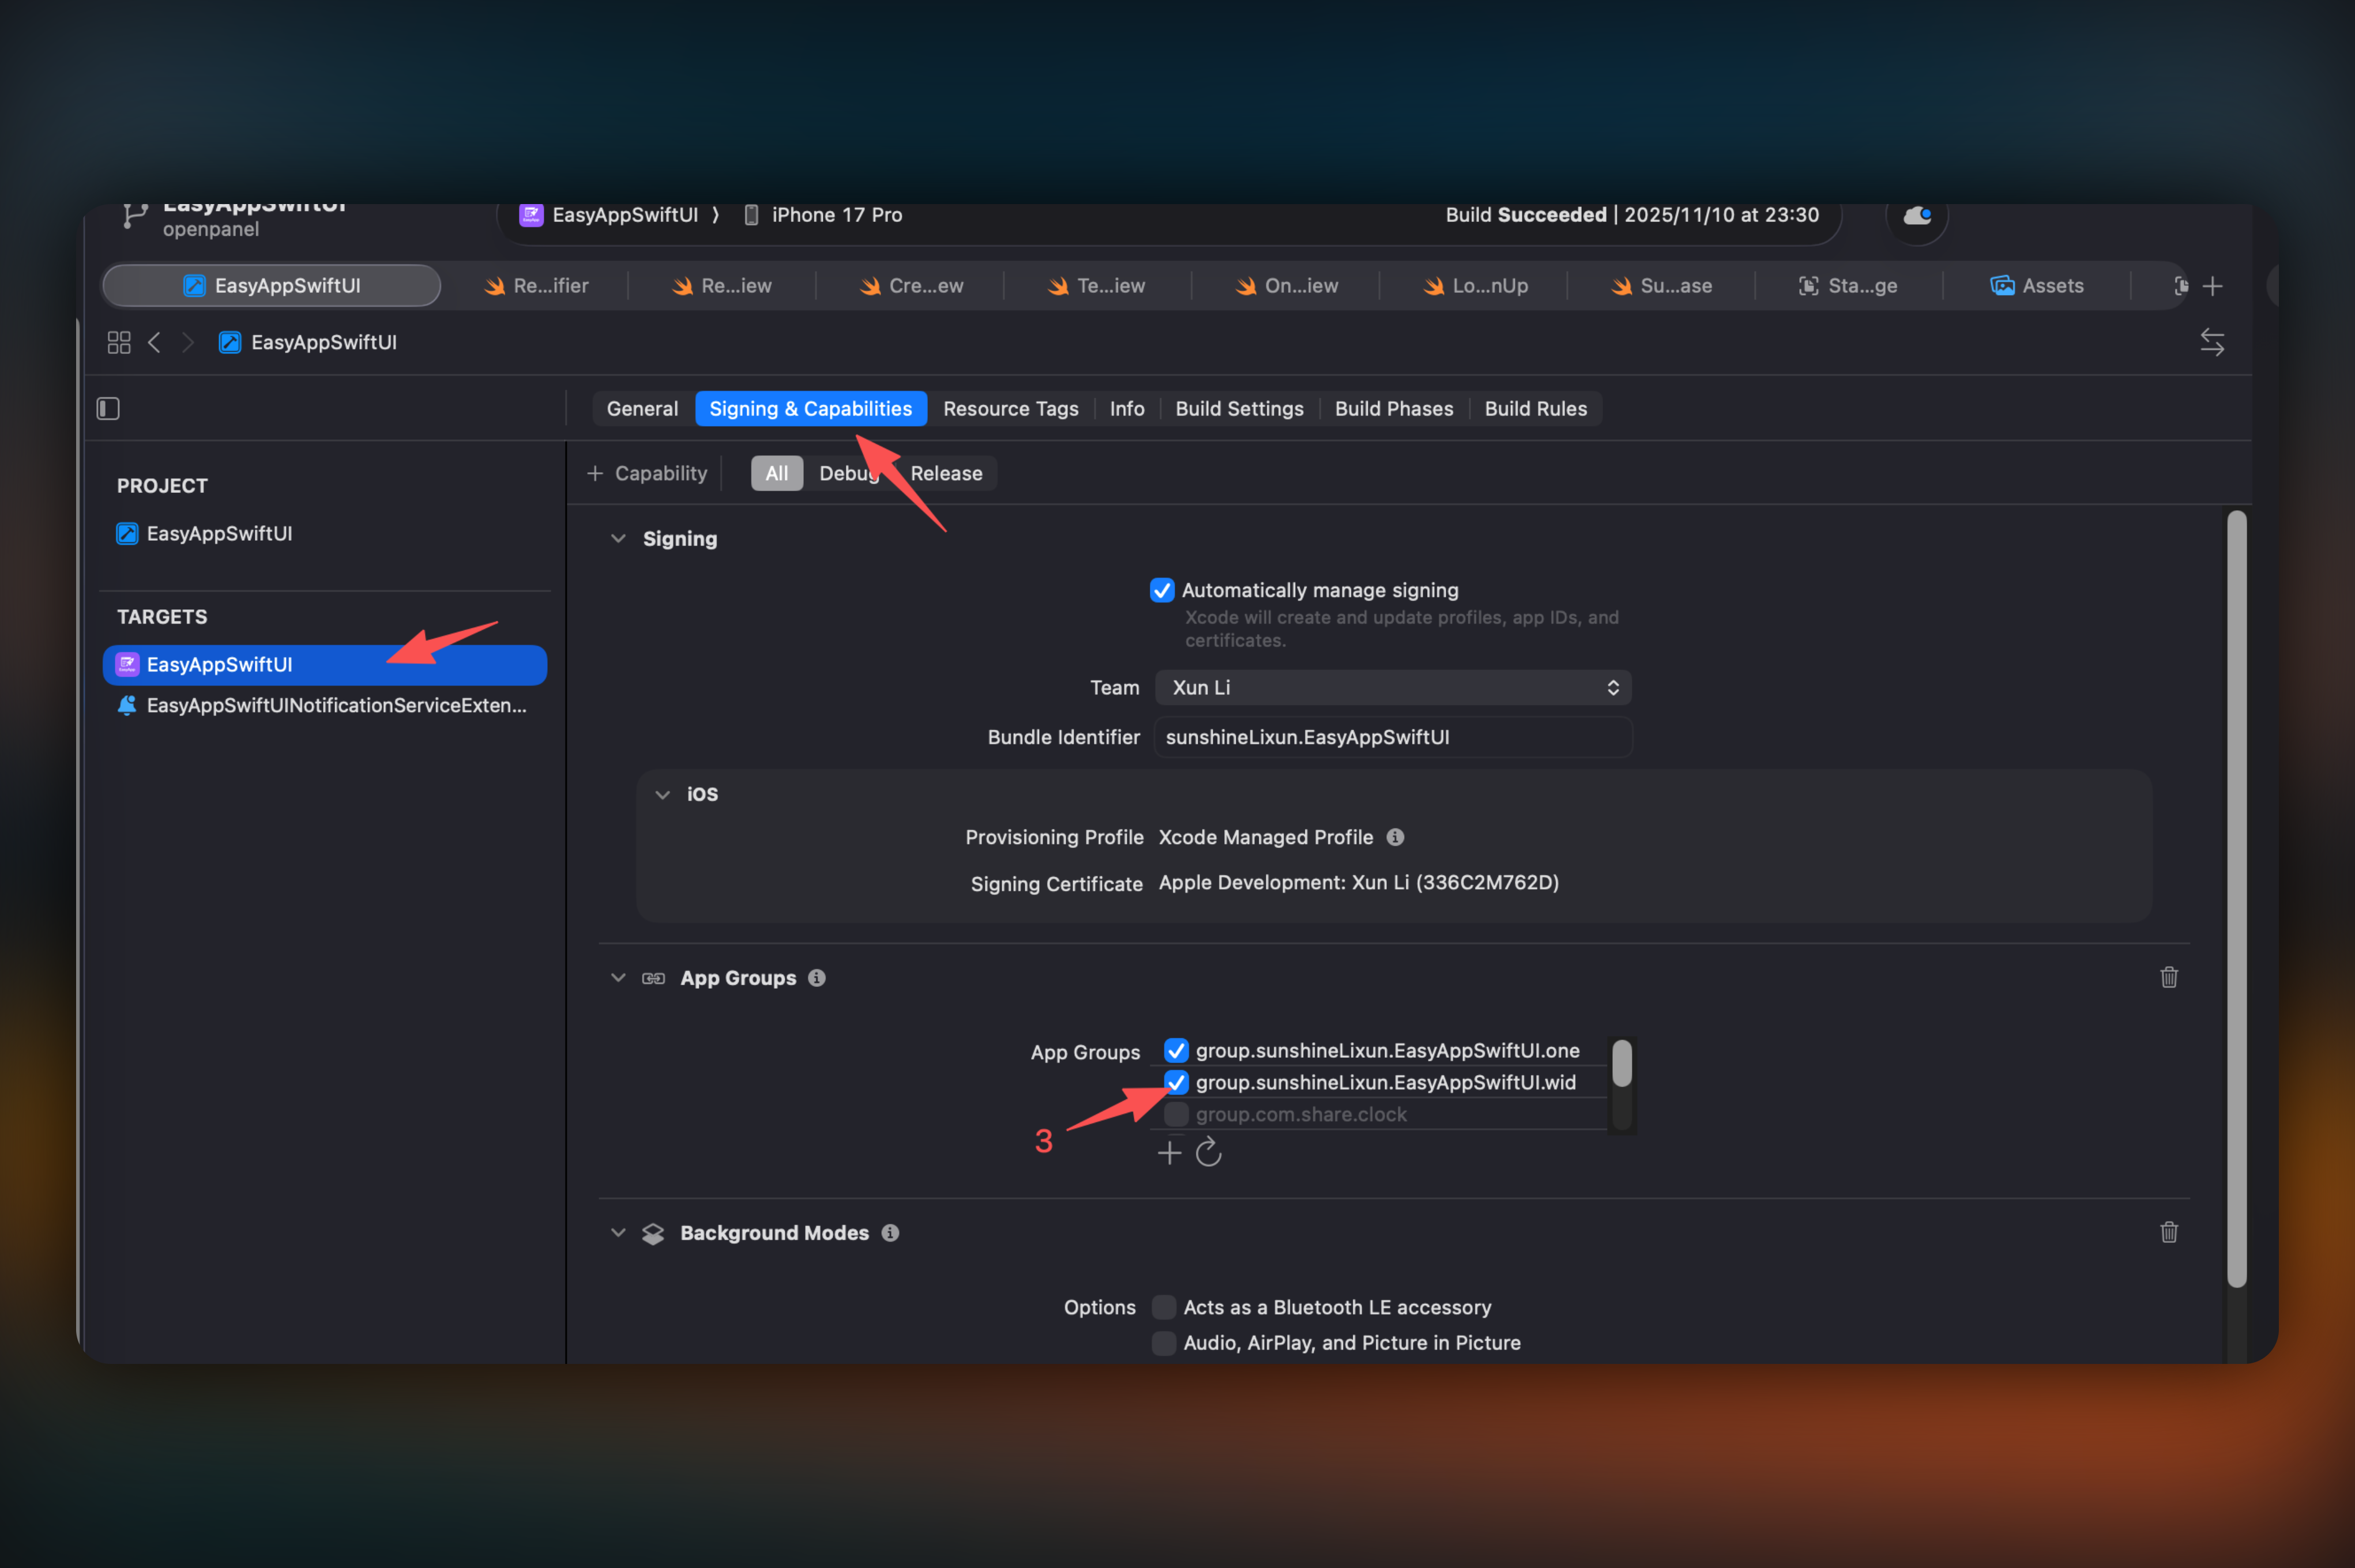
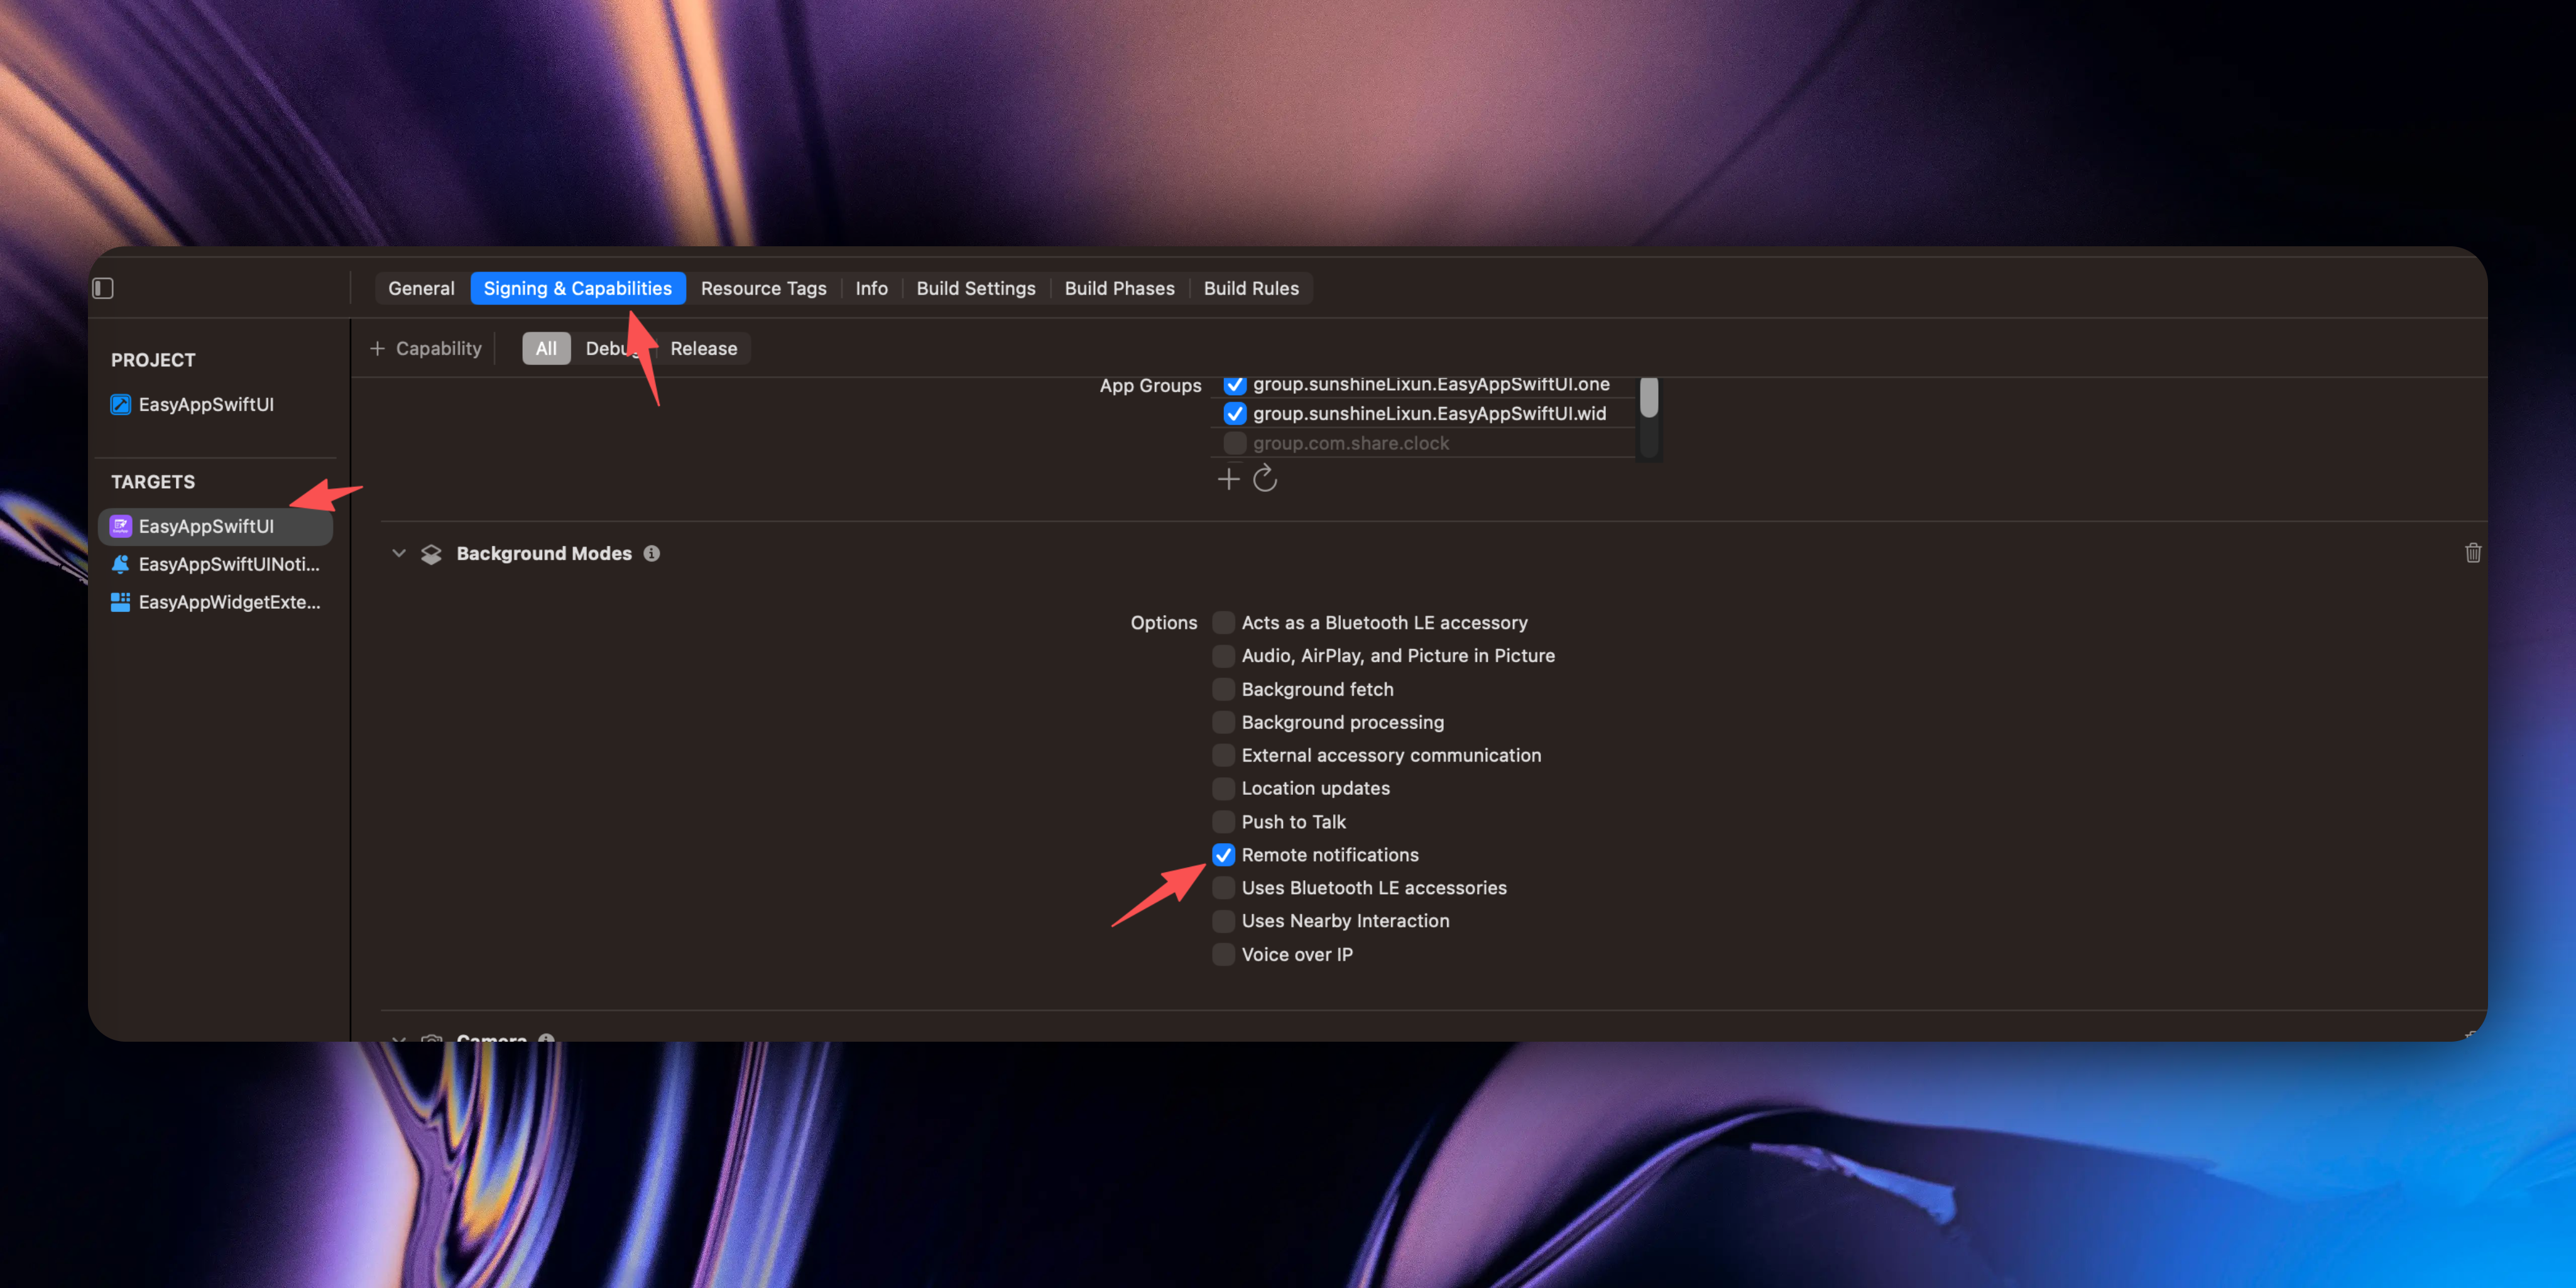
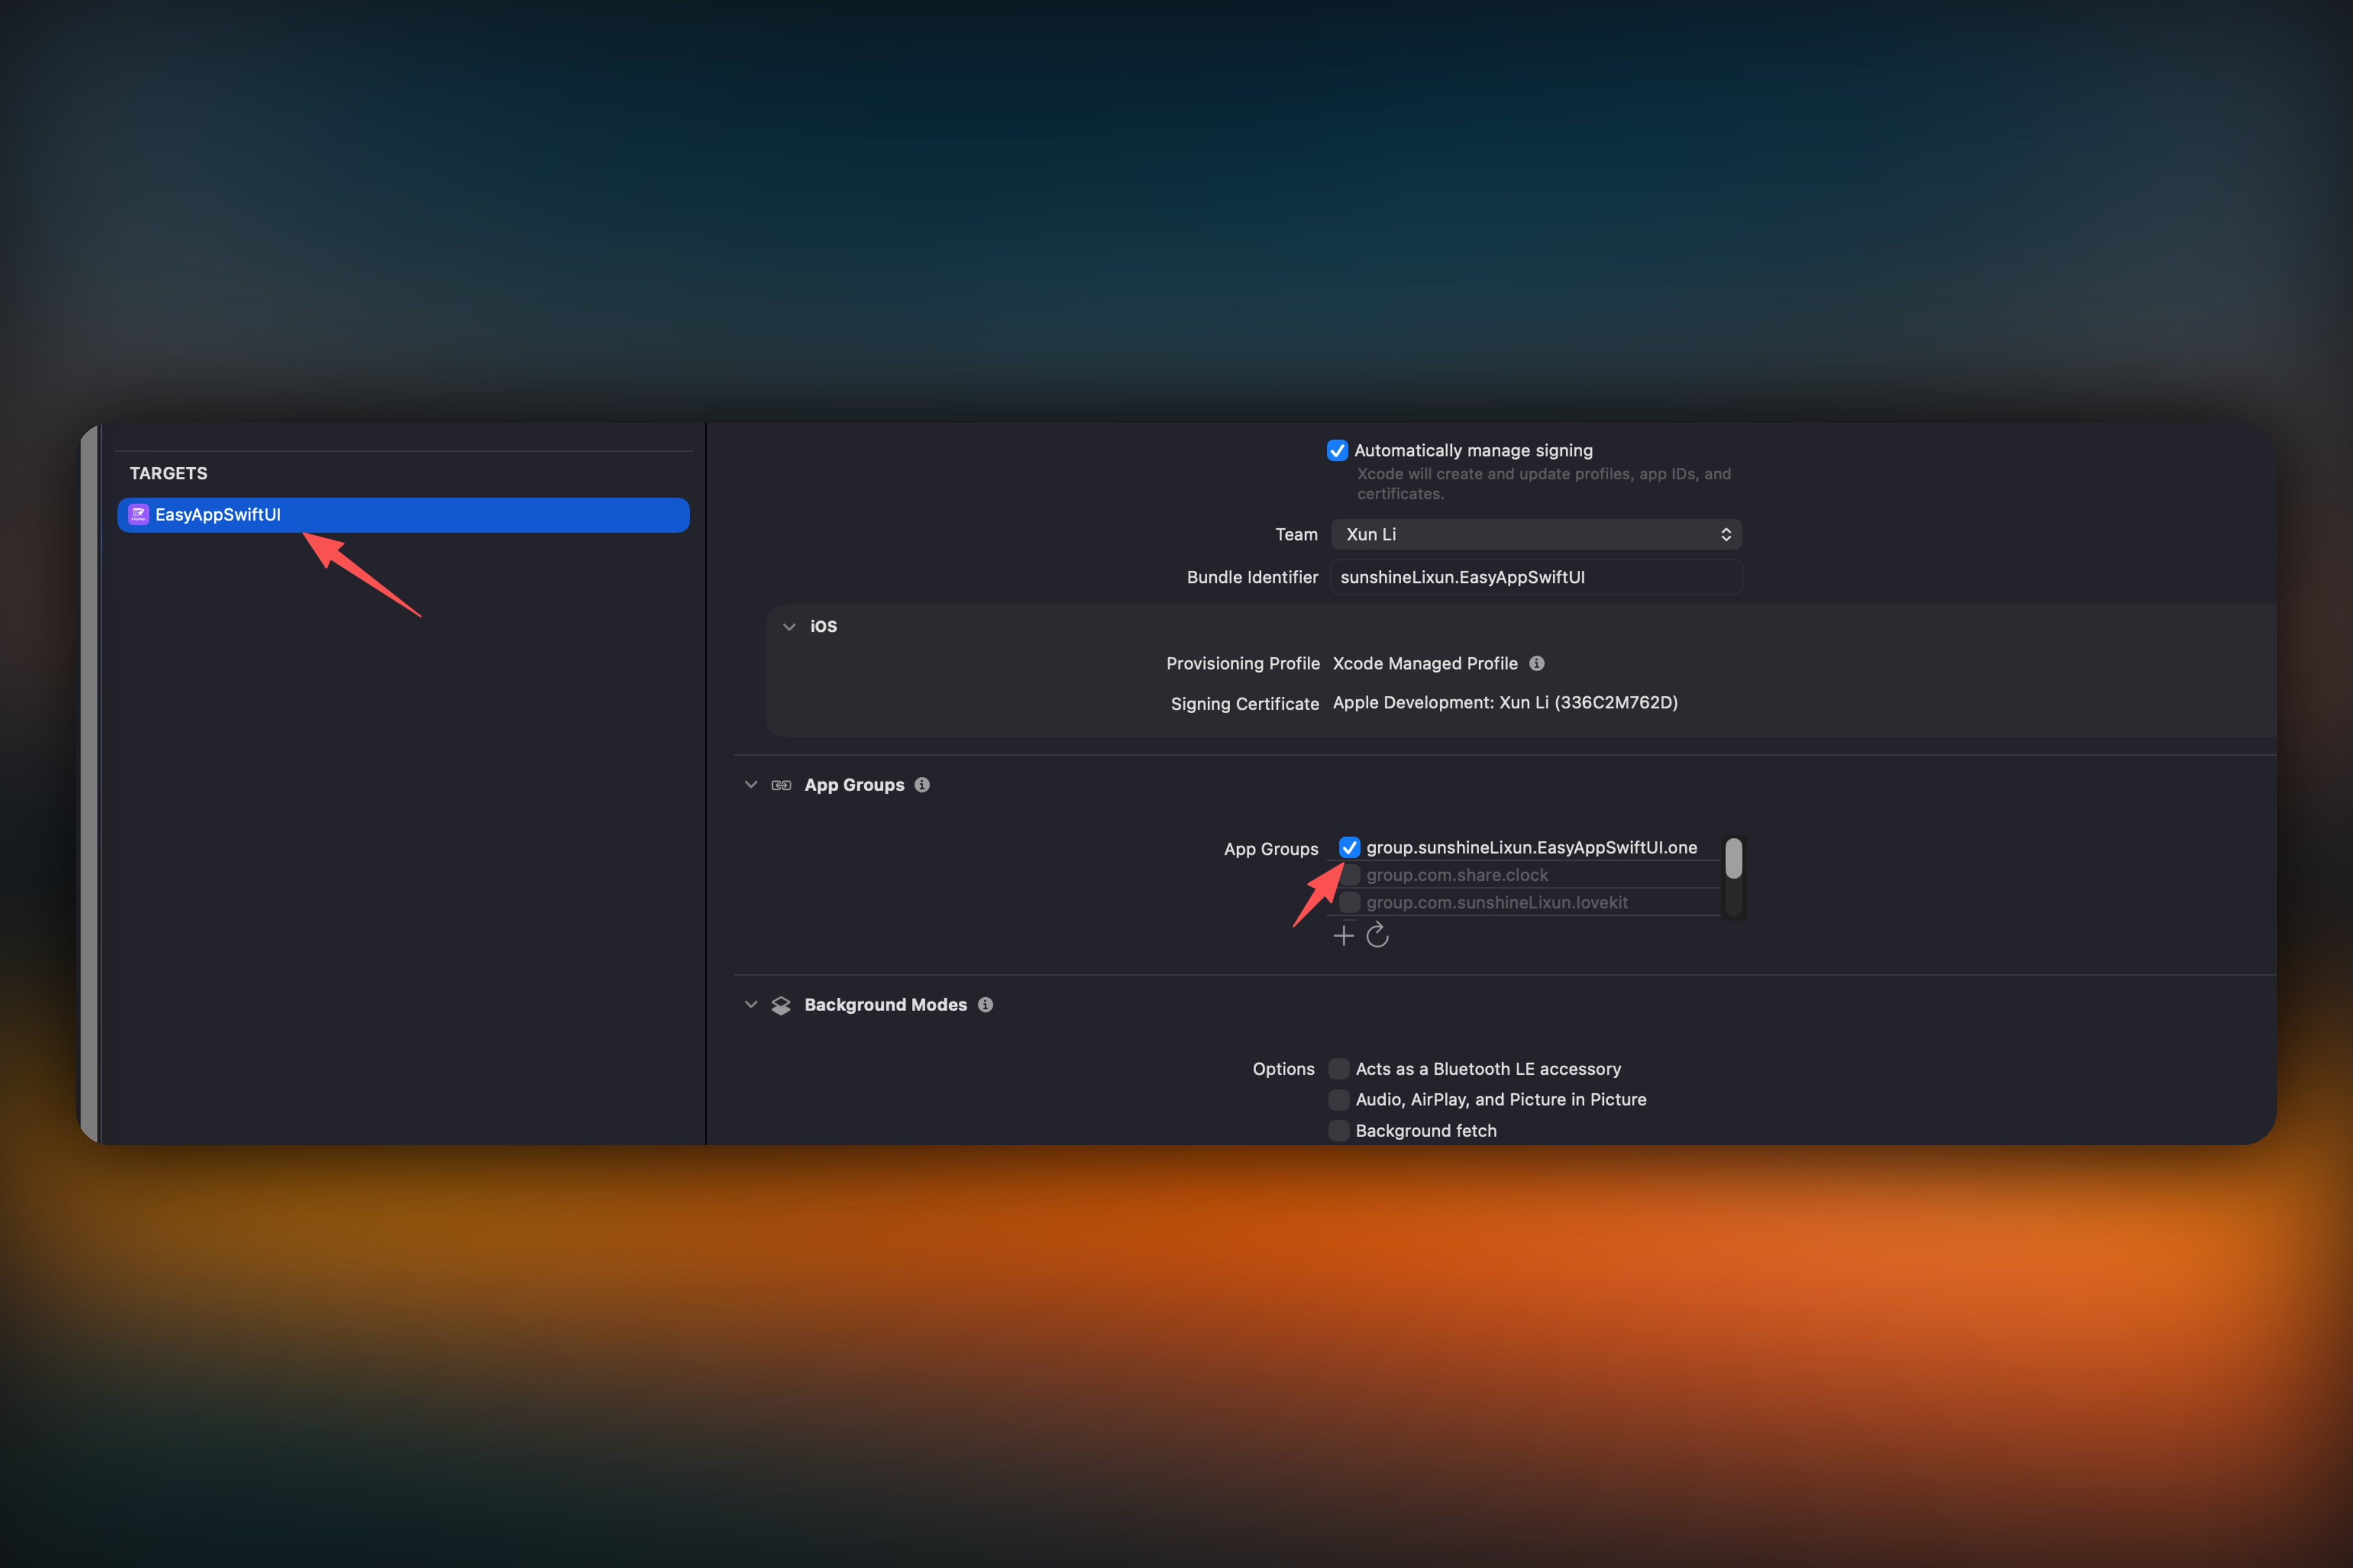
* Uncheck `widget` in `App Group`, as shown in step 3 of the image below
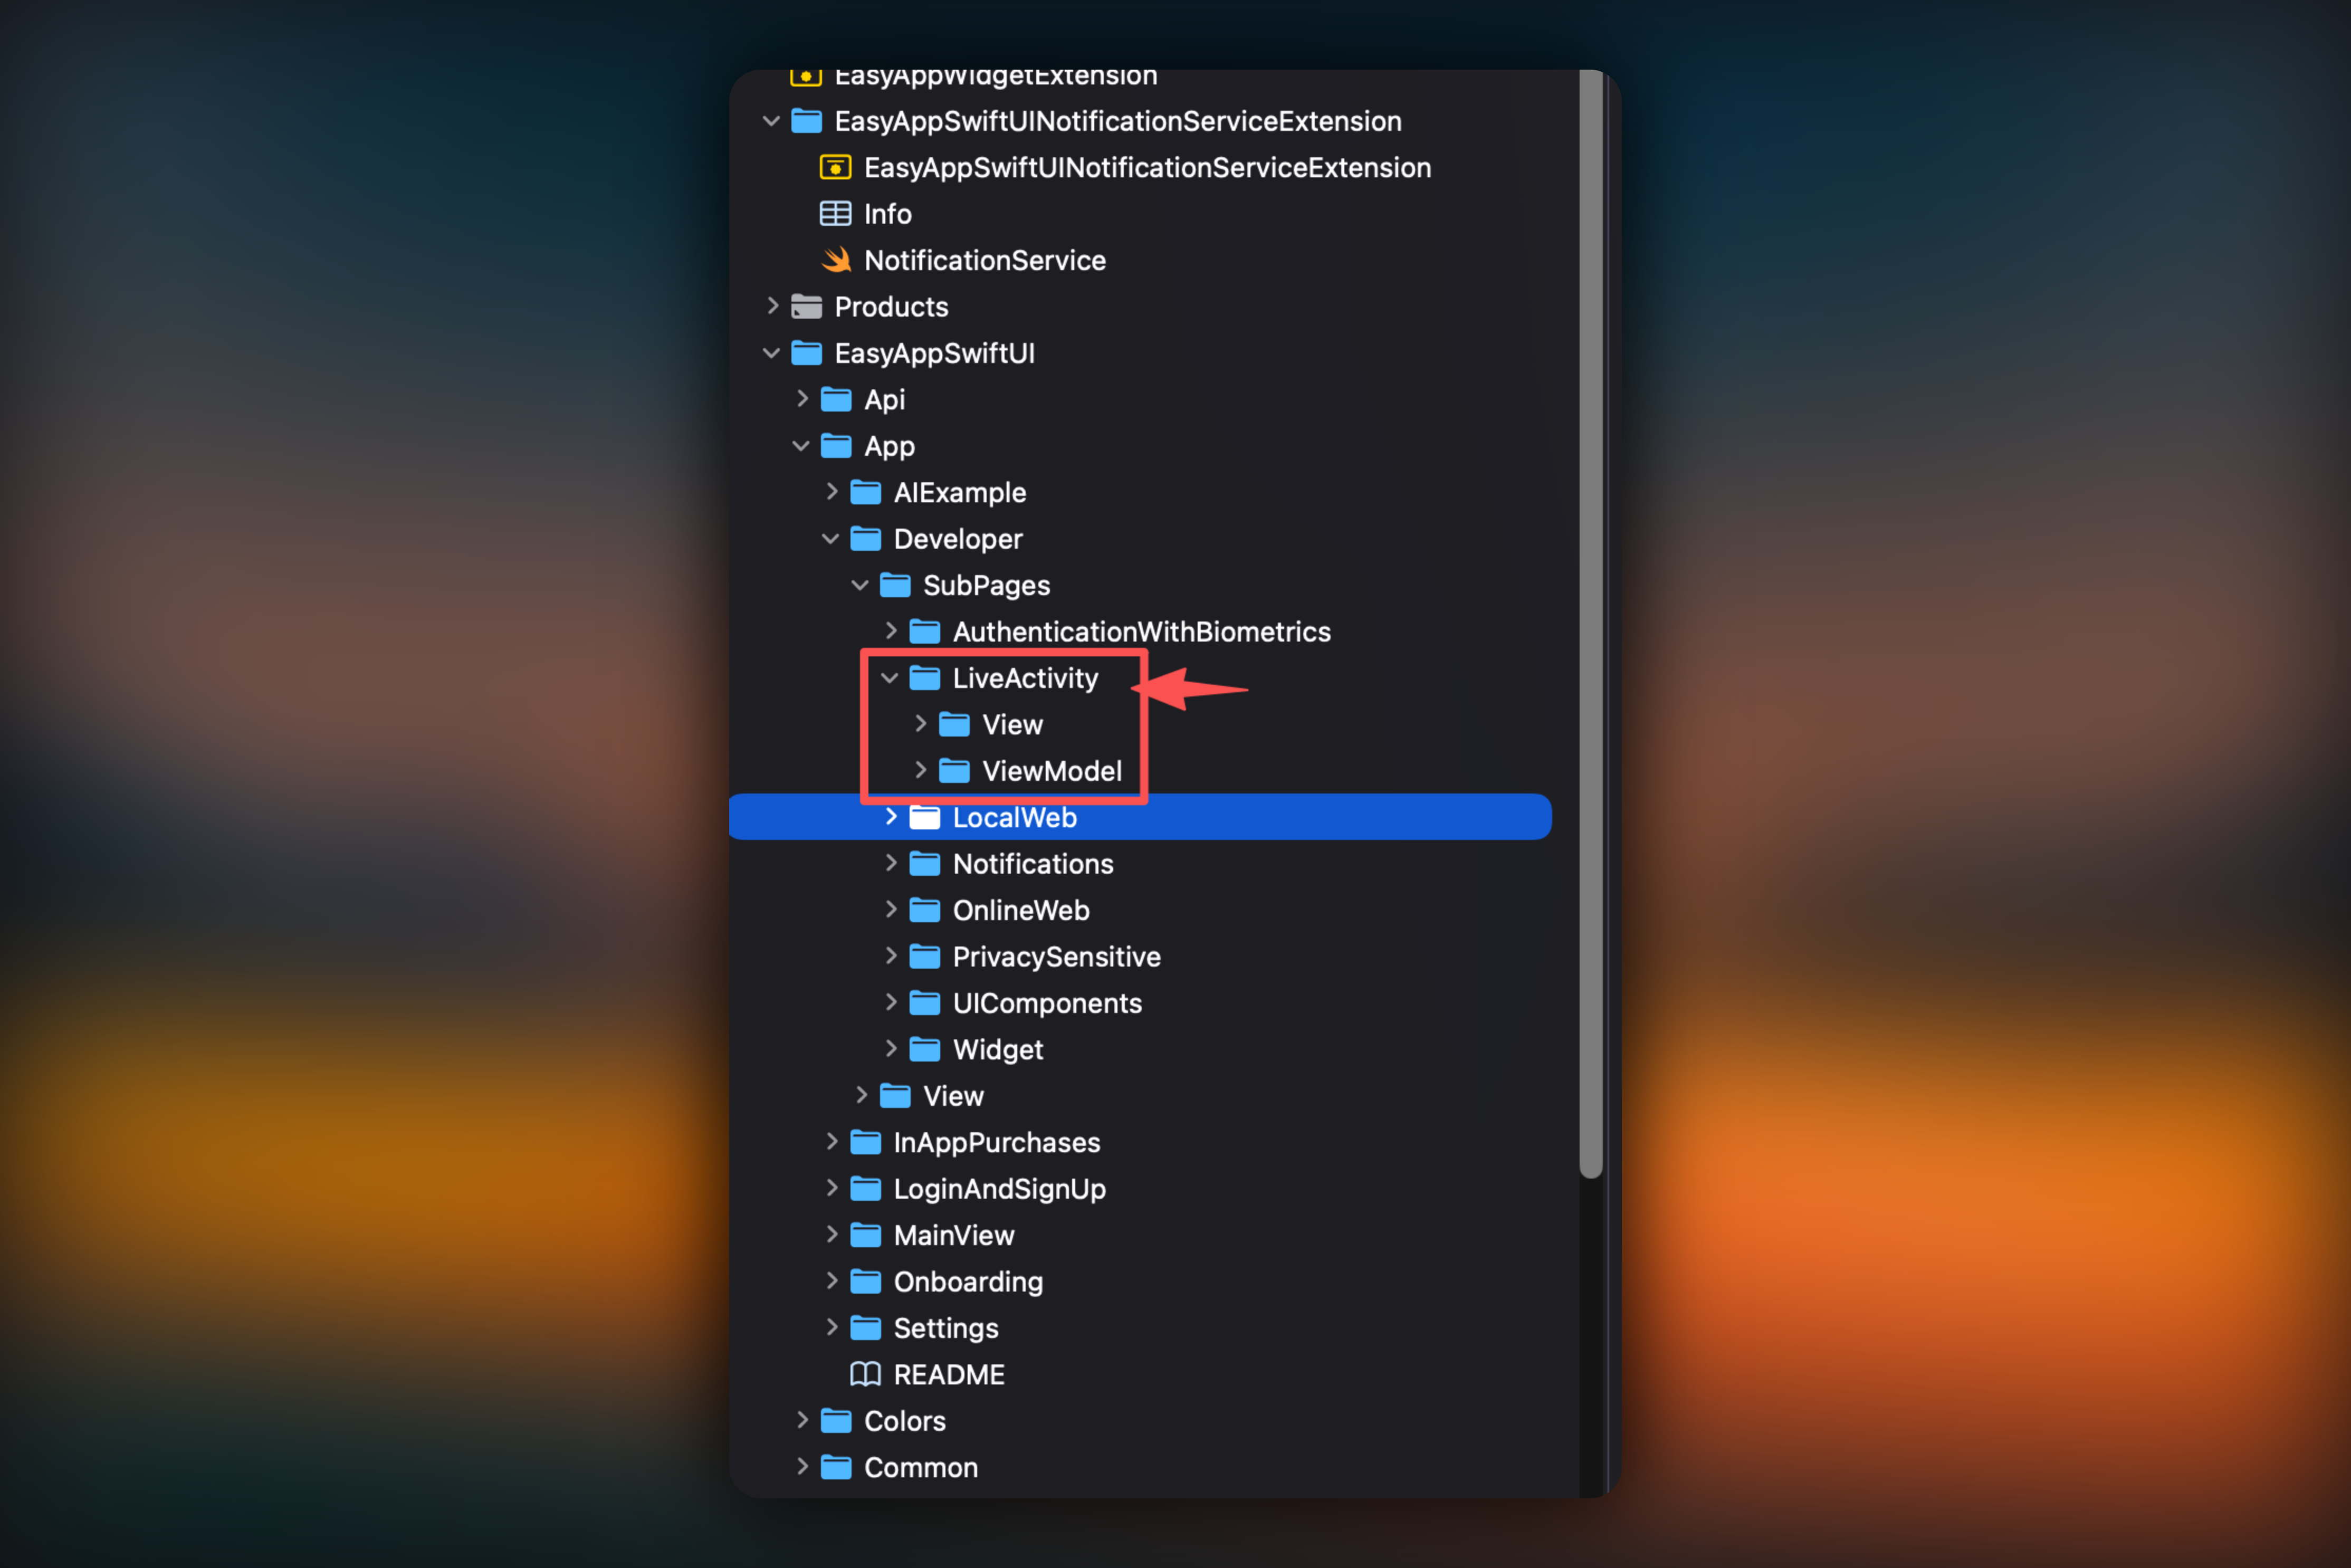
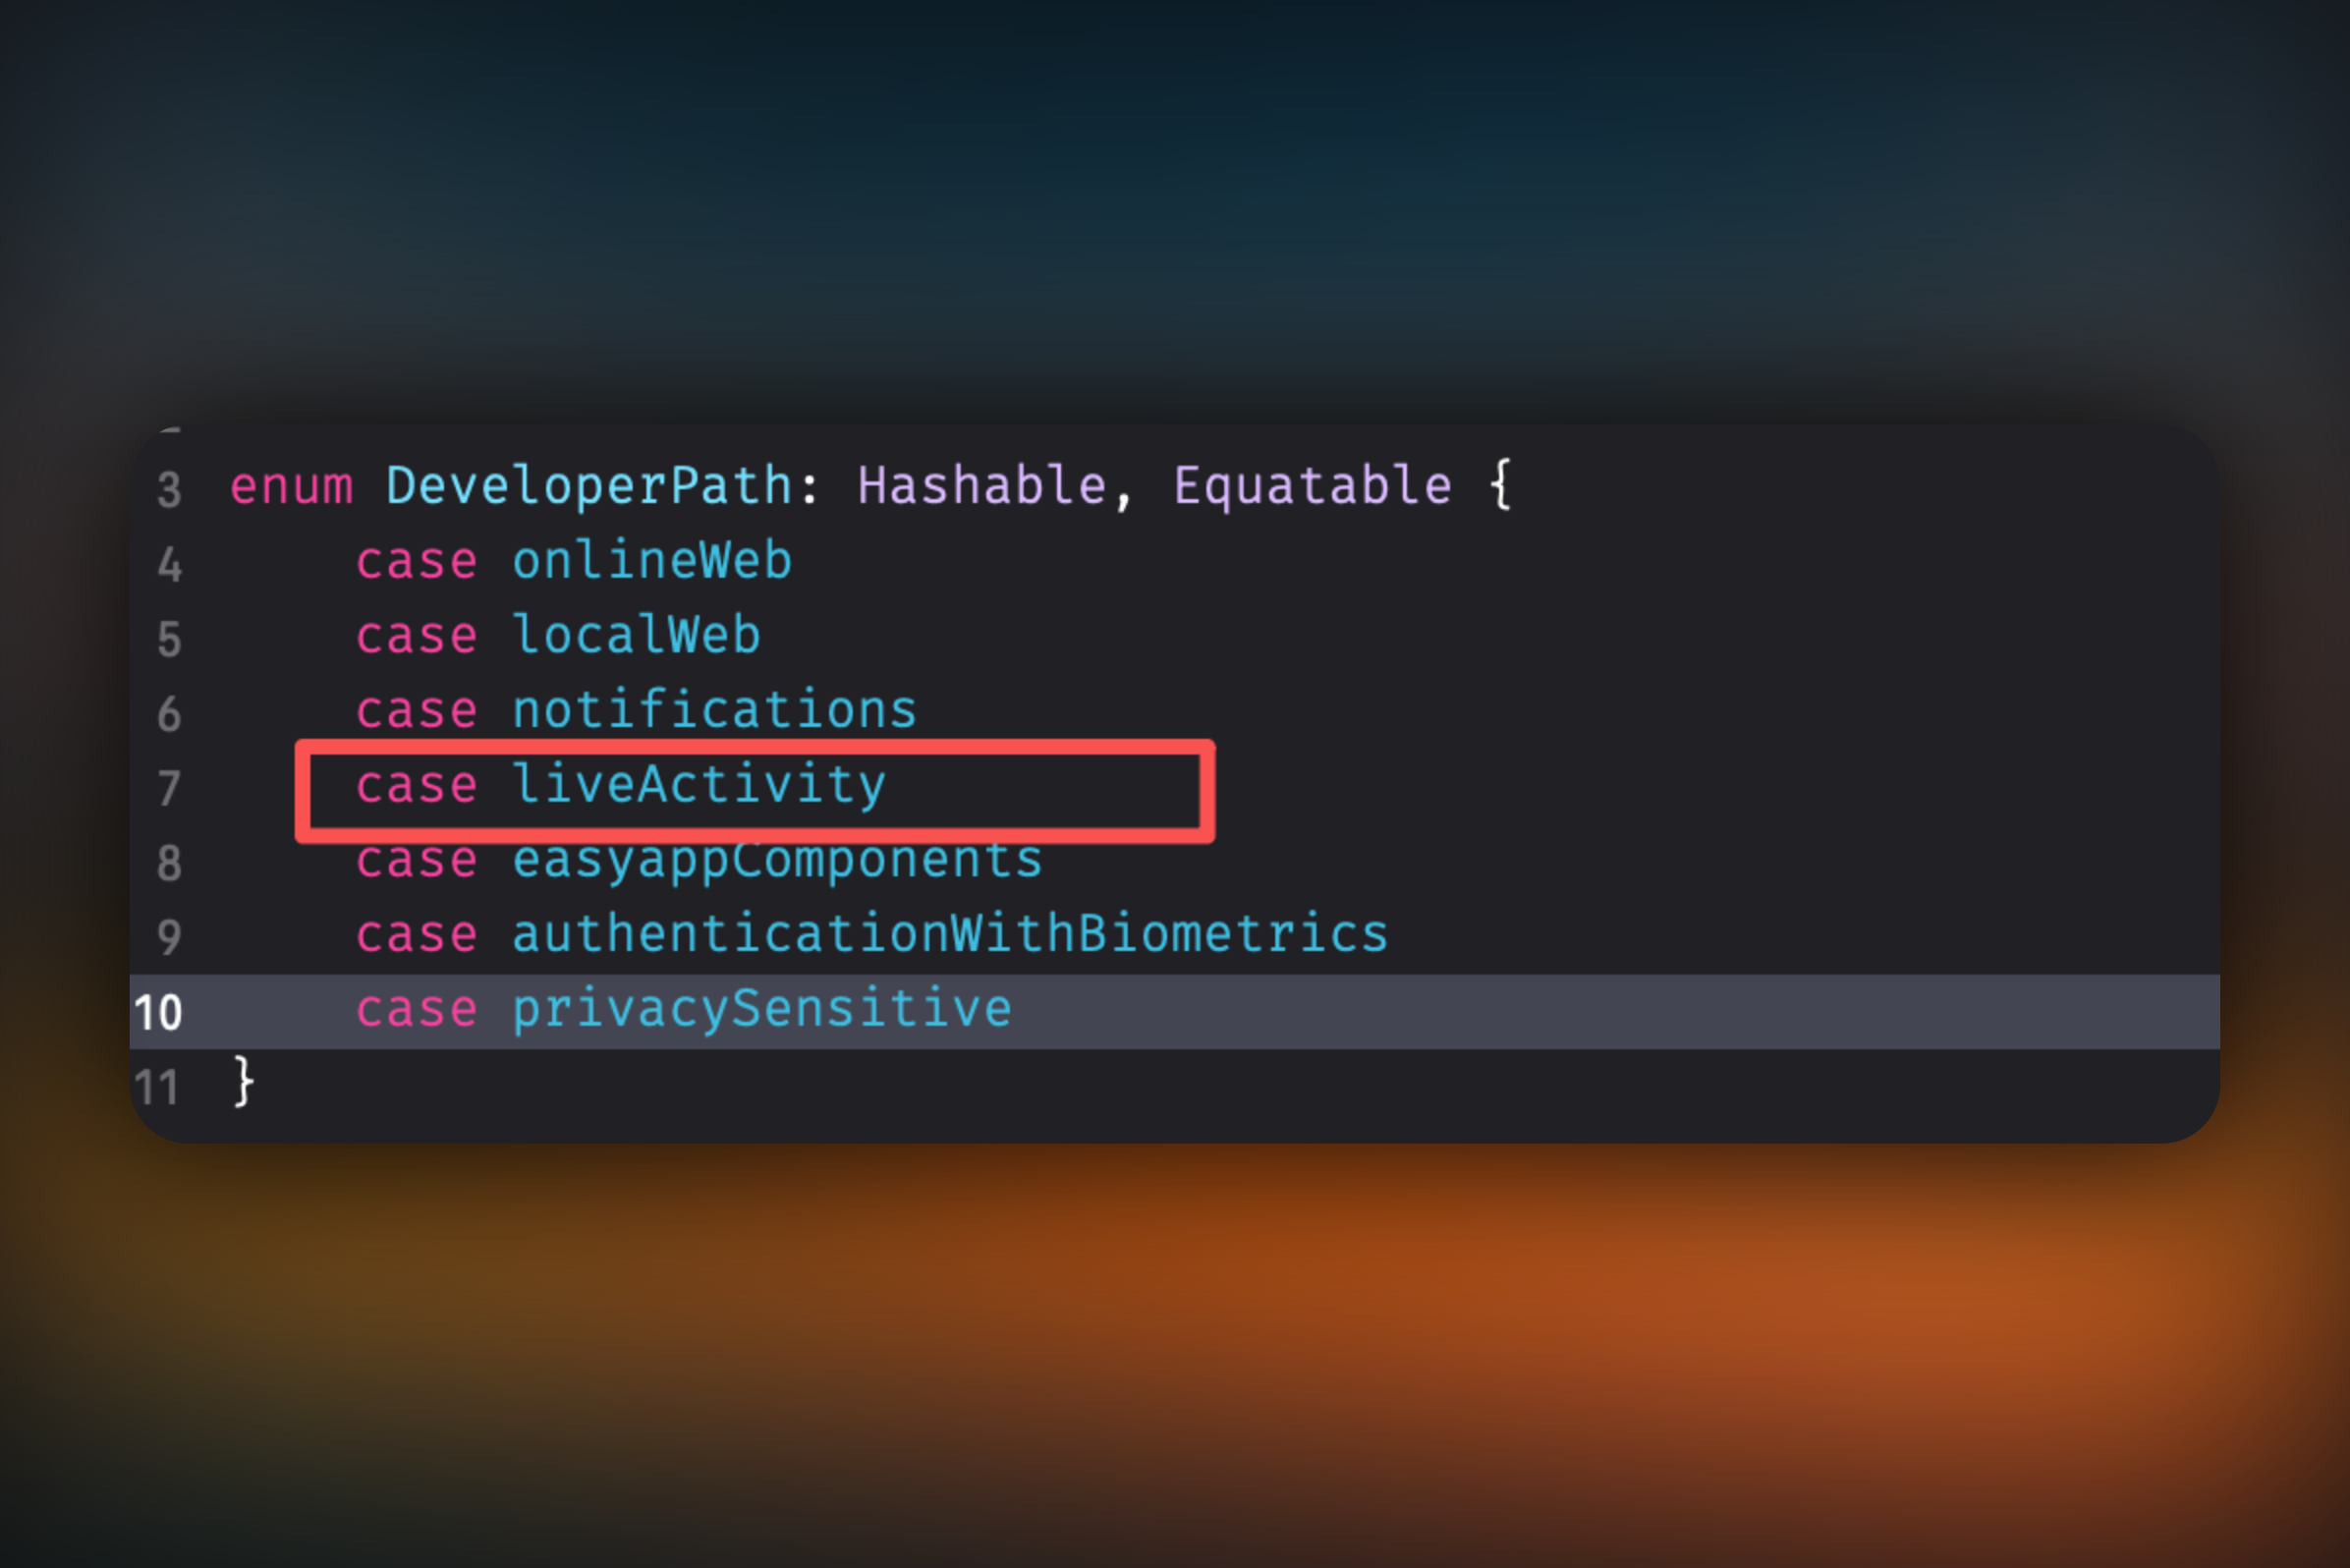
* Delete the `App -> Developer -> SubPages -> LiveActivity` folder, select `Move to Trash`
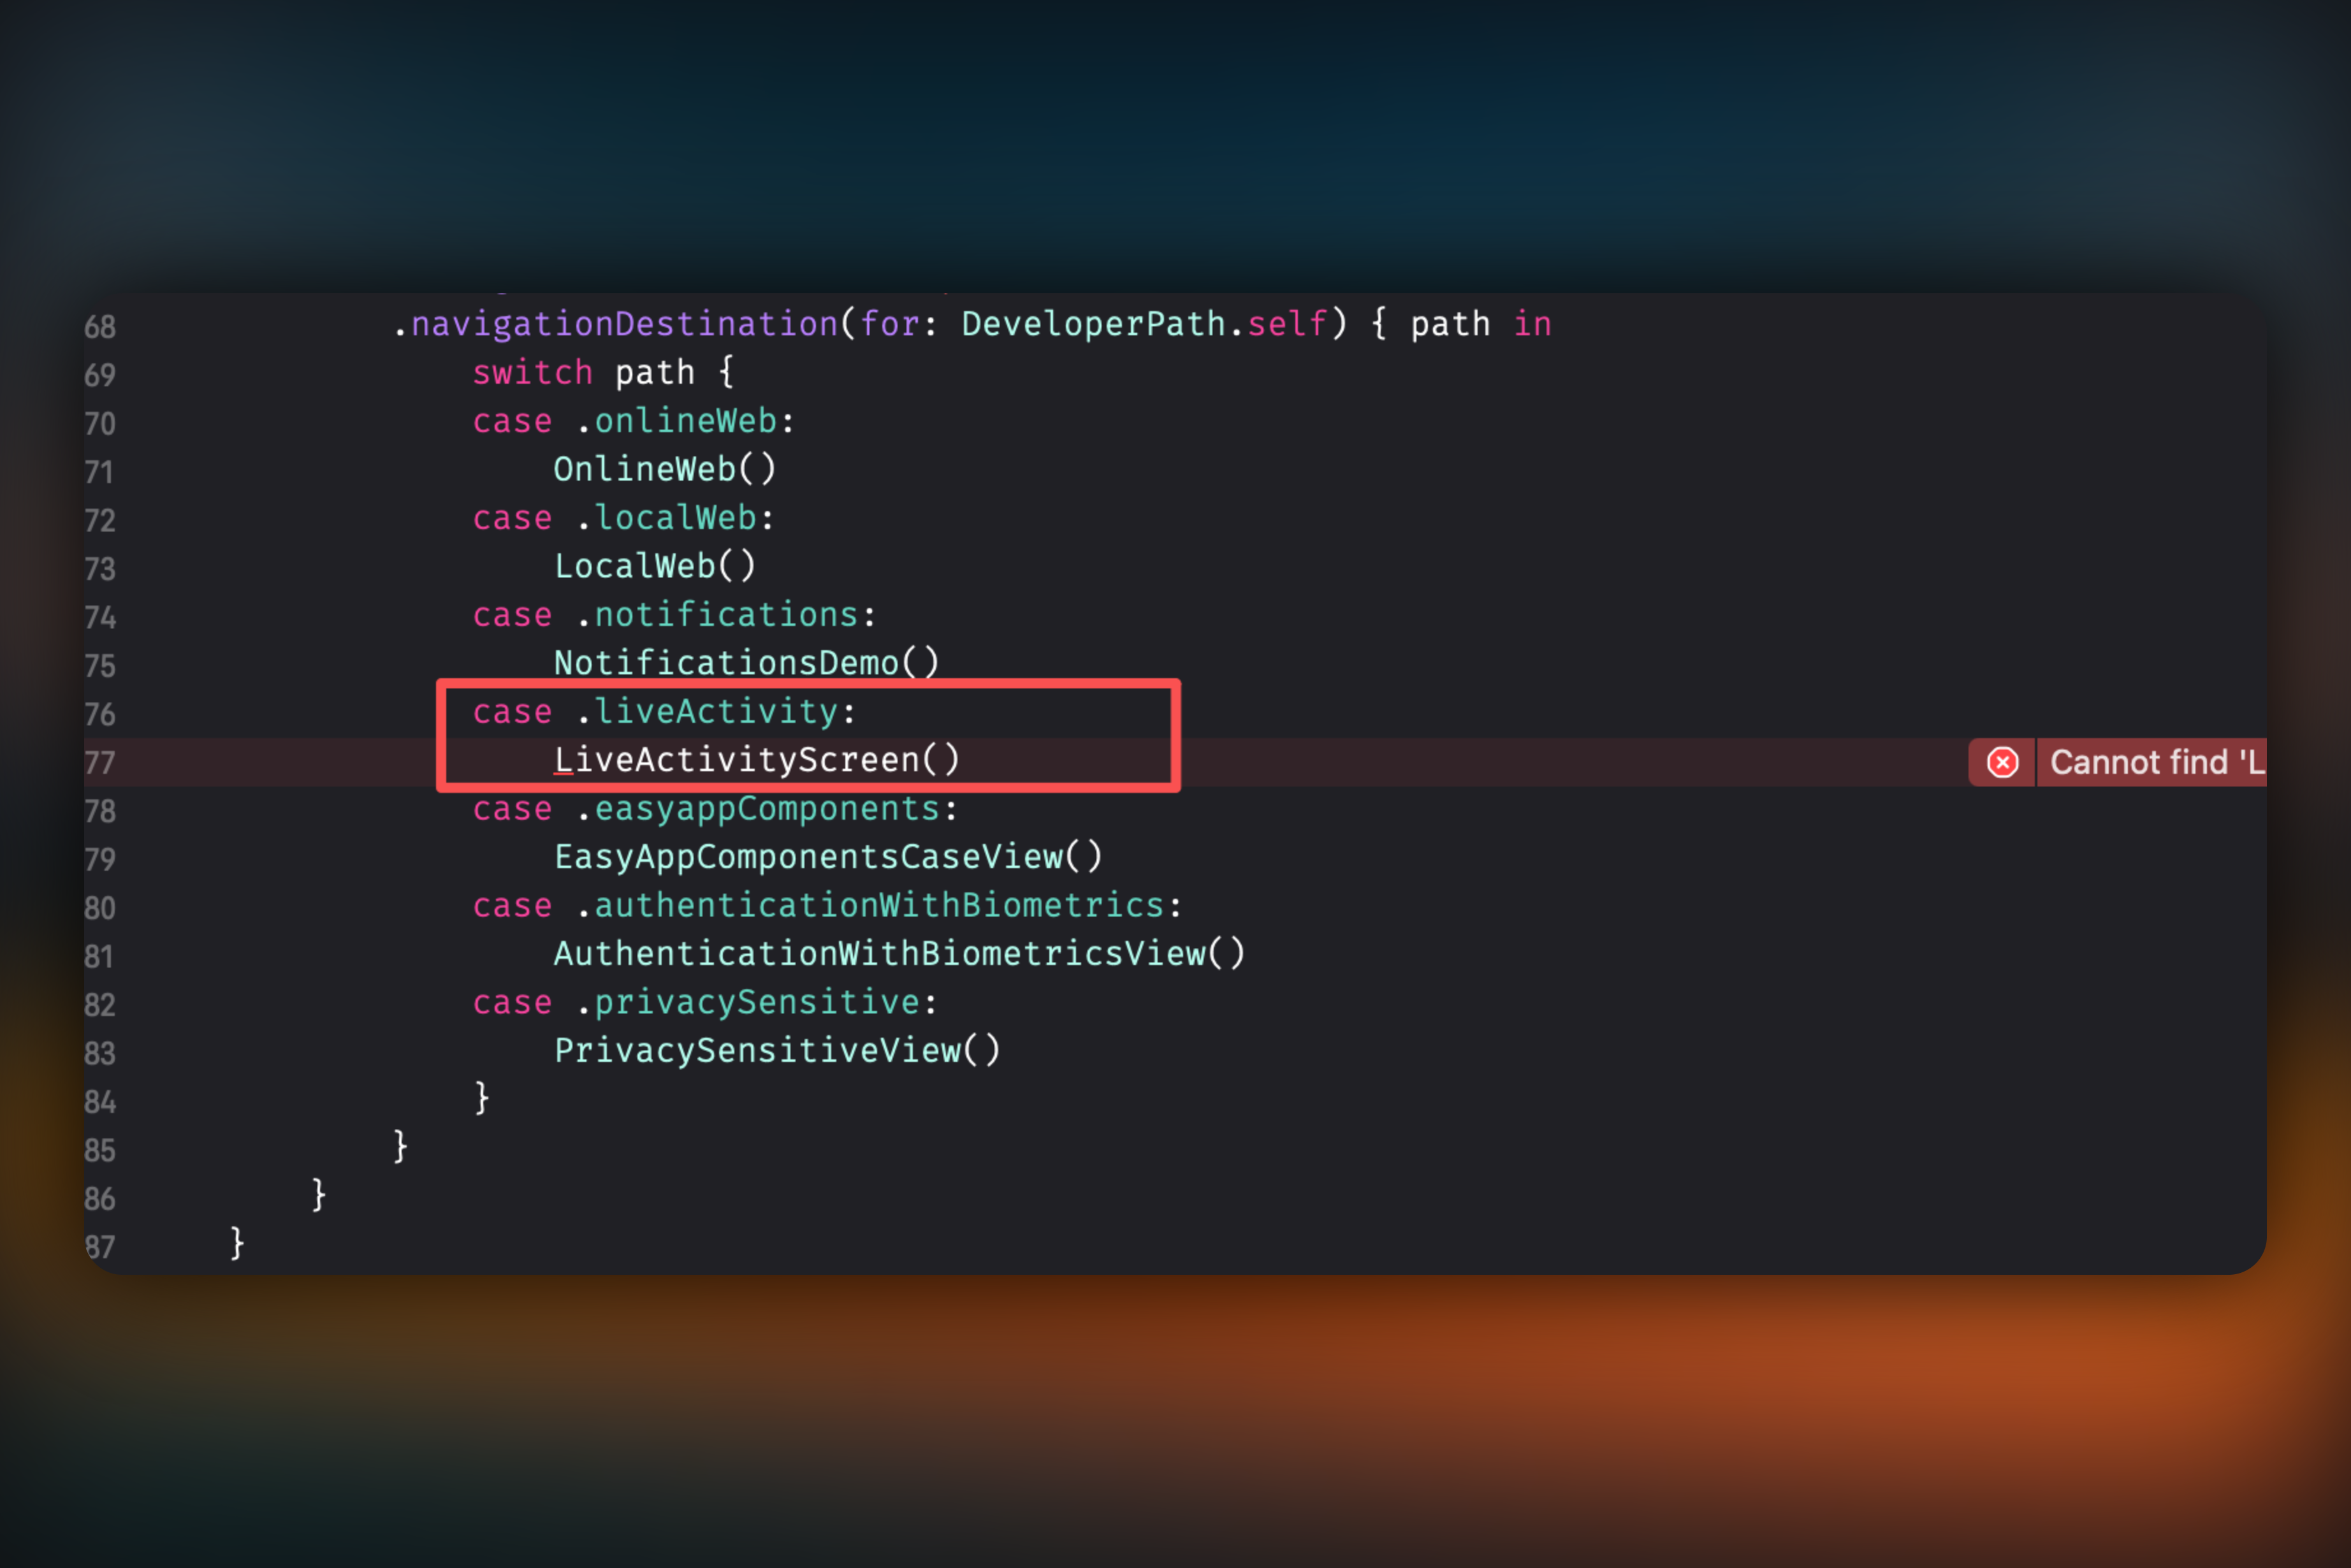
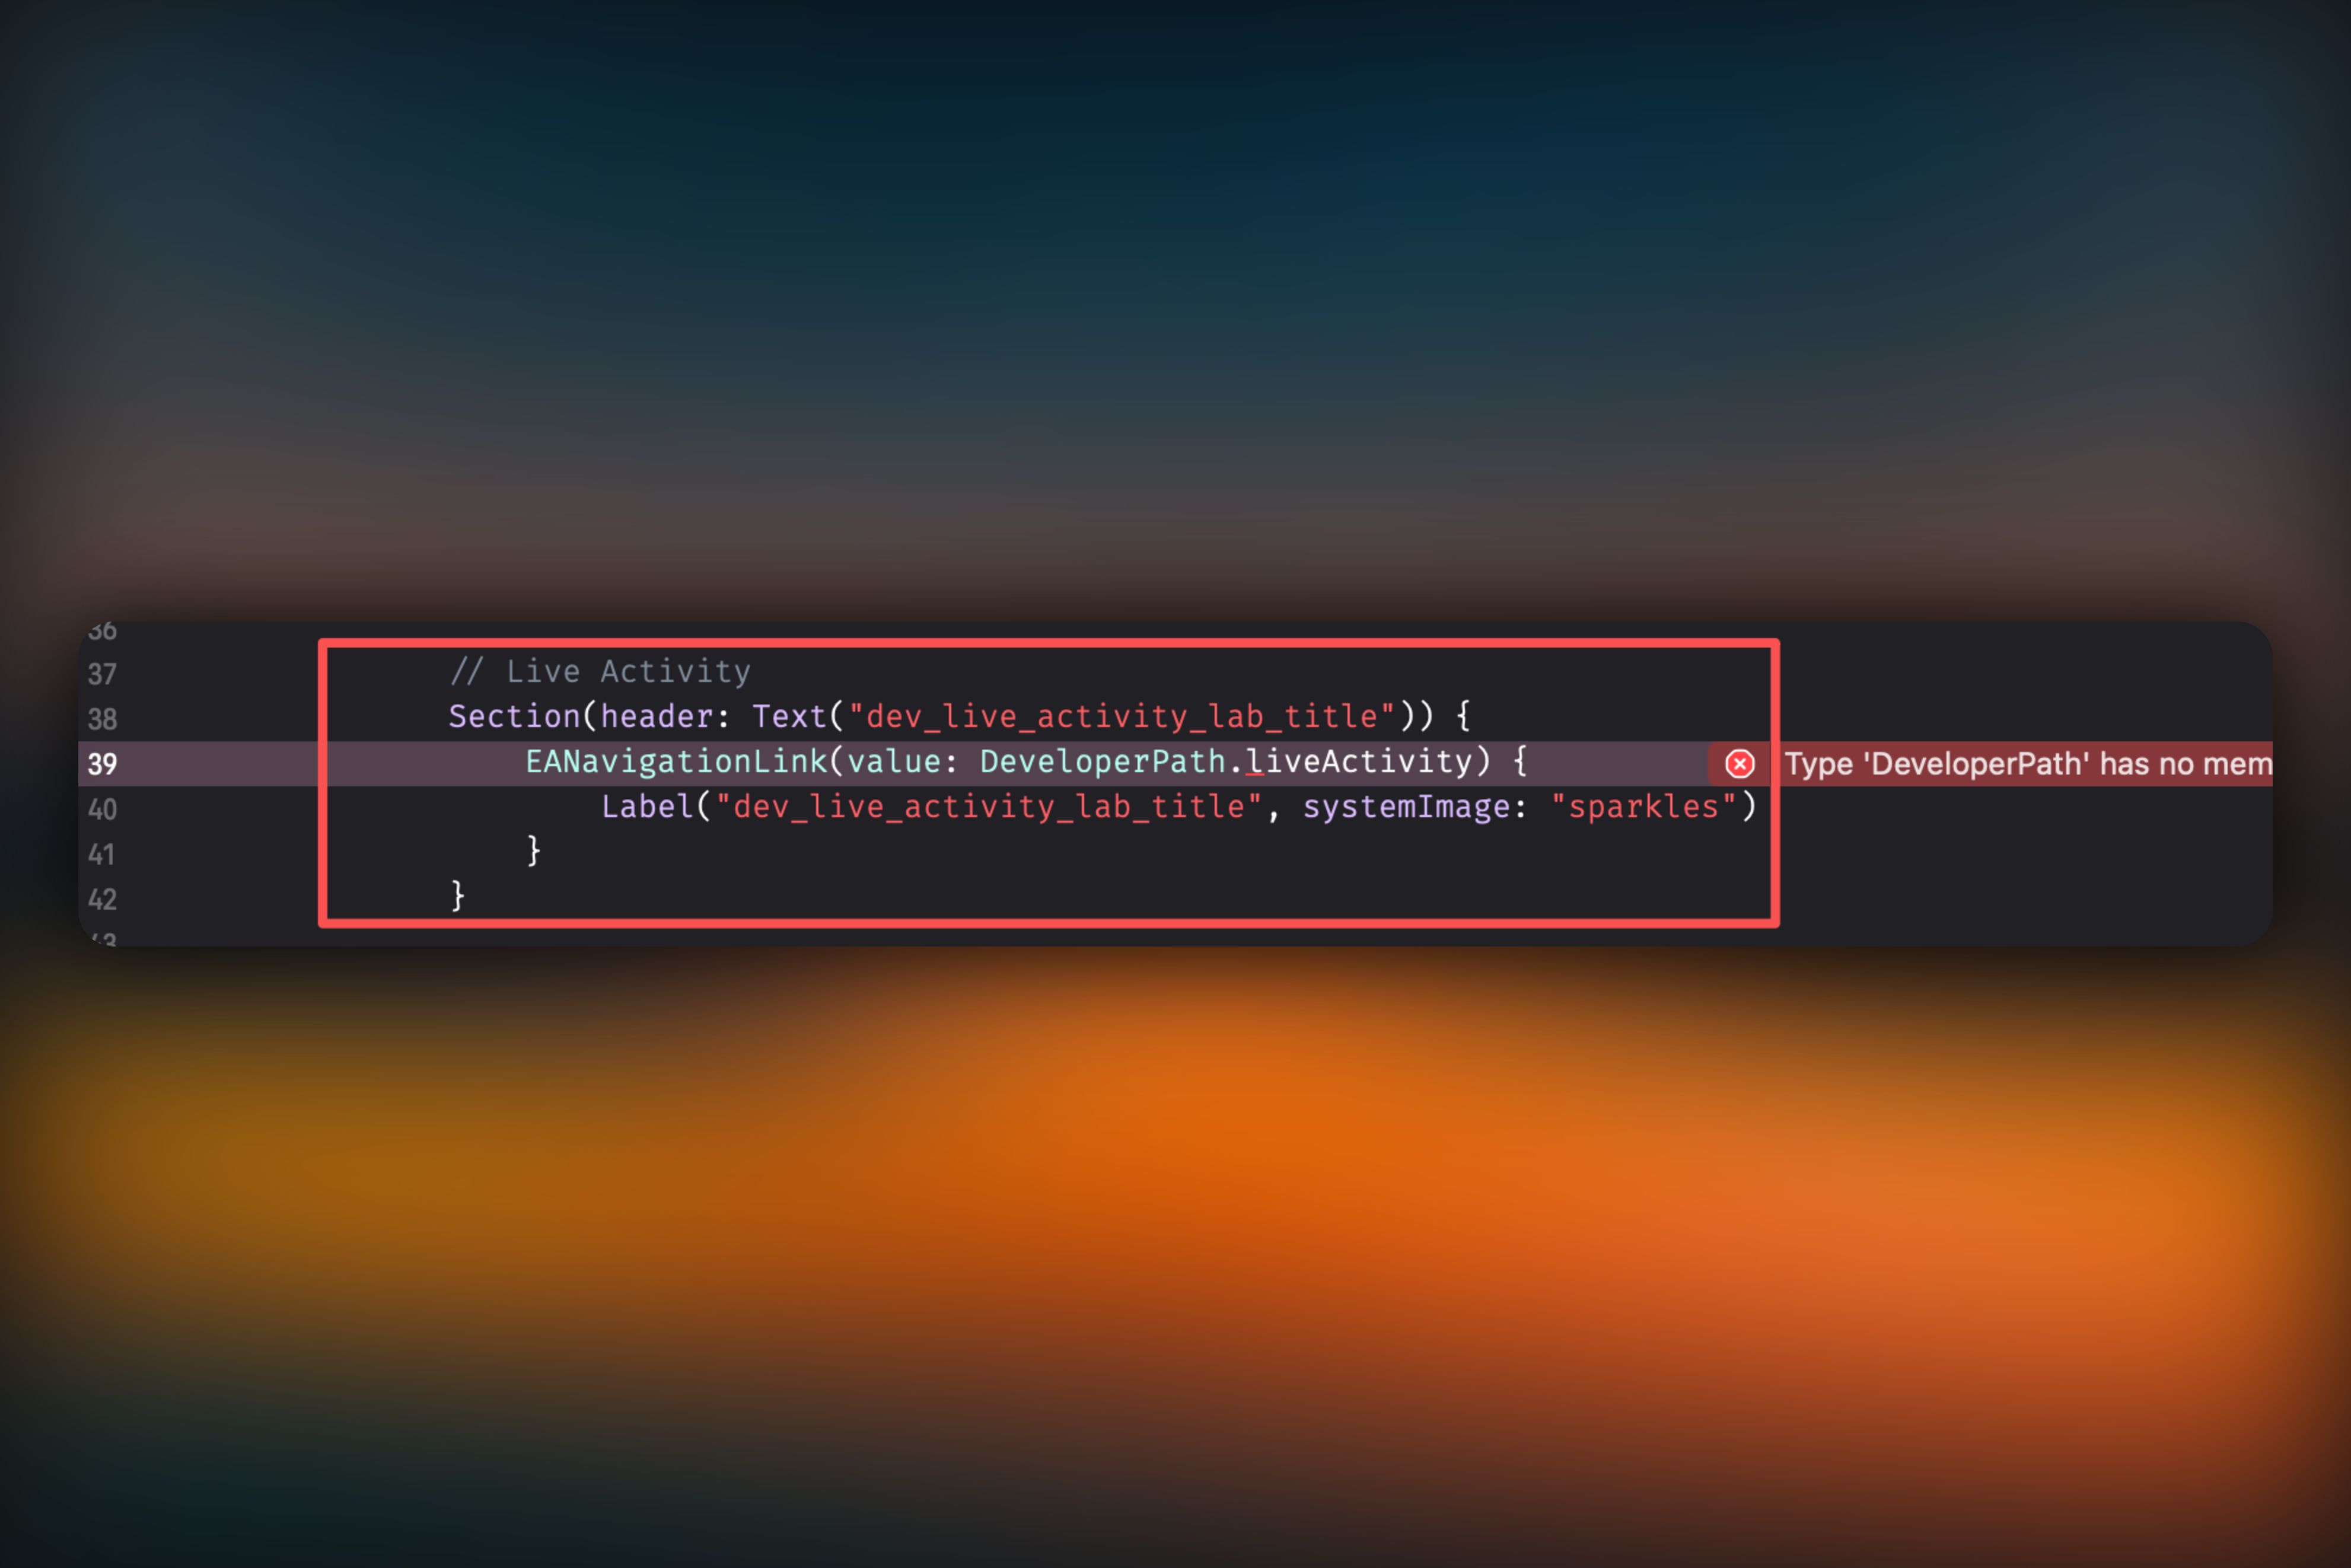
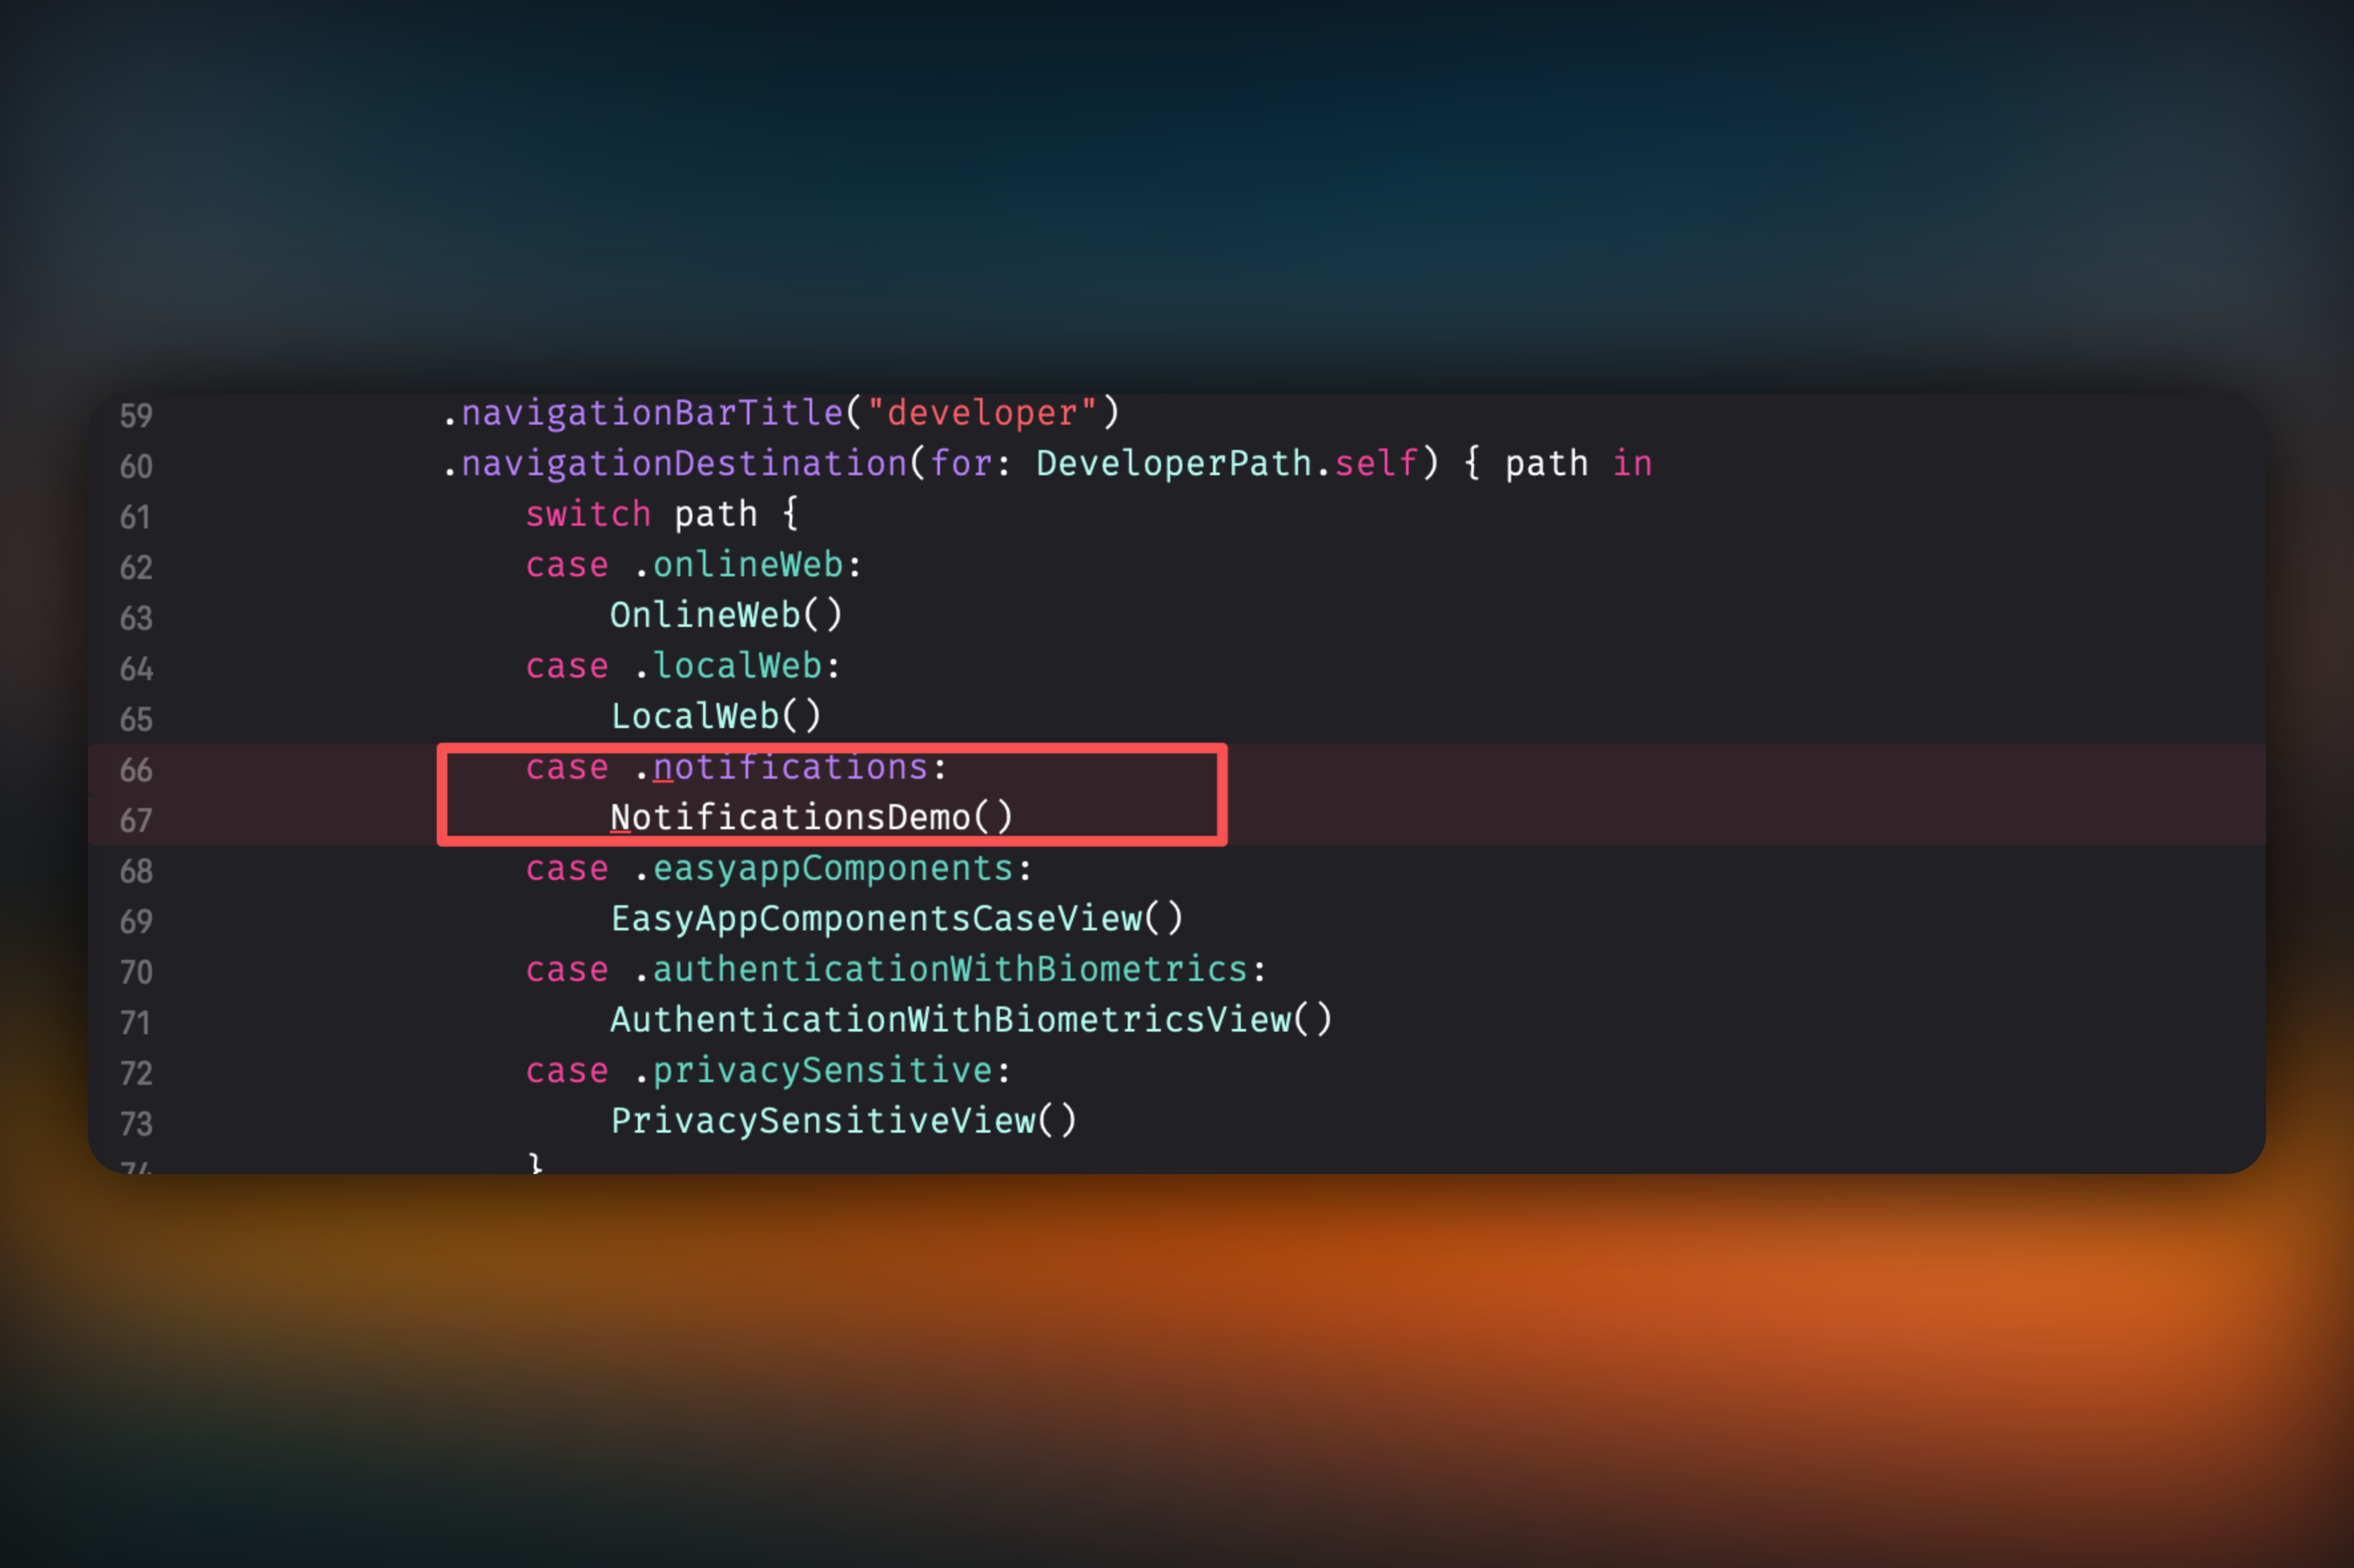
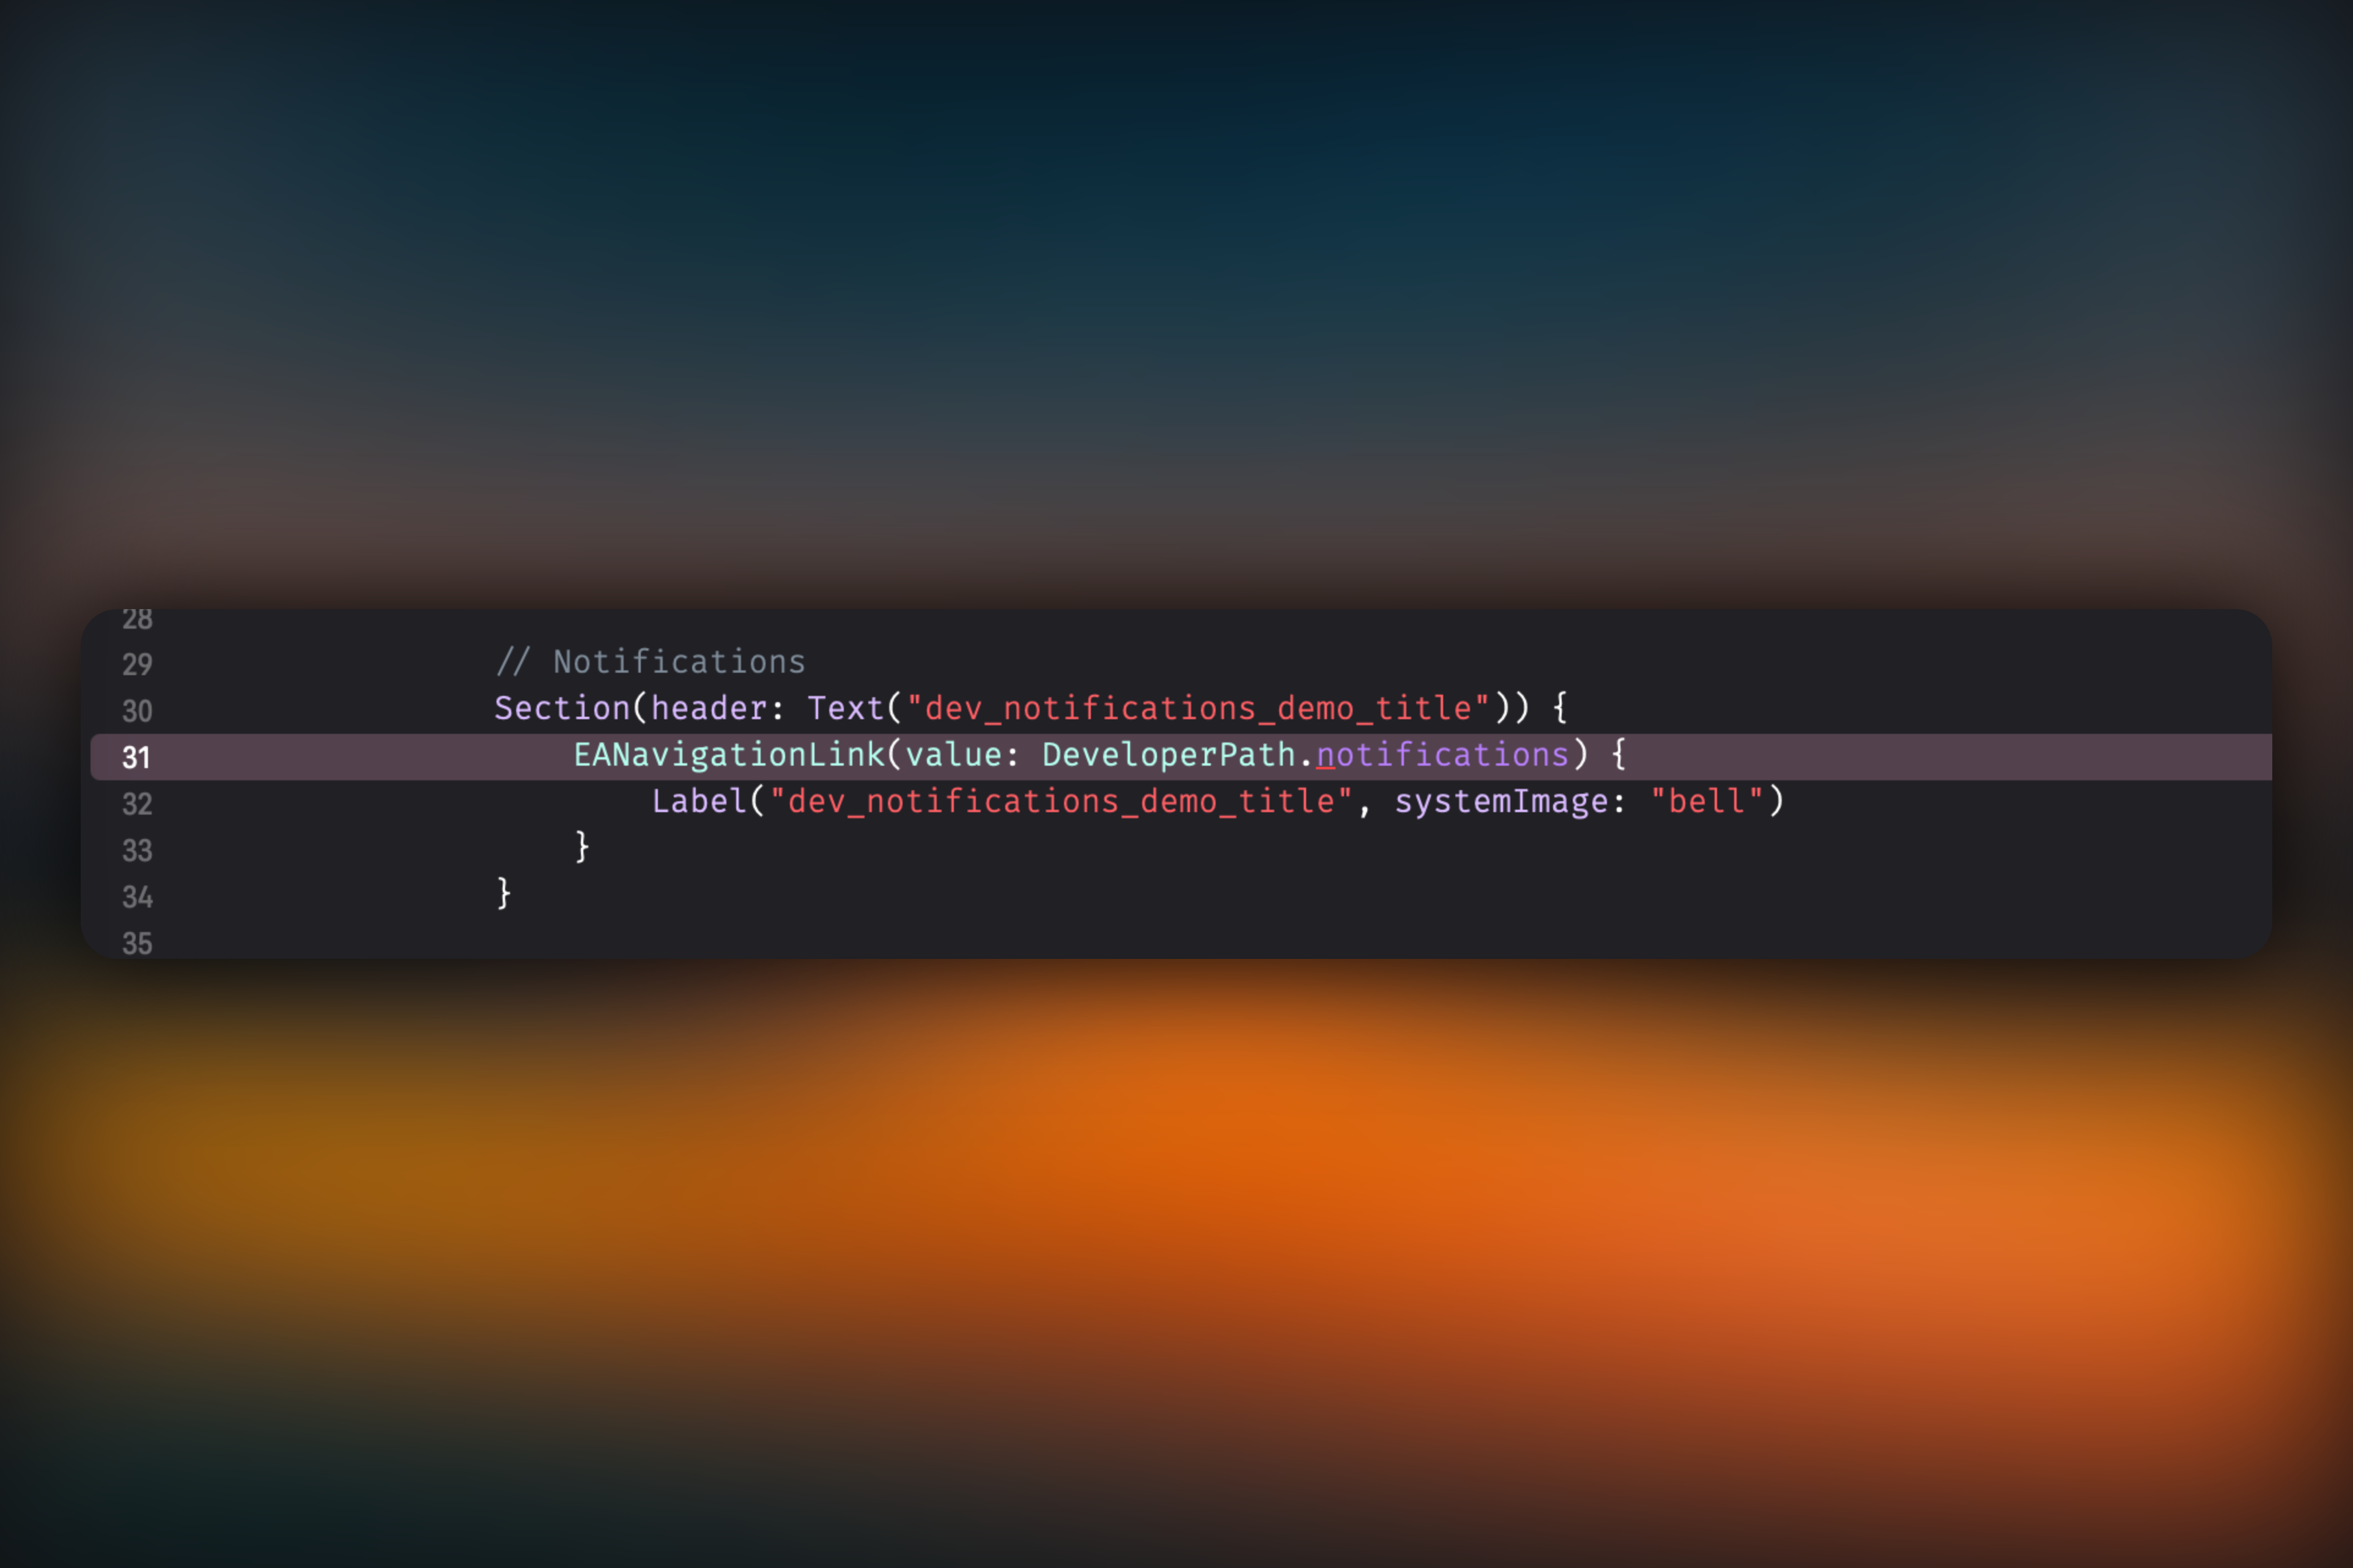
* Go to `App -> Developer -> View -> DeveloperView.swift` file, delete the code
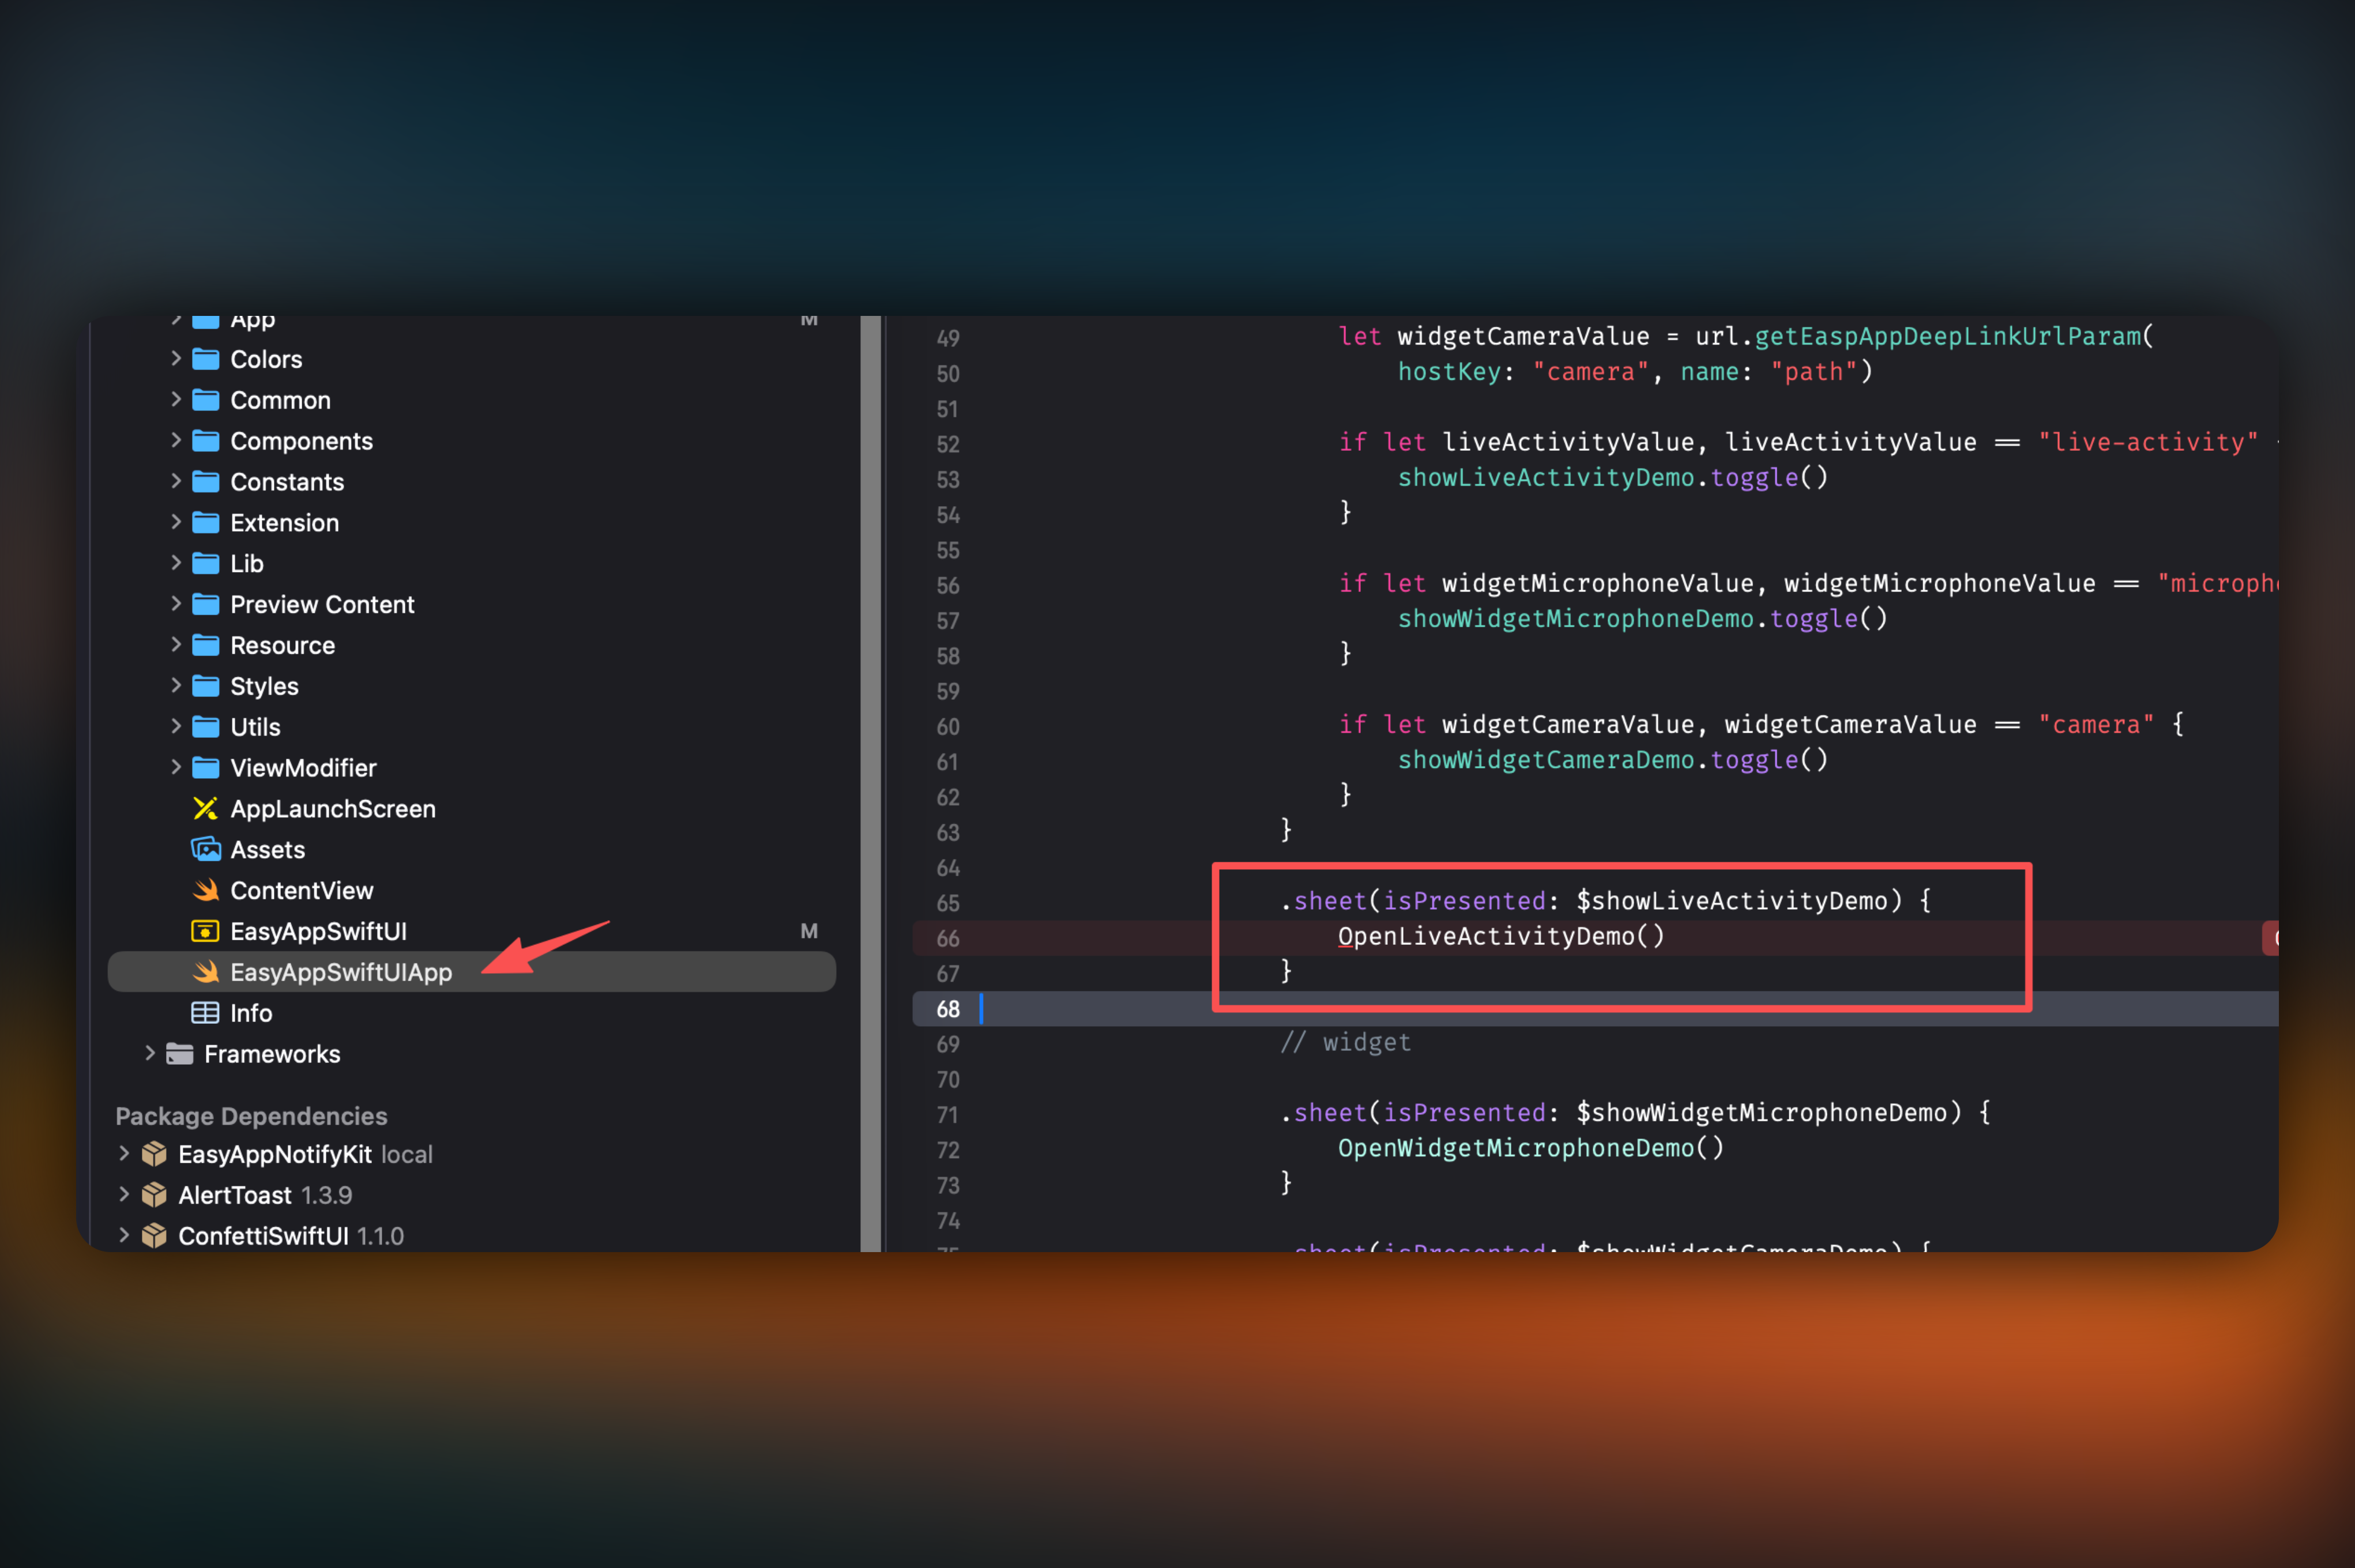
* Go to `EasyAppSwiftUIApp.swift` file, delete the following `widget` related code
```swift
#if DEBUG
@State private var showLiveActivityDemo = false
@State private var showWidgetMicrophoneDemo = false
@State private var showWidgetCameraDemo = false
#endif
```
```swift
// live activity
.onOpenURL { url in
devLogger.info("onOpenURL: \(url)")
let liveActivityValue = url.getEaspAppDeepLinkUrlParam(
hostKey: "live-activity", name: "path")
let widgetMicrophoneValue = url.getEaspAppDeepLinkUrlParam(
hostKey: "microphone", name: "path")
let widgetCameraValue = url.getEaspAppDeepLinkUrlParam(
hostKey: "camera", name: "path")
if let liveActivityValue, liveActivityValue == "live-activity" {
showLiveActivityDemo.toggle()
}
if let widgetMicrophoneValue, widgetMicrophoneValue == "microphone" {
showWidgetMicrophoneDemo.toggle()
}
if let widgetCameraValue, widgetCameraValue == "camera" {
showWidgetCameraDemo.toggle()
}
}
// widget
.sheet(isPresented: $showWidgetMicrophoneDemo) {
OpenWidgetMicrophoneDemo()
}
.sheet(isPresented: $showWidgetCameraDemo) {
OpenWidgetCameraDemo()
}
```
### Remove Notification Features
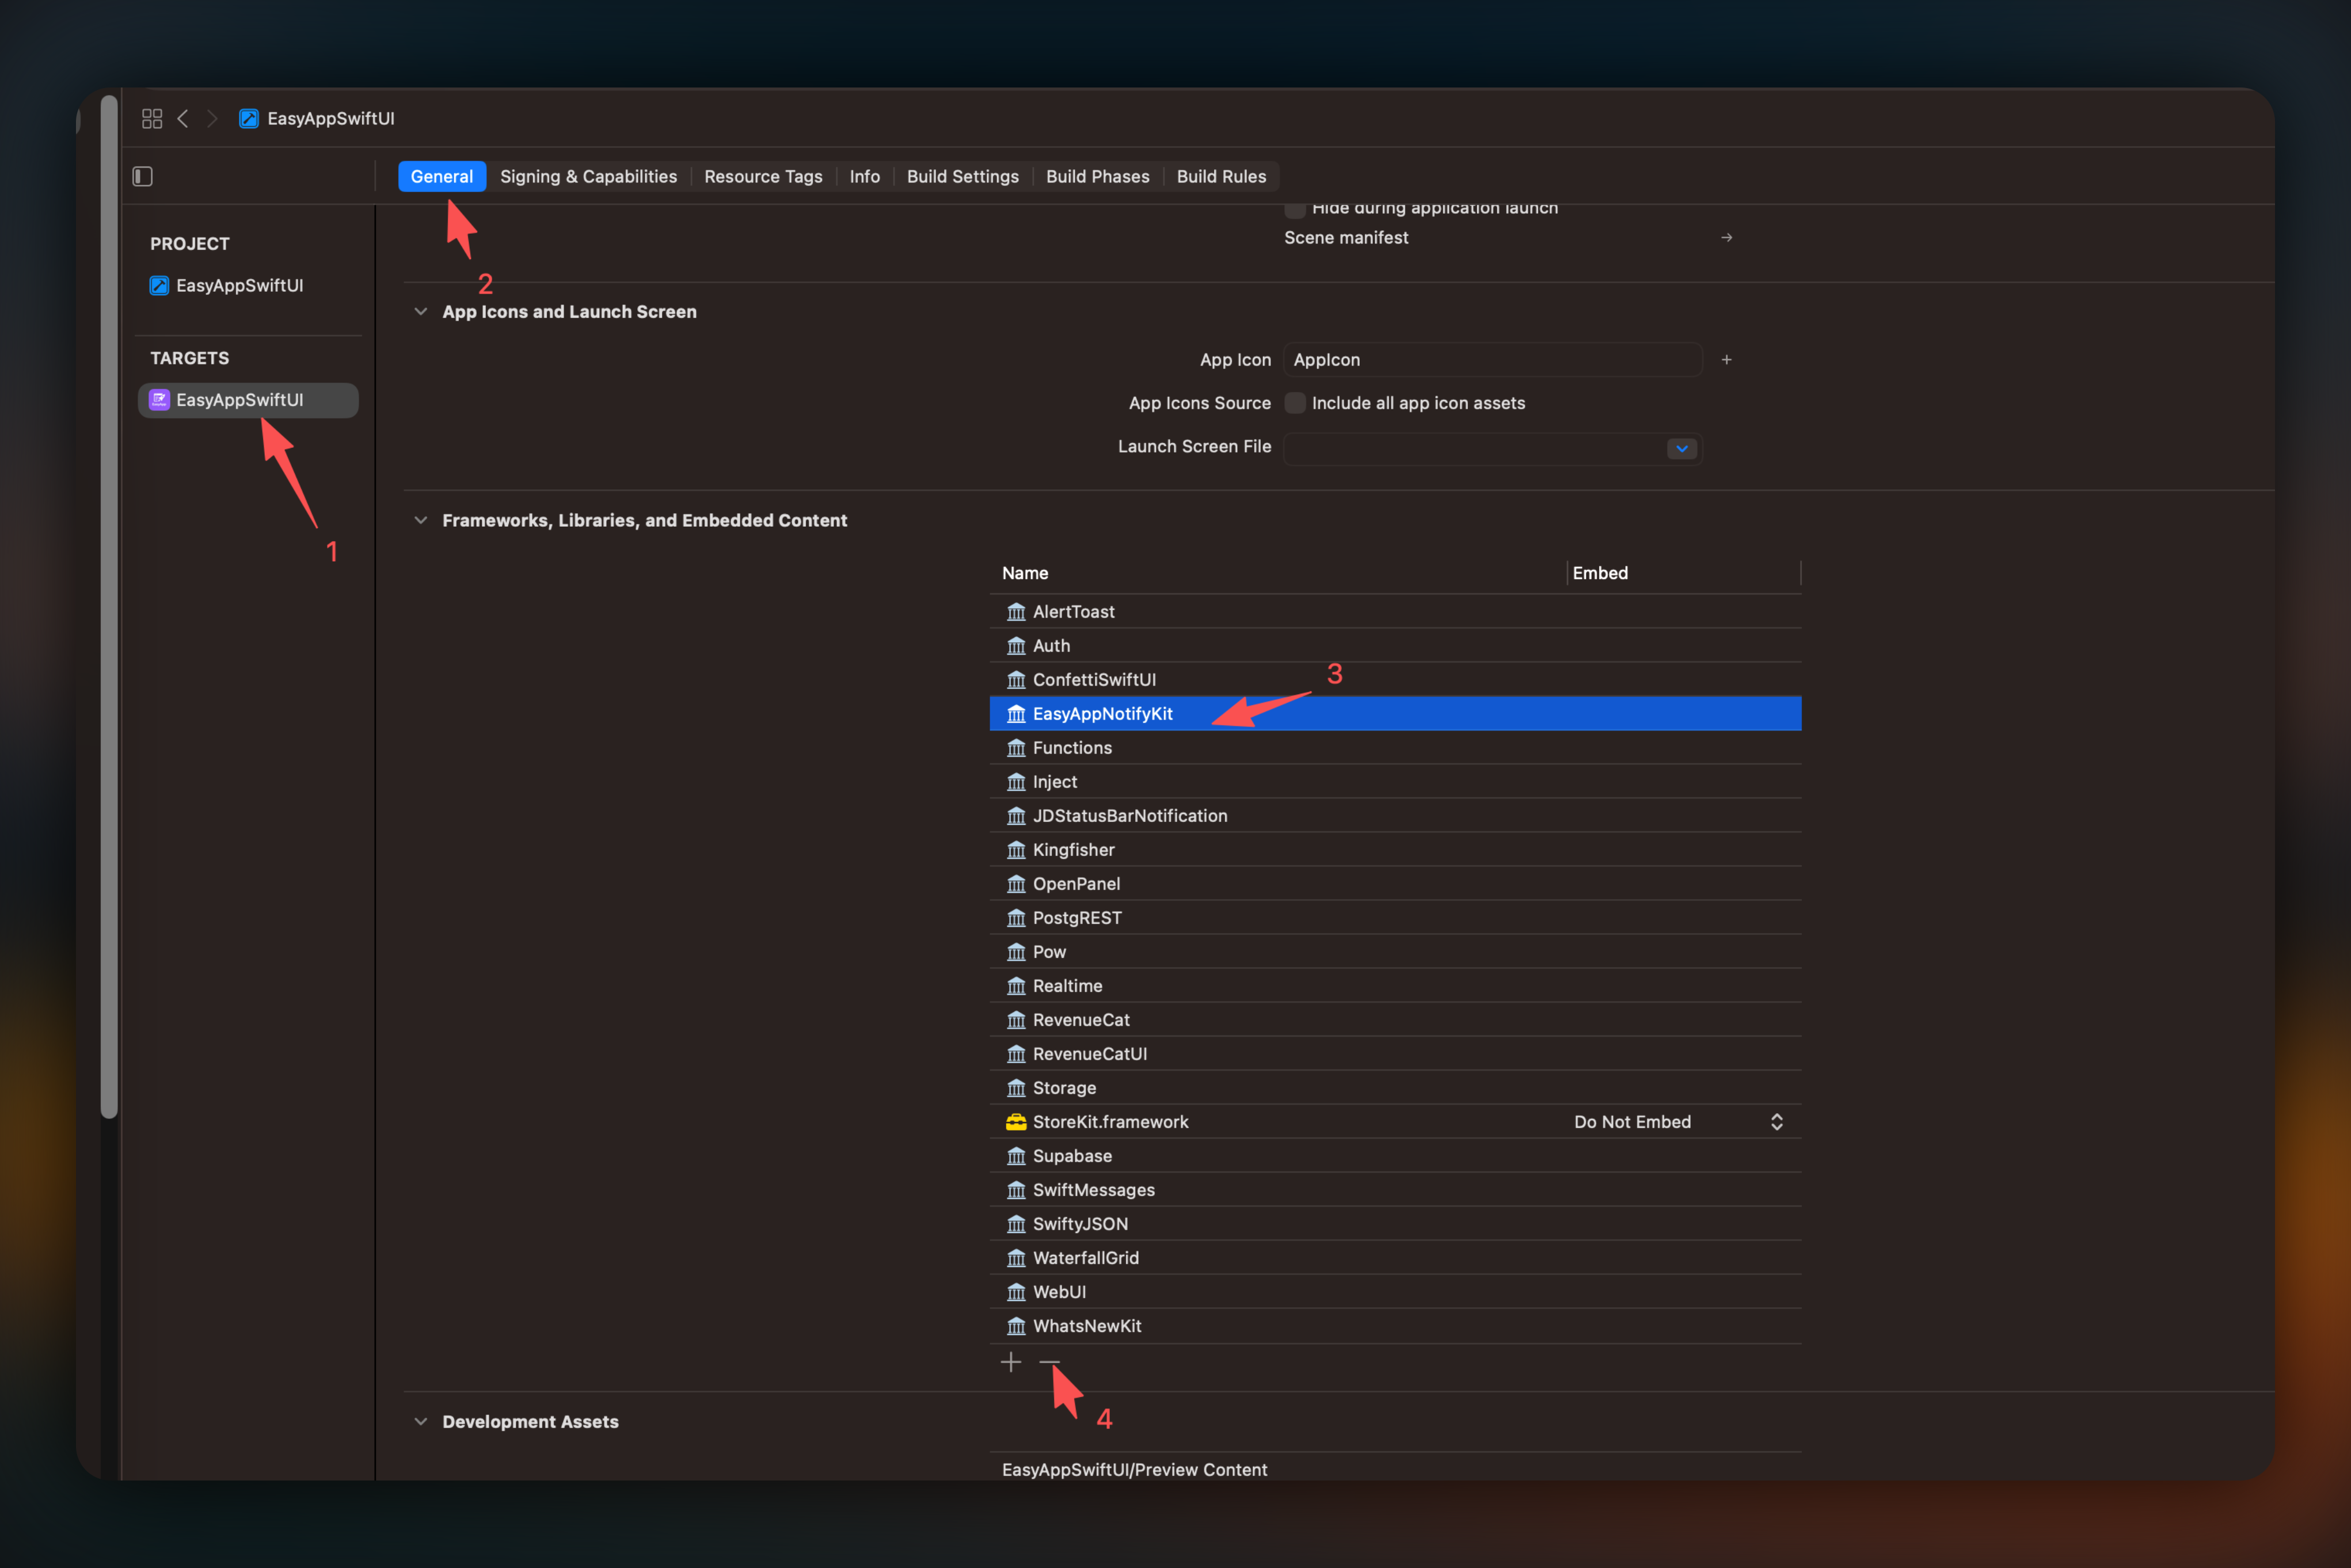
* Remove the dependency on `EasyAppNotifyKit` library
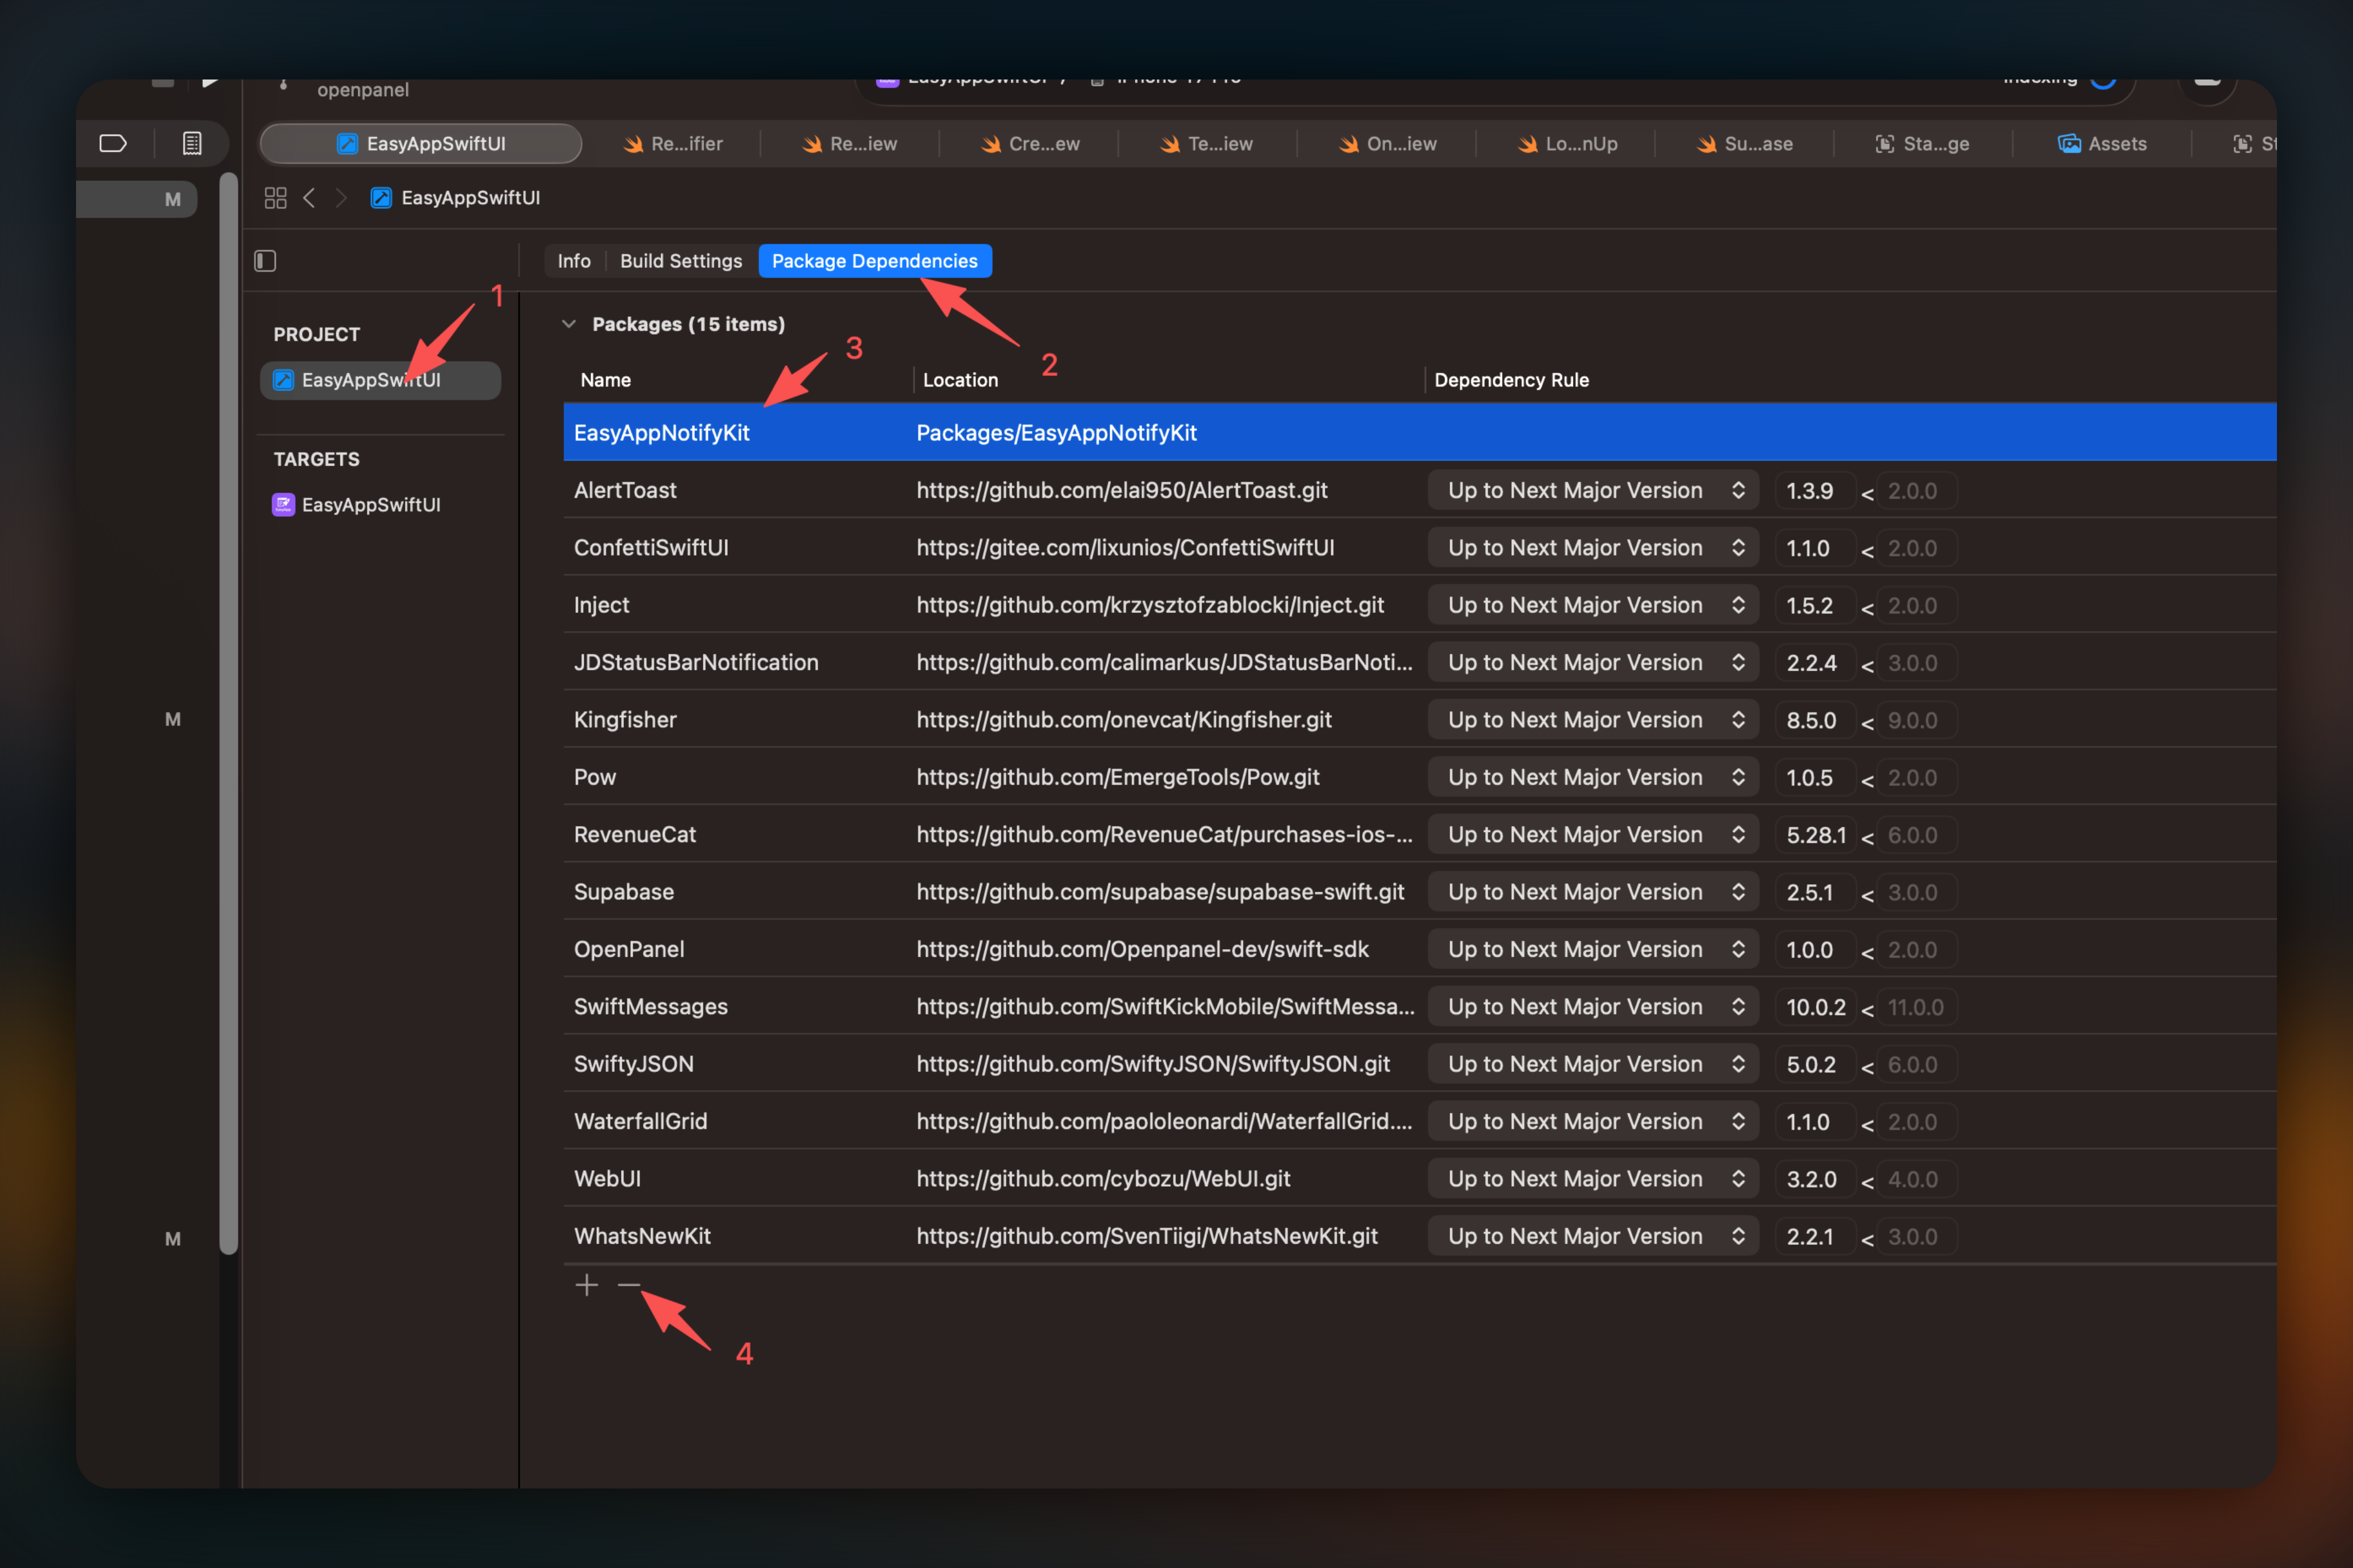
Select `EasyAppNotifyKit`, click the `-` button (might fail, try multiple times)
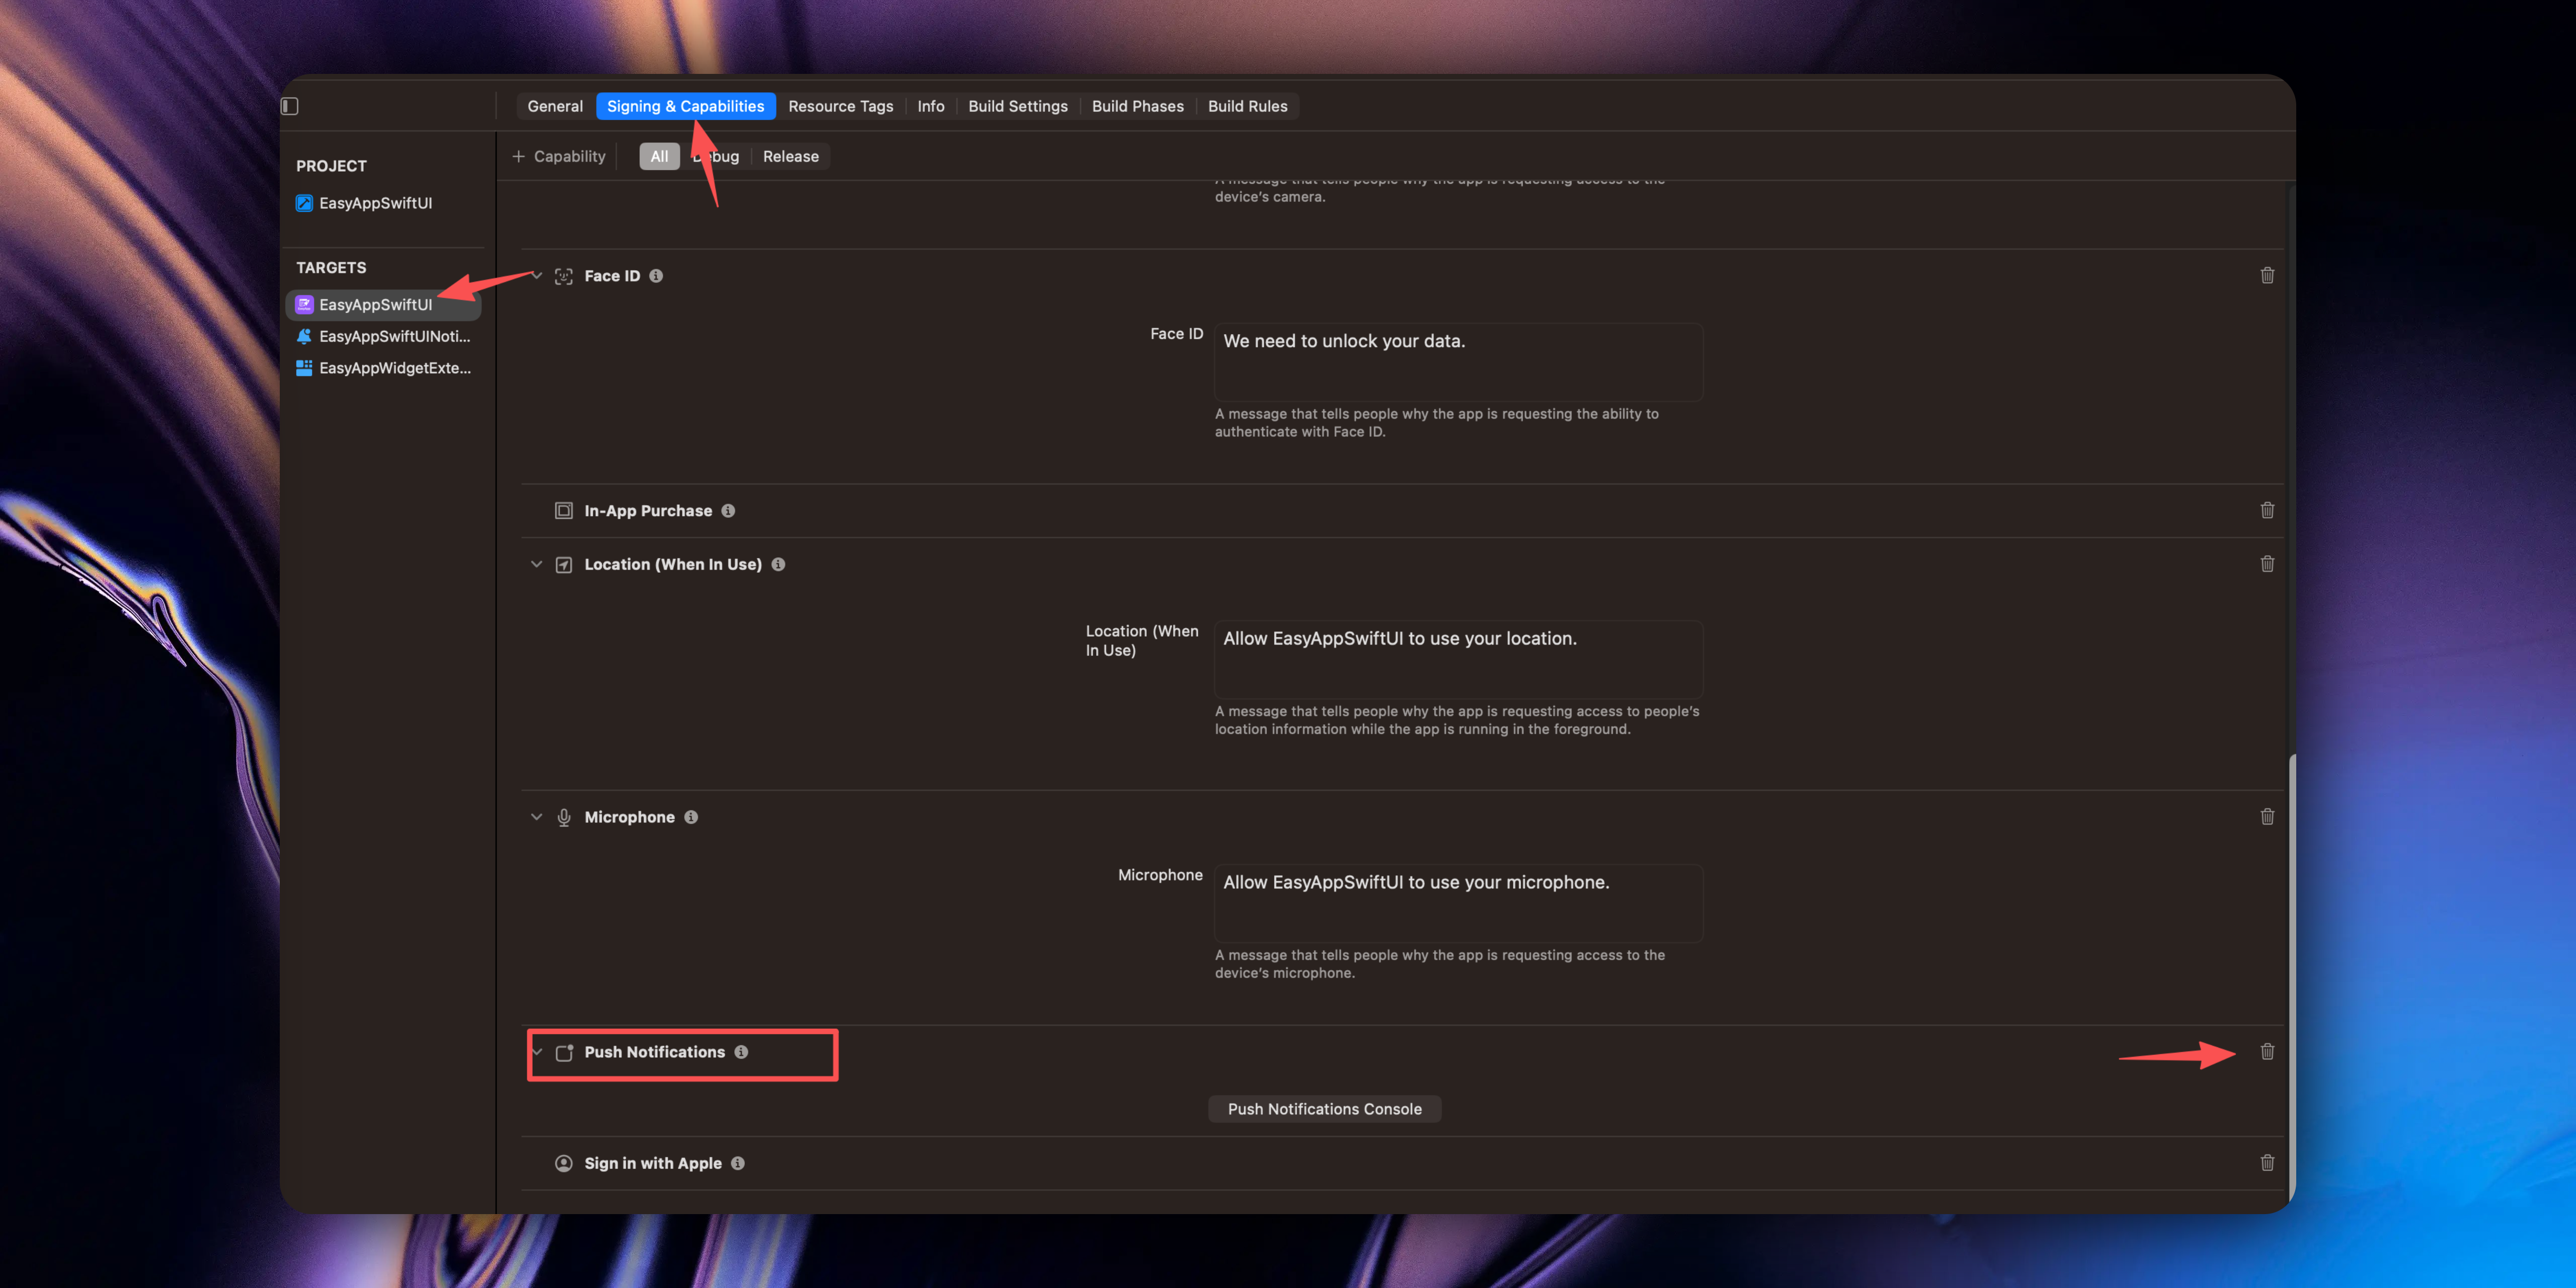
* Delete notification permissions
Uncheck `Notifications` permission
* Search and delete the following imported libraries in the `EasyAppSwiftUI` project
```swift
import EasyAppNotifyKit
import OneSignalFramework
```
* Delete/comment out the related code in the `EasyAppSwiftUI/Lib/Auth/AuthManager.swift` file
```swift title="EasyAppSwiftUI/Lib/Auth/AuthManager.swift"
PushManager.shared.loginUser(userId)
```
```swift title="EasyAppSwiftUI/Lib/Auth/AuthManager.swift"
PushManager.shared.logoutUser()
```
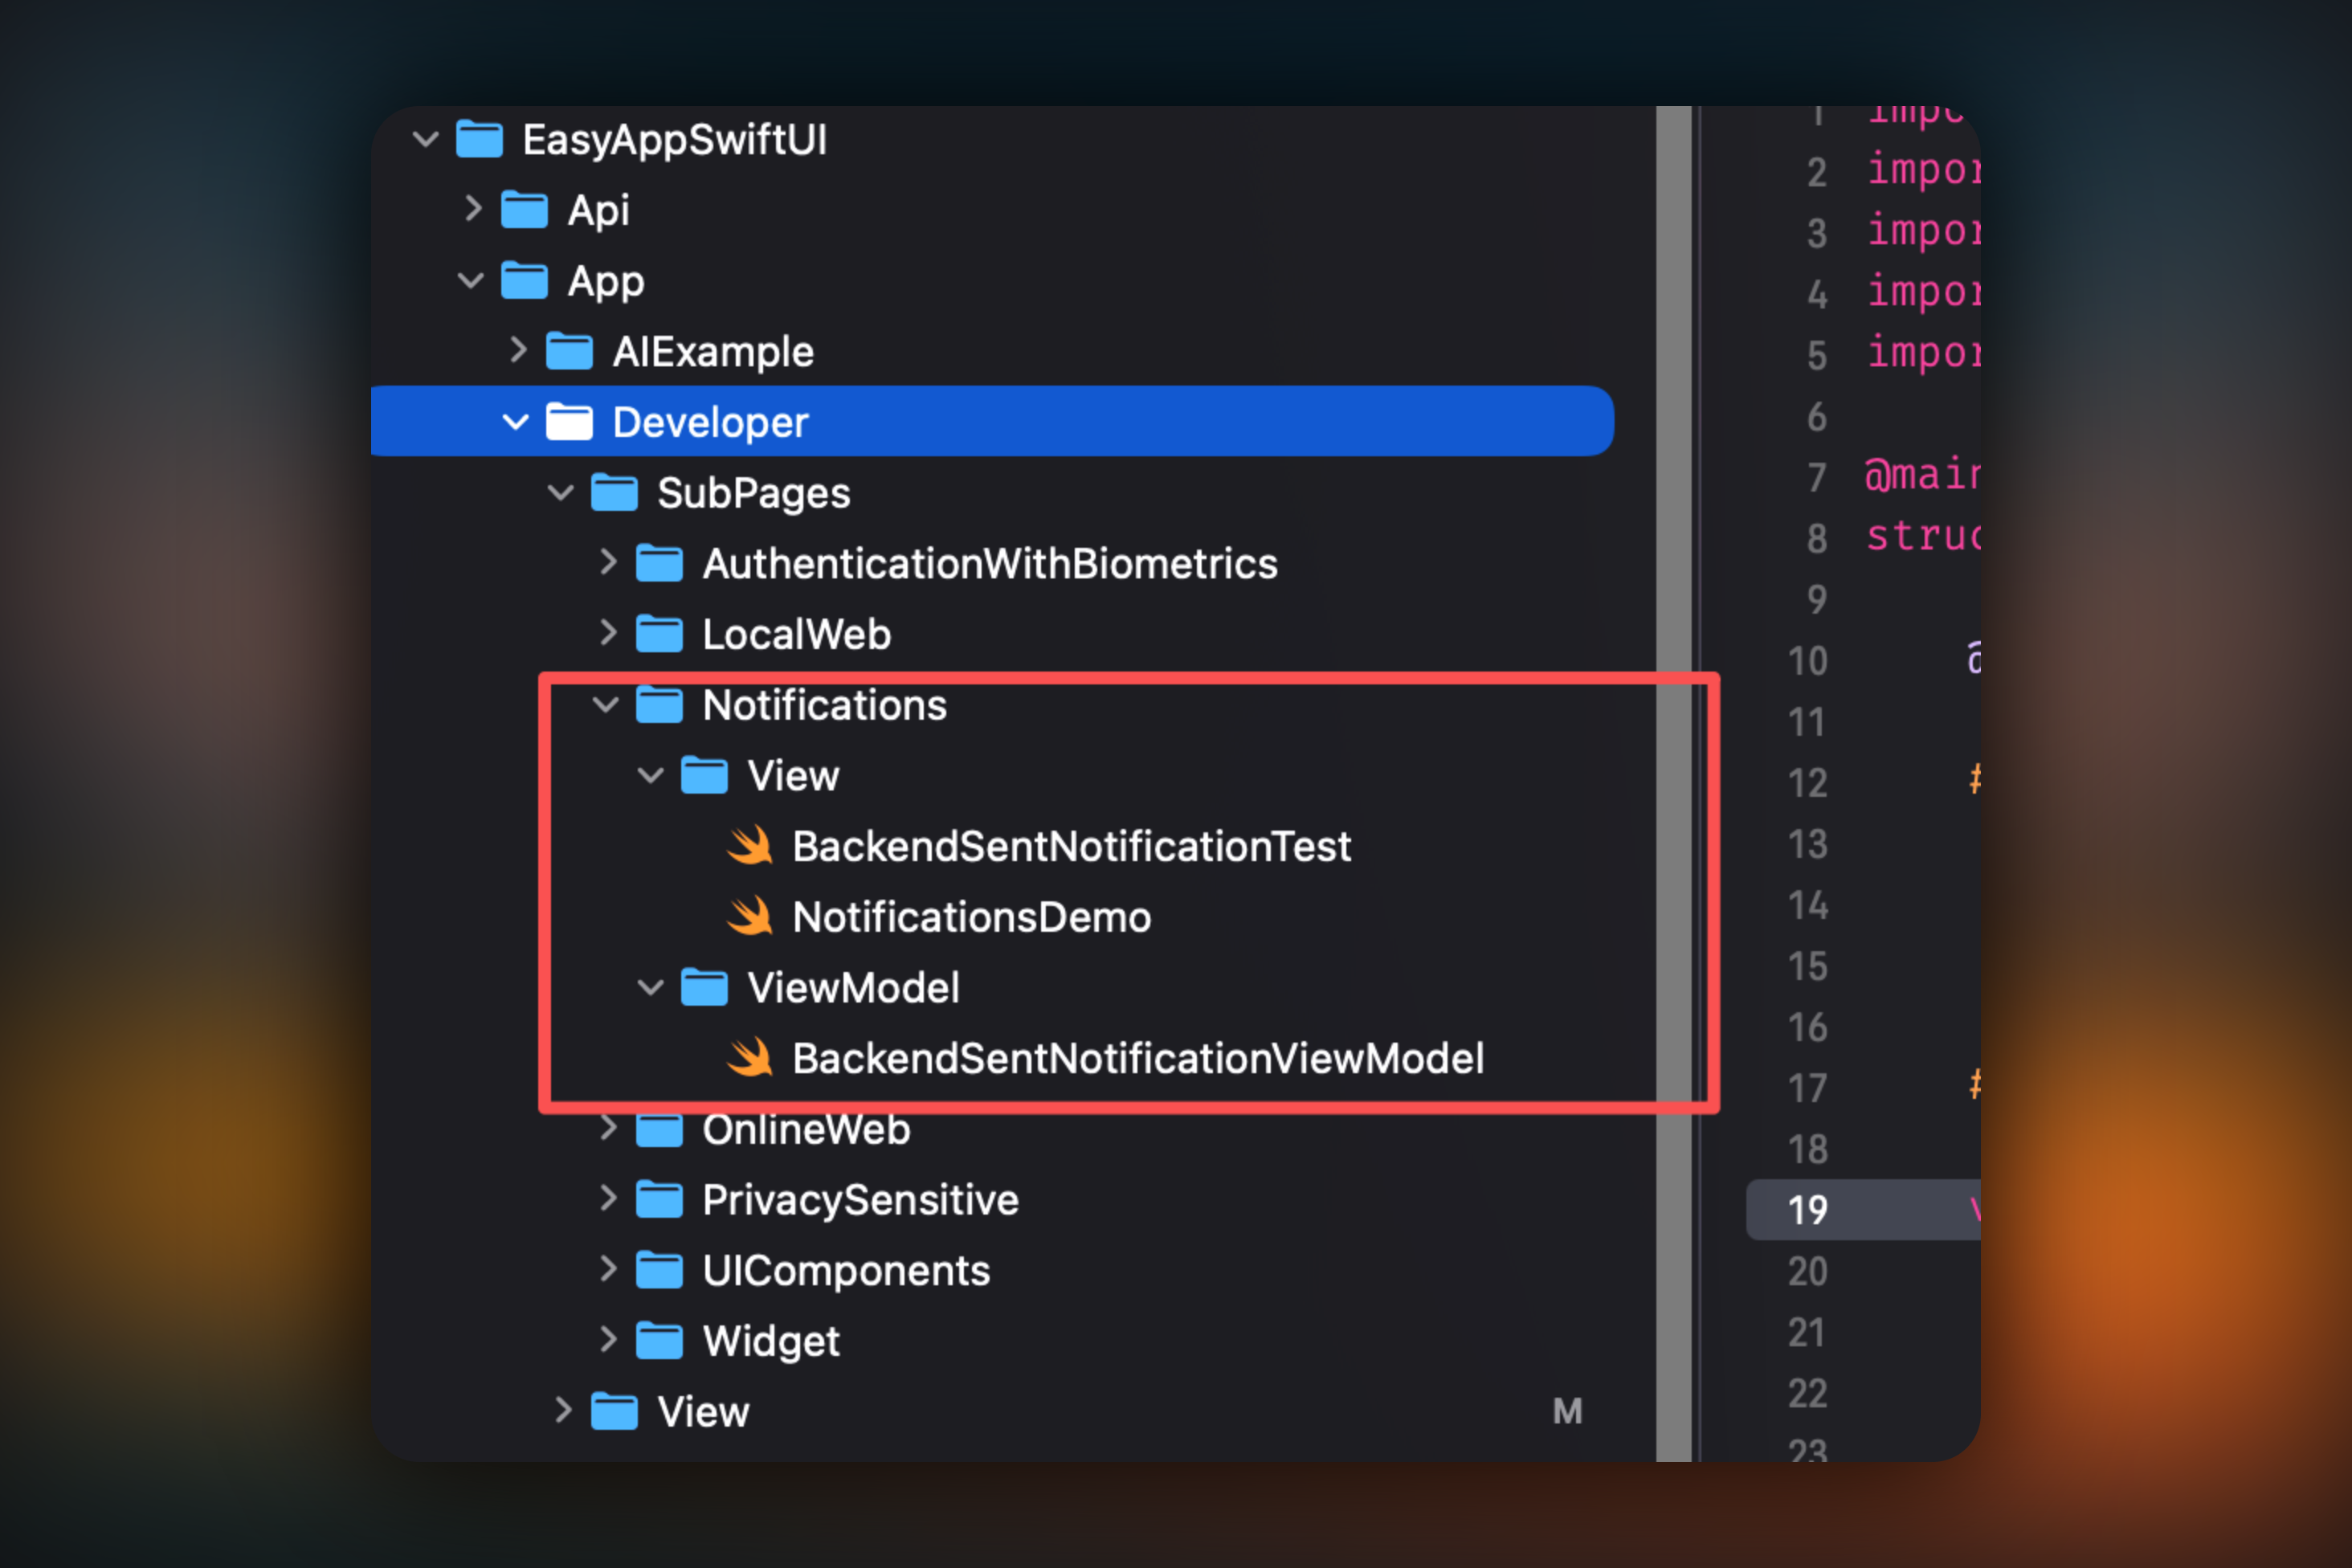
* Delete the following content, select `Move to Trash`
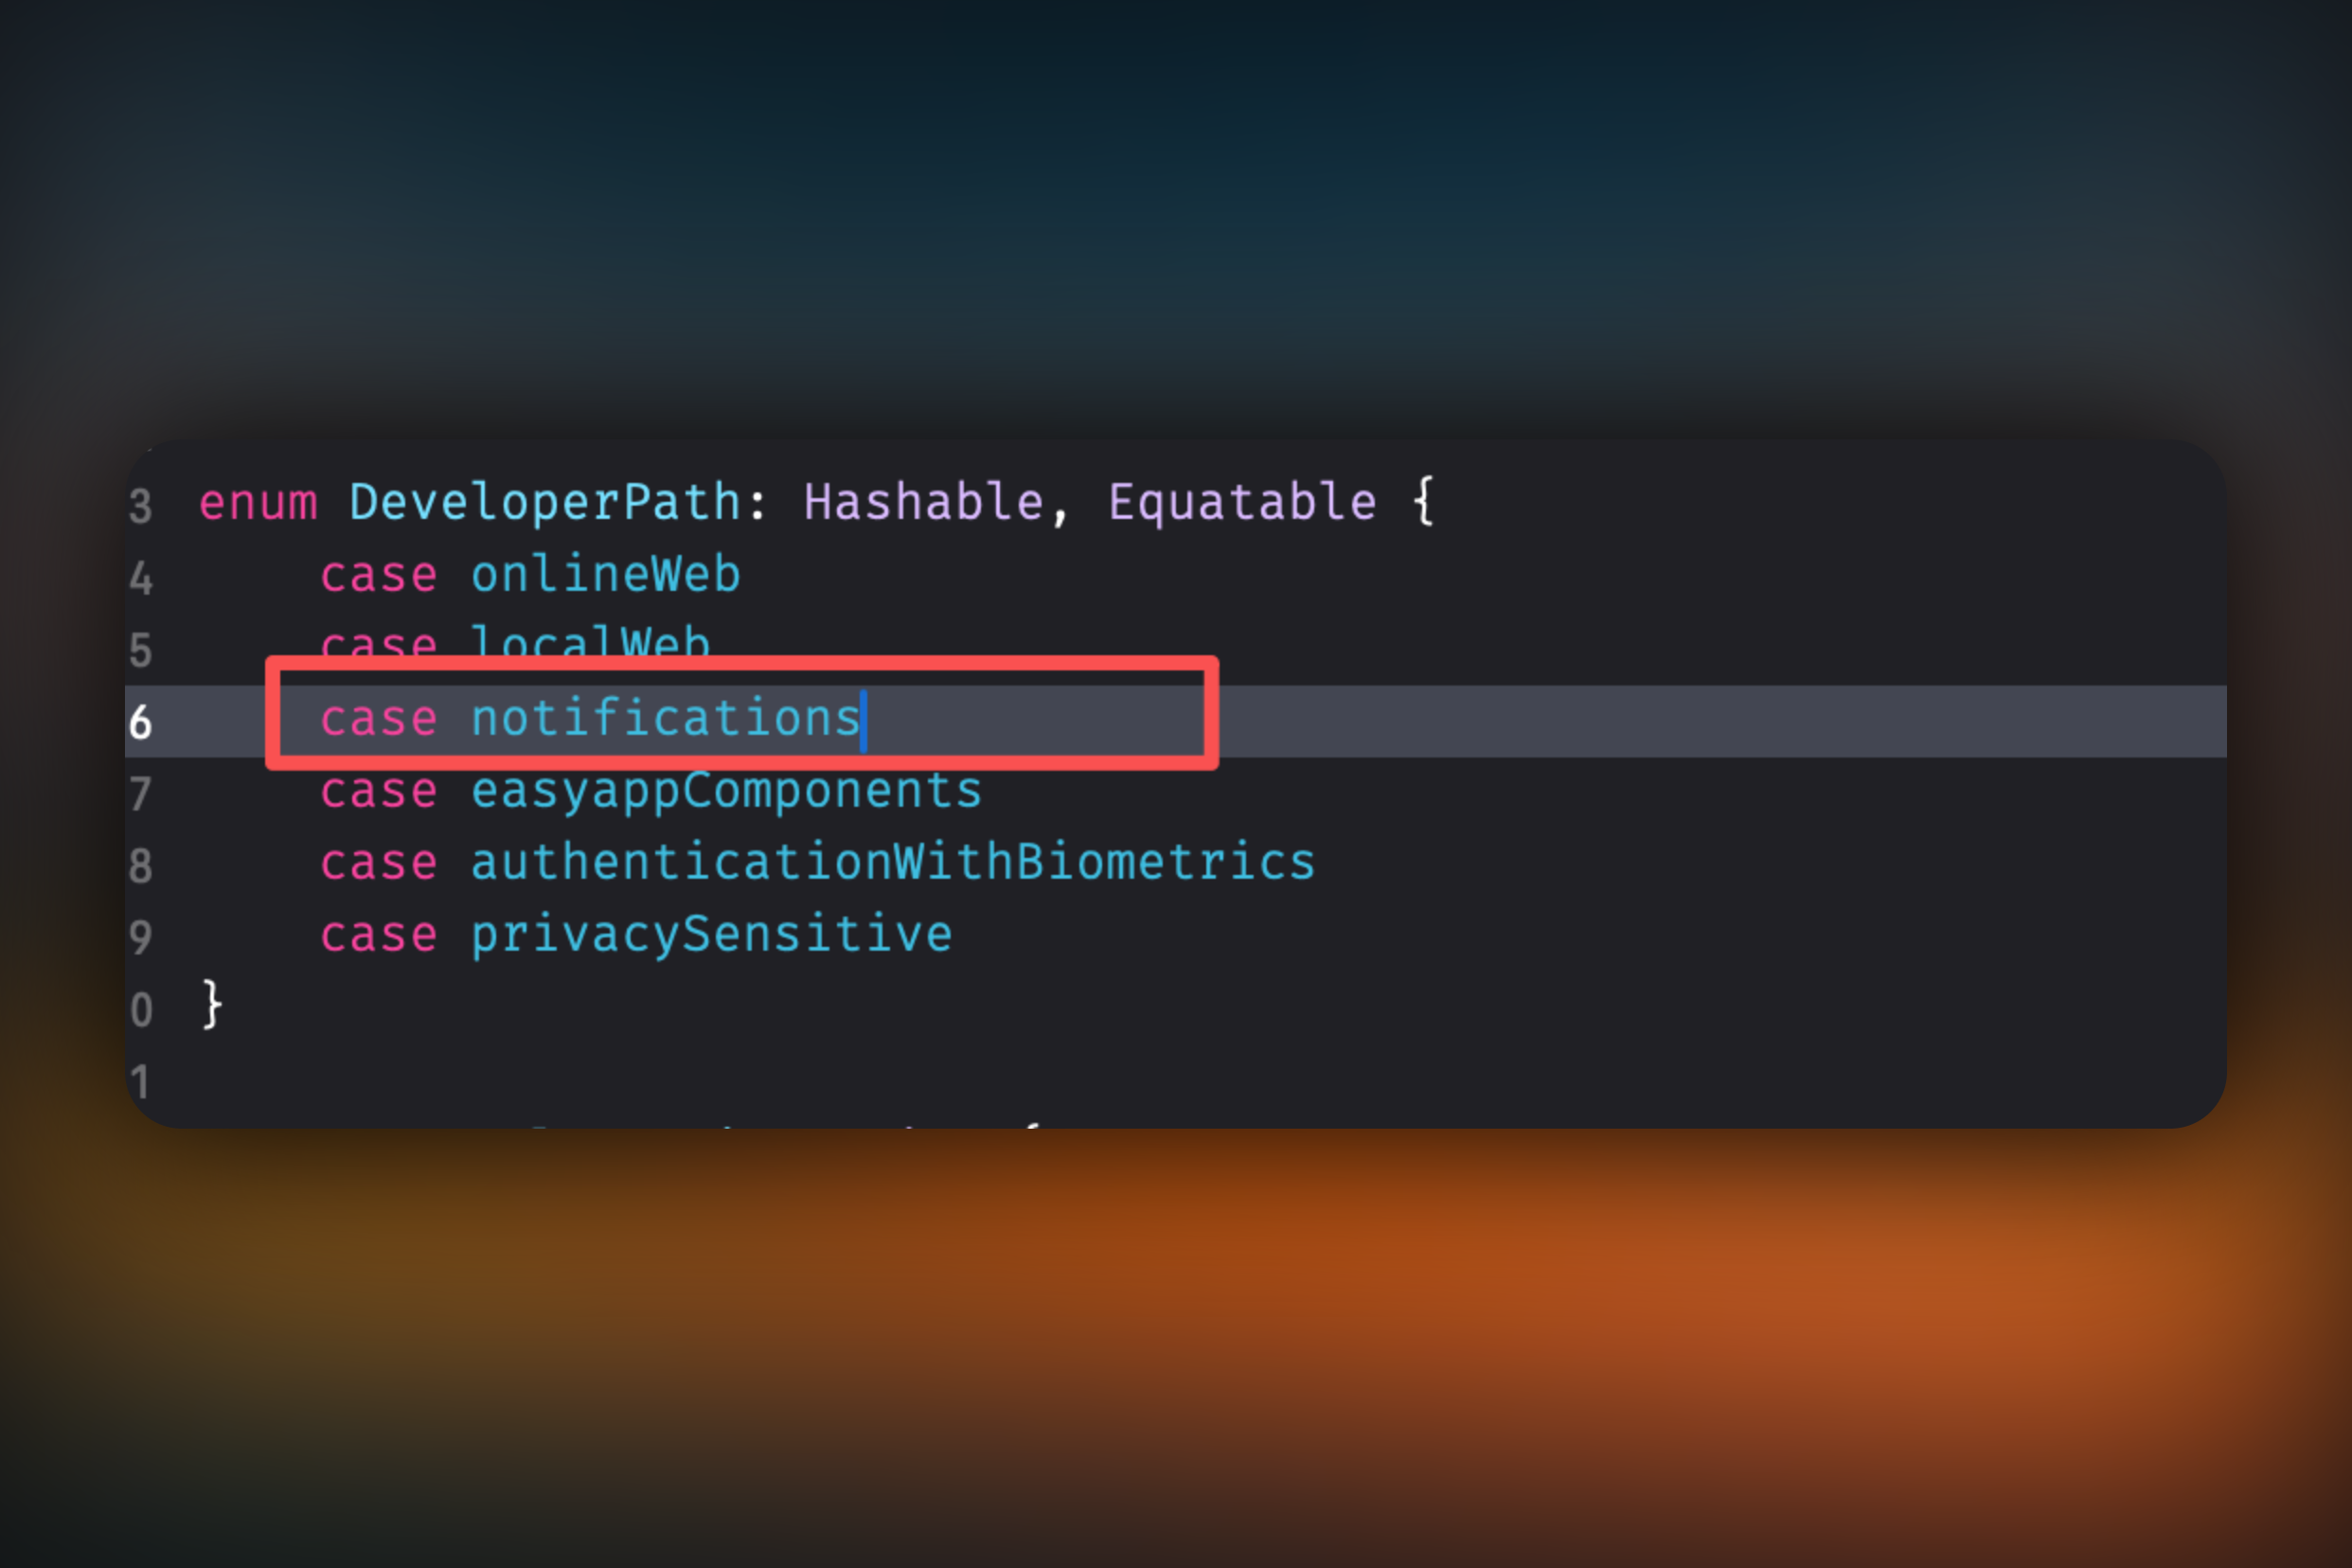
* Go to `EasyAppSwiftUI/App/Developer/View/DeveloperView.swift`, delete the code
* Uncheck
* Go to `EasyAppSwiftUIApp.swift` file, delete the following `notification` related code
```swift
#if DEBUG
@State private var showDeepLinkTest = false
#endif
```
```swift
// Show the deep link test view when the notification is clicked
#if DEBUG
.sheet(isPresented: $showDeepLinkTest) {
OSDeepLinkTargetTestView()
}
.onReceive(
NotificationCenter.default.publisher(
for: EasyAppNotifyKit.Notifications.osNotificationClicked)
) { notification in
let deeplink = notification.userInfo?["deeplink"] as? String
if let deeplink, deeplink == "EasyApp://notifykit?screen=osTests" {
withAnimation(.spring(response: 0.5, dampingFraction: 0.8)) {
showDeepLinkTest = true
}
}
}
#endif
```
```swift
if Constants.OneSignal.isEnabledNotification {
let oneSignalService = OneSignalService()
PushManager.shared.configure(with: oneSignalService)
let configuration: PushServiceConfiguration = PushServiceConfiguration(
appId: Constants.OneSignal.appId,
launchOptions: launchOptions
)
PushManager.shared.initialize(with: configuration)
OneSignal.Notifications.addClickListener(self)
OneSignal.Notifications.addForegroundLifecycleListener(self)
}
```
```swift
extension AppDelegate: OSNotificationClickListener, OSNotificationLifecycleListener {
func onClick(event: OSNotificationClickEvent) {
devLogger.info("Notification clicked: \(event.jsonRepresentation())")
self.handleViewTap(additionalData: event.notification.additionalData)
}
func onWillDisplay(event: OSNotificationWillDisplayEvent) {
devLogger.info("Foreground notification: \(event.notification.title ?? "No Title")")
event.preventDefault()
guard let notifTitle = event.notification.title,
let notifMessage = event.notification.body,
let additionalData = event.notification.additionalData,
let symbol = additionalData["symbolImage"] as? String
else {
event.notification.display() // Show notification as usual
return
}
var notifHaptics: UINotificationFeedbackGenerator.FeedbackType = .warning
if let size = additionalData["status"] as? String {
if size == "error" {
notifHaptics = .error
} else if size == "success" {
notifHaptics = .success
}
UINotificationFeedbackGenerator().notificationOccurred(notifHaptics)
}
ShowNotification.showInAppNotification(
title: notifTitle,
message: notifMessage,
isSuccess: notifHaptics == .success,
duration: .seconds(seconds: 5),
systemImage: symbol,
handleViewTap: {
self.handleViewTap(additionalData: event.notification.additionalData)
}
)
}
/// Handle the view tap
/// - Parameter additionalData: the additional data
private func handleViewTap(additionalData: [AnyHashable: Any]? = nil) {
// Parse the additional data
let ad = JSON(additionalData ?? [:])
// Get the deeplink
let deeplink = ad["deeplink"].stringValue
if !deeplink.isEmpty {
// Broadcast click to allow host views to react (e.g., navigate)
NotificationCenter.default.post(
name: EasyAppNotifyKit.Notifications.osNotificationClicked,
object: nil,
userInfo: [
"deeplink": deeplink
]
)
}
}
}
```
Finally, run the `Cmd + B` command to check for any other errors.
# RevenueCat Related
URL: https://easyapp.site/en/docs/FQA/revenueCat
RevenueCat Common Errors
***
title: RevenueCat Related
description: RevenueCat Common Errors
icon: FileQuestionIcon
----------------------
### RevenueCat Common Errors
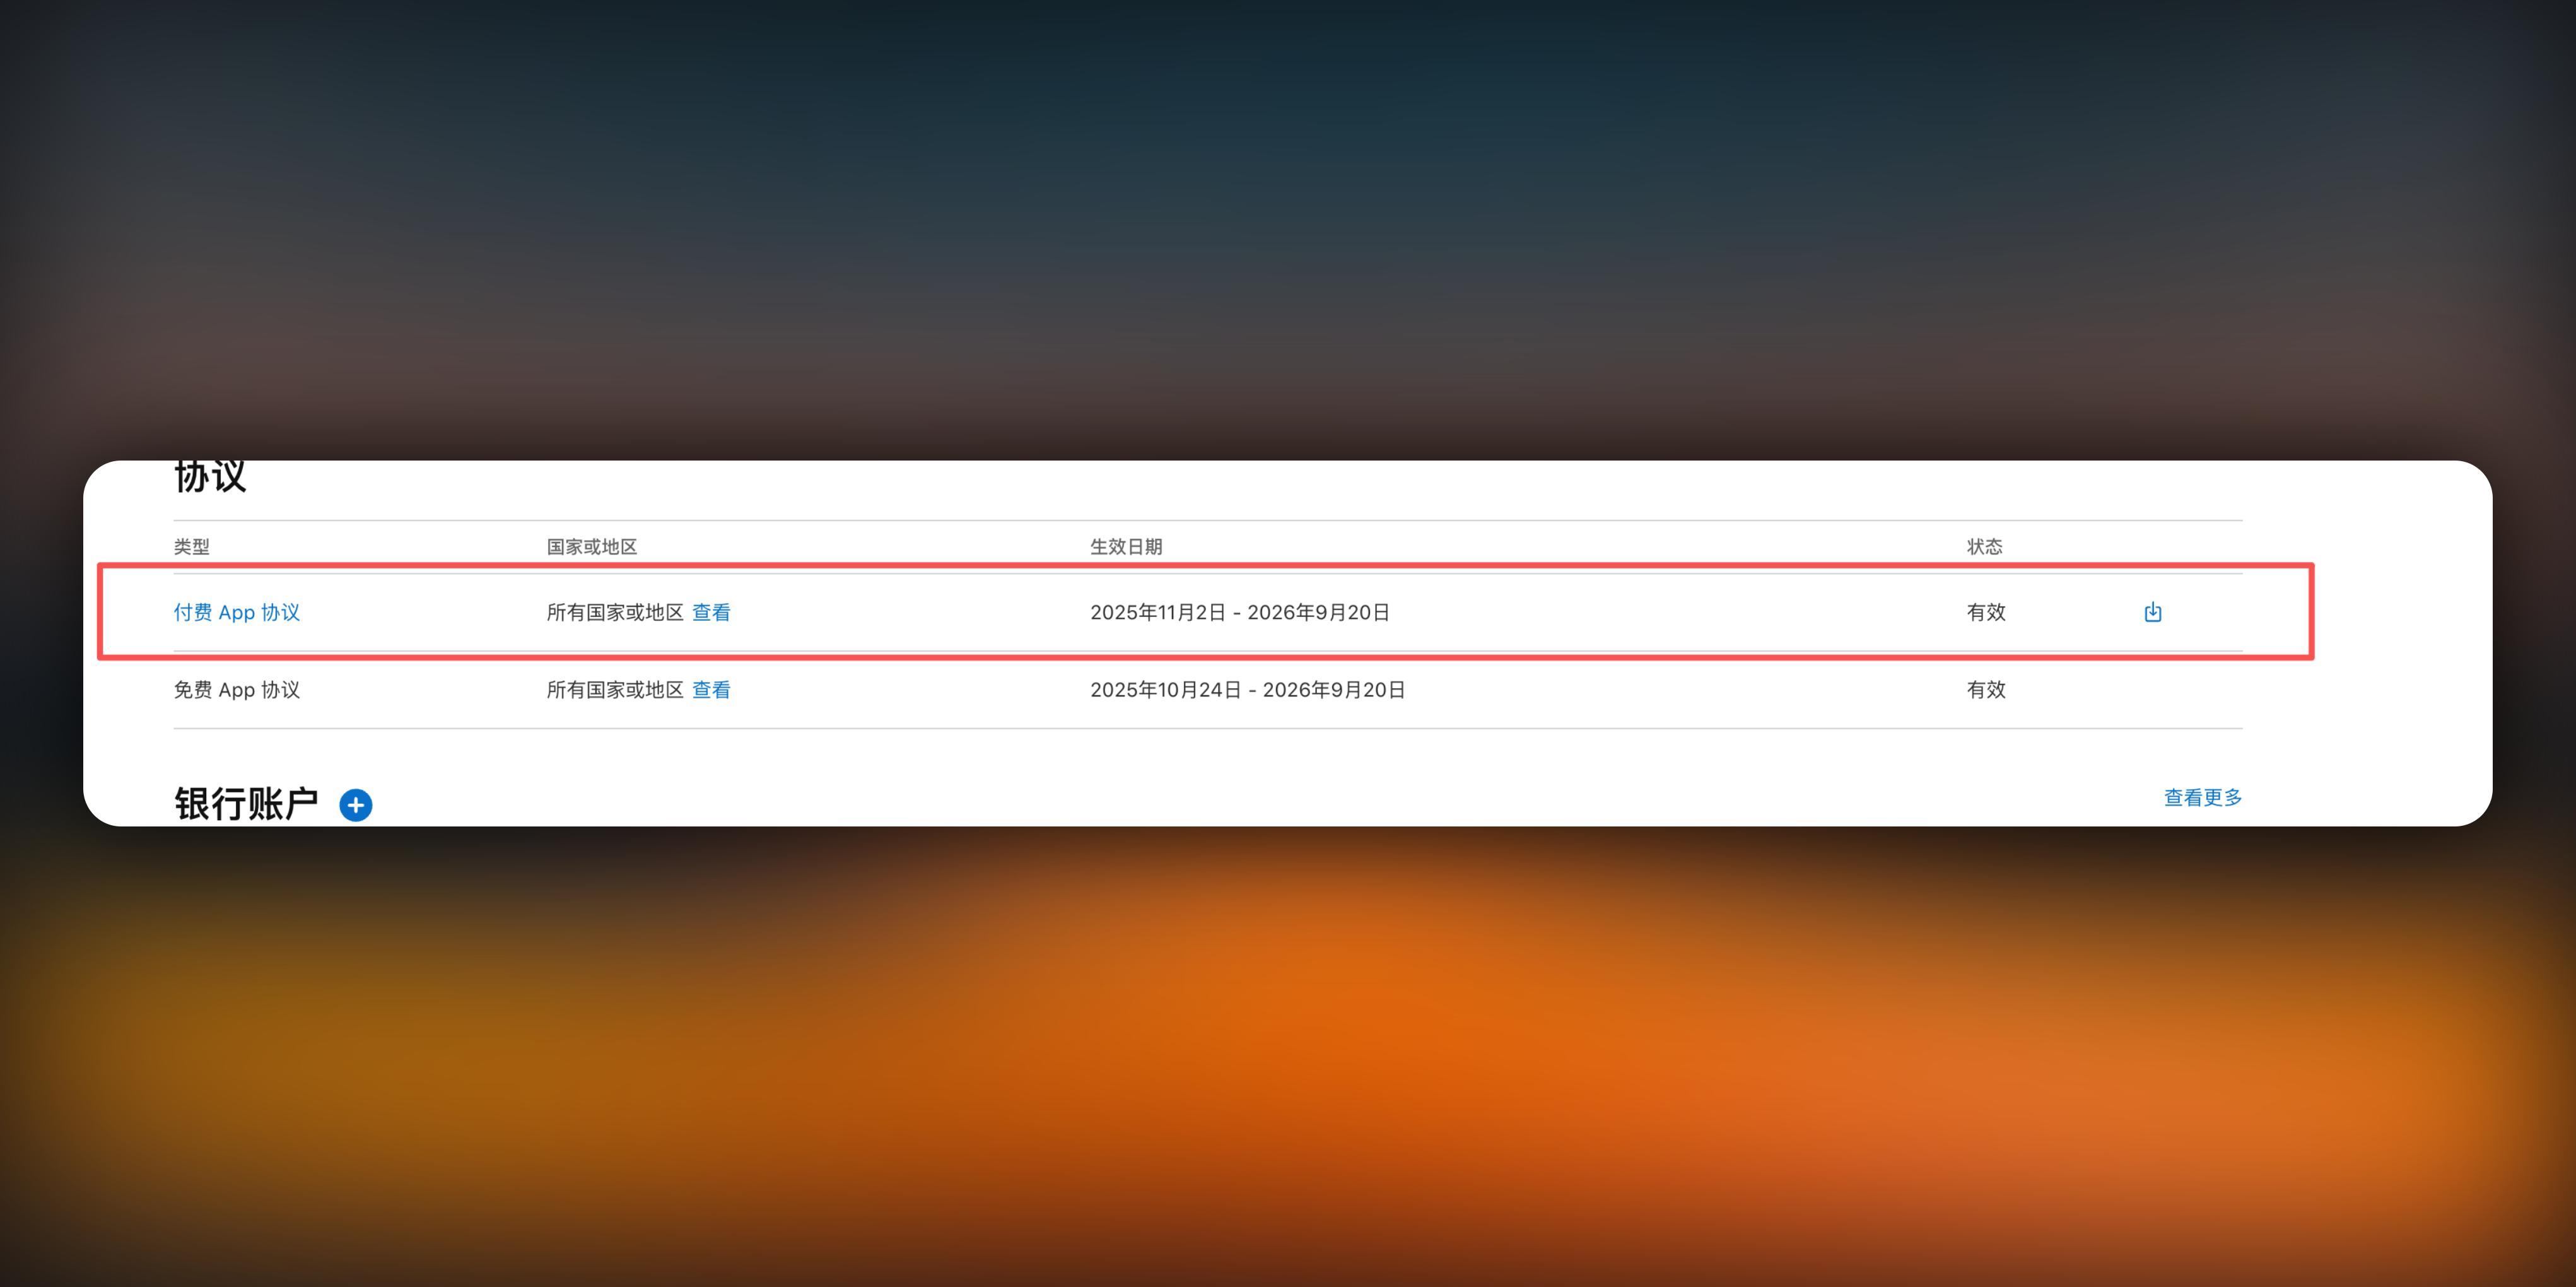
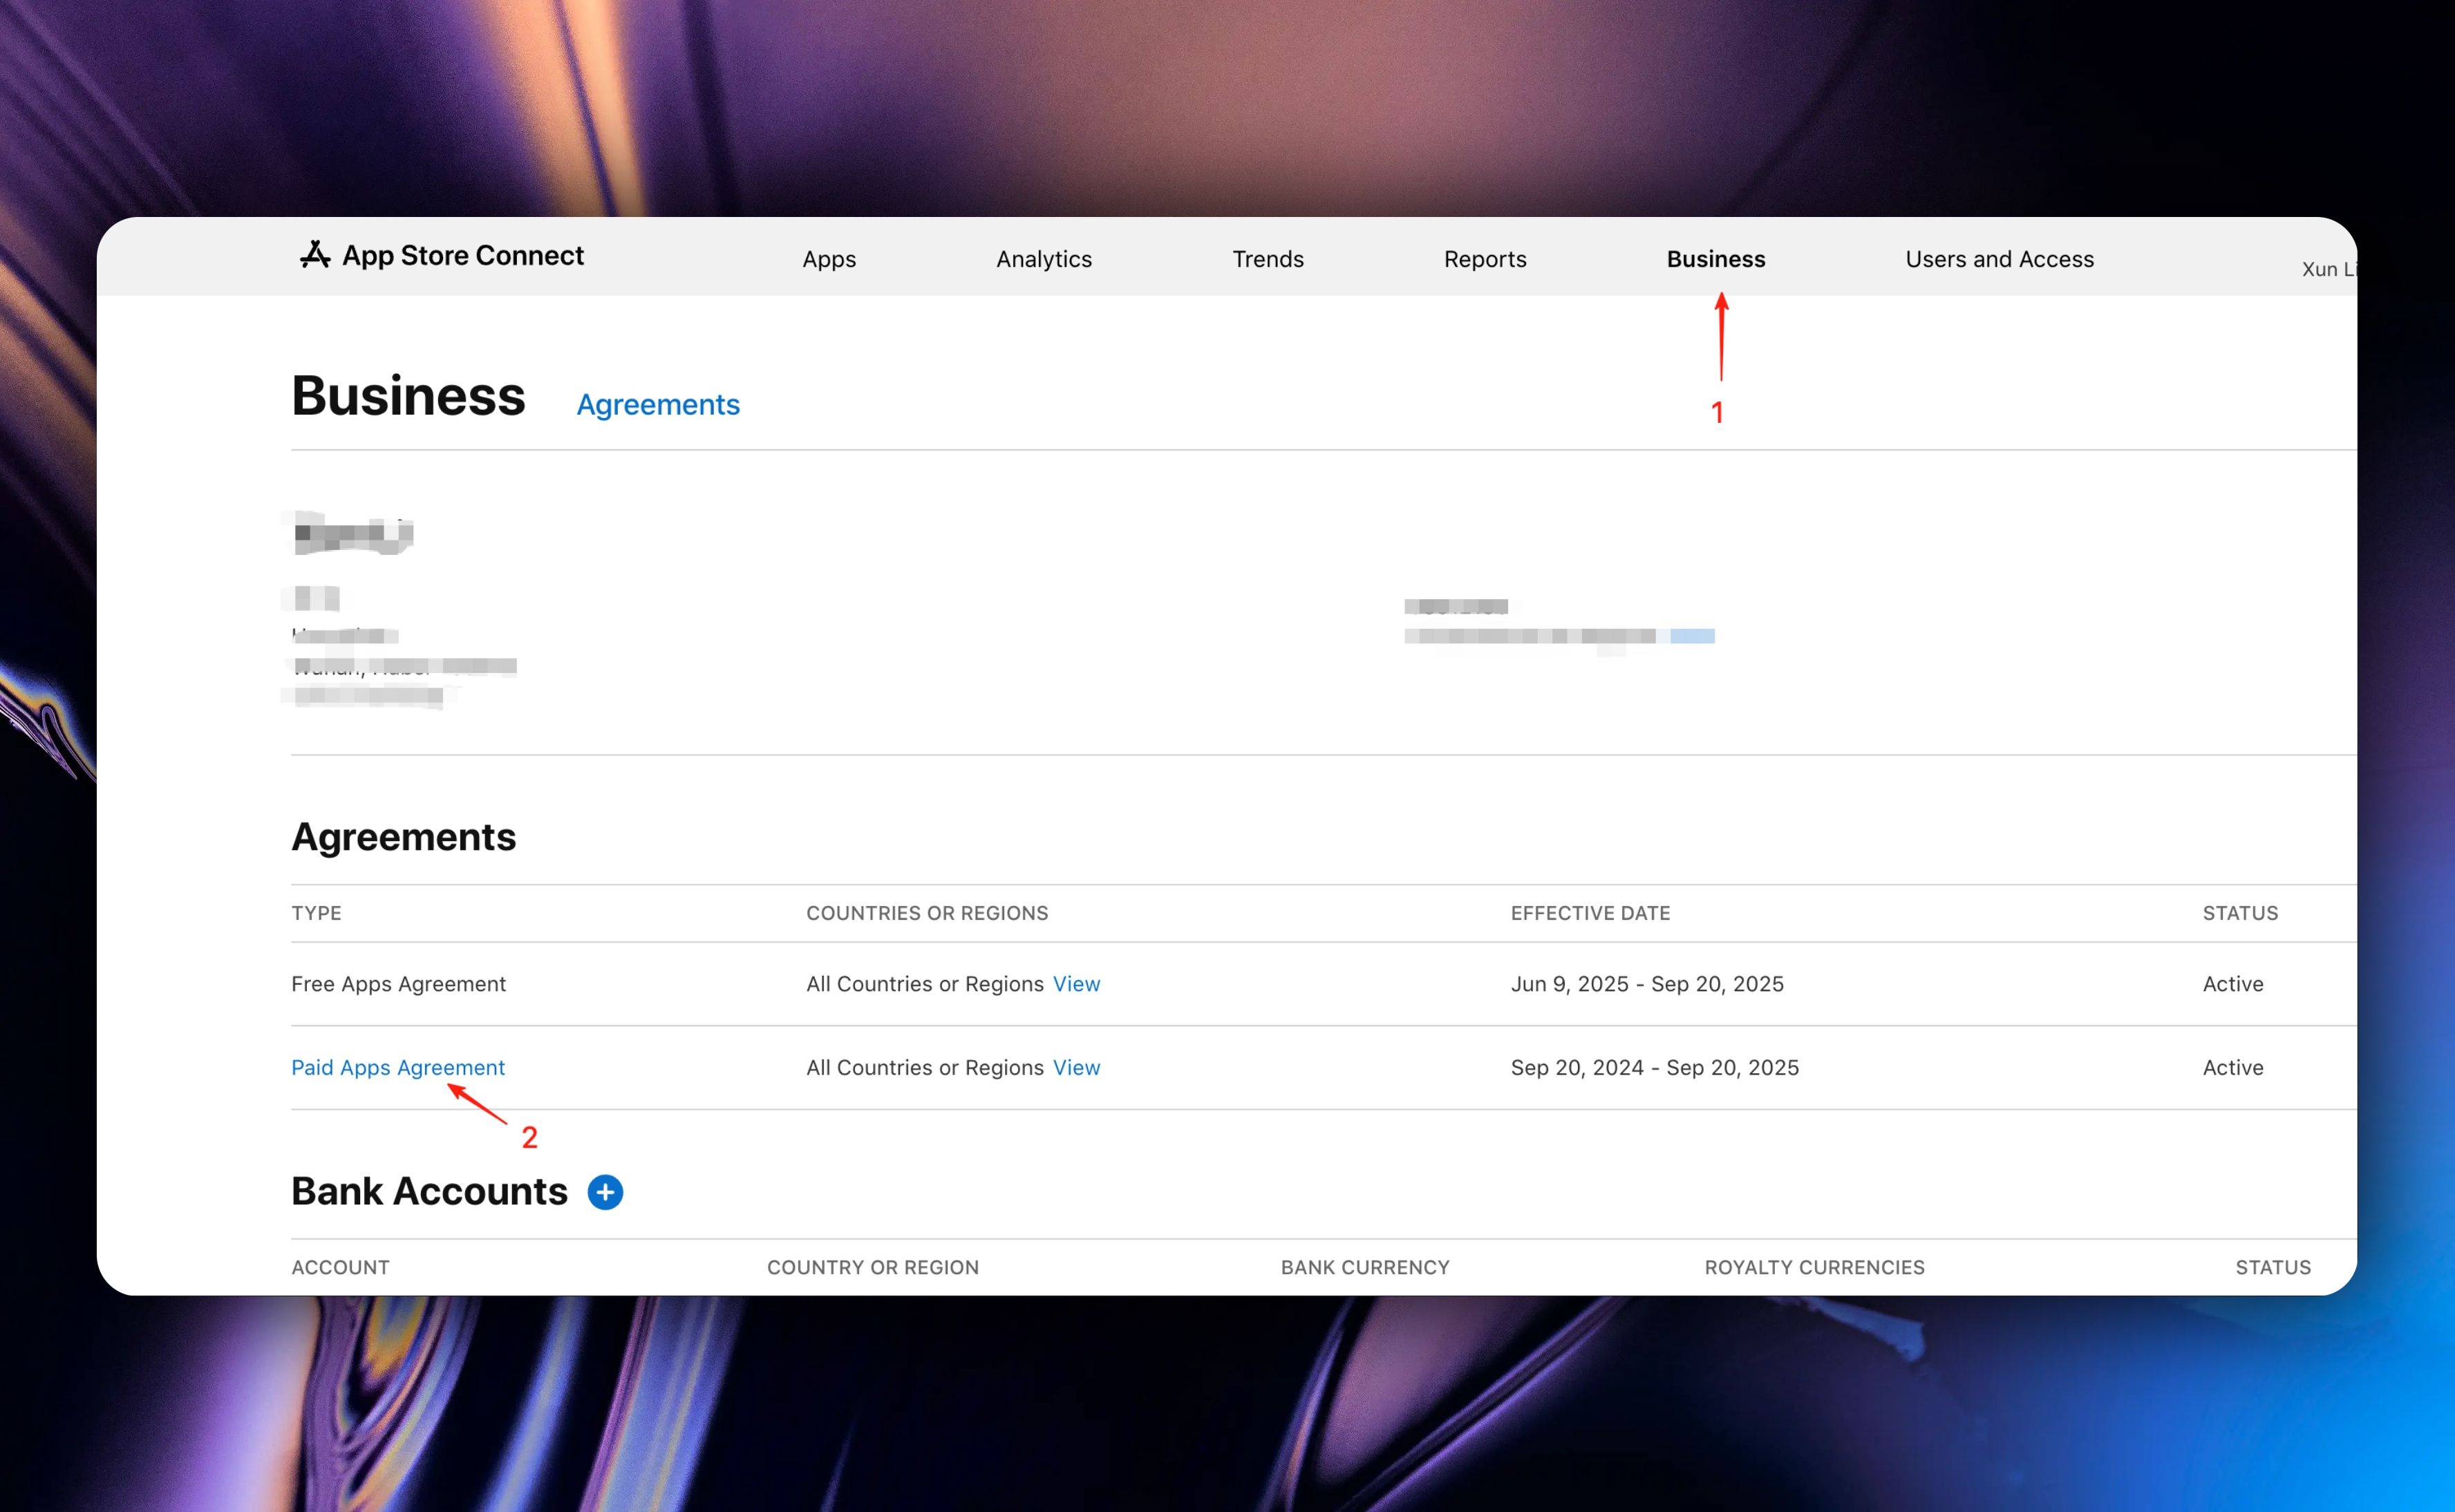
Usually, this is because your App Store Connect agreement is not signed or has issues.
You need to check [https://appstoreconnect.apple.com/business/atb/95c7eacb-a537-4036-9c21-ff4c032d3f94](https://appstoreconnect.apple.com/business/atb/95c7eacb-a537-4036-9c21-ff4c032d3f94)
Check if the paid app agreement is valid
# AI Features
URL: https://easyapp.site/en/docs/Integrations/AI
Learn how to use Supabase Edge Function to call AI APIs in EasyAppSwiftUI
***
title: AI Features
description: Learn how to use Supabase Edge Function to call AI APIs in EasyAppSwiftUI
icon: Brain
-----------
# AI Feature Integration Guide
This document provides a detailed guide on how to use **Supabase Edge Function** to call AI APIs in EasyAppSwiftUI, using receipt analysis functionality as an example to demonstrate the complete implementation process.
## Why Choose Supabase Edge Function?
Using Supabase Edge Function as an intermediate layer for AI services offers the following significant advantages:
No additional server maintenance costs, pay-as-you-go model
API Keys are securely stored on the server side, avoiding client-side packet capture risks
Easy access to user information for permission control and data management
**Strongly Recommended**: Store API Keys on the server side rather than the client side. Network requests from mobile apps are easily intercepted by packet capture tools, leading to API Key leakage.
### Related Resources
Want to learn more about Supabase Edge Function? Please refer to the official documentation:
* [Supabase Edge Functions Official Guide](https://supabase.com/docs/guides/functions)
For more information on how to integrate Supabase Edge Function, please refer to:
} href="/docs/Integrations/supabaseEdgeFuncton">
Introduction to Supabase Edge Function
We can combine with in-app purchases to provide different AI analysis counts, such as 10 free, 100 paid, 1000 paid, etc.
This feature is currently under development, stay tuned.
## System Architecture Overview
The AI feature adopts the following architecture design:
```
SwiftUI App → Supabase Storage → Supabase Edge Function → OpenAI API → Streaming Response → SwiftUI
```
## Demo
## Core Feature Characteristics
### Intelligent Receipt Analysis
* **Image Upload**: Support selecting receipt images from photo album or camera
* **AI Recognition**: Use OpenAI multimodal model to extract receipt information
* **Real-time Streaming Response**: Display analysis process to enhance user experience
* **Structured Data**: Automatically parse into standardized JSON format
* **Data Storage**: Analysis results saved to Supabase database
## Technical Implementation Details
### 1. Data Model Design
First, define the structured model for receipt data:
```swift
struct ReceiptModel: Identifiable, Codable, Equatable {
var id = UUID()
var userID: String?
let restaurantInfo: RestaurantInfo
let foodItems: [FoodItem]
let pricingSummary: PricingSummary
let paymentInfo: PaymentInfo
let receiptMetadata: ReceiptMetadata
}
struct RestaurantInfo: Codable {
let name: String?
let address: String?
let phone: String?
let date: String?
let time: String?
}
struct FoodItem: Codable, Identifiable {
var id = UUID()
let name: String?
let unitPrice: Double?
let quantity: Int?
let totalPrice: Double?
}
```
### 2. SwiftUI Frontend Implementation
#### Image Upload Functionality
```swift
func uploadImage(selectedImage: UIImage) async throws -> String {
isUploading = true
defer { isUploading = false }
guard let imageData = selectedImage.jpegData(compressionQuality: 0.8) else {
return ""
}
let imageName = UUID().uuidString
let imagePath = "\(imageName).jpeg"
return try await supabase.request {
let response = try await supabase.storage
.from("receipt-analysis")
.upload(
imagePath,
data: imageData,
options: FileOptions(contentType: "image/jpeg")
)
return response.fullPath
}
}
```
#### AI Analysis Call
```swift
func analyzeReceipt(imagePath: String) async {
isAnalyzing = true
analysisContent = ""
parsedReceipt = nil
let parameters = ["imgPath": imagePath]
do {
try await supabase.callStreamingFunction(
functionName: "receipt-analysis",
parameters: parameters,
onContent: { [weak self] (content: String) in
guard let self = self else { return }
self.analysisContent += content
},
onCompletion: { [weak self] in
guard let self = self else { return }
self.isAnalyzing = false
self.parseAnalysisContent()
}
)
} catch {
isAnalyzing = false
state = .result(.failure(error))
}
}
```
#### Function Entry and Authentication
```typescript
Deno.serve(async (req) => {
const userAuth = await getUserAuth(req);
if (!userAuth) {
return new Response(JSON.stringify({ error: "Unauthorized" }), {
status: 401,
});
}
return responseAIModelStream(req);
});
async function getUserAuth(req: Request) {
const supabaseClient = getSupabaseClient(req);
const authHeader = req.headers.get("Authorization");
if (!authHeader) return null;
const token = authHeader.replace("Bearer ", "");
const { data } = await supabaseClient.auth.getUser(token);
return data?.user || null;
}
```
#### AI Model Call and Streaming Response
```typescript
async function responseAIModelStream(req: Request) {
const { imgPath } = (await req.json()) as ReceiptAnalysisRequest;
// Get public URL of the image for AI analysis
const imageUrl = getImageUrl(req, imgPath);
console.log("Processing image:", imageUrl);
const stream = await openAIClient.chat.completions.create({
model: "qwen-vl-max-latest",
response_format: { type: "json_object" },
messages: [
{
role: "system",
content: "You are a professional restaurant receipt analysis expert..."
},
{
role: "user",
content: [
{
type: "image_url",
image_url: { url: imageUrl } // Use dynamically generated image URL
},
{
type: "text",
text: `Analyze this receipt and return JSON with fields:
- restaurant_info
- food_items
- pricing_summary
- payment_info
- receipt_metadata`
}
]
}
],
stream: true,
});
const readableStream = new ReadableStream({
start(controller) {
(async () => {
try {
for await (const chunk of stream) {
const content = chunk.choices[0]?.delta?.content || "";
if (content) {
const encoder = new TextEncoder();
controller.enqueue(
encoder.encode(`data: ${JSON.stringify({ content })}\n\n`)
);
}
}
const encoder = new TextEncoder();
controller.enqueue(encoder.encode("data: [DONE]\n\n"));
} catch (error) {
controller.error(error);
} finally {
controller.close();
}
})();
},
});
return new Response(readableStream, {
headers: {
"Content-Type": "text/event-stream",
"Cache-Control": "no-cache",
Connection: "keep-alive",
},
});
}
```
### 3. Data Parsing and Storage
#### JSON Parsing
```swift
func parseAnalysisContent() {
guard !analysisContent.isEmpty else {
state = .result(.failure(ParsingError.emptyAnalysisContent))
return
}
let cleanedContent = extractJSON(from: analysisContent)
guard let jsonData = cleanedContent.data(using: .utf8) else {
state = .result(.failure(ParsingError.invalidJSON))
return
}
do {
let decoder = JSONDecoder()
let receipt = try decoder.decode(ReceiptModel.self, from: jsonData)
self.parsedReceipt = receipt
} catch {
state = .result(.failure(error))
}
}
private func extractJSON(from content: String) -> String {
guard let firstBrace = content.firstIndex(of: "{"),
let lastBrace = content.lastIndex(of: "}") else {
return content
}
return String(content[firstBrace...lastBrace])
}
```
#### Database Storage
```swift
func saveReceiptAnalysisResult(receipt: ReceiptModel) async {
isSaving = true
defer { isSaving = false }
guard let user = supabase.auth.currentUser else { return }
let saveReceipt = ReceiptModel(
userID: user.id.uuidString,
restaurantInfo: receipt.restaurantInfo,
foodItems: receipt.foodItems,
pricingSummary: receipt.pricingSummary,
paymentInfo: receipt.paymentInfo,
receiptMetadata: receipt.receiptMetadata
)
do {
try await supabase.request {
try await supabase.client.from("receipt_analysis_results")
.insert(saveReceipt)
.select()
.single()
.execute()
}
} catch {
state = .result(.failure(error))
}
}
```
## Configuration Requirements
⚠️ **Important Reminder**: Please ensure to add the following content to the `.gitignore` file in your project root directory to avoid sensitive information leakage:
```bash
# Environment variable files
.env
.env.local
.env.production
.env.*.local
# Supabase
supabase/.branches
supabase/.temp
```
### 1. Supabase Configuration
#### Environment Variable Setup
Create a `.env` file in your Supabase project root directory and configure the following environment variables:
```bash
# .env file configuration example
# OpenAI API configuration (using Alibaba Cloud Tongyi Qianwen API here)
OPENAI_API_KEY=your_dashscope_api_key_here
# Supabase project configuration
SUPABASE_URL=https://your-project-ref.supabase.co
SUPABASE_SERVICE_ROLE_KEY=your_service_role_key_here
```
**Methods to obtain configuration information**:
1. **OPENAI\_API\_KEY**:
* Current code uses Alibaba Cloud Tongyi Qianwen API
* Visit [Alibaba Cloud Lingji Platform](https://dashscope.aliyun.com/)
* Register an account and create an API Key
* Can also be replaced with standard OpenAI API Key
2. **SUPABASE\_URL**:
* Login to [Supabase](https://supabase.com/dashboard/project/mutkgdbrerijqhqccalu/settings/api-keys)
* Select your project
* Find Project URL in Project Settings → Data API page
* Find Service Anon Key in Project Settings → API Keys page
### 2. Storage Bucket Setup
Create a `receipt-analysis` storage bucket to store receipt images with appropriate access permissions:
```sql
-- Create receipt analysis storage bucket
INSERT INTO storage.buckets (id, name, public)
VALUES ('receipt-analysis', 'receipt-analysis', true);
-- Set access policy: Allow authenticated users to upload
CREATE POLICY "Allow authenticated users to upload receipts"
ON storage.objects FOR INSERT
WITH CHECK (bucket_id = 'receipt-analysis' AND auth.role() = 'authenticated');
-- Set access policy: Allow authenticated users to view their own uploaded files
CREATE POLICY "Allow users to view their own receipts"
ON storage.objects FOR SELECT
USING (bucket_id = 'receipt-analysis' AND auth.role() = 'authenticated');
-- Set access policy: Allow users to delete their own files
CREATE POLICY "Allow users to delete their own receipts"
ON storage.objects FOR DELETE
USING (bucket_id = 'receipt-analysis' AND auth.role() = 'authenticated');
```
**Storage Bucket Configuration Notes**:
* `public = true`: Allow access via public URL (for AI analysis)
* Access policies ensure only authenticated users can upload, view, and delete files
* Image files automatically generate UUID filenames to avoid naming conflicts
### 3. Database Table Structure
Complete receipt analysis results table structure:
```sql
-- Create receipt analysis results table
CREATE TABLE public.receipt_analysis_results (
id UUID PRIMARY KEY DEFAULT gen_random_uuid(),
user_id UUID NOT NULL REFERENCES auth.users(id),
restaurant_info JSONB,
food_items JSONB,
pricing_summary JSONB,
payment_info JSONB,
receipt_metadata JSONB,
raw_response JSONB, -- Store original AI response for debugging
img_path TEXT, -- Image storage path
created_at TIMESTAMPTZ DEFAULT now(),
updated_at TIMESTAMPTZ DEFAULT now()
);
-- Enable row-level security policies
ALTER TABLE public.receipt_analysis_results ENABLE ROW LEVEL SECURITY;
-- Create access policy: Users can only access their own data
CREATE POLICY "Users can access their own receipt analysis results"
ON public.receipt_analysis_results
FOR ALL
USING (auth.uid() = user_id);
```
**Table Structure Notes**:
* `id`: Primary key, auto-generated UUID
* `user_id`: User ID, linked to authentication user table
* `restaurant_info`: Restaurant information (name, address, phone, date, time)
* `food_items`: Food items array (name, unit price, quantity, total price)
* `pricing_summary`: Price summary (subtotal, discount, tax, service fee, total)
* `payment_info`: Payment information (payment method, payment amount, change)
* `receipt_metadata`: Receipt metadata (receipt number, cashier, table number)
* `raw_response`: Original AI response data for debugging and auditing
* `img_path`: Receipt image path in storage
* `created_at/updated_at`: Record creation and update times
## Best Practices
### Security
* **Environment Variable Management**:
* Do not commit `.env` files to version control systems
* **User Authentication**: All API calls require valid authentication tokens
* **Data Validation**: Validate format and size of uploaded images
* **Error Handling**: Provide friendly error prompts and retry mechanisms
* **Row-Level Security**: Ensure users can only access their own analysis results
## Extended Applications
Based on this architecture, you can easily extend more AI features:
* **Document Recognition**: Extract information from ID cards, passports, and other documents
* **Text Translation**: Multi-language real-time translation functionality
* **Image Analysis**: Product recognition, scene analysis, etc.
* **Voice Processing**: Speech-to-text, etc.
This architecture provides a flexible, scalable AI integration solution that allows you to quickly build various AI application features.
# Credit System
URL: https://easyapp.site/en/docs/Integrations/Credits
Learn how to integrate the credit system in EasyApp
***
title: Credit System
description: Learn how to integrate the credit system in EasyApp
icon: Coins
-----------
## Overview
The EasyApp Credit System is a complete user credit management solution that provides credit earning, spending, transaction records, and anti-abuse protection features. The system supports multiple credit sources including registration bonuses, subscriptions, in-app purchases, promotional activities, and includes comprehensive anti-fraud mechanisms.
## Core Features
### 1. Credit Management
* **FIFO Consumption Mechanism**: Credits are consumed on a first-in-first-out basis, ensuring that earlier earned credits are used first
* **Validity Period Support**: Supports both permanent and temporary credits with configurable expiration times
* **Multi-source Tracking**: Detailed recording of credit sources (registration, subscription, purchase, promotion, refund, admin distribution, etc.)
* **Real-time Balance Query**: Quick retrieval of user credit balance, including permanent credits, temporary credits, and credits about to expire
### 2. Transaction System
* **Complete Transaction Records**: Detailed history of all credit operations including earning, spending, expiration, and refunds
* **Balance Tracking**: Records user balance changes after each transaction
* **Batch Management**: Supports batch credit operations for easy management and tracking
### 3. Feature Billing
* **Flexible Billing**: Set different credit consumption standards for different features
* **Dynamic Configuration**: Support for runtime adjustment of feature credit consumption costs
* **Feature Toggle**: Dynamically enable or disable billing for specific features
### 4. Anti-Abuse System
* **Email Restrictions**: Limit registration count and bonus distribution per email address
* **Device Fingerprinting**: Monitor device fingerprints to prevent multi-account abuse
* **Risk Scoring**: Calculate risk scores based on user behavior to automatically identify suspicious activities
* **Cooldown Mechanism**: Set cooldown periods for registration bonuses to prevent frequent account creation
### 5. In-App Purchase Integration
* **RevenueCat Integration**: Complete support for RevenueCat in-app purchase platform
* **One-time Purchases**: Support for credit package purchases, allowing users to directly buy credits
* **Subscription Services**: Support for monthly/yearly subscriptions with automatic credit distribution
## Database Configuration
### Credit Package Configuration (credit\_packages)
Currently only supports configuring credit packages in SQL. A management system will be implemented later to support configuring credit packages without modifying SQL code, reducing the barrier to entry.
The credit packages table is used to configure one-time credit packages available for user purchase:
```sql
CREATE TABLE credit_packages (
id UUID PRIMARY KEY,
name TEXT NOT NULL, -- Credit package name
credits INTEGER NOT NULL, -- Credit amount
price DECIMAL(10,2) NOT NULL, -- Price
product_id TEXT UNIQUE NOT NULL, -- RevenueCat product ID
is_permanent BOOLEAN DEFAULT true, -- Whether it's permanent credits
is_active BOOLEAN DEFAULT true, -- Whether enabled
sort_order INTEGER DEFAULT 0 -- Sort order
);
```
**RevenueCat In-App Purchase Product Configuration Example:**
```sql
INSERT INTO credit_packages (name, credits, price, product_id) VALUES
('Starter Pack', 1000, 9.99, 'easyapp_credits_1000'),
('Popular Pack', 5000, 39.99, 'easyapp_credits_5000'),
('Professional Pack', 10000, 69.99, 'easyapp_credits_10000'),
('Value Pack', 50000, 299.99, 'easyapp_credits_50000');
```
**Configuration Points:**
1. `product_id` must exactly match the product ID in the RevenueCat console
2. Credit packages are typically set as permanent credits (`is_permanent = true`)
3. Control display order in the app through `sort_order`
4. Temporarily disable specific credit packages through `is_active`
### Subscription Product Configuration (subscription\_products)
The subscription products table is used to configure monthly/yearly subscription services:
```sql
CREATE TABLE subscription_products (
id UUID PRIMARY KEY,
product_id TEXT UNIQUE NOT NULL, -- RevenueCat subscription product ID
product_name TEXT NOT NULL, -- Product name
subscription_type TEXT NOT NULL, -- Subscription type: 'monthly' or 'yearly'
credits_per_month INTEGER NOT NULL, -- Credits distributed per month
price DECIMAL(10,2), -- Price
currency TEXT DEFAULT 'USD', -- Currency unit
is_active BOOLEAN DEFAULT true -- Whether enabled
);
```
**RevenueCat Subscription Product Configuration Example:**
```sql
INSERT INTO subscription_products (
product_id, product_name, subscription_type, credits_per_month, price
) VALUES
('subscription_credit_monthly_basic_1', 'Premium Monthly', 'monthly', 2000, 9.99),
('subscription_credit_yearly_basic_1', 'Premium Yearly', 'yearly', 2000, 83.99);
```
**Configuration Points:**
1. `product_id` must exactly match the subscription product ID in the RevenueCat console
2. Monthly and yearly subscriptions typically set the same `credits_per_month` (yearly users get the same monthly credits)
3. Yearly subscription prices are usually cheaper than monthly price × 12 (like the 30% discount in the example)
4. The system automatically handles credit distribution cycles based on subscription type
### Feature Billing Configuration (feature\_credit\_costs)
The feature billing table defines credit consumption standards for various features:
```sql
INSERT INTO feature_credit_costs (feature_name, credit_cost, description) VALUES
('text2image', 100, 'Text to Image Generation'),
('image2image', 150, 'Image to Image Conversion'),
('receipt_analysis', 50, 'Receipt Analysis'),
('receipt_analysis_pro', 100, 'Advanced Receipt Analysis');
```
## RevenueCat Integration Configuration
### 1. Product ID Mapping
##### Credit Packages
* RevenueCat Product ID → `credit_packages.product_id`
* Used for one-time credit package purchases
* Credits are distributed immediately after successful purchase
Next, let's introduce how to create one-time credit package products.
You must have an Apple Developer account and have already created an App to create one-time credit package products.
If you forgot how to create in-app purchase products, you can refer back to
} href="/docs/Integrations/RevenueCat">
Learn how to integrate RevenueCat service
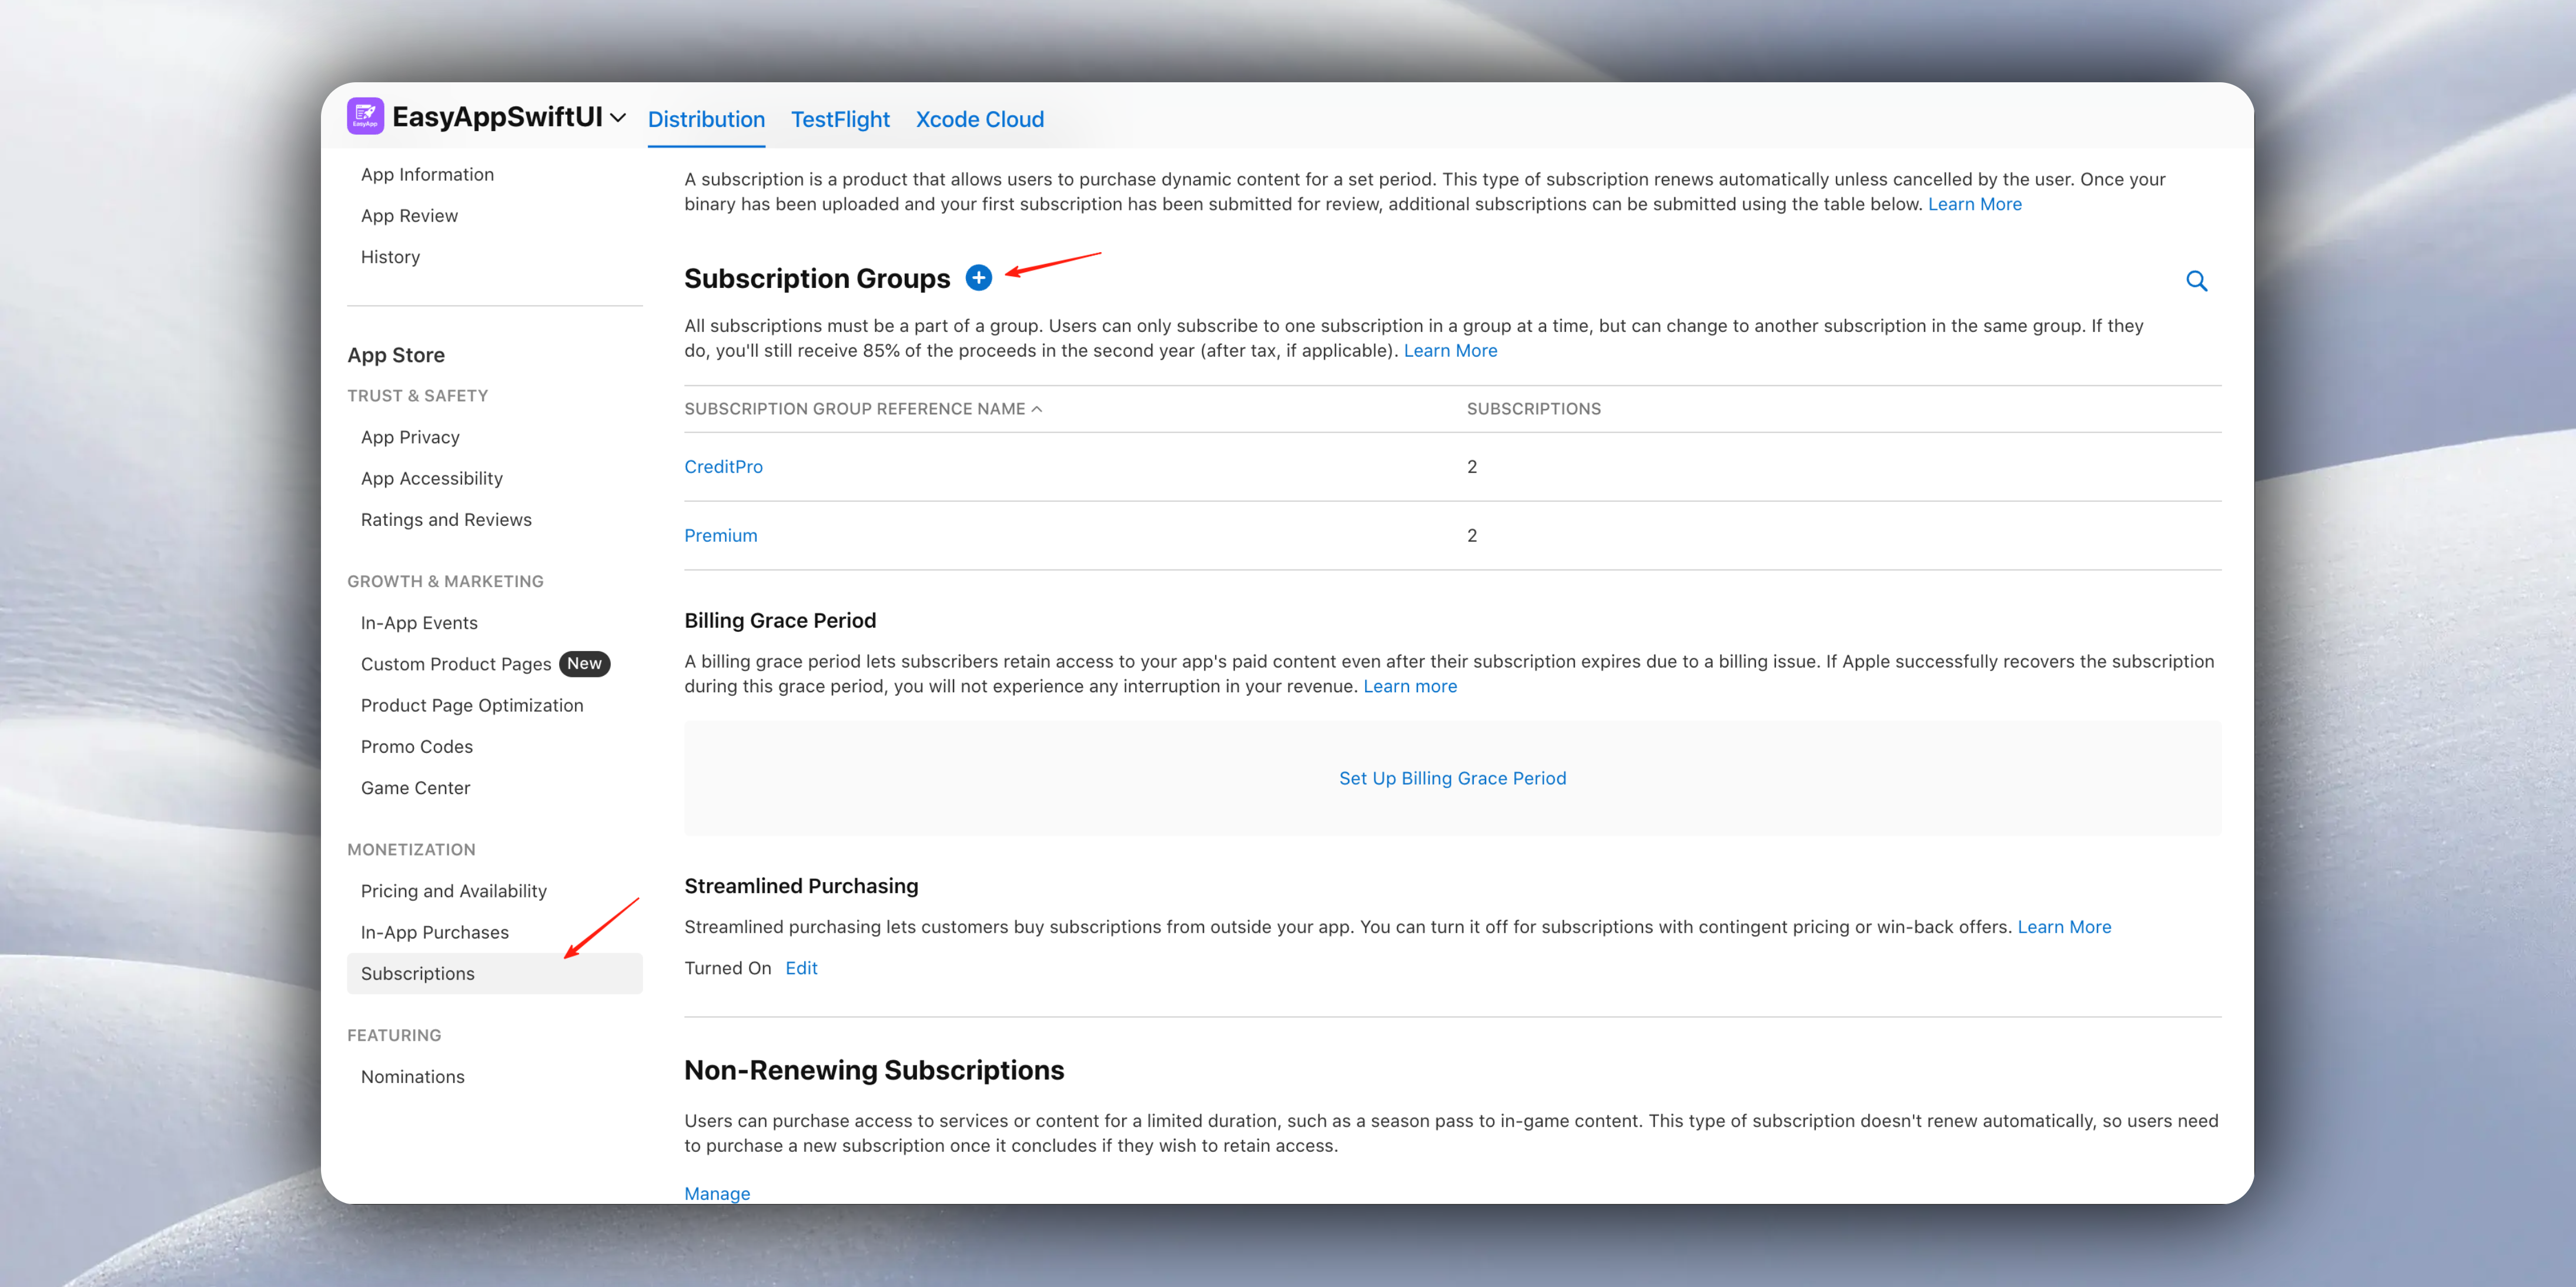
1: First, go to [App Store Connect](https://appstoreconnect.apple.com/) and select In-App Purchases.
Since we're creating one-time credit package products, select In-App Purchases, not Subscriptions.
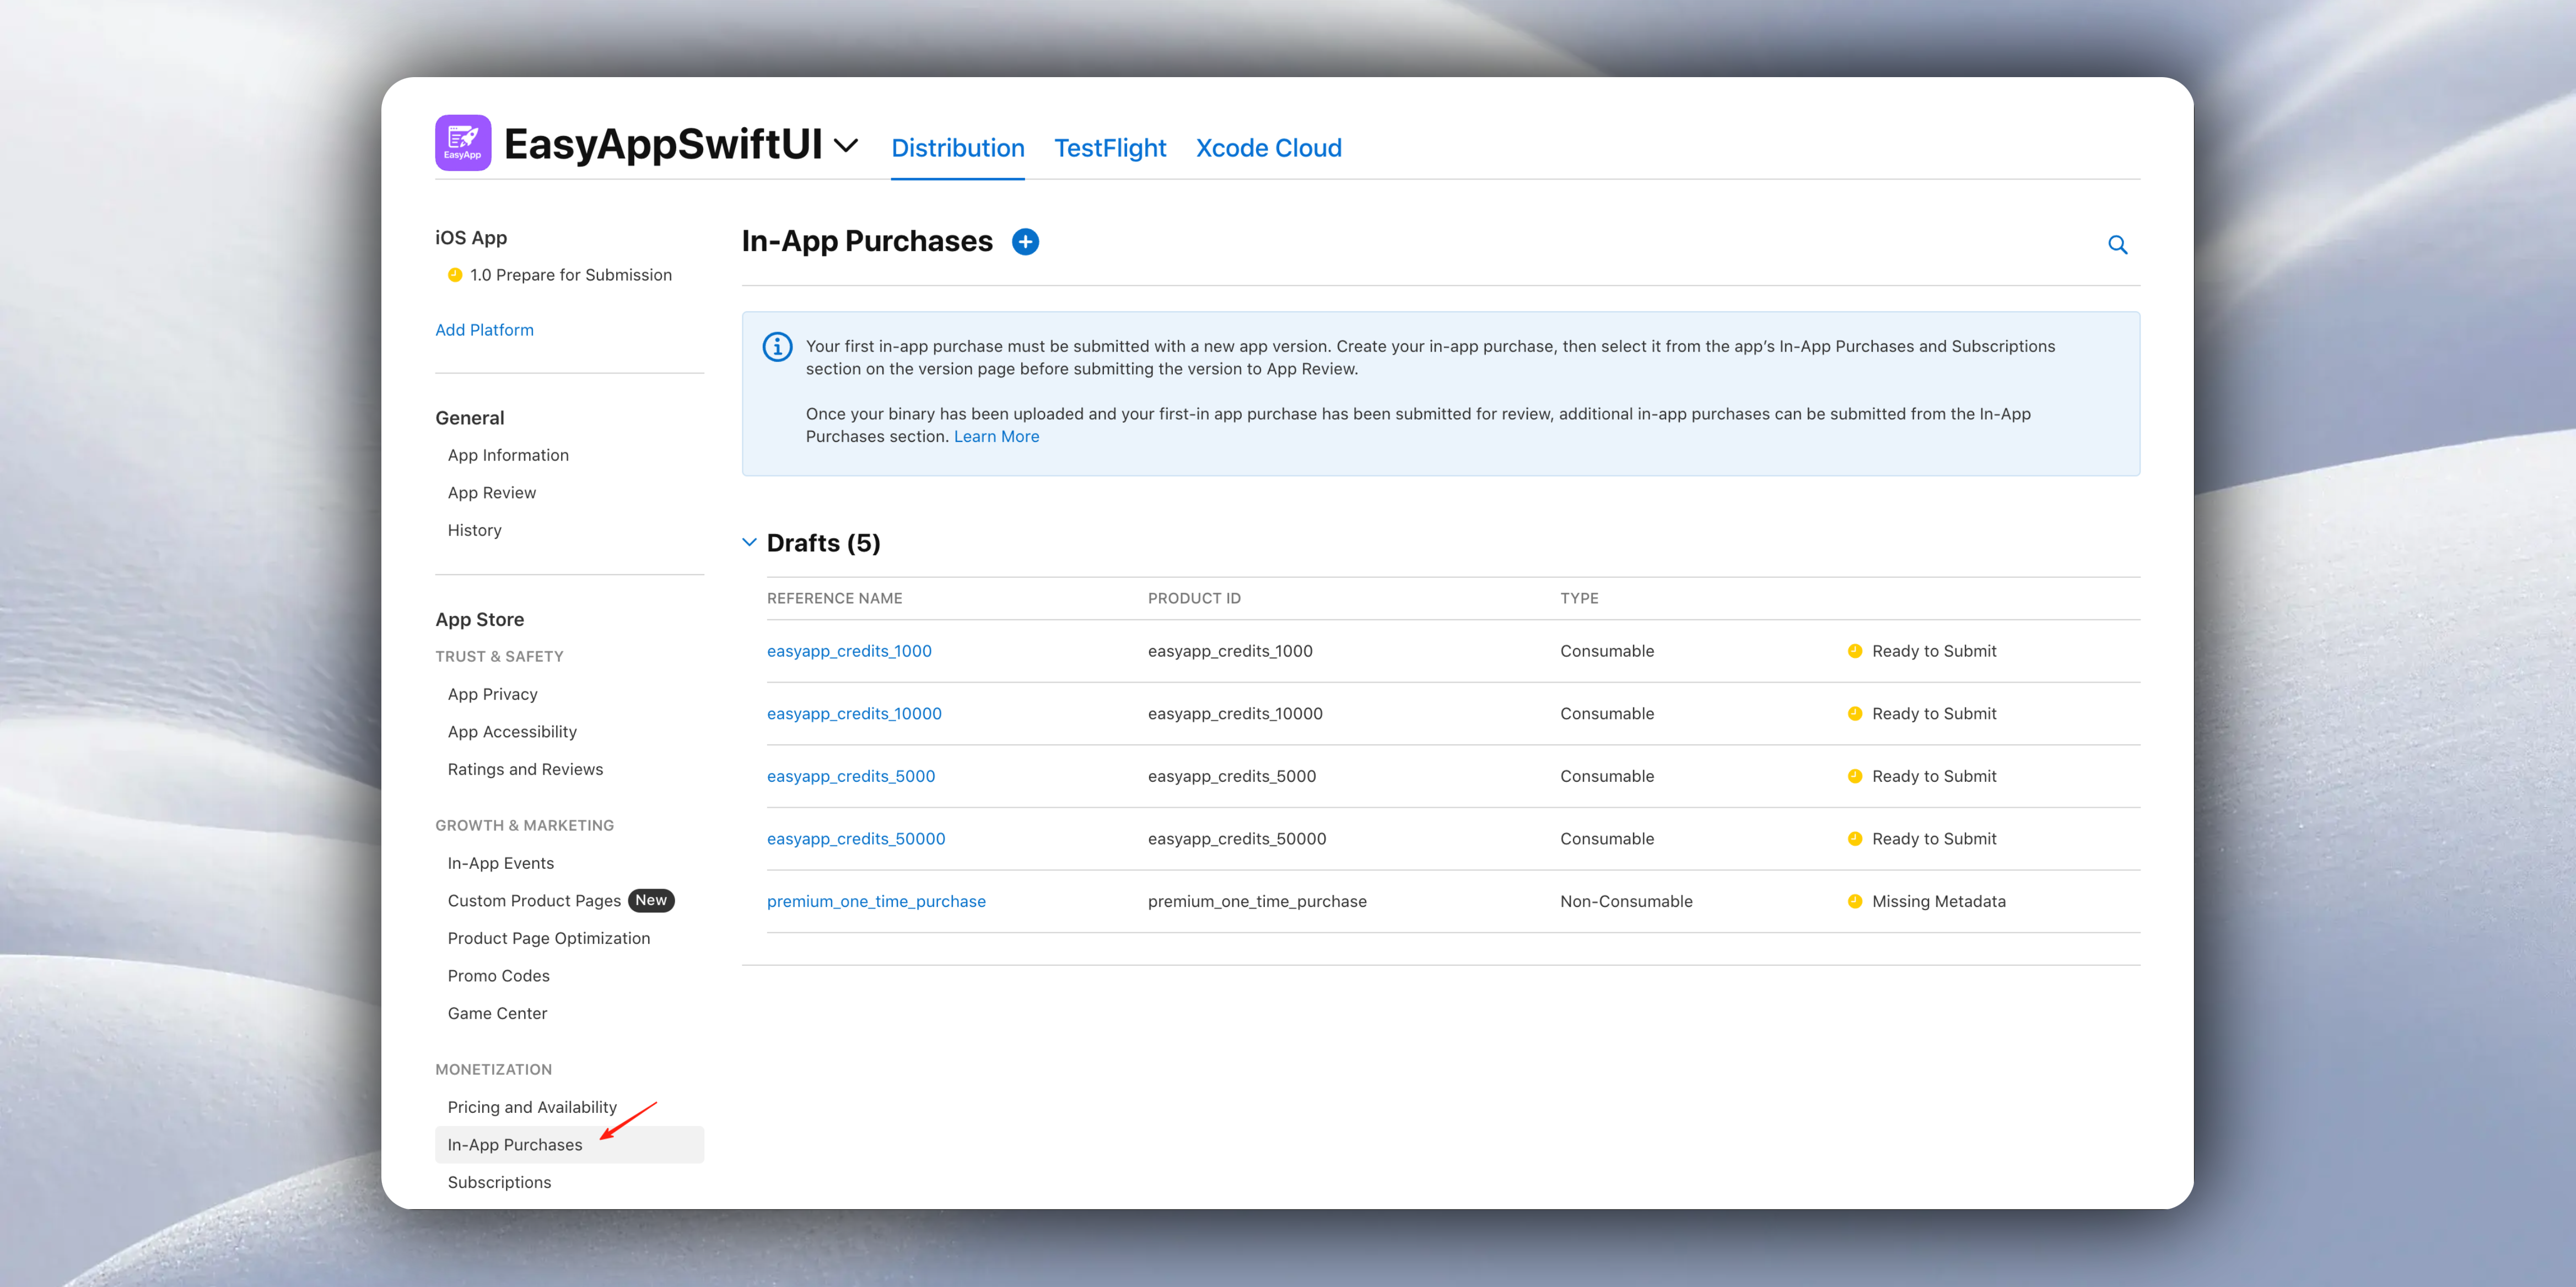
Click `+` to create a one-time credit package product.
Select `Type` as `Consumable`, representing consumable products. (Credits are consumable products)
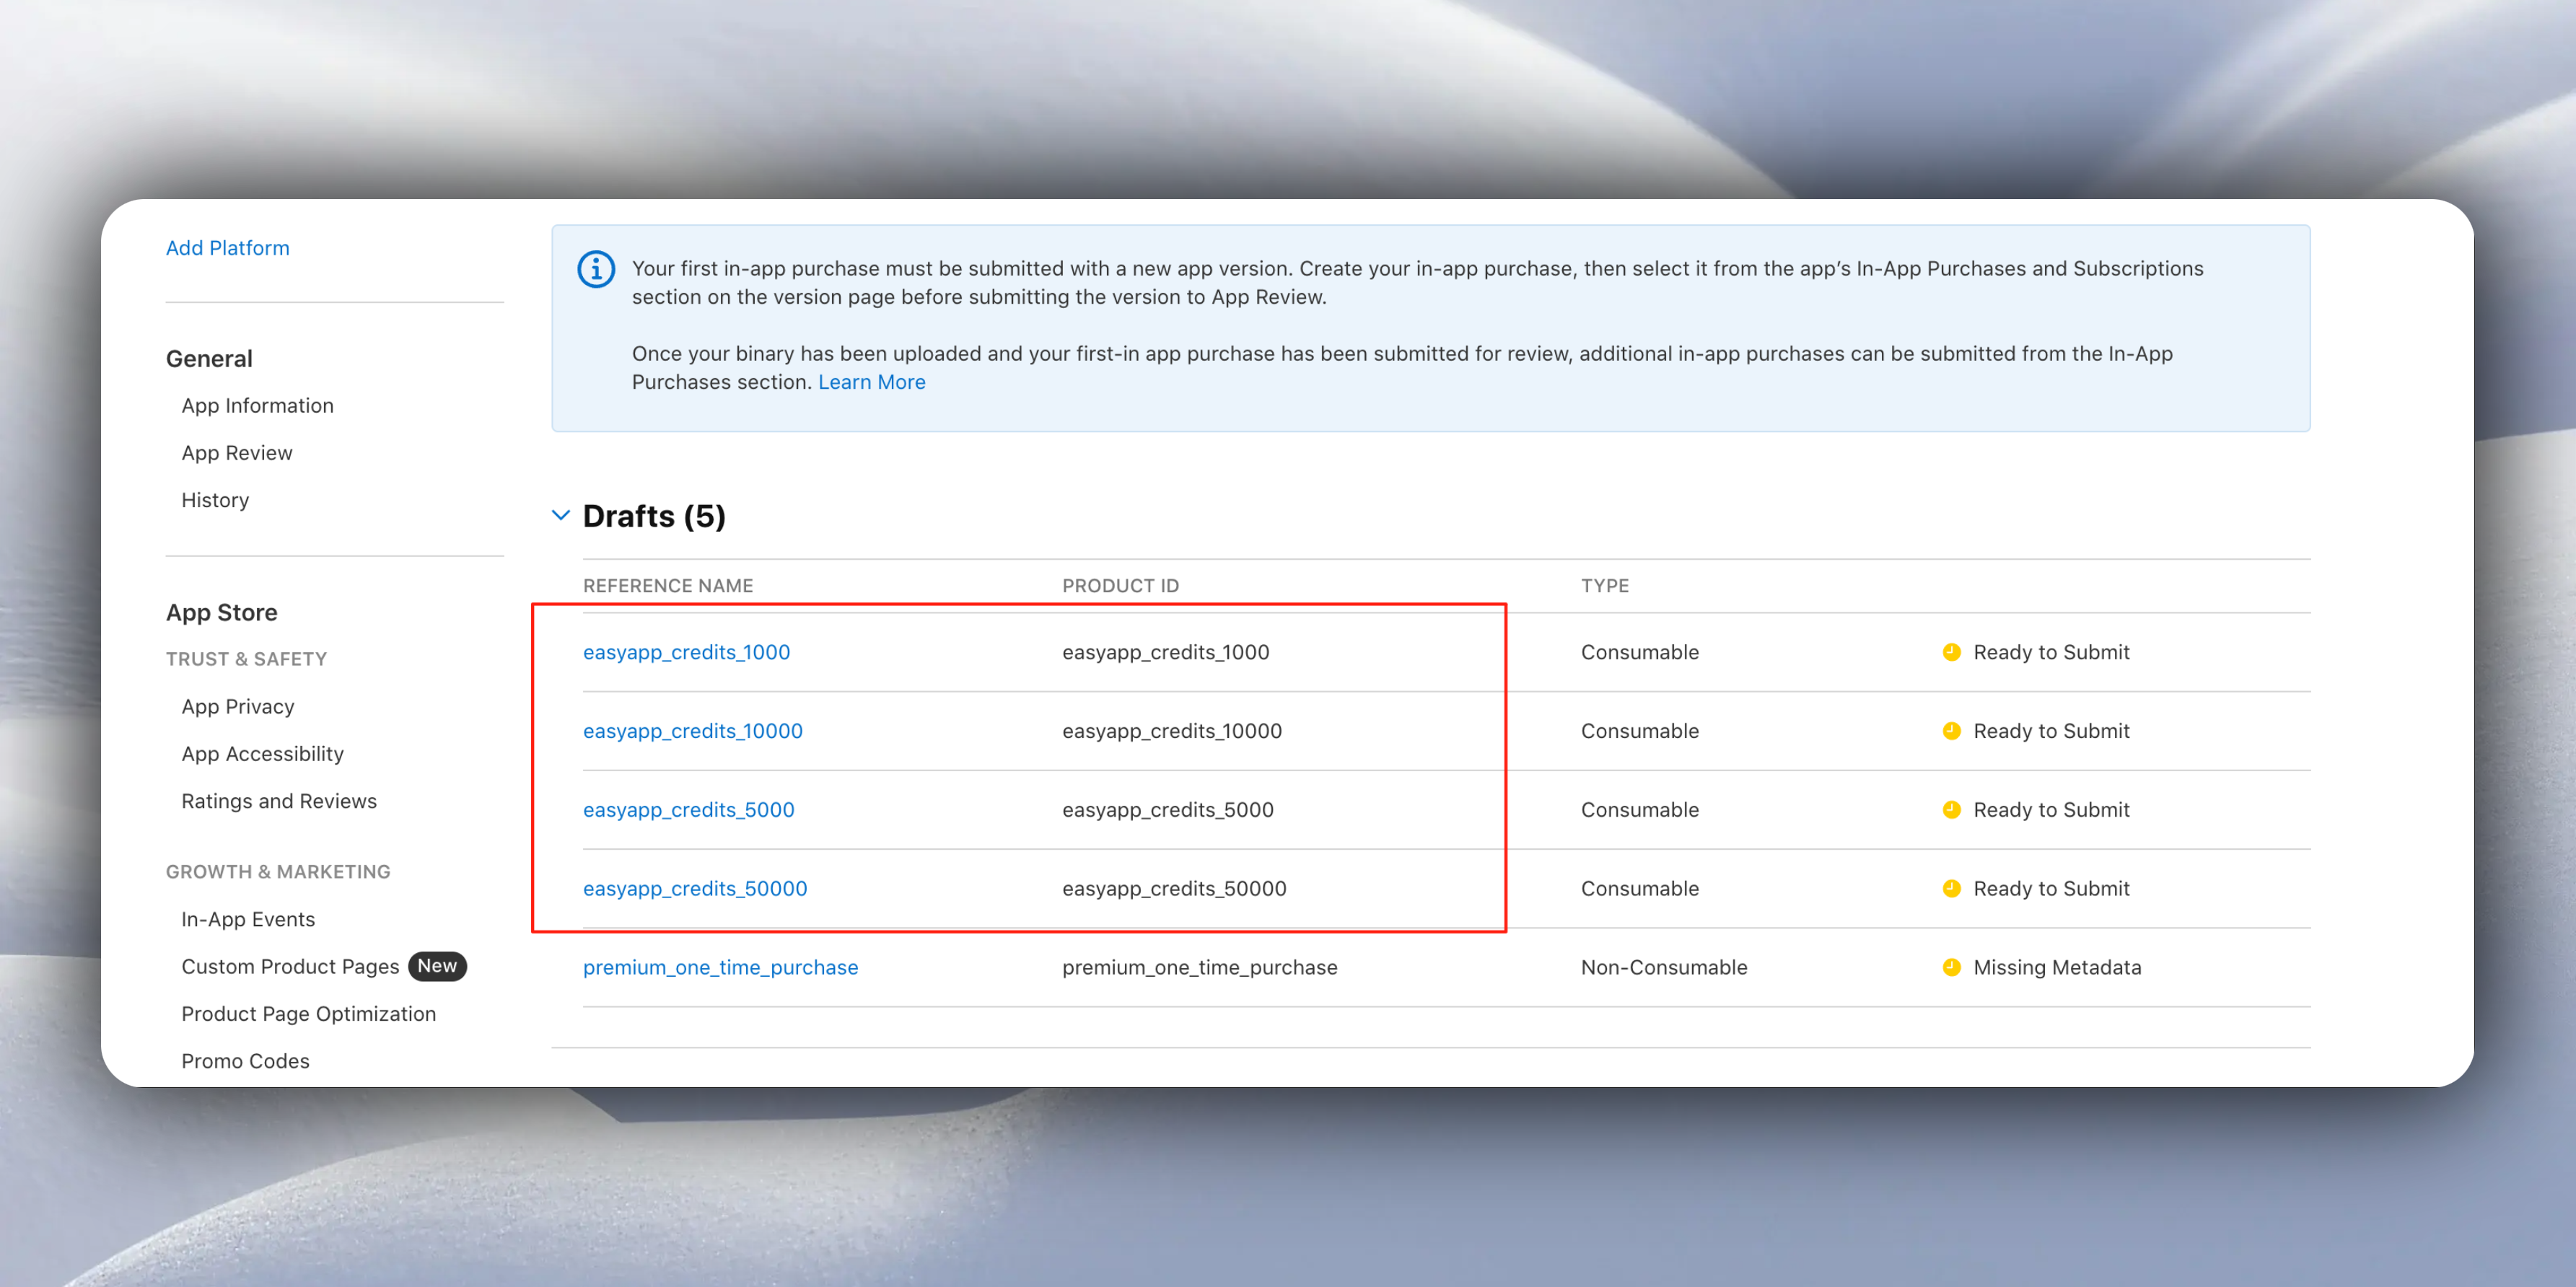
`Reference Name` and `Product ID`: The `Product ID` should match the `product_id` field you defined in the `credit_packages` table. It must be consistent because during purchase, it determines which credit package is being purchased based on `product_id`.
As for `Reference Name`, you can make it the same as `product_id` or different - this is your own definition.
The `Product ID` should match the `product_id` field you defined in the `credit_packages` table. It must be consistent because during purchase, it determines which credit package is being purchased.
When setting the price, also keep it consistent with the `price` field you defined in the `credit_packages` table.
The "Learn how to integrate RevenueCat" chapter provides detailed instructions on how to create in-app purchase products, including: internationalization, sales scope, and required screenshots for review. If you forgot, you can refer back. We won't repeat how to create in-app purchase products here.
} href="/docs/Integrations/RevenueCat#%E5%88%9B%E5%BB%BA%E4%B8%80%E6%AC%A1%E6%80%A7%E8%B4%AD%E4%B9%B0%E7%BB%88%E8%BA%AB%E4%BC%9A%E5%91%98">
Learn how to integrate RevenueCat service
Using `EasyApp` as an example, here's how to fill it out: According to the `credit_packages` table, 4 credit packages were created
2: Next, configure `RevenueCat`
Login to [RevenueCat](https://app.revenuecat.com/)
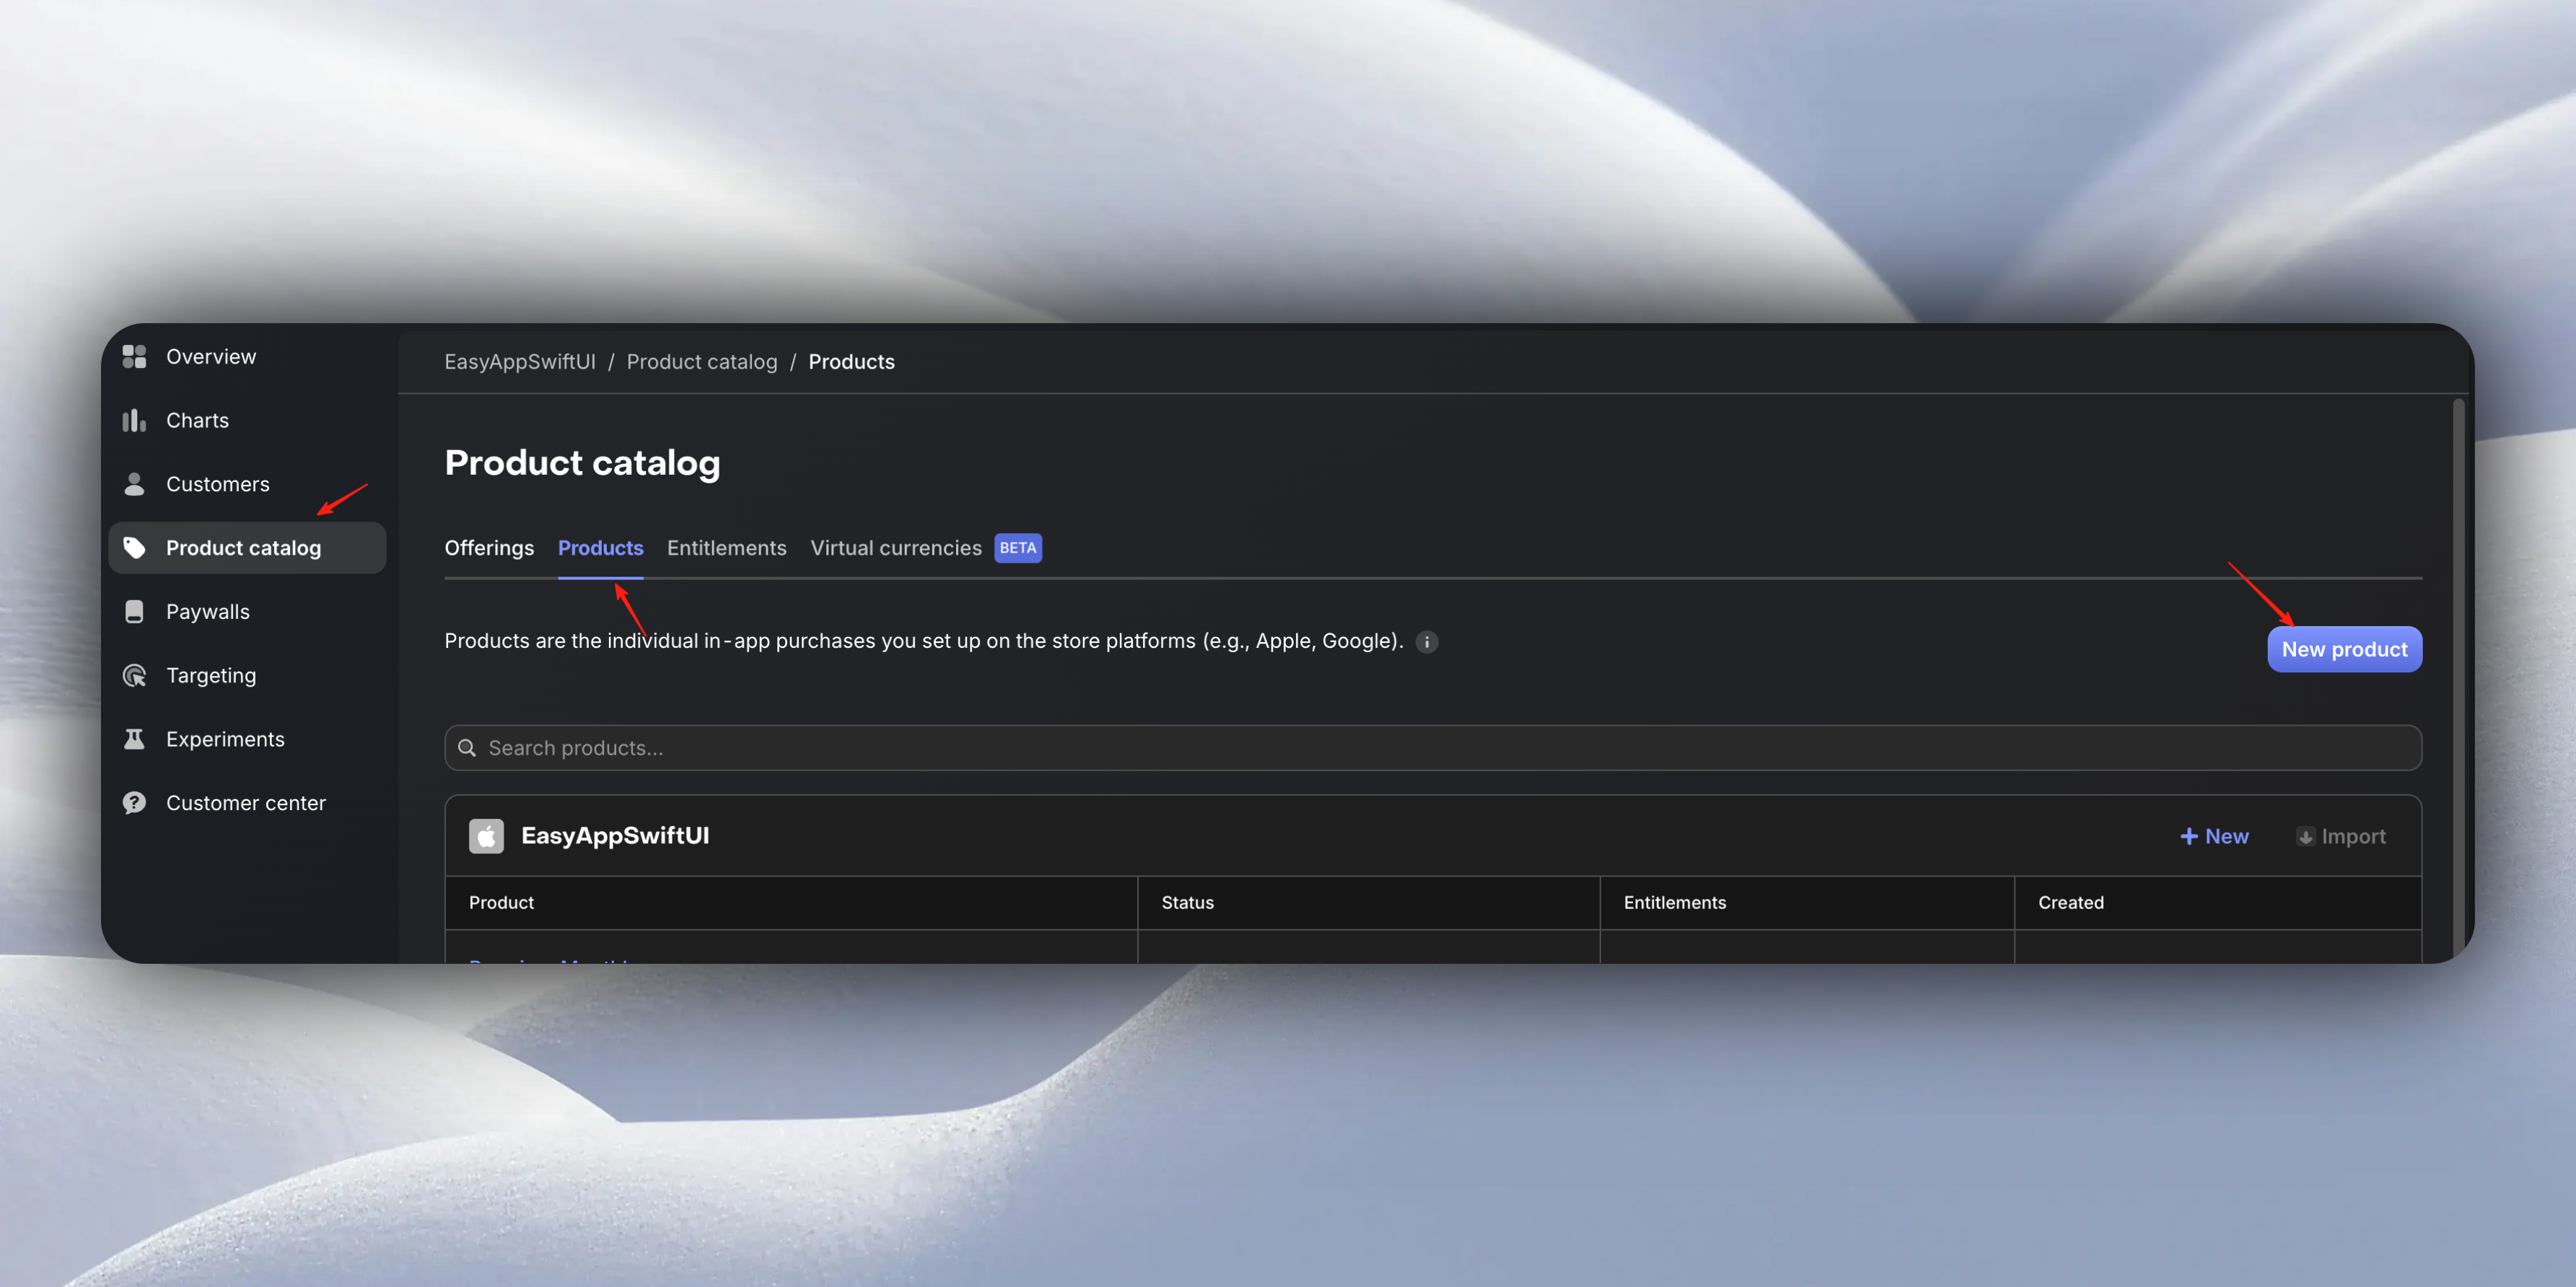
* Select `Product catalog`
* Select `Product`
* Select `New Product`
* Click `New Product`
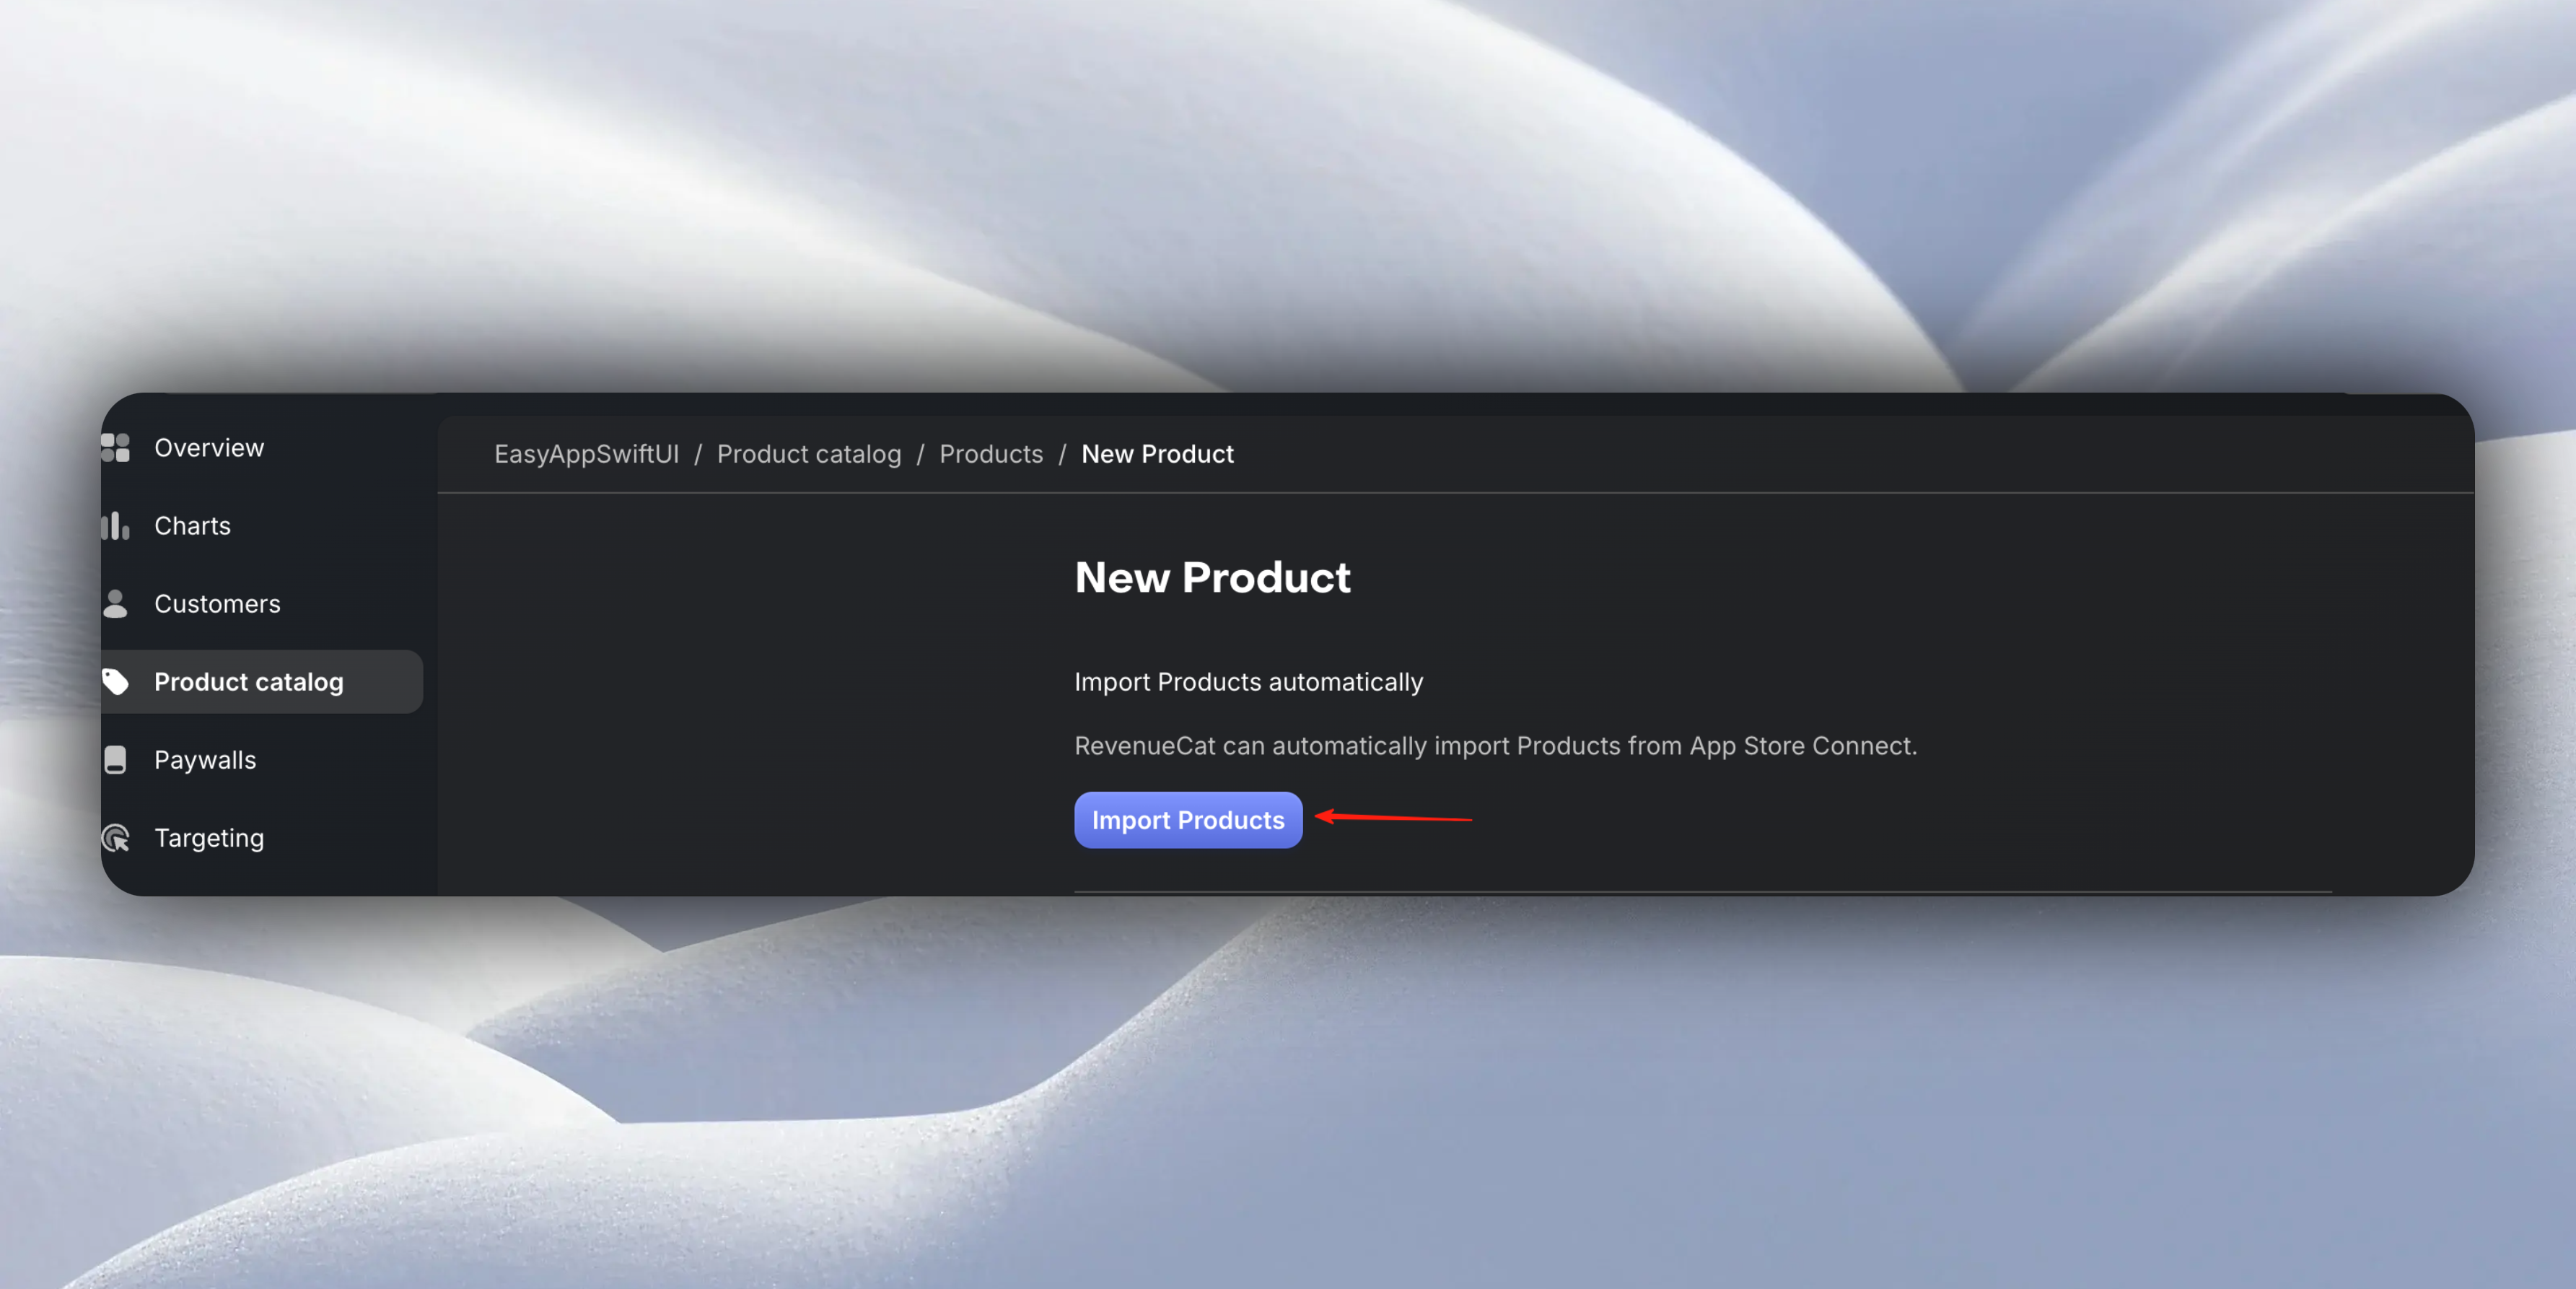
It will automatically pull the in-app purchase products you just created. Select your desired credit packages.
After importing the in-app purchase products, we need to configure `Offerings`. EasyApp will pull credit packages based on `Offerings`.

Click `New Offering`
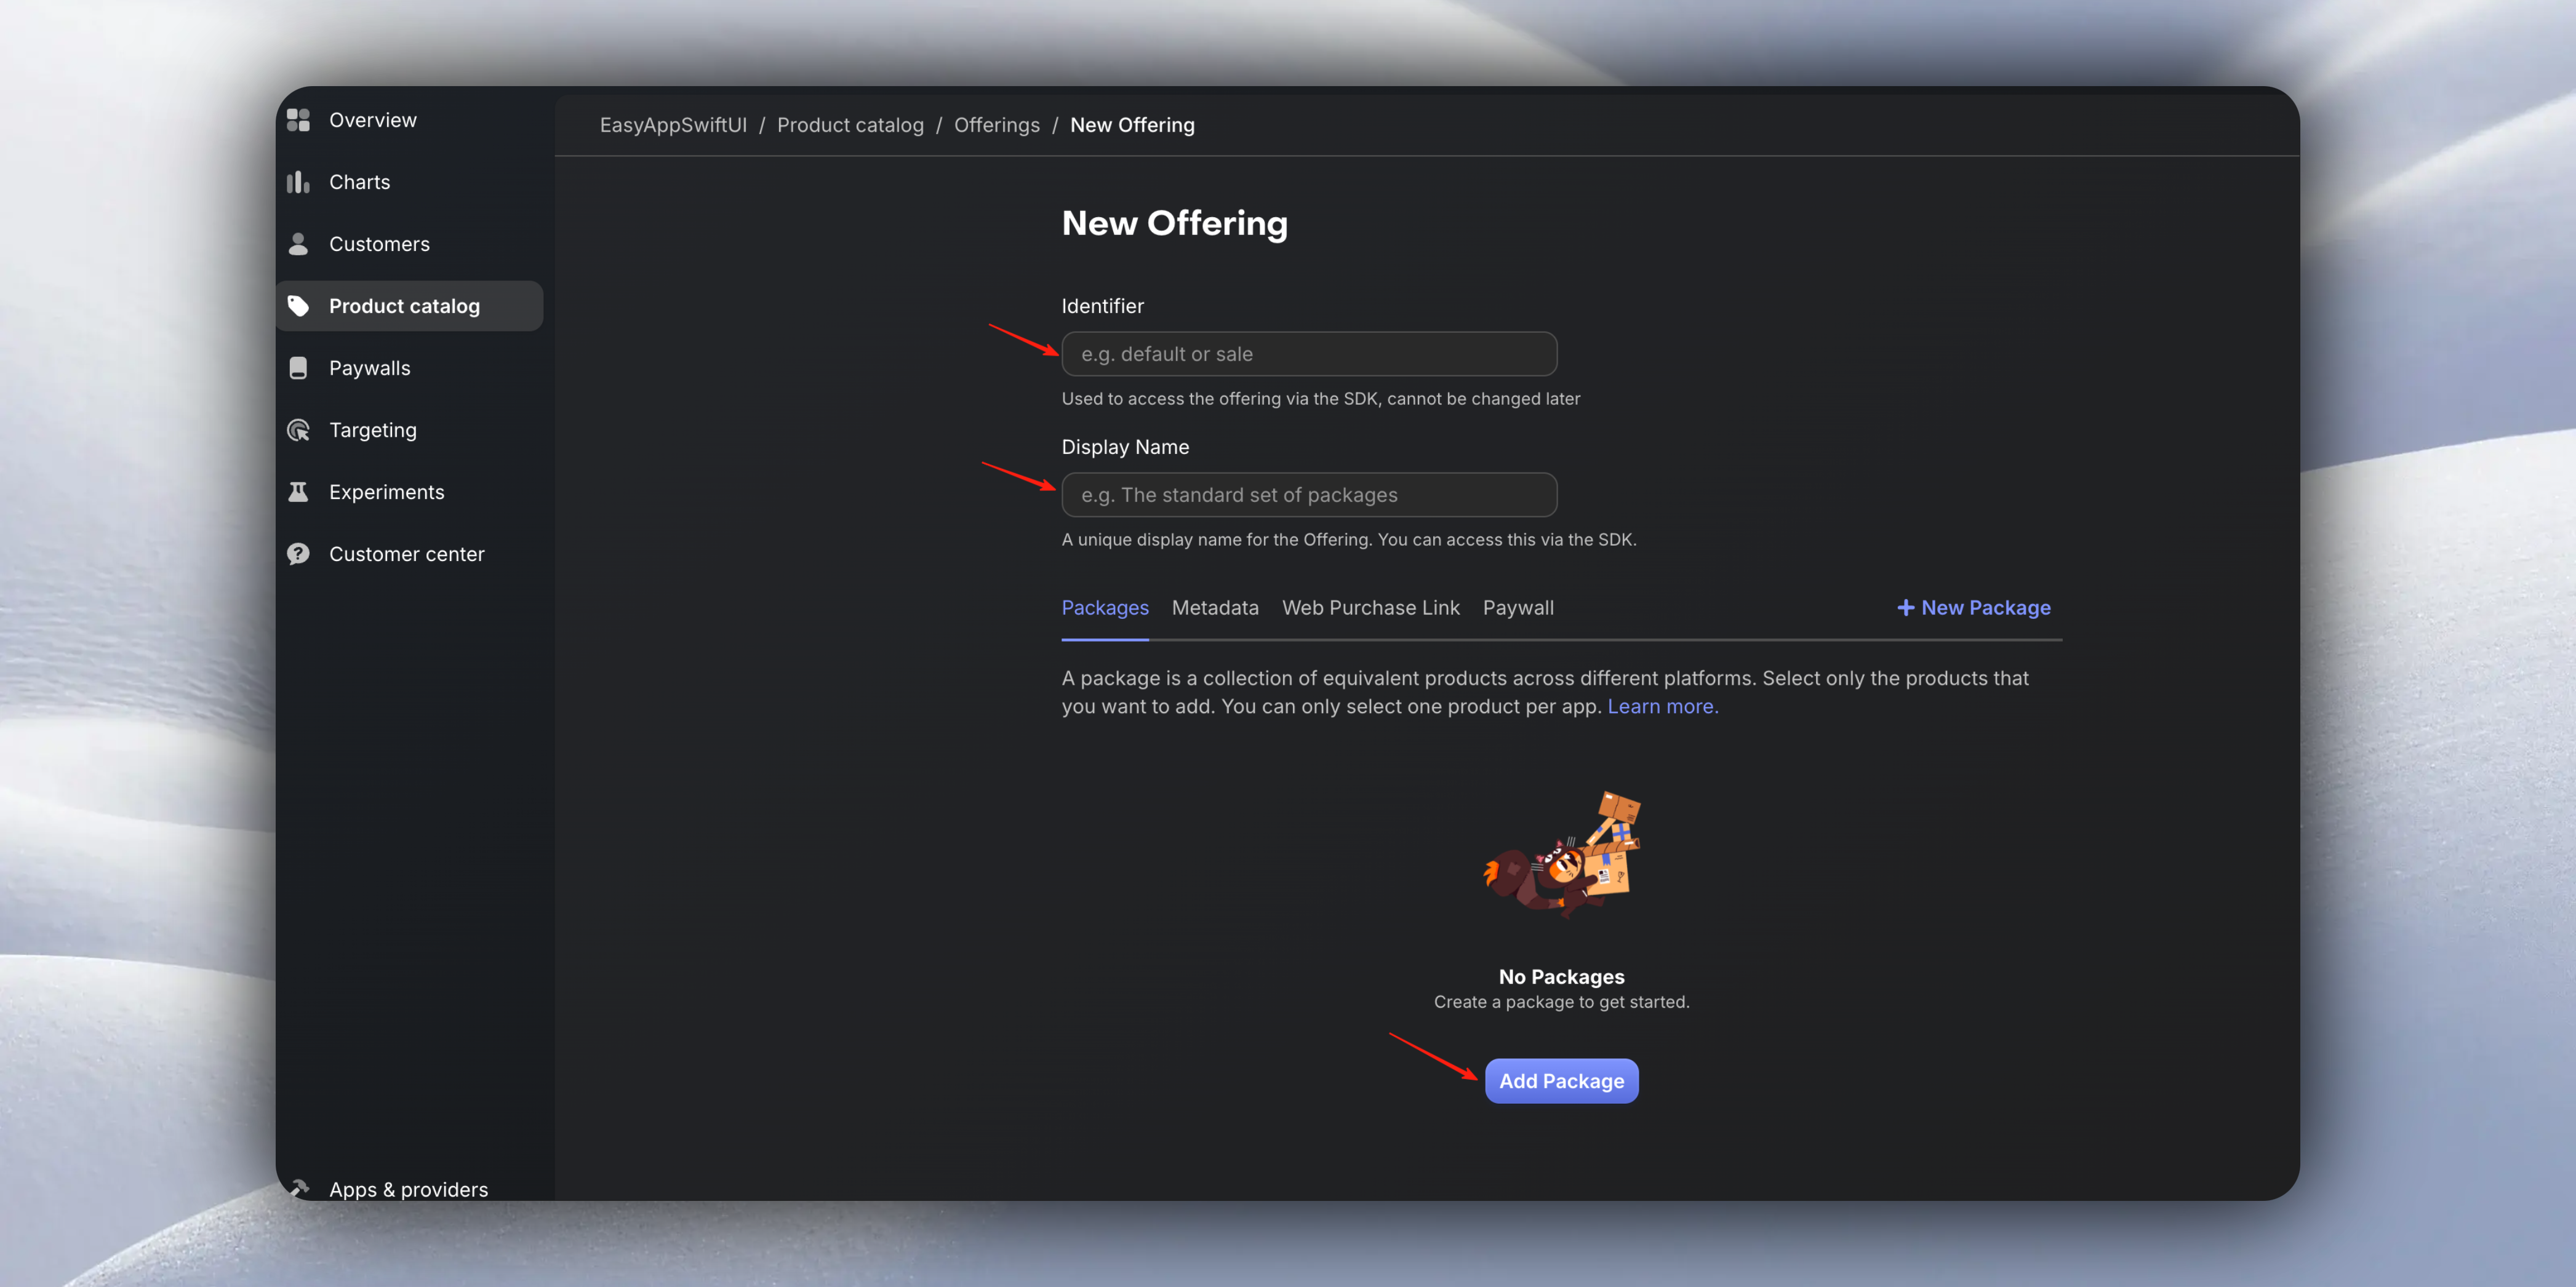
* Fill in your `Identifier`, `Display Name`, and `Packages`.
For `Packages` `Identifier`, you can choose `Custom`, and for `Product`, select the in-app purchase products you just imported.
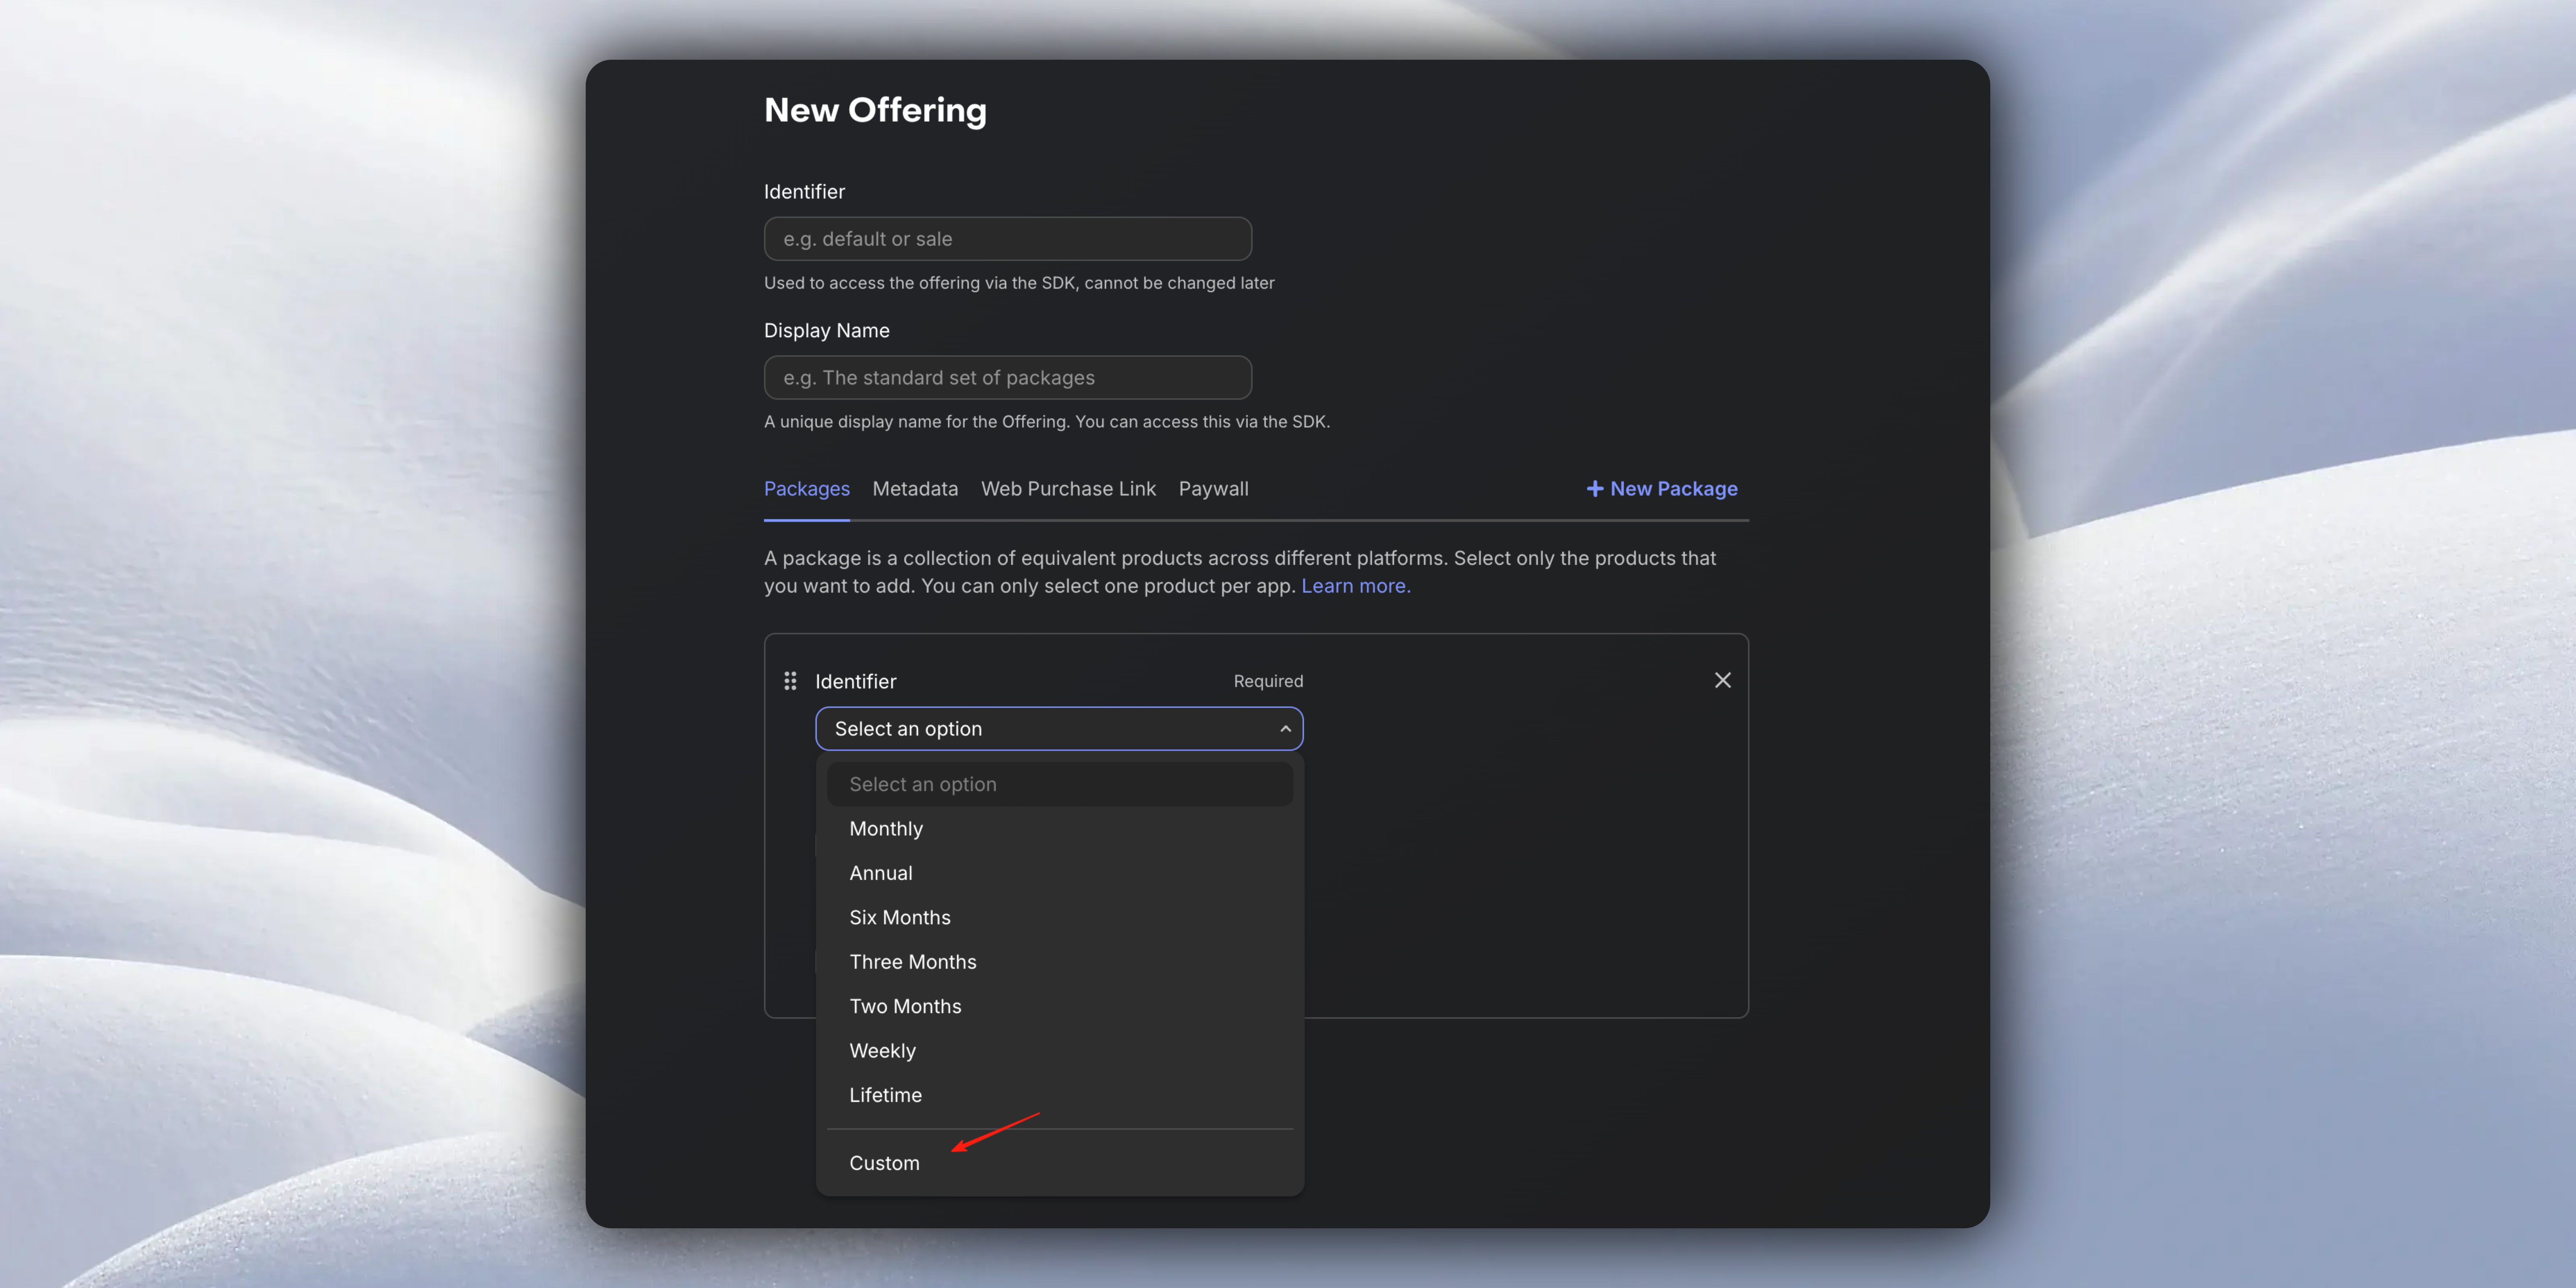
Using `EasyApp` as an example, fill it out as follows:
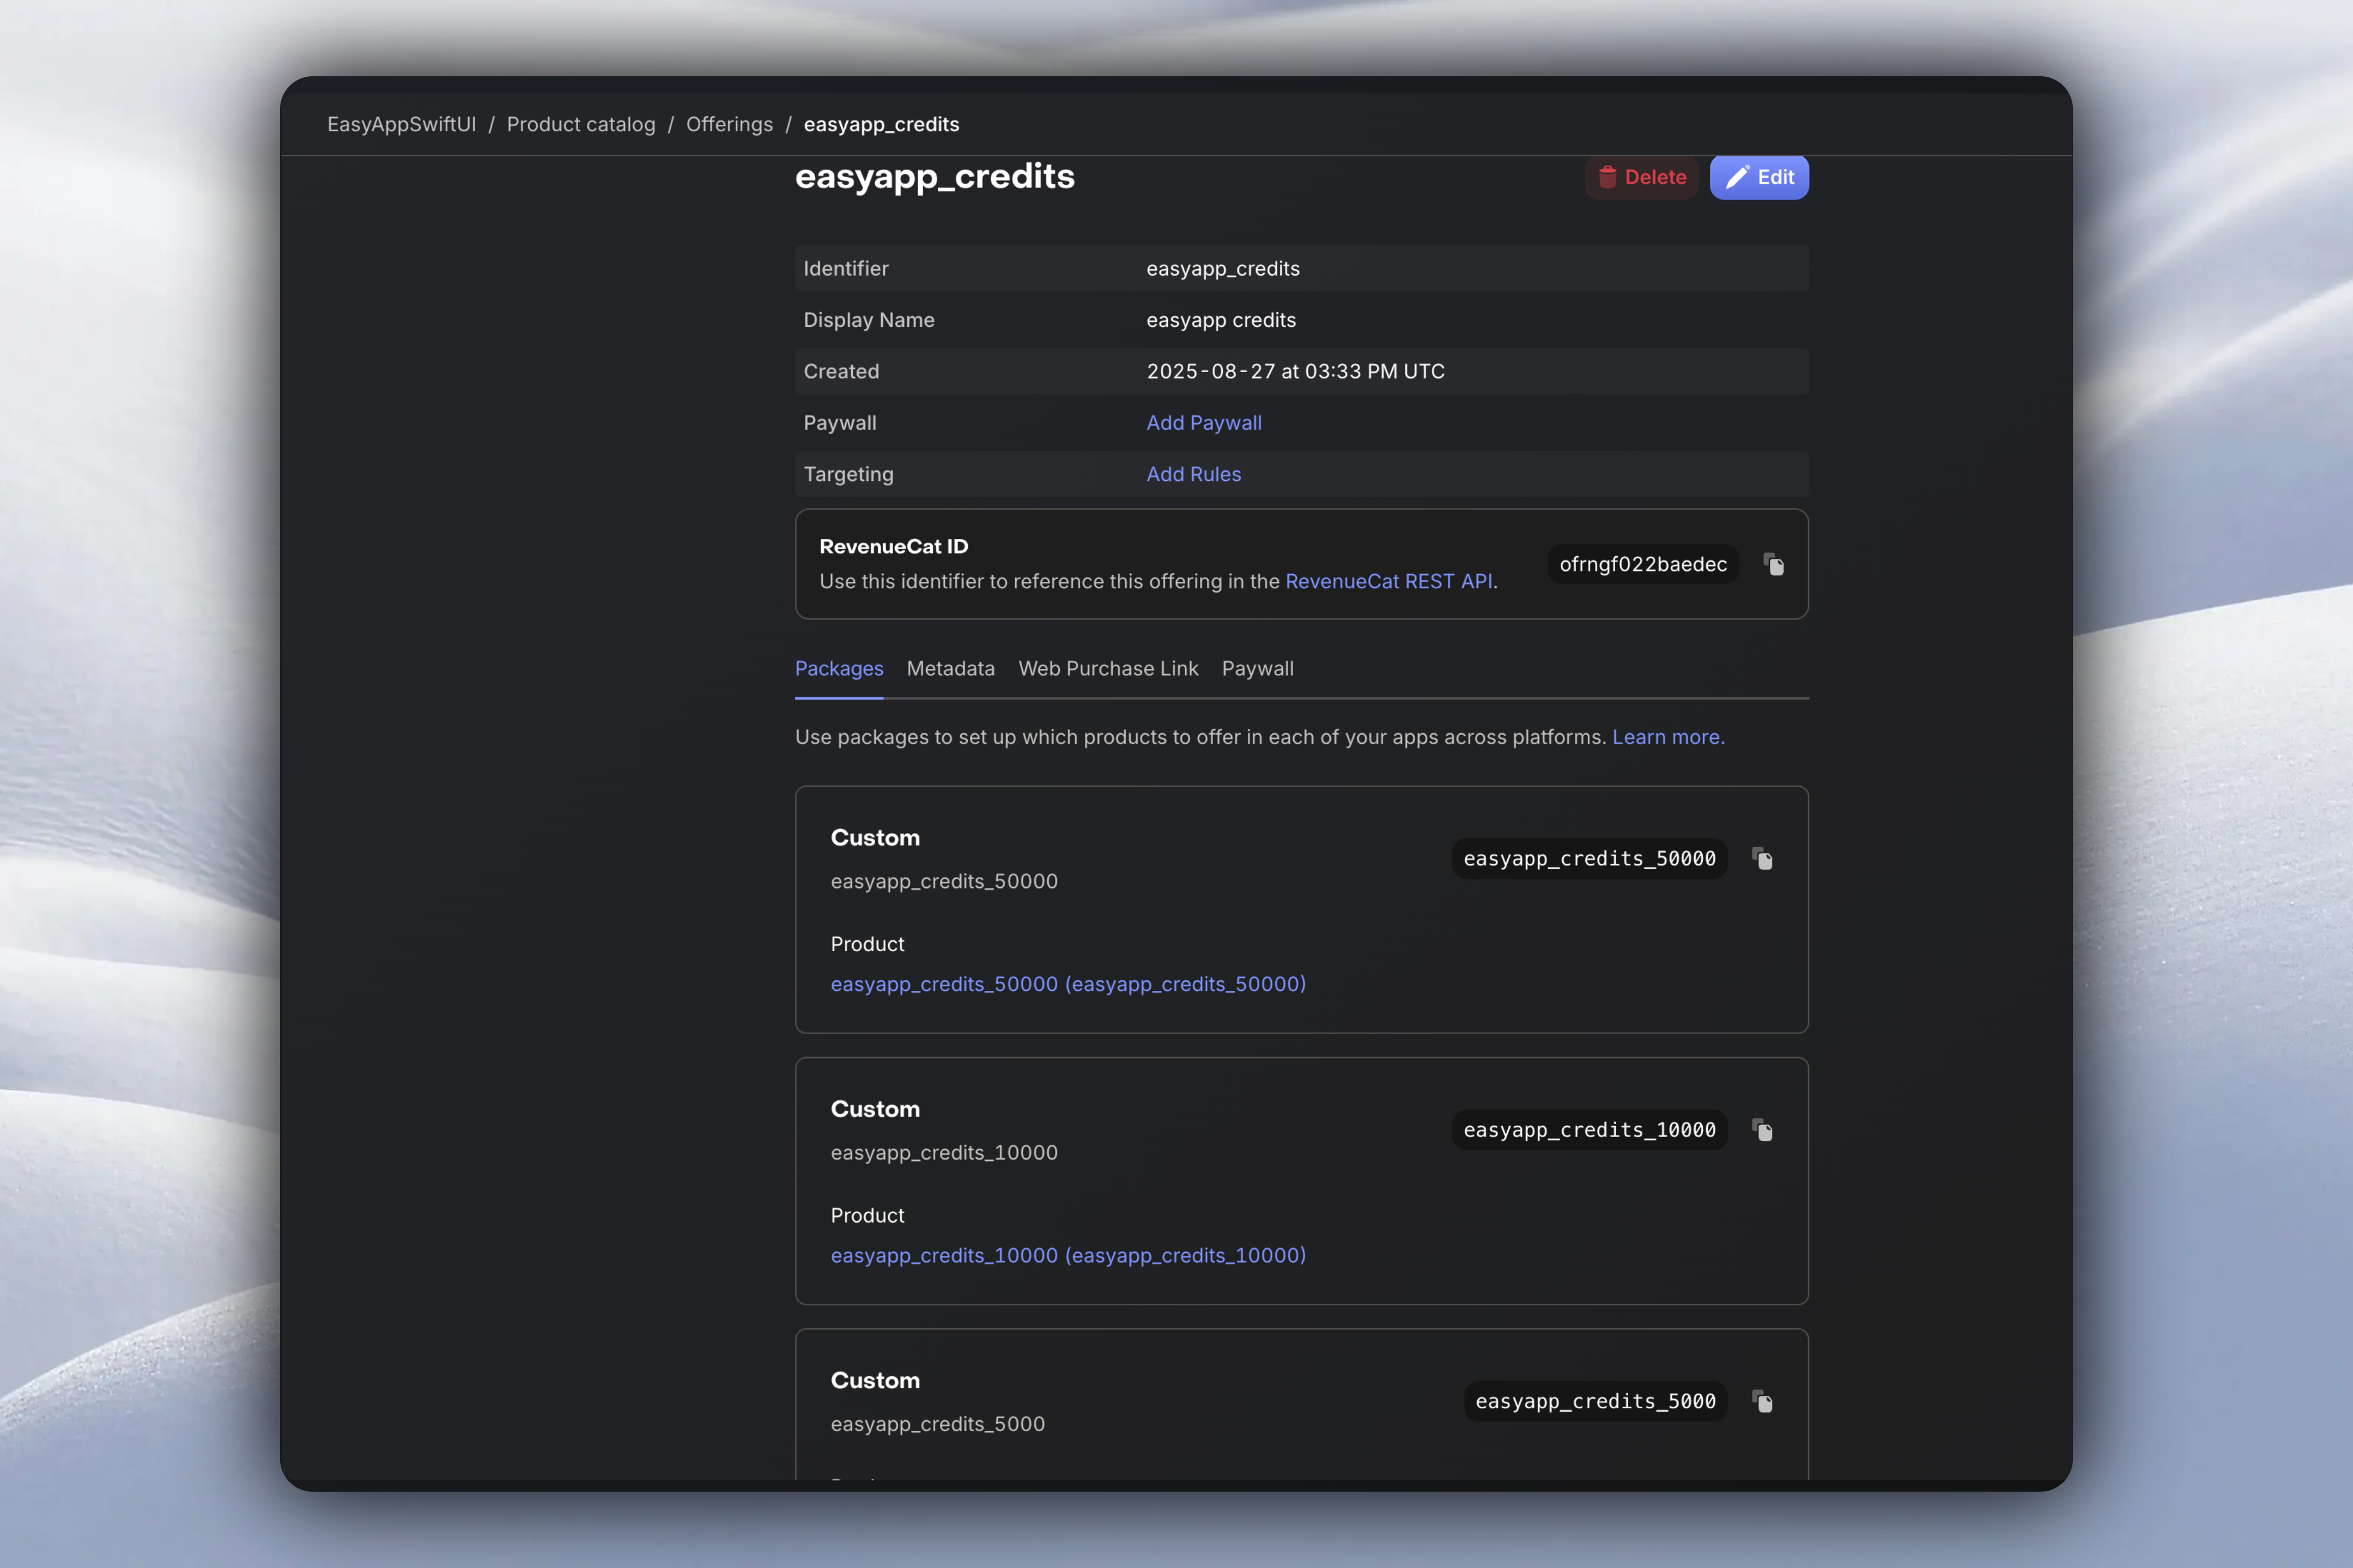
Again emphasizing:
The `Product ID` should match the `product_id` field you defined in the `credit_packages` table. It must be consistent because during purchase, it determines which credit package is being purchased.
When setting the price, also keep it consistent with the `price` field you defined in the `credit_packages` table.
3: Go to the `EasyAppSwiftUI` project, and in the `Constants/Constants.swift` file, configure the `creditPackagesEntitlementID` value for `RevenueCat`.
```swift
enum RevenueCat {
// ...
/// Credit Packages entitlement ID
static let creditPackagesEntitlementID = "easyapp_credits"
// ...
}
```
At this point, the credit package configuration is completely finished.
##### Subscriptions
* RevenueCat Product ID → `subscription_products.product_id`
* Used for monthly/yearly subscription services
* Automatically distribute credits based on subscription cycle
The steps for subscription products are the same as credit packages, except you're configuring subscription products.
For the remaining steps, please refer to the article below
Fill in the subscription product's price, id, name, and subscription duration. This section is covered in detail in RevenueCat subscription product creation, please check.
} href="/docs/Integrations/RevenueCat#%E5%88%9B%E5%BB%BA%E6%9C%88%E5%BA%A6%E8%AE%A2%E9%98%85">
Learn about RevenueCat subscription product creation
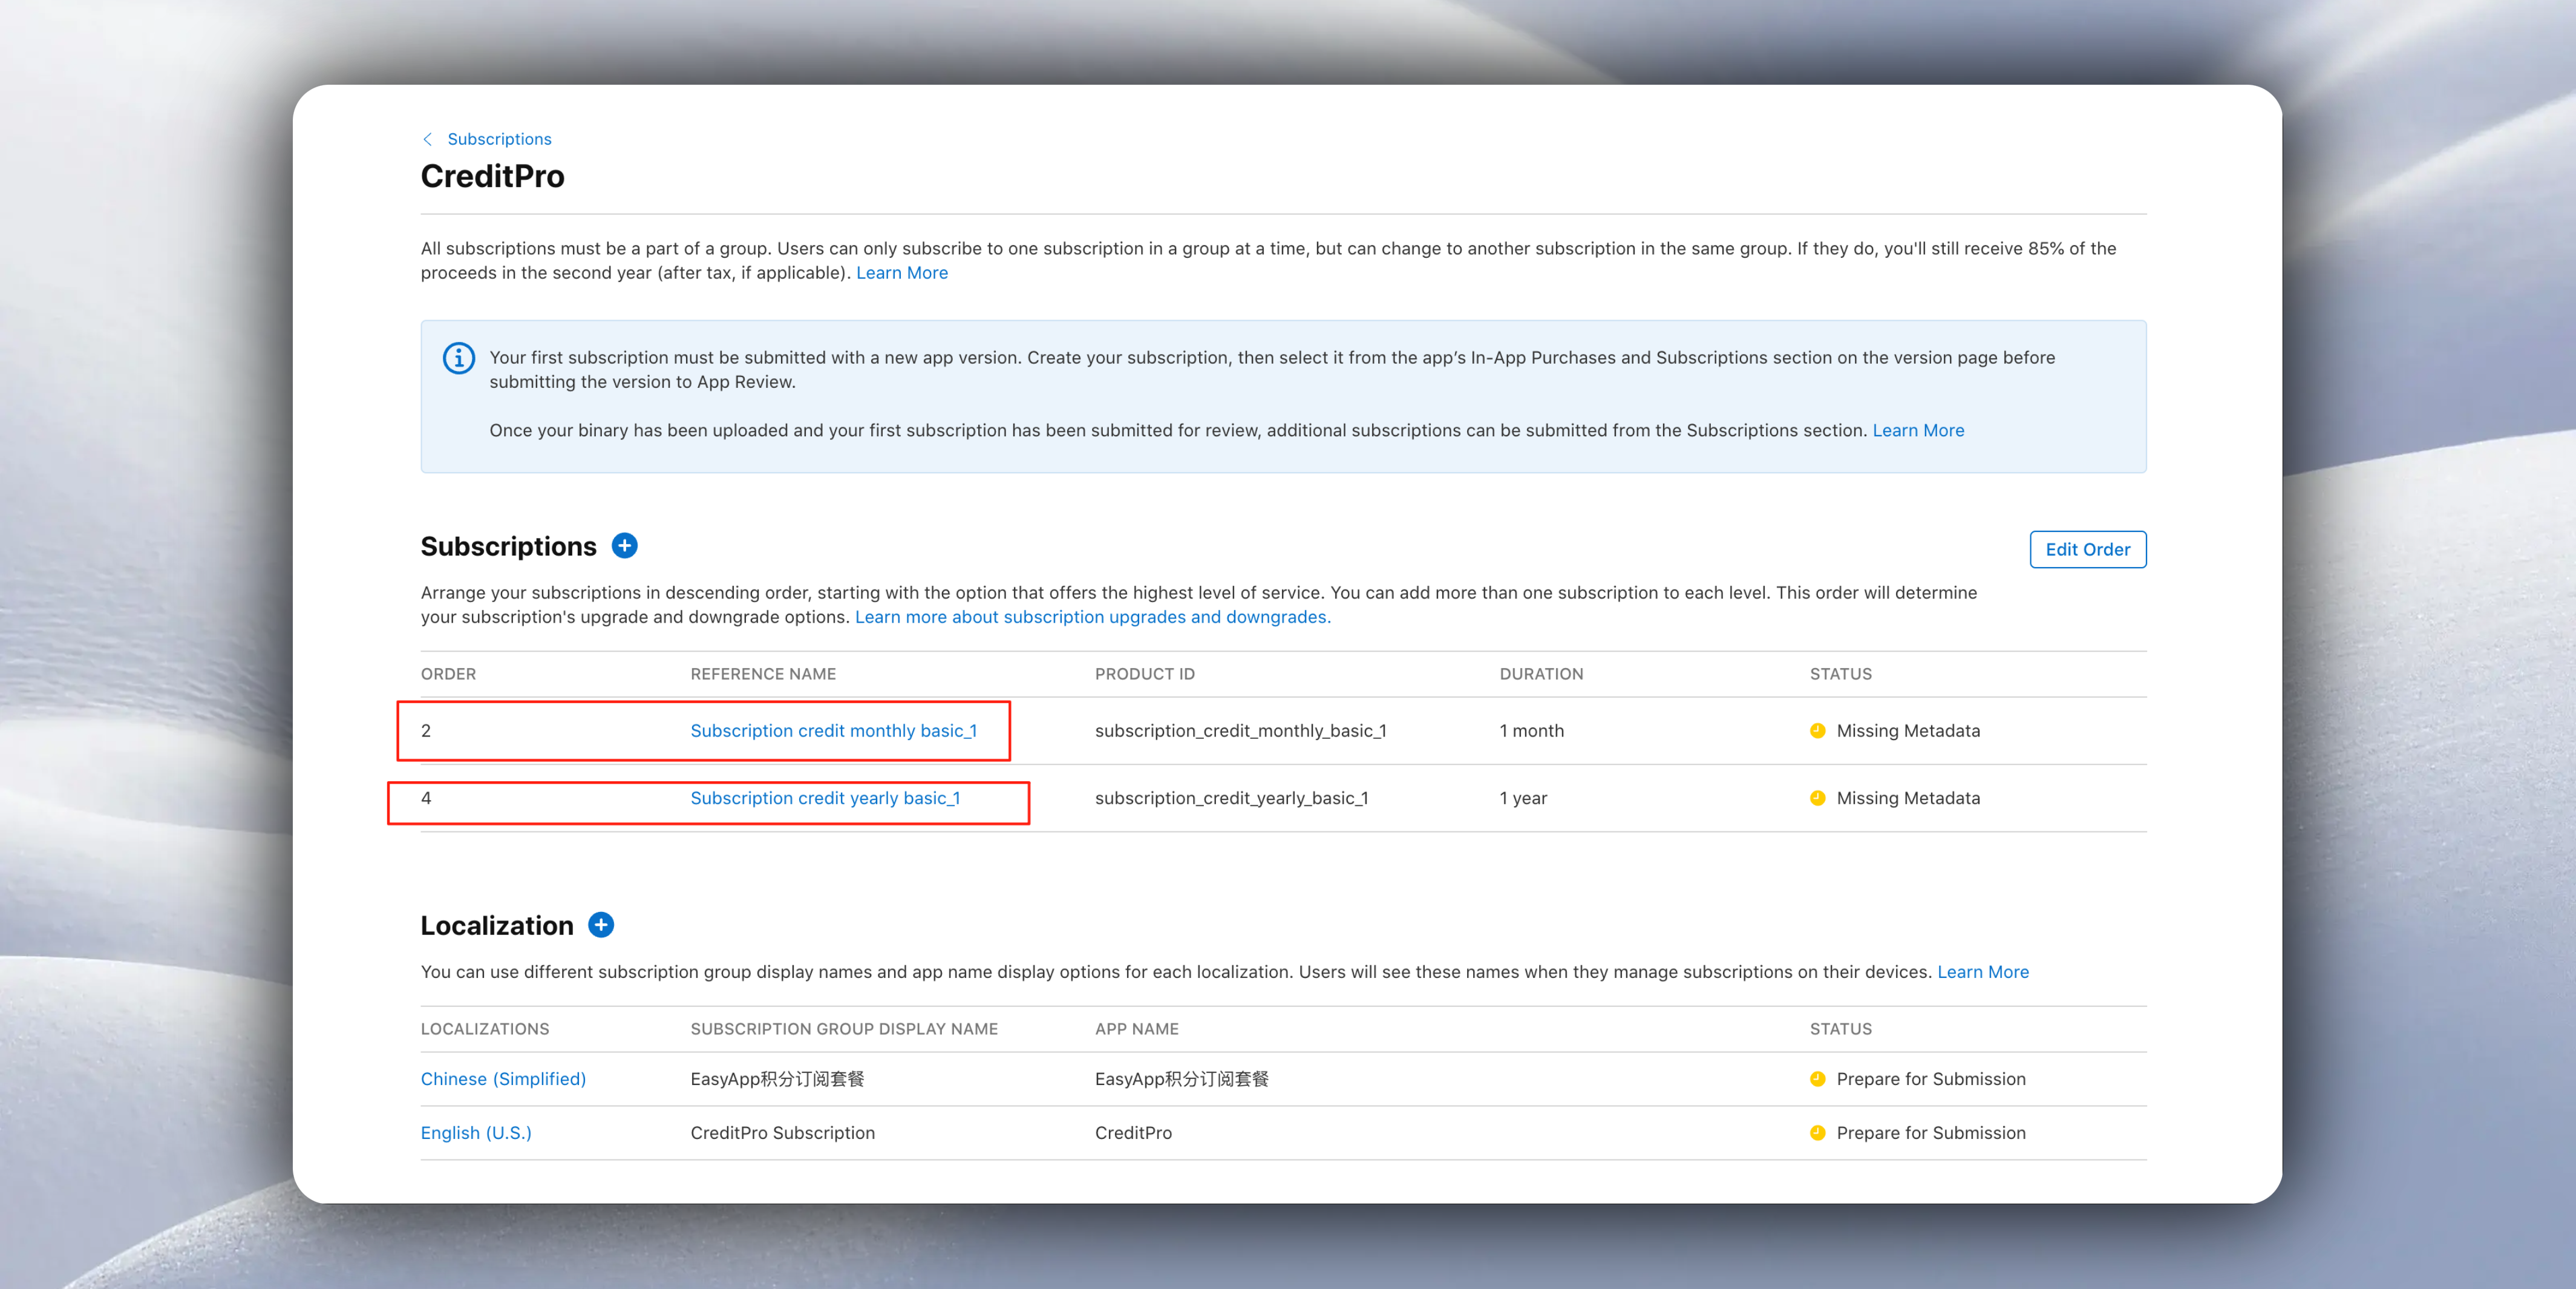
Using `EasyApp` as an example, our created subscription product information is as follows:
1: After creating the subscription in App Store Connect, return to RevenueCat to configure `Offerings`.
2: In the steps above for creating credit packages, we've already detailed how to configure `Offerings`. We won't repeat it here.
3: For subscription products, in addition to creating `Offerings`, we also need to create `Entitlements`.
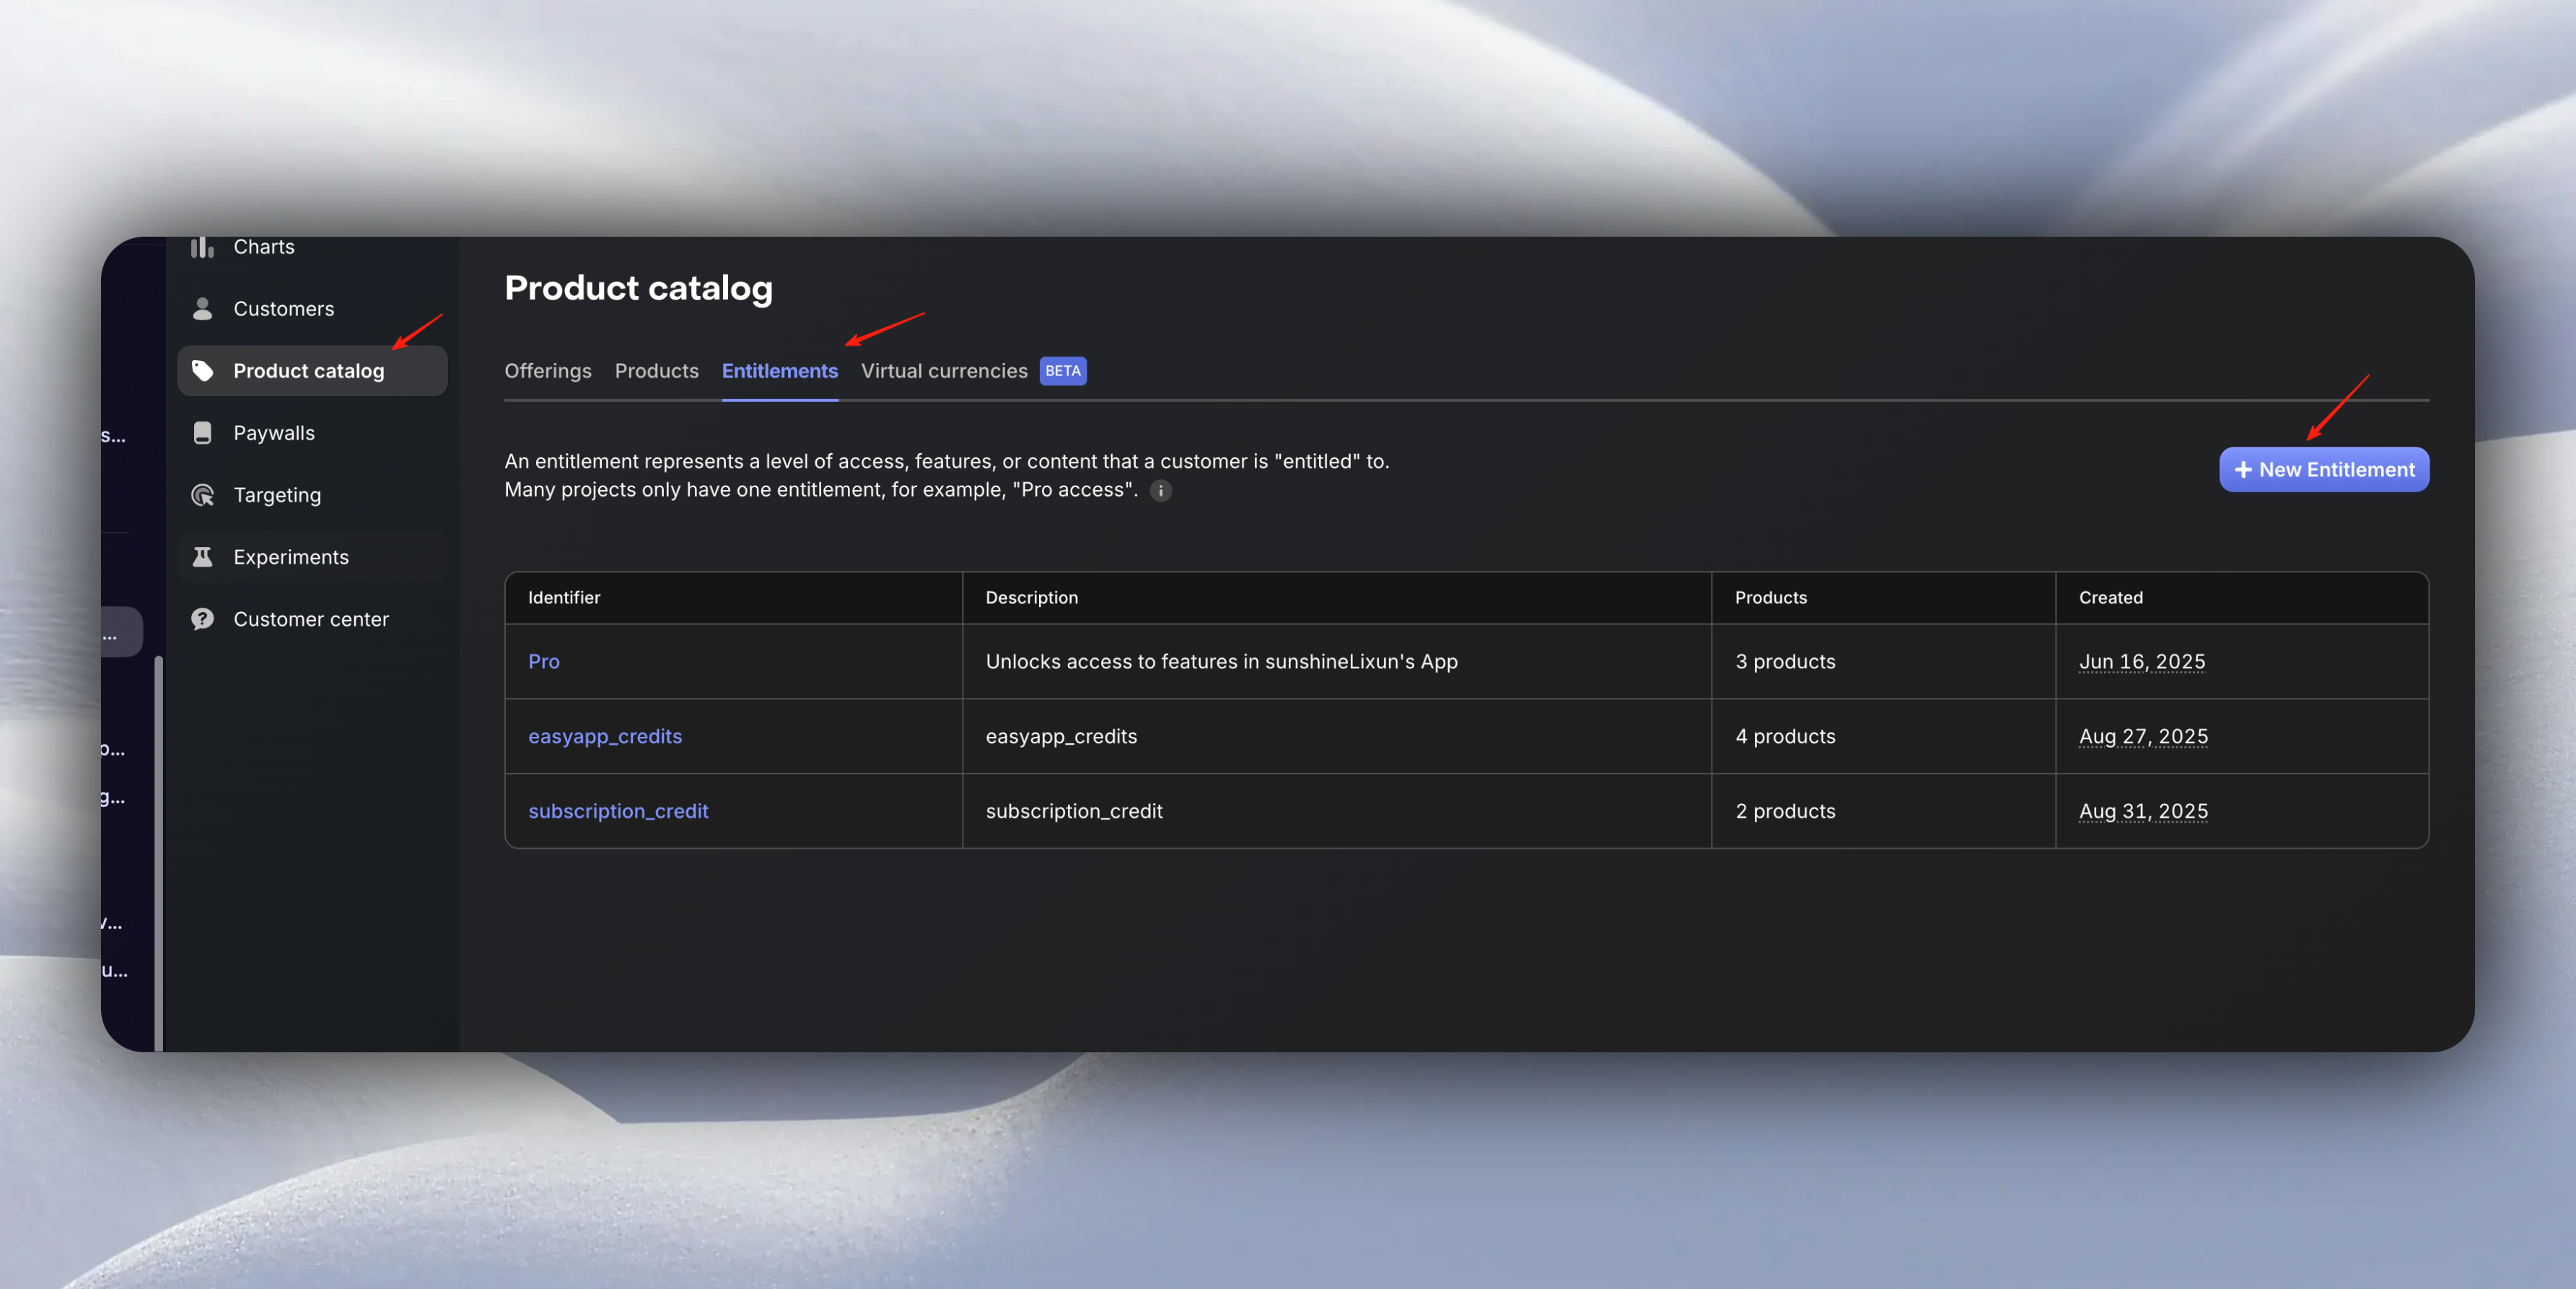
* Fill in `Identifier`
* Fill in `Description`
* Associate with the subscription products you created in App Store Connect
Using `EasyApp` as an example, the created `Entitlements` are filled out as follows:
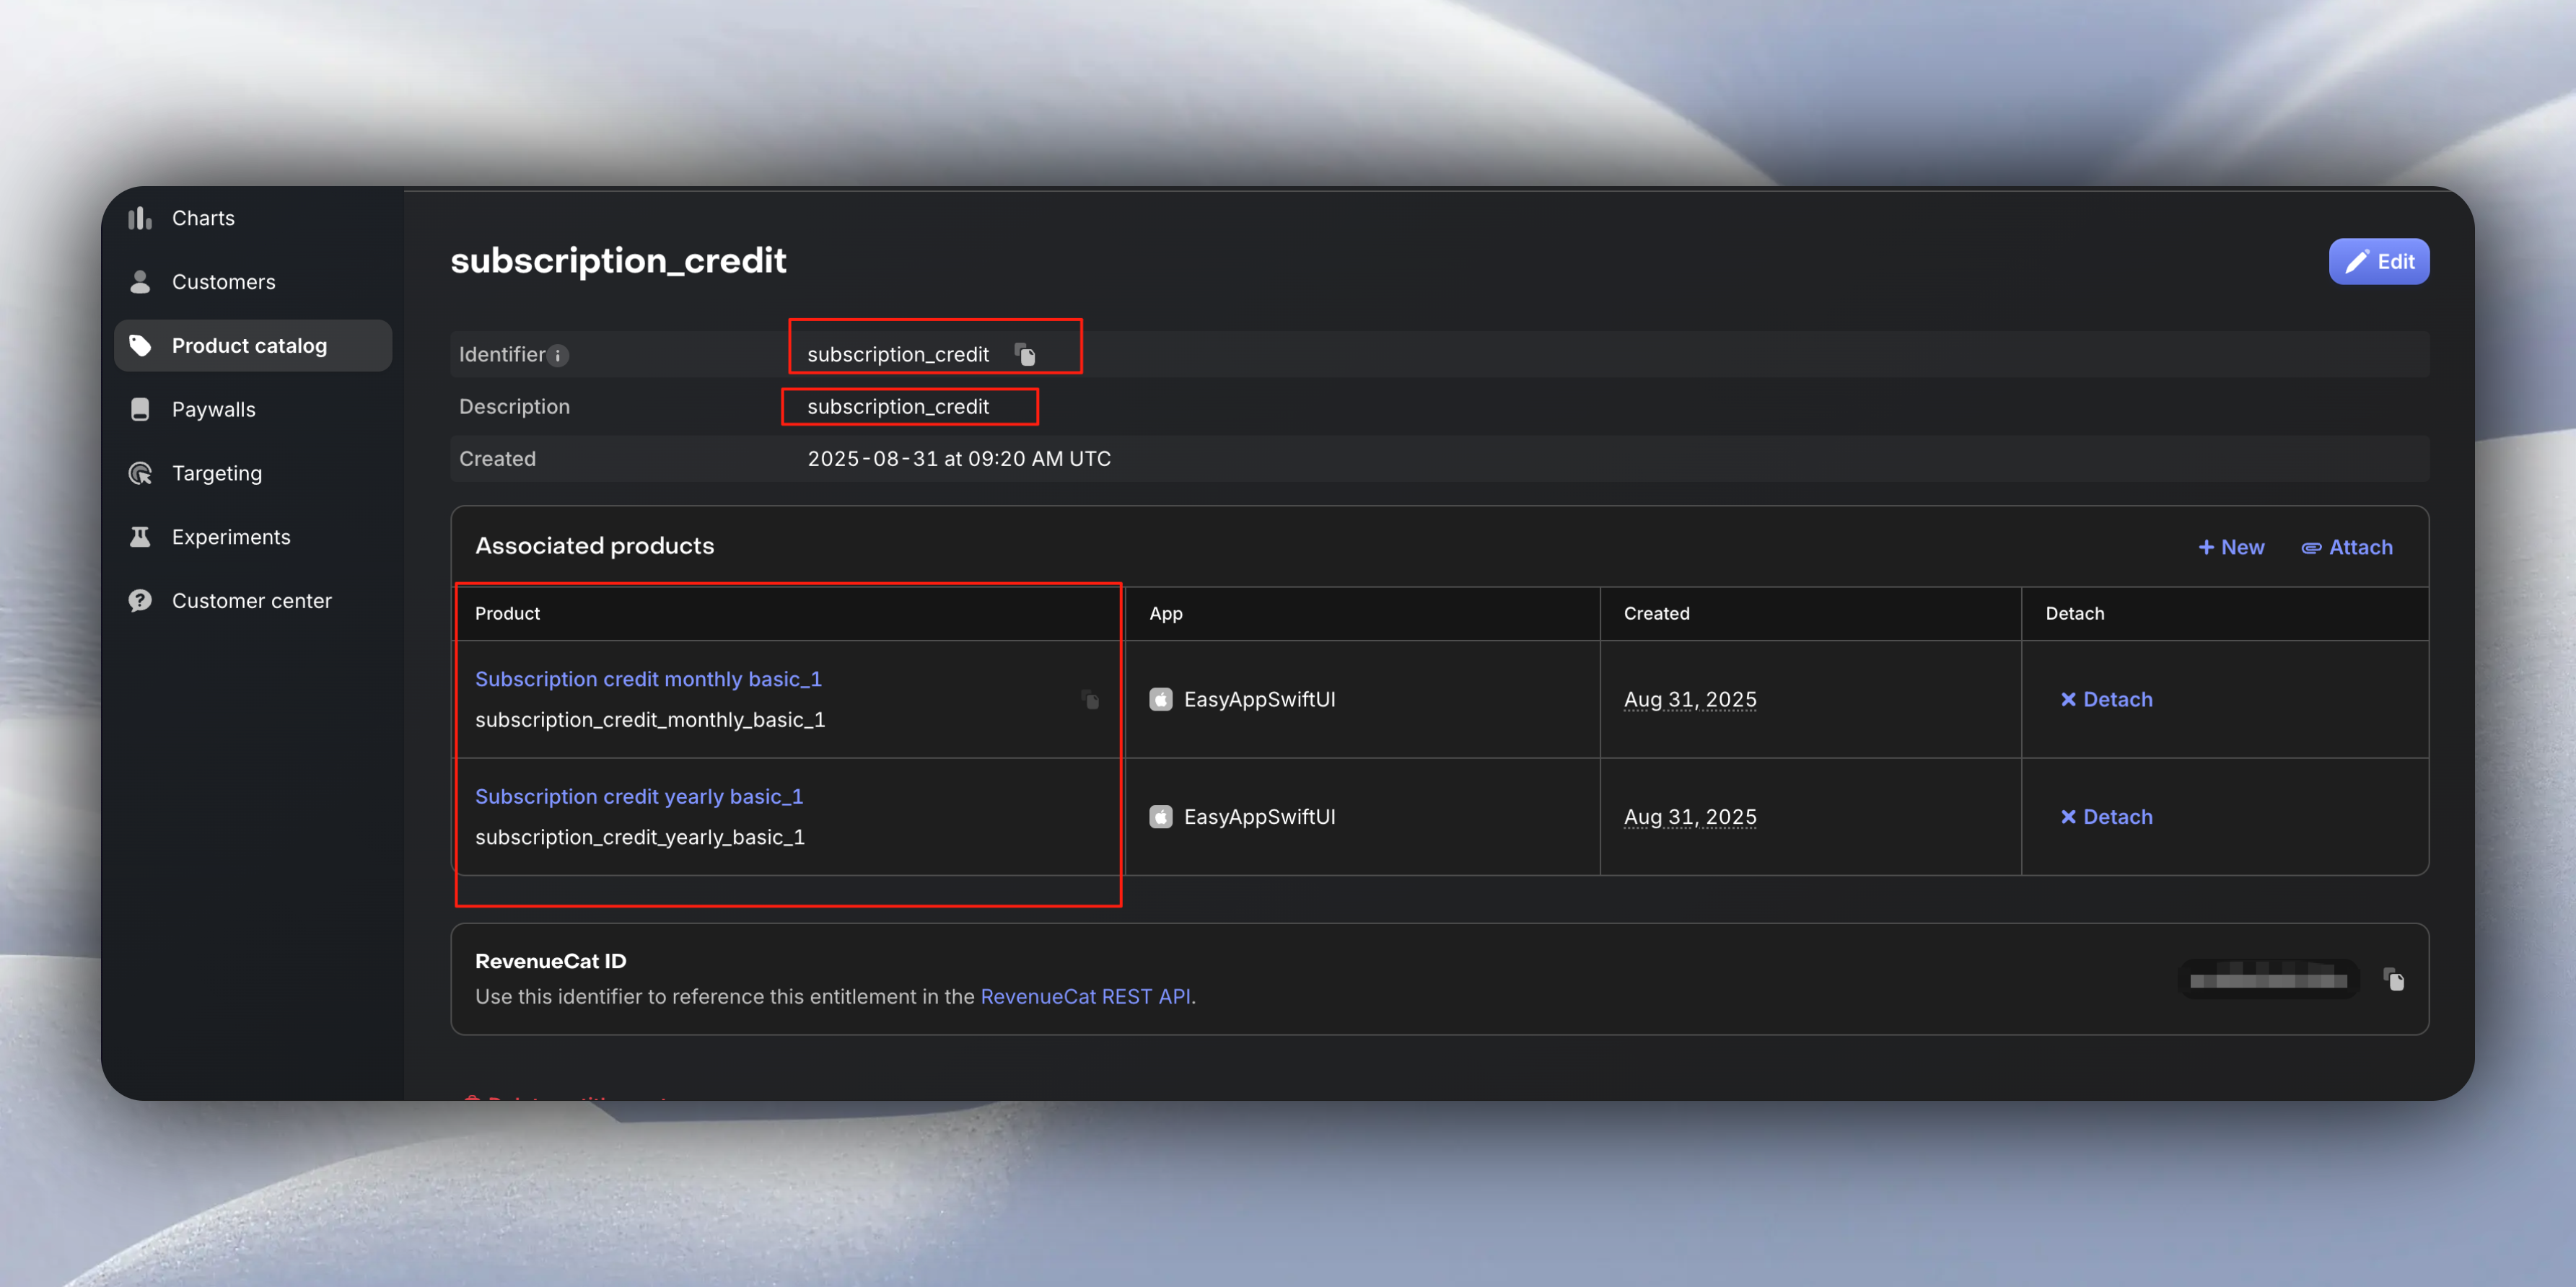
4: Go to the `EasyAppSwiftUI` project, and in the `Constants/Constants.swift` file, configure the `creditSubscriptionEntitlementID` value for `RevenueCat`.
```swift
enum RevenueCat {
// ...
/// Credit Packages entitlement ID
static let creditSubscriptionEntitlementID = "subscription_credit"
// ...
}
```
When creating subscription products: The `Product ID` should match the `product_id` field you defined in the `subscription_products` table. It must be consistent because during purchase, it determines which subscription product is being purchased.
When setting the price, also keep it consistent with the `price` field you defined in the `subscription_products` table.
### 2. Webhook Configuration
The system automatically handles purchase and subscription events through RevenueCat Webhook:
**Supported Event Types:**
* `INITIAL_PURCHASE`: First purchase/subscription
* `RENEWAL`: Subscription renewal
* `CANCELLATION`: Subscription cancellation
* `EXPIRATION`: Subscription expiration
* `PRODUCT_CHANGE`: Subscription upgrade/downgrade
* `BILLING_ISSUE`: Payment issues
**Webhook URL Configuration:**
```
https://your-project.supabase.co/functions/v1/subscription-webhook
```
For development environment webhook URL configuration, we recommend using [ngrok](https://ngrok.com/) for setup.
For ngrok installation and usage, please refer to [ngrok](https://ngrok.com/).
Execute the command:
```bash
ngrok http 54321
```
Then configure RevenueCat's Webhook URL as `https://your-ngrok-url/functions/v1/subscription-webhook`.
As shown in the figure below:
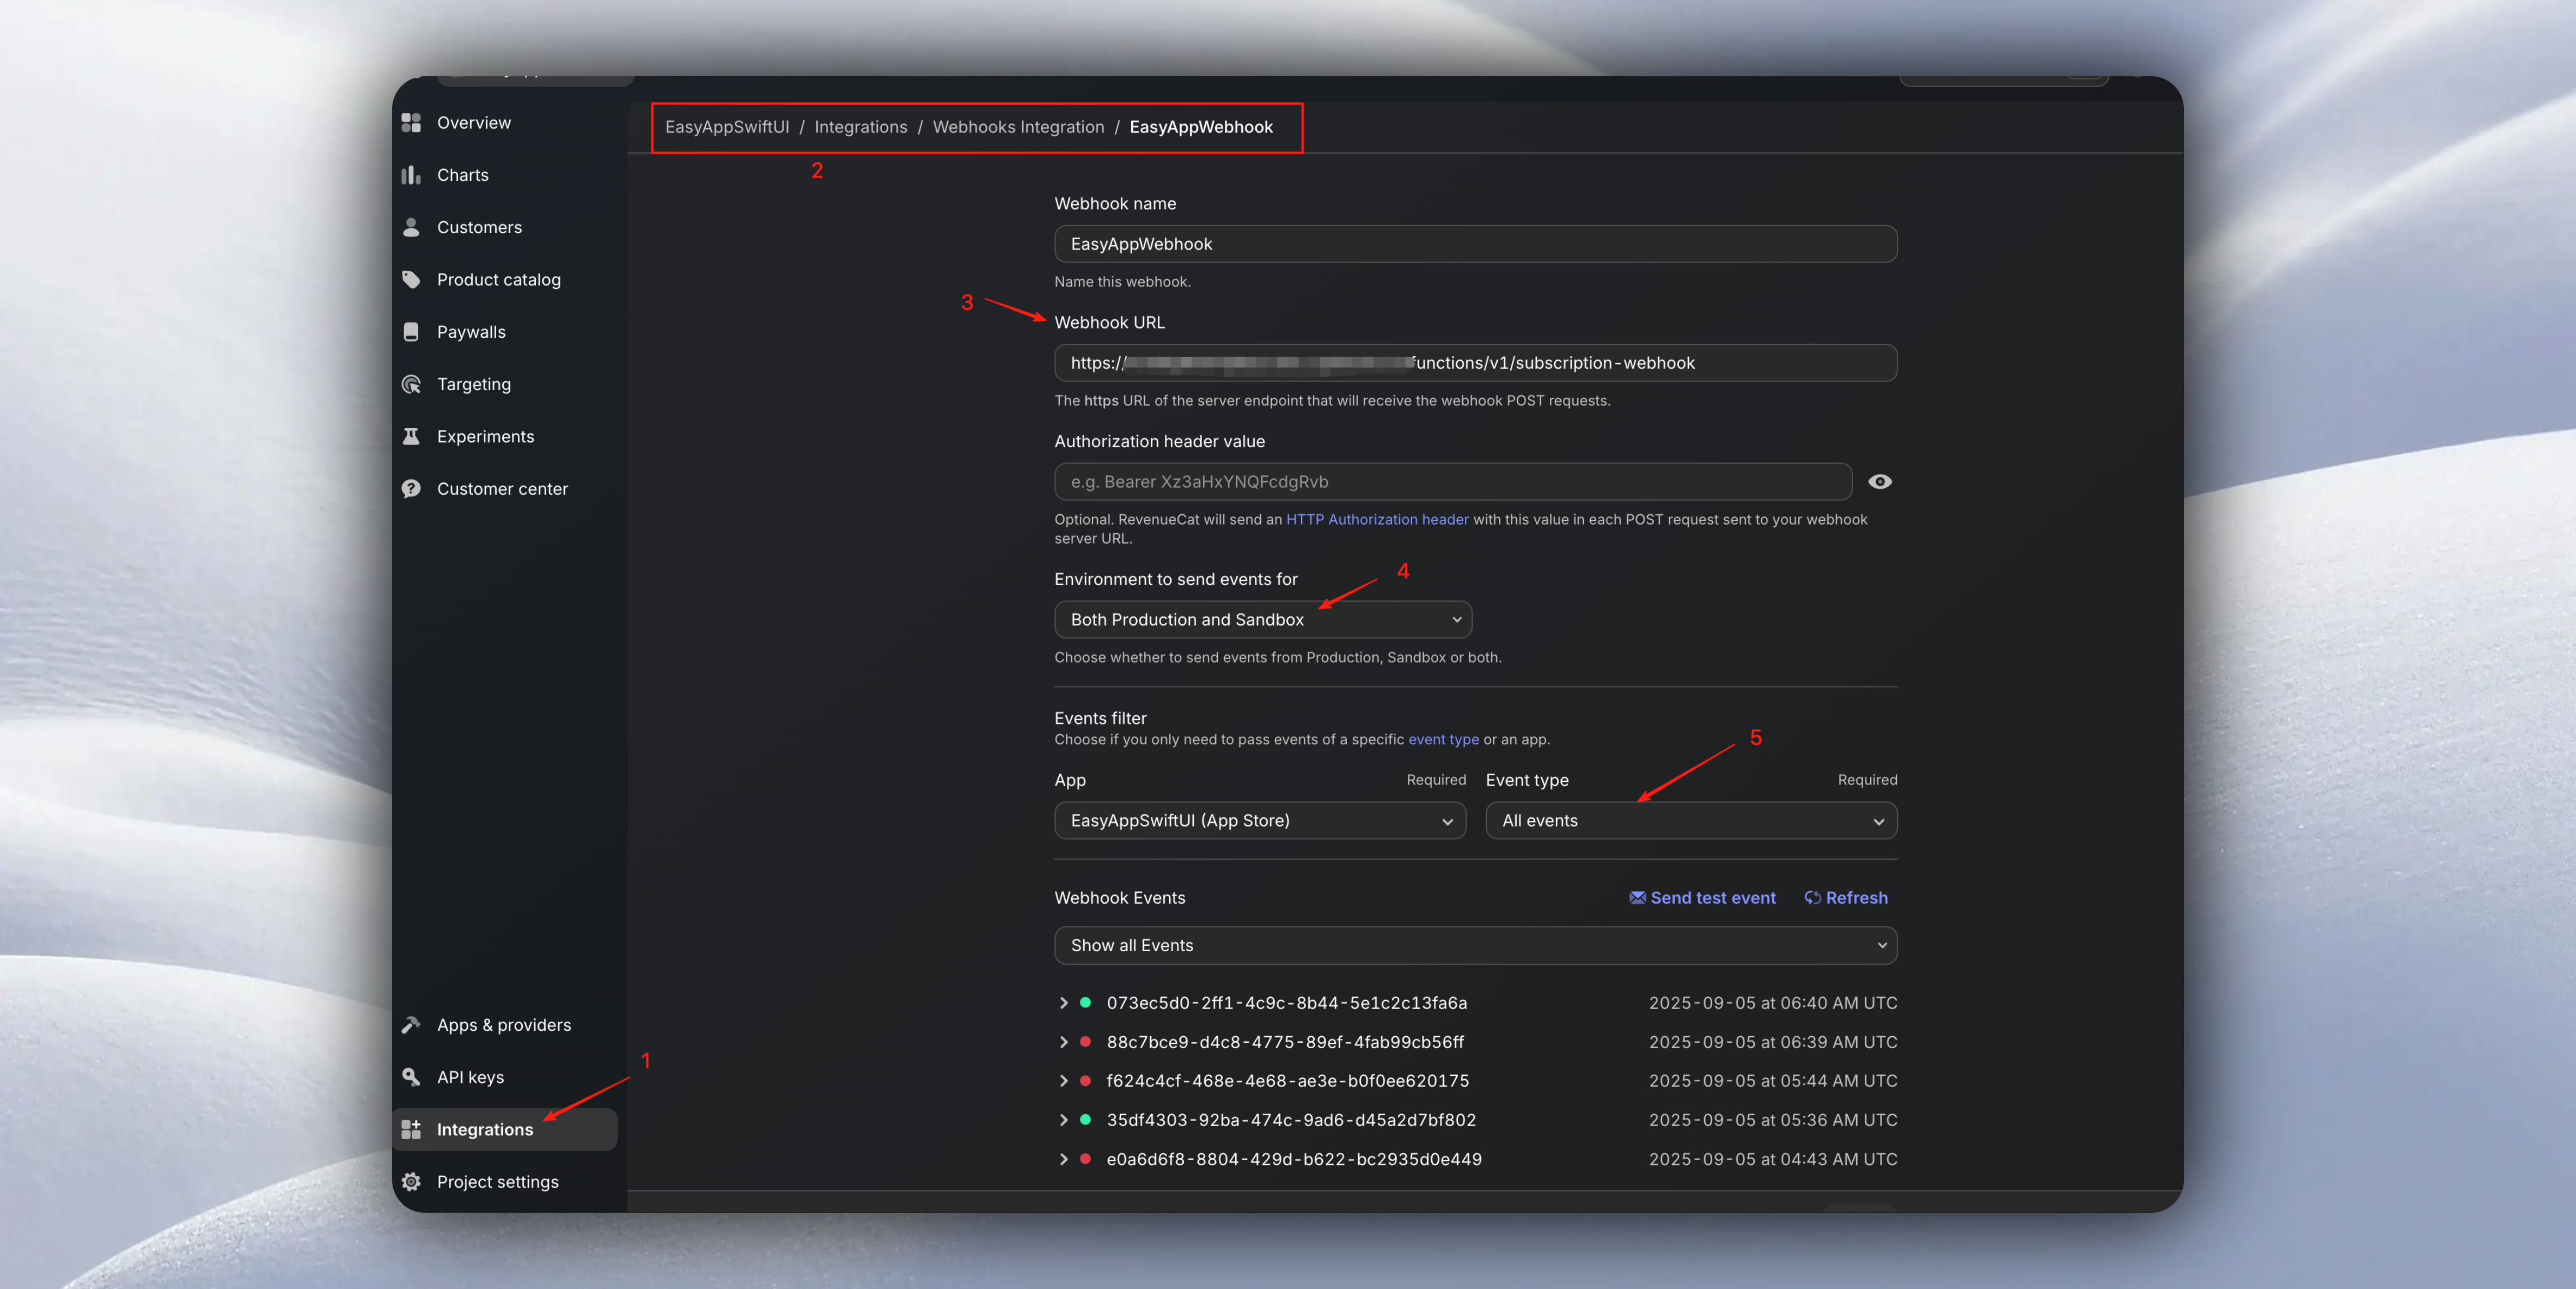
When we're ready to go live, don't forget to configure the production environment Webhook URL.
RevenueCat supports configuring multiple Webhook URLs. You can add a new Webhook URL and specifically configure the production environment Webhook URL.
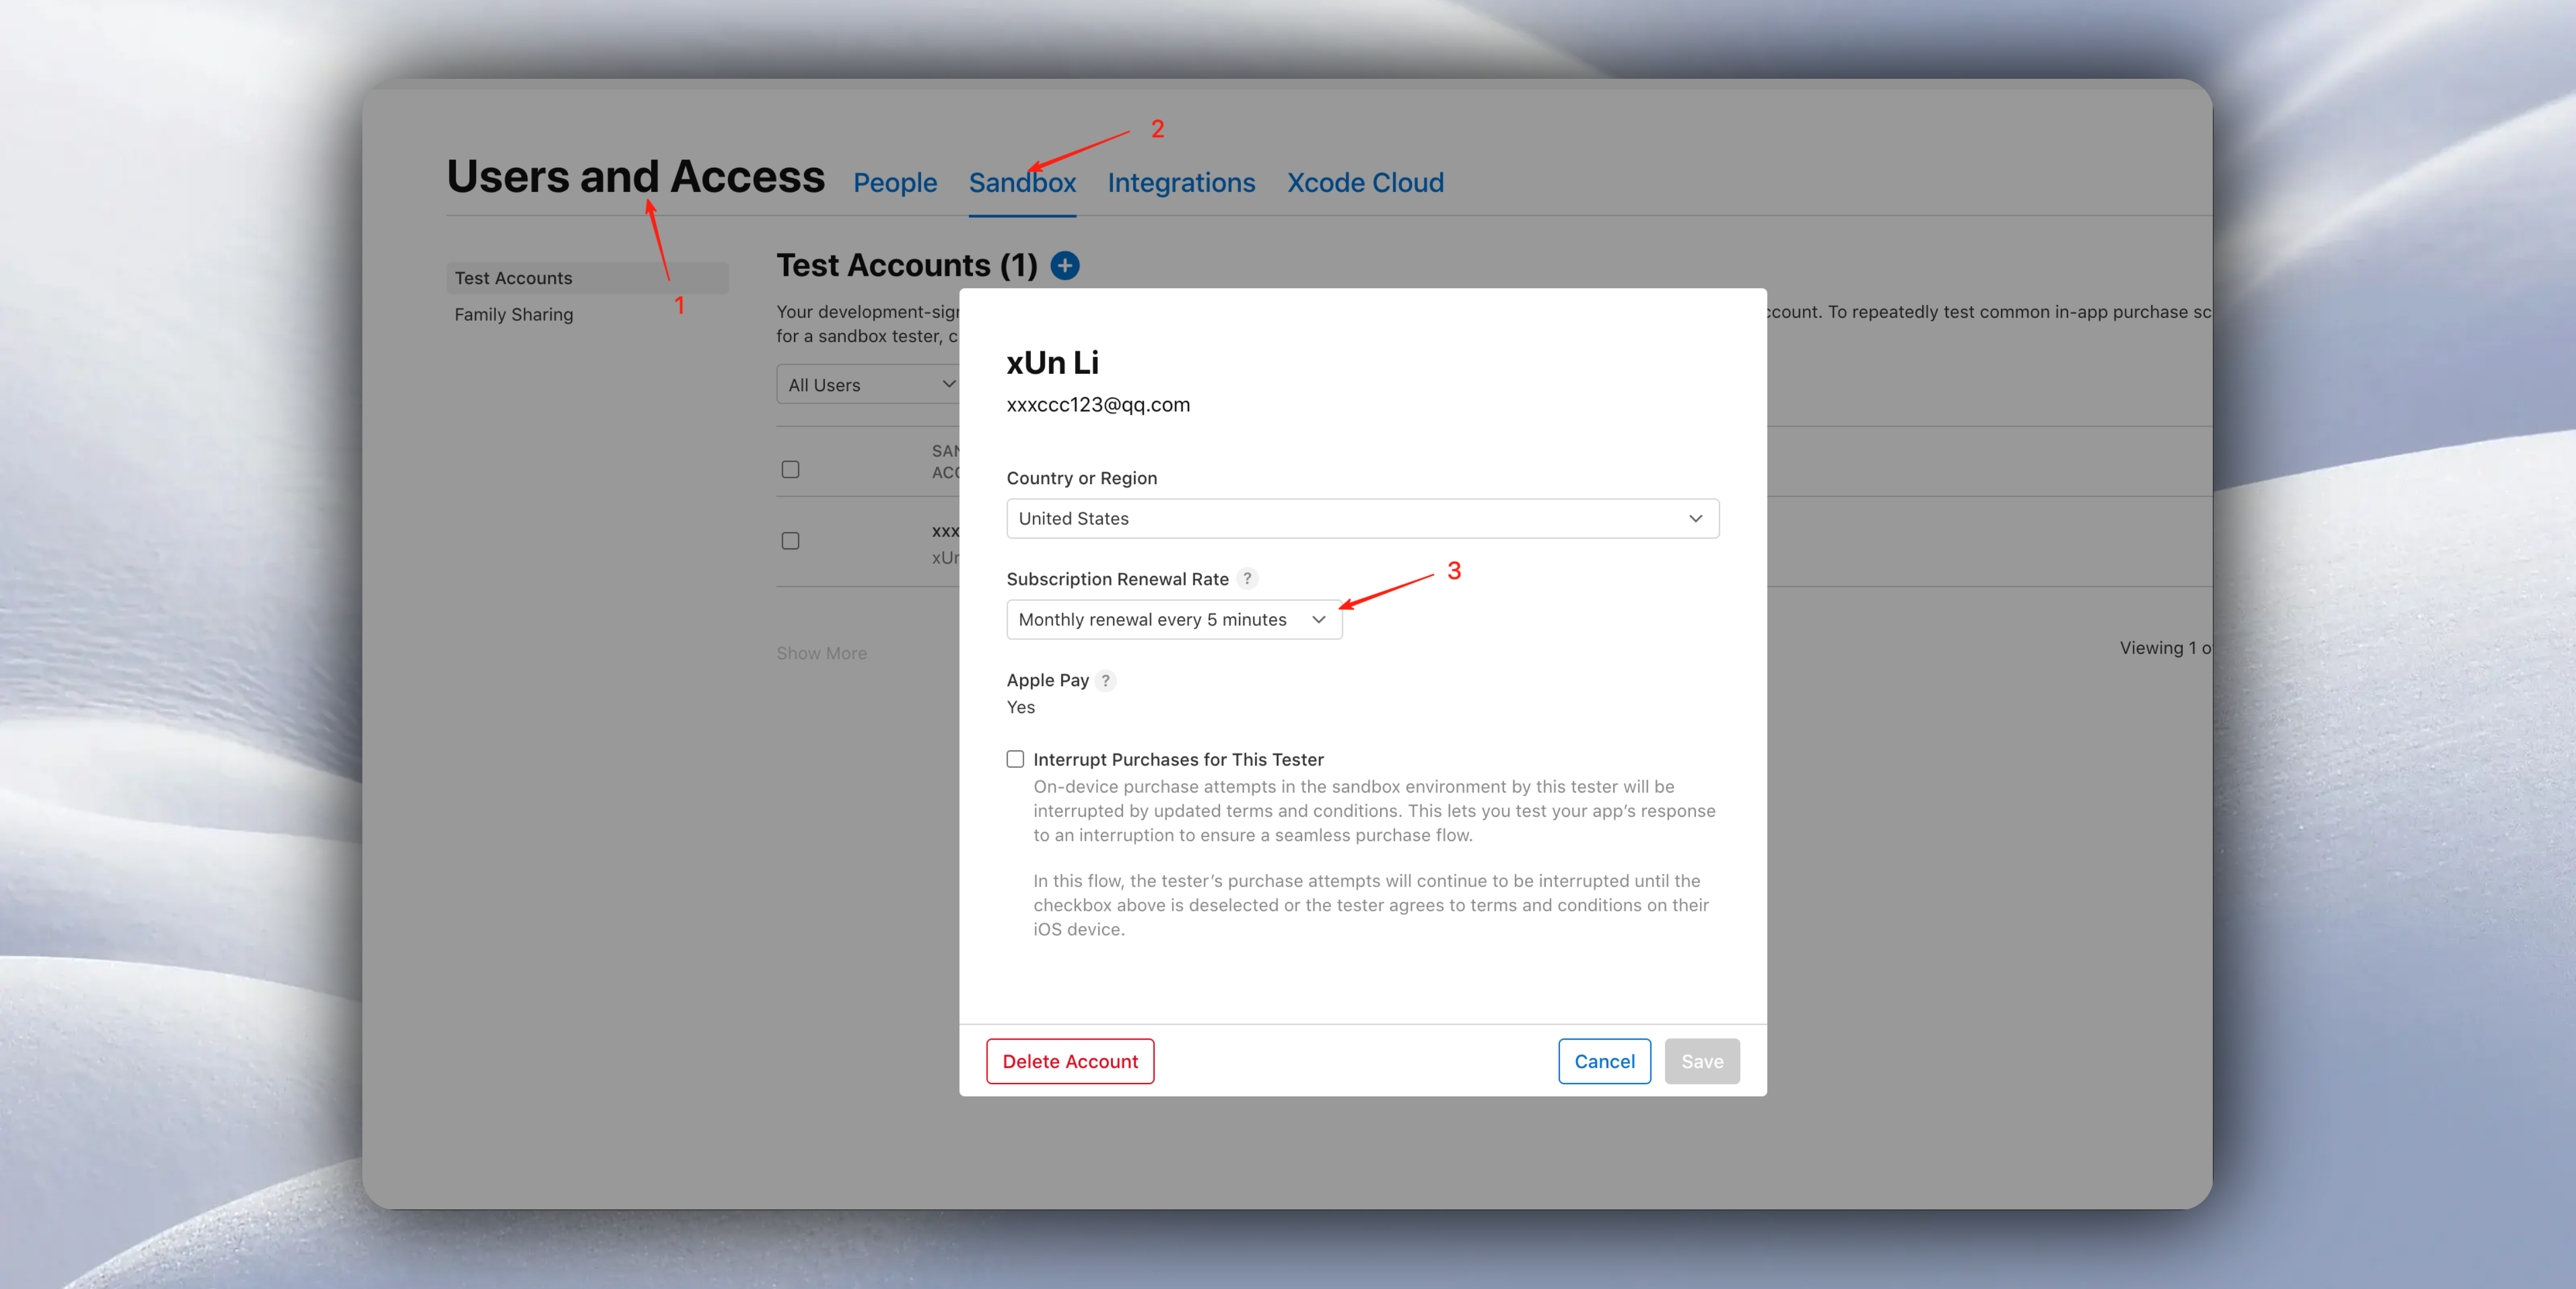
**Renewal Trigger Time:**
For the test environment, sandbox subscription trigger time can be configured in App Store Connect. That is, if you set it to 5-minute intervals, the Webhook URL will trigger every 5 minutes.
### 3. User ID Mapping
We have already set RevenueCat's `app_user_id` to the Supabase user's UUID during EasyApp login, ensuring the system can correctly identify user identity.
```swift
// logInRevenueCat
try await logInRevenueCat(userId: response.user.id.lowercasedString)
```
## System Configuration
### Dynamic Configuration System
The system supports runtime dynamic configuration adjustment without service restart:
**Credit System Configuration (system\_config.credit\_system):**
```json
{
"enabled": true,
"registration_bonus": 3000,
"enable_anti_abuse": true,
"refund_on_failure": true
}
```
**Feature Toggle Configuration (system\_config.features):**
```json
{
"image_generation": true,
"receipt_analysis": true
}
```
**Anti-Abuse Configuration (system\_config.anti\_abuse):**
```json
{
"max_registrations_per_email": 1,
"max_bonus_per_email": 3000,
"max_accounts_per_device": 10,
"registration_cooldown_days": 30,
"risk_score_threshold": 70,
"refund_time_limit_hours": 24
}
```
### Security Features
1. **Row Level Security (RLS)**: All data tables have RLS enabled, ensuring users can only access their own data
2. **Permission Control**: Edge Functions use Service Role for management operations
3. **Parameter Validation**: Strict parameter validation for all interfaces
4. **Duplicate Prevention**: Ensure Webhook events are not processed repeatedly through event IDs
5. **Audit Logging**: Complete audit trail for all credit operations
## Best Practices
1. **Regular Cleanup**: Recommend regular cleanup of expired credit records and transaction logs
2. **Monitoring Alerts**: Set up monitoring alerts for abnormal credit consumption and batch operations
3. **Performance Optimization**: Use pre-computed views to improve credit balance query performance
4. **Backup Strategy**: Regularly backup credit-related data to ensure data security
5. **Test Validation**: Thoroughly test in sandbox environment before production deployment
Through the above configuration and integration, you will have a fully functional, secure, and reliable credit management system that supports various business scenarios and monetization models.
# Flux Text-to-Image Series
URL: https://easyapp.site/en/docs/Integrations/Flux
Learn how to integrate Flux text-to-image features in EasyApp
***
title: Flux Text-to-Image Series
description: Learn how to integrate Flux text-to-image features in EasyApp
icon: Brain
-----------
EasyApp integrates the Flux text-to-image capability through the [Replicate](https://replicate.com/docs/topics/predictions/lifecycle) platform.
For any AI feature, make sure the API token is stored on the server to avoid the risk of client-side interception.
The [Supabase Edge Function](/docs/Integrations/supabaseEdgeFuncton) guide explains how to store API tokens with Supabase Edge Functions and send requests to large language models.
We recommend building and validating everything in the local development environment first, then deploying to production once all functionality is confirmed.
For details on using the local environment, see the instructions in [SupabaseEdgeFuncton](/docs/Integrations/supabaseEdgeFuncton#5-%E6%9C%AC%E5%9C%B0%E6%B5%8B%E8%AF%95).
# Configure the [Replicate](https://replicate.com/) API Token
Within the `EasyAppSupabase` project, set `REPLICATE_API_TOKEN` in `supabase/.env.local`:
```bash
REPLICATE_API_TOKEN=your_replicate_api_token
```
Create a new token on the [Replicate API token](https://replicate.com/account/api-tokens) page.
After setting `REPLICATE_API_TOKEN`, start the local development environment. The `EasyAppSupabase` project already ships with common scripts:
```json
"scripts": {
"deploy": "./deploy.sh",
"migrate": "supabase db push",
"functions:deploy": "supabase functions deploy",
"functions:logs": "supabase functions logs",
"start": "supabase start",
"stop": "supabase stop",
"reset": "supabase db reset",
"status": "supabase status",
"dev": "./dev.sh",
"dev:functions.env.local": "supabase functions serve --env-file ./supabase/.env.local",
"dev:functions": "supabase functions serve",
"dev:migration": "supabase migration up"
},
```
For development, simply run `npm run dev`.
The `dev.sh` script handles all prerequisites for you:
```bash
# Start Supabase
echo "Starting Supabase..."
supabase start
# Apply migrations to local database
echo "Applying migrations to local database..."
supabase migration up
# if you want to reset the database, uncomment the following line
# supabase db reset
# Run the function locally
echo "Running the function locally..."
# supabase functions serve --env-file ./supabase/.env.local
supabase functions serve
```
# Cloud Functions Overview
The Flux text-to-image flow relies on the following cloud functions:
```
image-generation
image-generation-history
image-generation-status
```
`image-generation` is the primary function that creates images.
`image-generation-history` returns the generation history.
`image-generation-status` reports the current status. The client polls this function to retrieve real-time task updates.
With `image-generation-status`, the client gains task-state management that stays in sync with the database. Even after leaving and re-entering the app, the latest task status remains accessible.
# Result Preview
# Deploy Cloud Functions and Database
Once development is complete, deploy the `EasyAppSupabase` project to production.
The project already includes common deployment scripts. Run either command:
```bash
cd EasyAppSupabase
npm run deploy
```
or:
```bash
cd EasyAppSupabase
./deploy.sh
```
Finally, configure the `REPLICATE_API_TOKEN` environment variable inside the Supabase Dashboard:

AI features typically tie into the credit system. Refer to the related chapter for integration details:
} href="/docs/modules/Credits">
Credits System
# Native and H5 Interaction
URL: https://easyapp.site/en/docs/Integrations/H5
Learn how to interact with H5 in your app
***
title: Native and H5 Interaction
description: Learn how to interact with H5 in your app
icon: MousePointerClick
-----------------------
EasyApp includes a built-in WebView component that makes it easy to interact with H5.
### Basic Usage
#### 1. Load a remote webpage
```swift
struct ContentView: View {
var body: some View {
WebView(request: URLRequest(url: URL(string: "https://example.com/")!))
}
}
```
#### 2. Load an offline webpage
```swift
struct LocalWeb: View {
@StateObject var viewModel = LocalWebViewModel()
var body: some View {
WebViewReader { proxy in
VStack {
WebView(configuration: viewModel.configuration)
}
.onAppear {
proxy.loadHTMLString(viewModel.htmlString, baseURL: viewModel.htmlURL)
}
}
}
}
class LocalWebViewModel: CommonEAWebViewModel {
let htmlURL = Bundle.main.url(forResource: "sample", withExtension: "html")!
let htmlString: String
override init() {
htmlString = try! String(contentsOf: htmlURL, encoding: .utf8)
super.init()
}
}
```
You need to add the `sample.html` file to your project.
For a fully featured offline H5 experience, you may need incremental updates and server-delivered H5 content. This is beyond the scope of this guide—please research as needed.
### Native ↔ H5 Interaction
#### 1. How can H5 call native capabilities?
We provide an example here: [EasyApp-WebView-Debugger](https://github.com/sunshineLixun/easyapp_webview_debugger)
The example demonstrates:
* Calling native Alert
* Calling native Confirm
* Calling native Alert Input
* Initiating a phone call
* Initiating an SMS
* Initiating FaceTime
* Sending an email
* And more that you can implement yourself in the example project
* Selecting files/photos
* Analyzing photos
* Getting current location
* Accessing camera/microphone
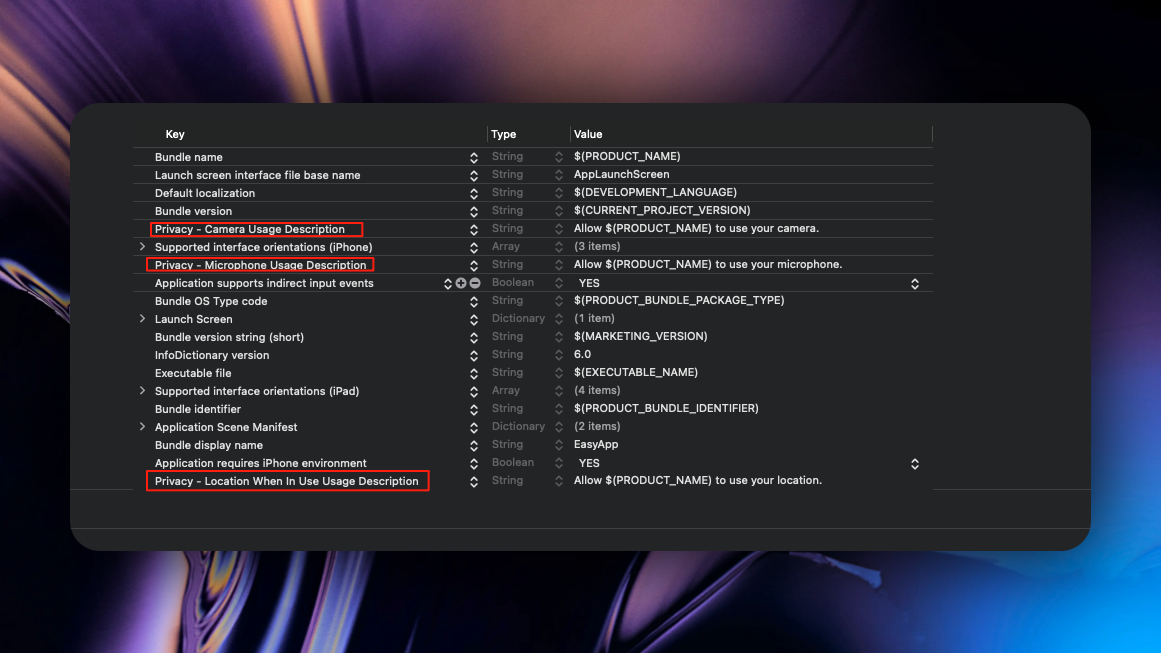
Note: EasyApp does not include the following permissions by default. If your app does not use these capabilities, per Apple’s review rules, you should not request them. To keep review simple, EasyApp omits them by default.
If you need camera, microphone, or location from H5, add the following permissions to your Info.plist:
```xml
NSCameraUsageDescriptionWe need access to your camera to let you share them with your friends.
```
Microphone
```xml
NSMicrophoneUsageDescriptionWe need access to your microphone to let you share them with your friends.
```
Location
```xml
NSLocationWhenInUseUsageDescriptionWe need access to your location to let you share them with your friends.
```
As shown below:
#### 2. How does native inject scripts?
See `ScriptMessageHandler.swift` for an example:
```swift title="EasyAppSwiftUI/App/Developer/SubPages/OnlineWeb/ViewModel/ScriptMessageHandler.swift"
/// Setup WebView JavaScript bridge
private func setupWebViewBridge() {
let source = """
injectYourScriptHere
"""
let userScript = WKUserScript(
source: source,
injectionTime: .atDocumentStart,
forMainFrameOnly: true
)
userContentController.addUserScript(userScript)
}
```
In `setupWebViewBridge`, you can inject a `source` script before H5 loads.
For example, inject a function that H5 can call:
```js
window.easyapp = {
alert: function(message) {
alert(message);
}
}
```
Typically, attach functions to `window` so JavaScript can call `window.easyapp.alert` directly.
#### 3. How to inject cookies
The template provides a common class `CommonEAWebViewModel` with a built-in method:
About `CommonEAWebViewModel`:
This class abstracts common native-H5 interaction logic such as alerts, internal WebView delegates, cookie injection, etc.
Simply inherit from this class.
```swift
/// Set Cookie
/// - Parameters:
/// - request: The request to set the cookie for
/// - name: Cookie name
/// - value: Cookie value
func setCookie(request: URLRequest, name: String, value: String) {
if let domain = request.url?.host(),
let cookie = HTTPCookie(properties: [
HTTPCookiePropertyKey.name: name,
HTTPCookiePropertyKey.value: value,
HTTPCookiePropertyKey.domain: domain,
HTTPCookiePropertyKey.path: "/",
])
{
configuration.websiteDataStore.httpCookieStore.setCookie(cookie)
}
}
```
You can inherit from `CommonEAWebViewModel` and call `setCookie` in `init`:
```swift
class OnlineWebViewModel: CommonEAWebViewModel {
/// Request to the webview
let request = URLRequest(url: URL(string: "https://easyapp-webview-debugger.vercel.app/")!)
/// Init
override init() {
super.init()
setCookie(request: request, name: "SampleKey", value: "SampleValue")
}
}
```
Why inject cookies?
For example, if the user has logged in within the app, you may want H5 to recognize that login state. Inject a cookie in the app; once H5 reads it, H5 can use the login state.
#### 4. How does native call H5 functions / send messages?
First, H5 must provide the function. In our example project [EasyApp-WebView-Debugger](https://github.com/sunshineLixun/easyapp_webview_debugger/blob/master/src/script/script-config.ts),
you can see we register `showSwiftUIMessage` on `window.sample` in `registerReceiveMessageFunctions`:
```js
/**
* The functions registered here are specifically for SwiftUI client to call
*/
export function registerReceiveMessageFunctions() {
//@ts-ignore
window.sample.showSwiftUIMessage = showSwiftUIMessage;
// If you want to receive messages from SwiftUI, you can register your functions here
}
```
Recommended approach:
Since JavaScript lacks namespaces, we recommend organizing by business modules. If you attach everything to `window`, ensure names do not collide.
In the example, we register `showSwiftUIMessage` on `sample`. Here, `sample` acts as your business module, preventing name collisions.
If you later add a `user` module, you can also register a `showSwiftUIMessage` method there. Module scoping avoids conflicts.
Once JS functions are ready, the client can call them like this:
```swift
Task {
do {
try await proxy.evaluateJavaScript(
"window.sample.showSwiftUIMessage('Hello from SwiftUI')")
} catch {
print("error: \(error)")
}
}
```
See `EasyAppSwiftUI/App/Developer/SubPages/OnlineWeb/View/OnlineView.swift` for usage.
#### 5. How does JS call native functions / send messages?
Similarly, we use the global `window` object. We attach a `sample` object on `window` and register a `doSomething` function.
You can name functions as you like. We still recommend using a business module as a namespace for maintainability.
```js
/**
* common post message to SwiftUI
* @param message message to send to SwiftUI
*/
function commonPostMessage(message: string) {
// @ts-ignore
webkit.messageHandlers.sample.postMessage({
message: message,
});
}
/**
* The functions registered here are specifically for sending messages to the SwiftUI client
*/
export function registerSendMessageFunctions() {
//@ts-ignore
window.sample.doSomething = function (message: string) {
// @ts-ignore
commonPostMessage(message);
};
// if your SwiftUI has a function that you want to call, you can register it here
}
```
After registration, you can call native via `window.sample.doSomething`:
```js
export function sendSomethisToSwiftUI() {
// @ts-ignore
if (window.sample && typeof window.sample.doSomething === "function") {
// @ts-ignore
window.sample.doSomething("Hello from H5");
}
}
```
You can find the complete usage in our example project: [EasyApp-WebView-Debugger](https://github.com/sunshineLixun/easyapp_webview_debugger/blob/master/src/script/script-config.ts).
On the client side, we use another class, `ScriptMessageHandler`, dedicated to JS interaction. Script injection is also handled there.
When the client receives a message from H5, this method is triggered:
```swift
/// Handle messages from the webview
/// - Parameters:
/// - userContentController: The user content controller
/// - message: The message from the webview
func userContentController(
_ userContentController: WKUserContentController,
didReceive message: WKScriptMessage
) {
// Here, name is the H5 namespace
guard message.name == "sample" else {
print("⚠️ Received message from unknown handler: \(message.name)")
return
}
let json = JSON(message.body)
let formattedJSON = json.rawString() ?? "{}"
messageHandler?(formattedJSON)
}
```
Note:
`message.name` is the H5 namespace. It must match the namespace used on the H5 side. This mismatch is a common source of issues—align it explicitly.
You can extract the message sent from H5 here, and then proceed with your own business logic.
### Summary
For client-side best practices:
* You may have multiple modules needing WebView capabilities. We recommend creating a dedicated `ViewModel` per module, each inheriting from `CommonEAWebViewModel` to gain shared WebView functionality.
* Load the WebView URL in the corresponding `ViewModel`:
```swift
/// Request to the webview
let request = URLRequest(url: URL(string: "https://easyapp-webview-debugger.vercel.app/")!)
```
* For native/H5 interactions, create a module-specific `XXX_ScriptMessageHandler` class. Do not put all logic into the provided `ScriptMessageHandler`; that class is just an example.
* Each module’s `ScriptMessageHandler` should be associated with its `ViewModel`. Set up the association in the `ViewModel`:
```swift
/// Message handler
let messageHandler = ScriptMessageHandler.shared
configuration.defaultWebpagePreferences.preferredContentMode = .mobile
configuration.userContentController = messageHandler.userContentController
```
* Let `ScriptMessageHandler` notify the `ViewModel` via a closure when receiving messages:
```swift
/// Start listening to messages from ScriptMessageHandler
private func startListeningToMessages() {
messageHandler.messageHandler = { [weak self] message in
guard let self = self else { return }
// do your business logic here
}
}
```
* On the H5 side, remember: since JS has no namespaces, organize by business modules instead of hanging everything directly under `window` to avoid name collisions as modules grow.
# RevenueCat
URL: https://easyapp.site/en/docs/Integrations/RevenueCat
Use RevenueCat to manage your subscriptions.
***
title: RevenueCat
description: Use RevenueCat to manage your subscriptions.
icon: CreditCard
----------------
EasyApp provides [RevenueCat](https://www.revenuecat.com/) as a subscription management service. [RevenueCat](https://www.revenuecat.com/) has the following advantages compared to [StoreKit2](https://developer.apple.com/storekit/):
| Comparison Dimension | RevenueCat | StoreKit 2 |
| -------------------------- | ---------------------------------------------------------- | ---------------------------------------------------------------- |
| **Cross-platform Support** | ✅ Unified management across iOS, Android, Web, etc. | ❌ Limited to Apple ecosystem (iOS/macOS) |
| **Advanced Features** | 📊 Data analytics, A/B testing, Webhooks, etc. | 🛠️ Basic API only, advanced features require custom development |
| **Compatibility** | 📱 Compatible with StoreKit 1 & 2, supports legacy systems | 🍏 Only supports iOS 15+/macOS 12+ |
| **Rich Paywalls** | 🚀 Configure rich paywalls in RevenueCat without re-review | 🐢 Paywall UI changes require app re-submission and review |
| **Real-time Data** | 📊 Real-time in-app purchase data synchronization | 📊 Data only available the next day in App Store Connect |
RevenueCat's pricing is also very friendly - they only charge a 1% fee when your app's monthly revenue reaches $2,500. Below that, you can use it for free.
Nevertheless, we still provide [StoreKit2](https://developer.apple.com/storekit/) integration options.
If you don't plan to integrate RevenueCat, please refer to the [StoreKit2 documentation](/docs/Integrations/StoreKit2) to configure StoreKit2 in-app purchases.
However, you still need to configure in-app purchases in App Store Connect. For this part, please check the [Adding In-App Purchases in App Store Connect](#adding-in-app-purchases-in-app-store-connect) section. After reading this section, you can ignore the other sections of this article and go to the [StoreKit2 documentation](/docs/Integrations/StoreKit2) to see how to integrate StoreKit2.
} href="/docs/Integrations/StoreKit2">
Integrate StoreKit2 service
Before integrating in-app purchases, you must have a valid [Apple Developer Program membership](https://developer.apple.com/help/account/membership/enrolling-in-the-app) and have signed the [Paid Applications Agreement](https://appstoreconnect.apple.com/business/atb/95c7eacb-a537-4036-9c21-ff4c032d3f94)
Friendly reminder: App Store Connect is internationalized and the webpage will automatically display internationalized content based on your browser language.
Our documentation will be primarily in English, but you can still find the corresponding operations in Chinese based on the screenshots in the documentation.
[App Store Connect Chinese Address](https://developer.apple.com/cn/app-store-connect/)
# Adding In-App Purchases in App Store Connect
## First Create an App
Before adding in-app purchases, you need to create your App first, which is mandatory.
We log in to [App Store Connect](https://appstoreconnect.apple.com/apps), click "Apps" at the top, then click the "+" button to create your App.
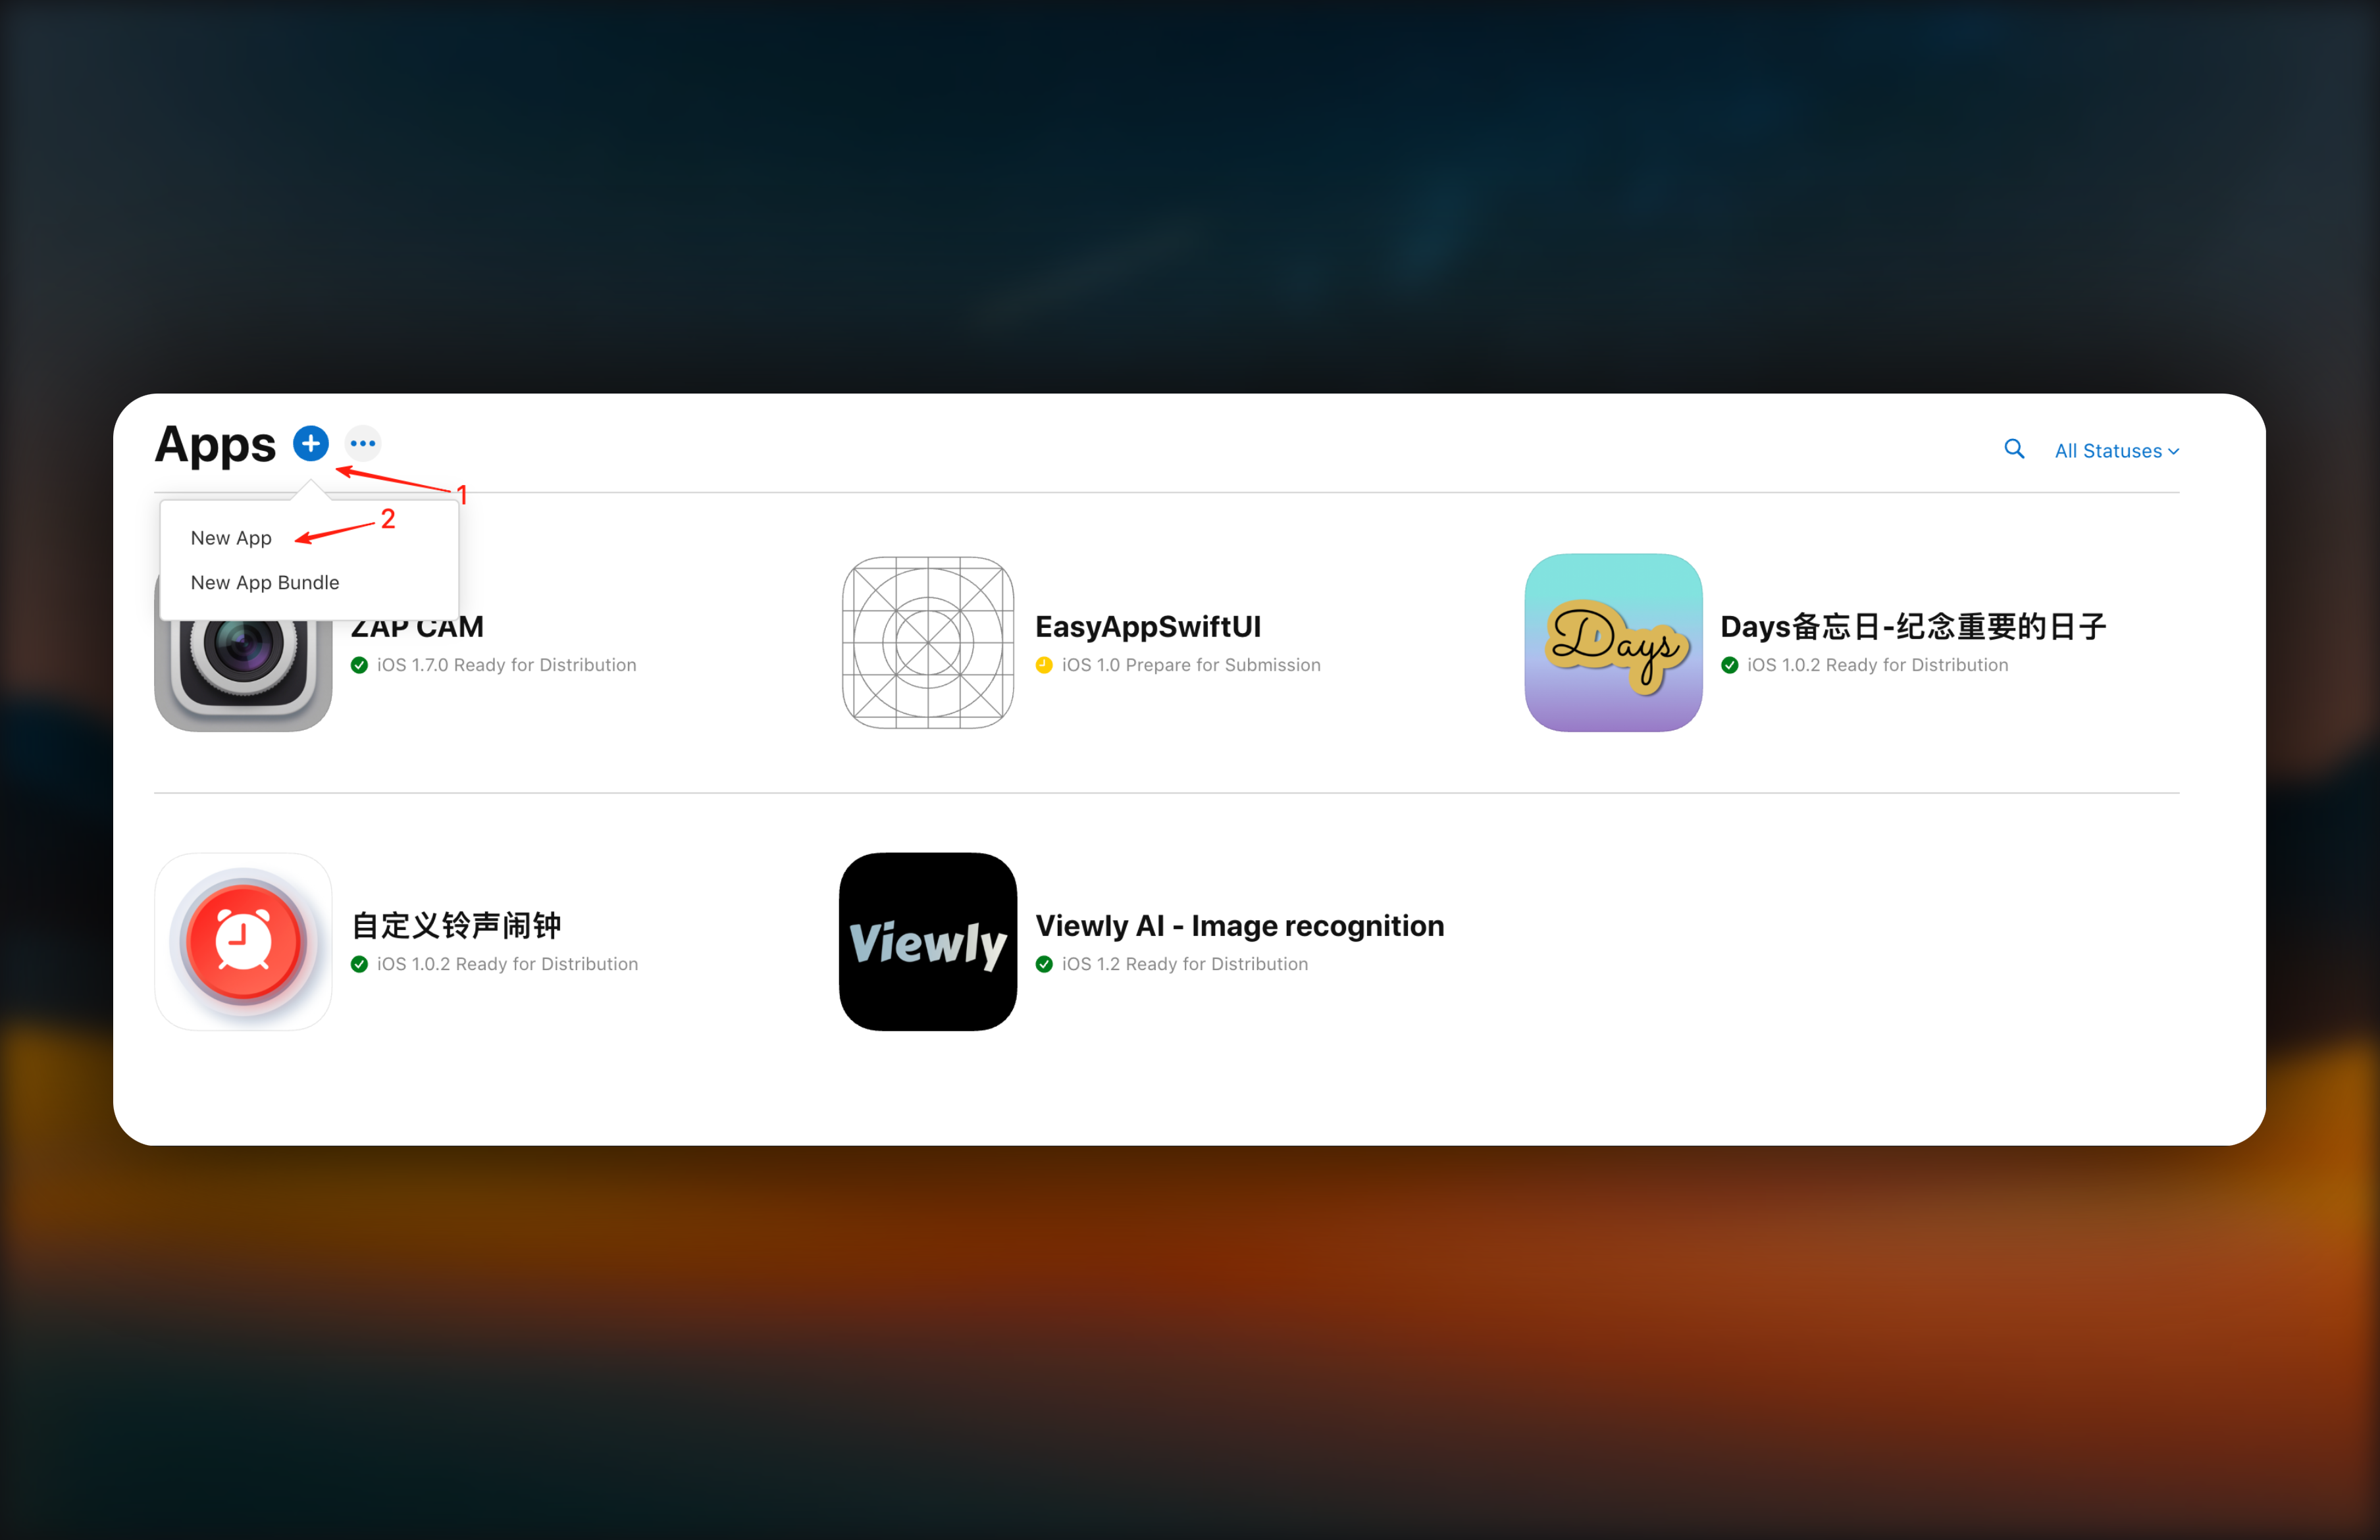
In the New App popup, you need to fill in the following information:
1. Platform: Select your App's platform
The platform you expect to publish on. Choose iOS, and both iPhone and iPad can download (provided you need to adapt for iPad)
2. App Name: Your App name
3. Bundle ID: Your App's Bundle ID
You can select from the dropdown, please choose the Bundle ID that corresponds to your Xcode project.
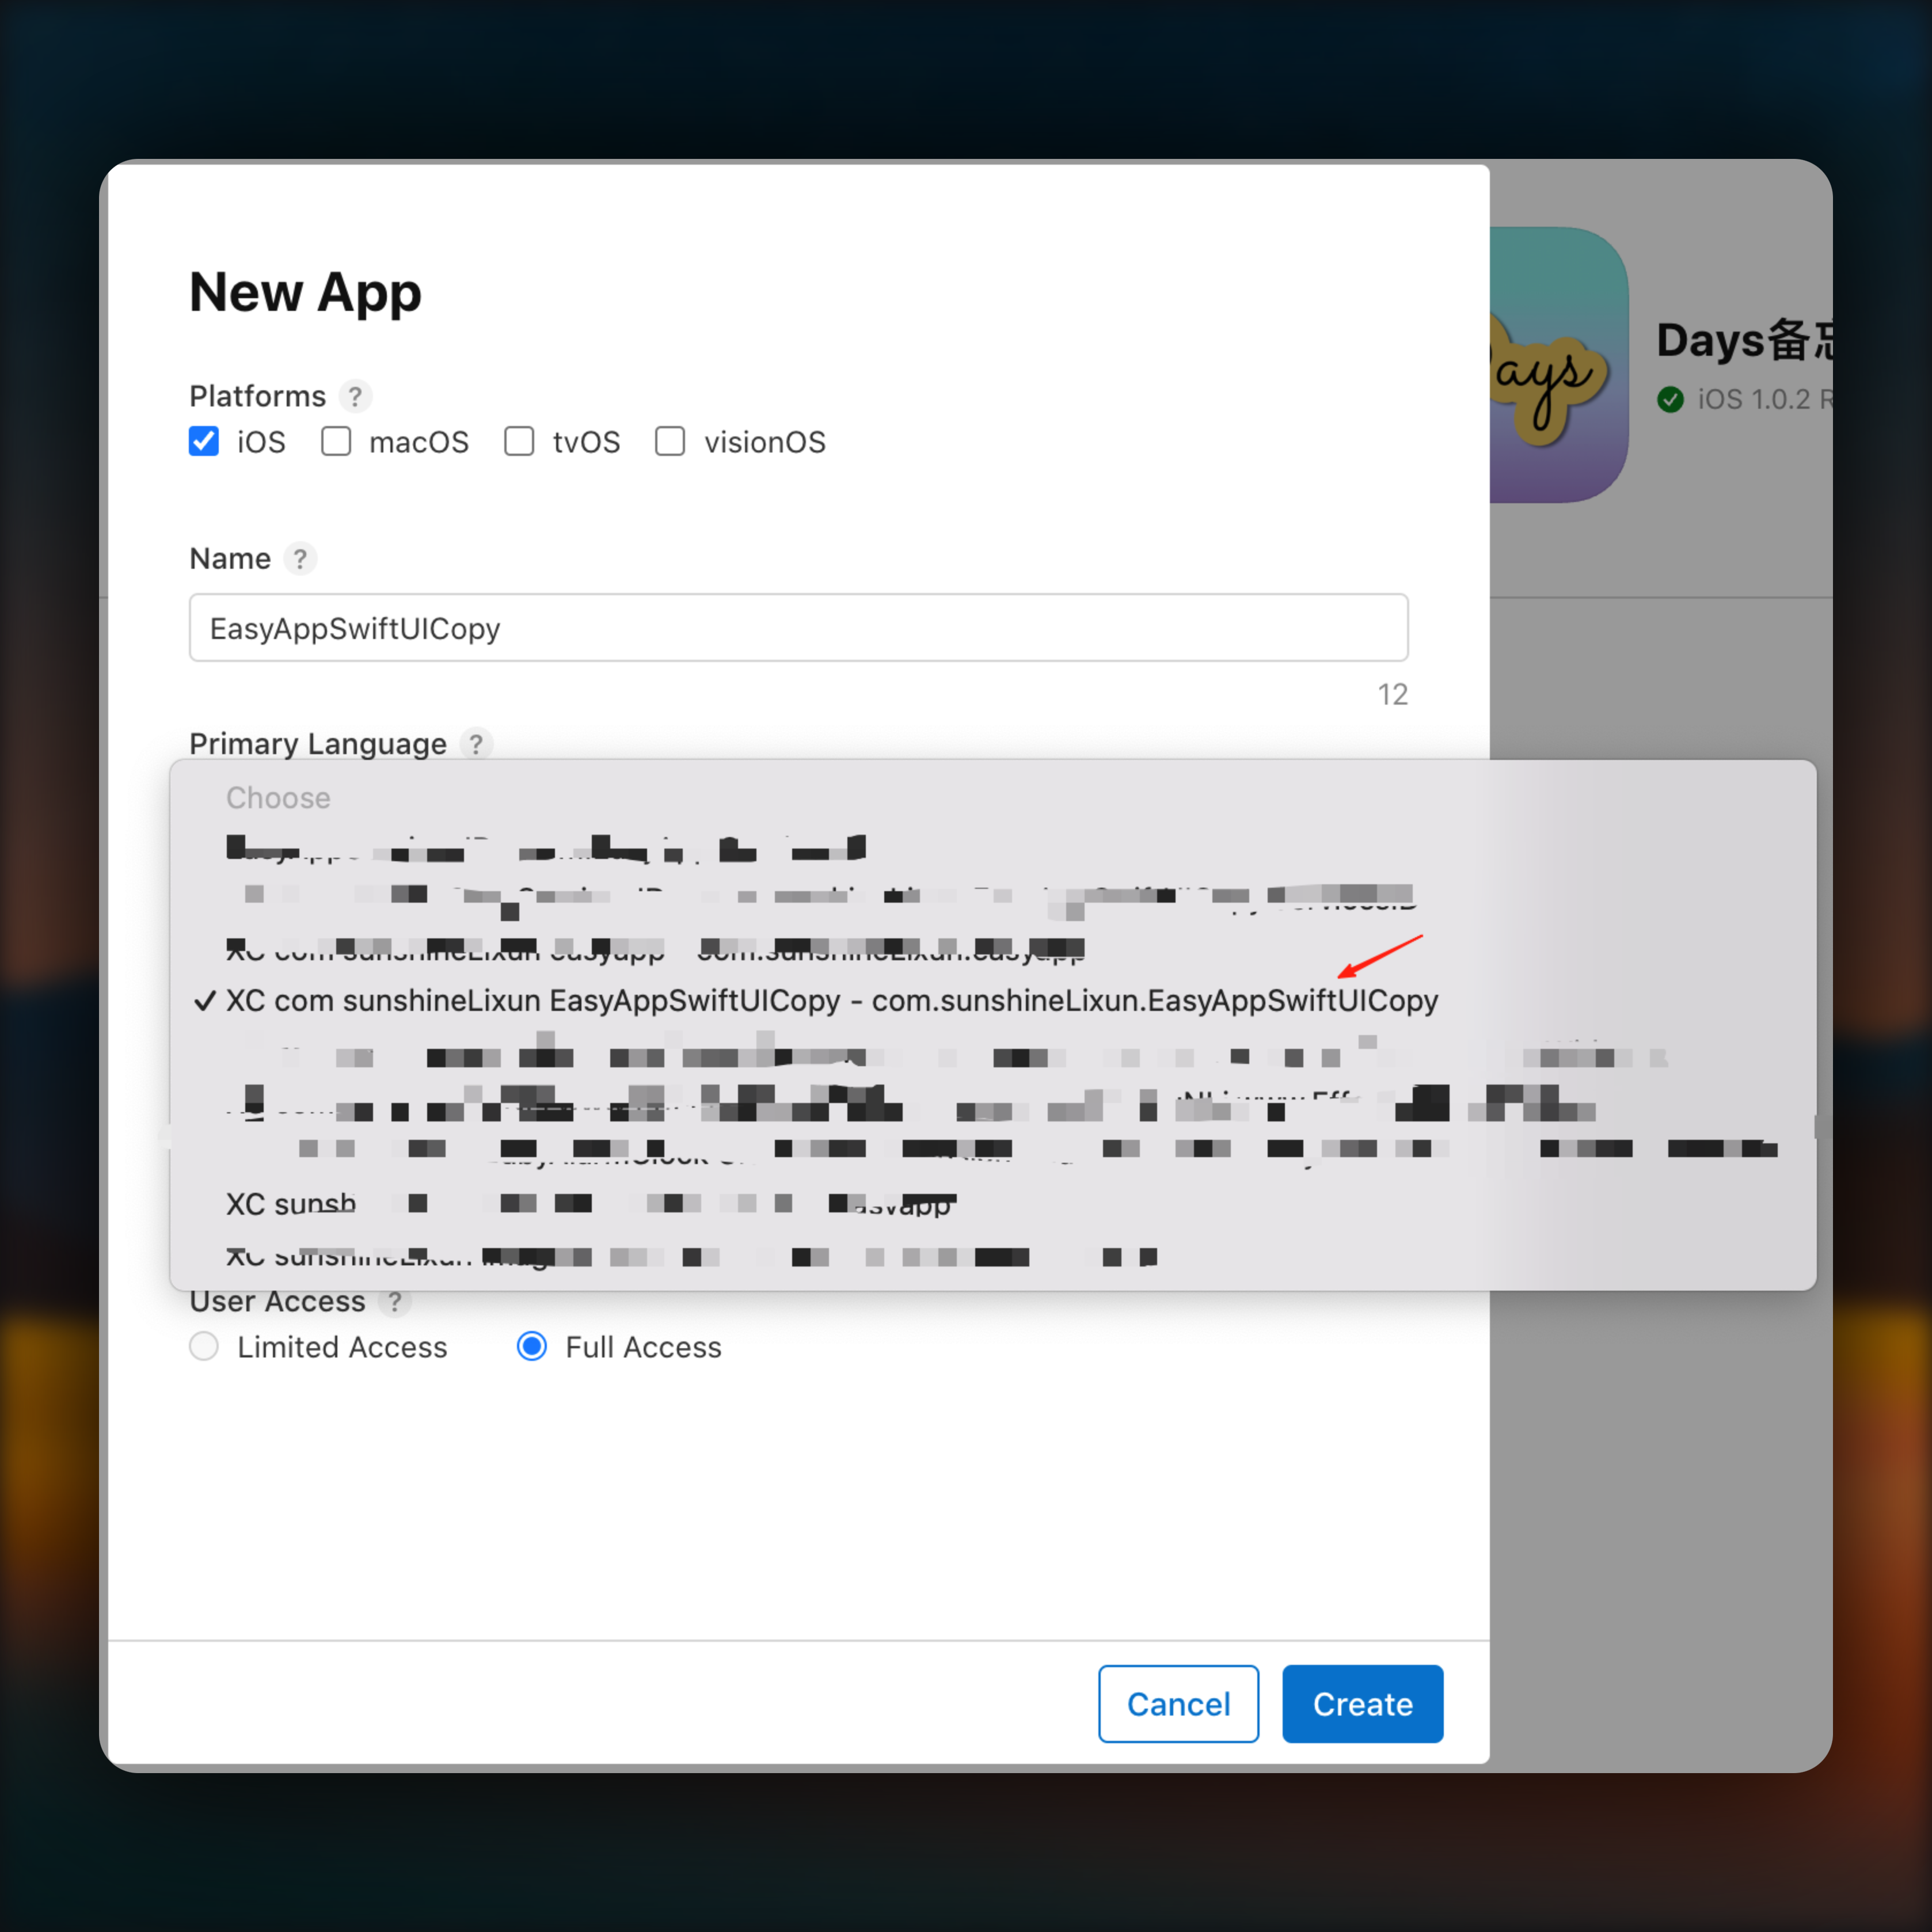
4. Fill in SKU information (this information is only visible to you), you can fill in the App name
5. Access selection: Full Access
6. Click Create button
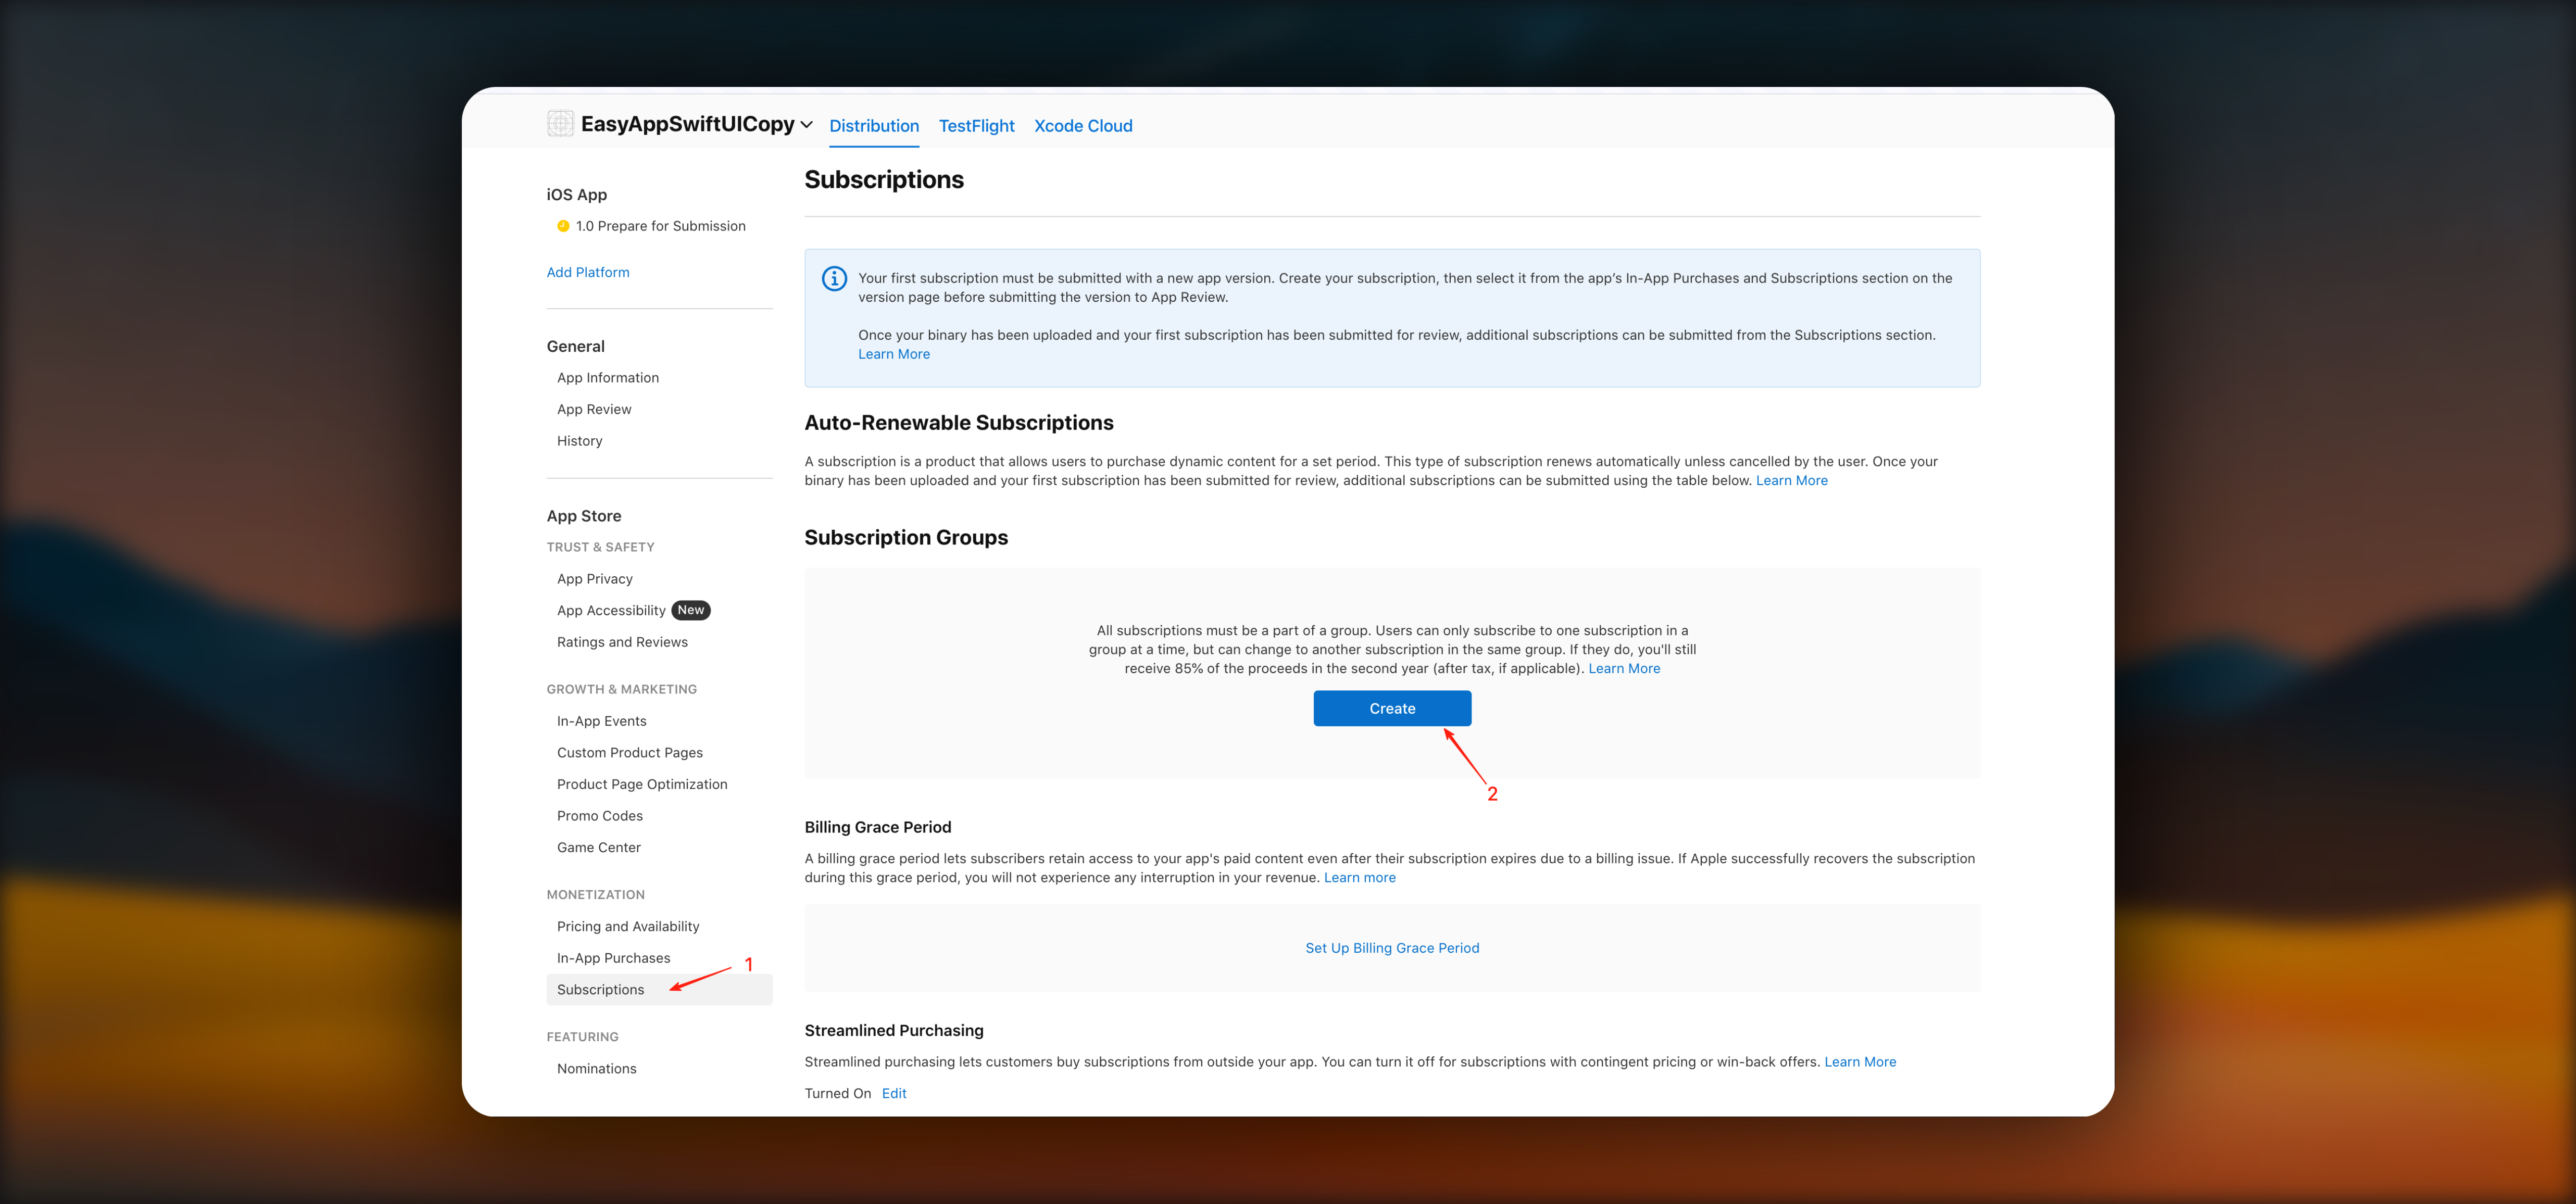
Recurring subscriptions depend on subscription groups, so you need to create a subscription group first.
## Create Subscription Group
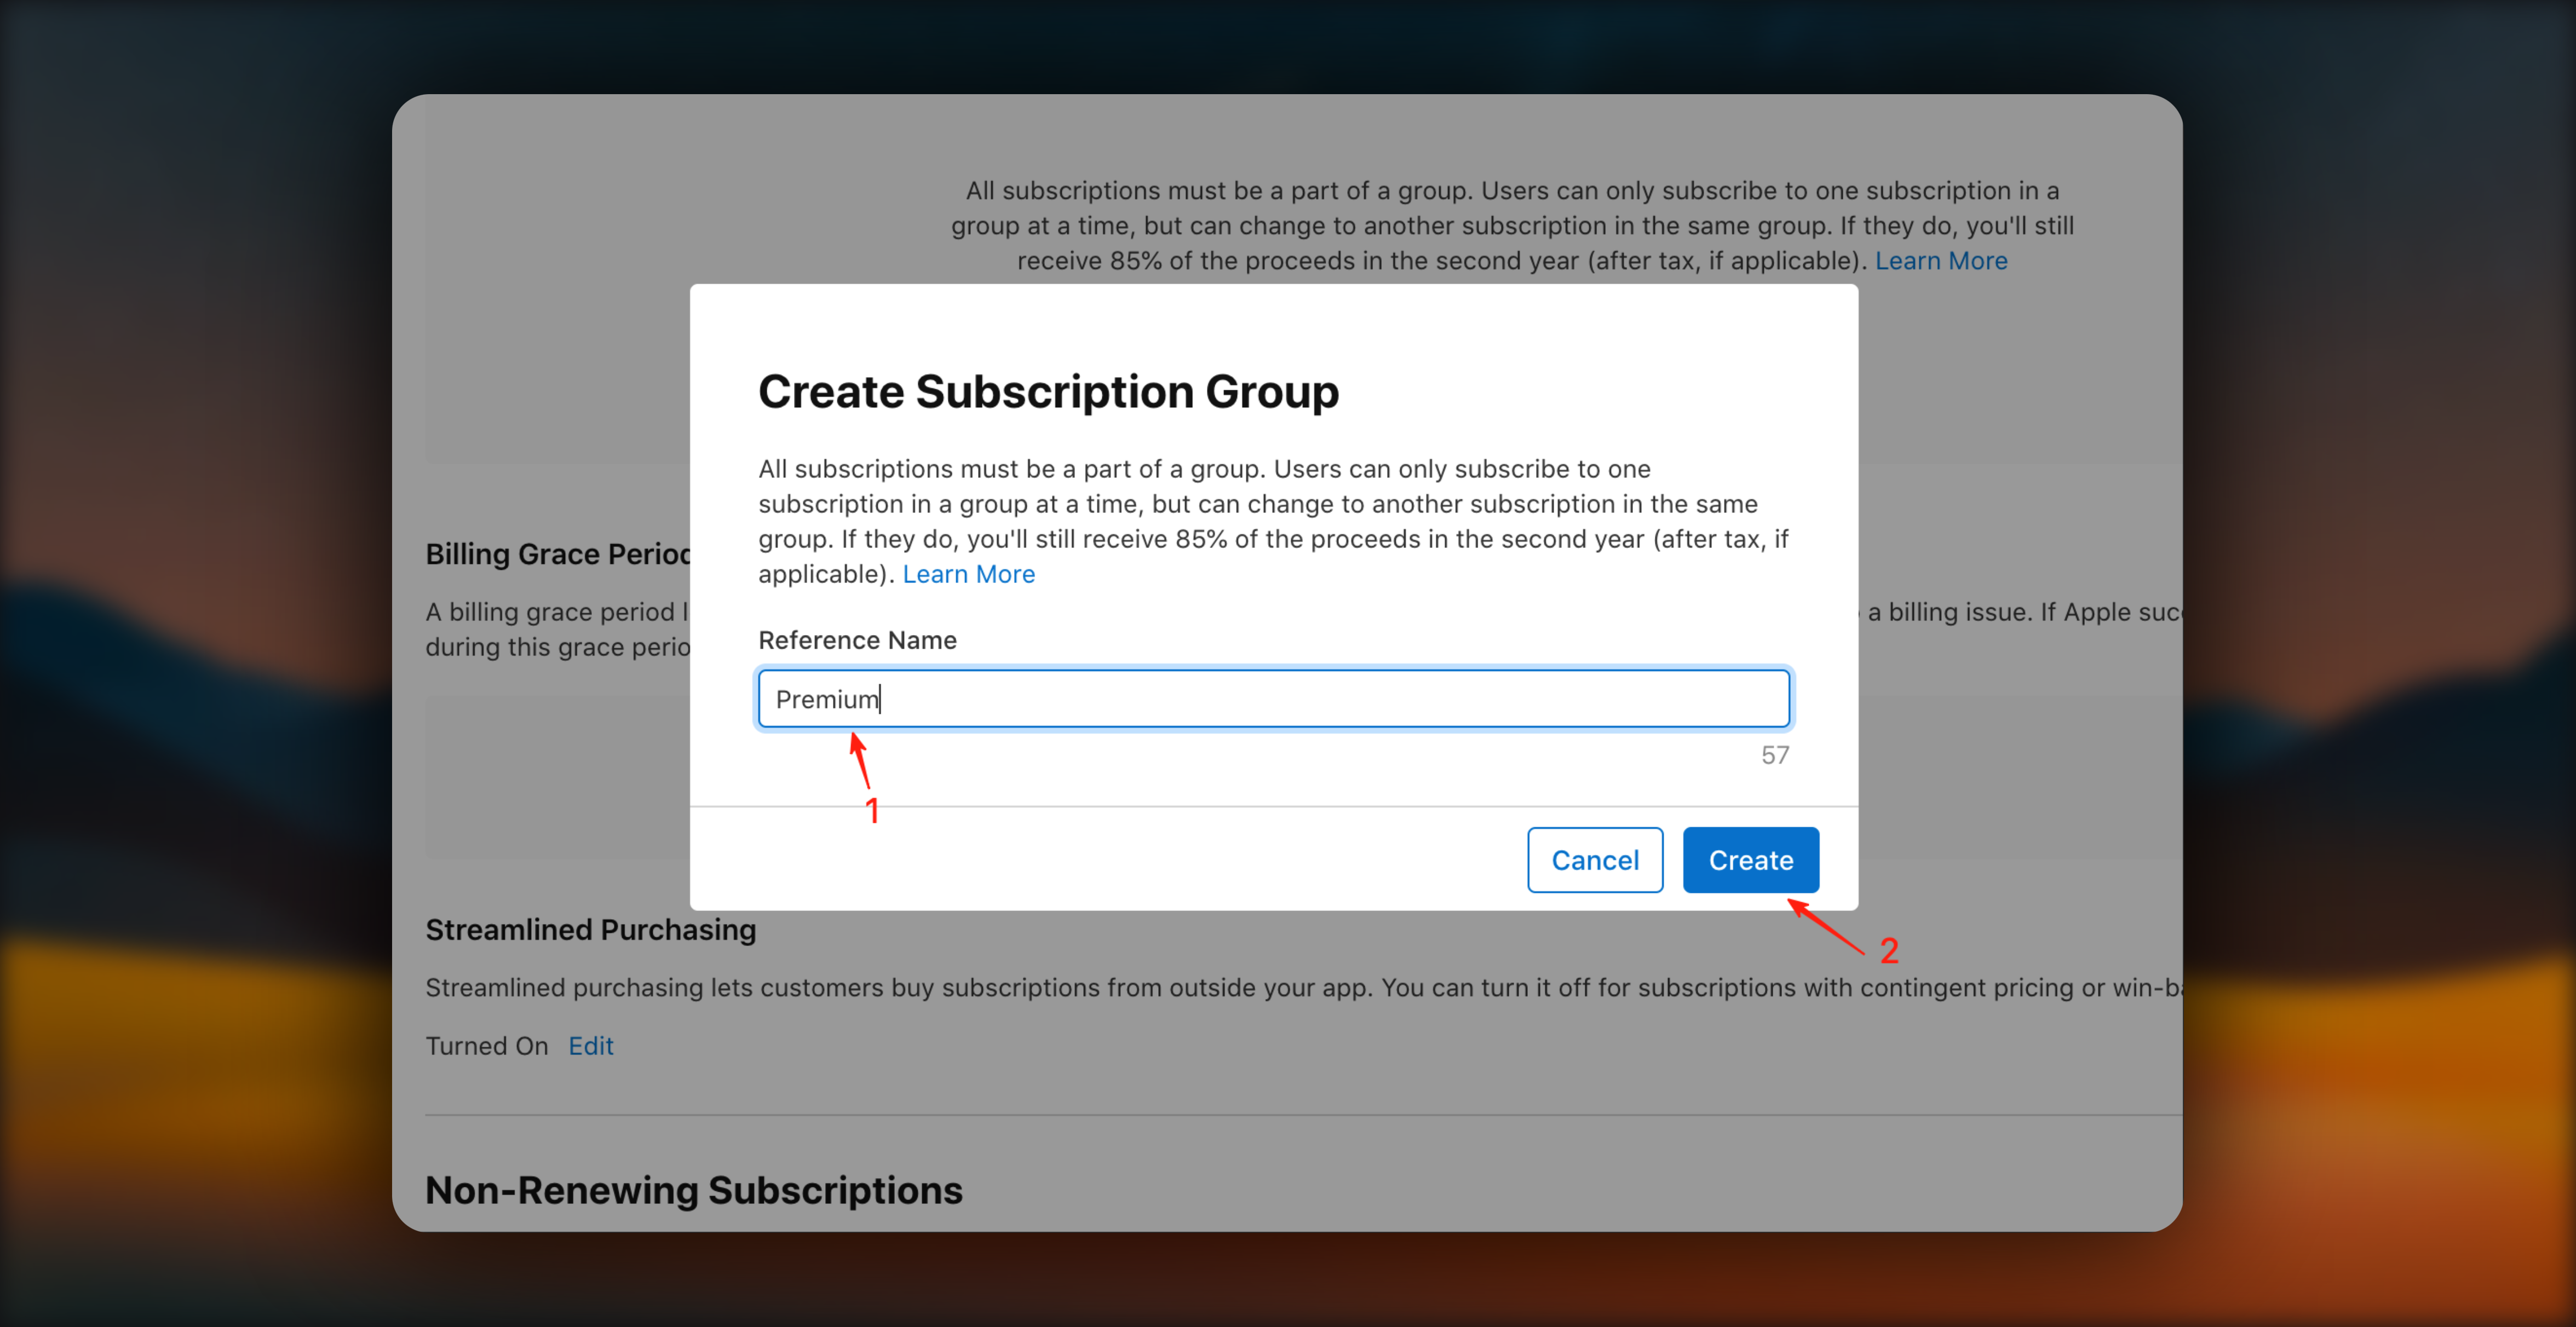
1. Select `Subscriptions` on the left side, click the `Create` button to create a new subscription group
2. Fill in your subscription group name, most are names like `Pro`, `Plus`, `VIP`, `Premium`, `Unlimited`, etc. Then click the `Create` button
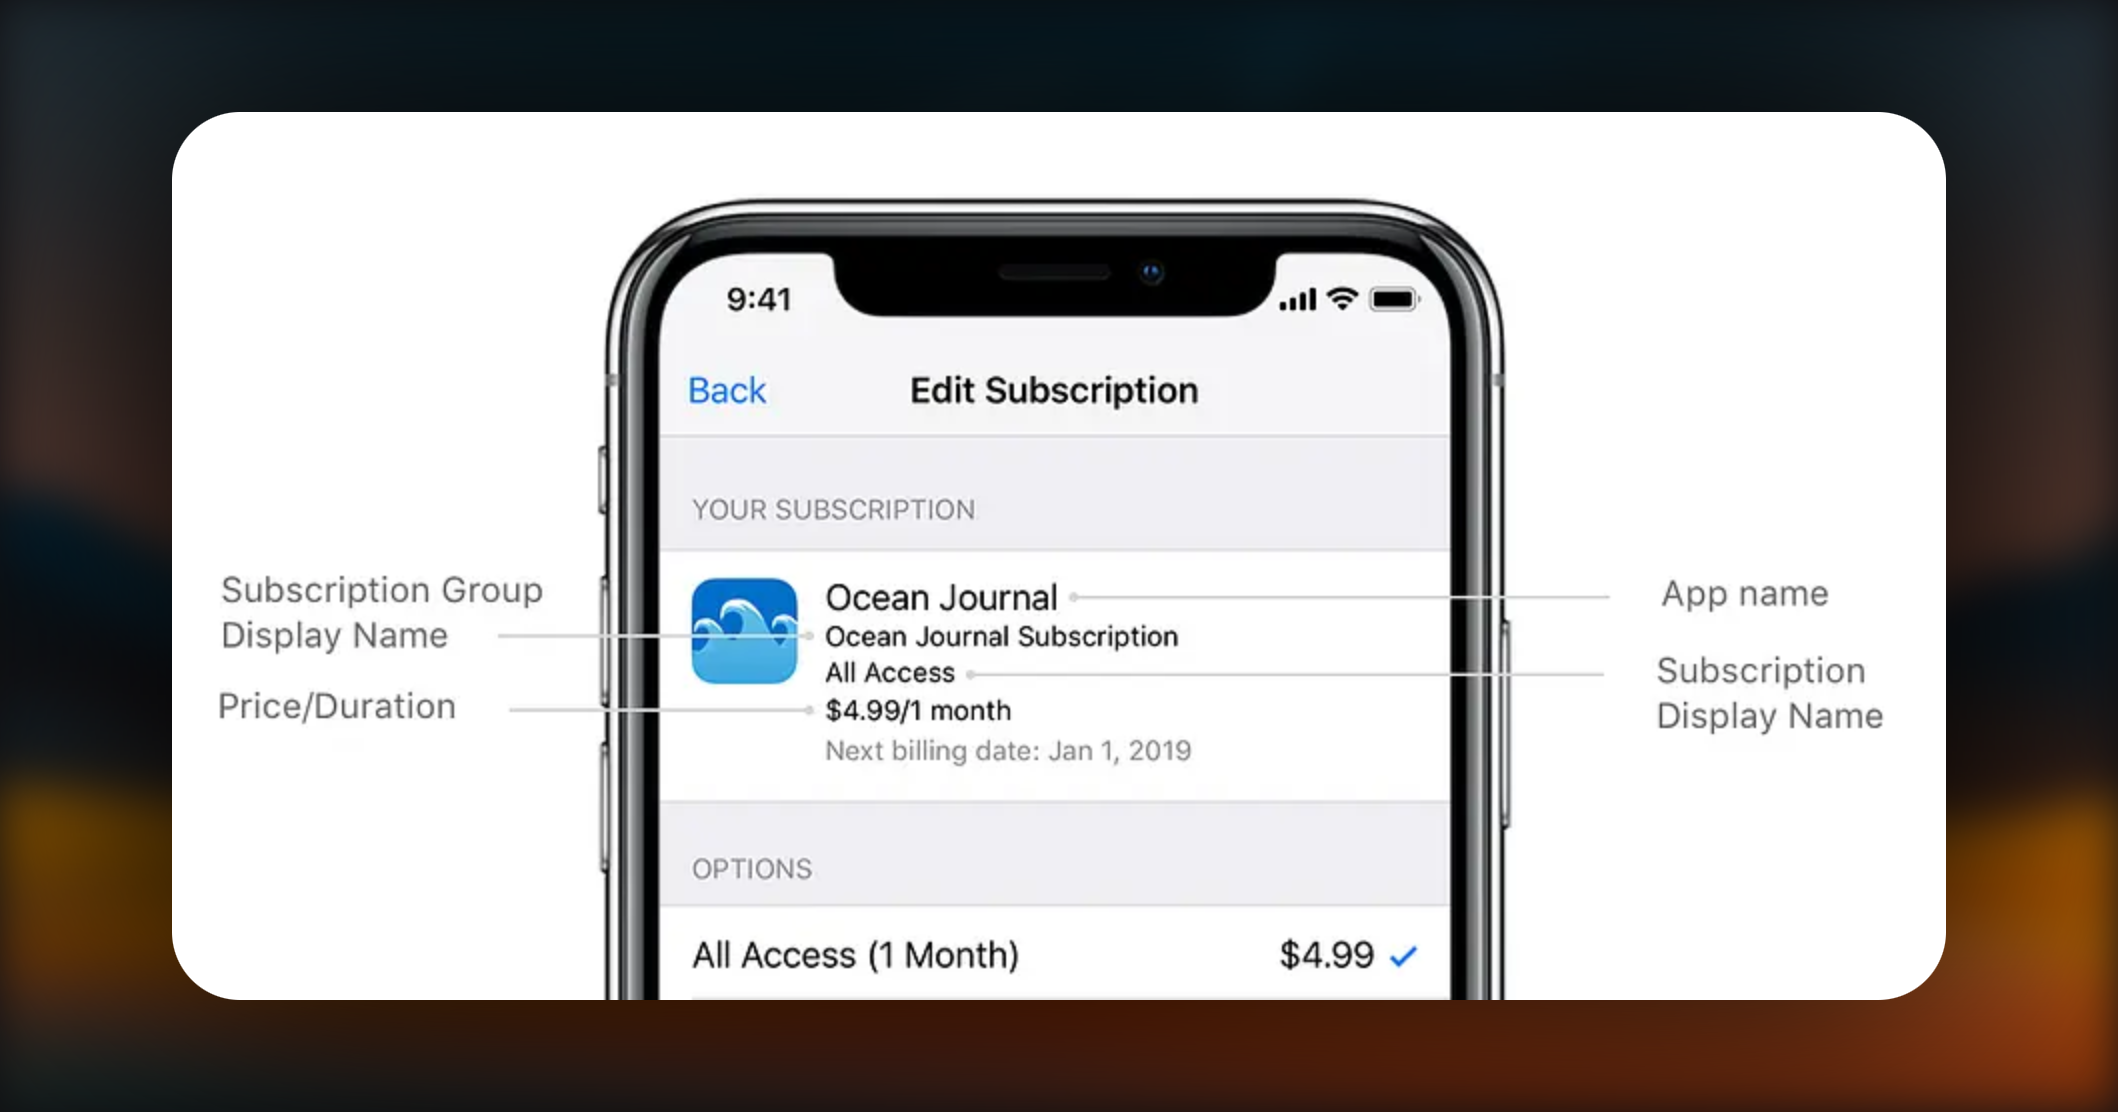
3. Fill in subscription group internationalization information. We'll use English/Chinese as examples, filling in the English subscription group name and description.
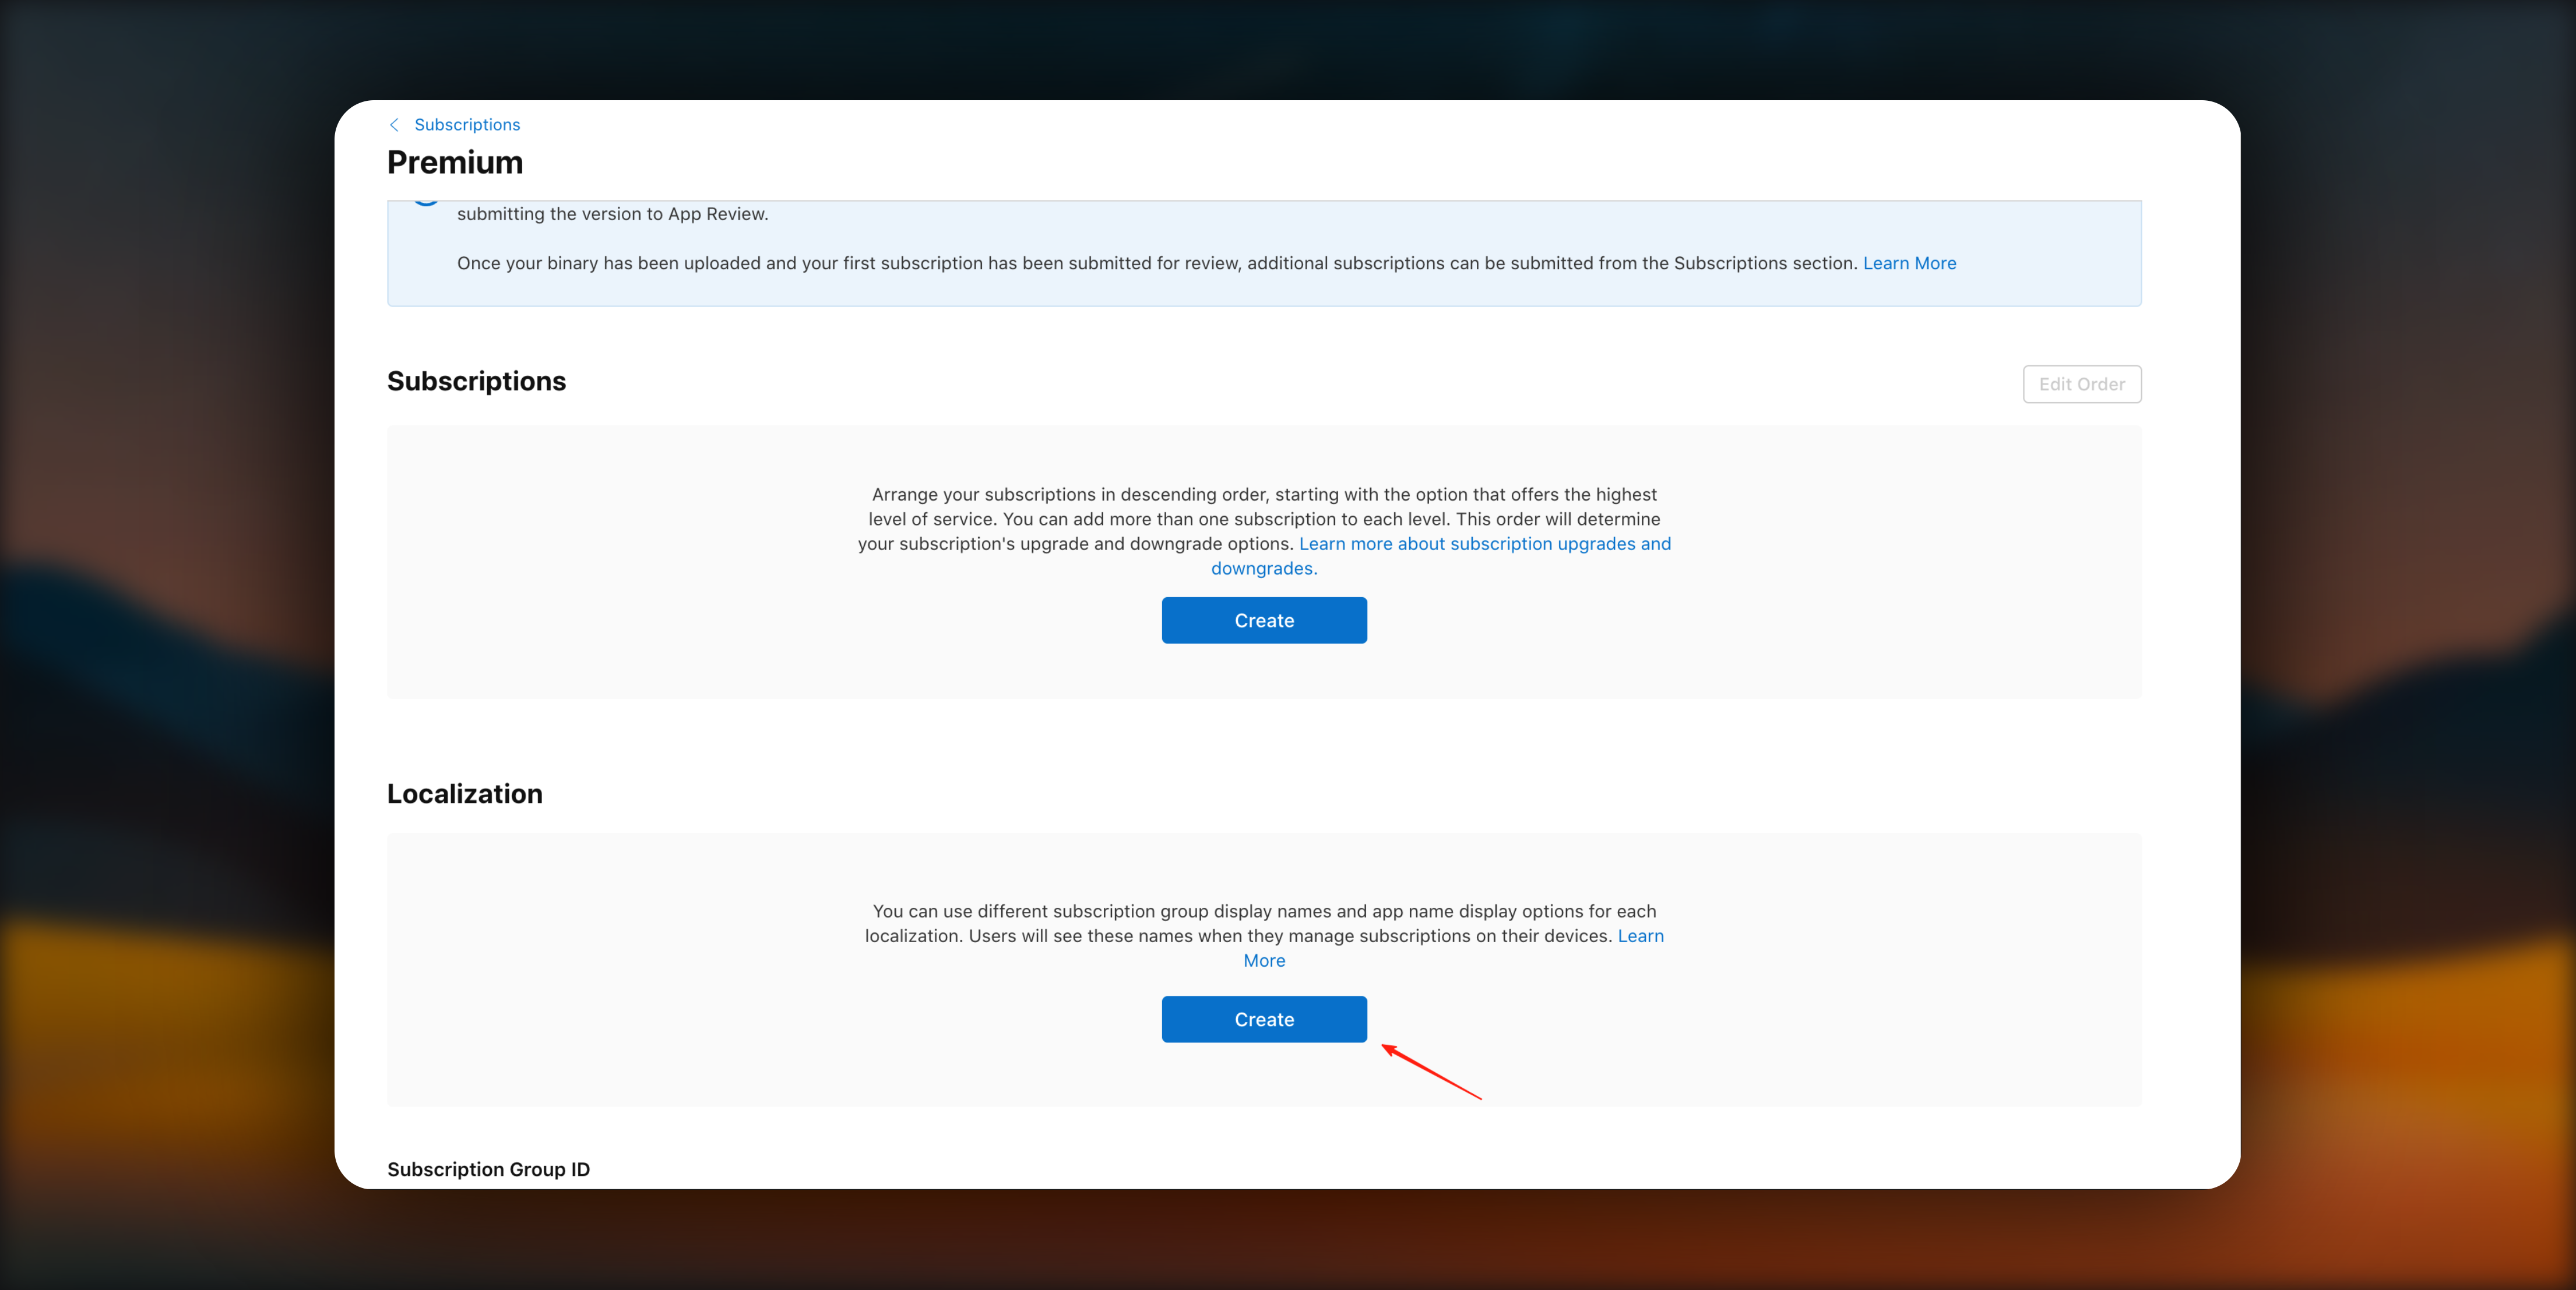
Subscription group internationalization information will automatically display the corresponding language in the AppStore based on the user's region.
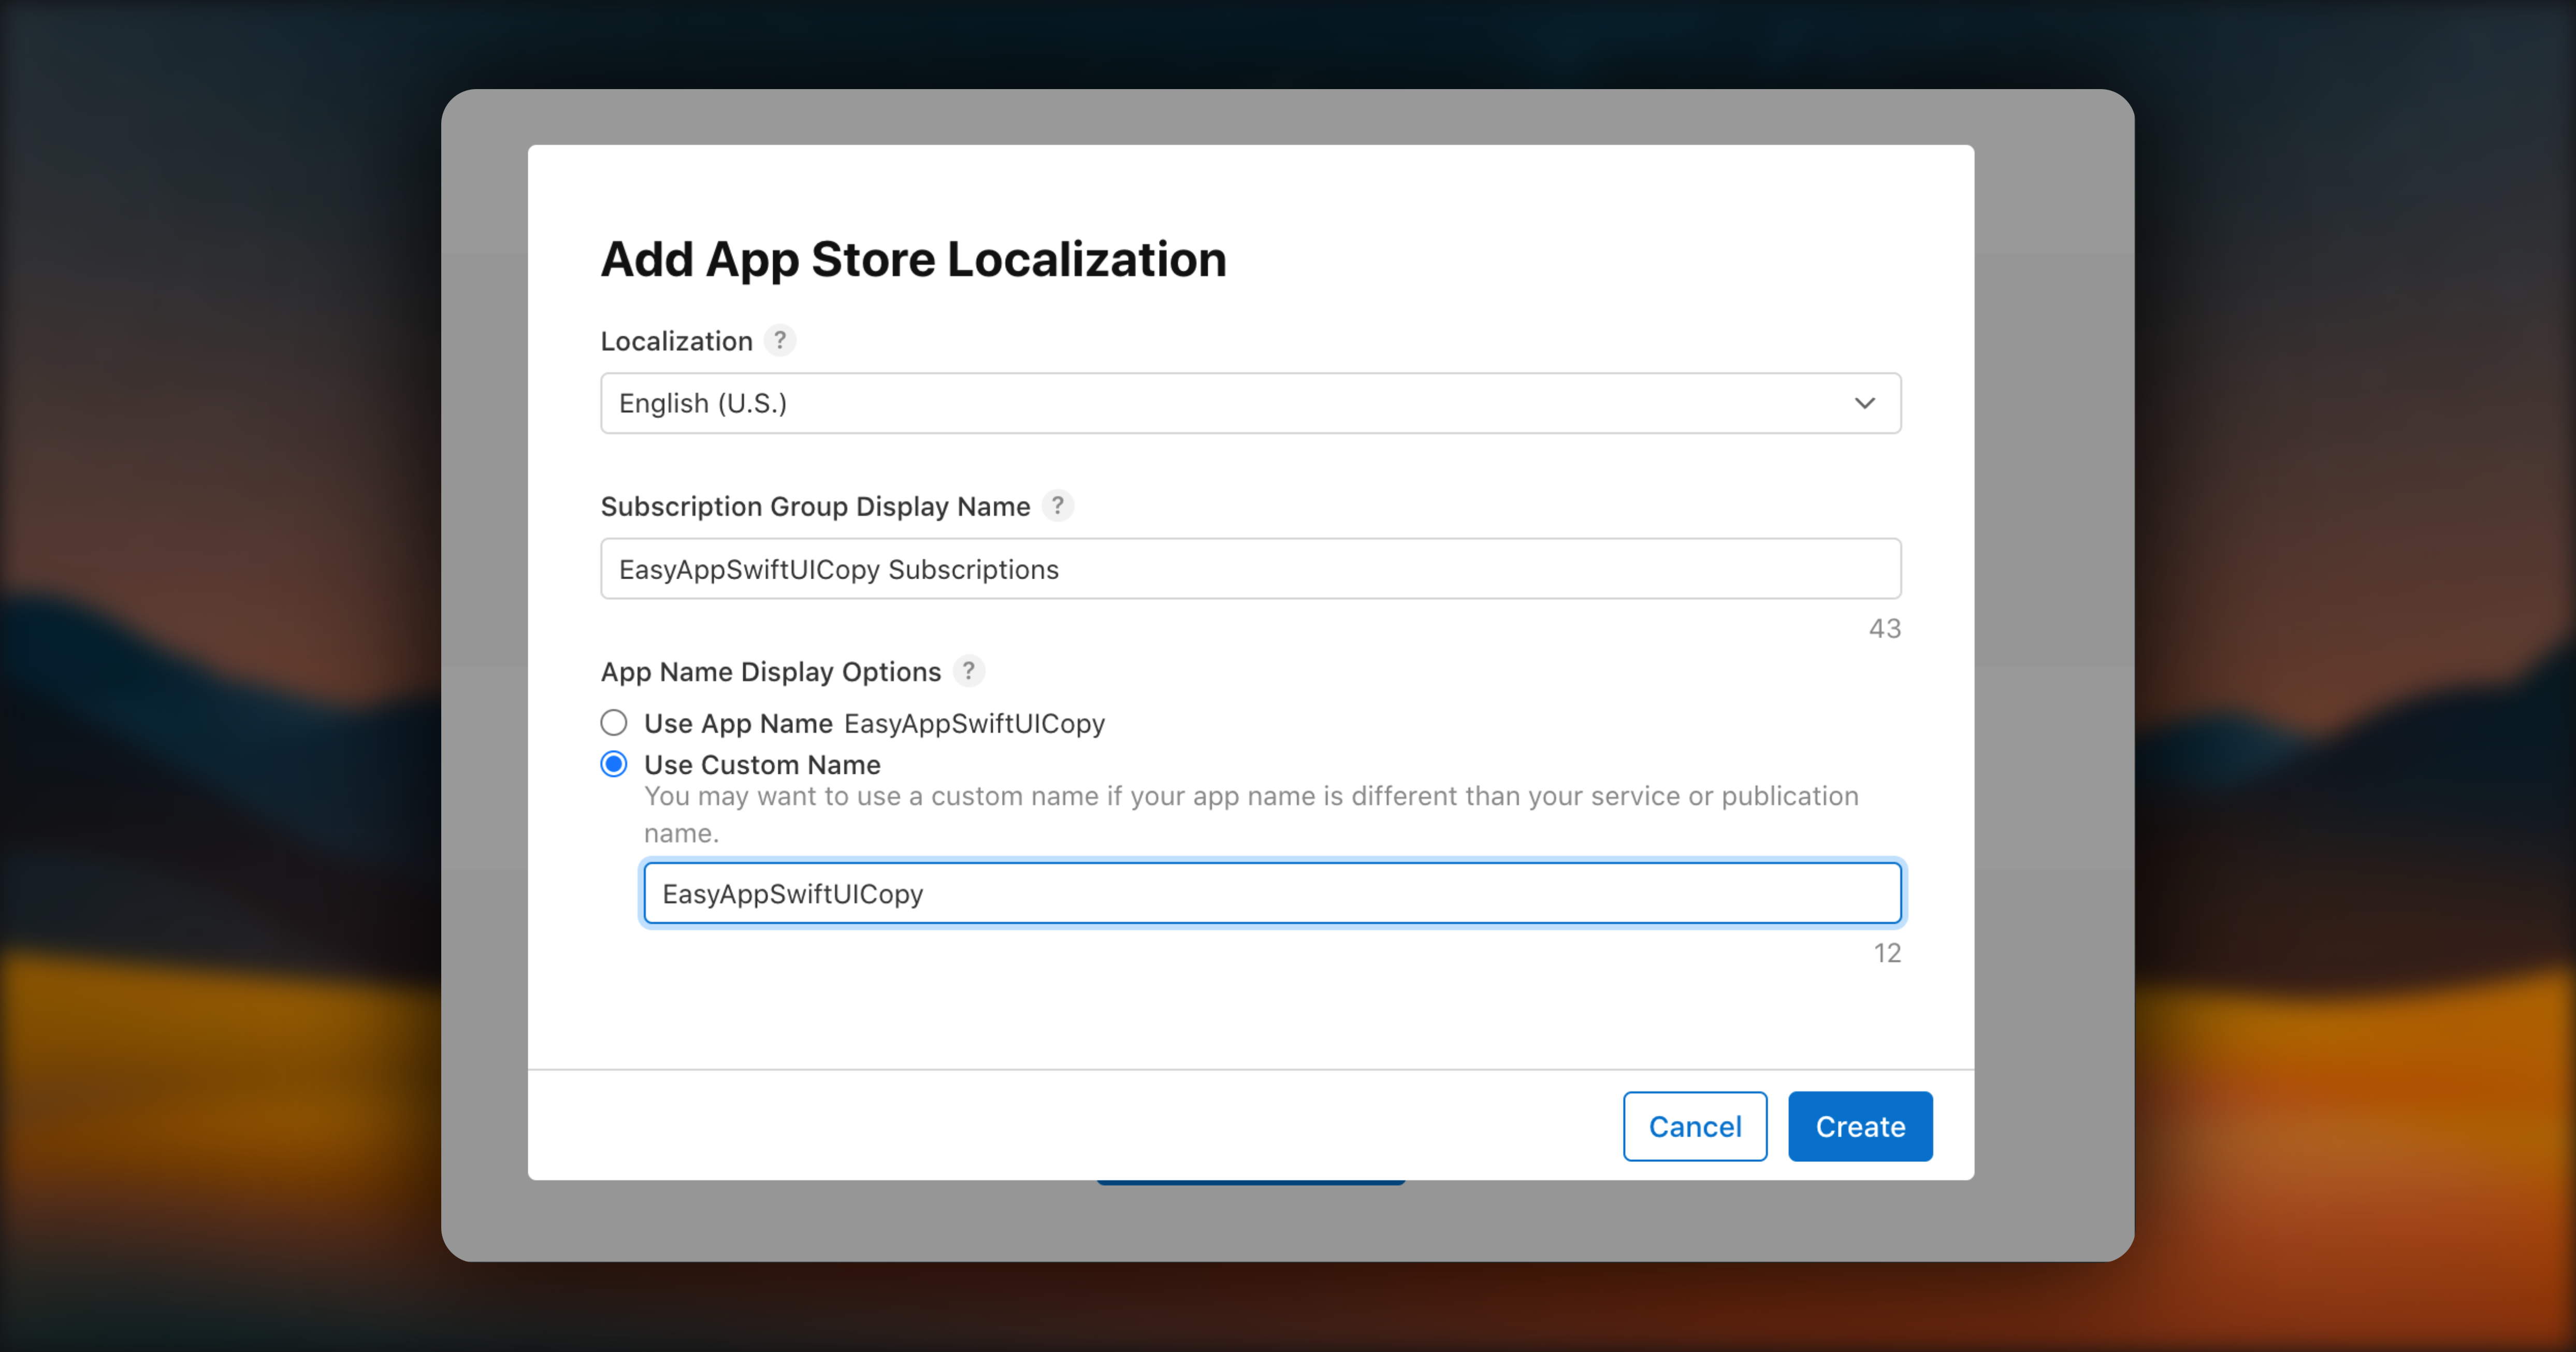
The following image shows subscription group related information
* Step 1: Localization: Select the corresponding language
* Step 2: Fill in subscription group name
* Step 3: App Name Display Options select: Use Custom Name, because you may modify the App name later, so choose Use Custom Name here
* Step 4: Create to save
Using Chinese as an example
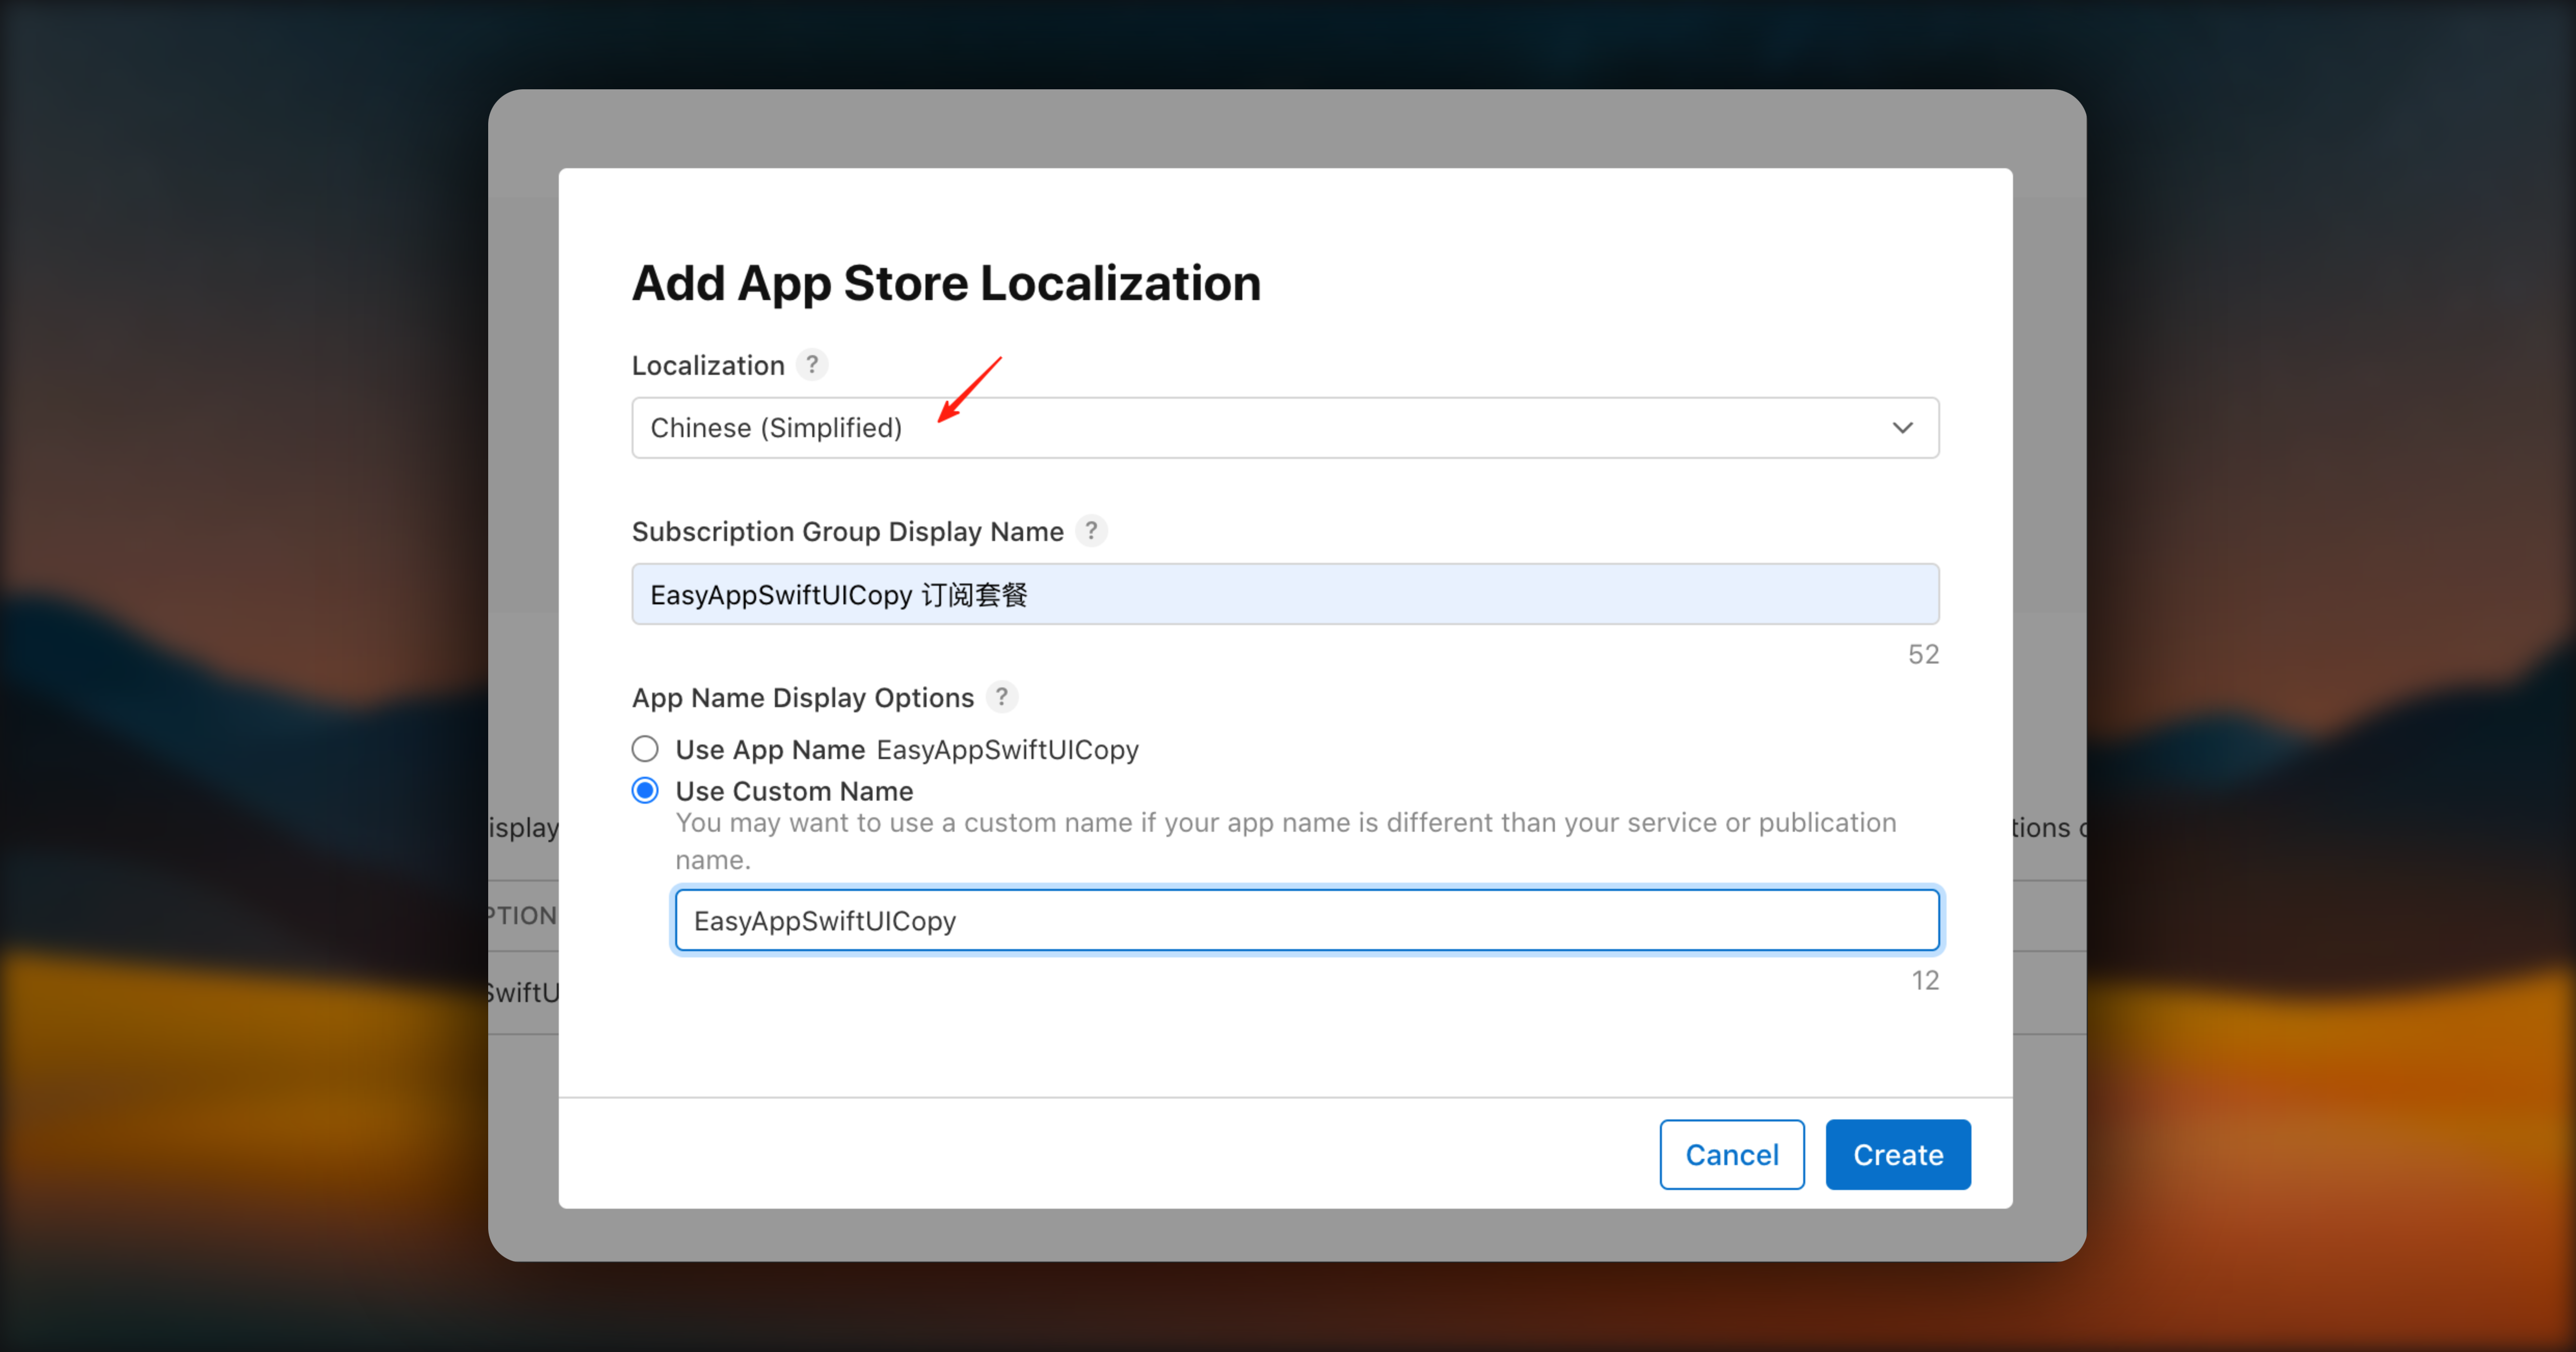
After creation, you can view and manage internationalization information here

## Create Subscriptions Under Subscription Group
In most cases, the subscriptions we create are recurring subscriptions, which are common annual subscriptions (yearly payment/membership), monthly subscriptions (monthly payment/membership), or weekly subscriptions (weekly payment/membership).
So we'll use annual and monthly subscriptions as examples. Similarly, you can create weekly subscriptions. The steps are all the same.
### Create Annual Subscription
#### 1. Create Subscription Type
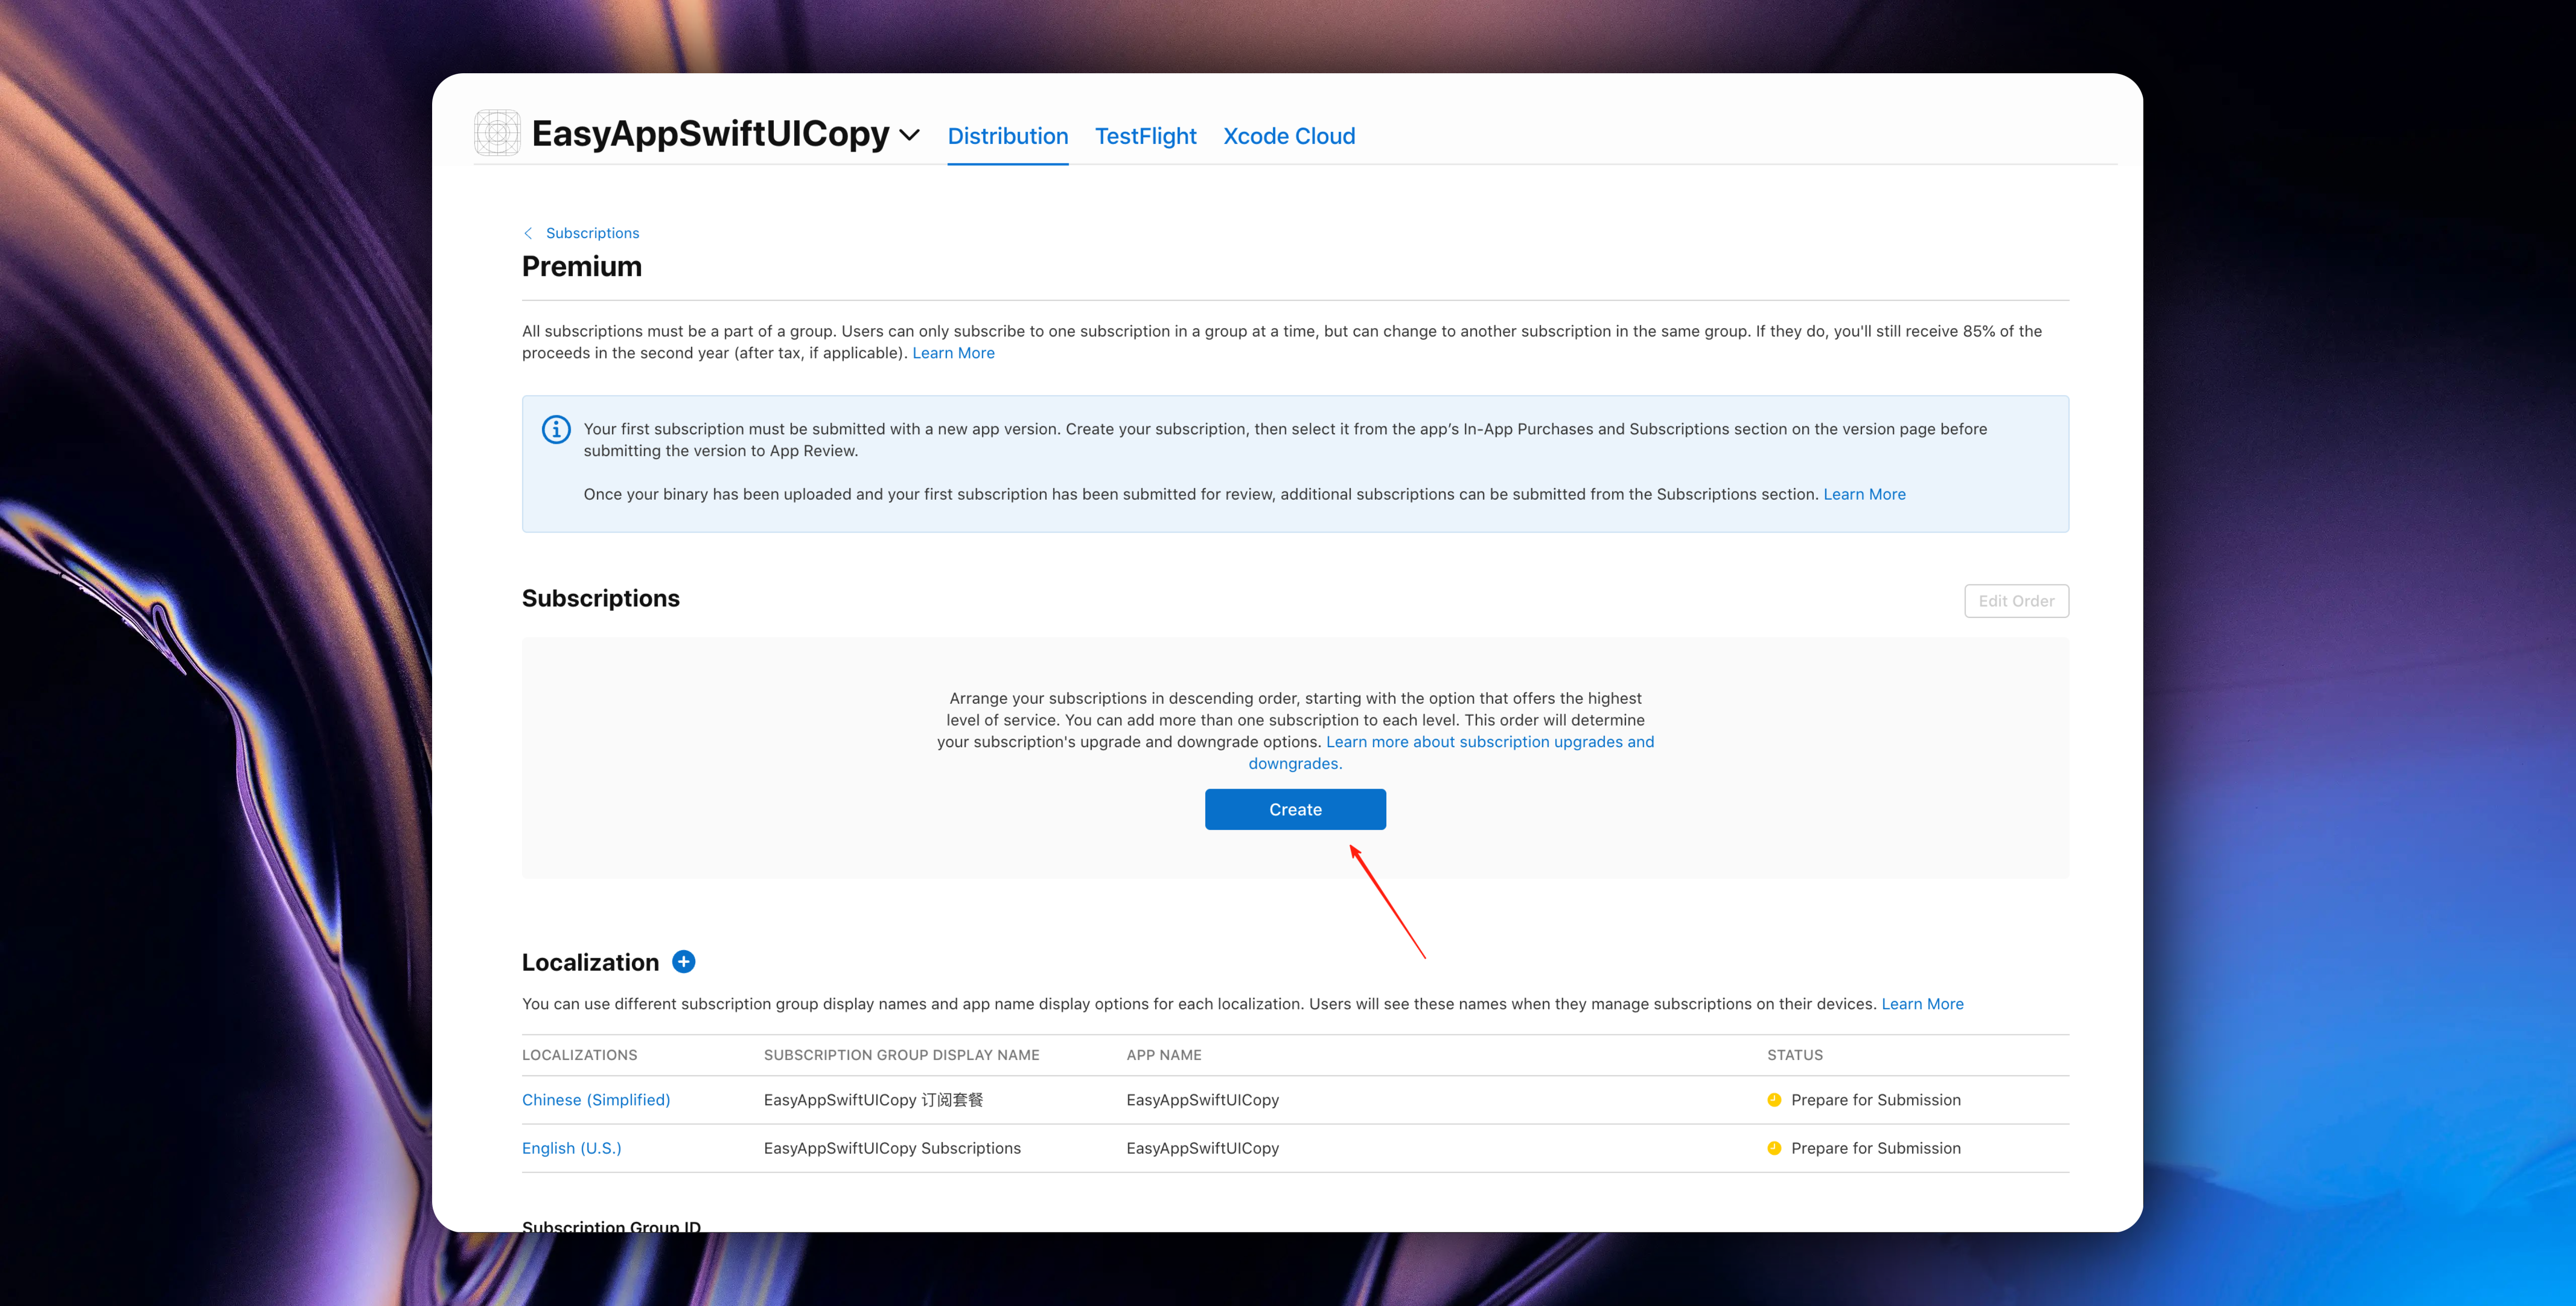
Next, the system will ask you to provide a reference name and product ID
We need to explain Reference Name and Product ID to help you better understand App Store Connect related knowledge
* Reference Name: Reference Name will be used for App Store Connect and Apple's sales and trends reports, but will not be displayed to users in the App Store. It's recommended to use an easy-to-understand product description as the name, and the length must not exceed 64 characters.
* Product ID: Product ID is a unique alphanumeric identifier used to access your product in development and sync with RevenueCat. Once you use a product ID for a product in App Store Connect, even if the product is deleted, that ID cannot be used for any of your other apps. It's recommended to stay organized from the beginning - we recommend using a unified naming scheme for all product identifiers, for example:
`___`
We further explain the above specification:
* app (application prefix): This is a unique prefix exclusive to your application, because the same product ID cannot be used for any other apps you create in the future.
* price: The fee you plan to charge for this product in the default currency.
* duration (subscription duration): The duration of the regular subscription cycle.
* intro duration (trial period duration): If there is a trial period, this represents the duration of the trial period.
* intro price (trial price): If there is a trial period, this represents the trial price in the default currency.
In this example, I want to set up an annual subscription priced at $69. Following this format, I set the product identifier as:
`easyappswiftui_69_1y`
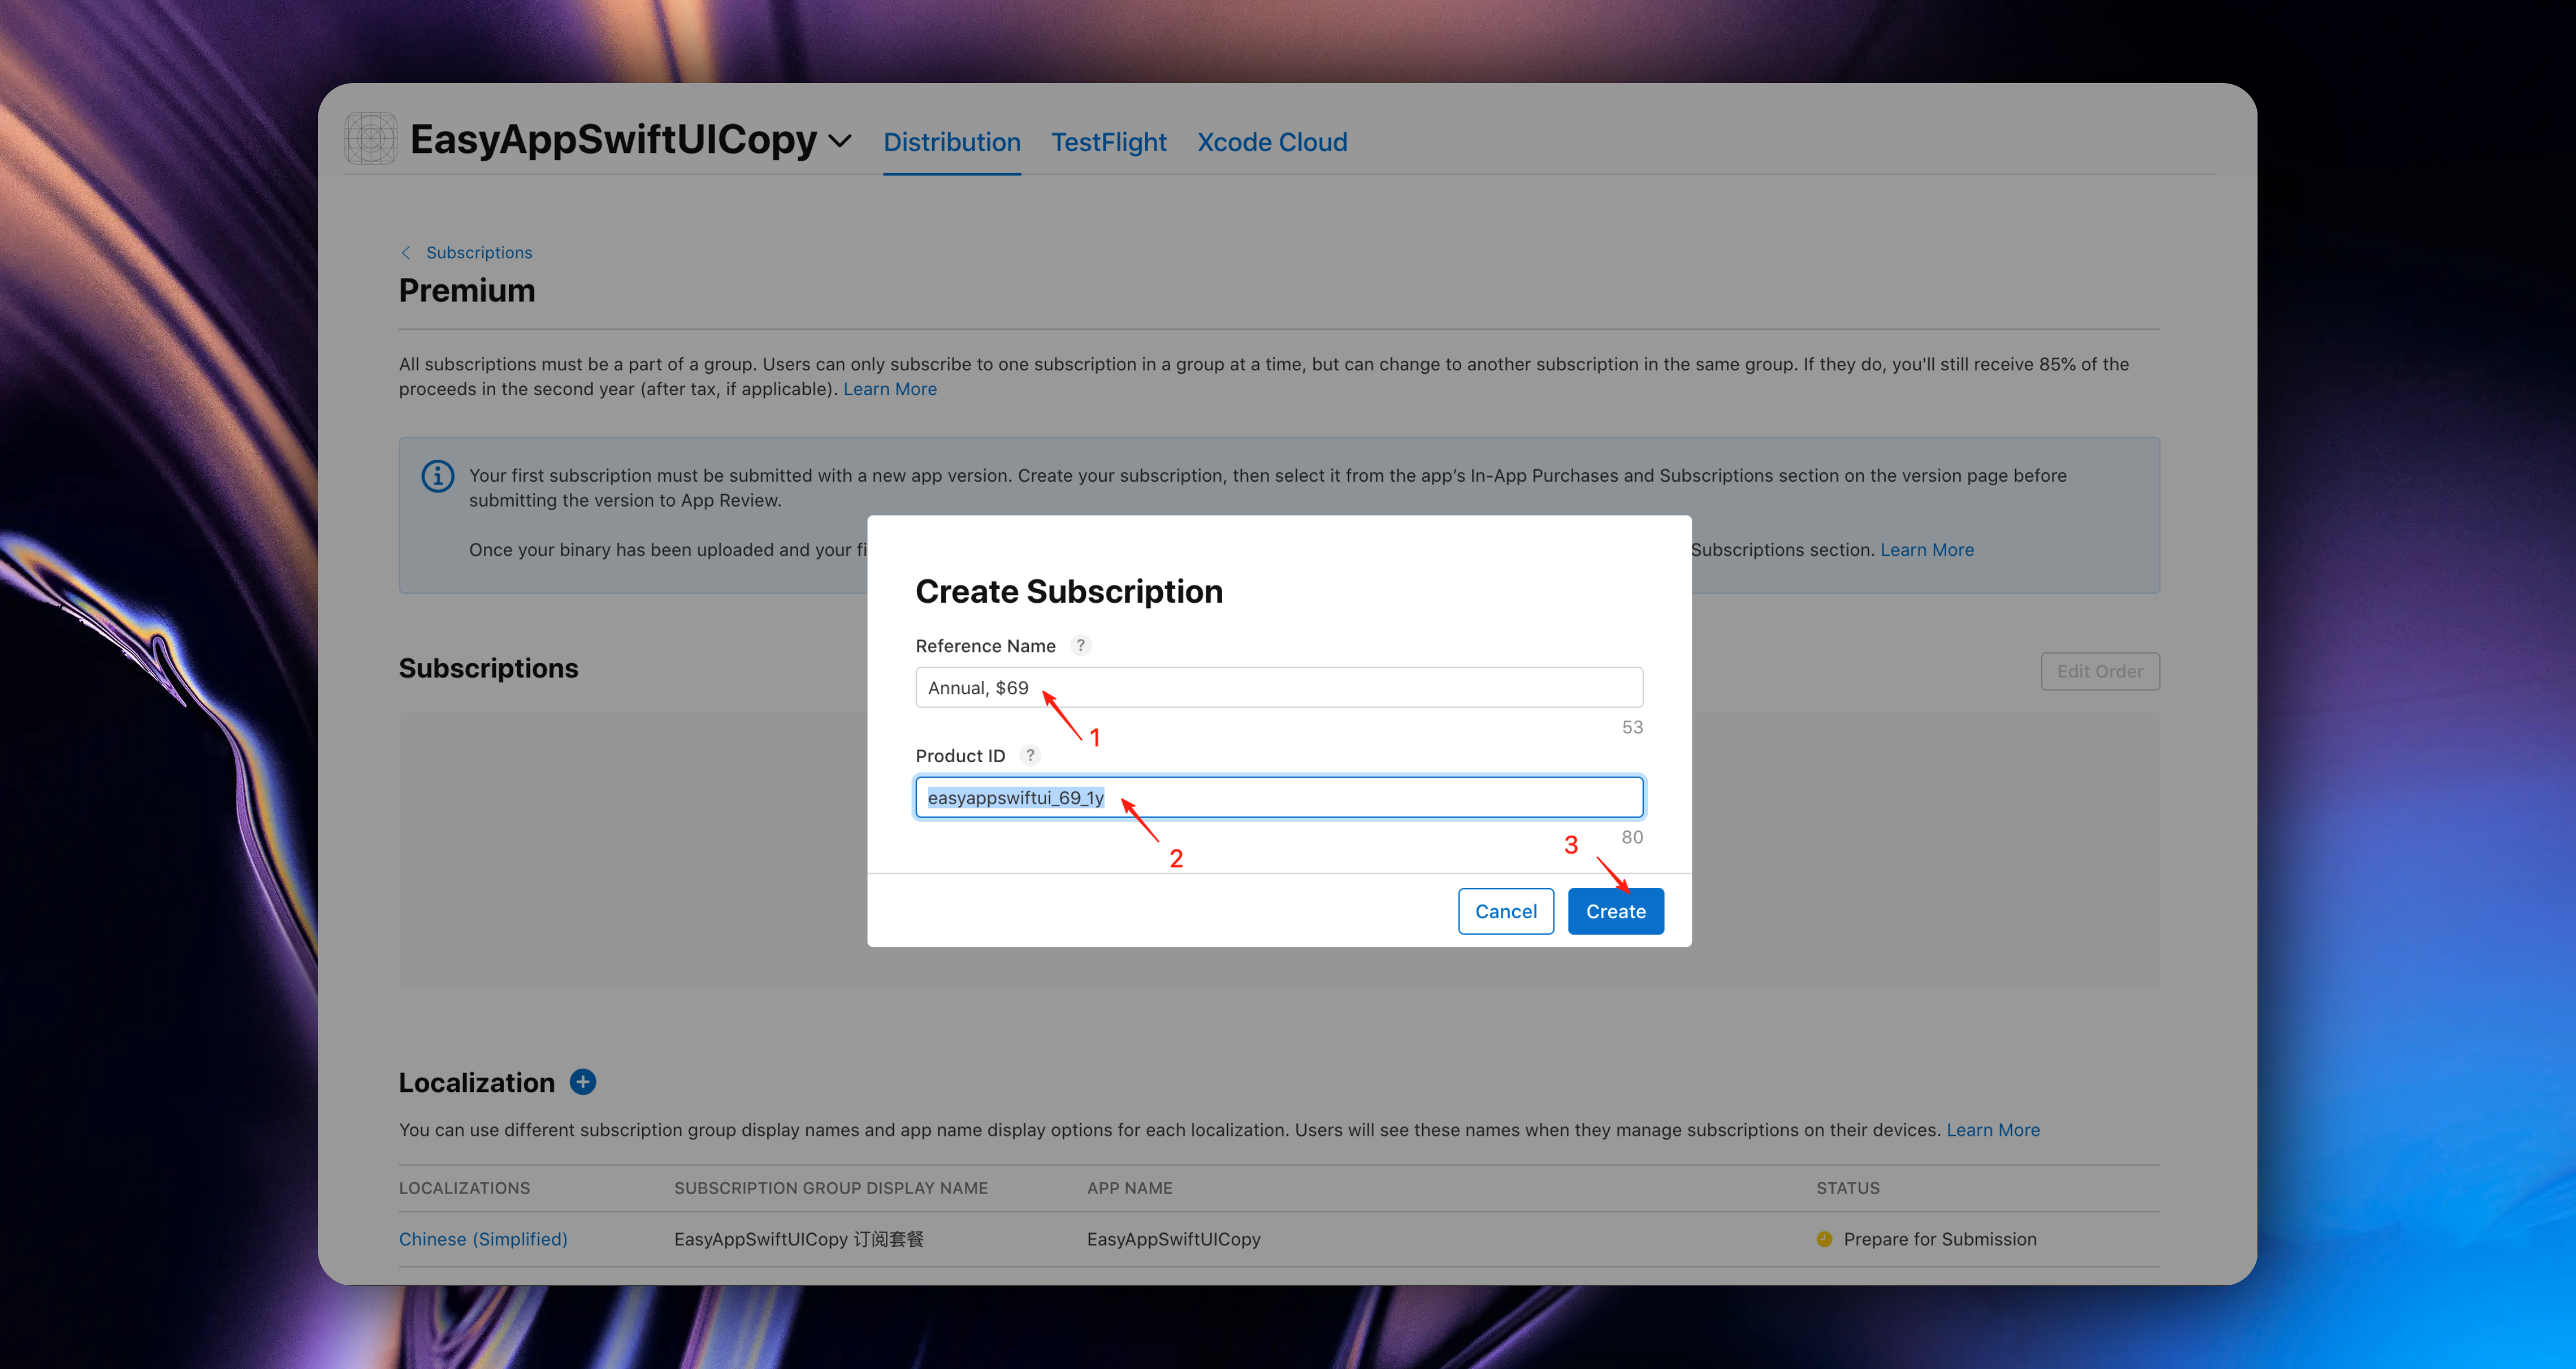
Using a consistent naming scheme for product identifiers in App Store Connect can save you time in the future and make it easier to organize and understand your products just by the identifier.
#### 2. Set Subscription Duration
After clicking Save in the previous step, we need to set the subscription duration. For annual membership, we select 1 year validity period.
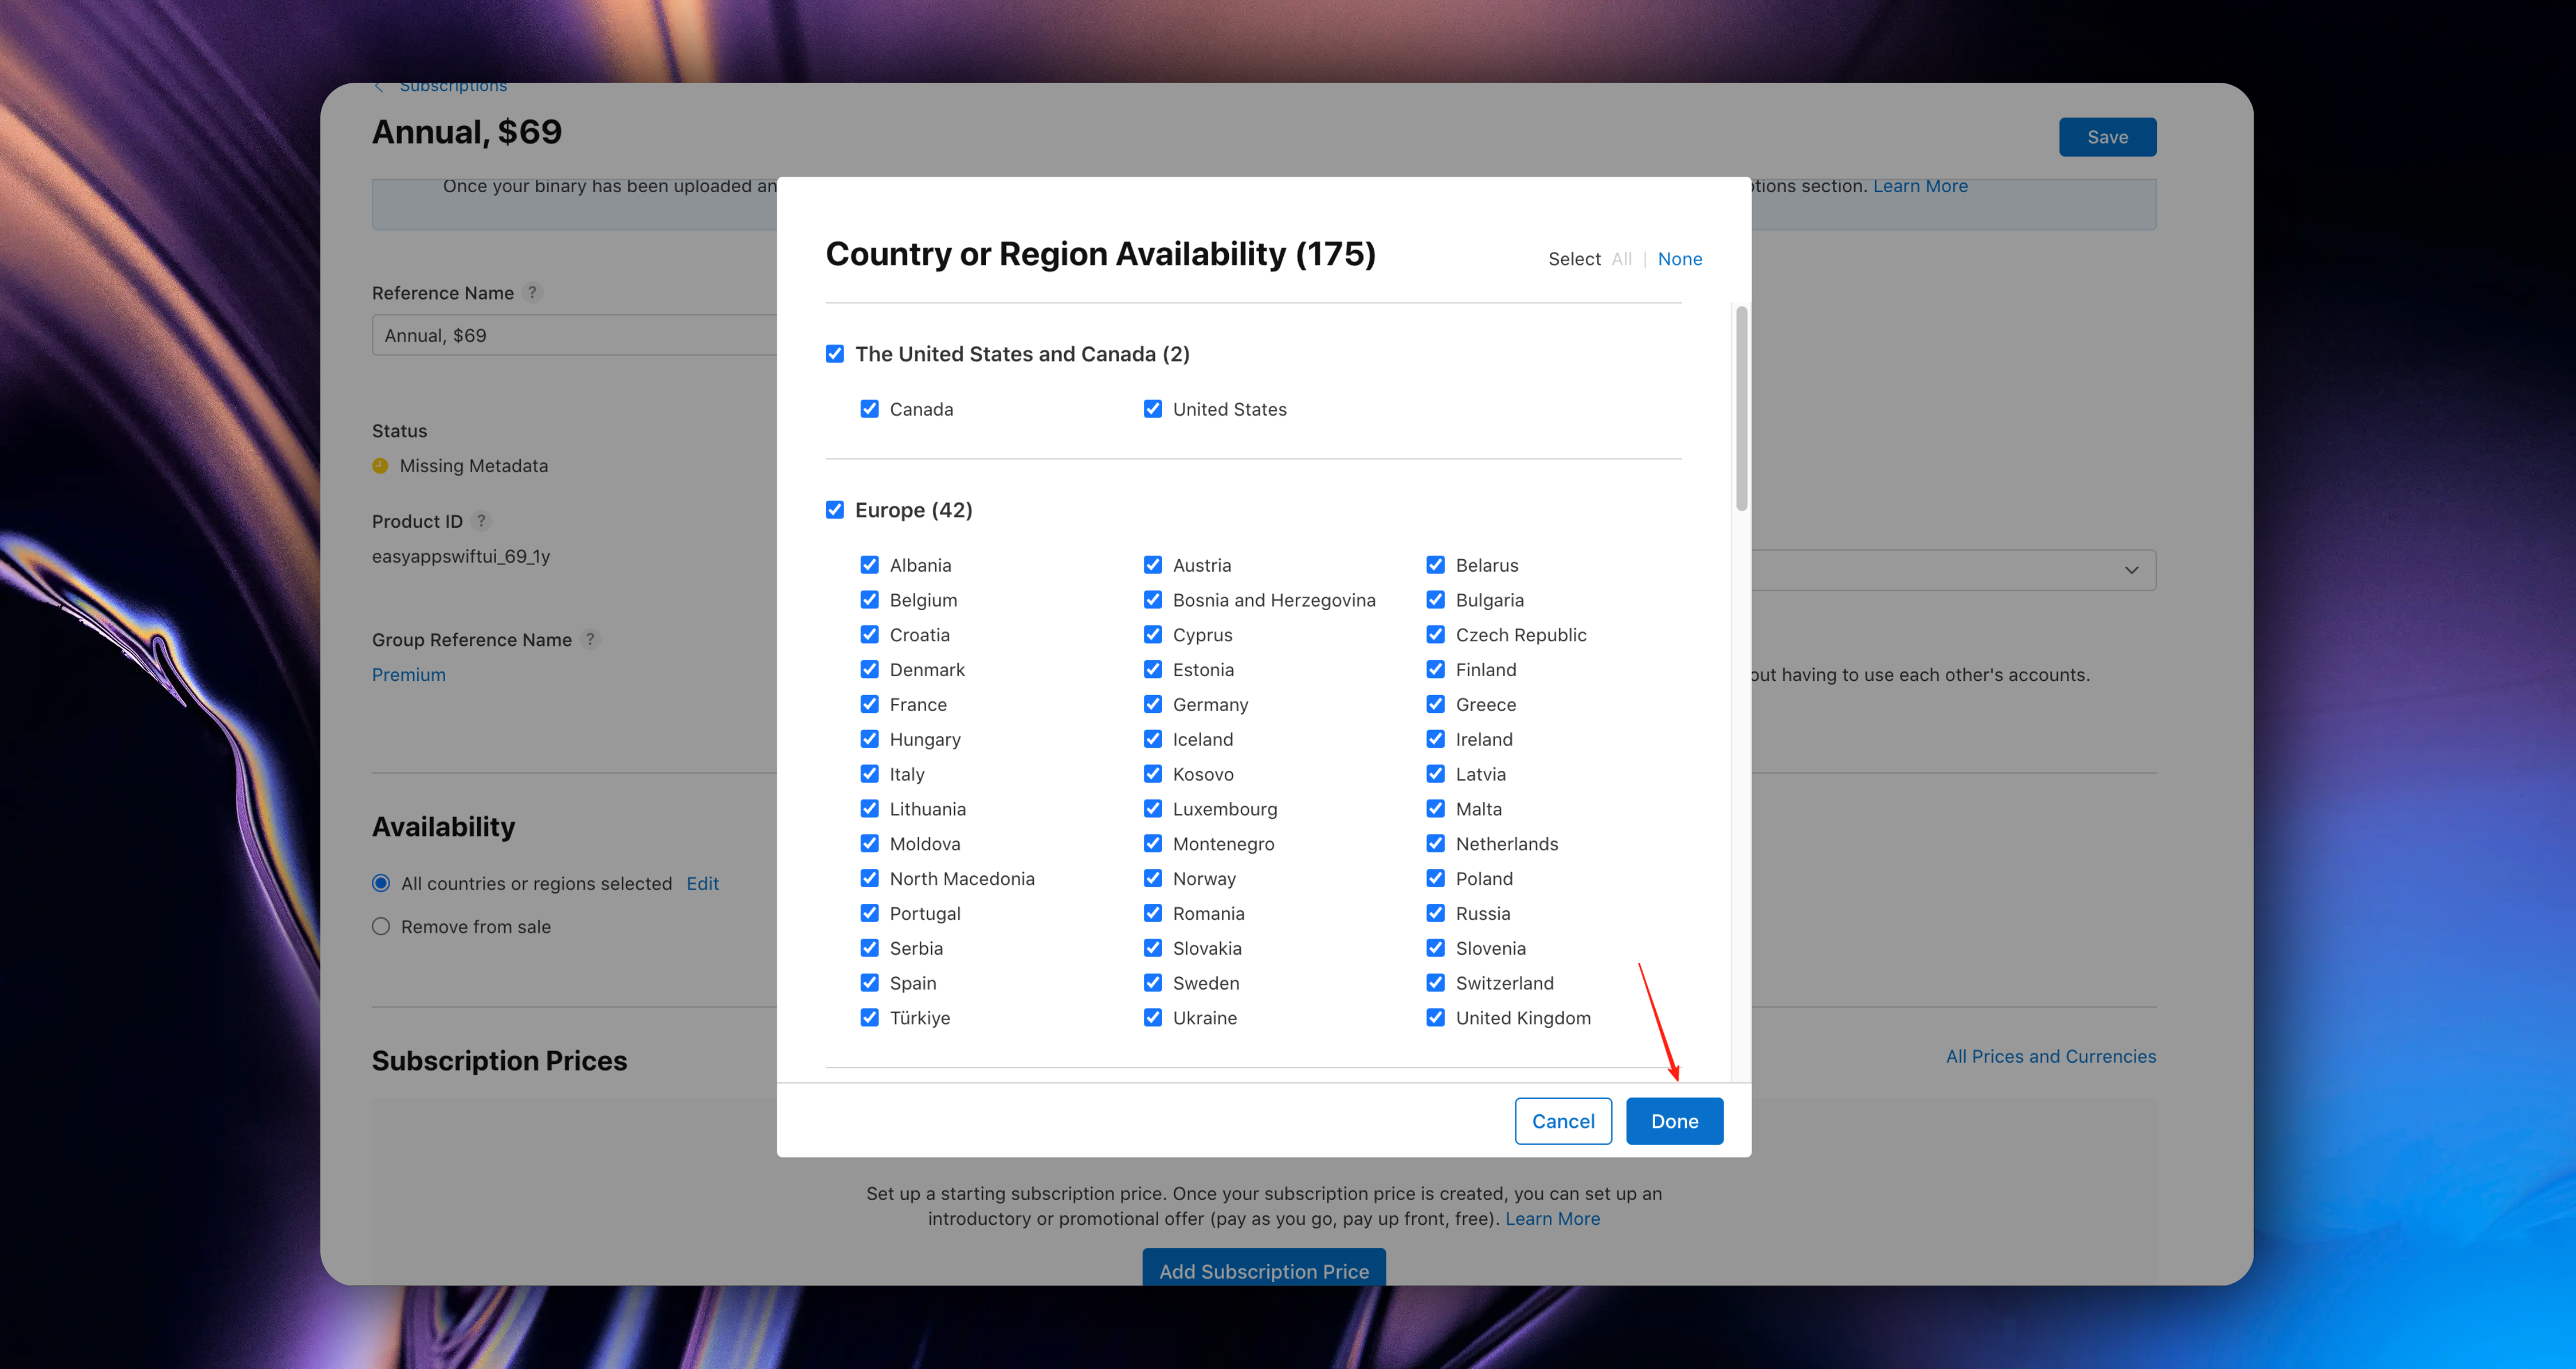
Then set `Availability`
`Availability` is selecting which countries/regions your subscription service will be effective in.
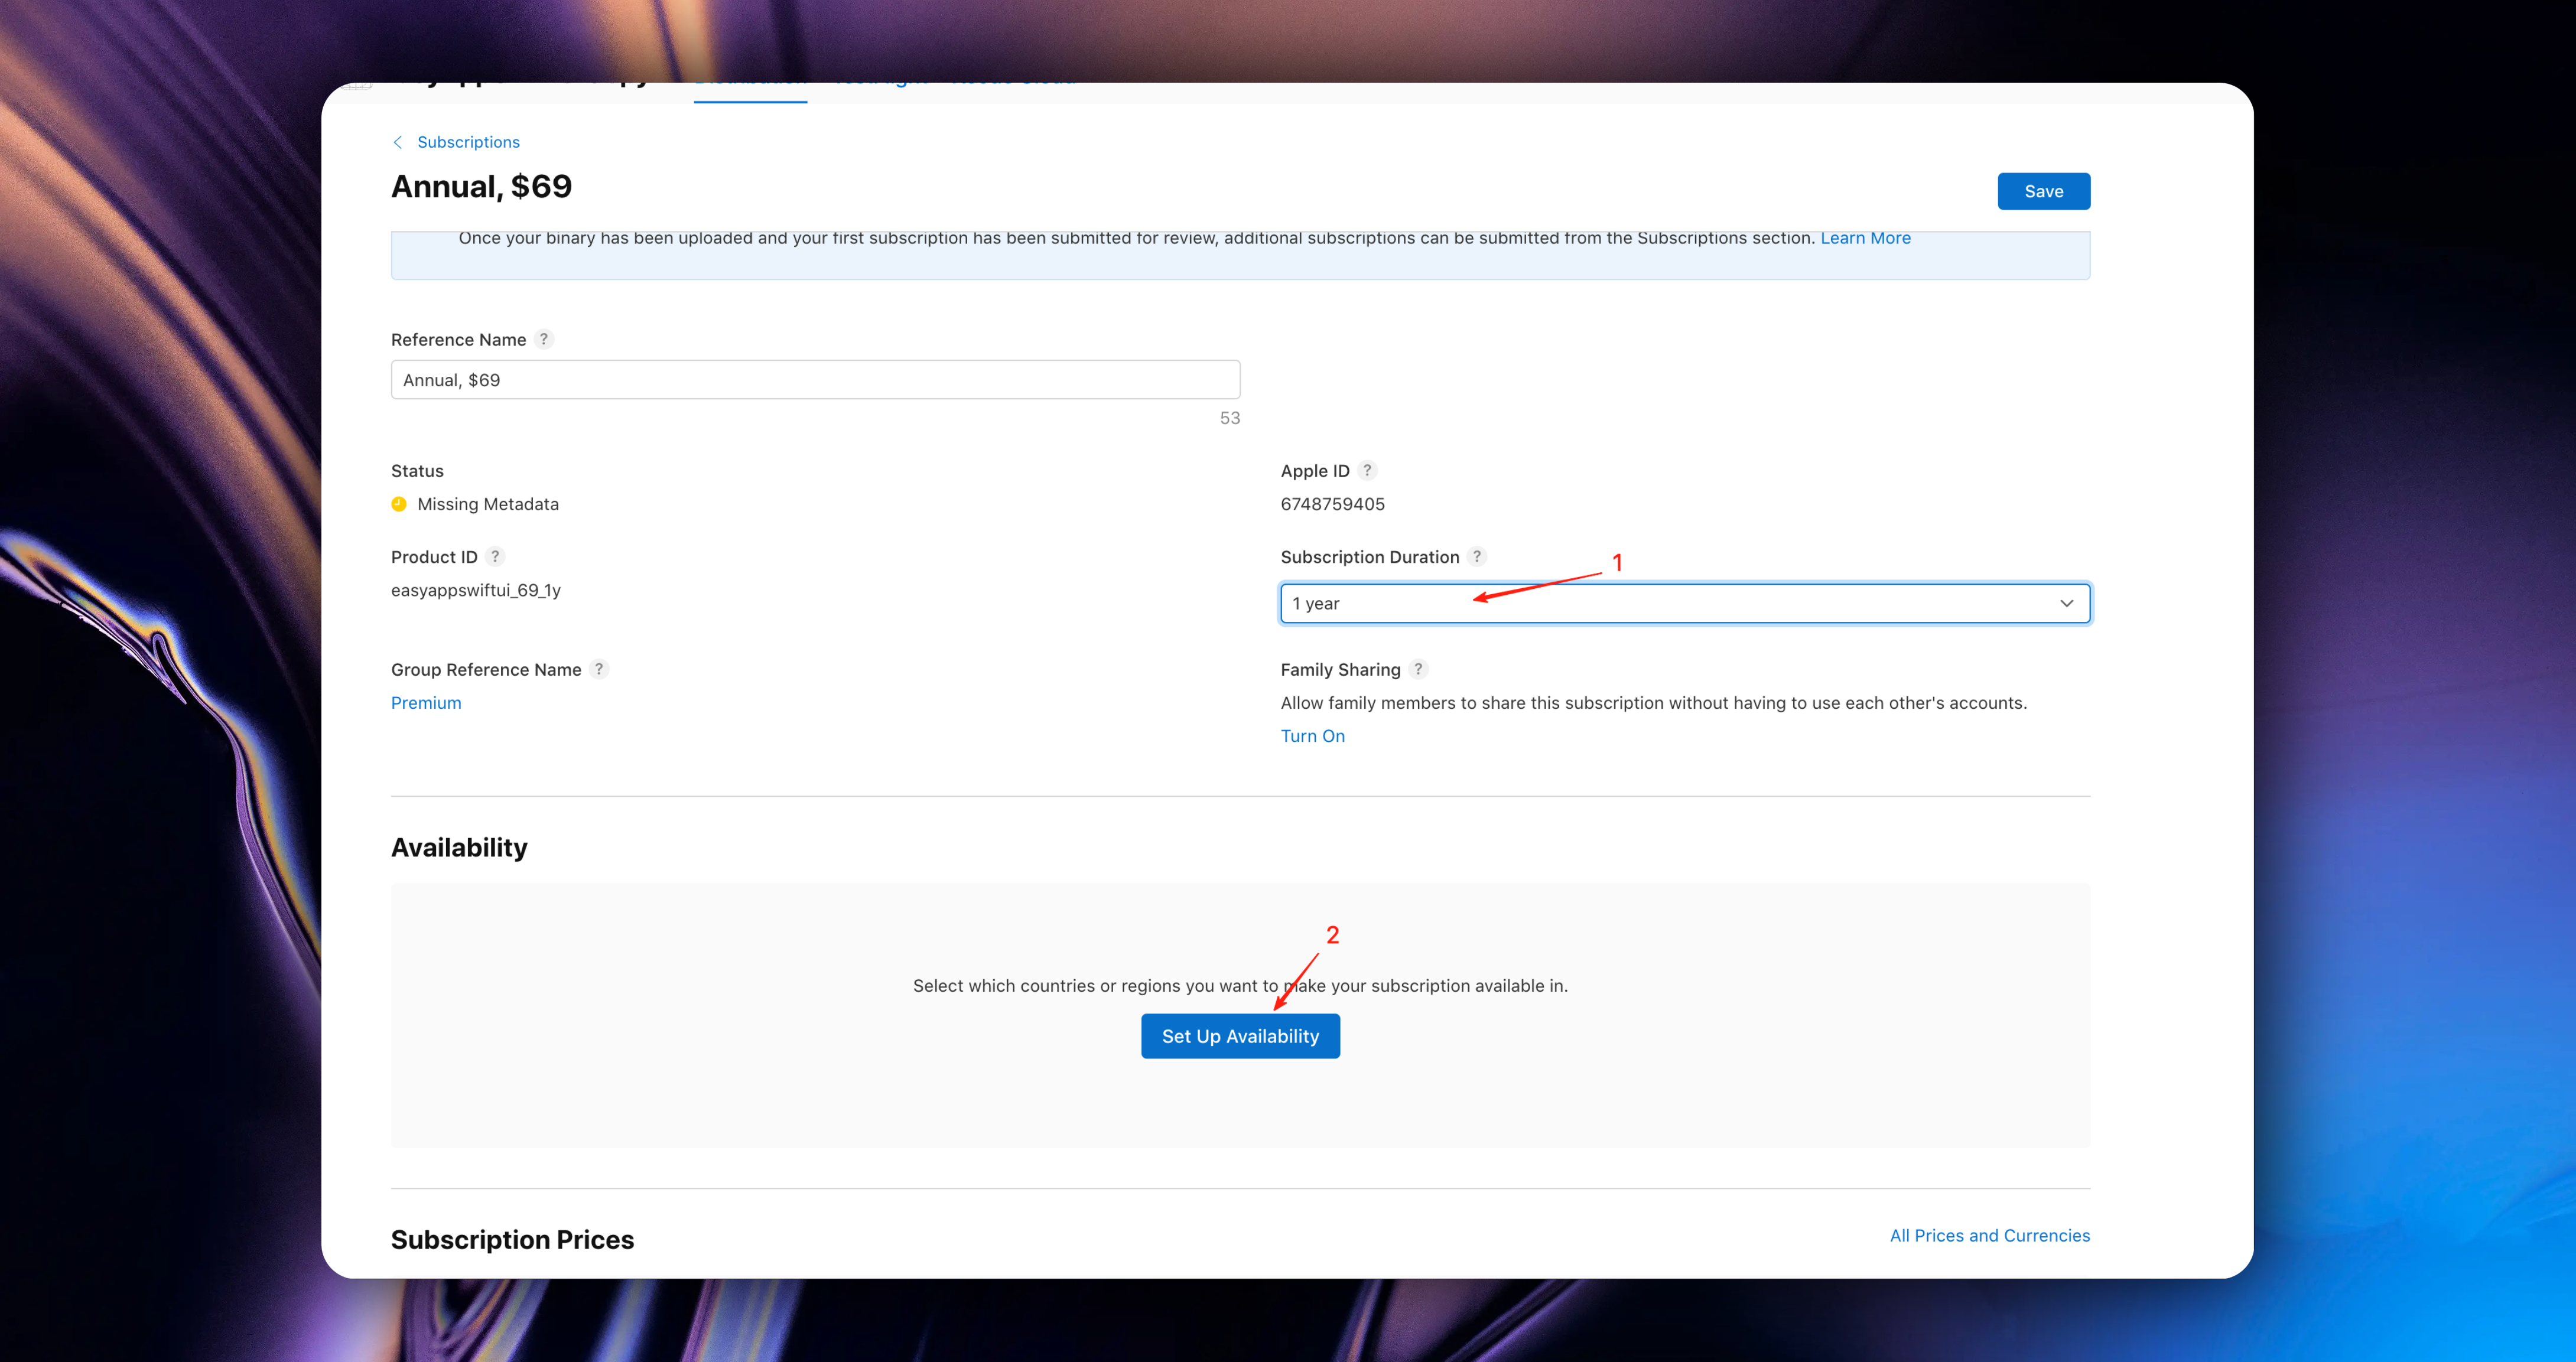
Of course, we want all countries/regions to be able to use our subscription service, so we check all by default here.
Click the `Save` button to save
#### 3. Set Subscription Prices
Scroll down the page to find `Subscription Prices`, click the `Add Subscription Prices` button to set subscription prices
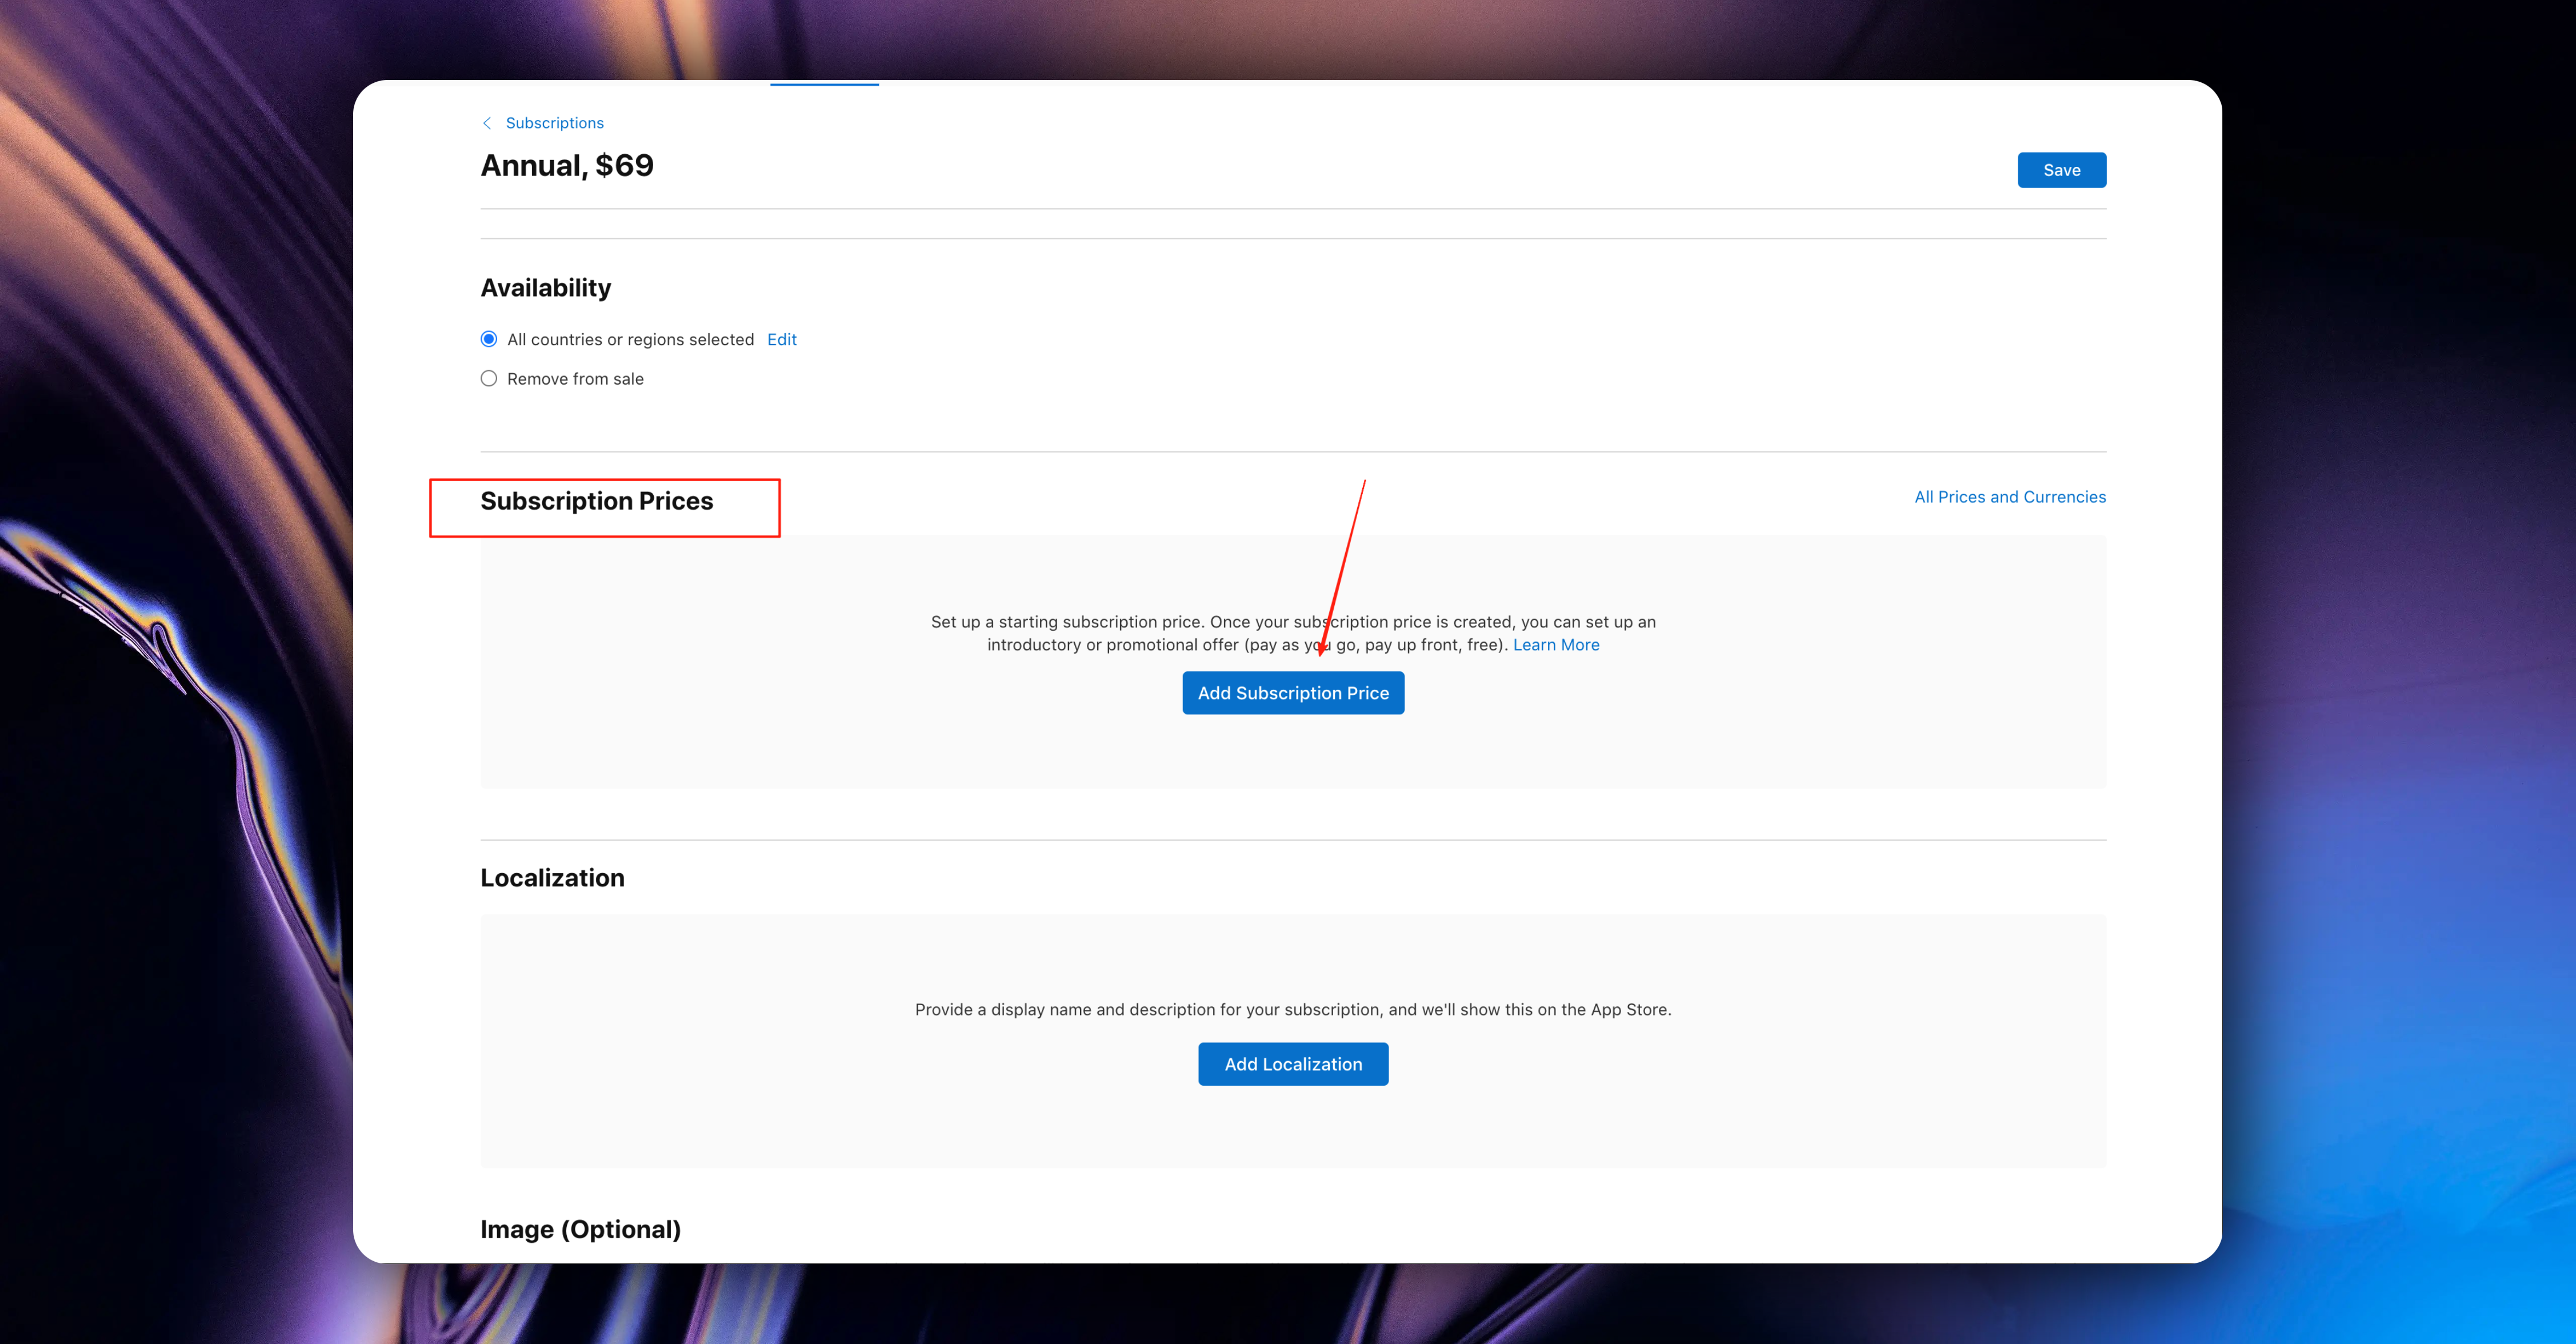
In the popup, we need to set 2 pieces of information
* First: Select country/region
* Second: Select price
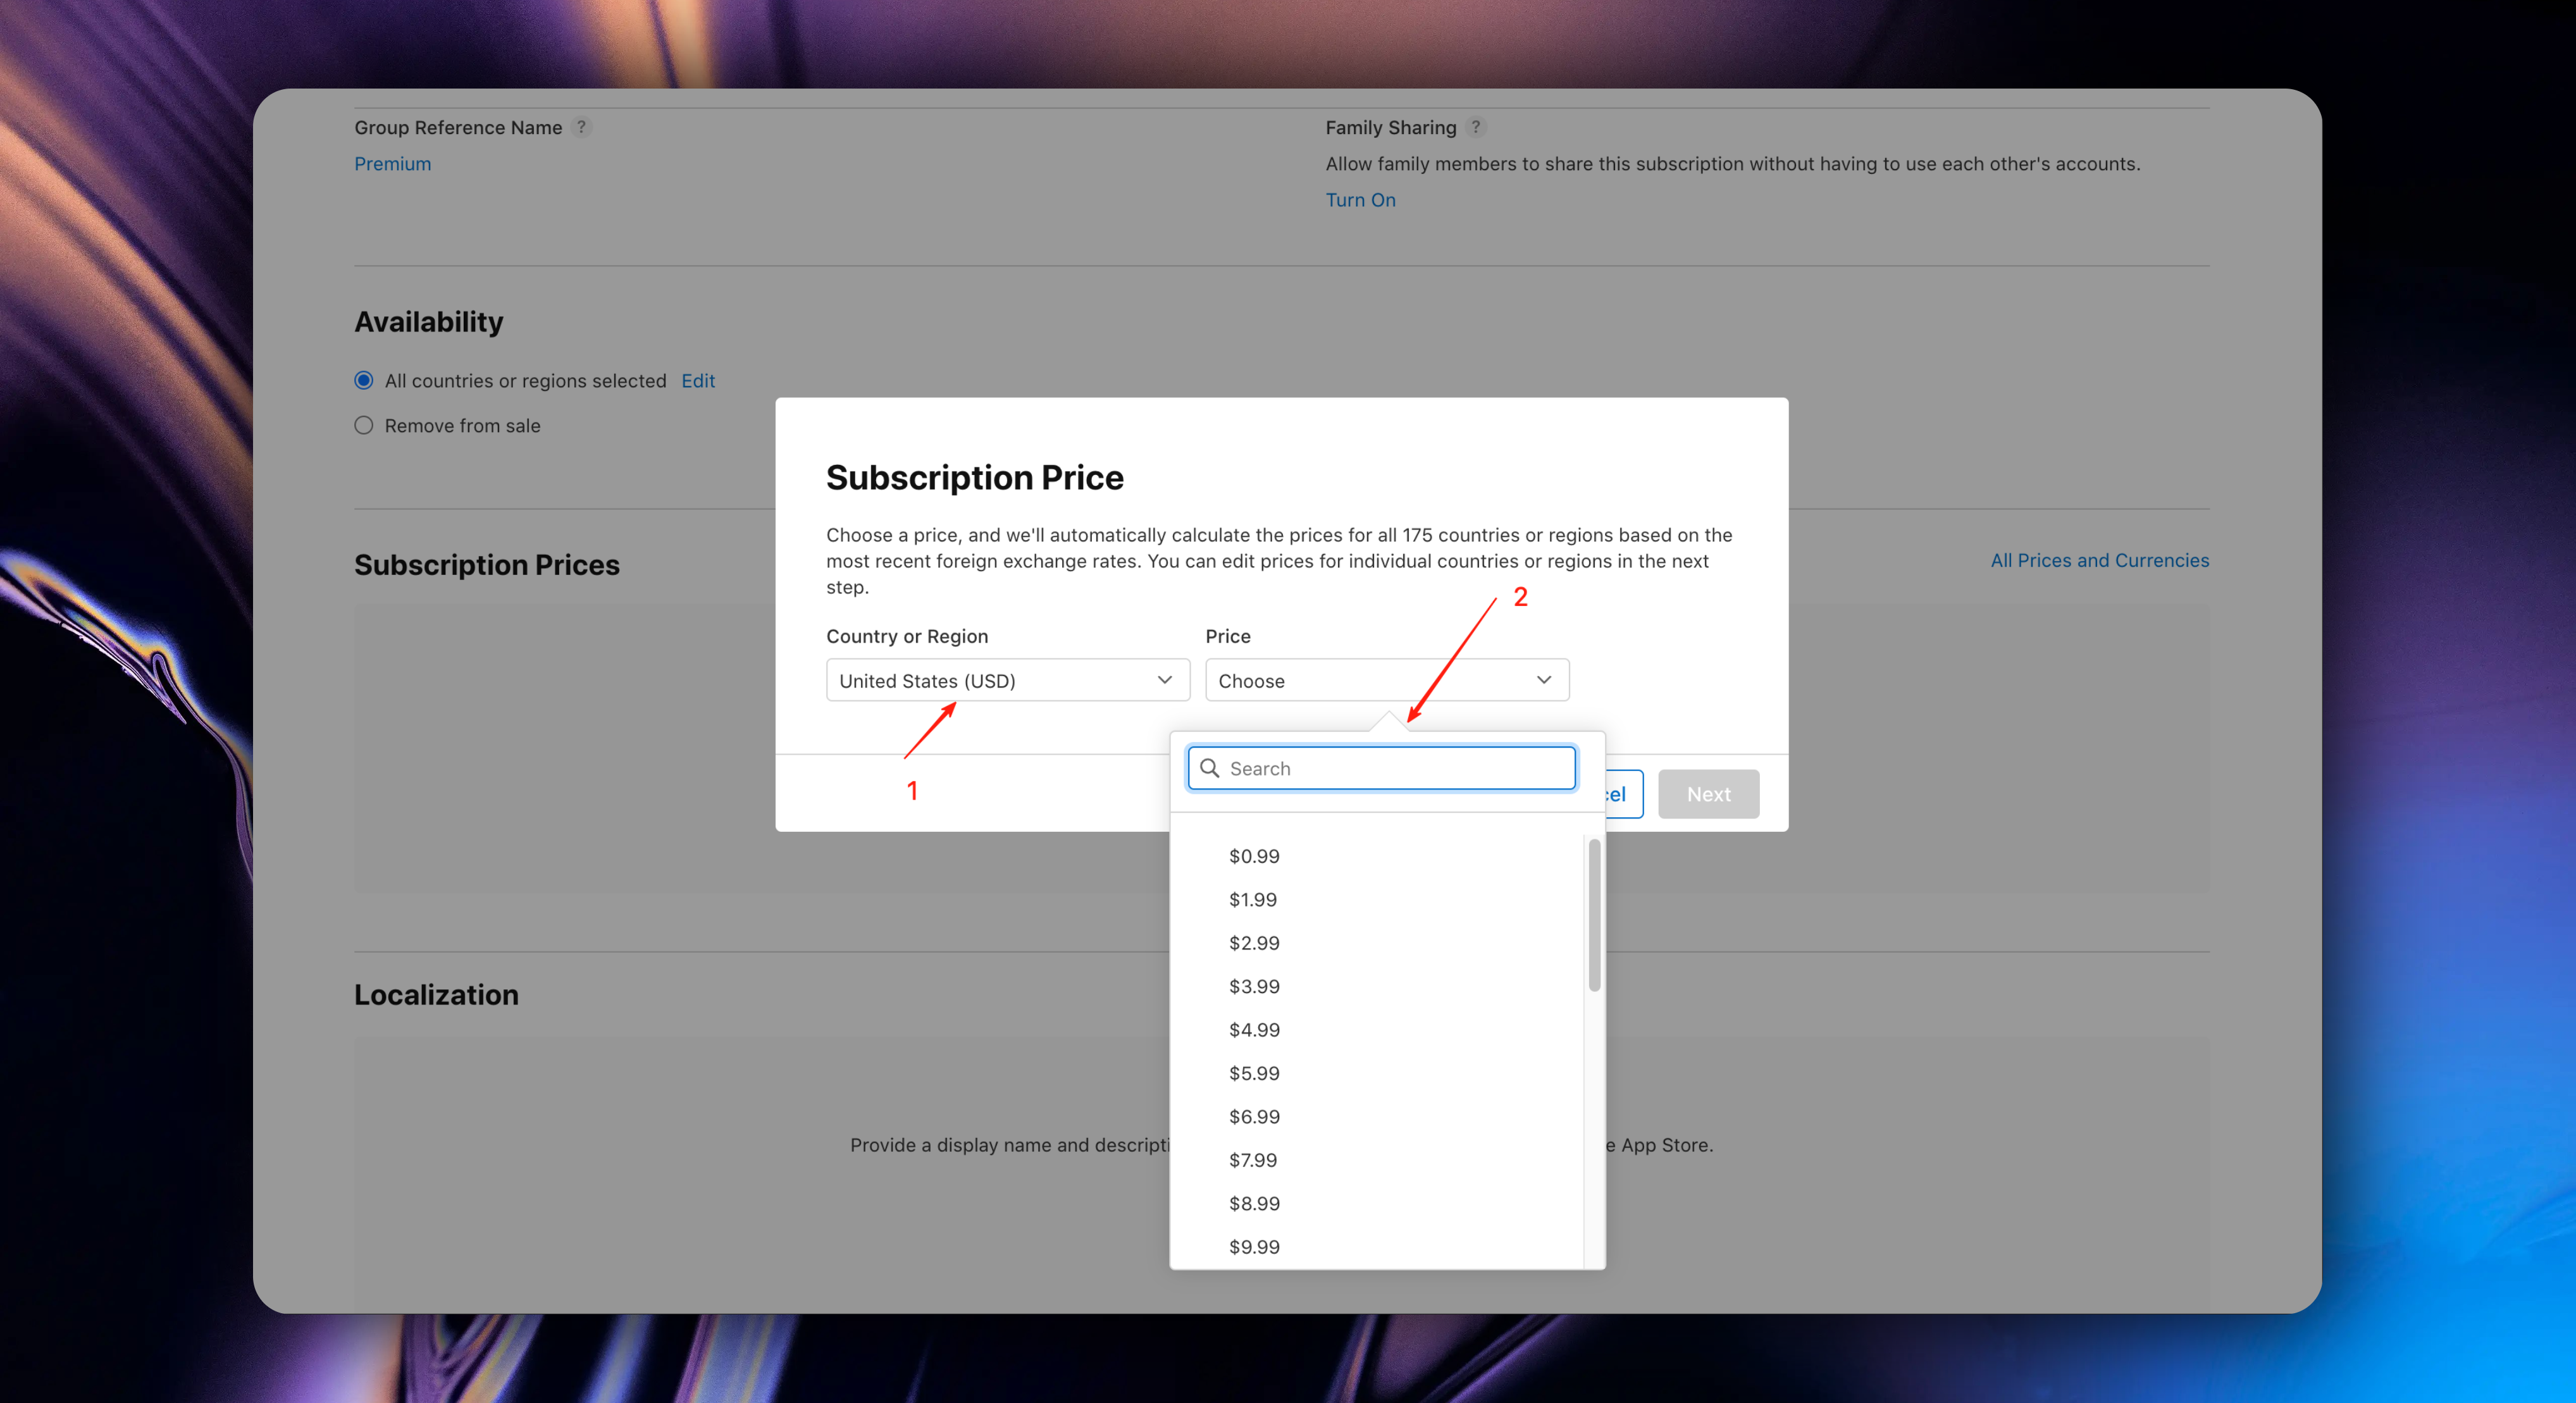
For country, we first select United States, to settle in US dollars
For price, we select $69
If you want to find more price options, click the `See Additional Prices` button to select your desired price
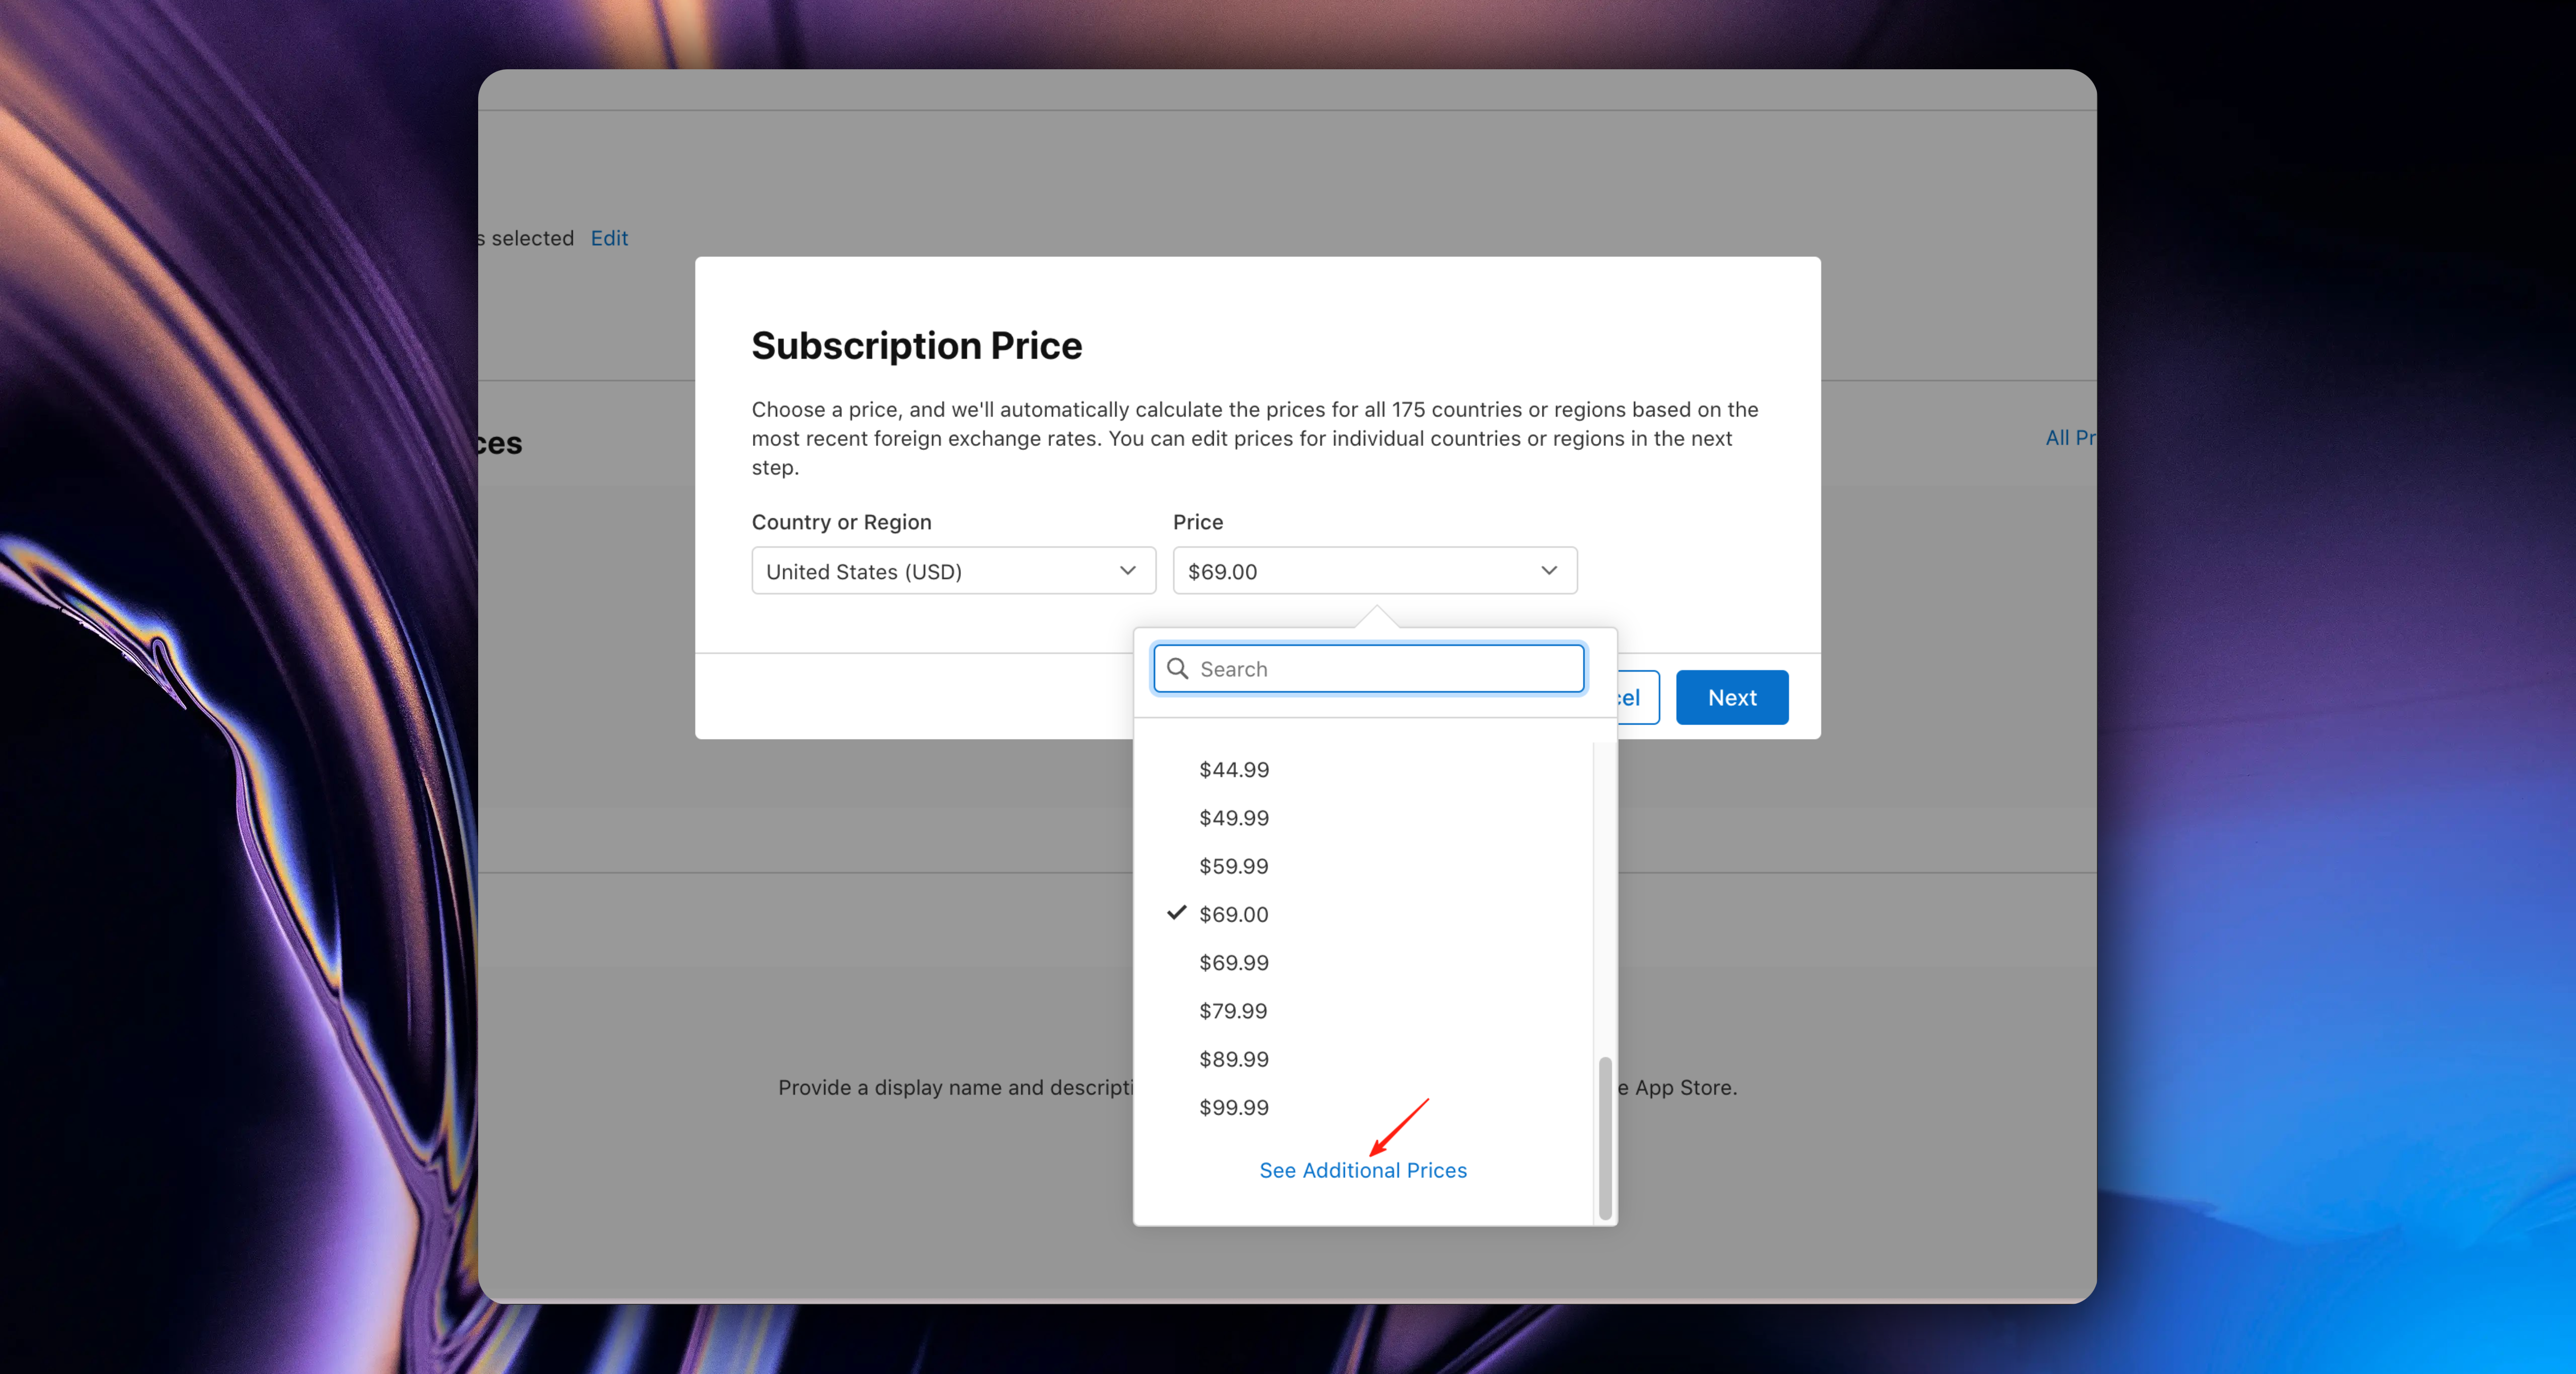
Then click the `Next` button
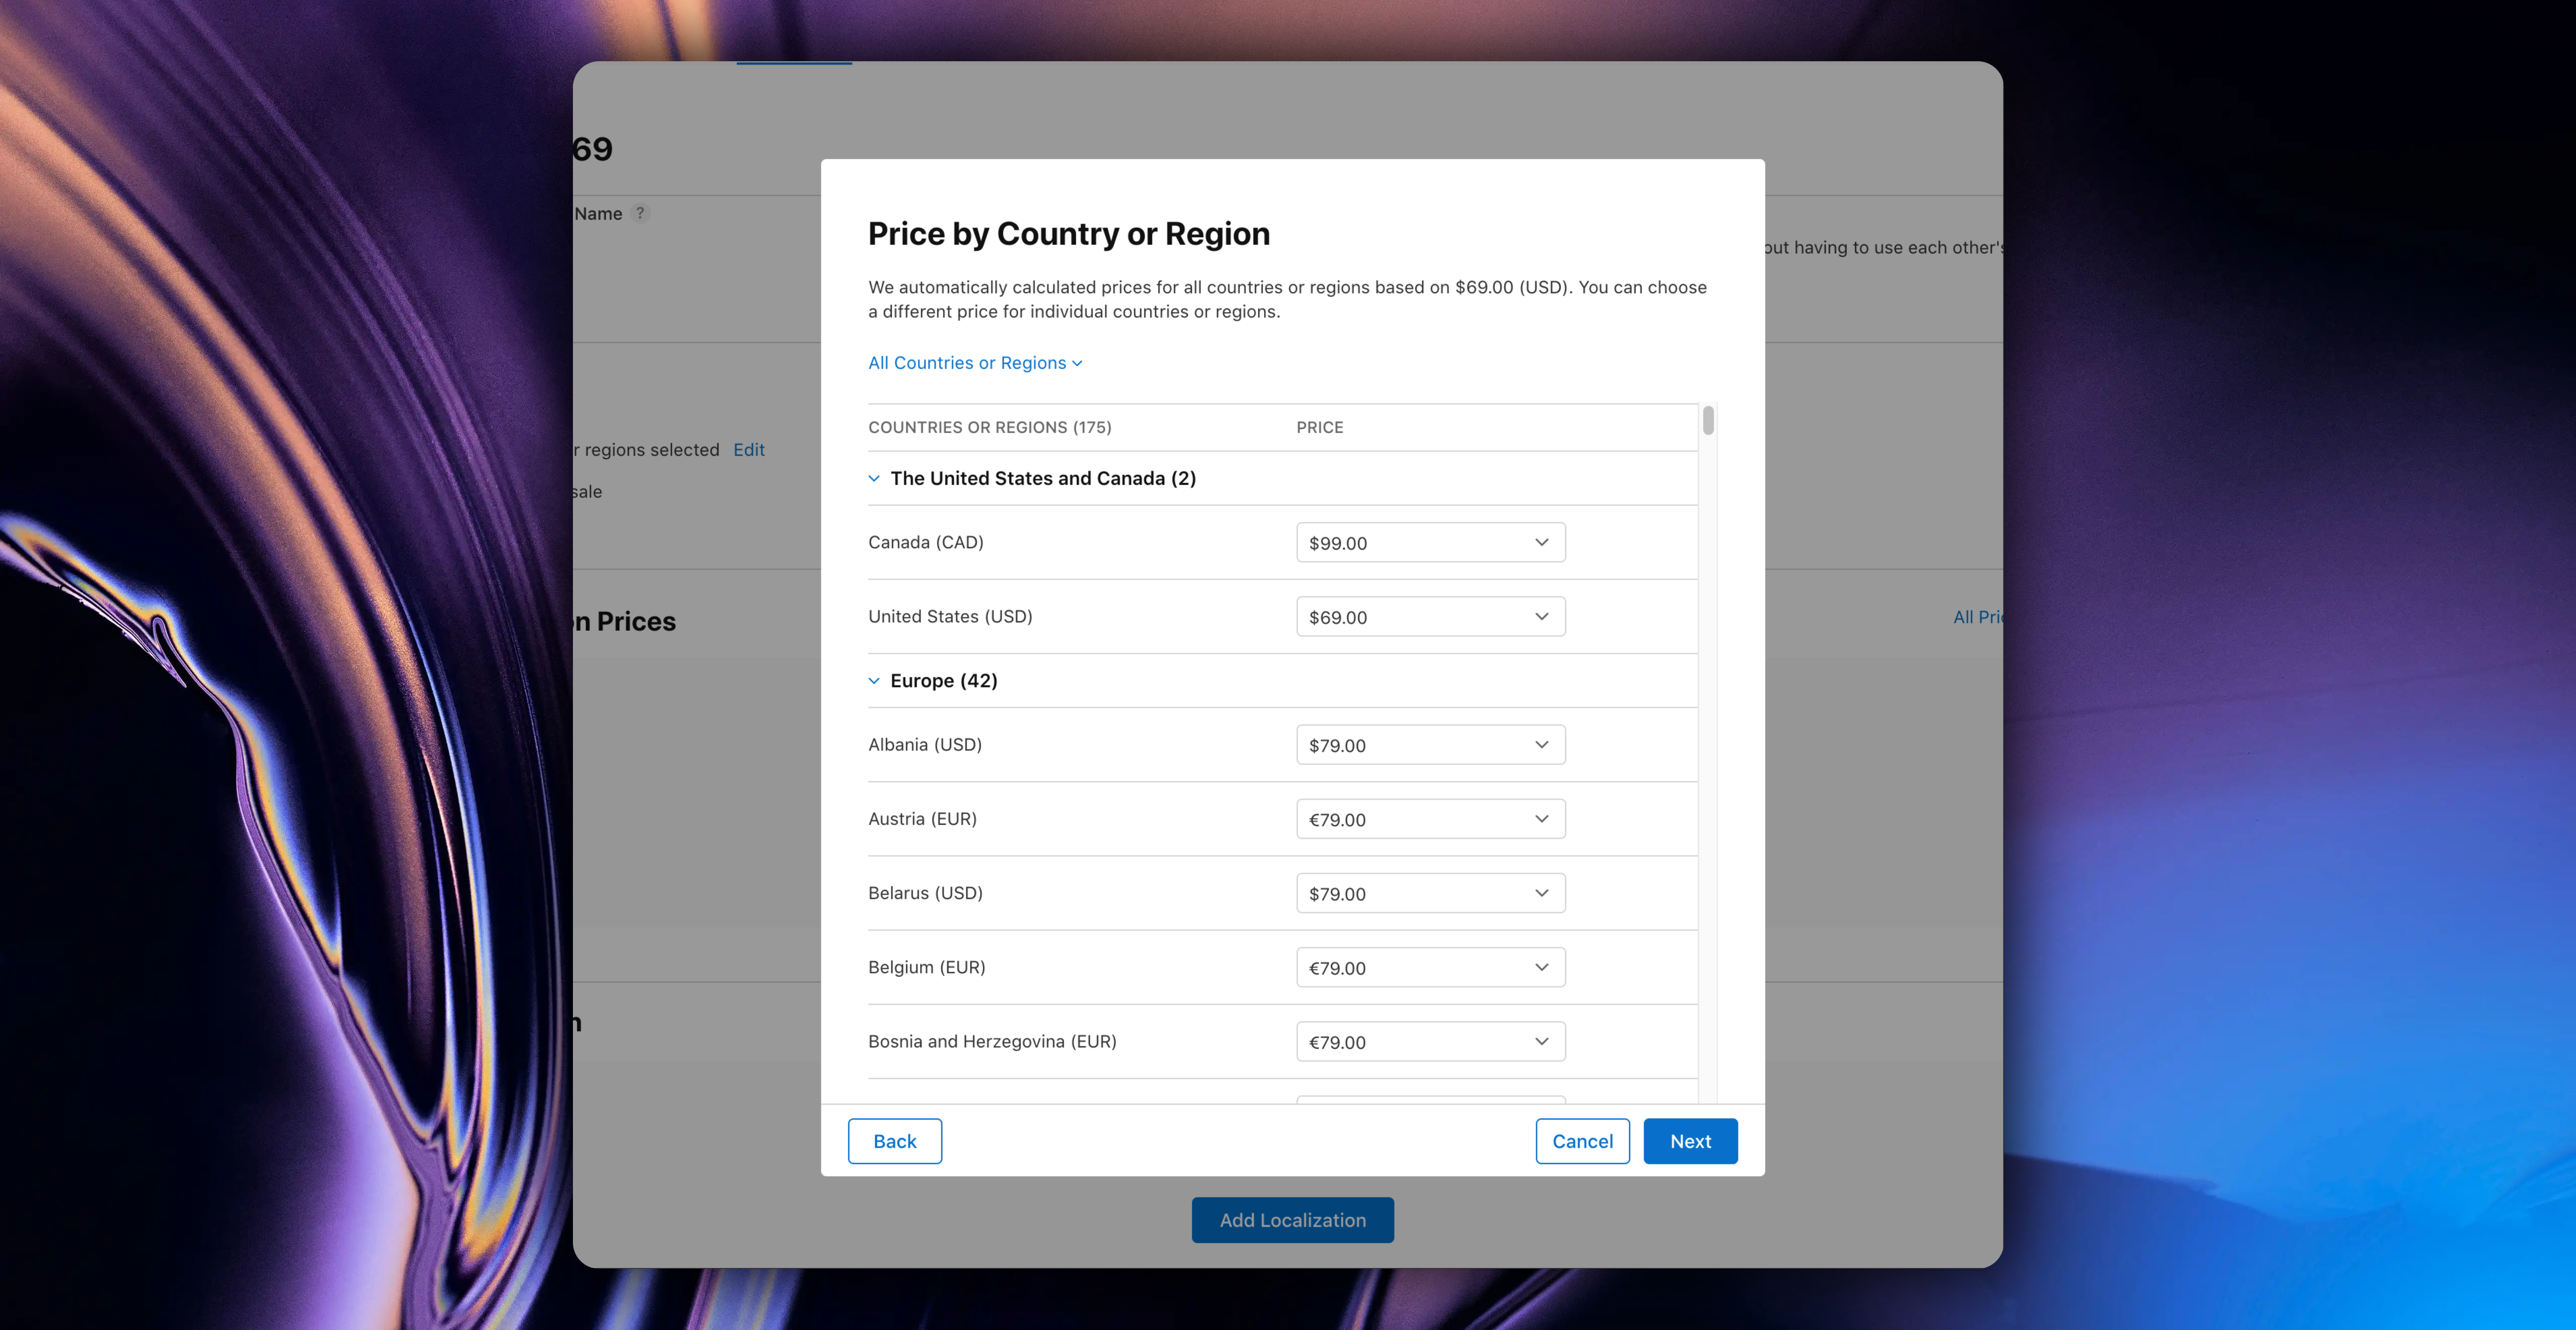
Next, you'll see another popup
In this popup, you can set different prices based on country/region. For example, I set mainland China to ¥128 RMB
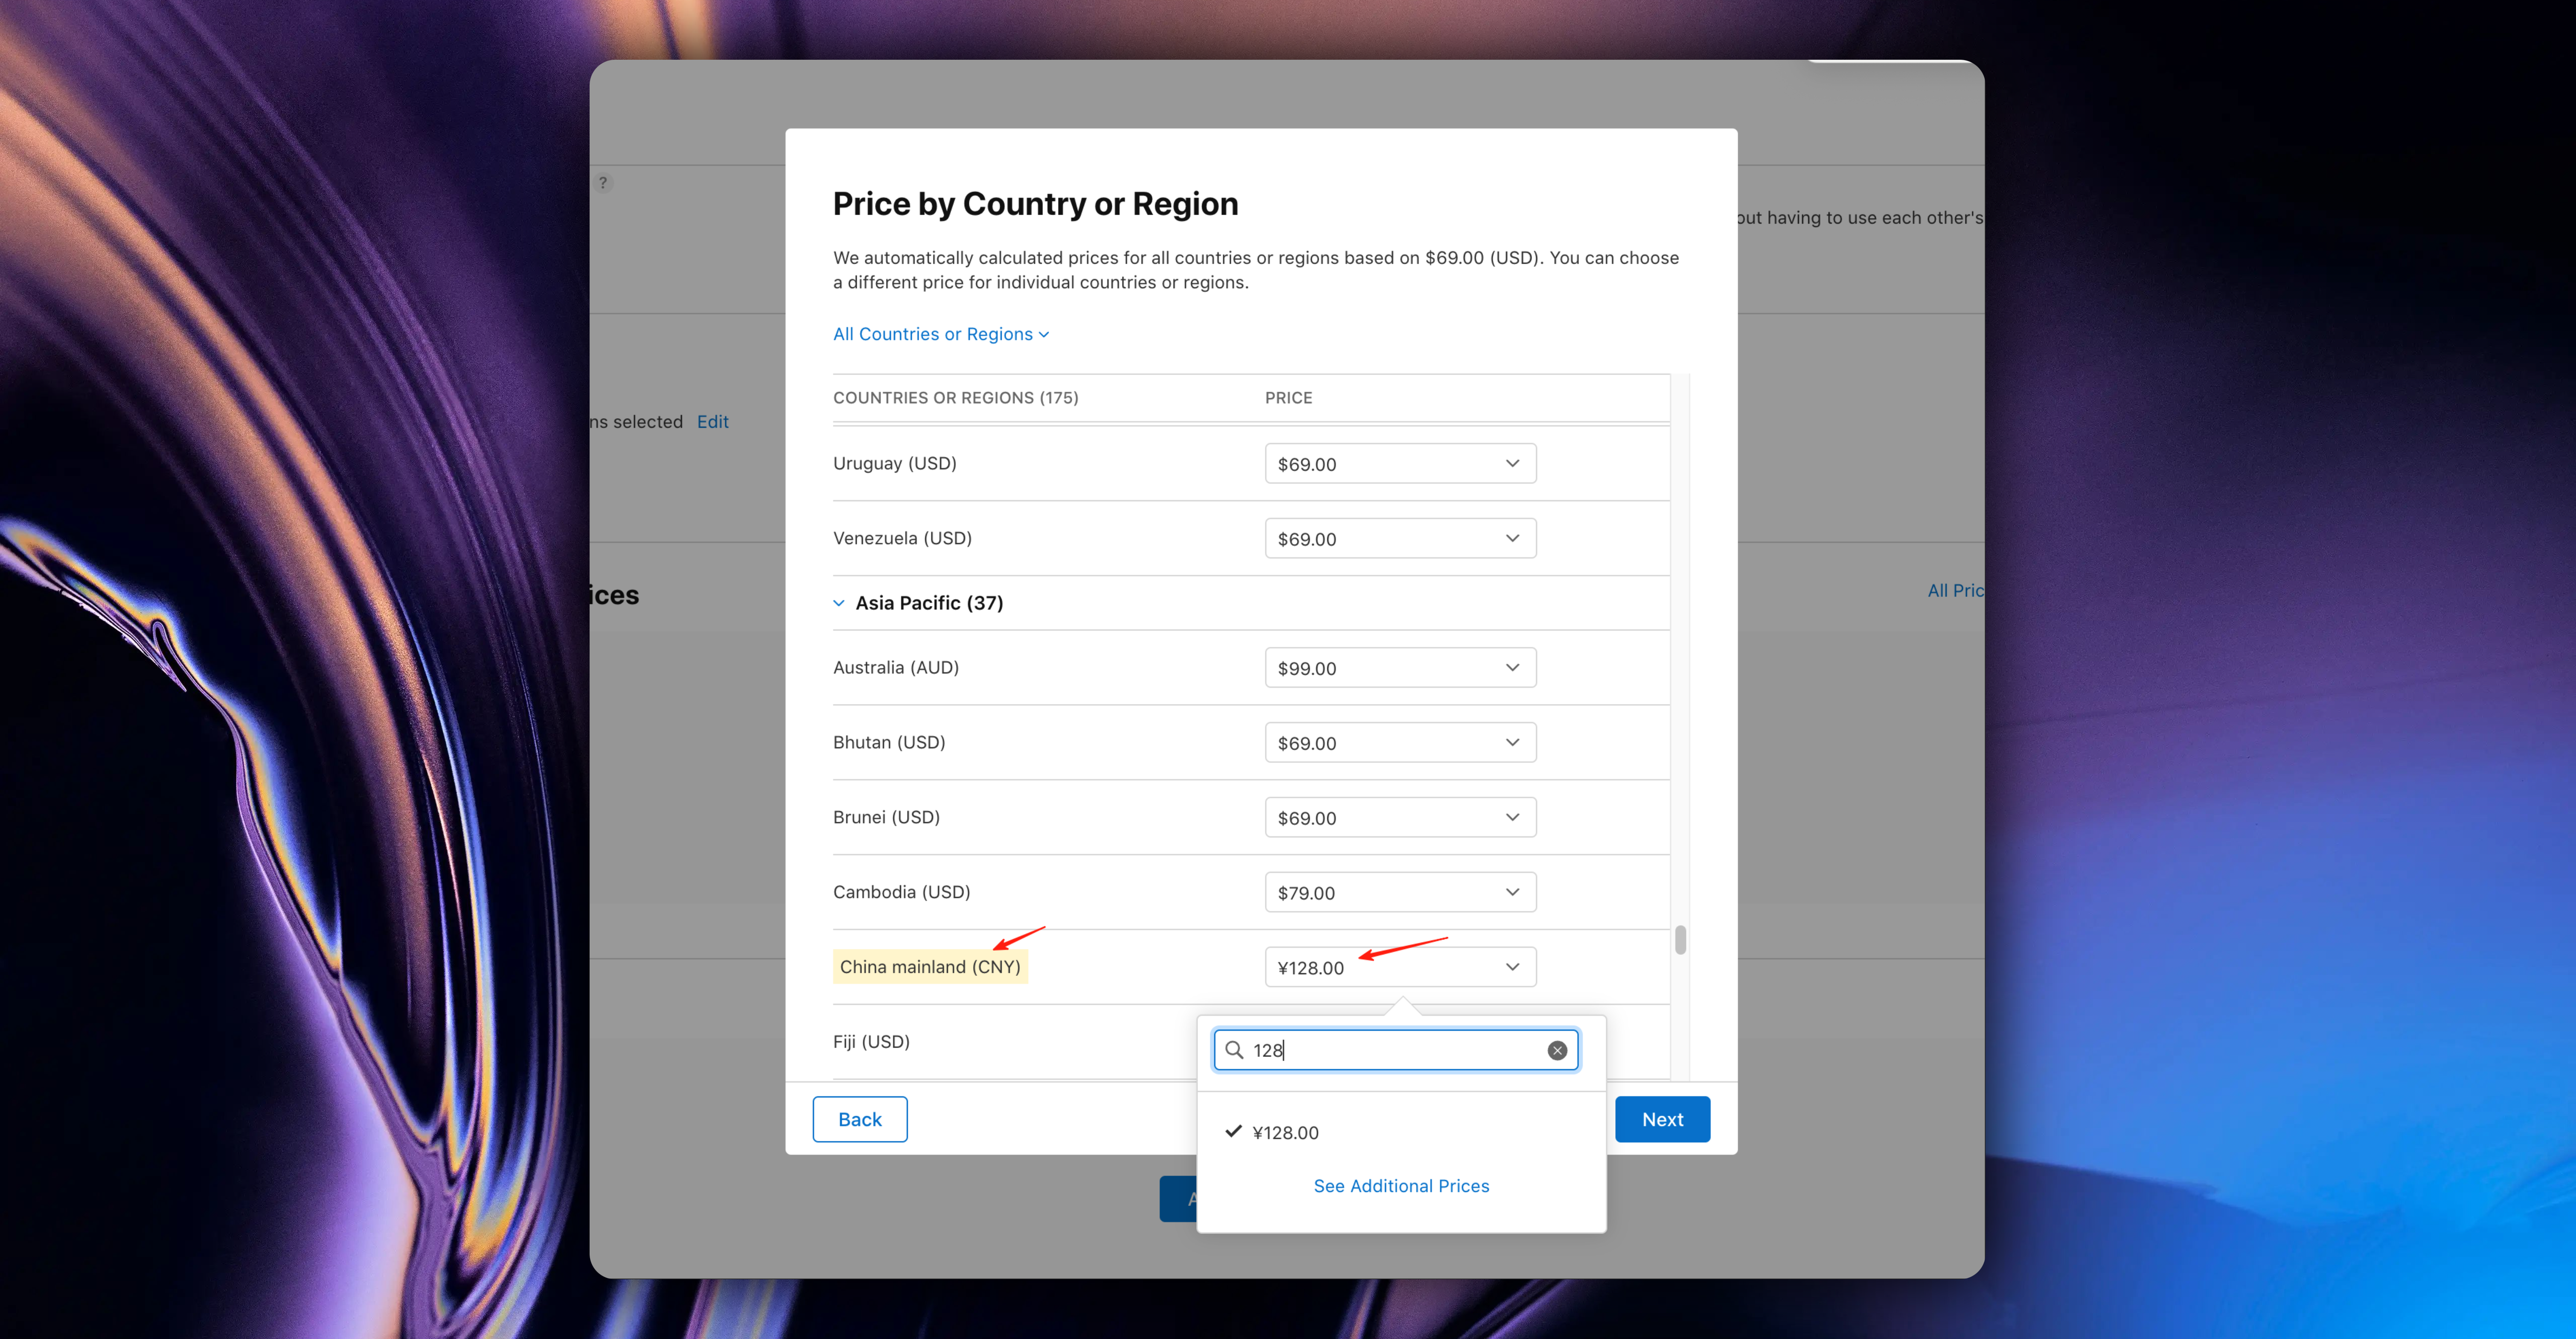
Similarly, you can also click the `See Additional Prices` button to select your desired price
Here, App Store Connect is very thoughtful and will automatically calculate corresponding prices for other countries/regions based on the USD price you set, combined with current exchange rates.
After setting, click the `Next` button, then click the `Confirm` button
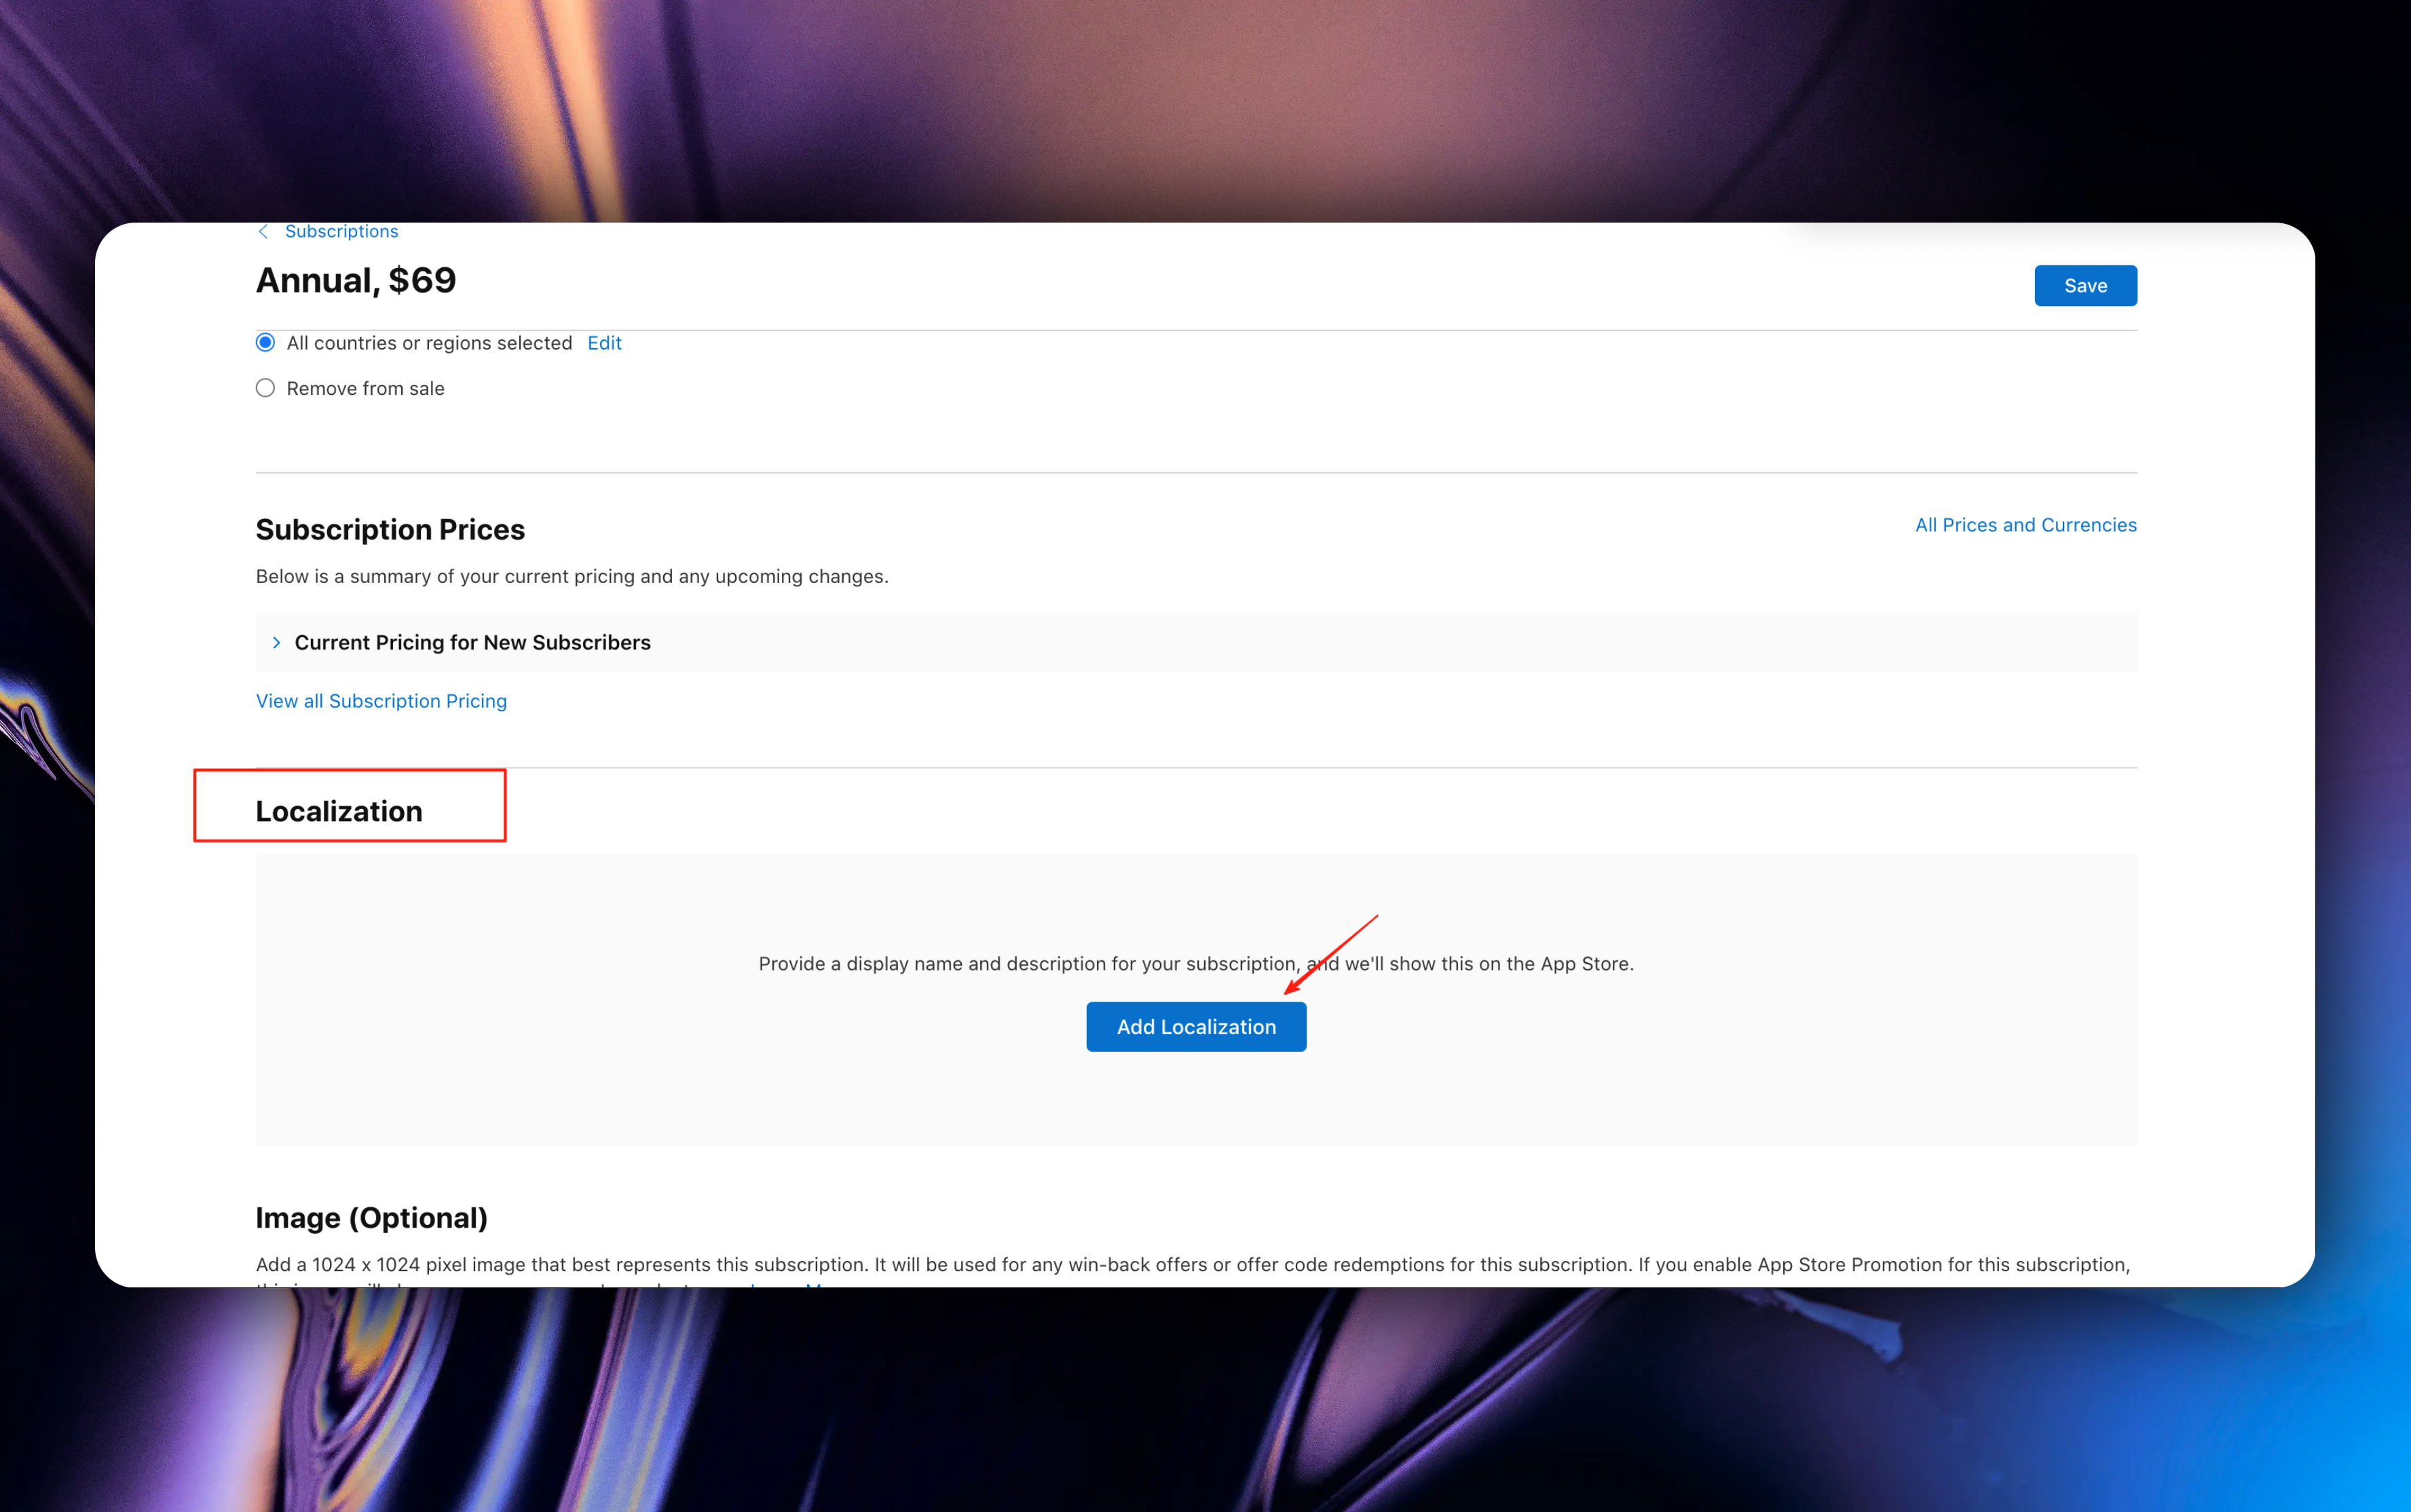
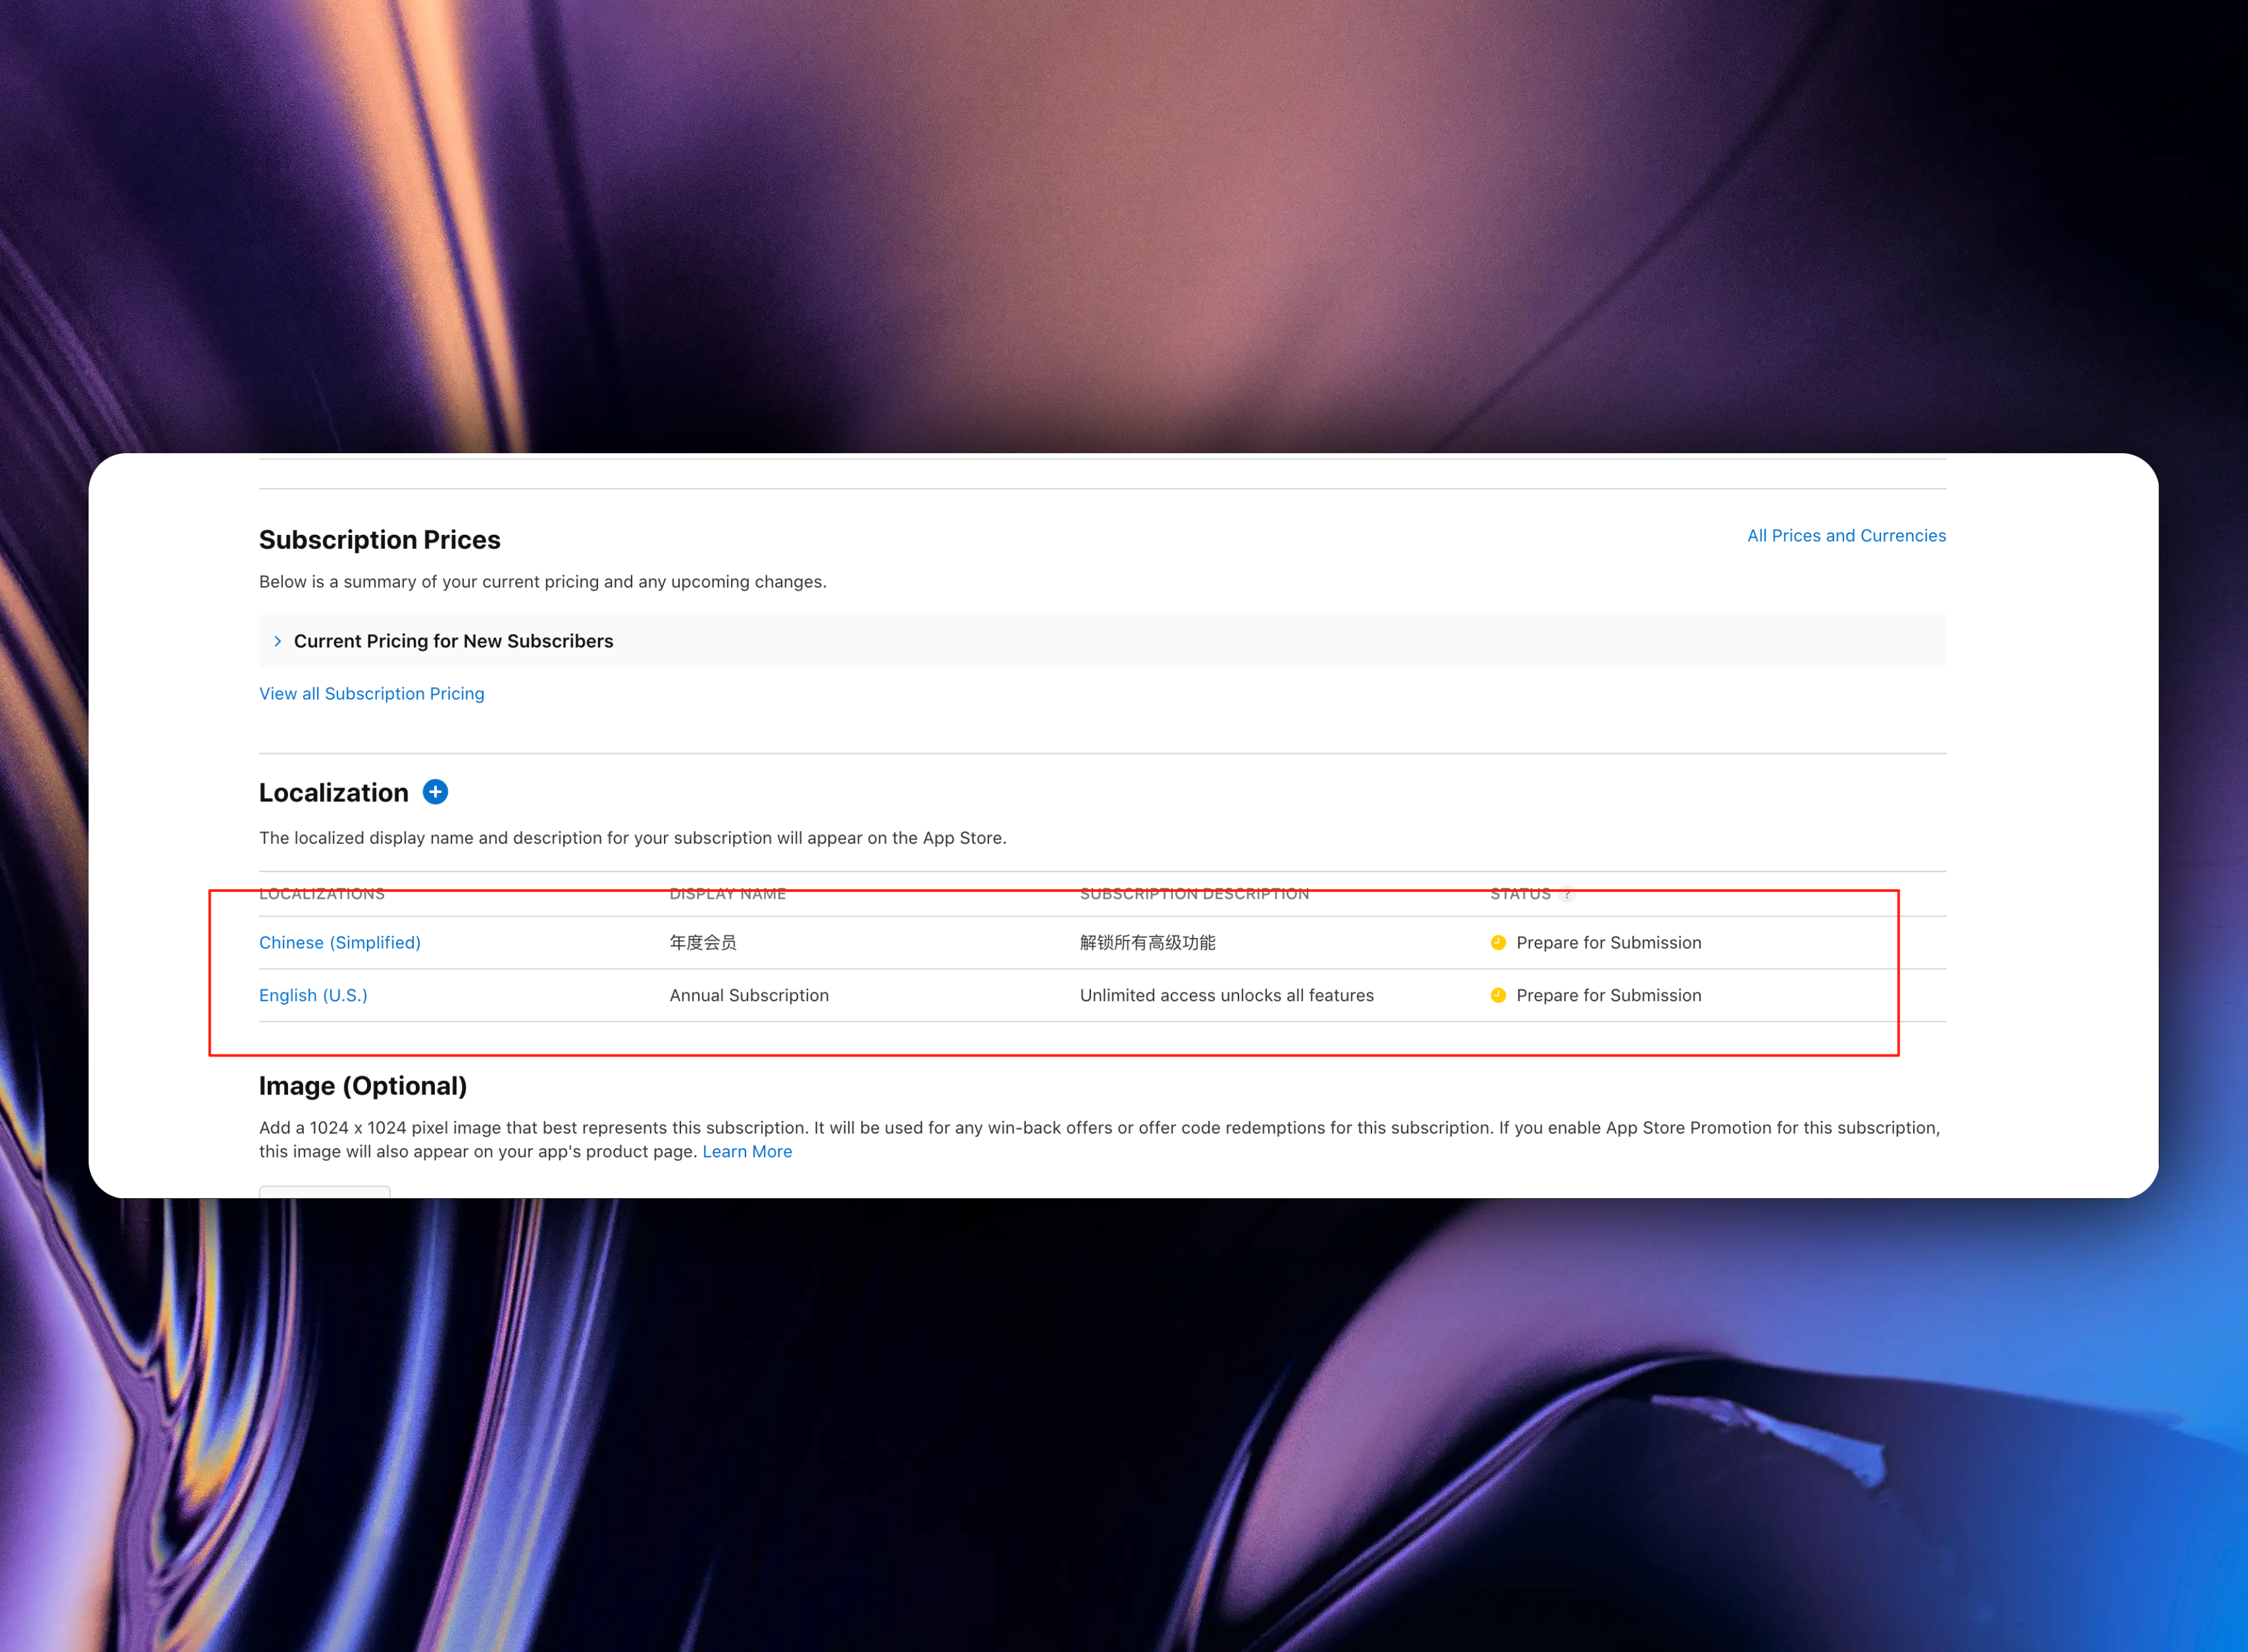
#### 4. Set Subscription Internationalization Information
Next, we need to set up App Store localization information. These are the in-app purchase names and descriptions that users will see.
Continue scrolling down the page, find `Localization`, click the `Add Localization` button
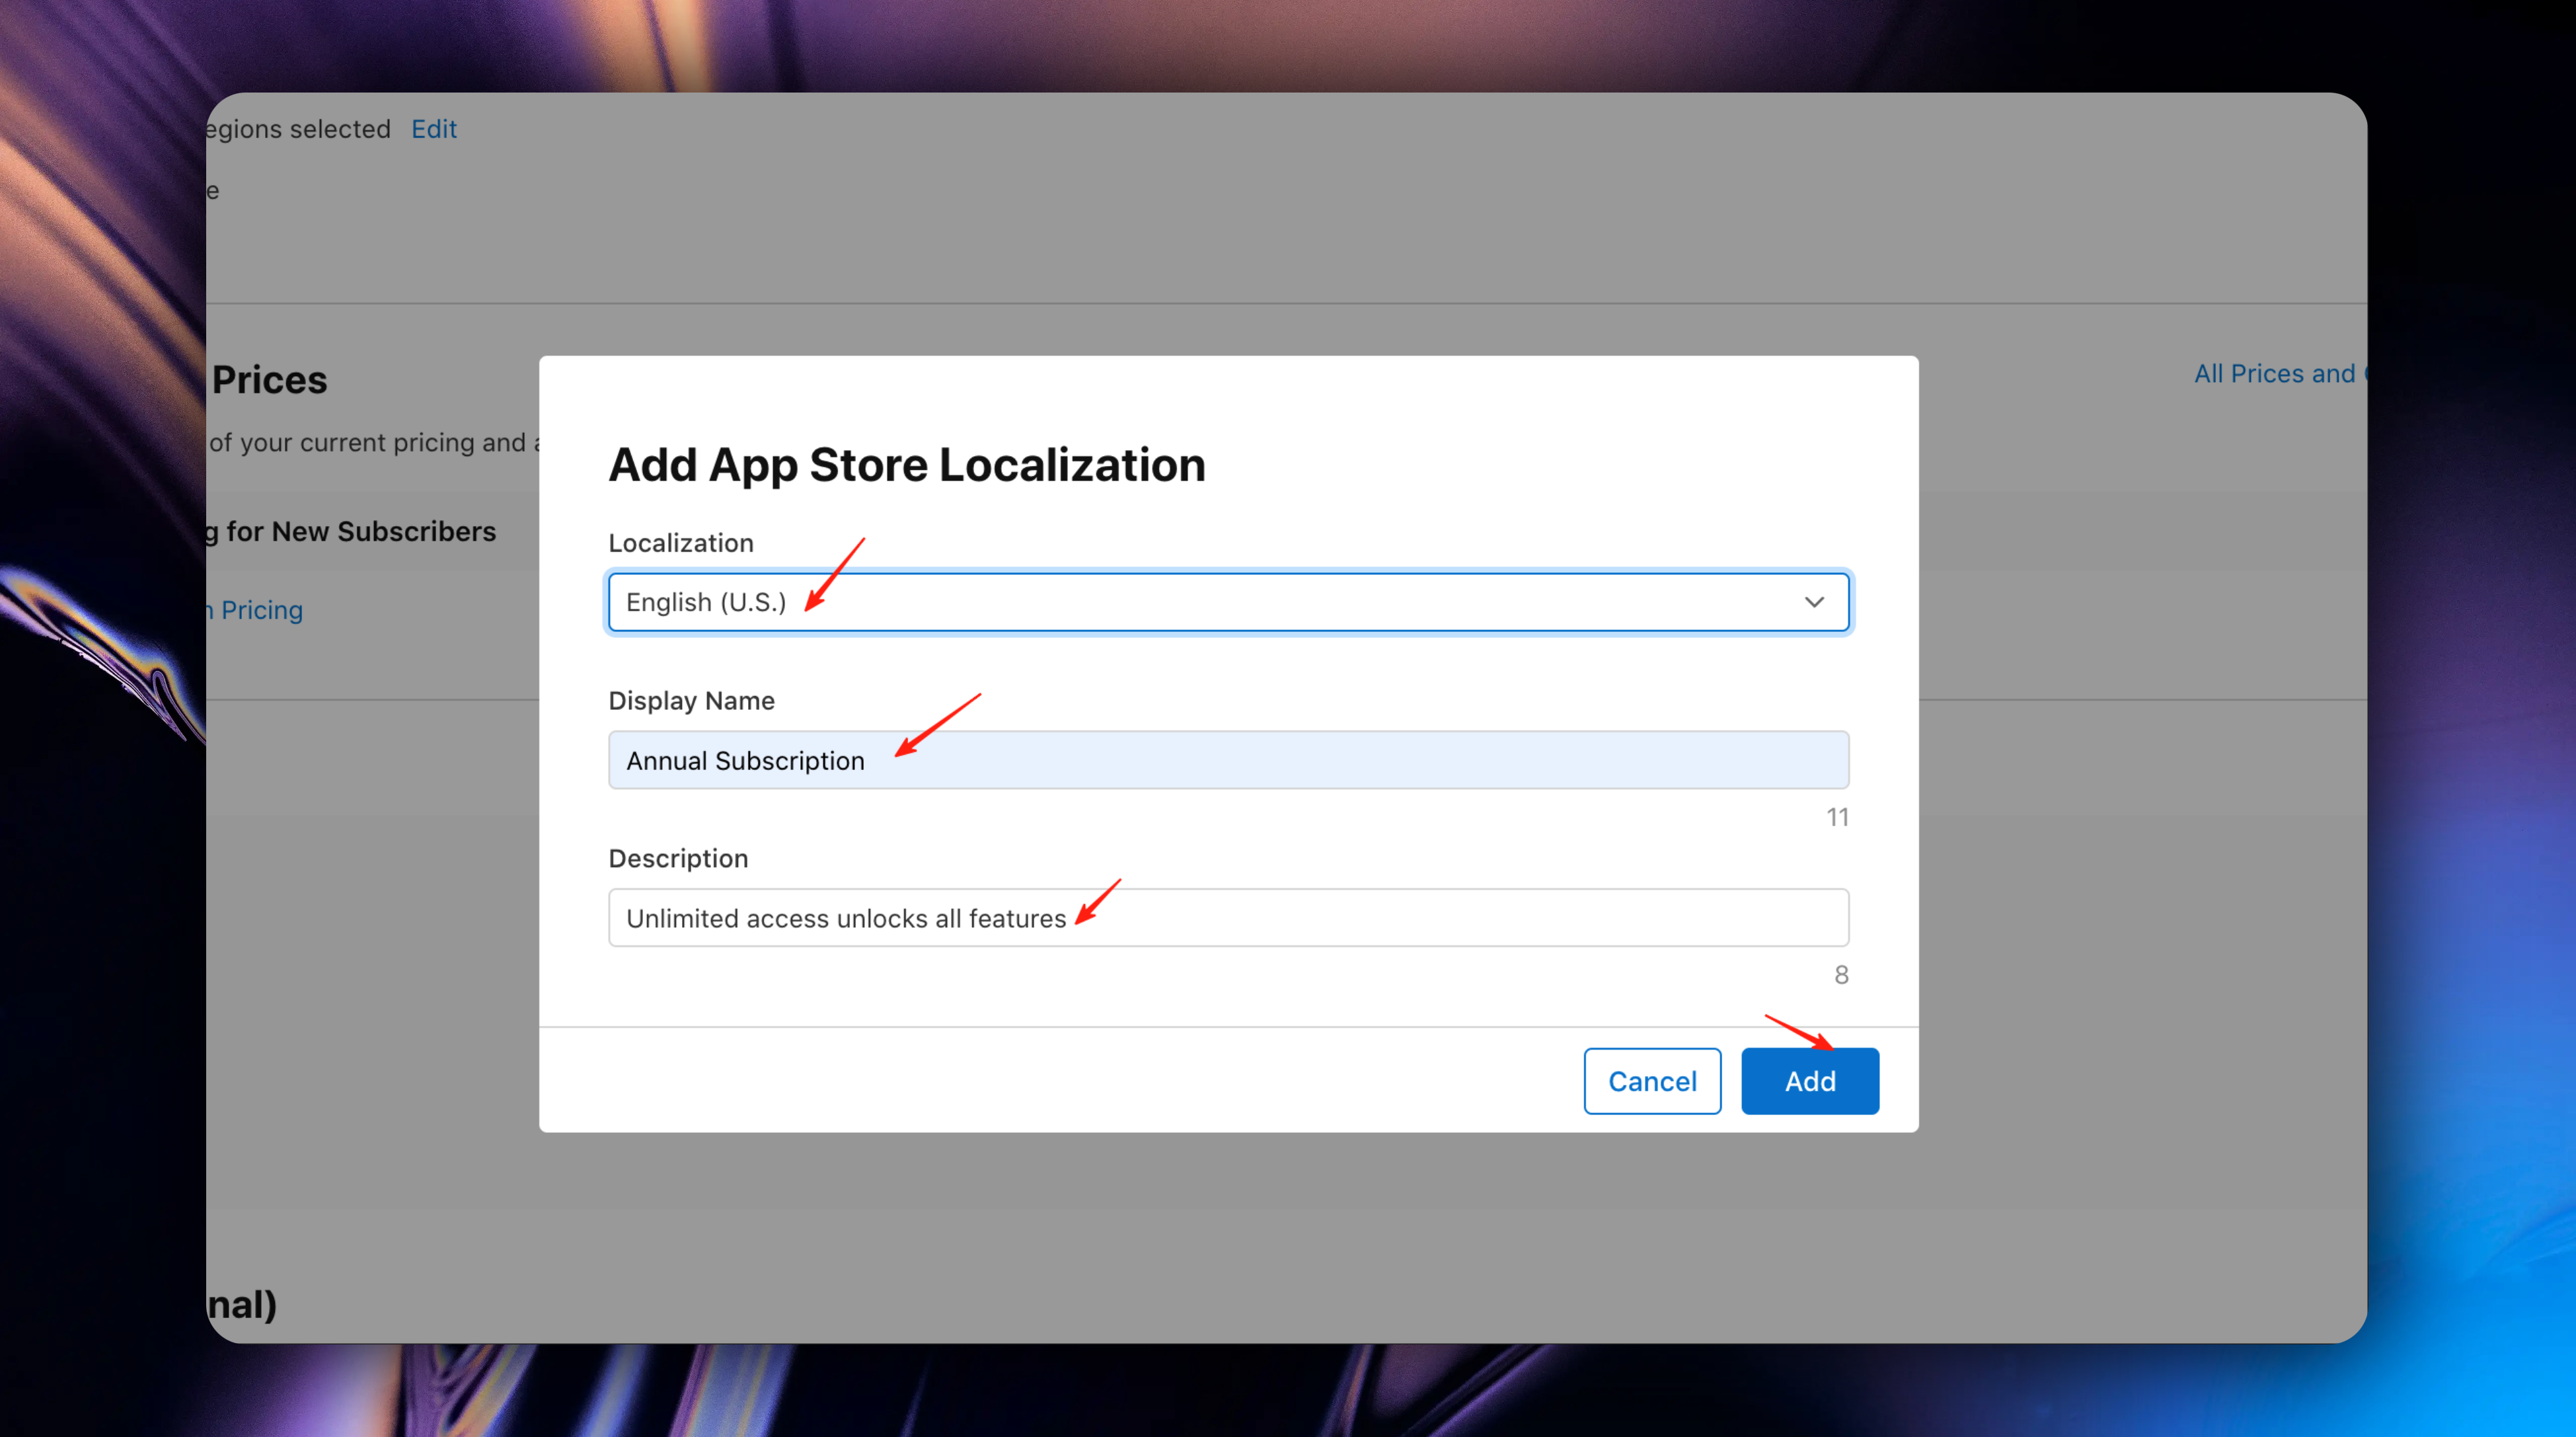
We need to provide subscription display name and description. The subscription display name and description will be shown in the App Store and in users' subscription management settings.
Taking the annual subscription we just created as an example: our subscription name is `Annual Subscription`, and the subscription description is `Unlimited access unlocks all features`
In the documentation, we use English and Chinese as examples
First, set the English subscription display name and description
After filling it out, click the `Add` button
Then set the Chinese subscription display name and description
* Select Chinese
* Subscription display name: 年度订阅
* Subscription description: 解锁所有高级功能
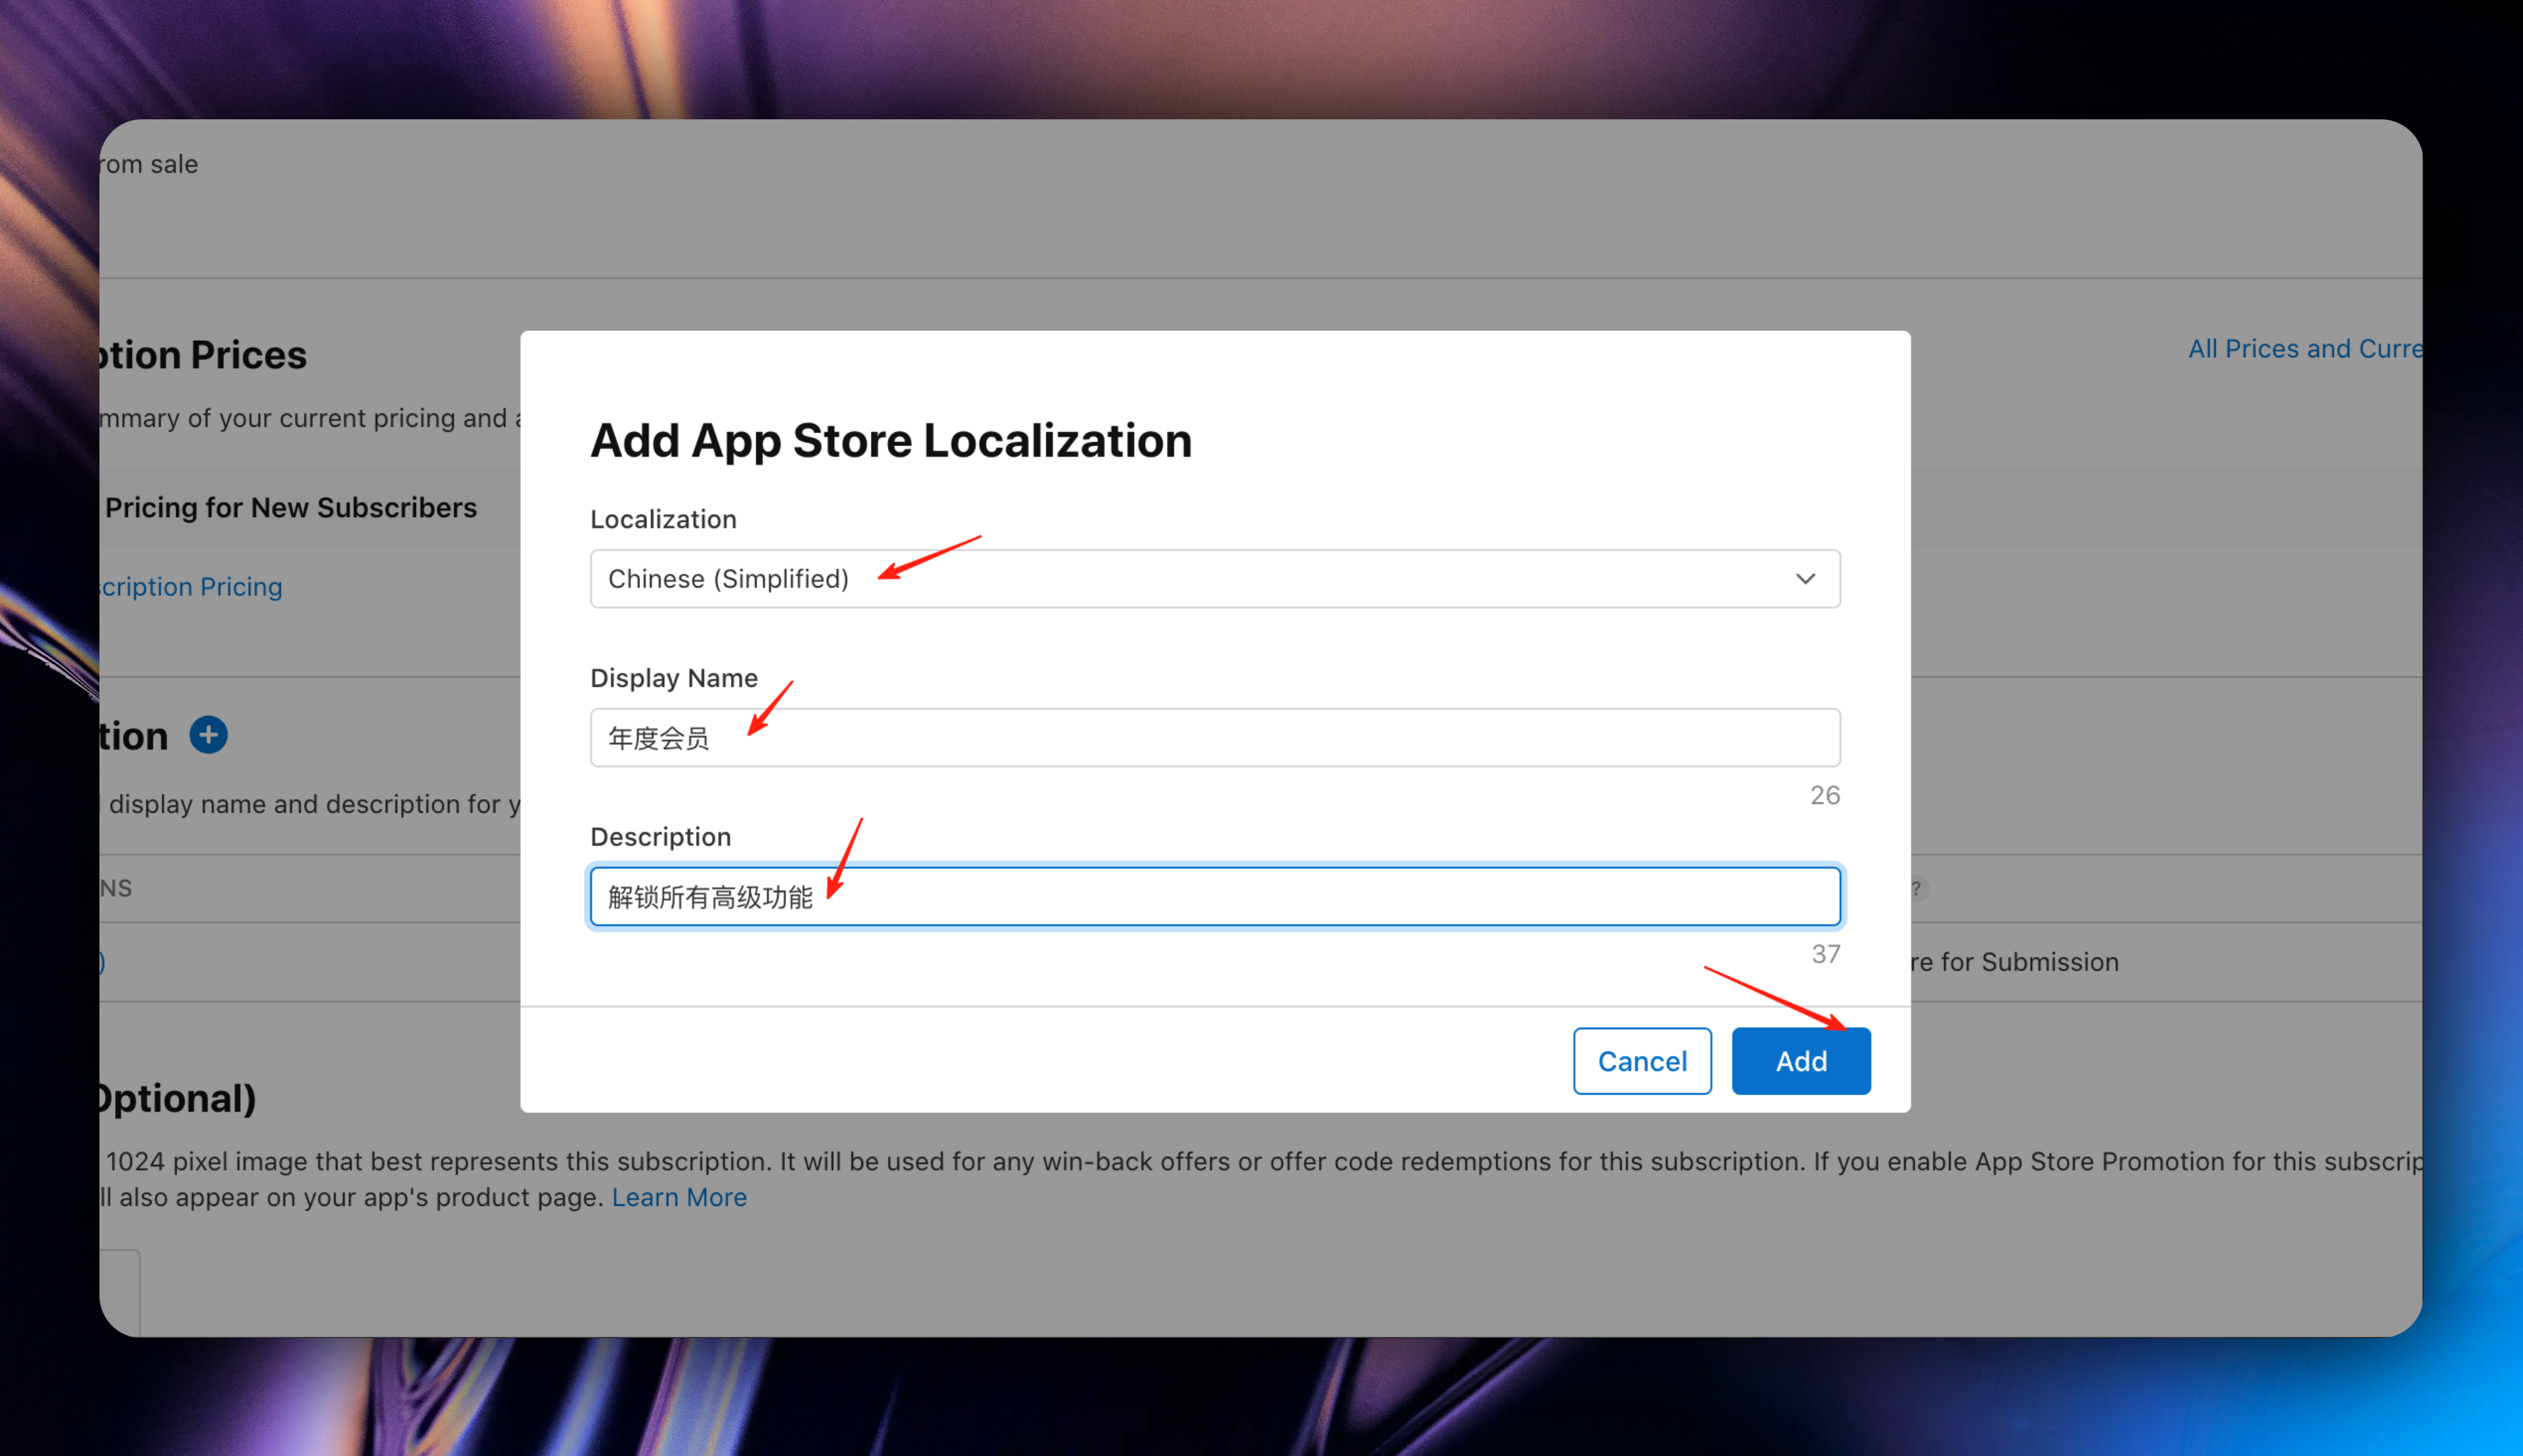
After filling it out, click the `Add` button
After creation, you can view and manage internationalization information here
#### 5. Add Review Information
Continue scrolling down the page to find `Review Information`
The final step in setting up in-app purchases in iOS is to add information for reviewers. This includes a screenshot and optional review notes. Developers often overlook screenshots, but you cannot submit a product for review without a screenshot.
* Screenshot: In-app purchase paywall for reviewers to view. During testing, you can upload any 640×920 blank image here. Before submitting for review, be sure to replace it with an actual paywall interface image.
* Review Notes: This is optional, used to explain anything related to in-app purchases to reviewers. (Most cases don't need to be filled)
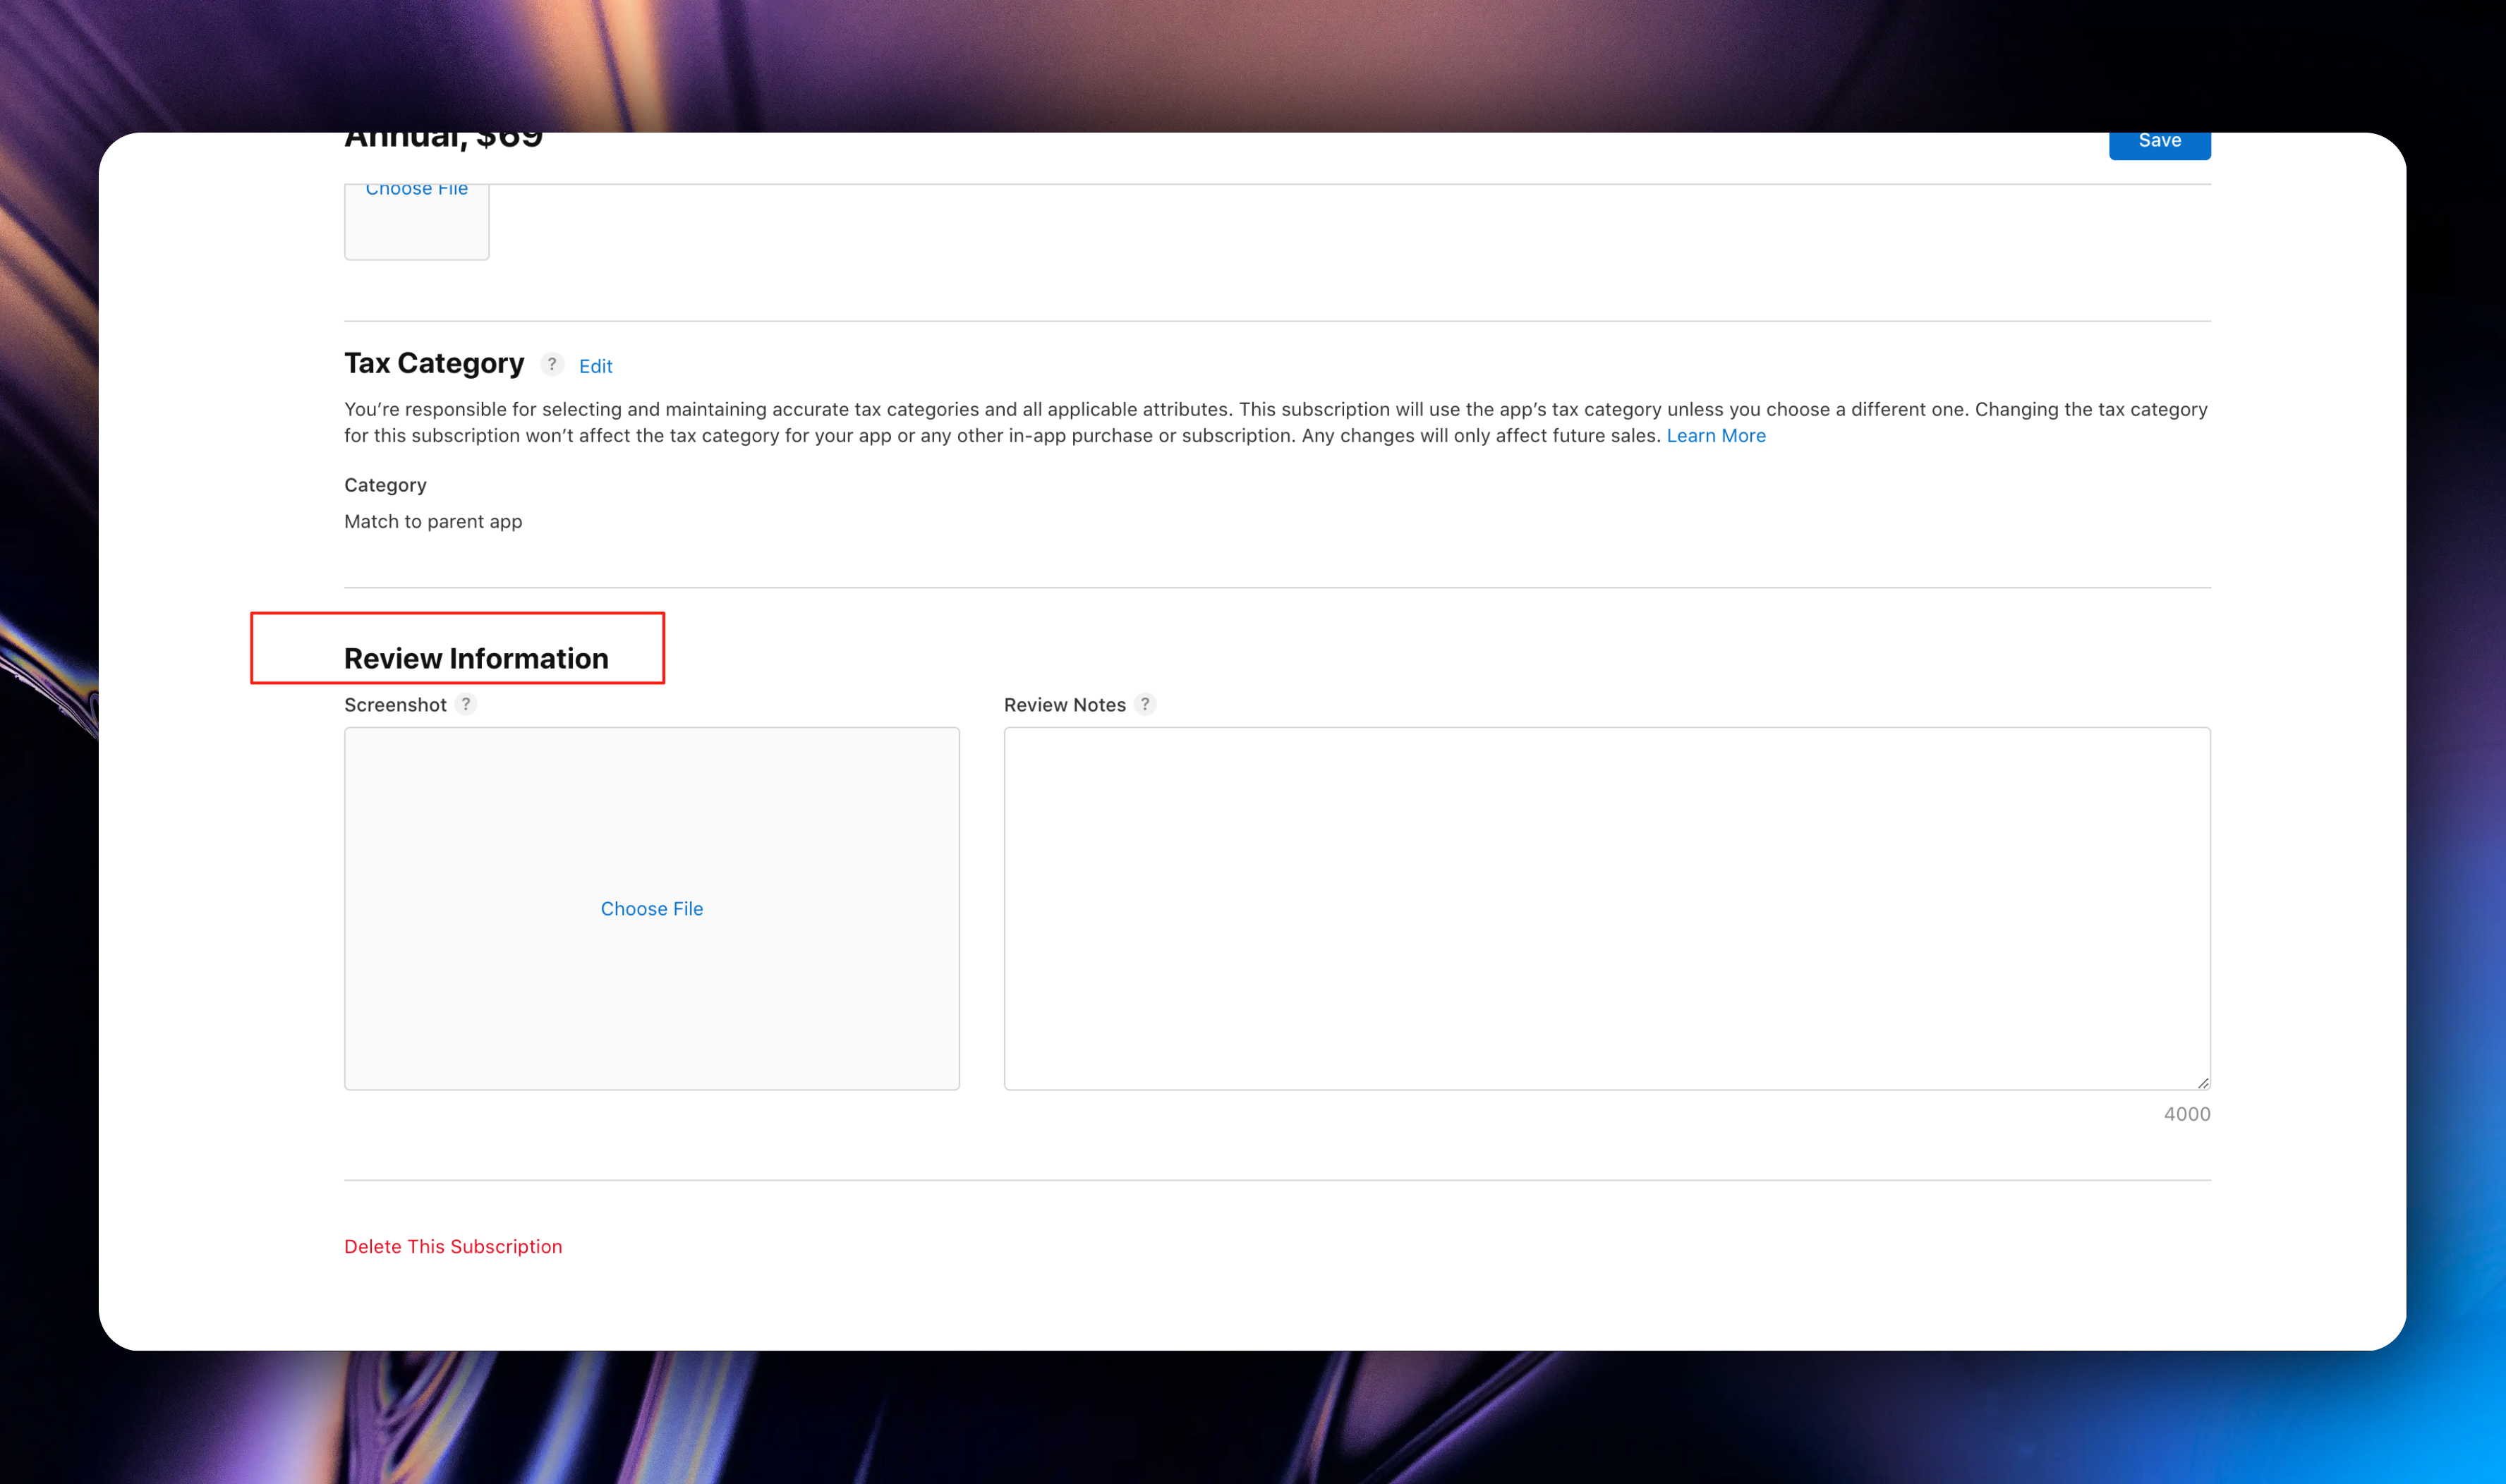
During testing, you can download this image and upload it as a placeholder. Before submitting for review, be sure to replace it with an actual paywall image.
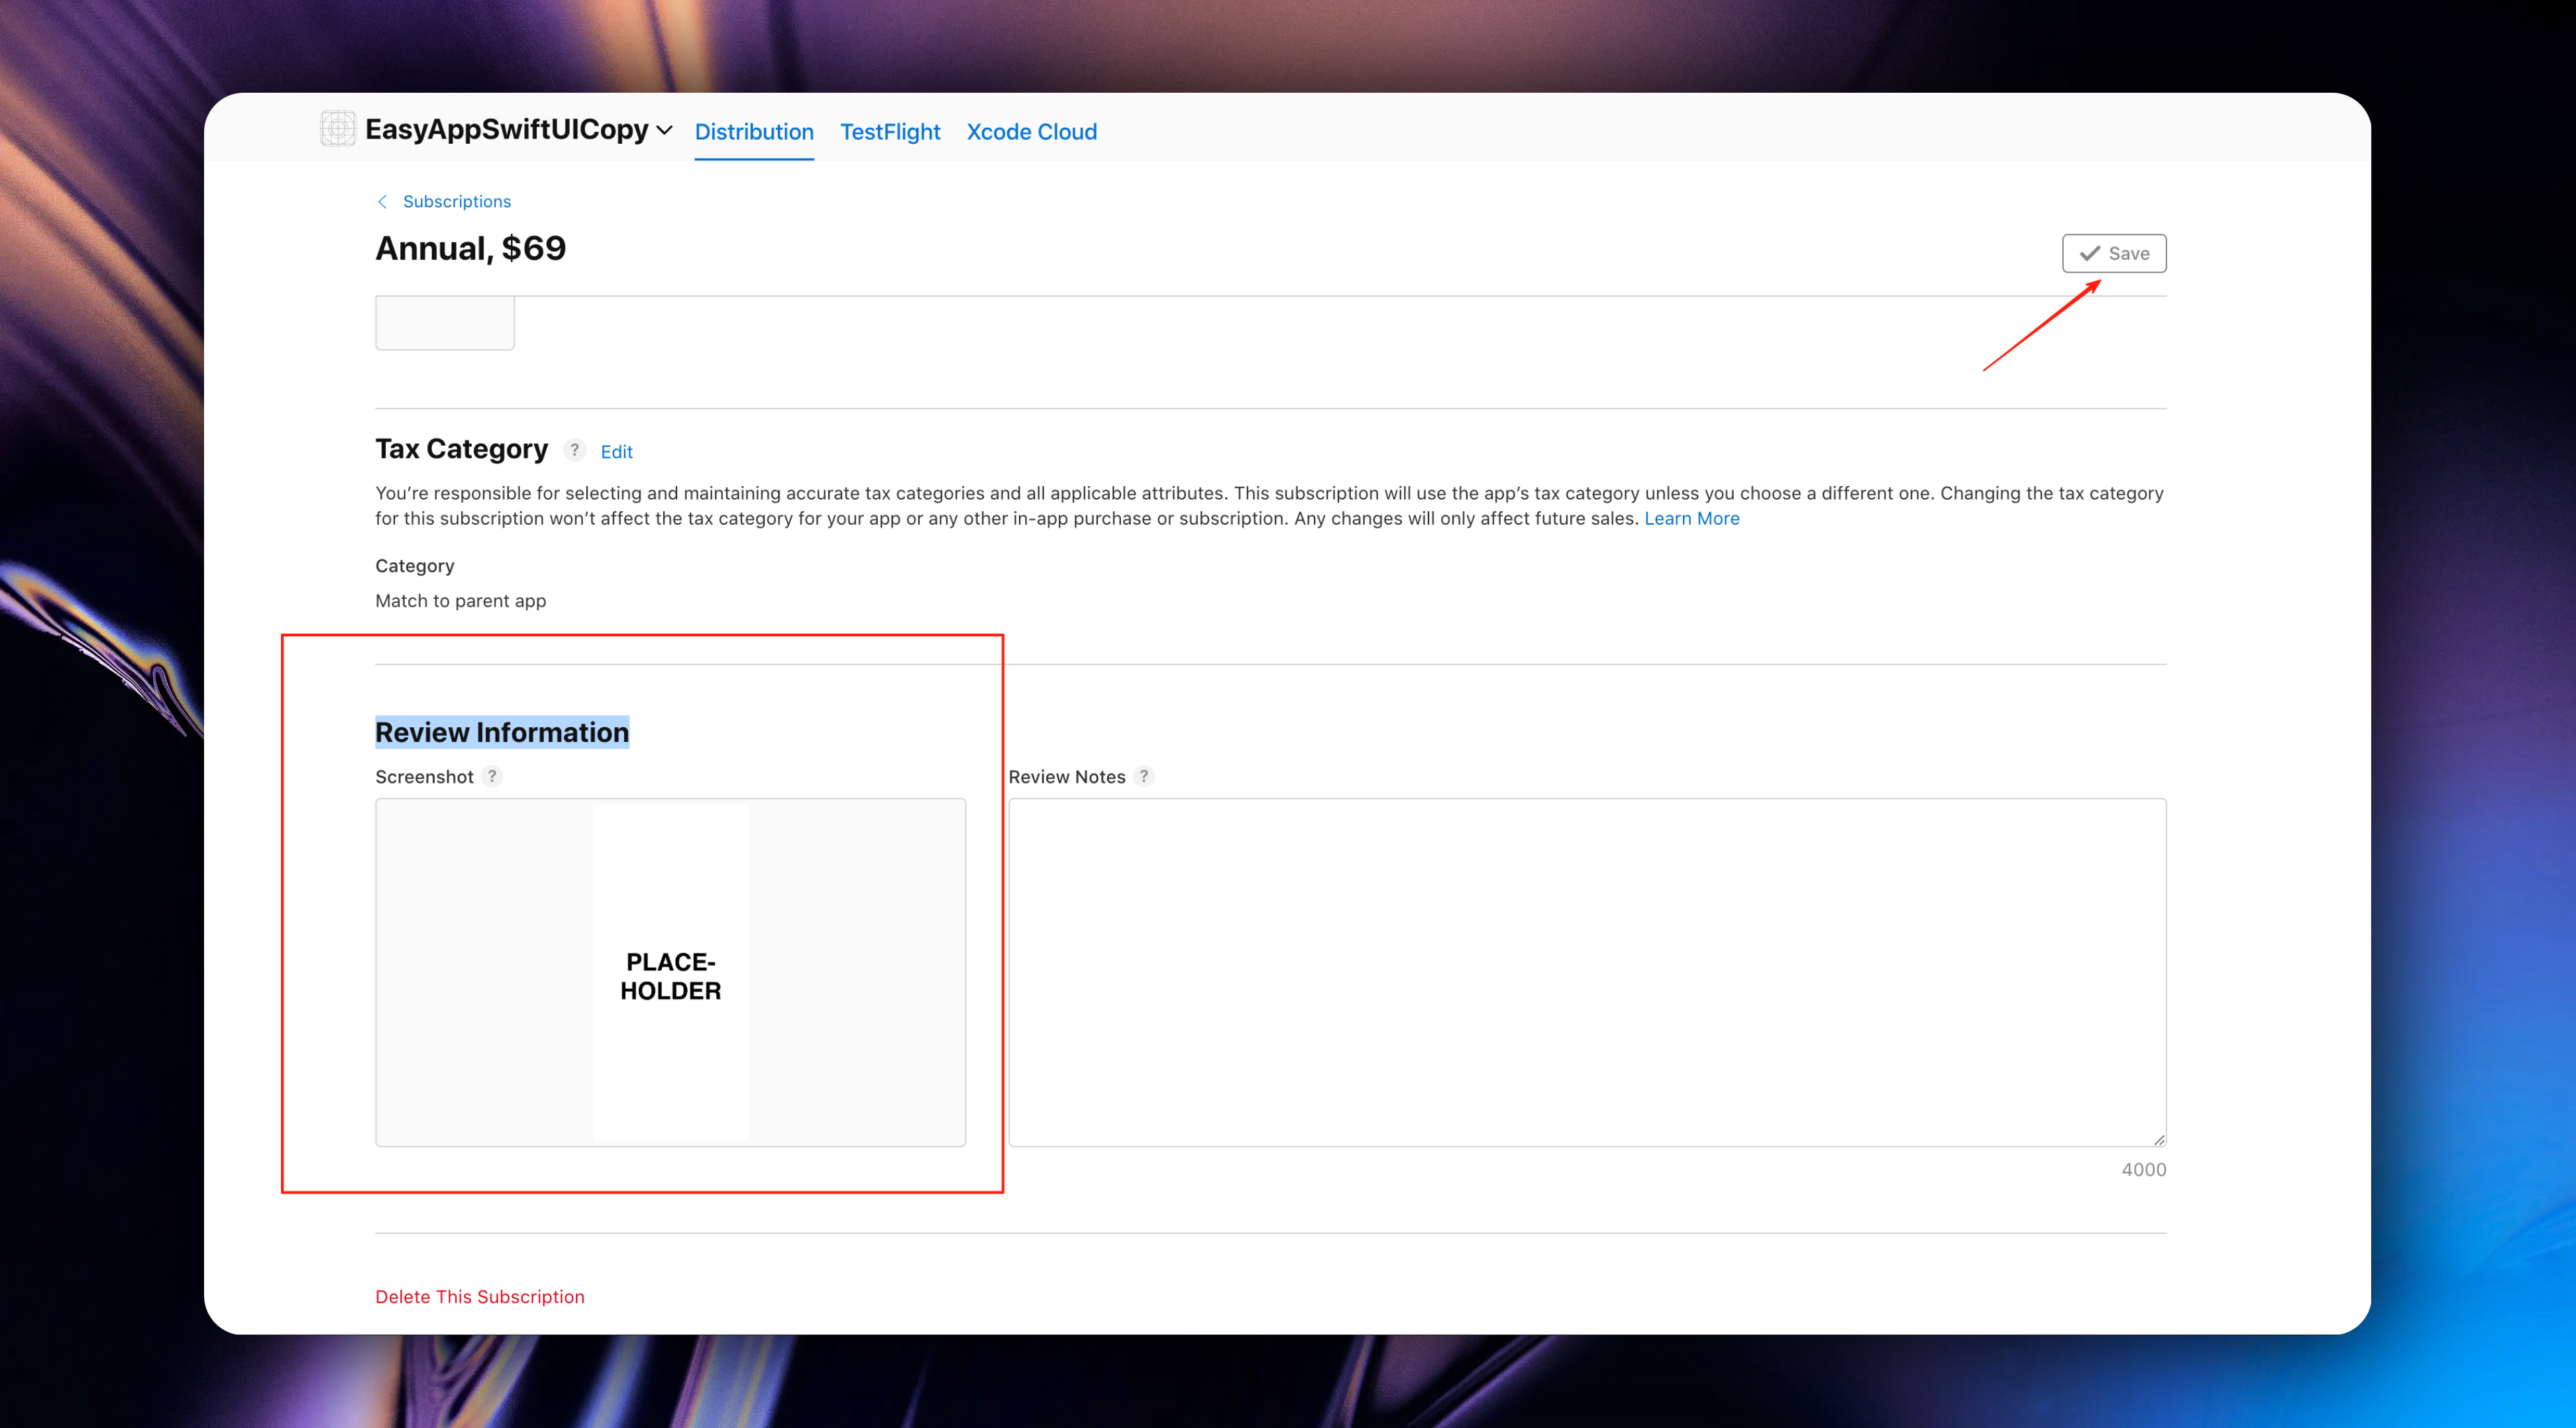
After setting up, click the `Save` button in the upper right corner to save. The annual subscription creation is now complete.
Next, we'll follow the steps for creating annual subscriptions to create monthly subscriptions.
### Create Monthly Subscription
We return to the subscription group preview page, click the `Subscriptions` + button to create a monthly subscription
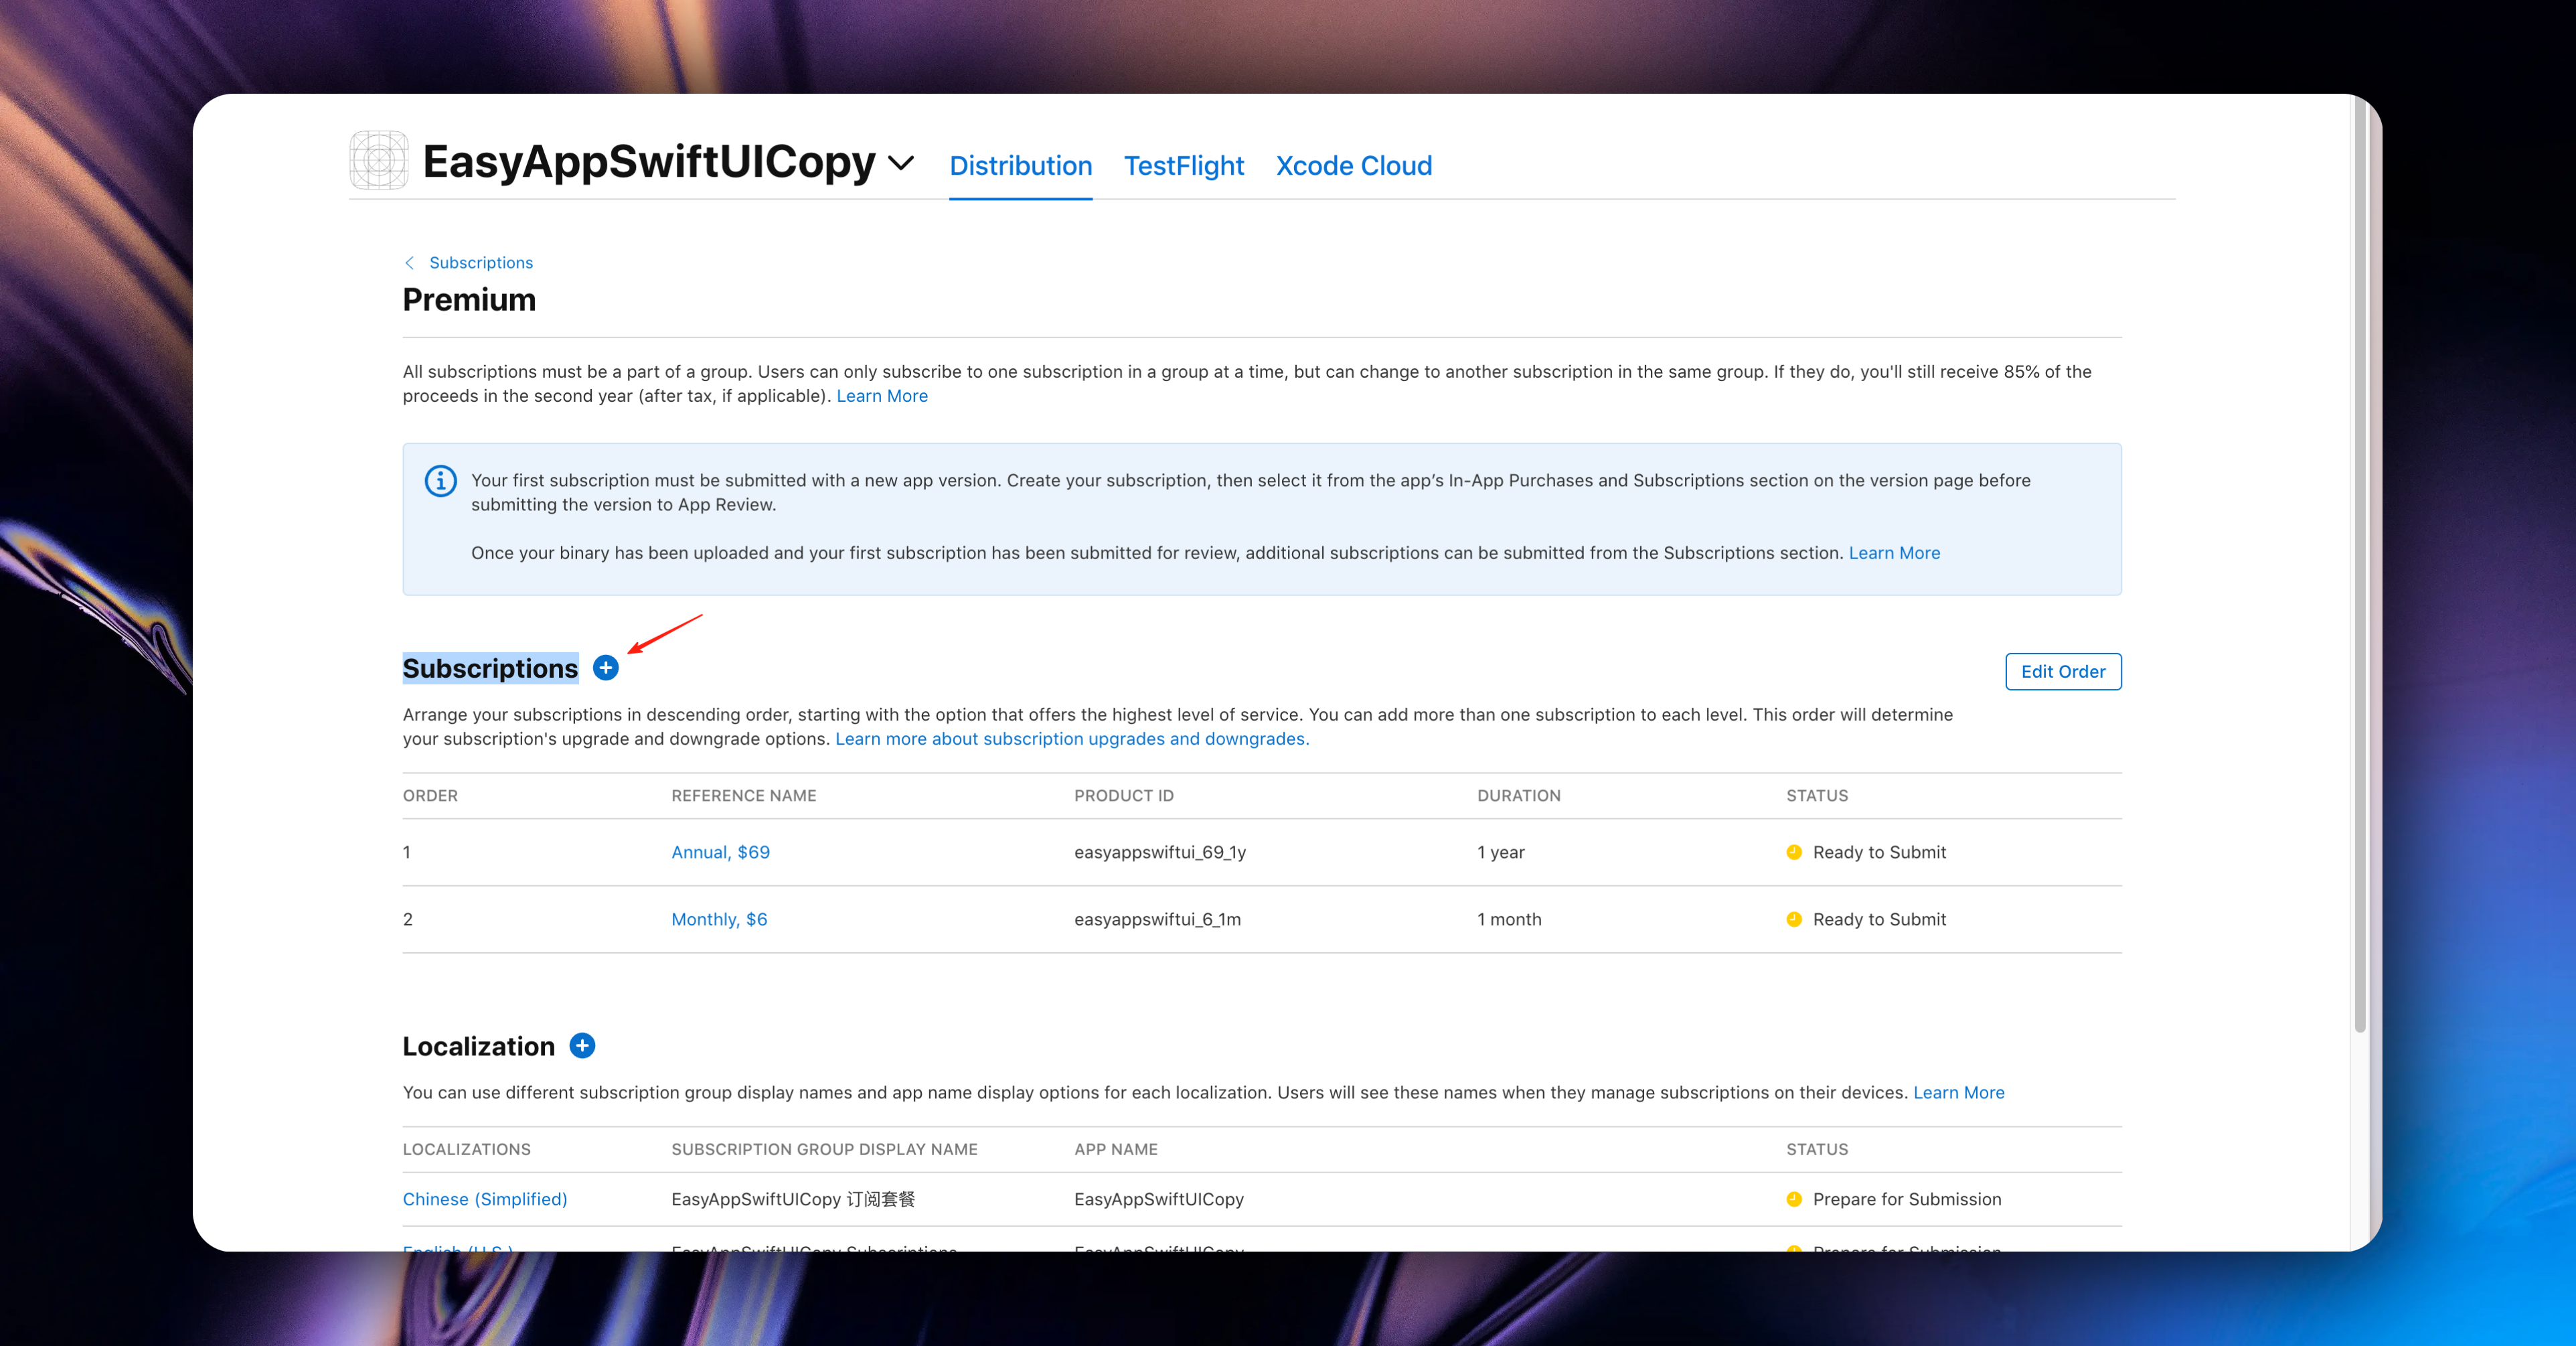
At this point, the steps are exactly the same as [Create Annual Subscription](#create-annual-subscription).
You can refer to the steps in [Create Annual Subscription](#create-annual-subscription) to create monthly subscriptions
Of course, you can also create weekly subscriptions, quarterly subscriptions, and semi-annual subscriptions. The steps are all the same.
Remember to select the correct subscription duration here 😄

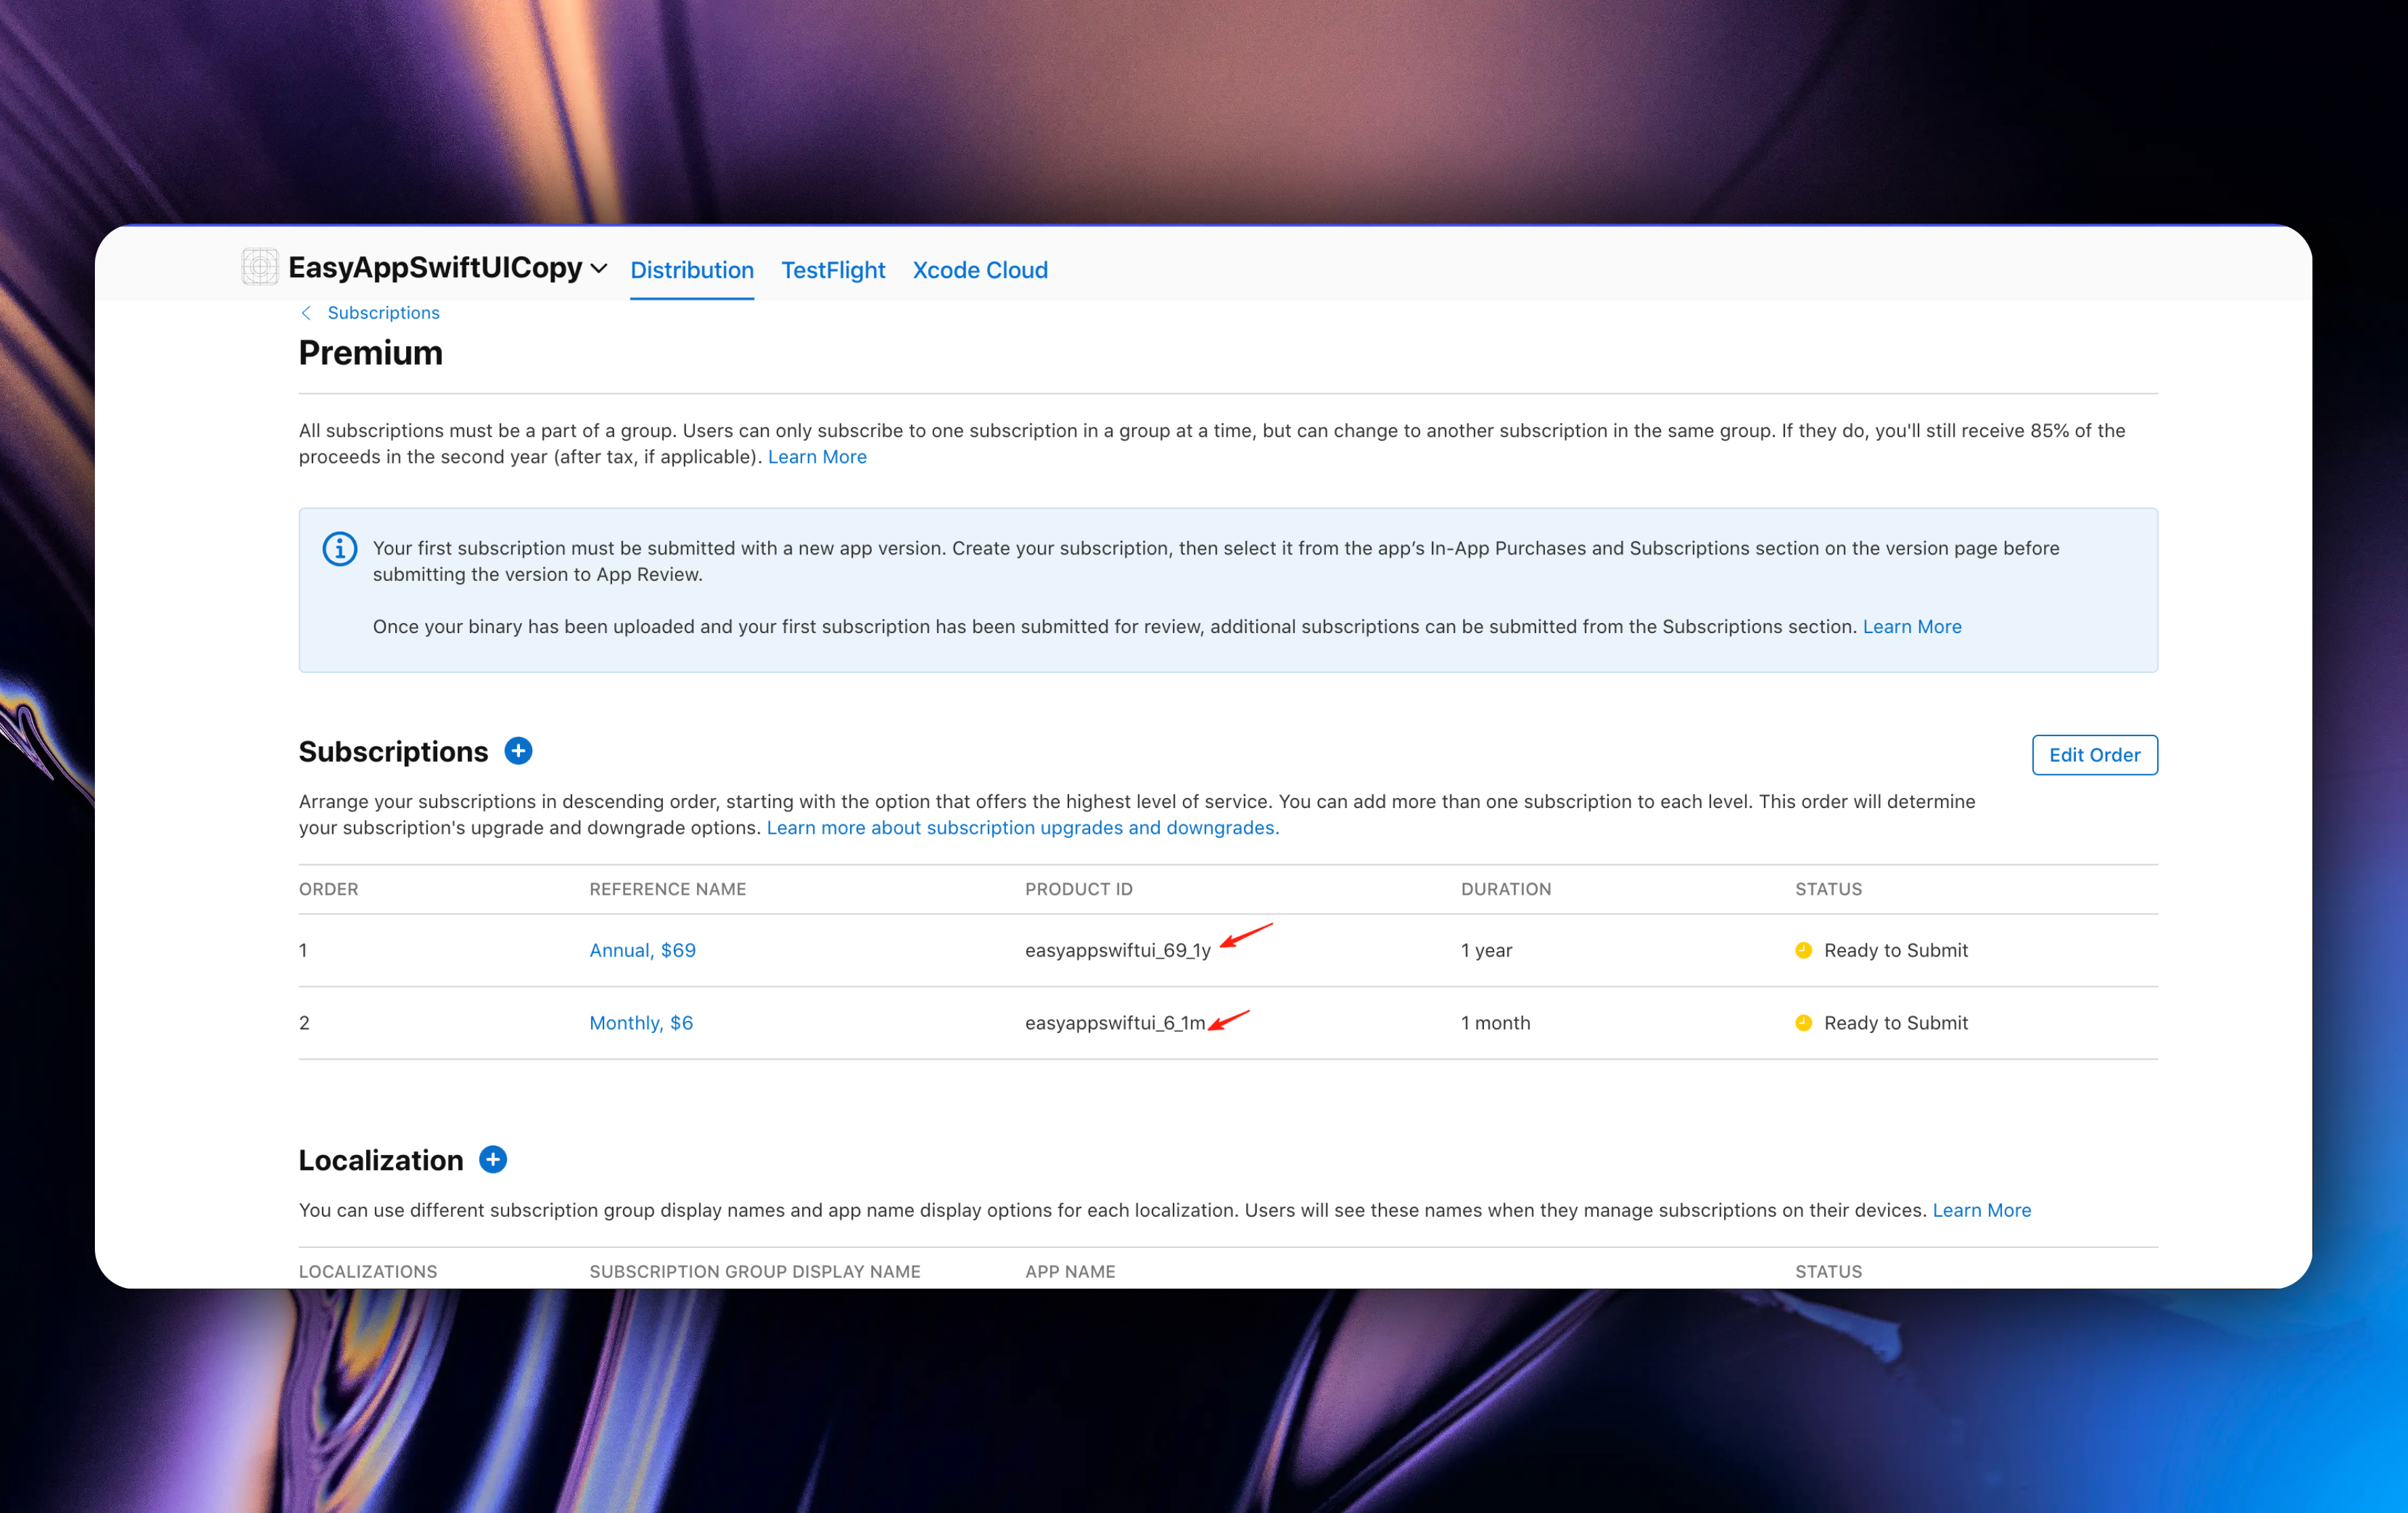
If you complete the entire process successfully, you should see the following page. All the subscriptions you created will be displayed here.
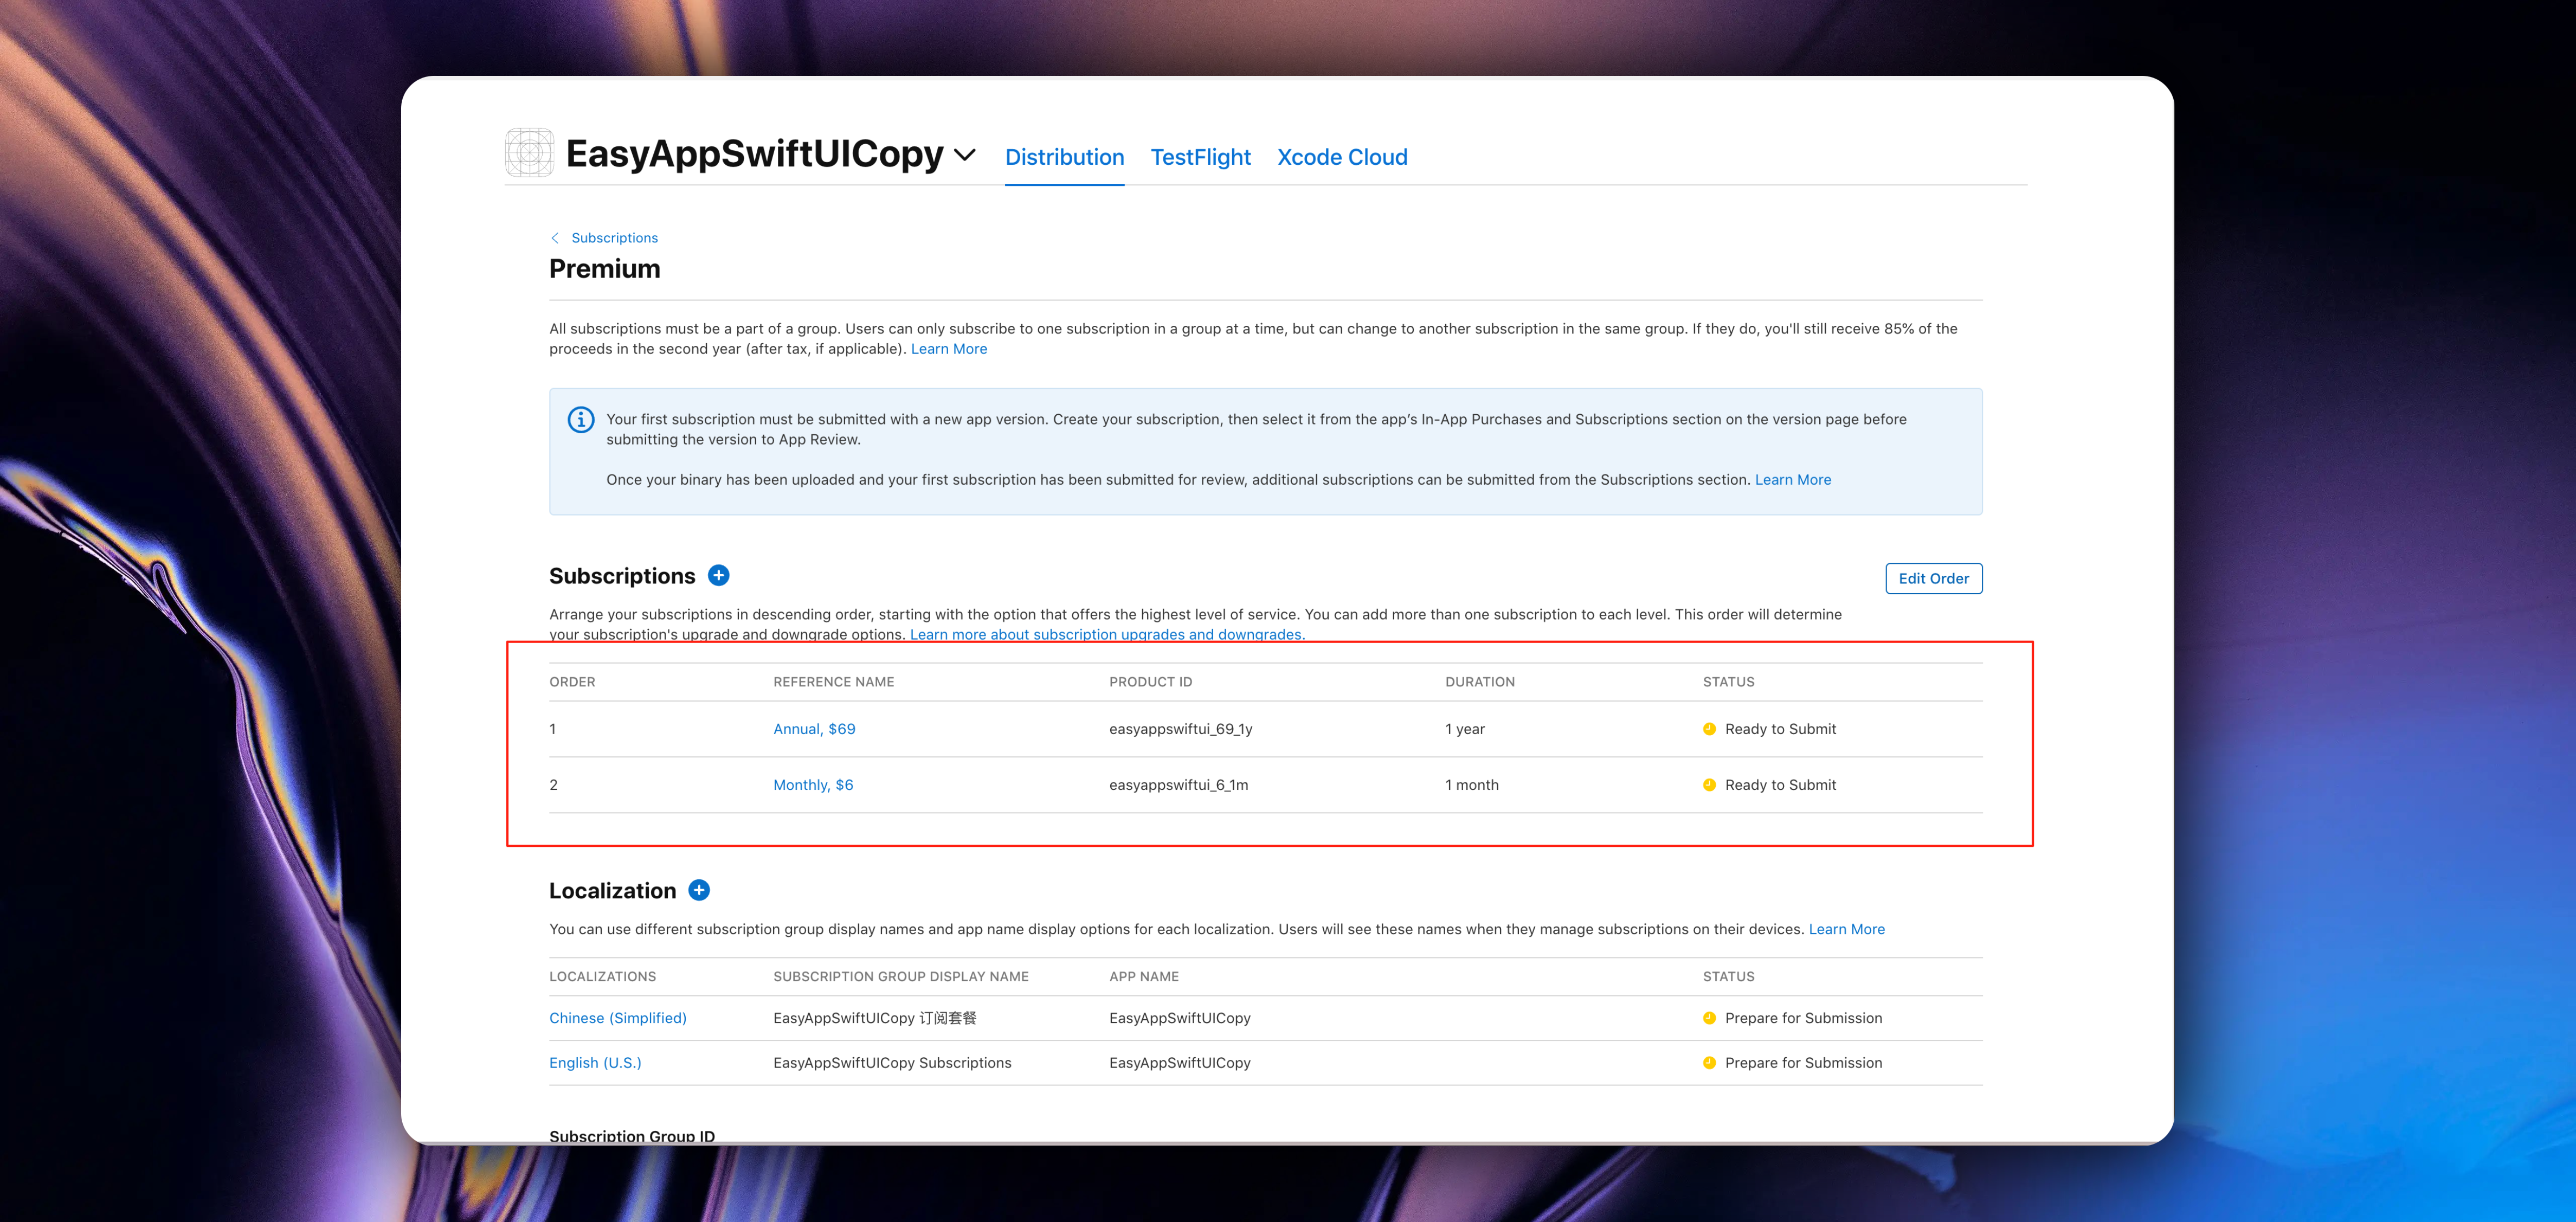
If you want to modify subscription information, you can click the subscription name to enter the subscription details page. Then modify the information you want.
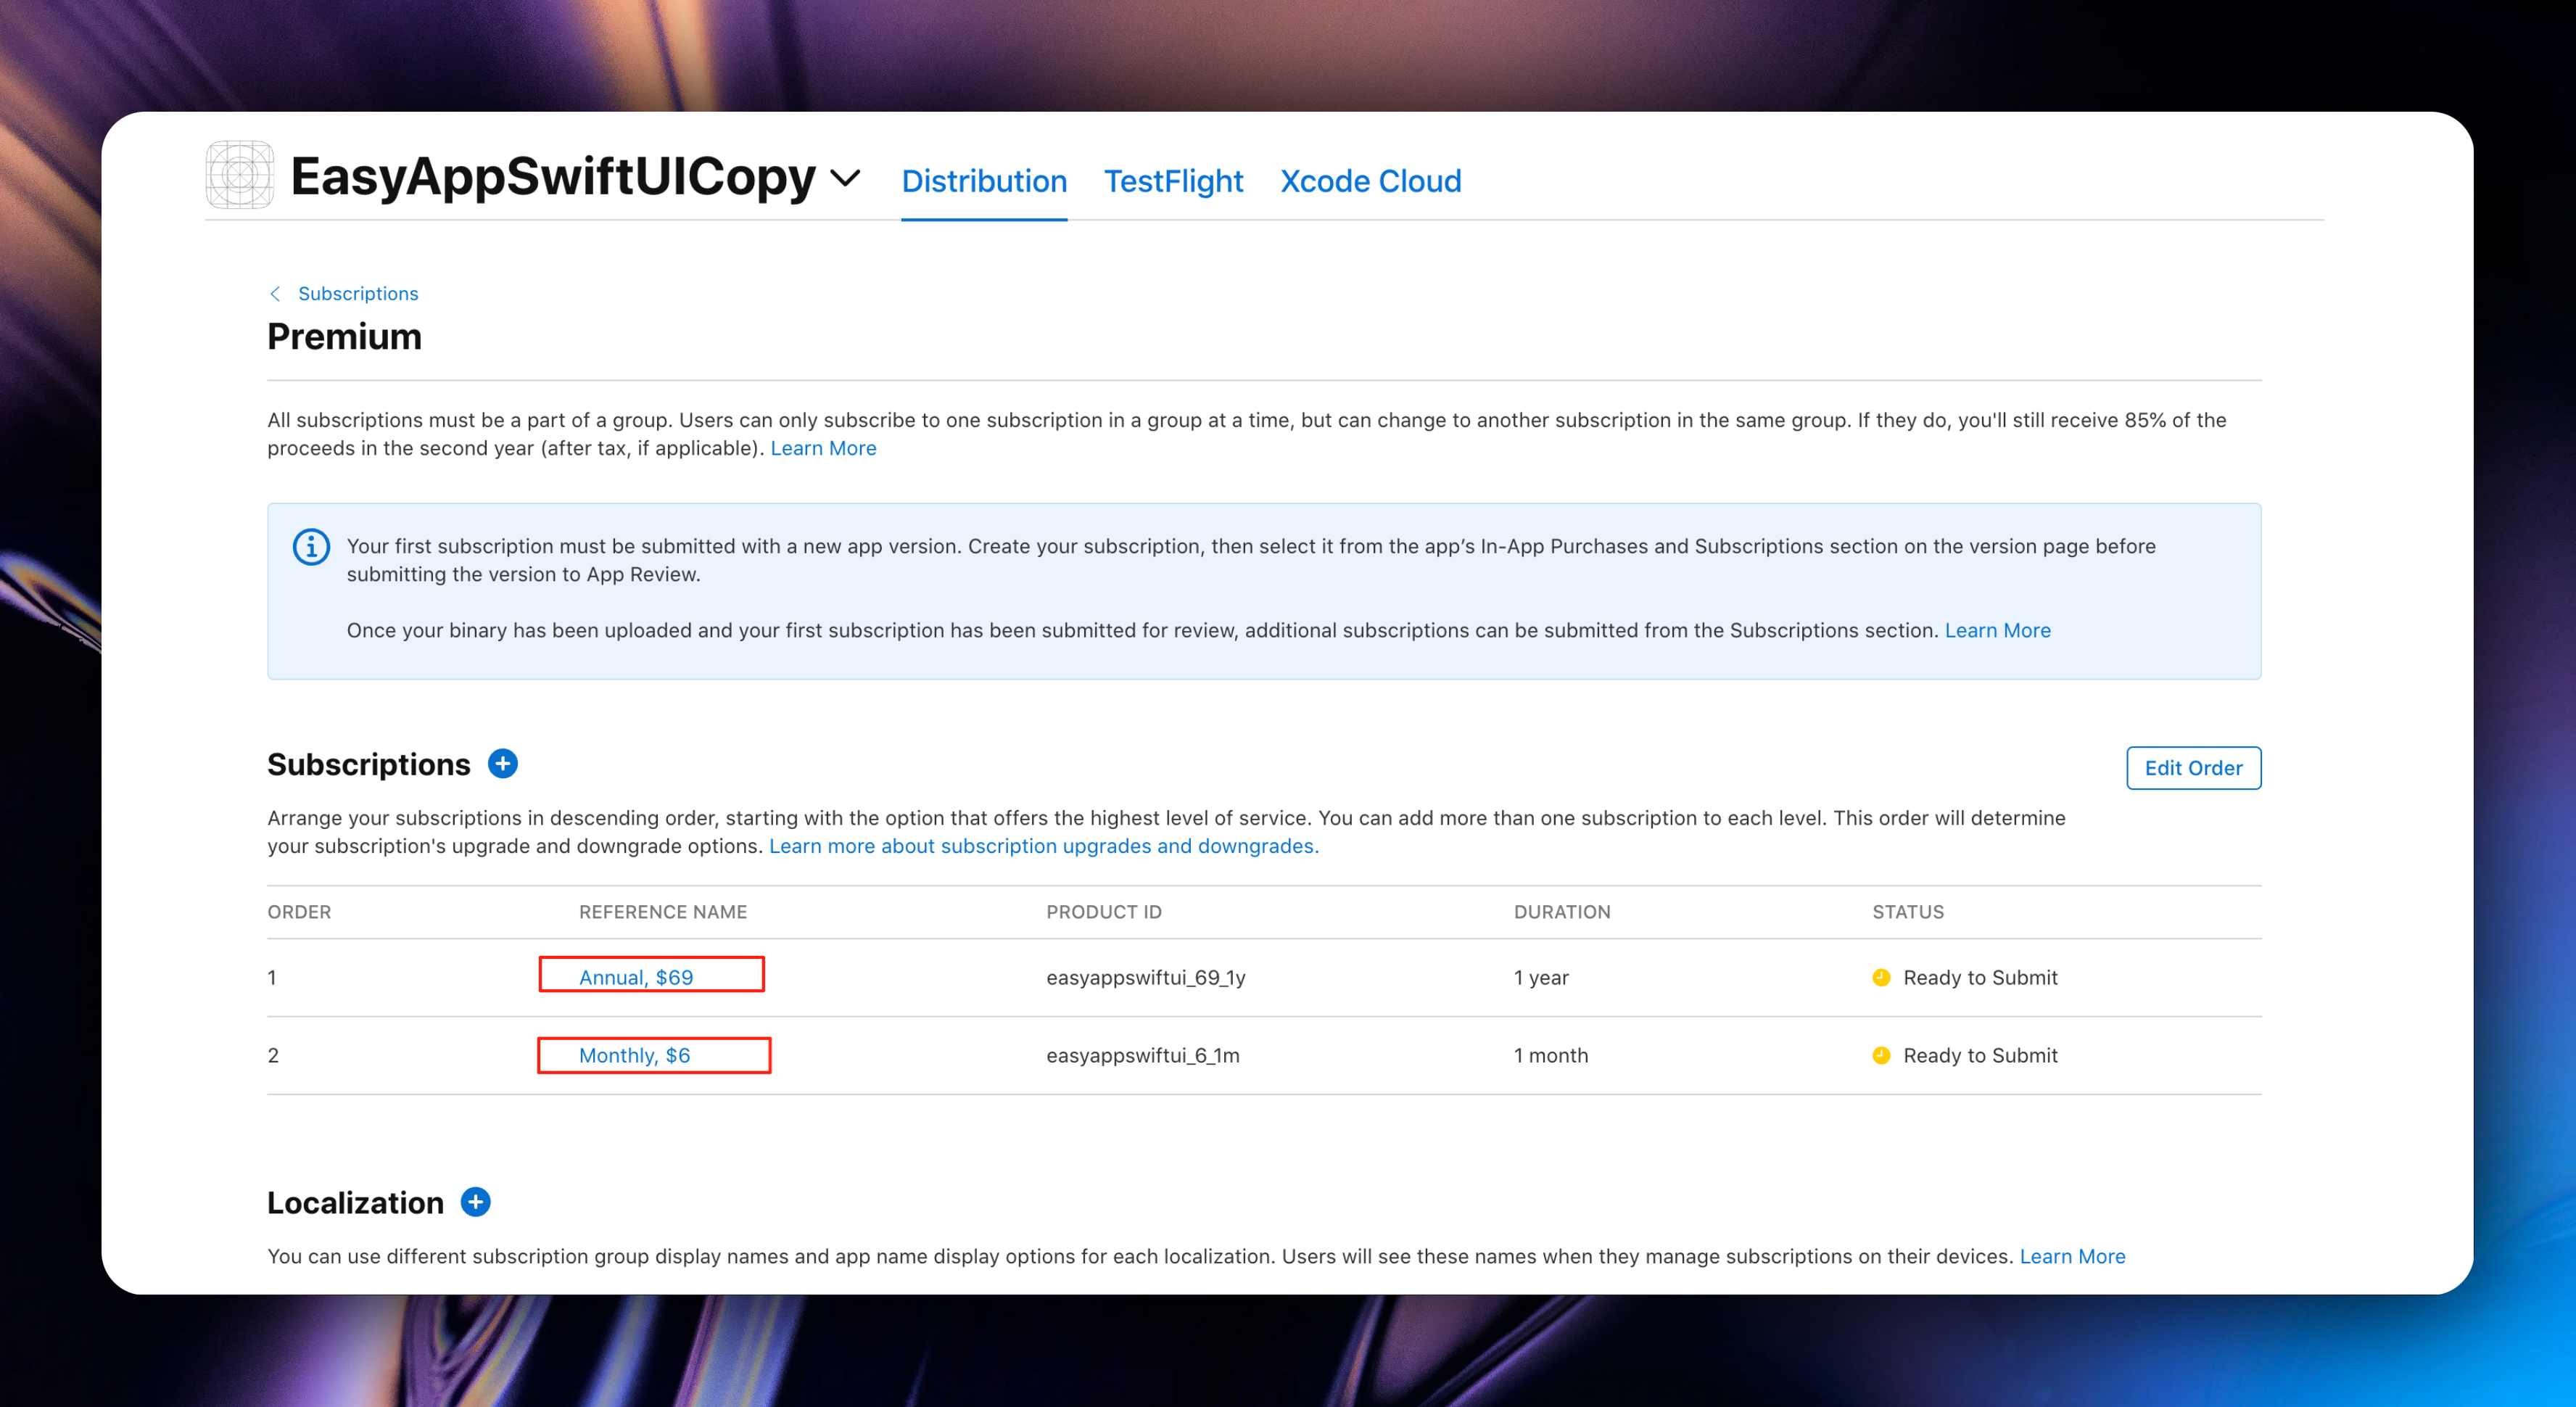
We cannot modify the subscription's `Product ID`. Even if the product is deleted, that ID cannot be used for any of your other apps. This is the unique identifier for getting subscription information. If you're unsure, please refer to the `Product ID` explanation in [here](#1-create-subscription-type).
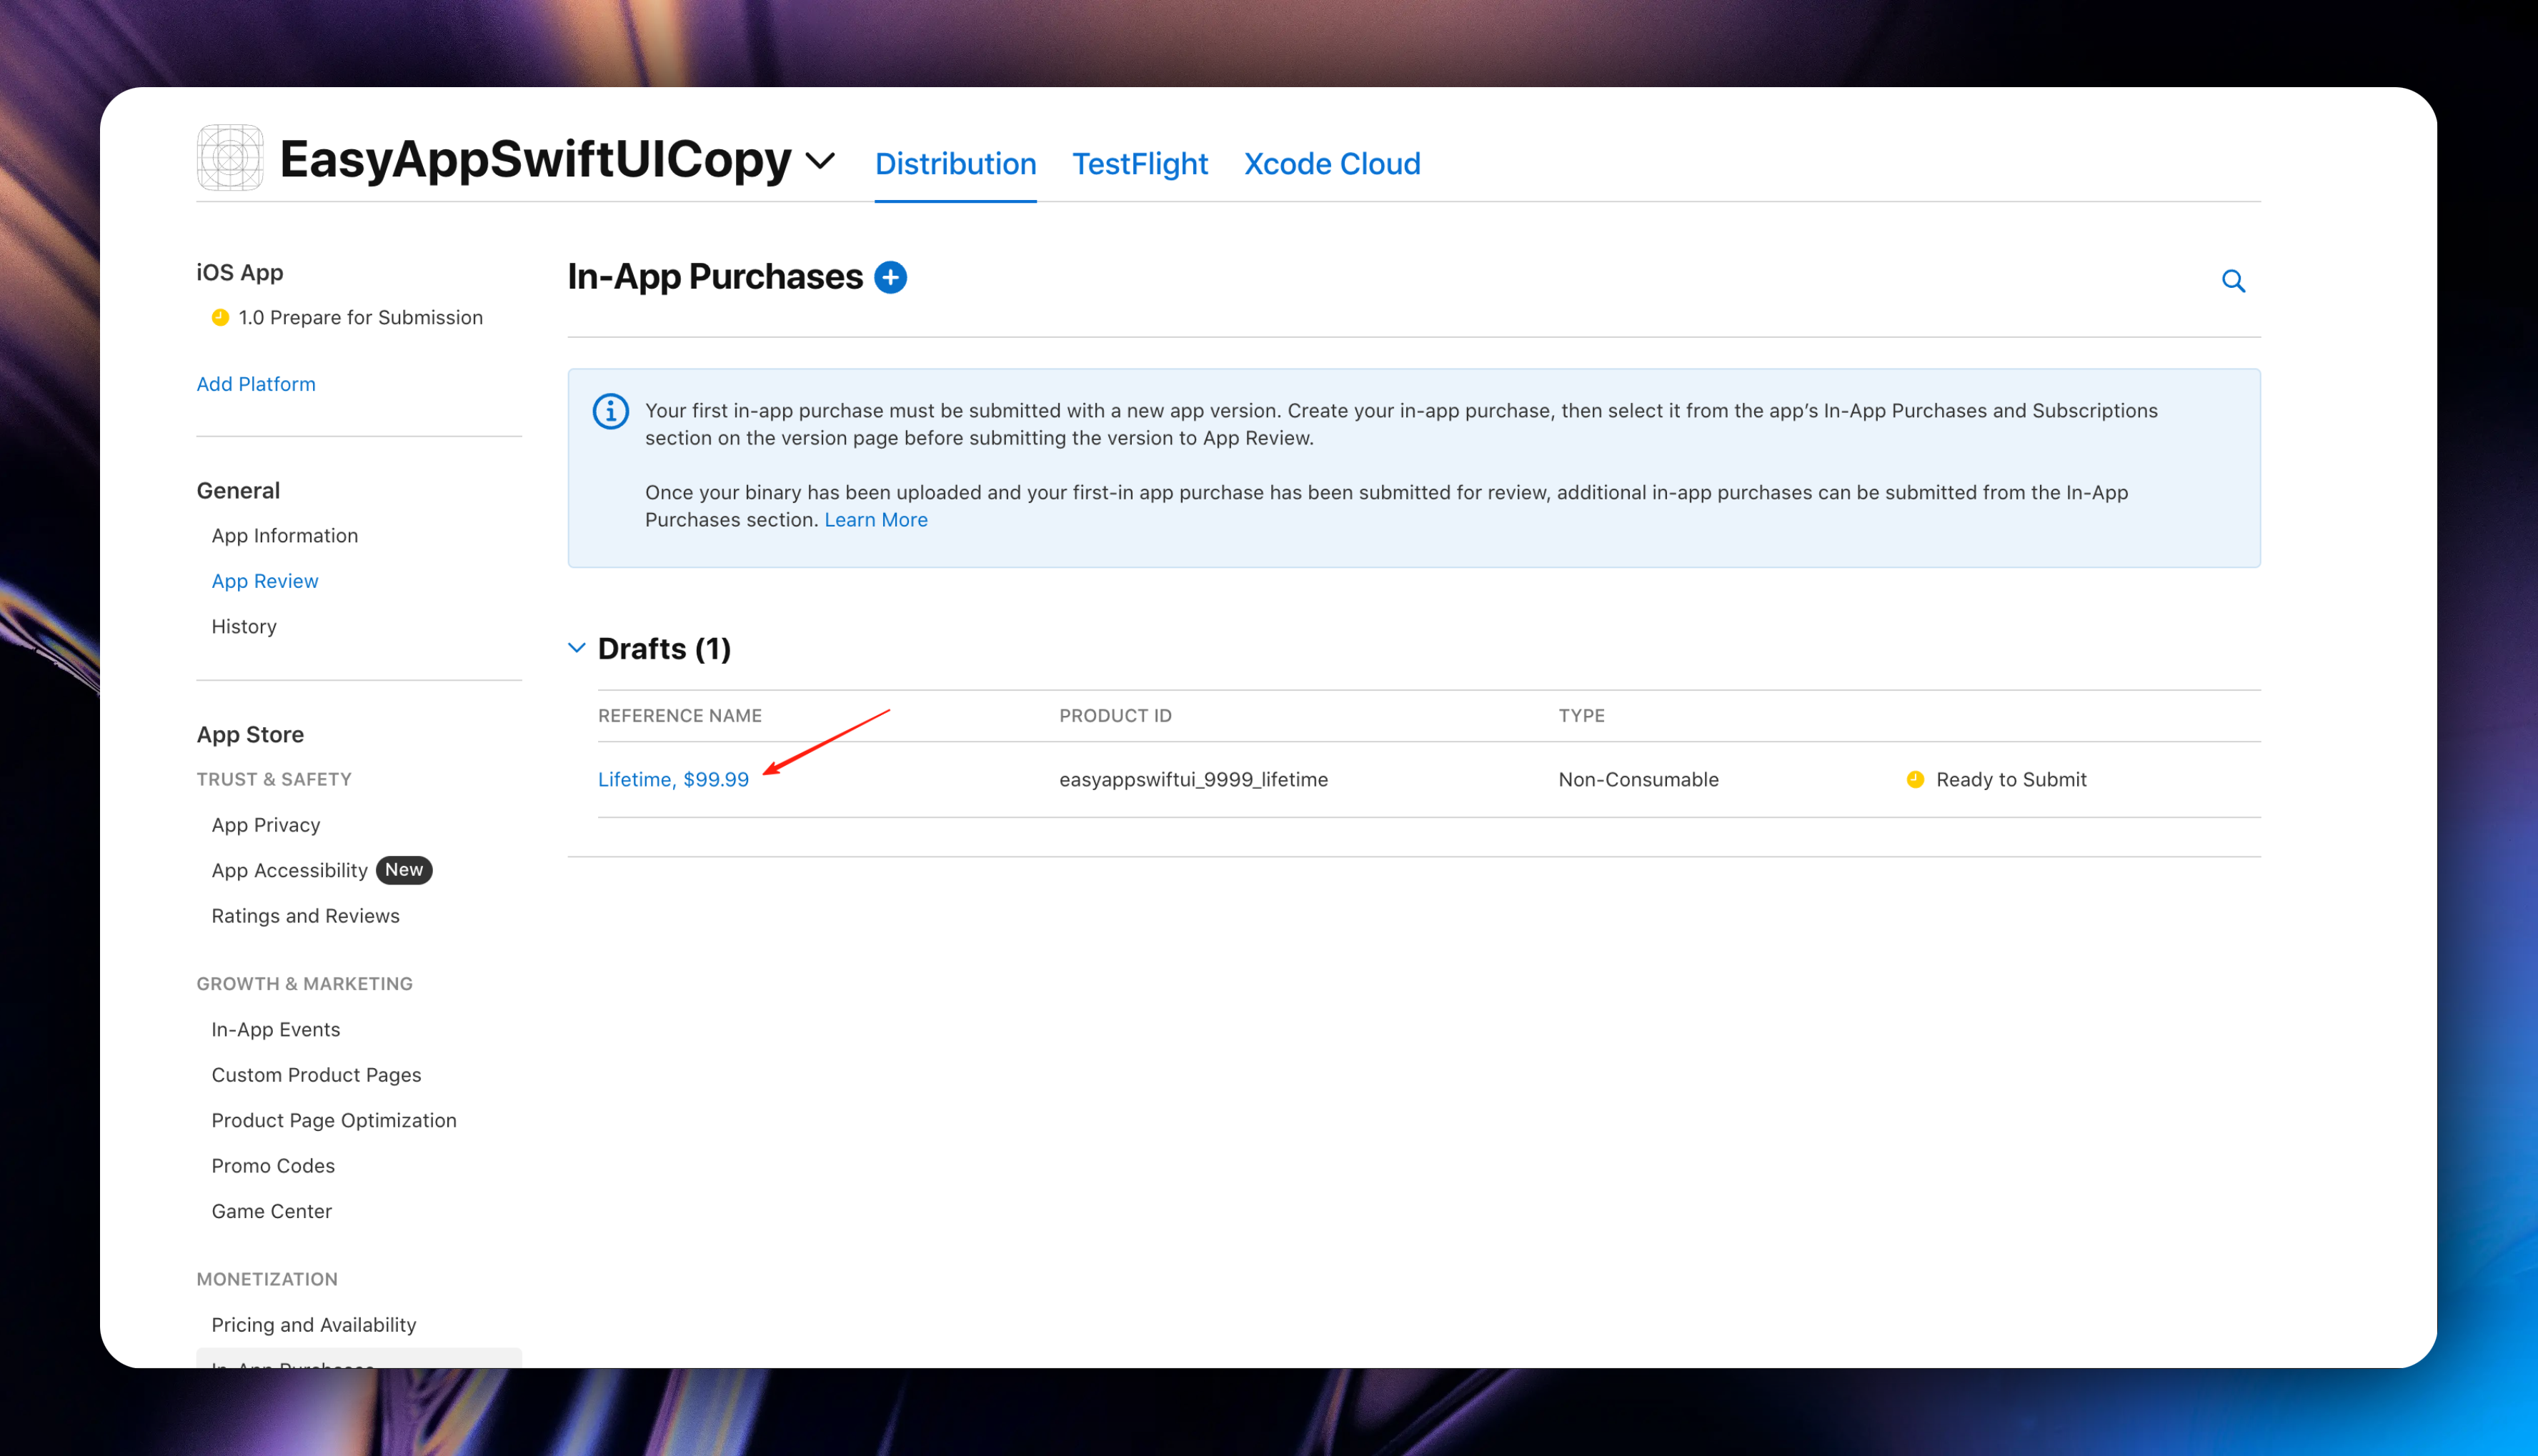
### Create One-time Purchase (Lifetime Membership)
Creating one-time purchases doesn't depend on subscription groups. We return to the App preview homepage, click `In-App Purchases`, click the `Create` button to create a one-time purchase
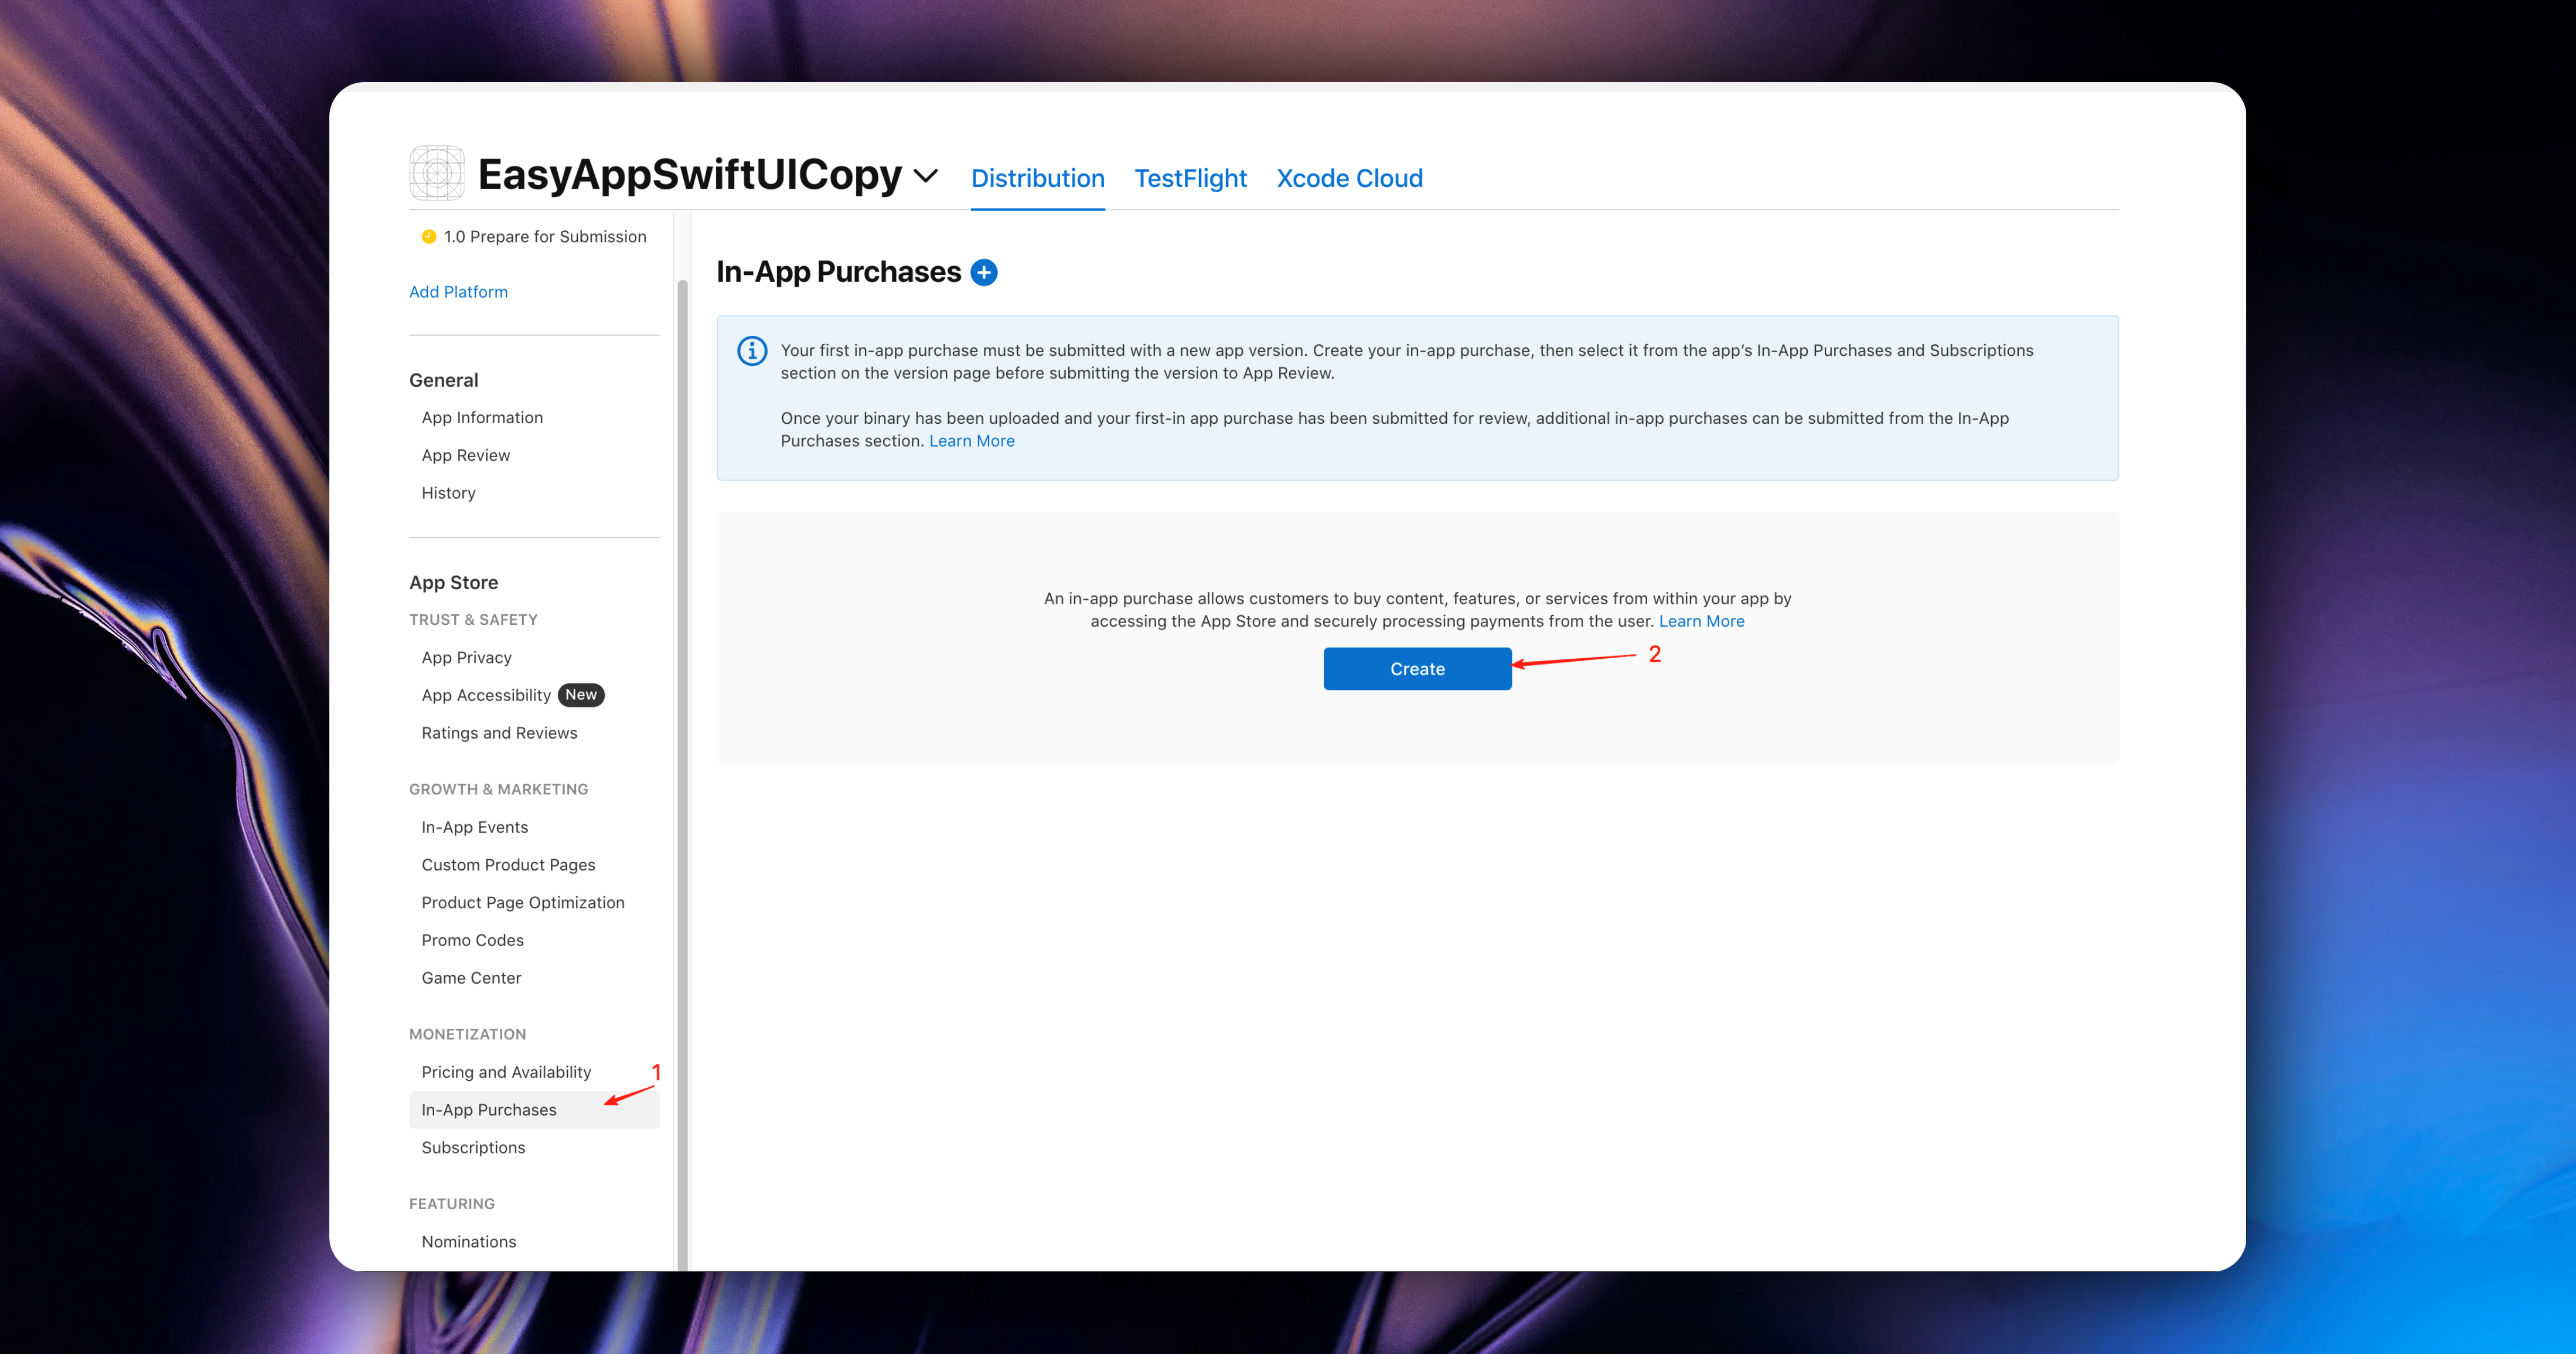
In the popup, we need to fill in the following information:
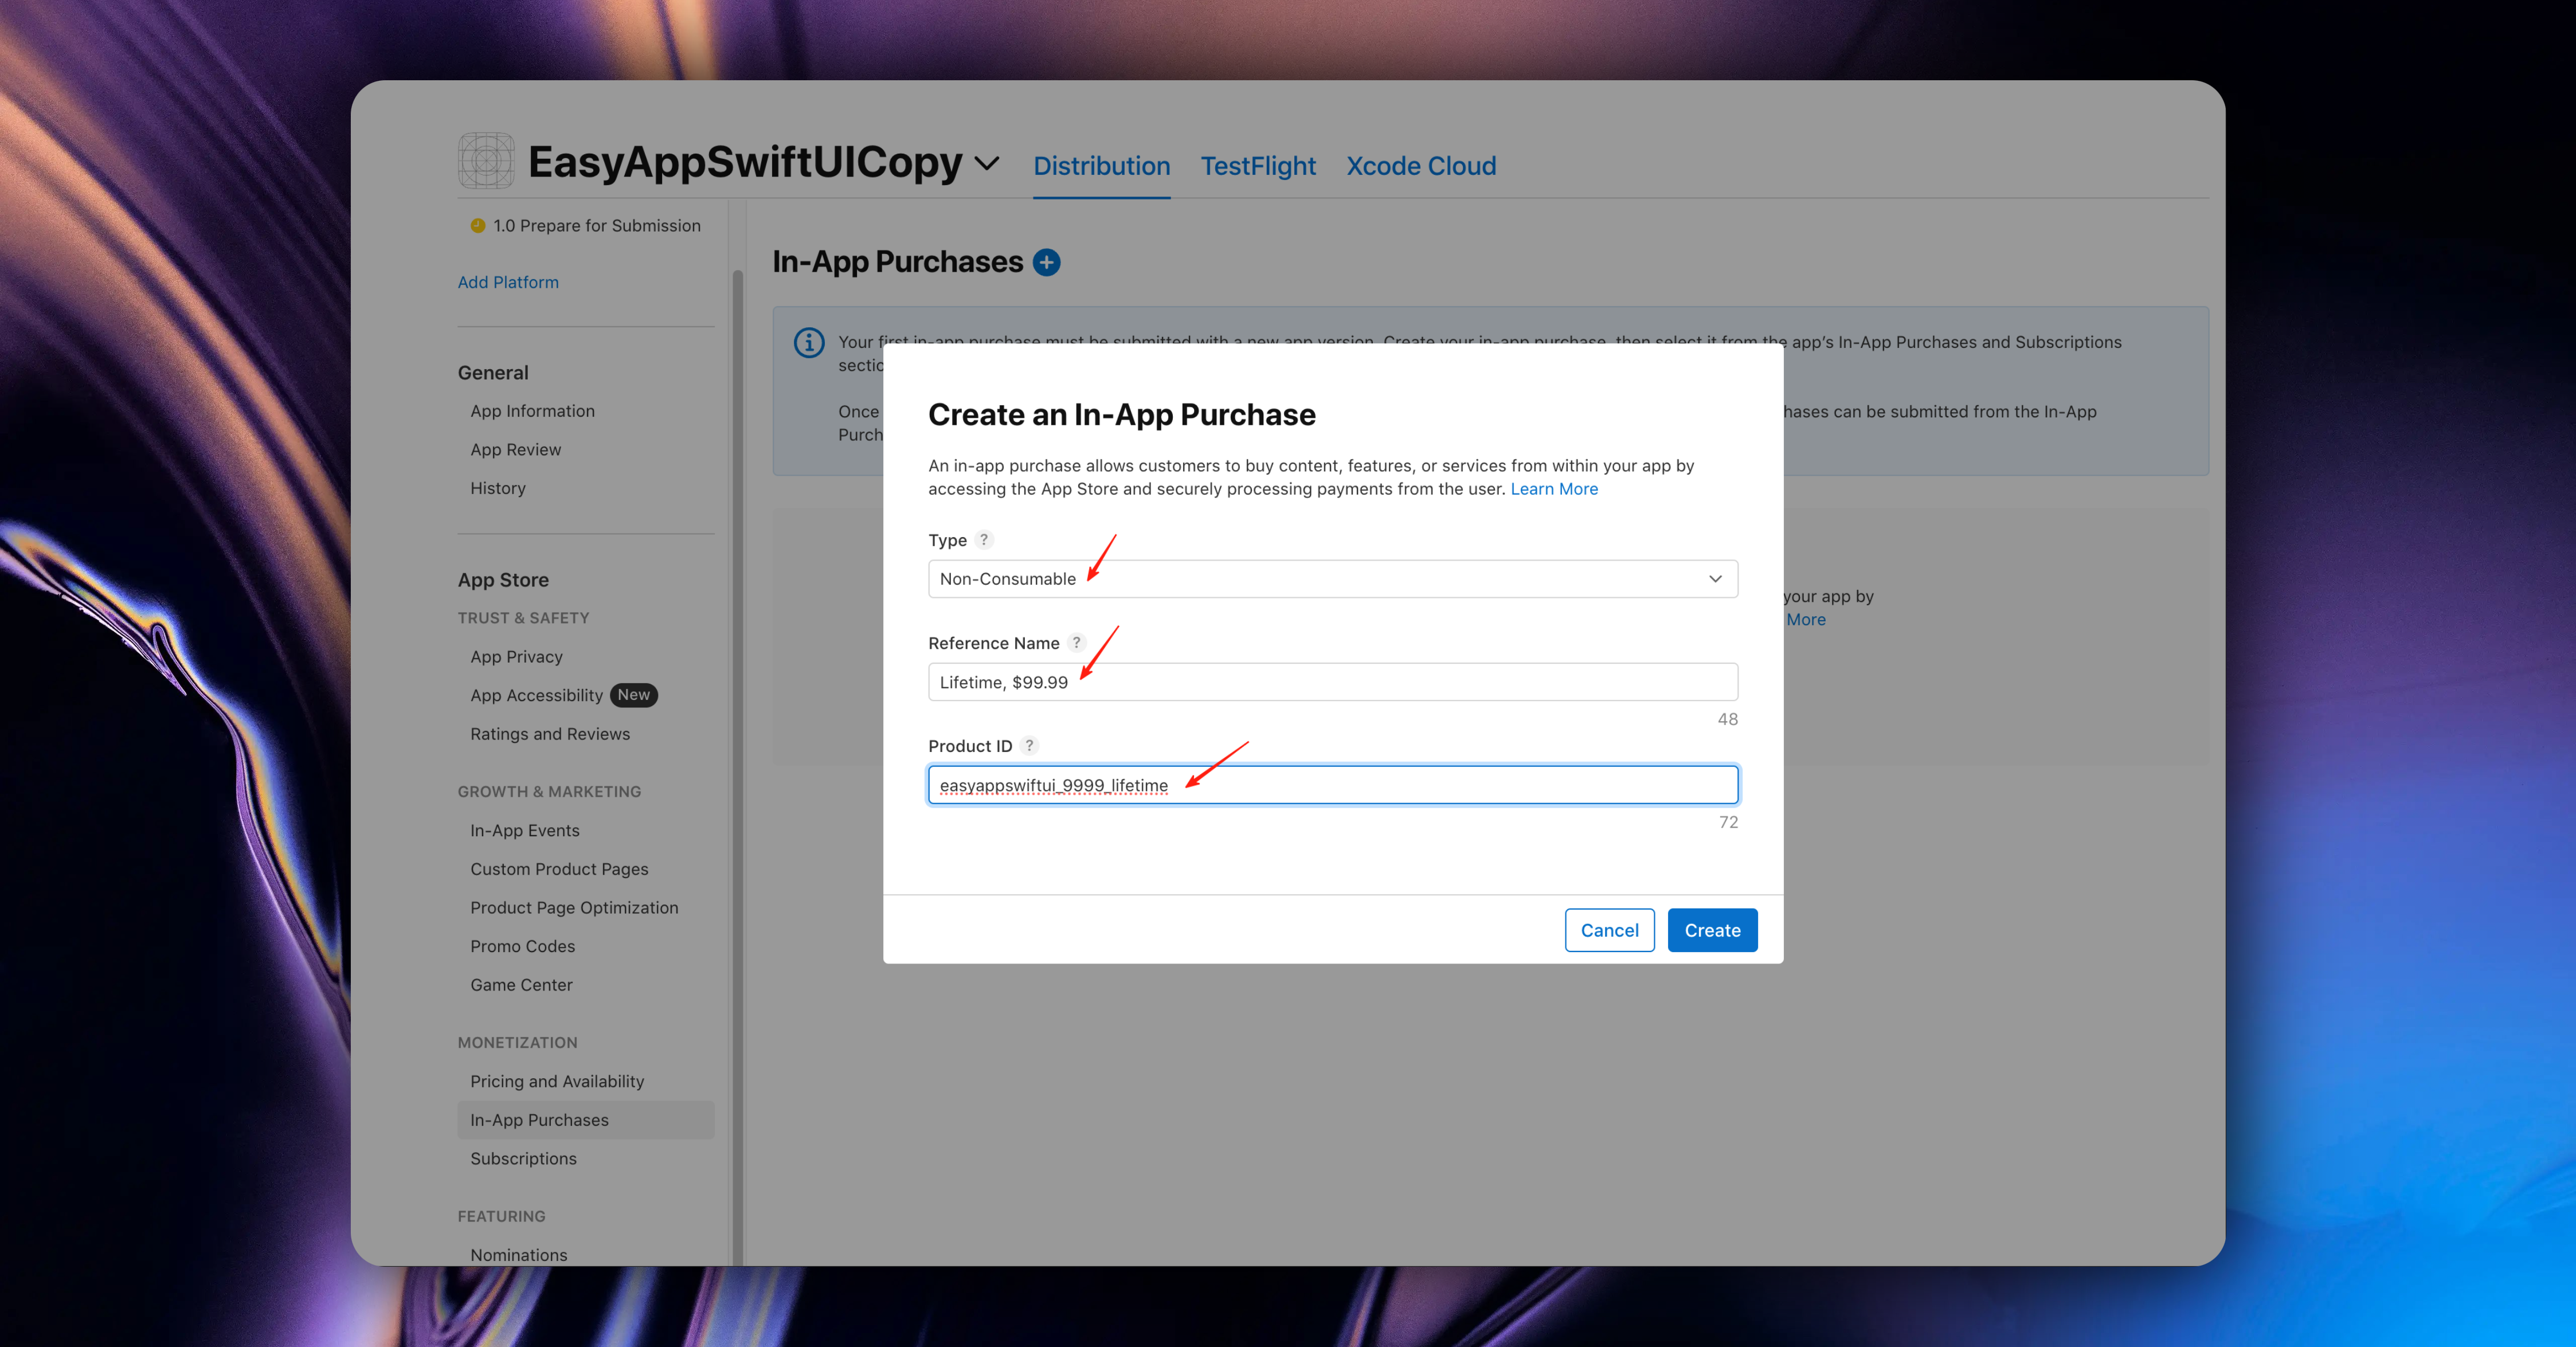
* Type: Select `Non-Consumable`, representing non-consumable goods
Here's an example to help you understand:
Non-consumable goods can be understood as: for example, if we develop an image recognition App, after users purchase lifetime membership, they can use this feature permanently. No usage limit, no time limit.
Consumable goods: For example, if we set that users can purchase 100 recognition opportunities, then after users purchase, they can use this feature permanently. But after the usage is exhausted, users need to purchase again.
* The filling of `Reference Name` and `Product ID` follows the same rules as the `Reference Name` and `Product ID` filling rules in [Create Annual Subscription](#create-annual-subscription).
* Click the `Create` button to create a one-time purchase and enter the one-time purchase details page
Similarly, we need to set the one-time purchase's `Availability`, `Price Schedule`, `App Store Localization`, `Review Information` according to the rules in [Create Annual Subscription](#create-annual-subscription)
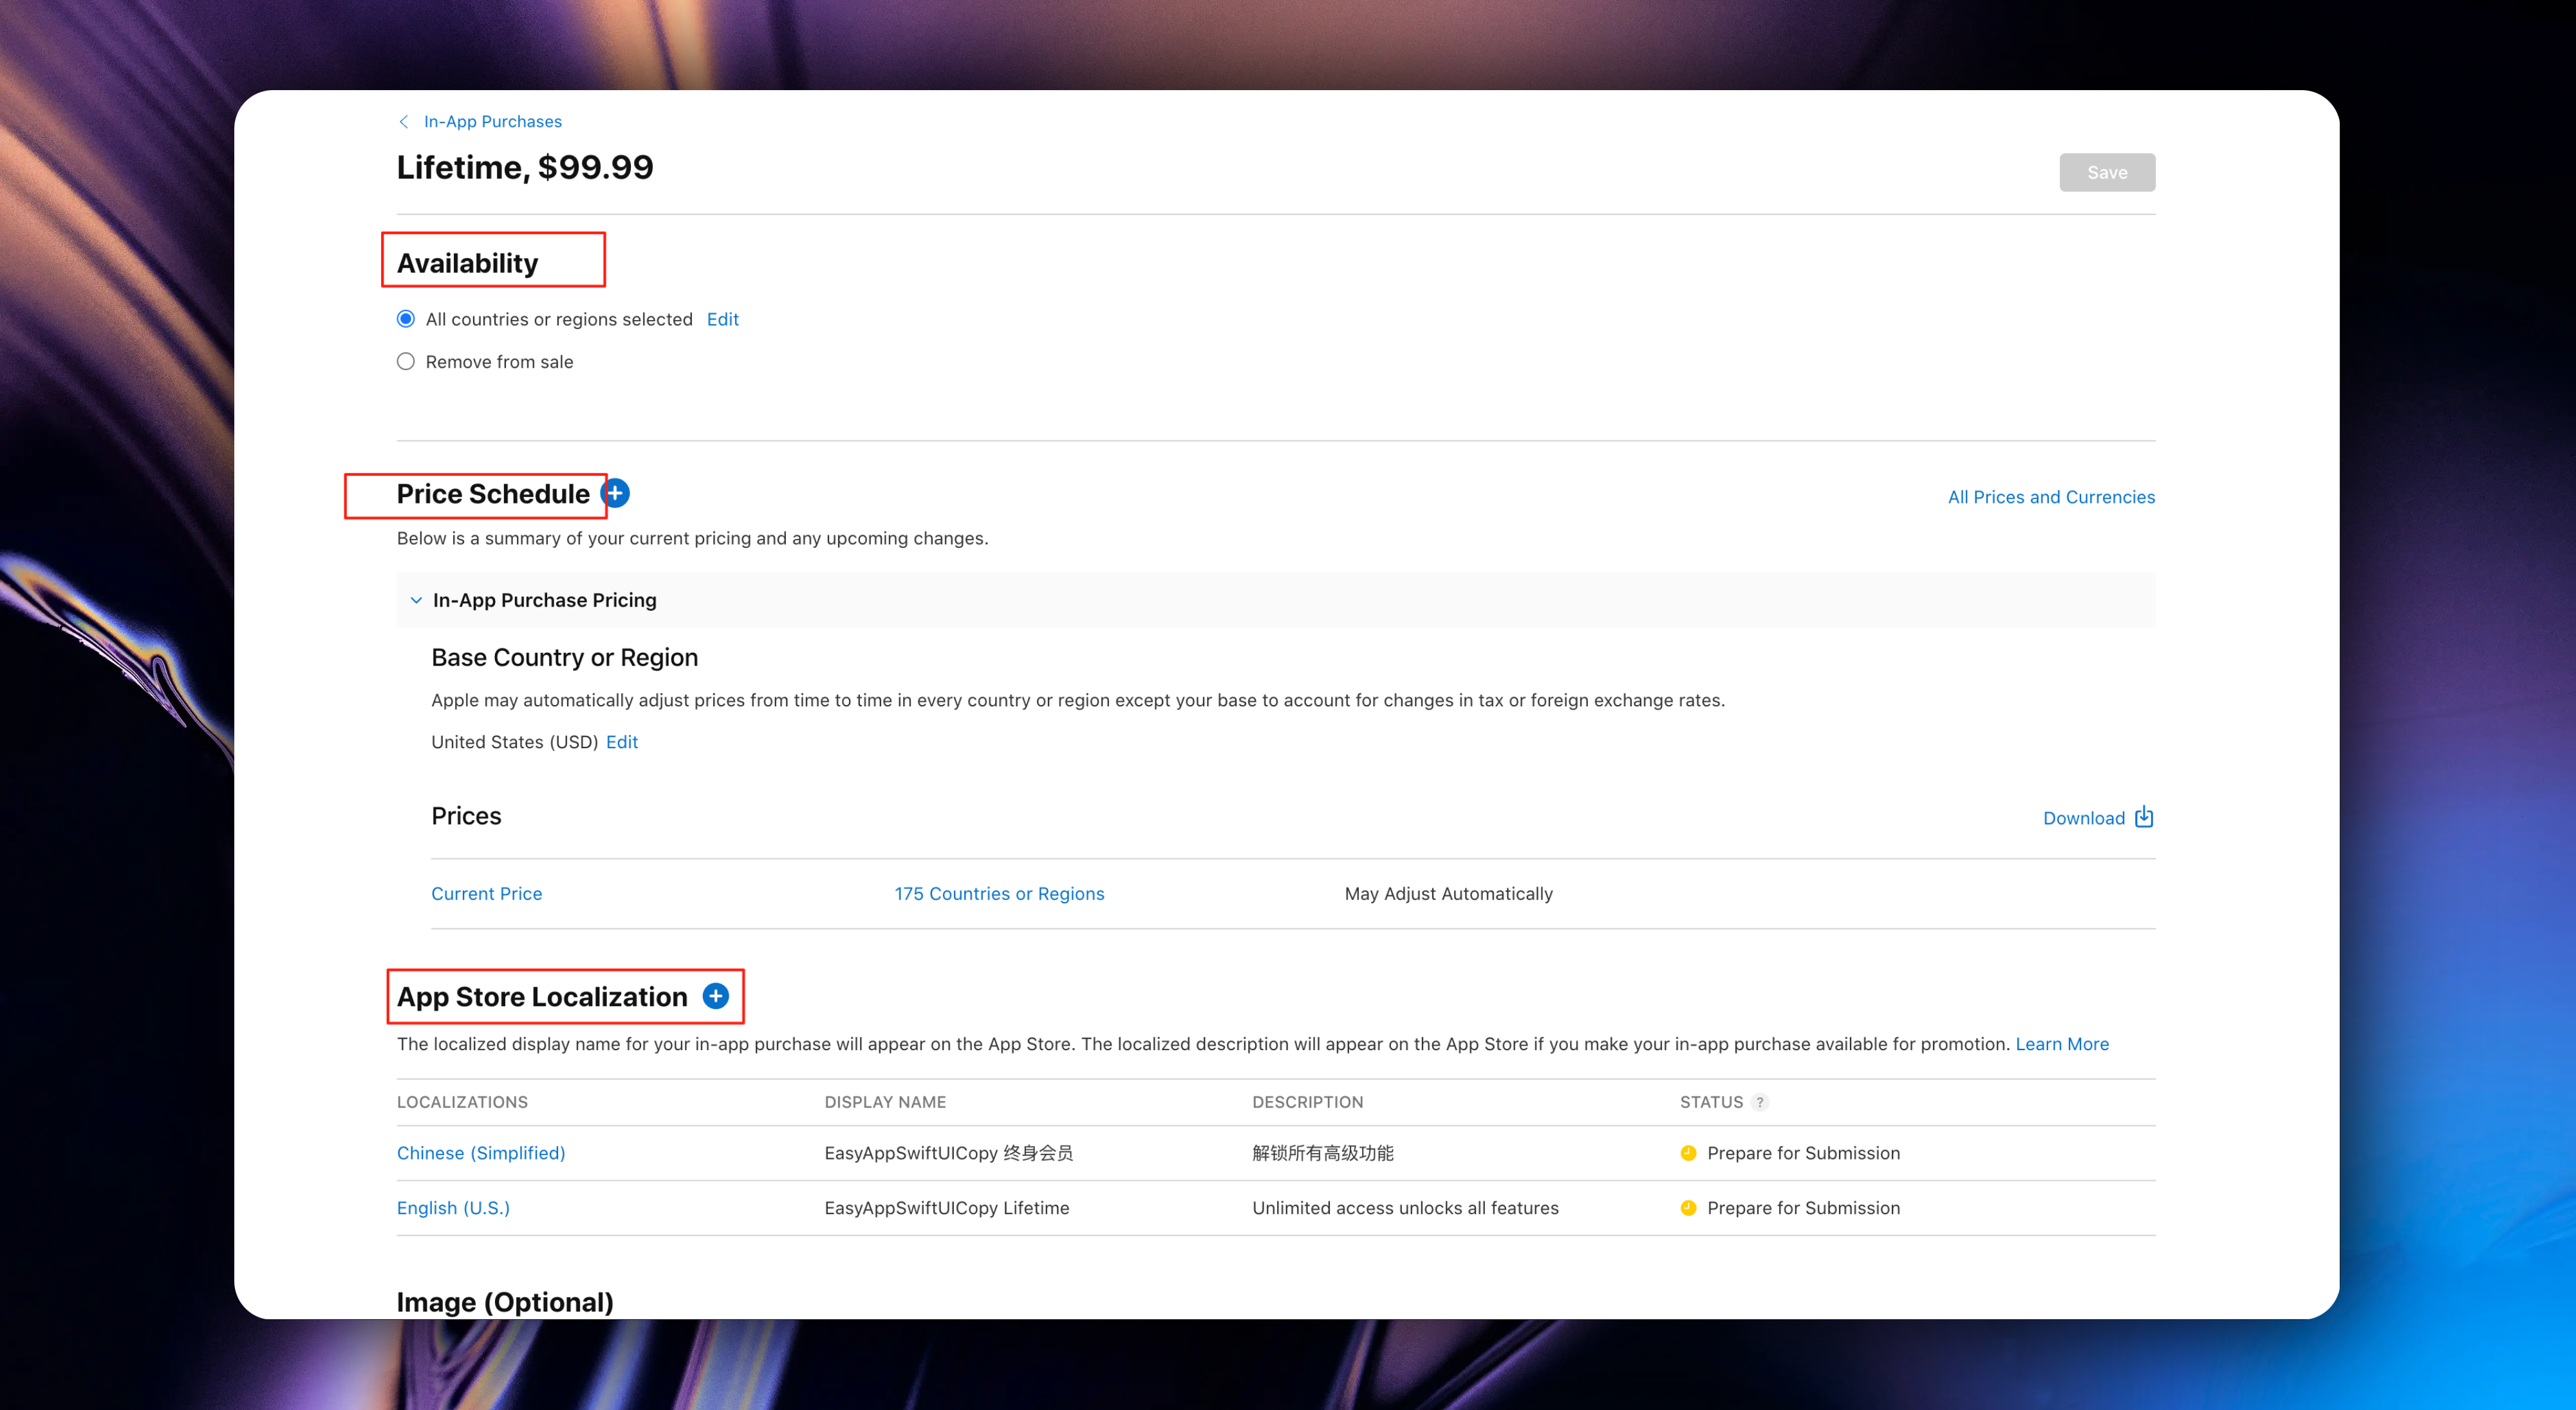
Finally, don't forget to click the `Save` button in the upper right corner to save
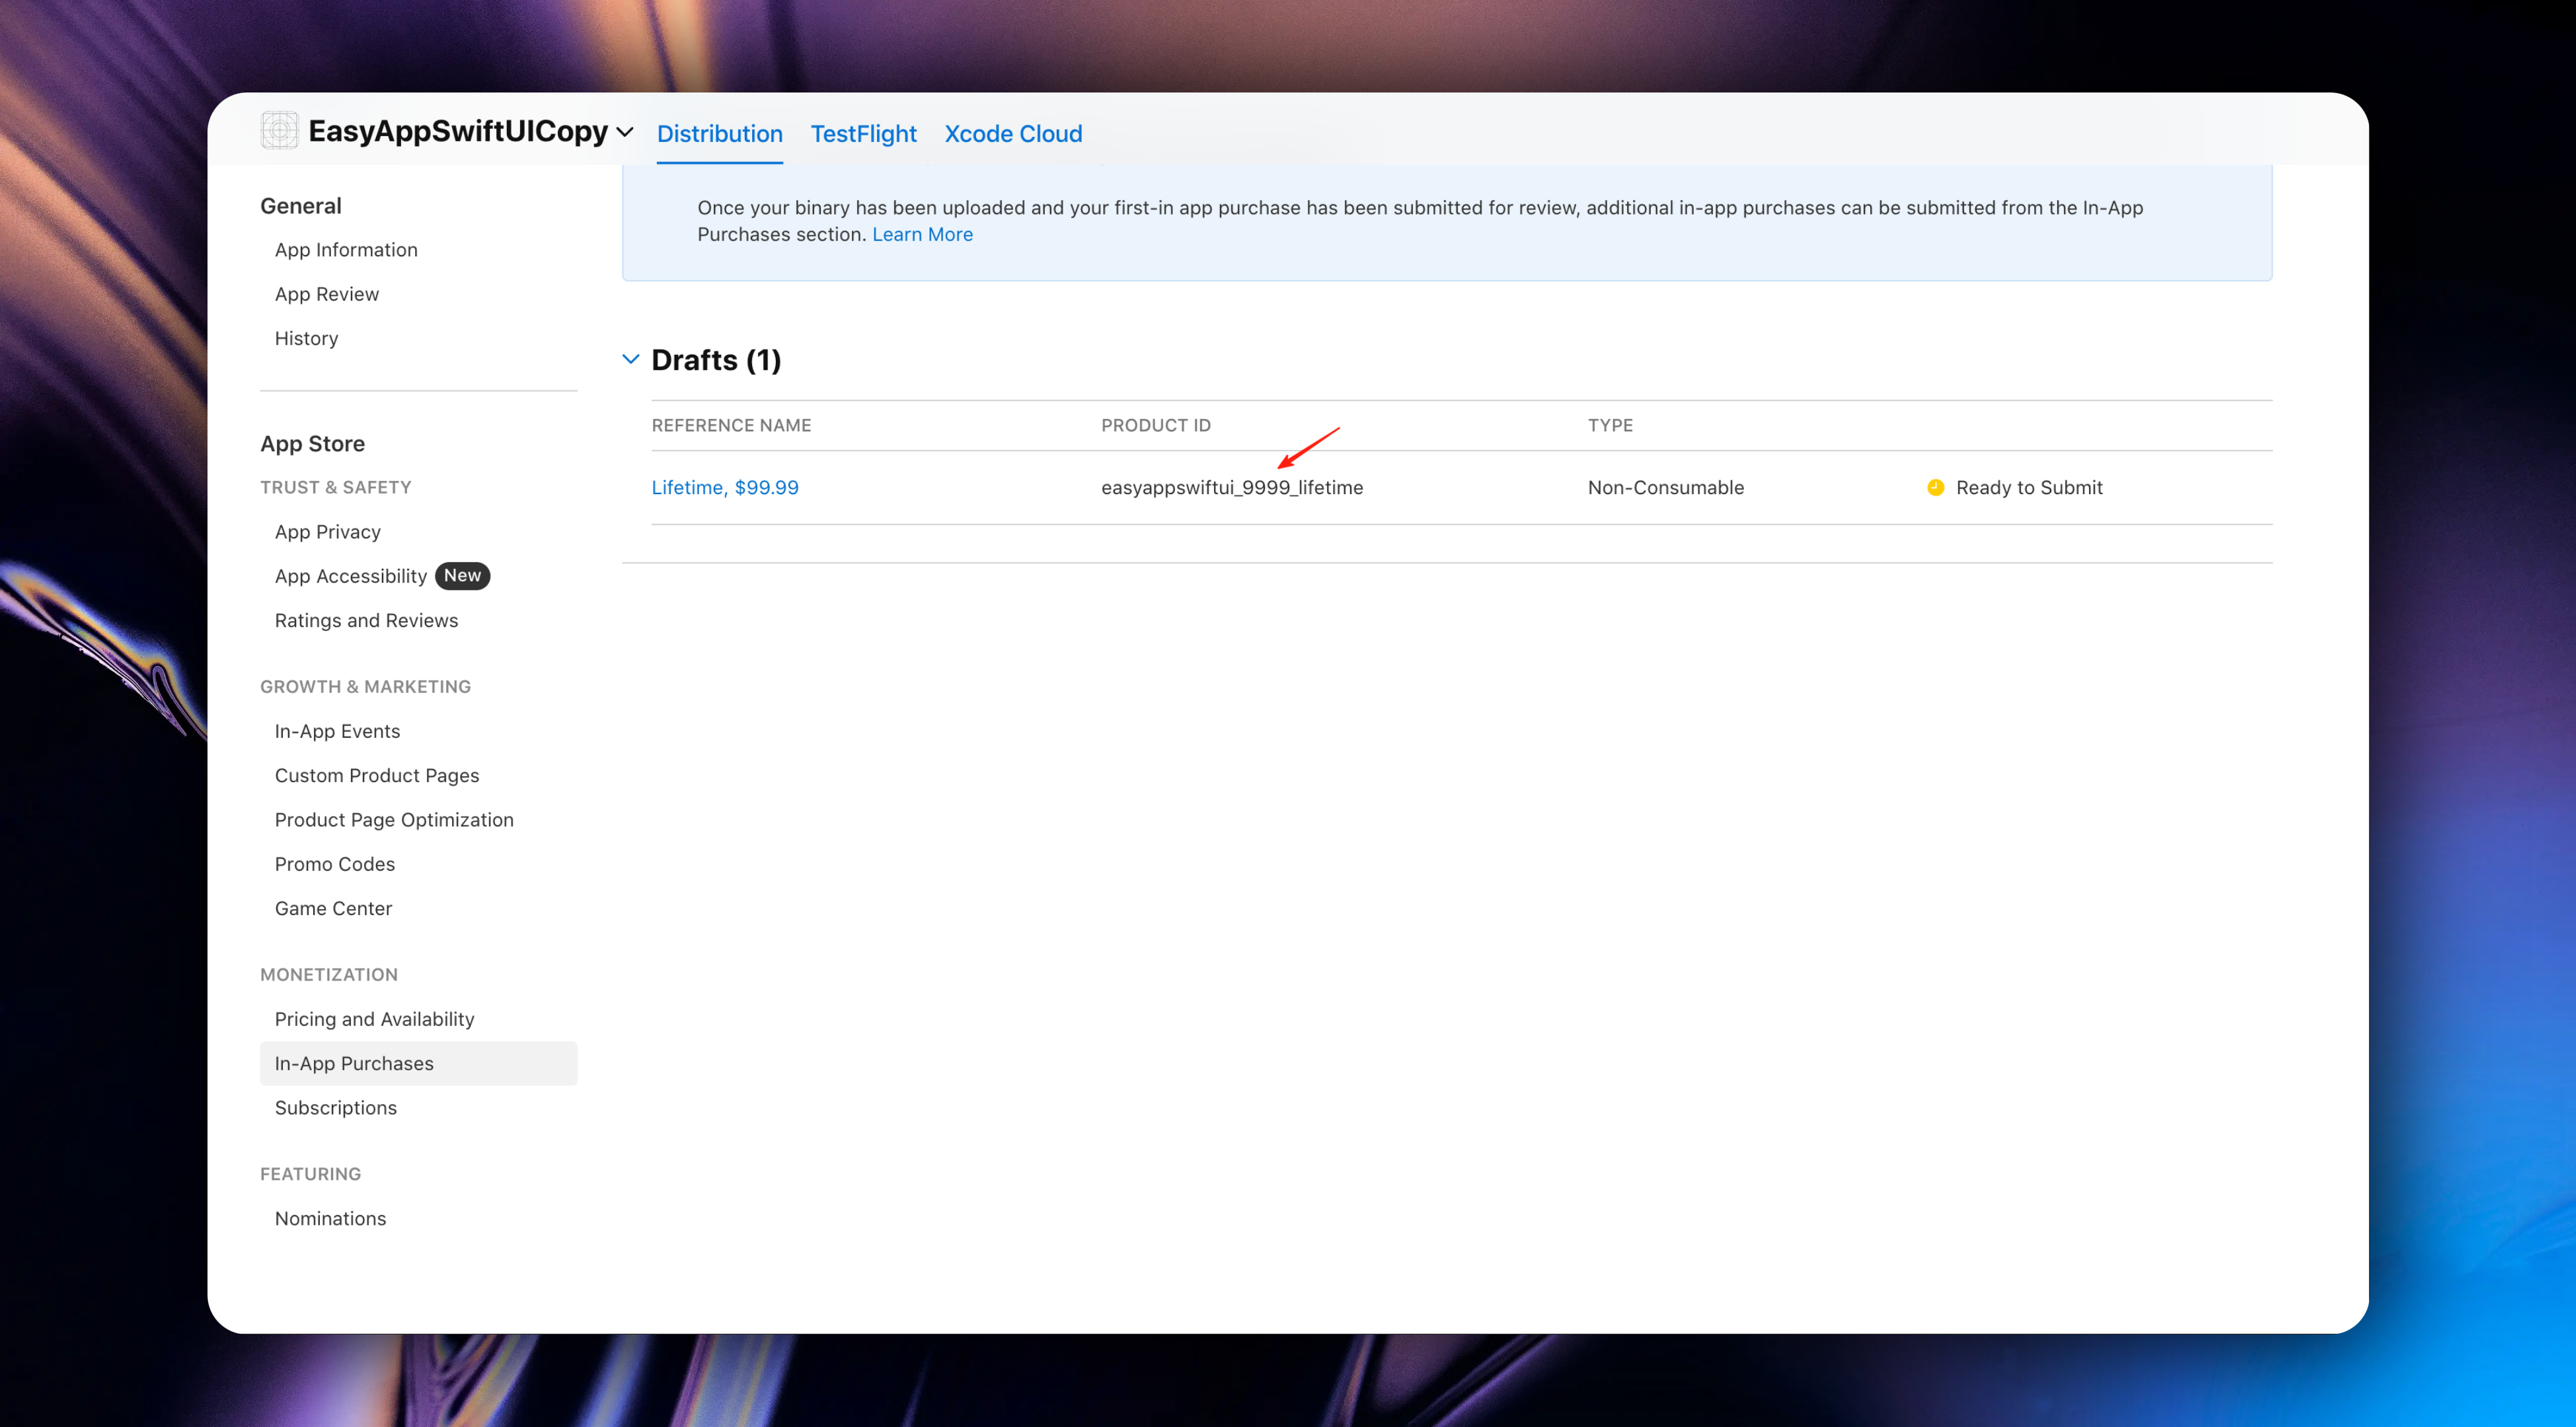
After success, you can view and manage one-time purchases here
Congratulations 🎉🎉🎉, you have completed the creation of subscription in-app purchases and one-time purchases in App Store Connect.
Next, let's [register a RevenueCat](https://app.revenuecat.com/signup) account (if you don't have one yet).
### Integrating RevenueCat Service
#### Register RevenueCat Account
Registering a RevenueCat account is very simple. You just need to fill in your information correctly according to the registration process. We won't go into detail here.
We will focus on how to integrate RevenueCat service.
After regular registration, you will see the following page:
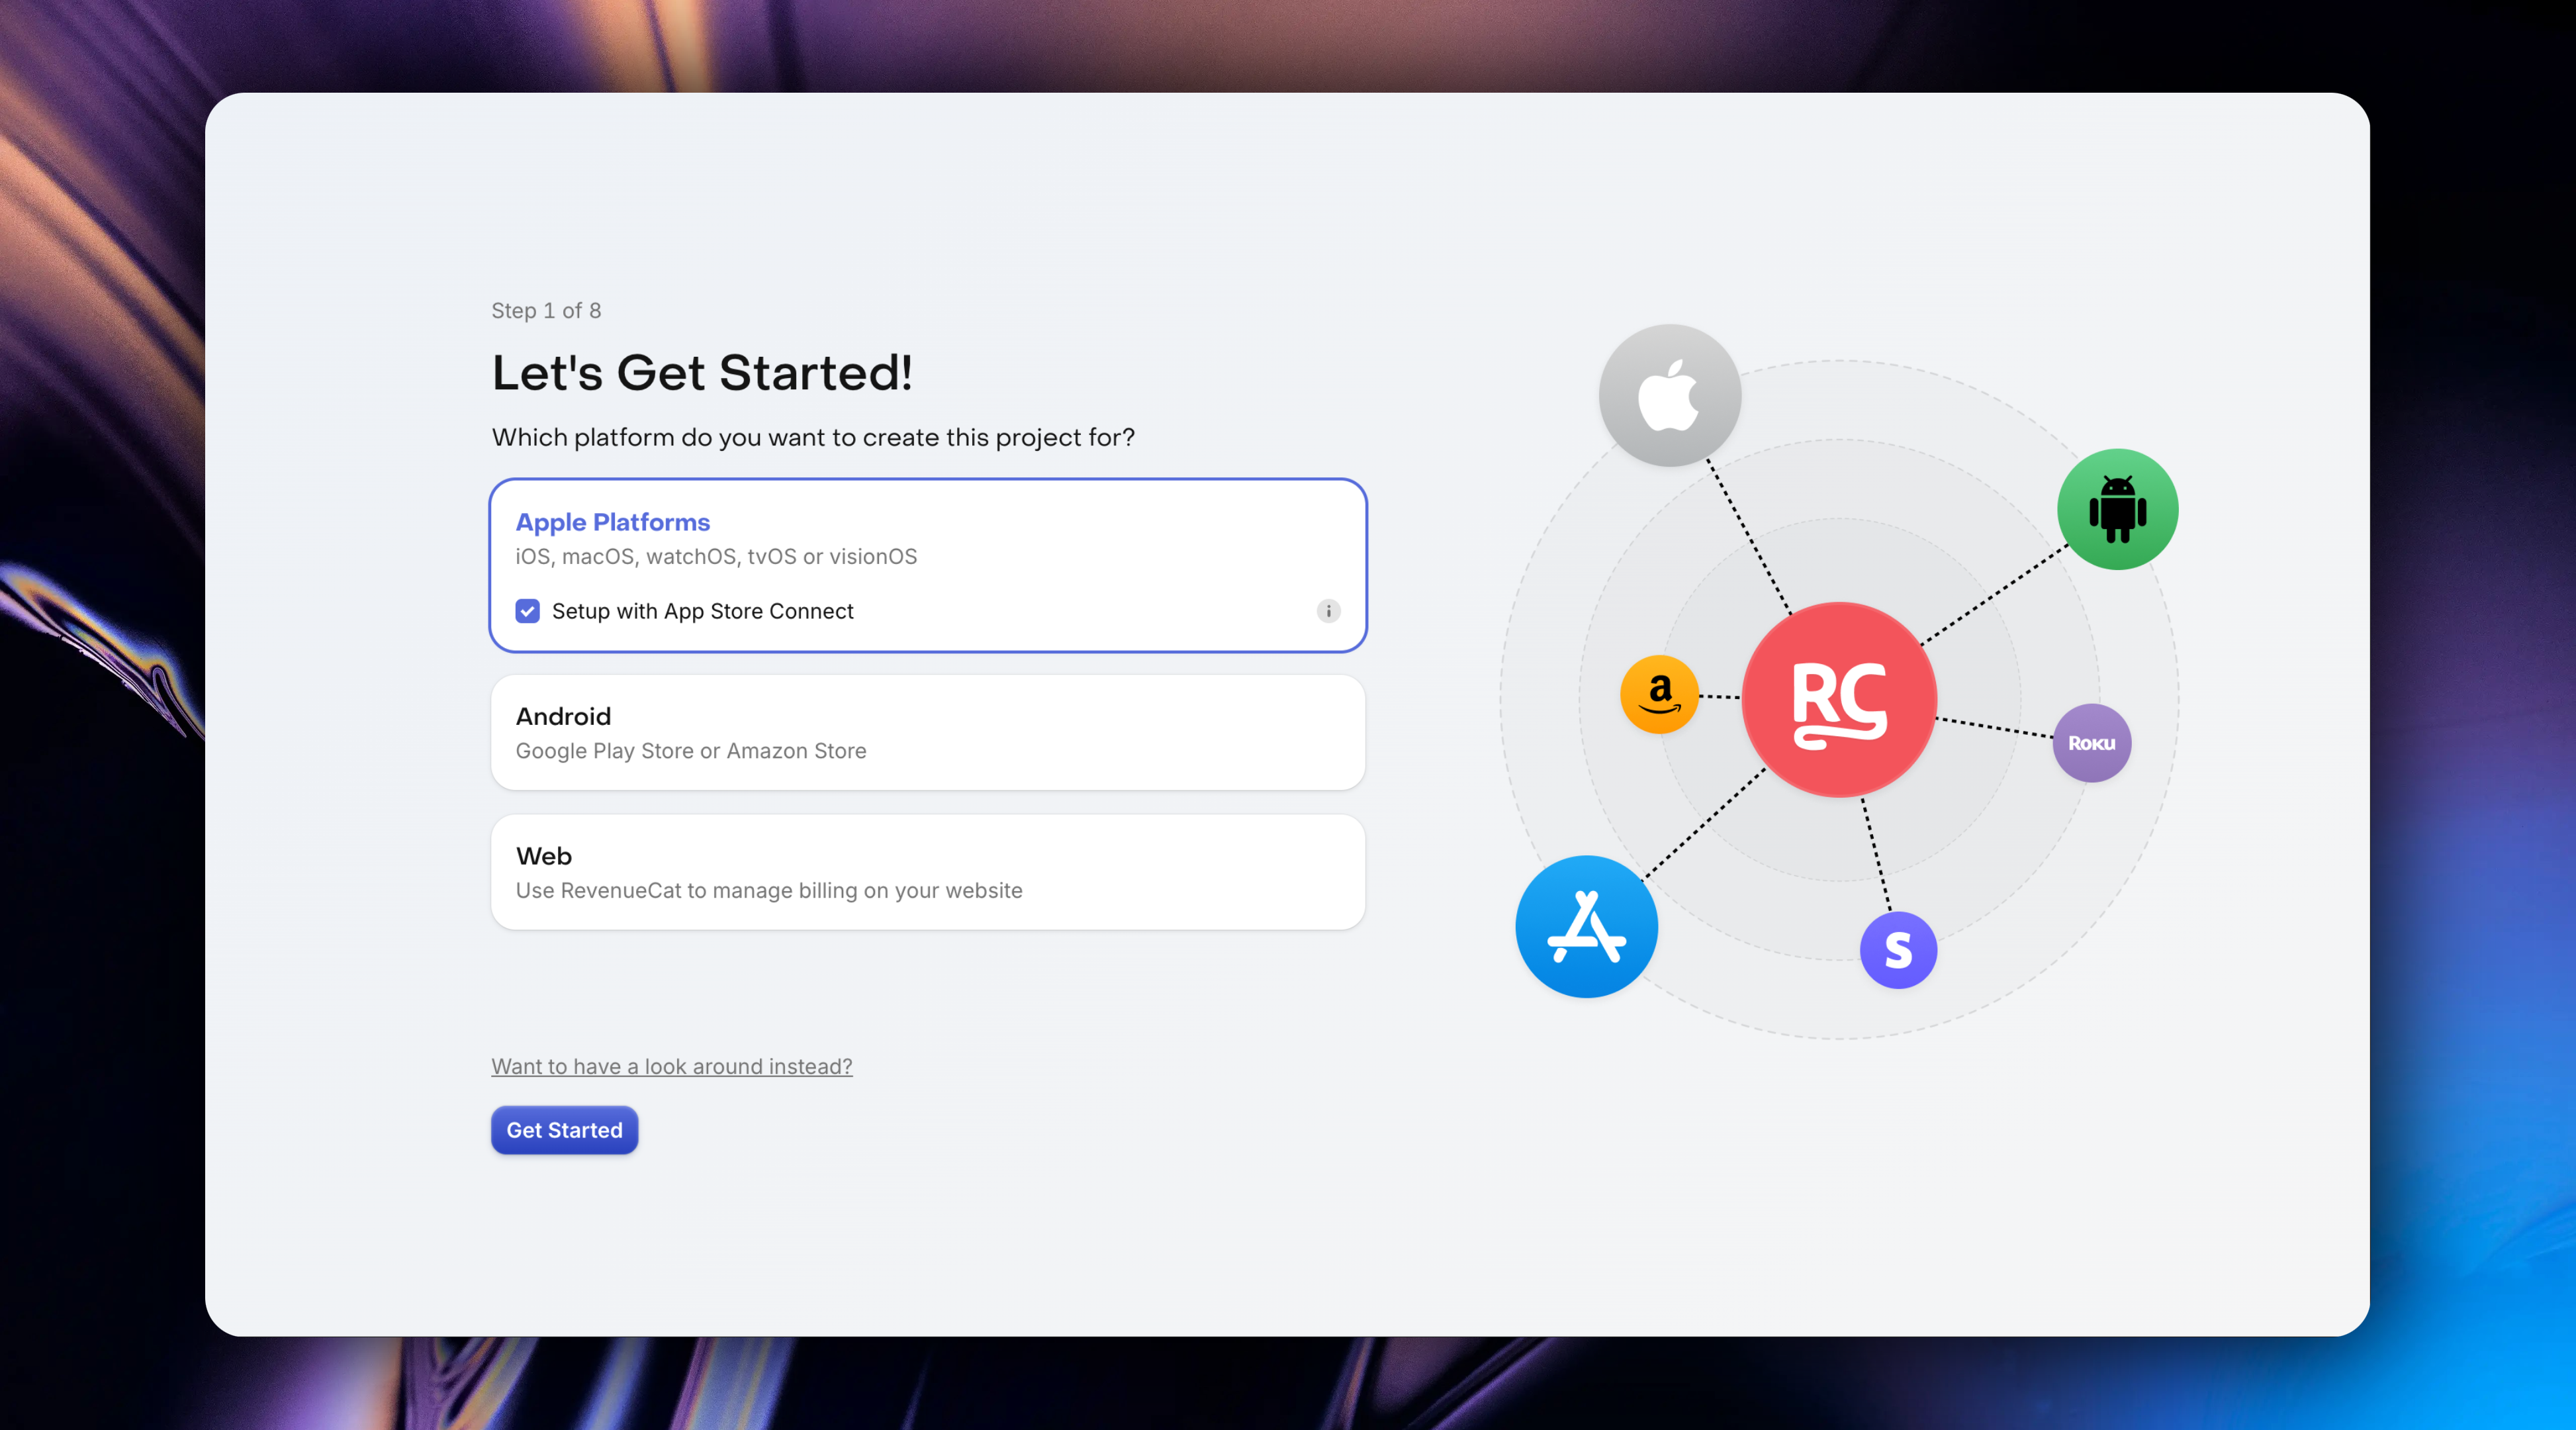
RevenueCat's registration onboarding process is very user-friendly. From here, you need to follow the steps below step by step. You will complete RevenueCat integration very quickly.
* Select `Apple platform`
* Click `Get Started`
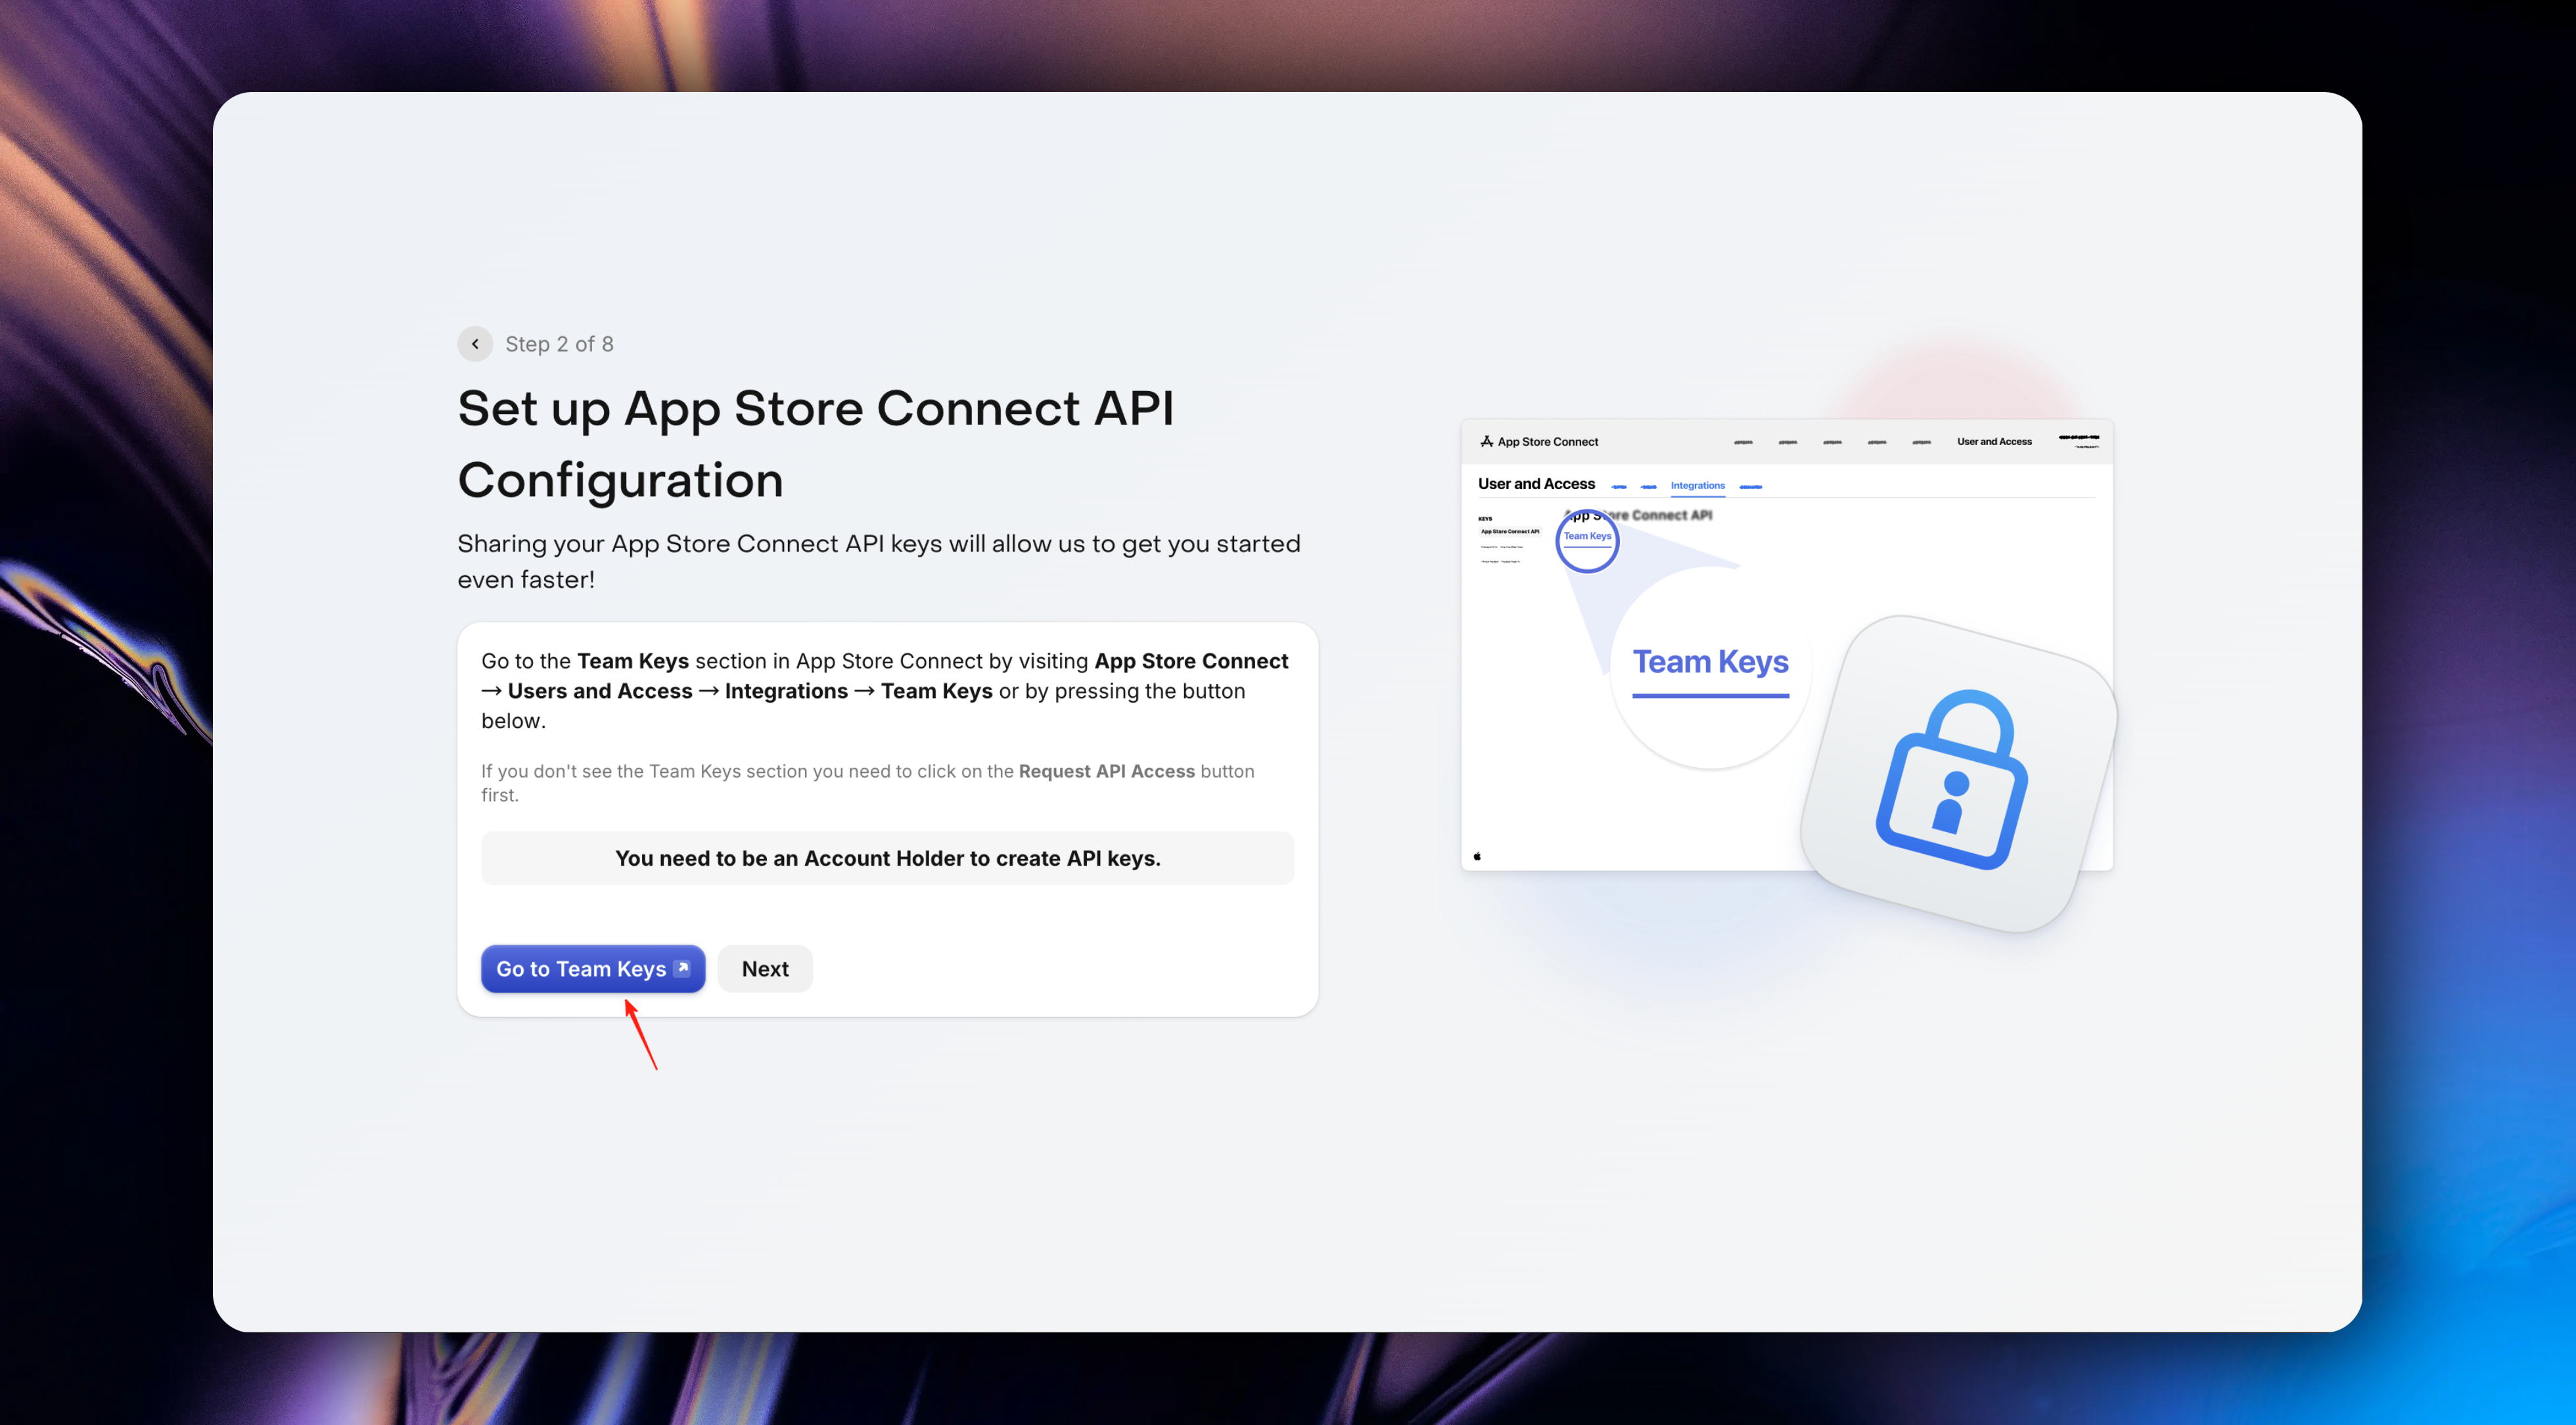
Click the `Go To Team Keys` button, and we will directly enter the [App Store Connect Team Keys](https://appstoreconnect.apple.com/access/integrations/api) page
#### Set Up Team Keys
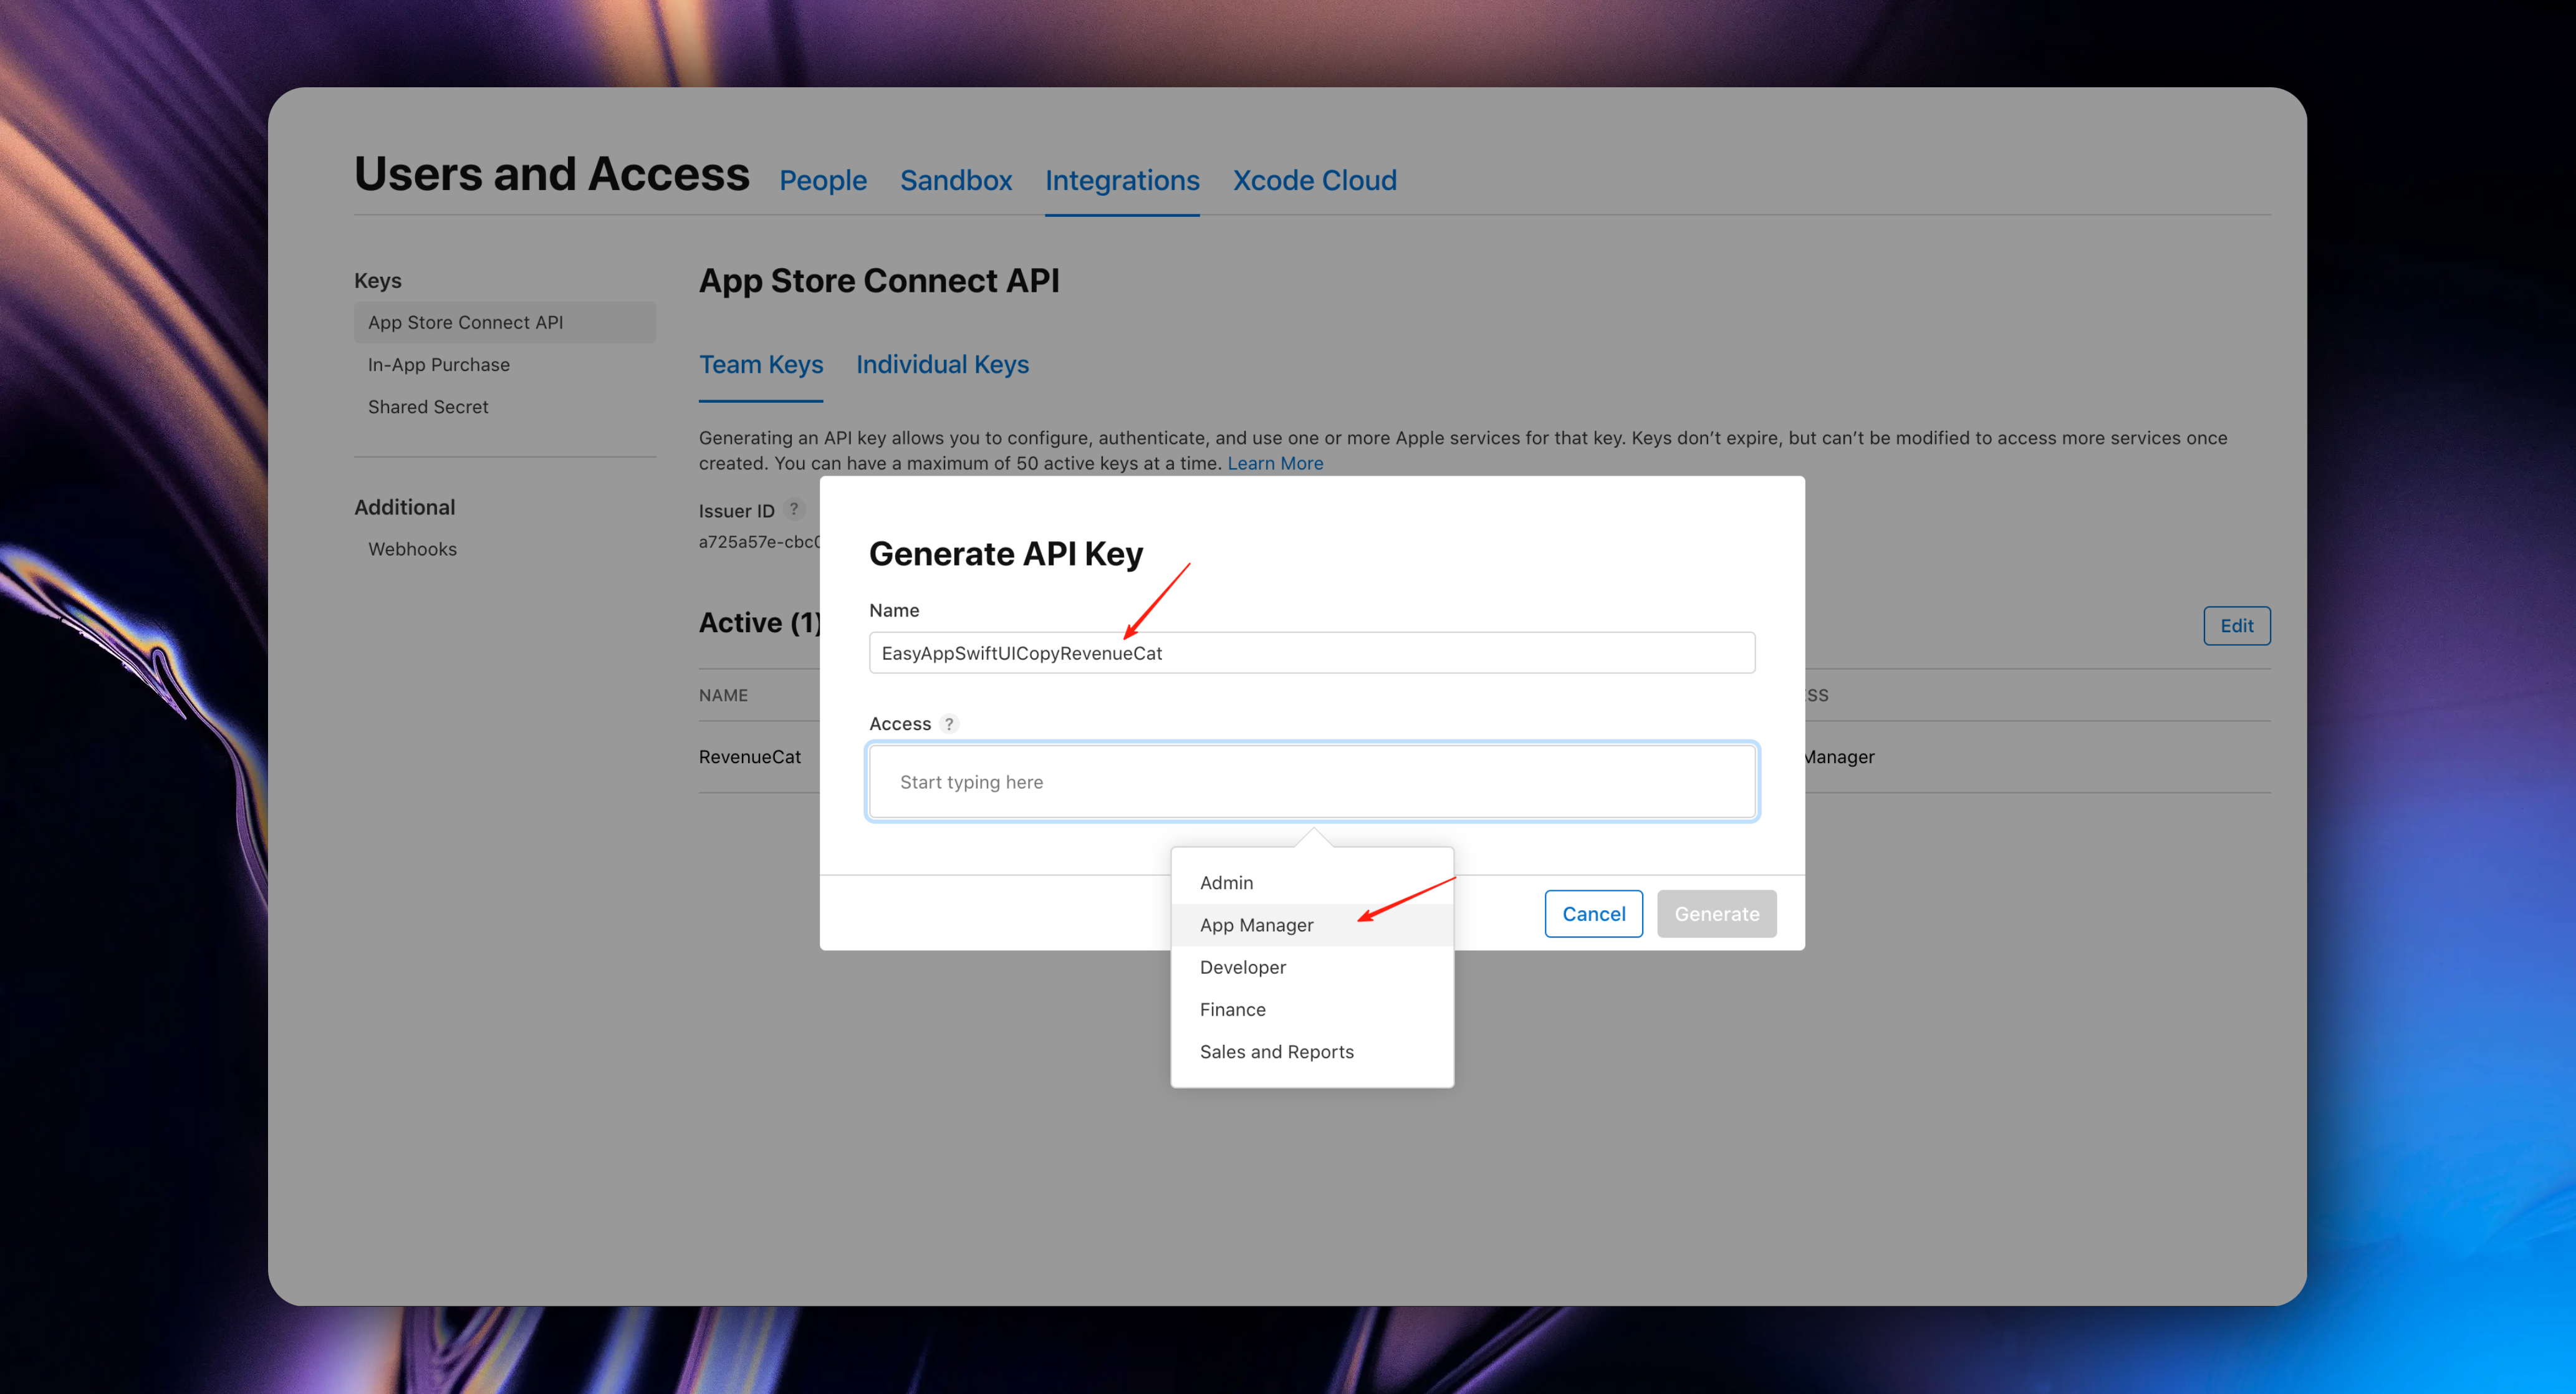
Click the plus button to create a new Team Key
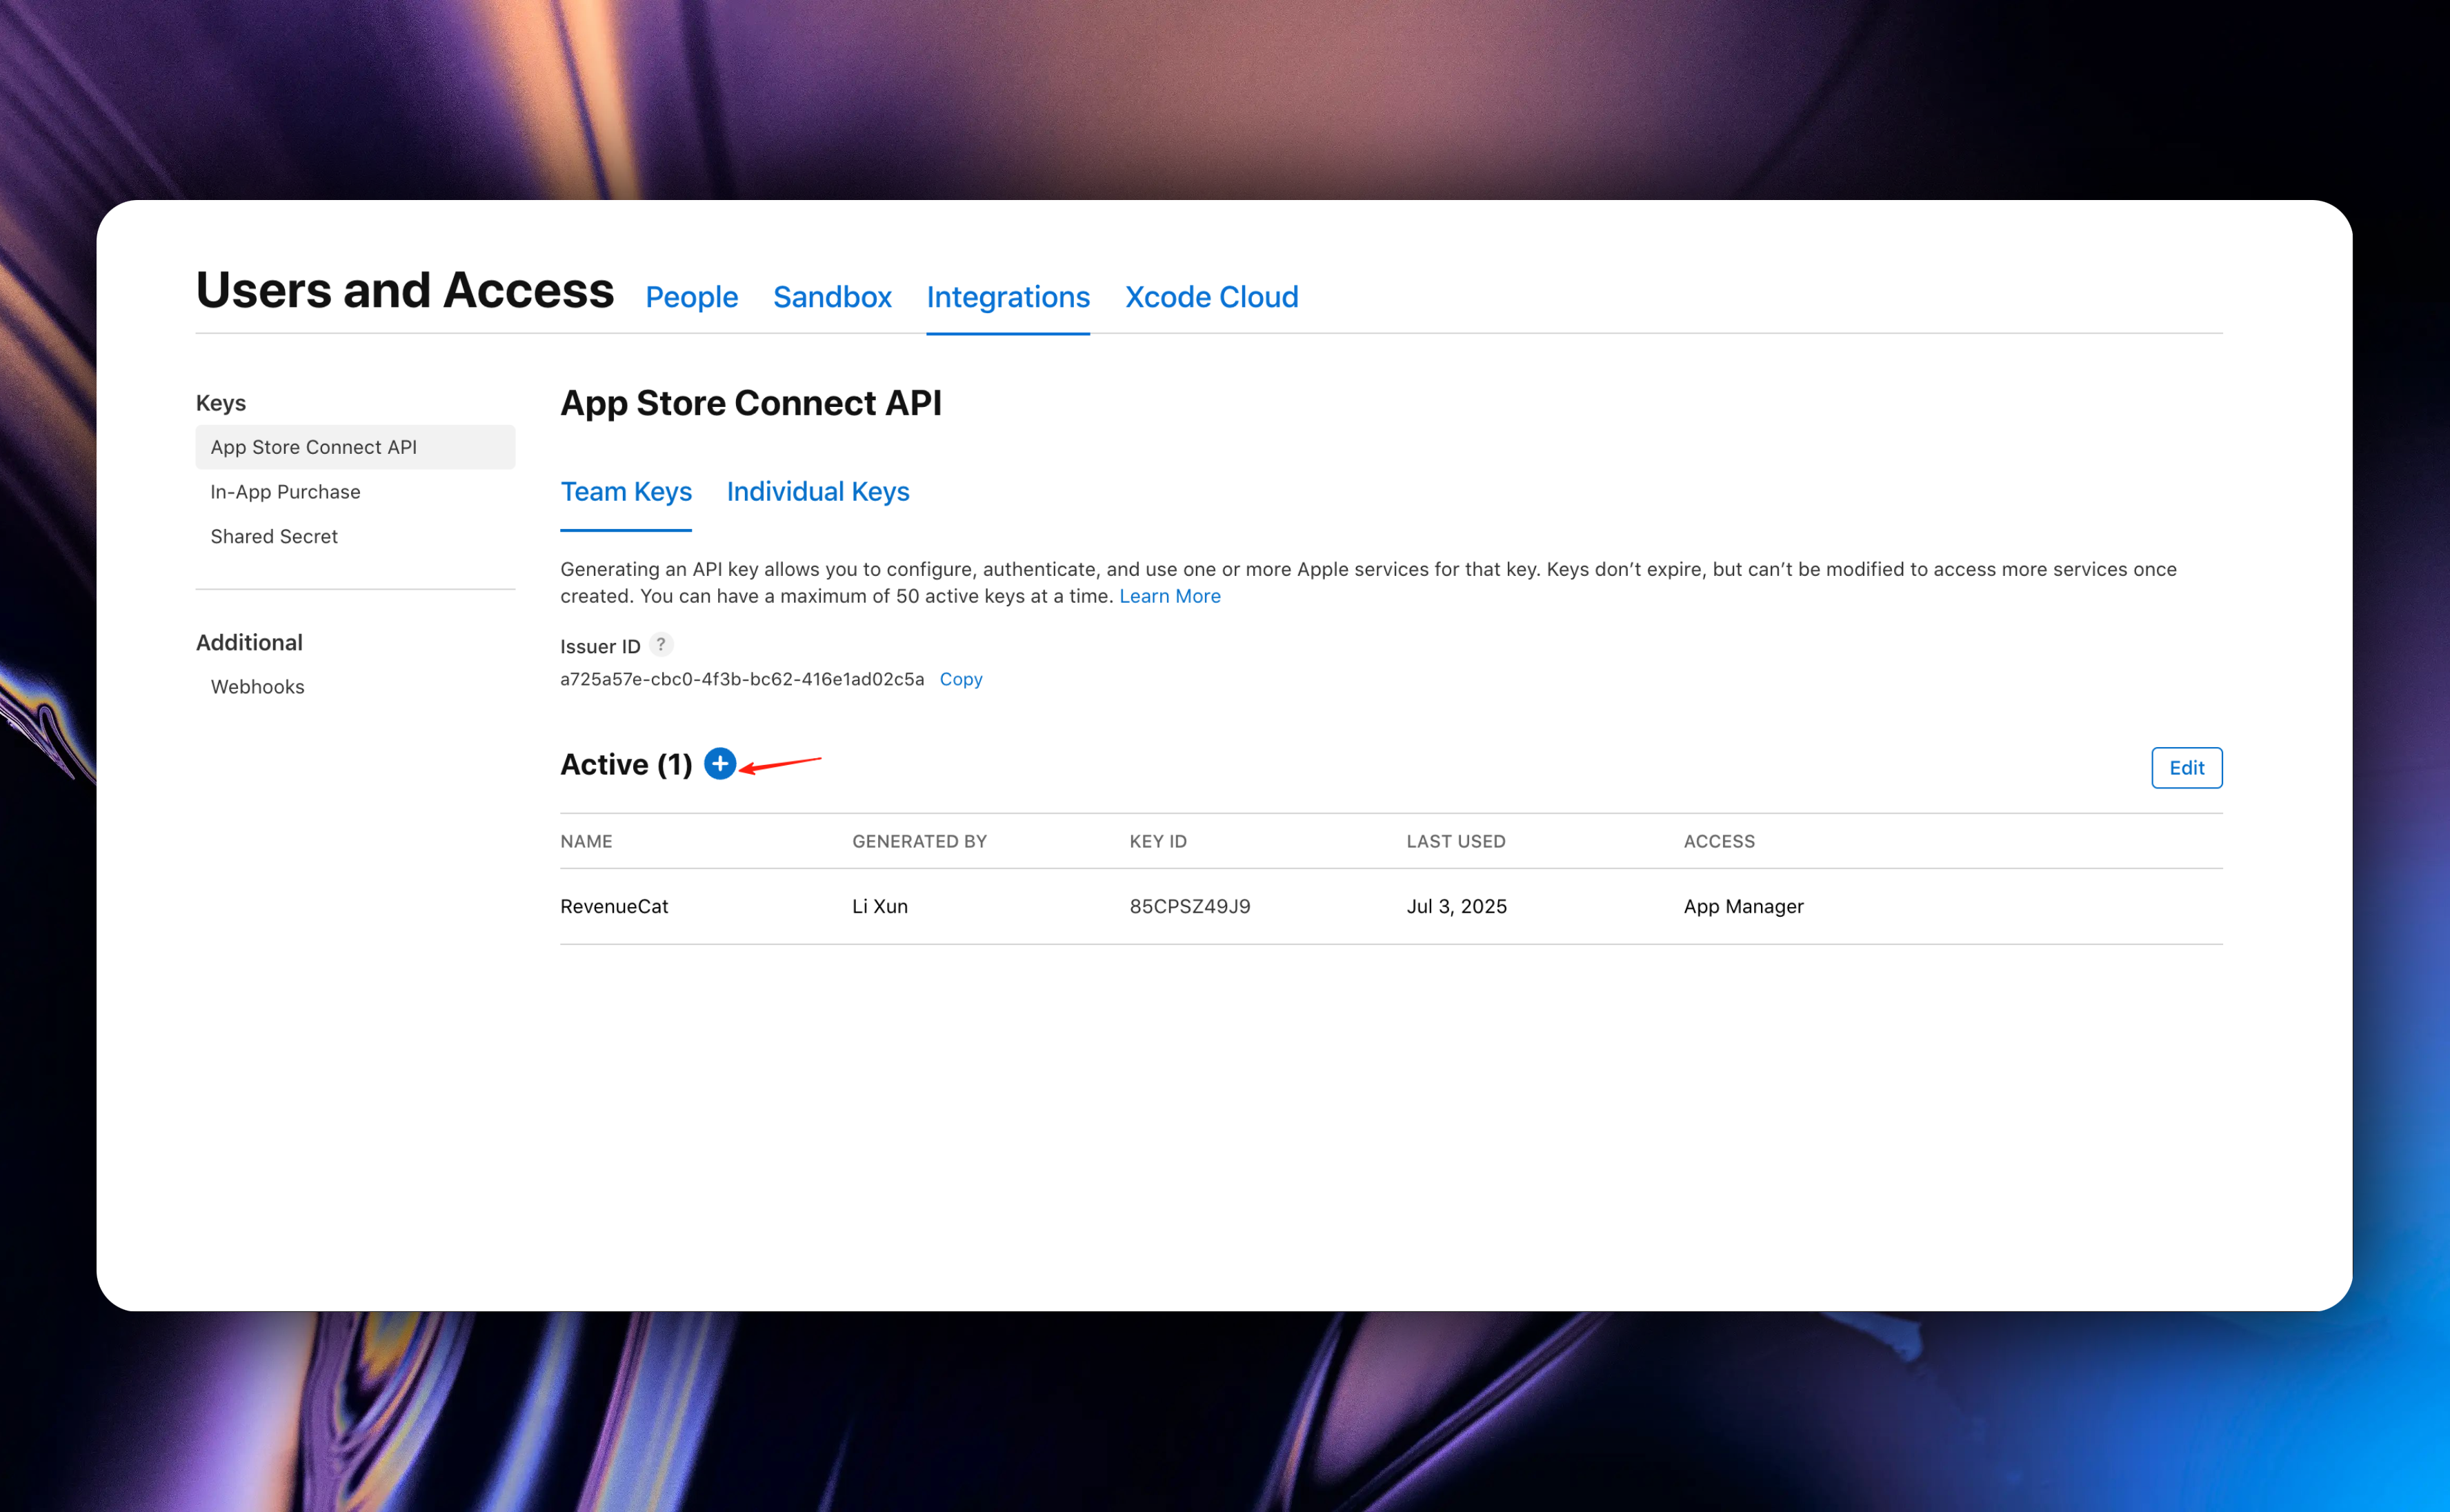
In the popup, fill in the following information:
* Name: Fill in your Team Key name. For better distinction, it's recommended to use a combination of your App name + RevenueCat
* Access: Select `App Manager`
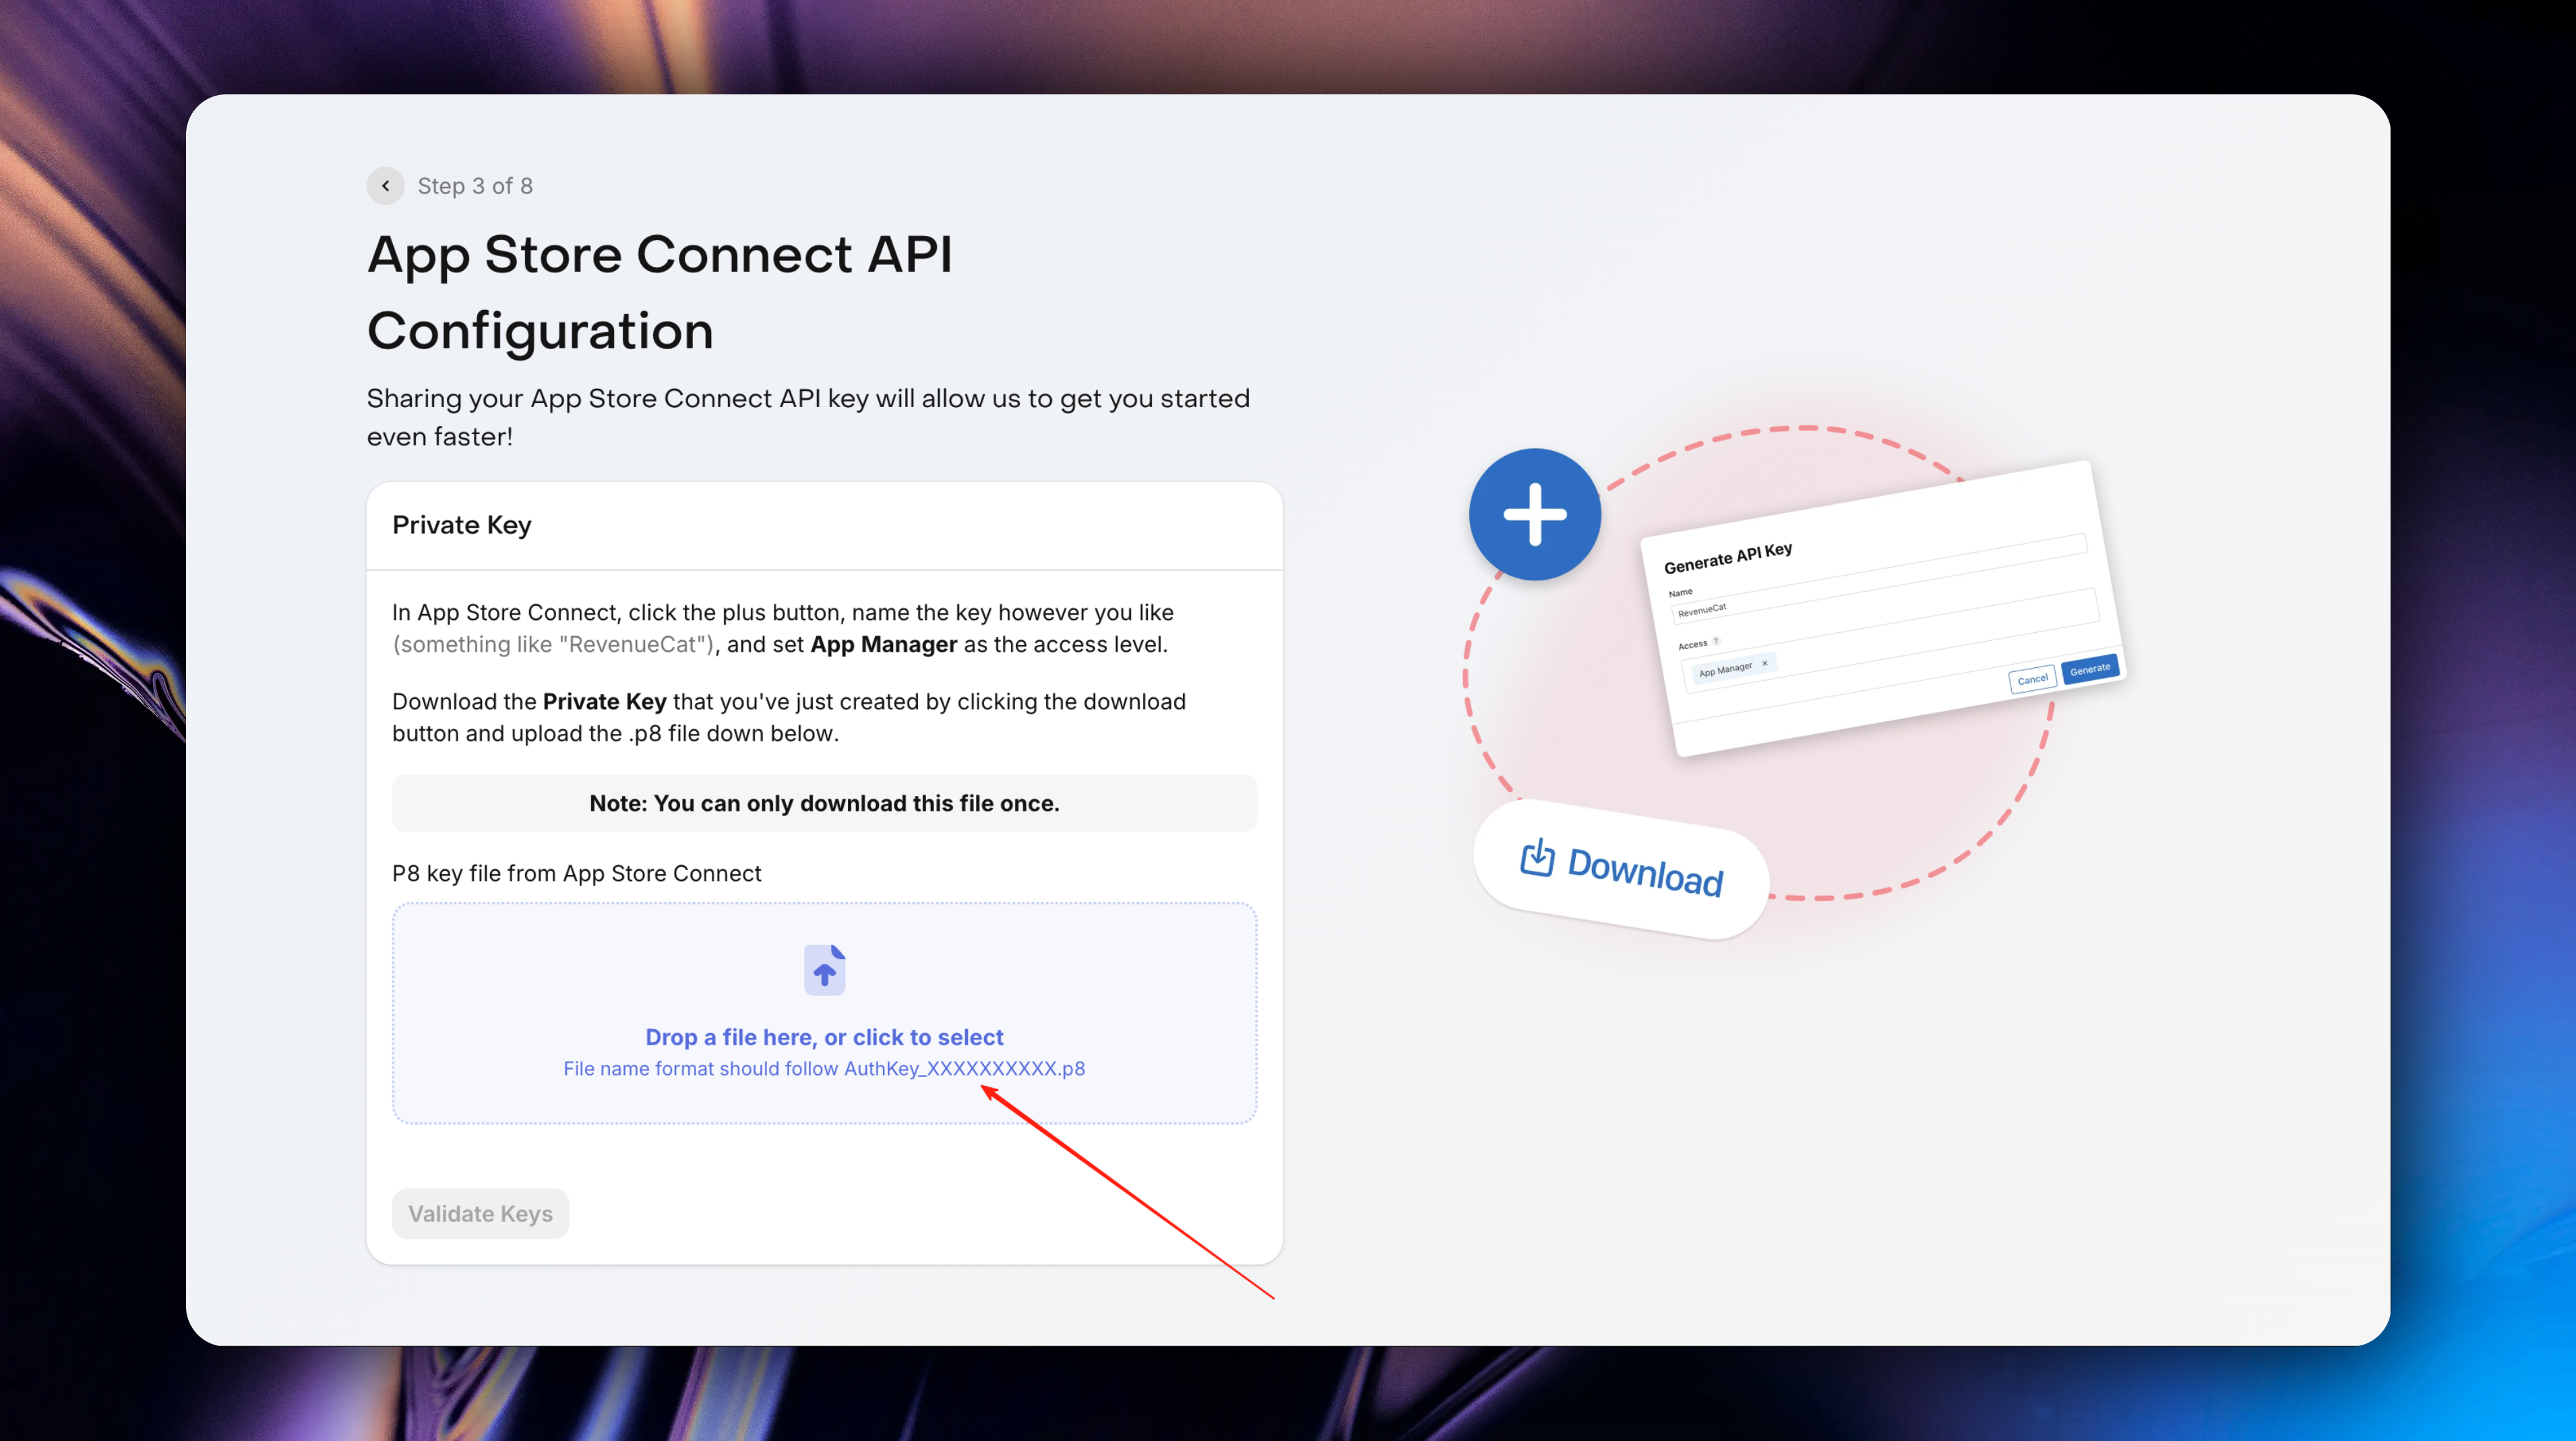
#### Download p8 Private Key File
* After completion, you need to click the `Download` button to download the private key file you just created.
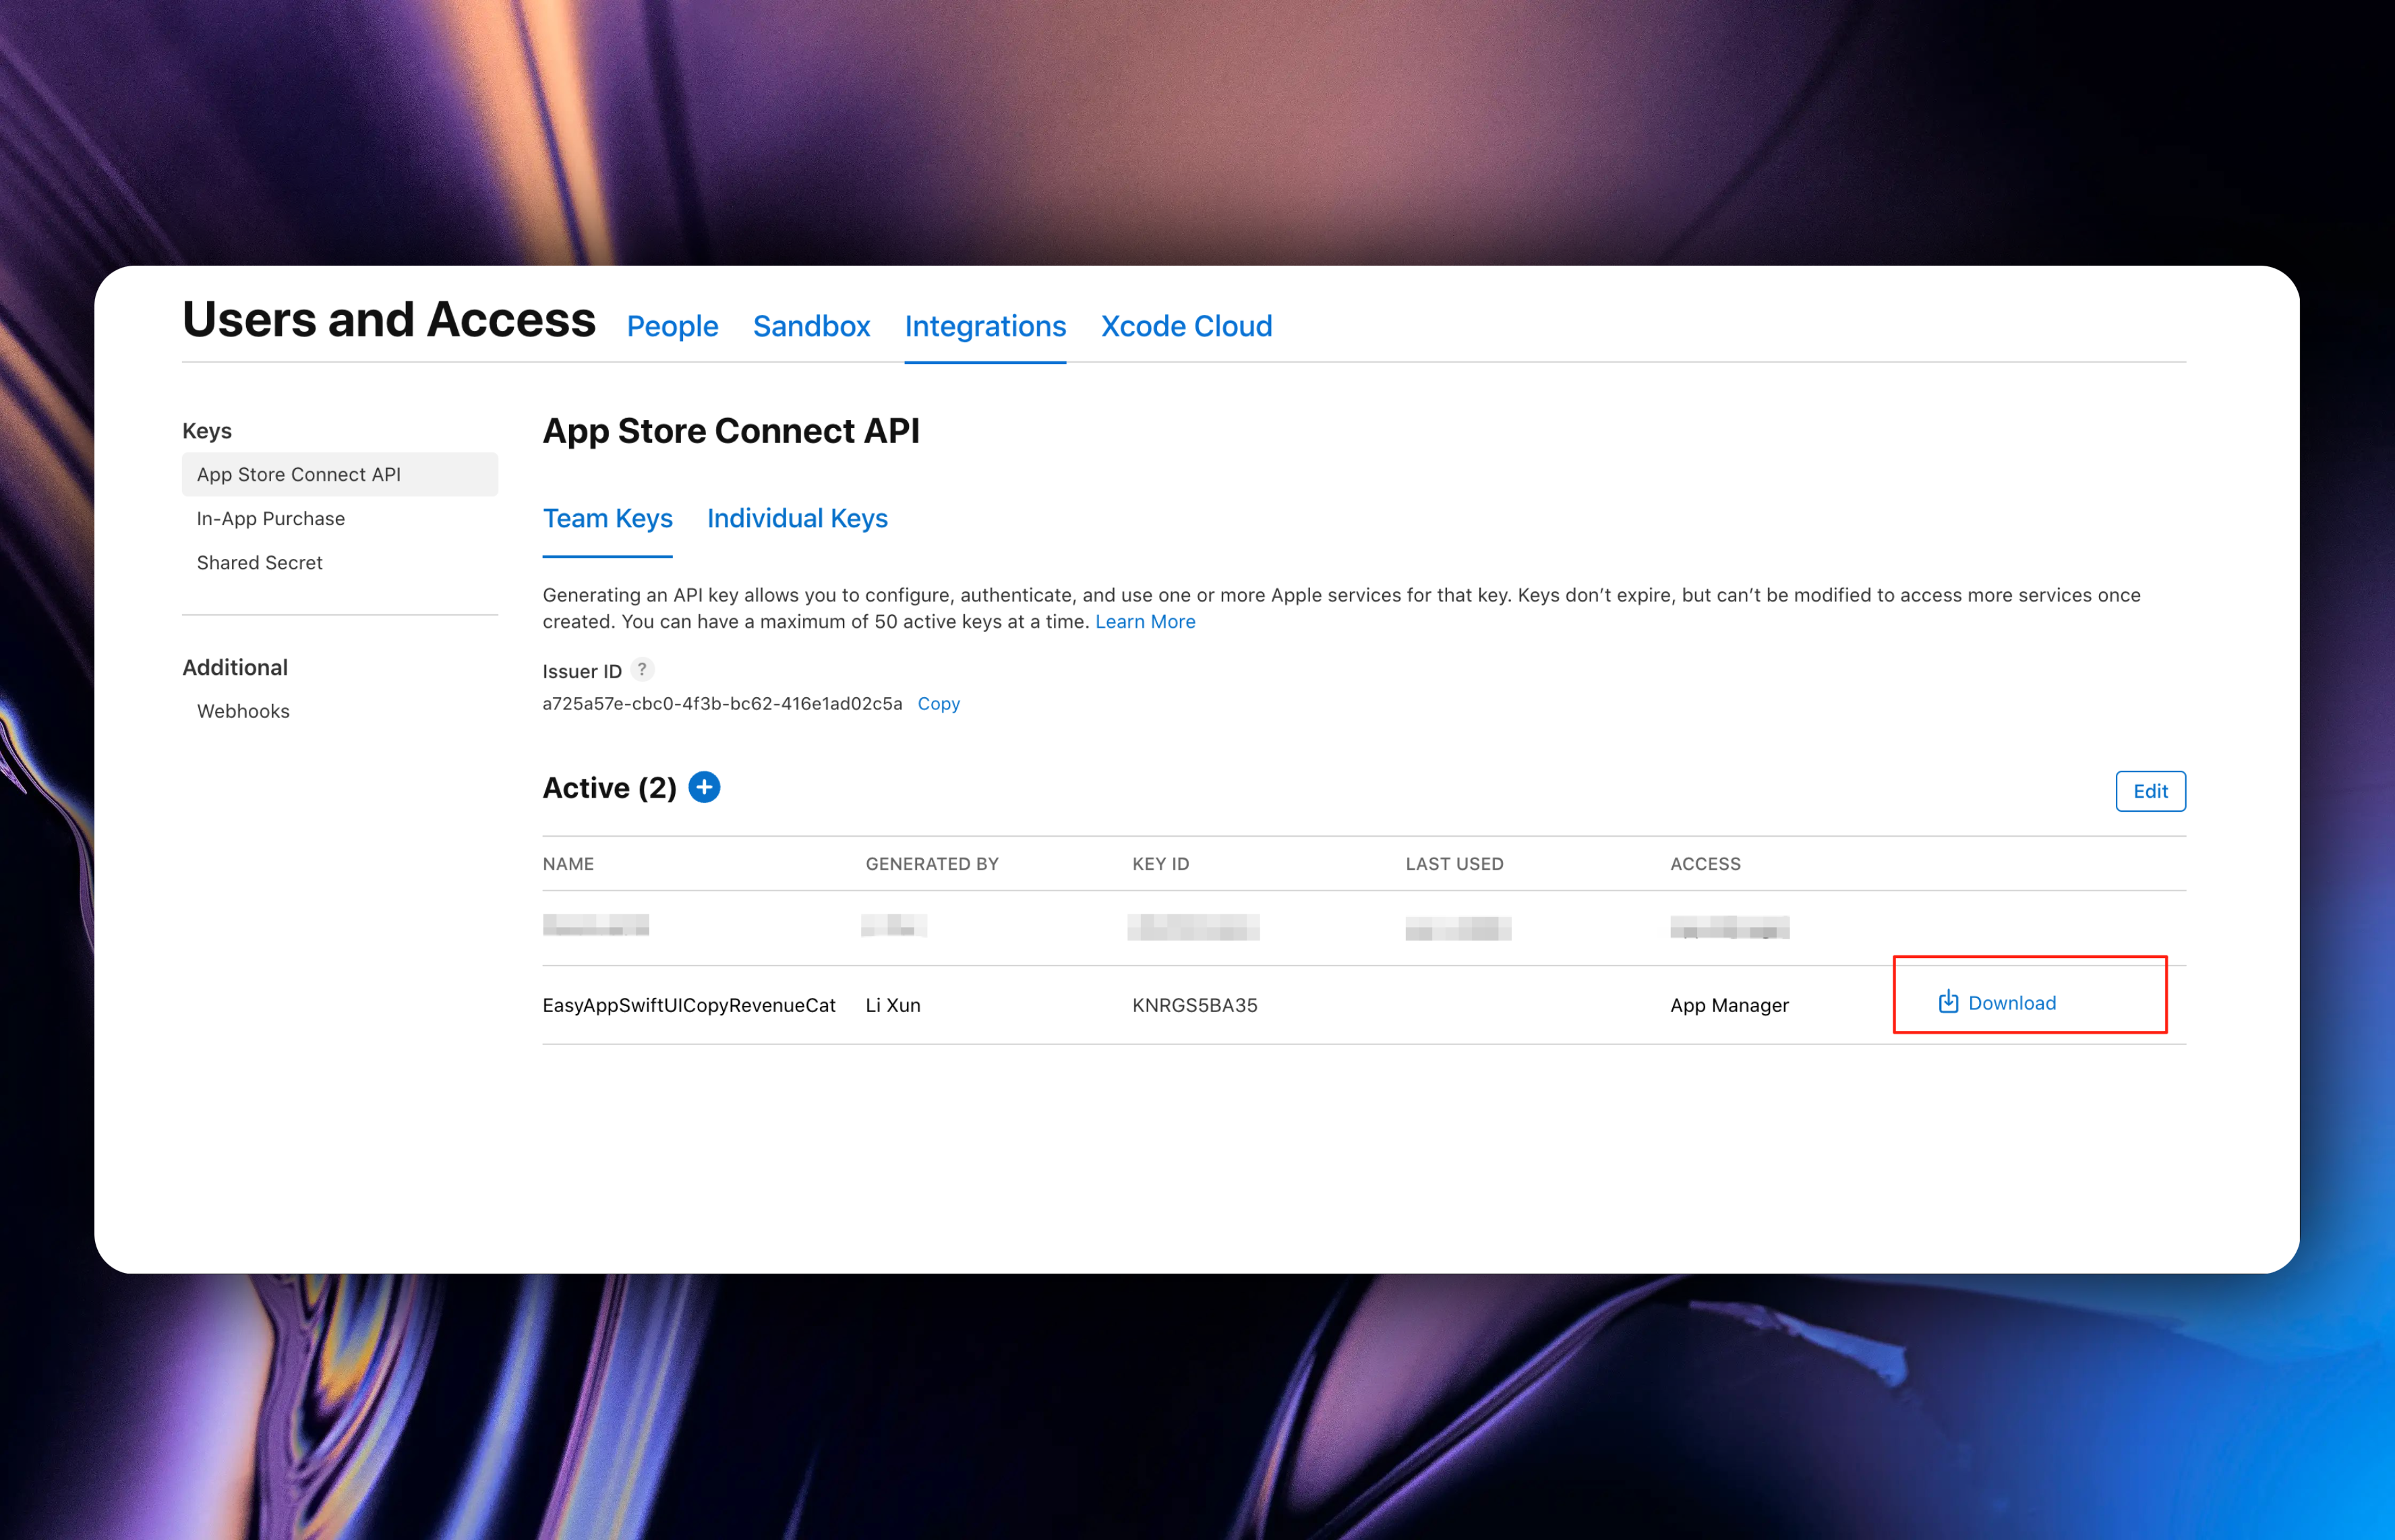
Note: This file can only be downloaded once, please keep it safe. If you accidentally lose it, please follow the above process to create a new Team Key.
#### Upload p8 Private Key File
* Return to the RevenueCat page and upload the private key file we just downloaded
#### Set Issuer ID
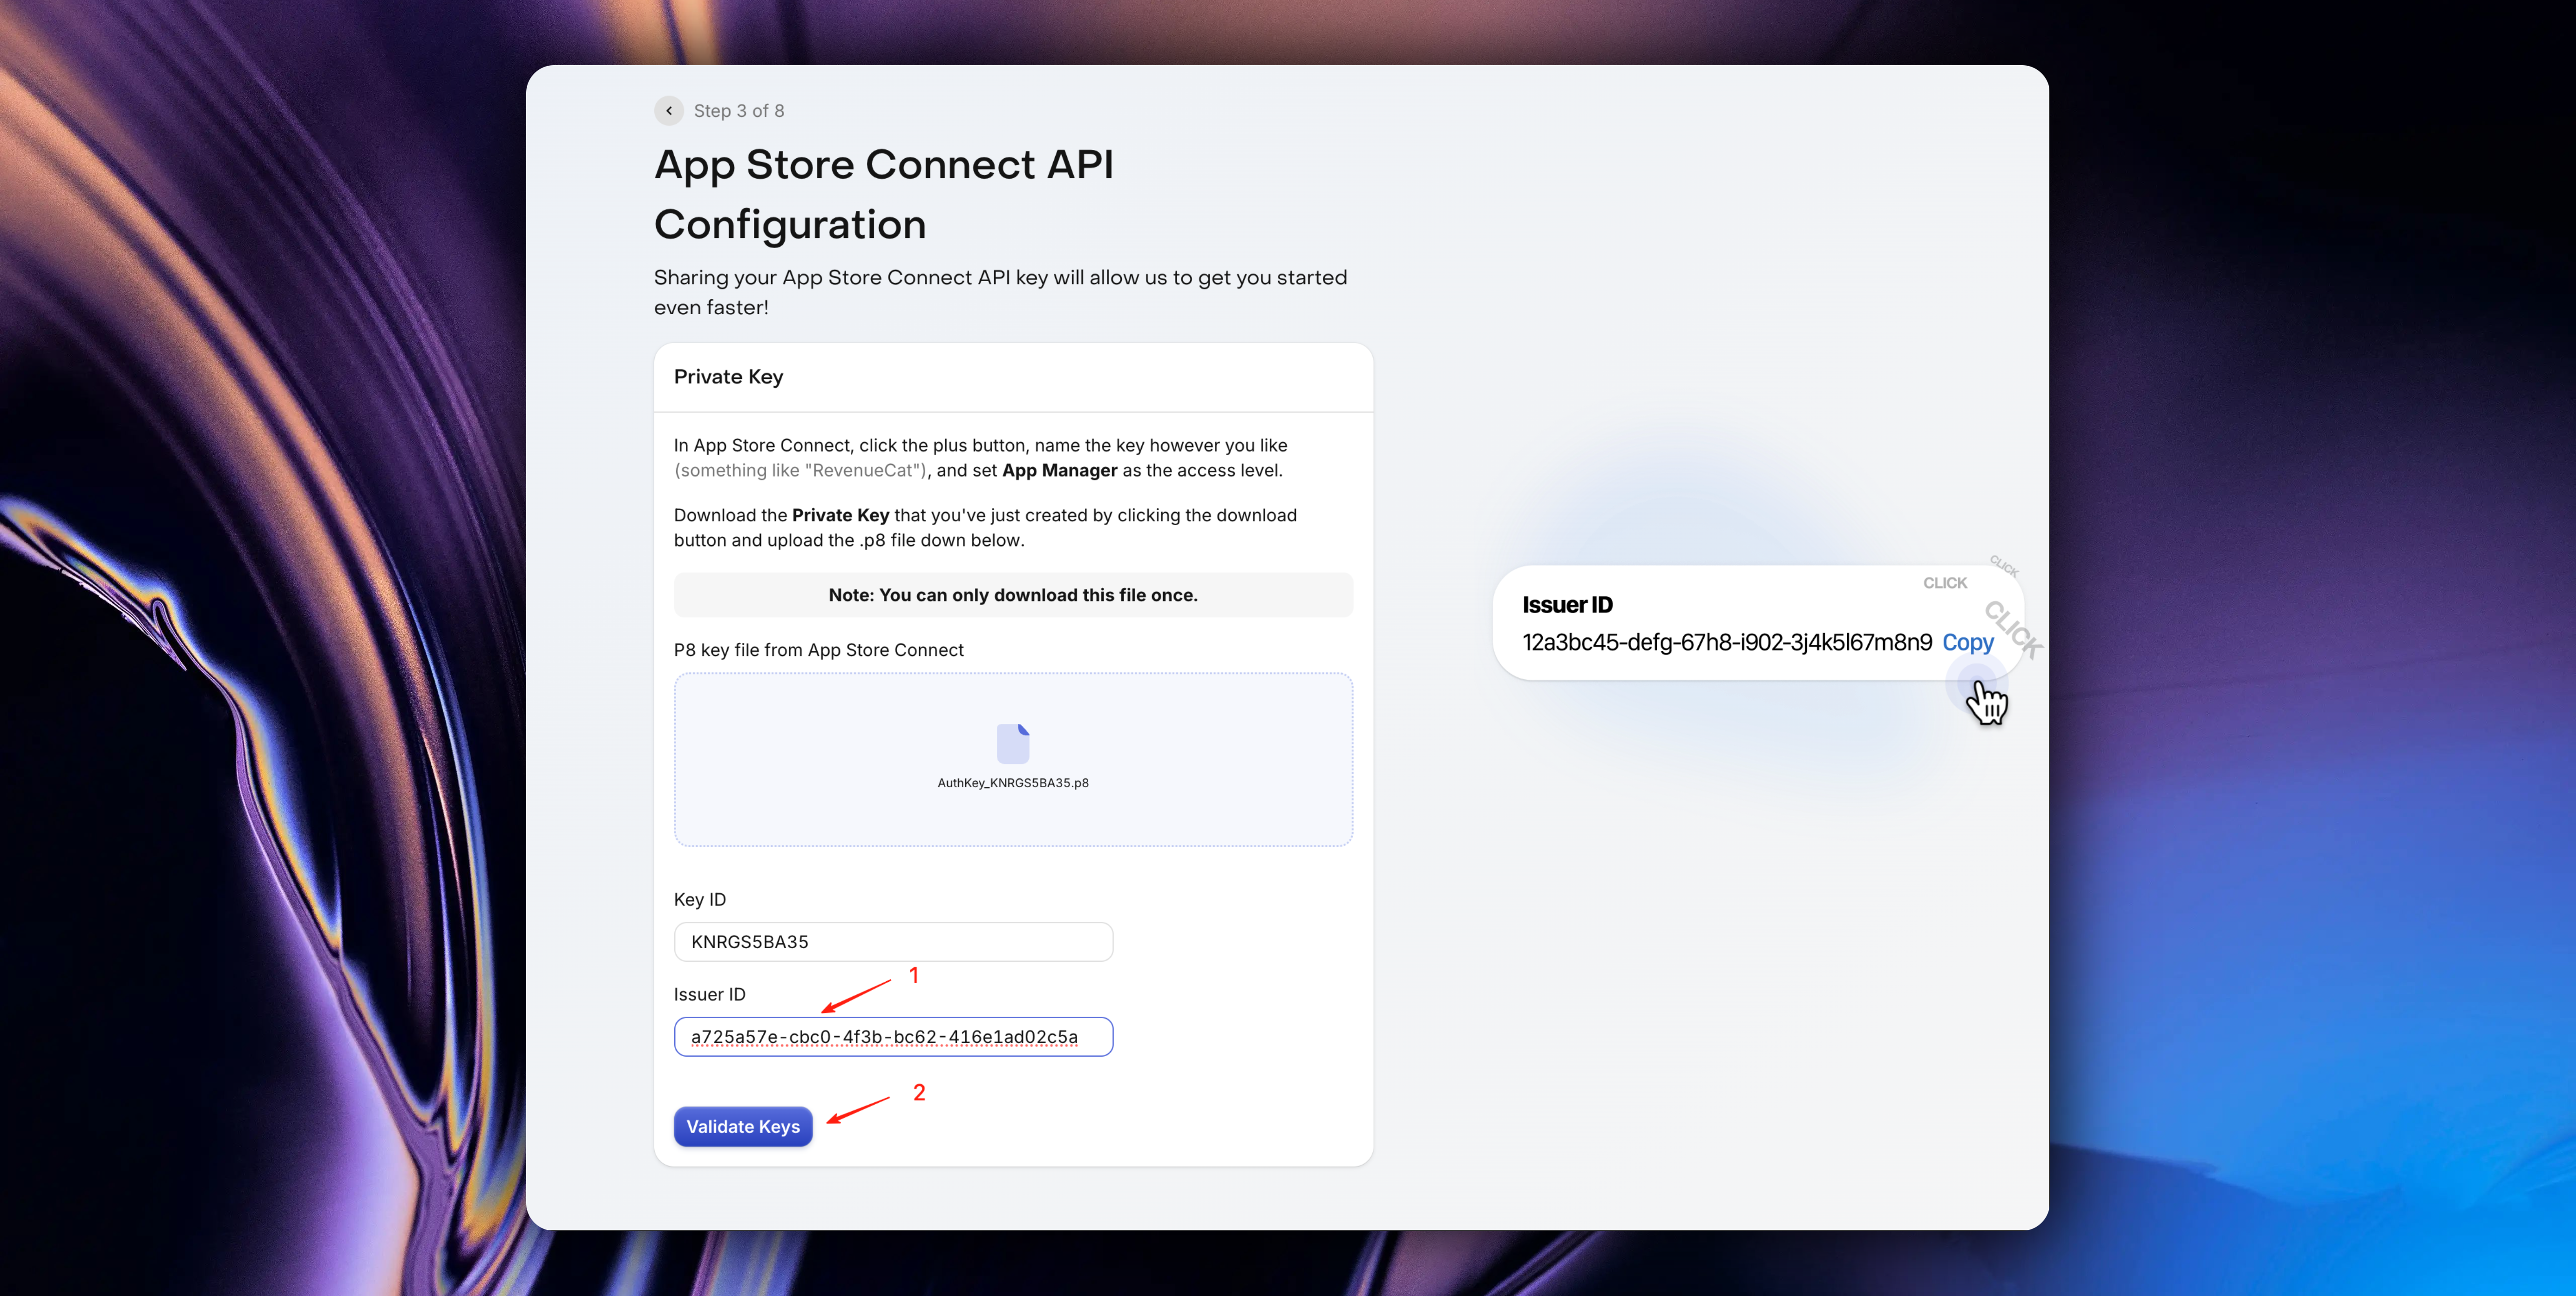
After successful upload, you need to fill in the `Issuer ID`
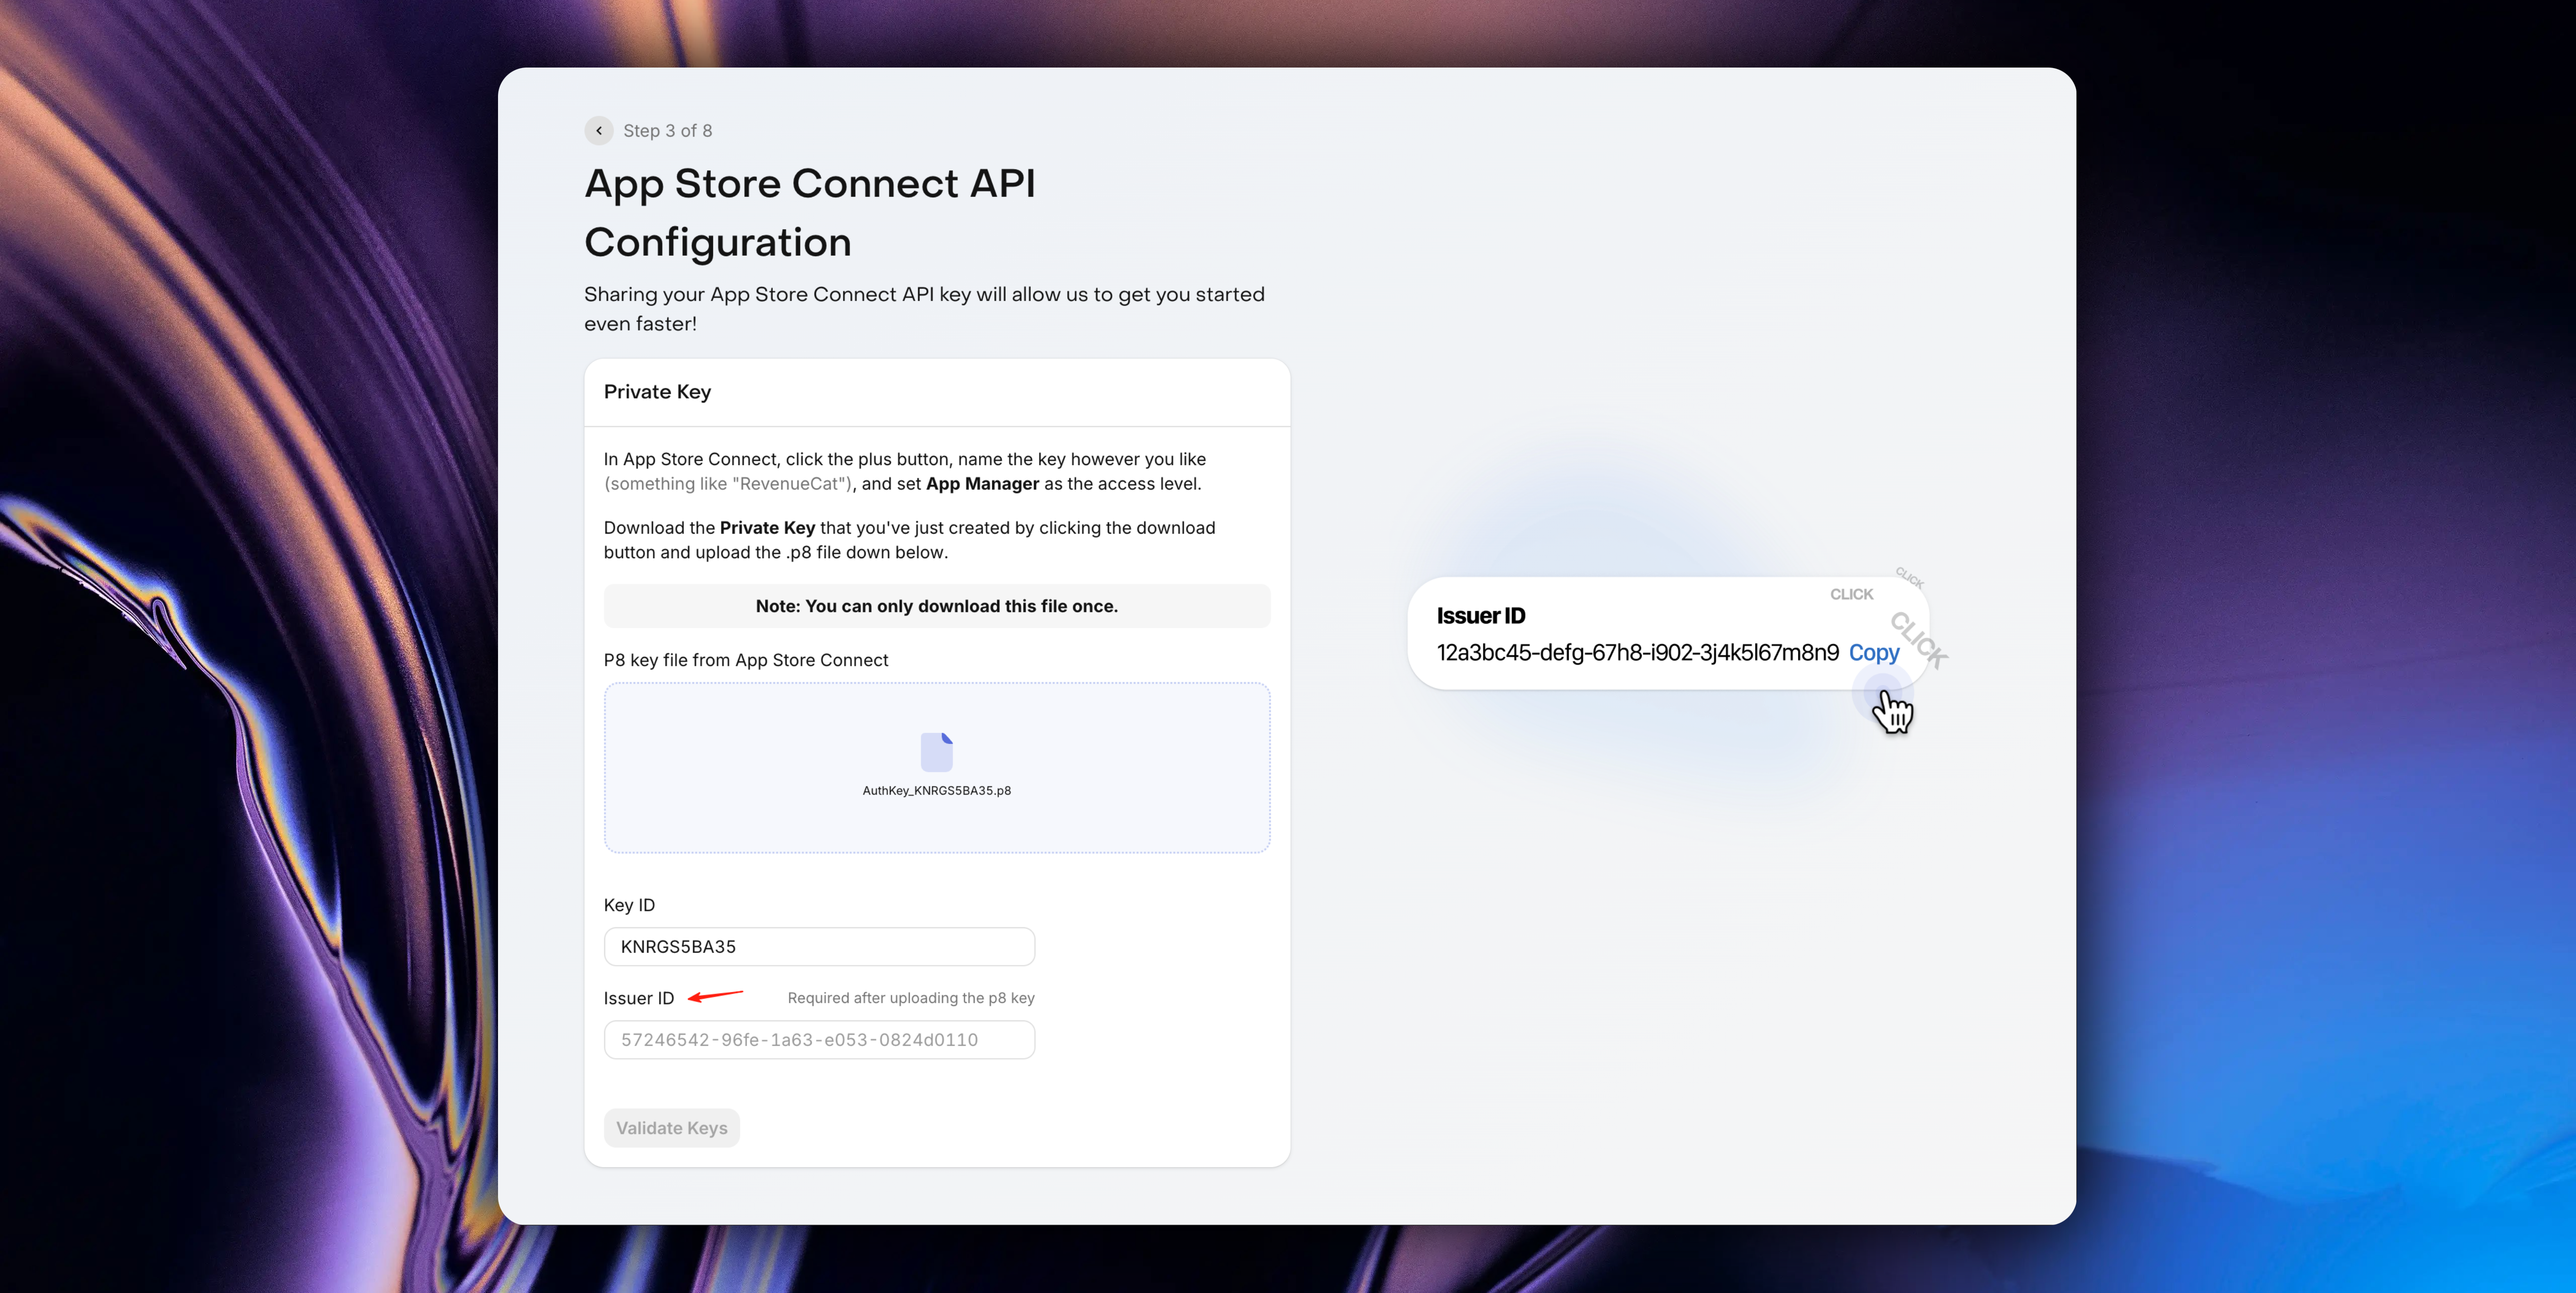
How to get `Issuer ID`:
Return to the [App Store Connect Team Keys](https://appstoreconnect.apple.com/access/integrations/api) page, you can see the `Issuer ID`
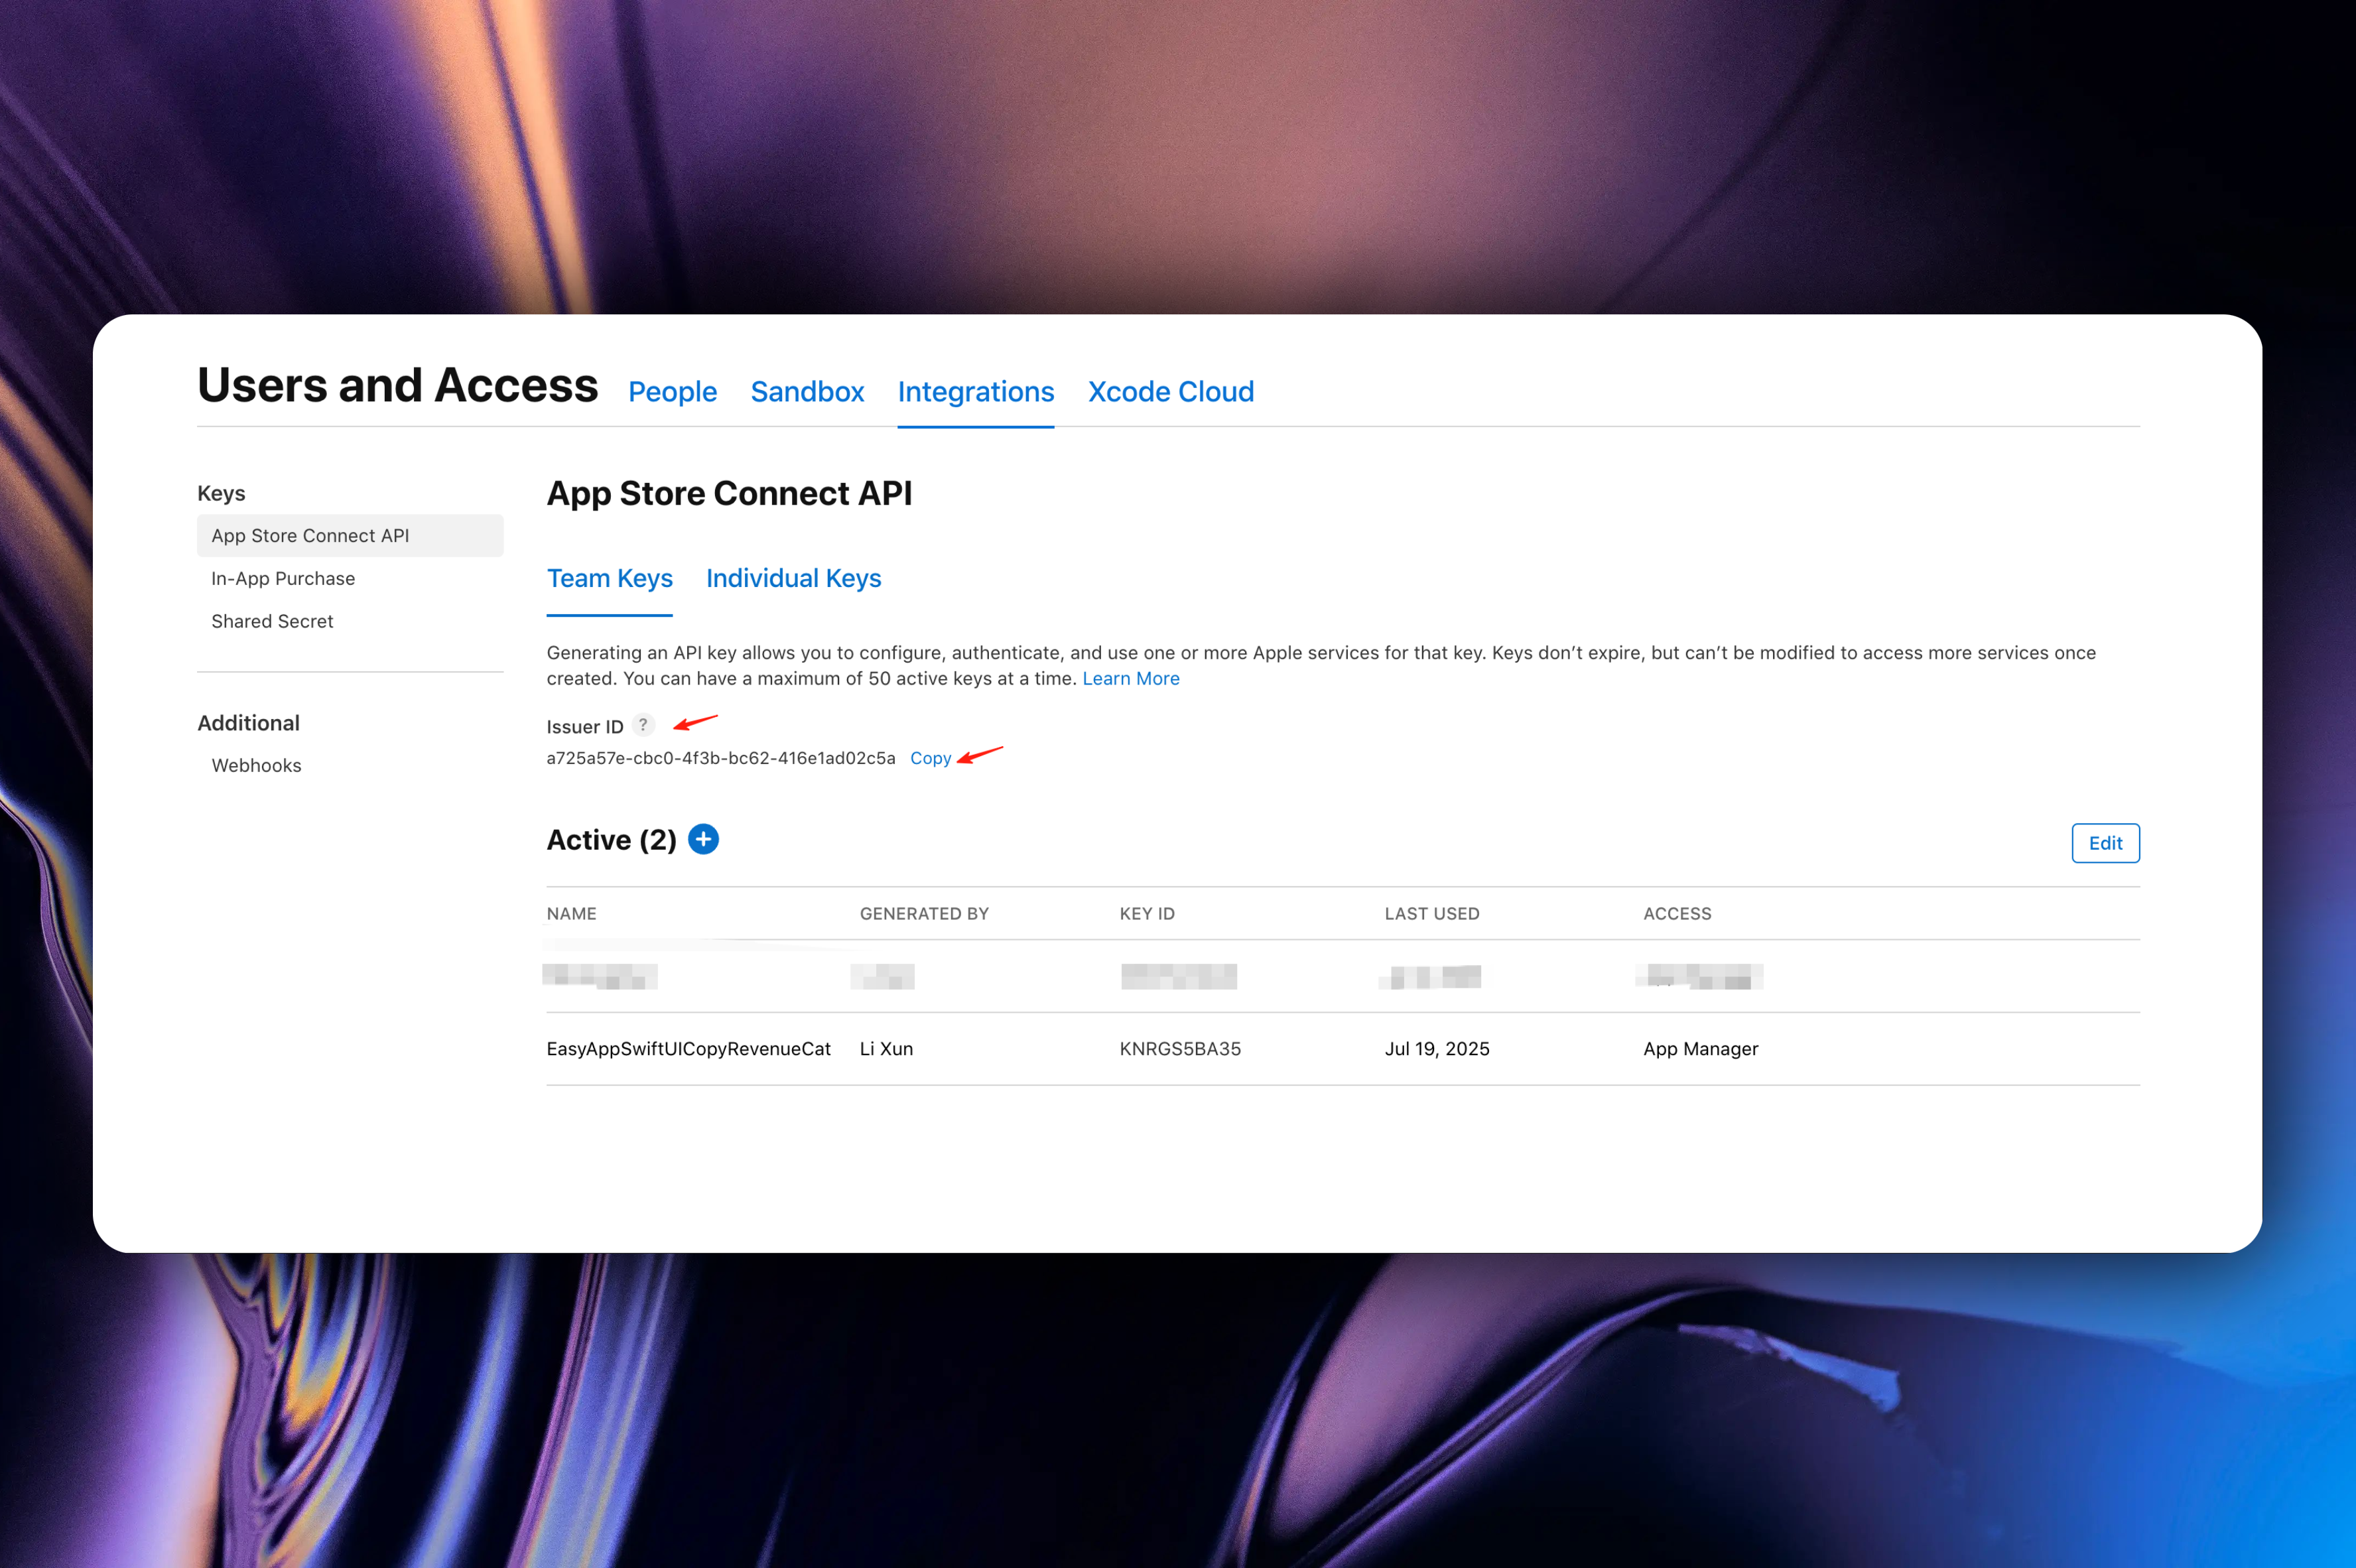
After clicking the `Copy` button, paste it into the RevenueCat page, then click the `Validate Keys` button and wait for validation results.
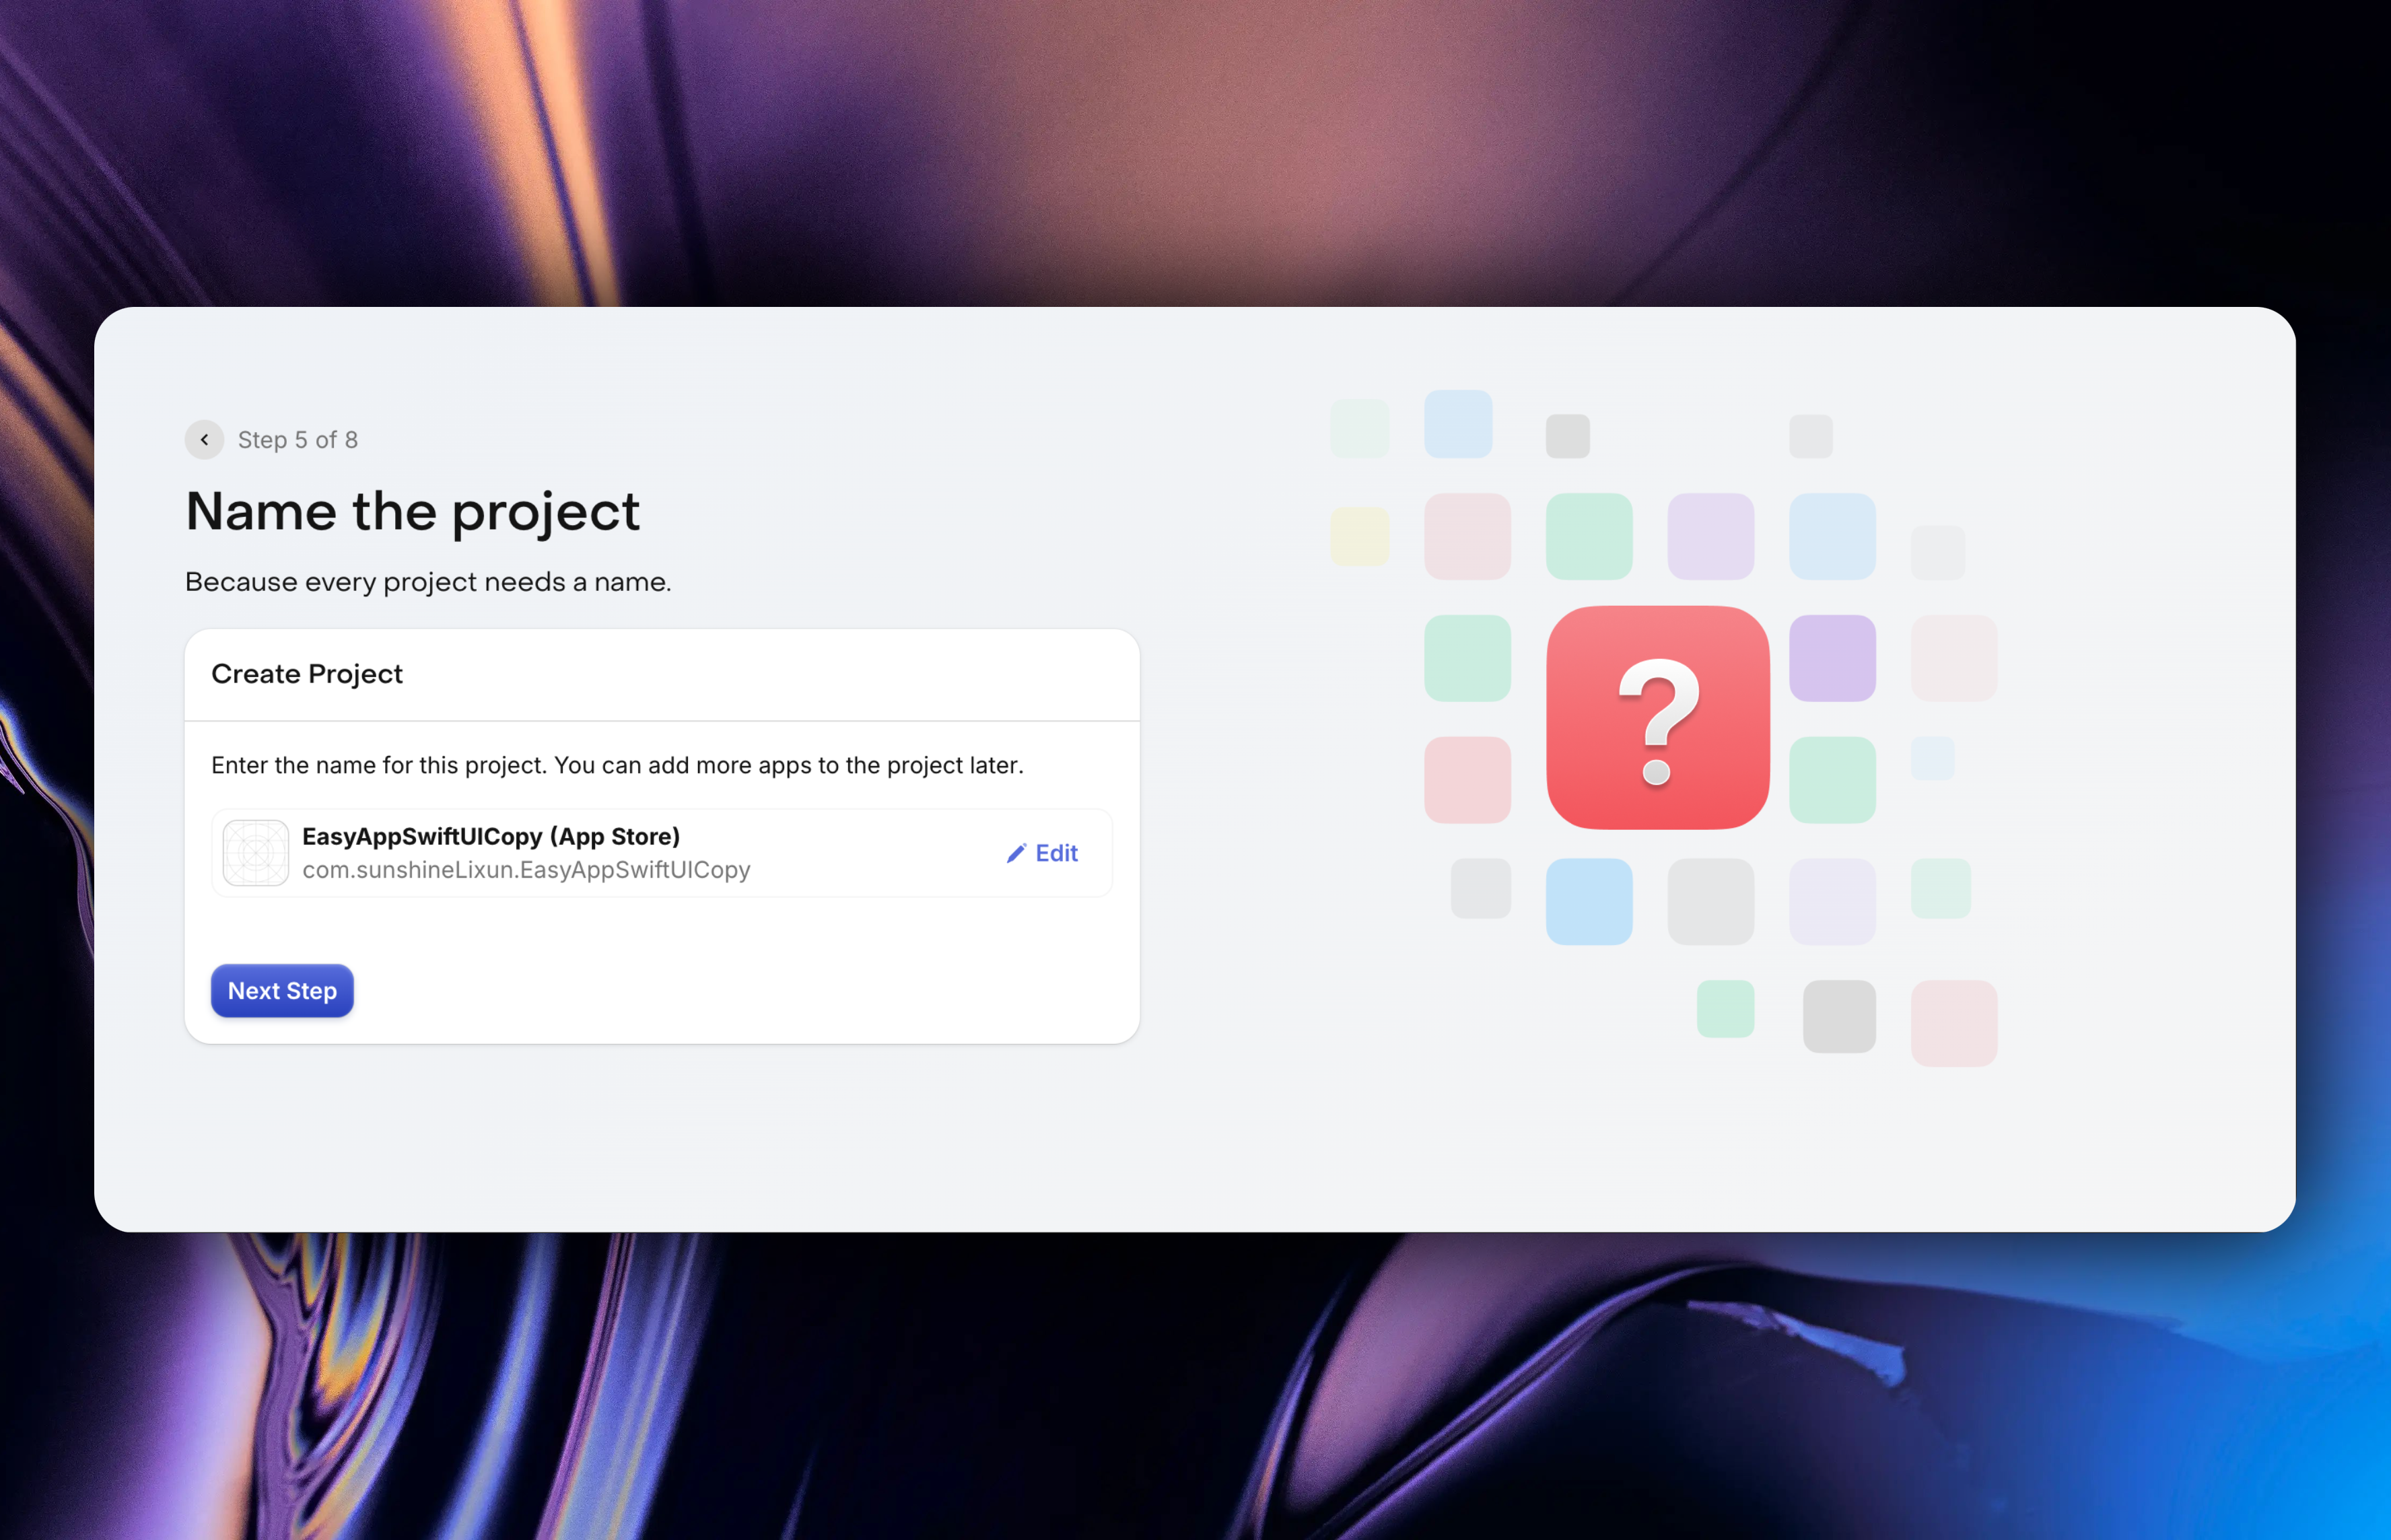
#### Select App to Integrate
After validation is complete, we need to select the App to integrate, click the `Next Step` button
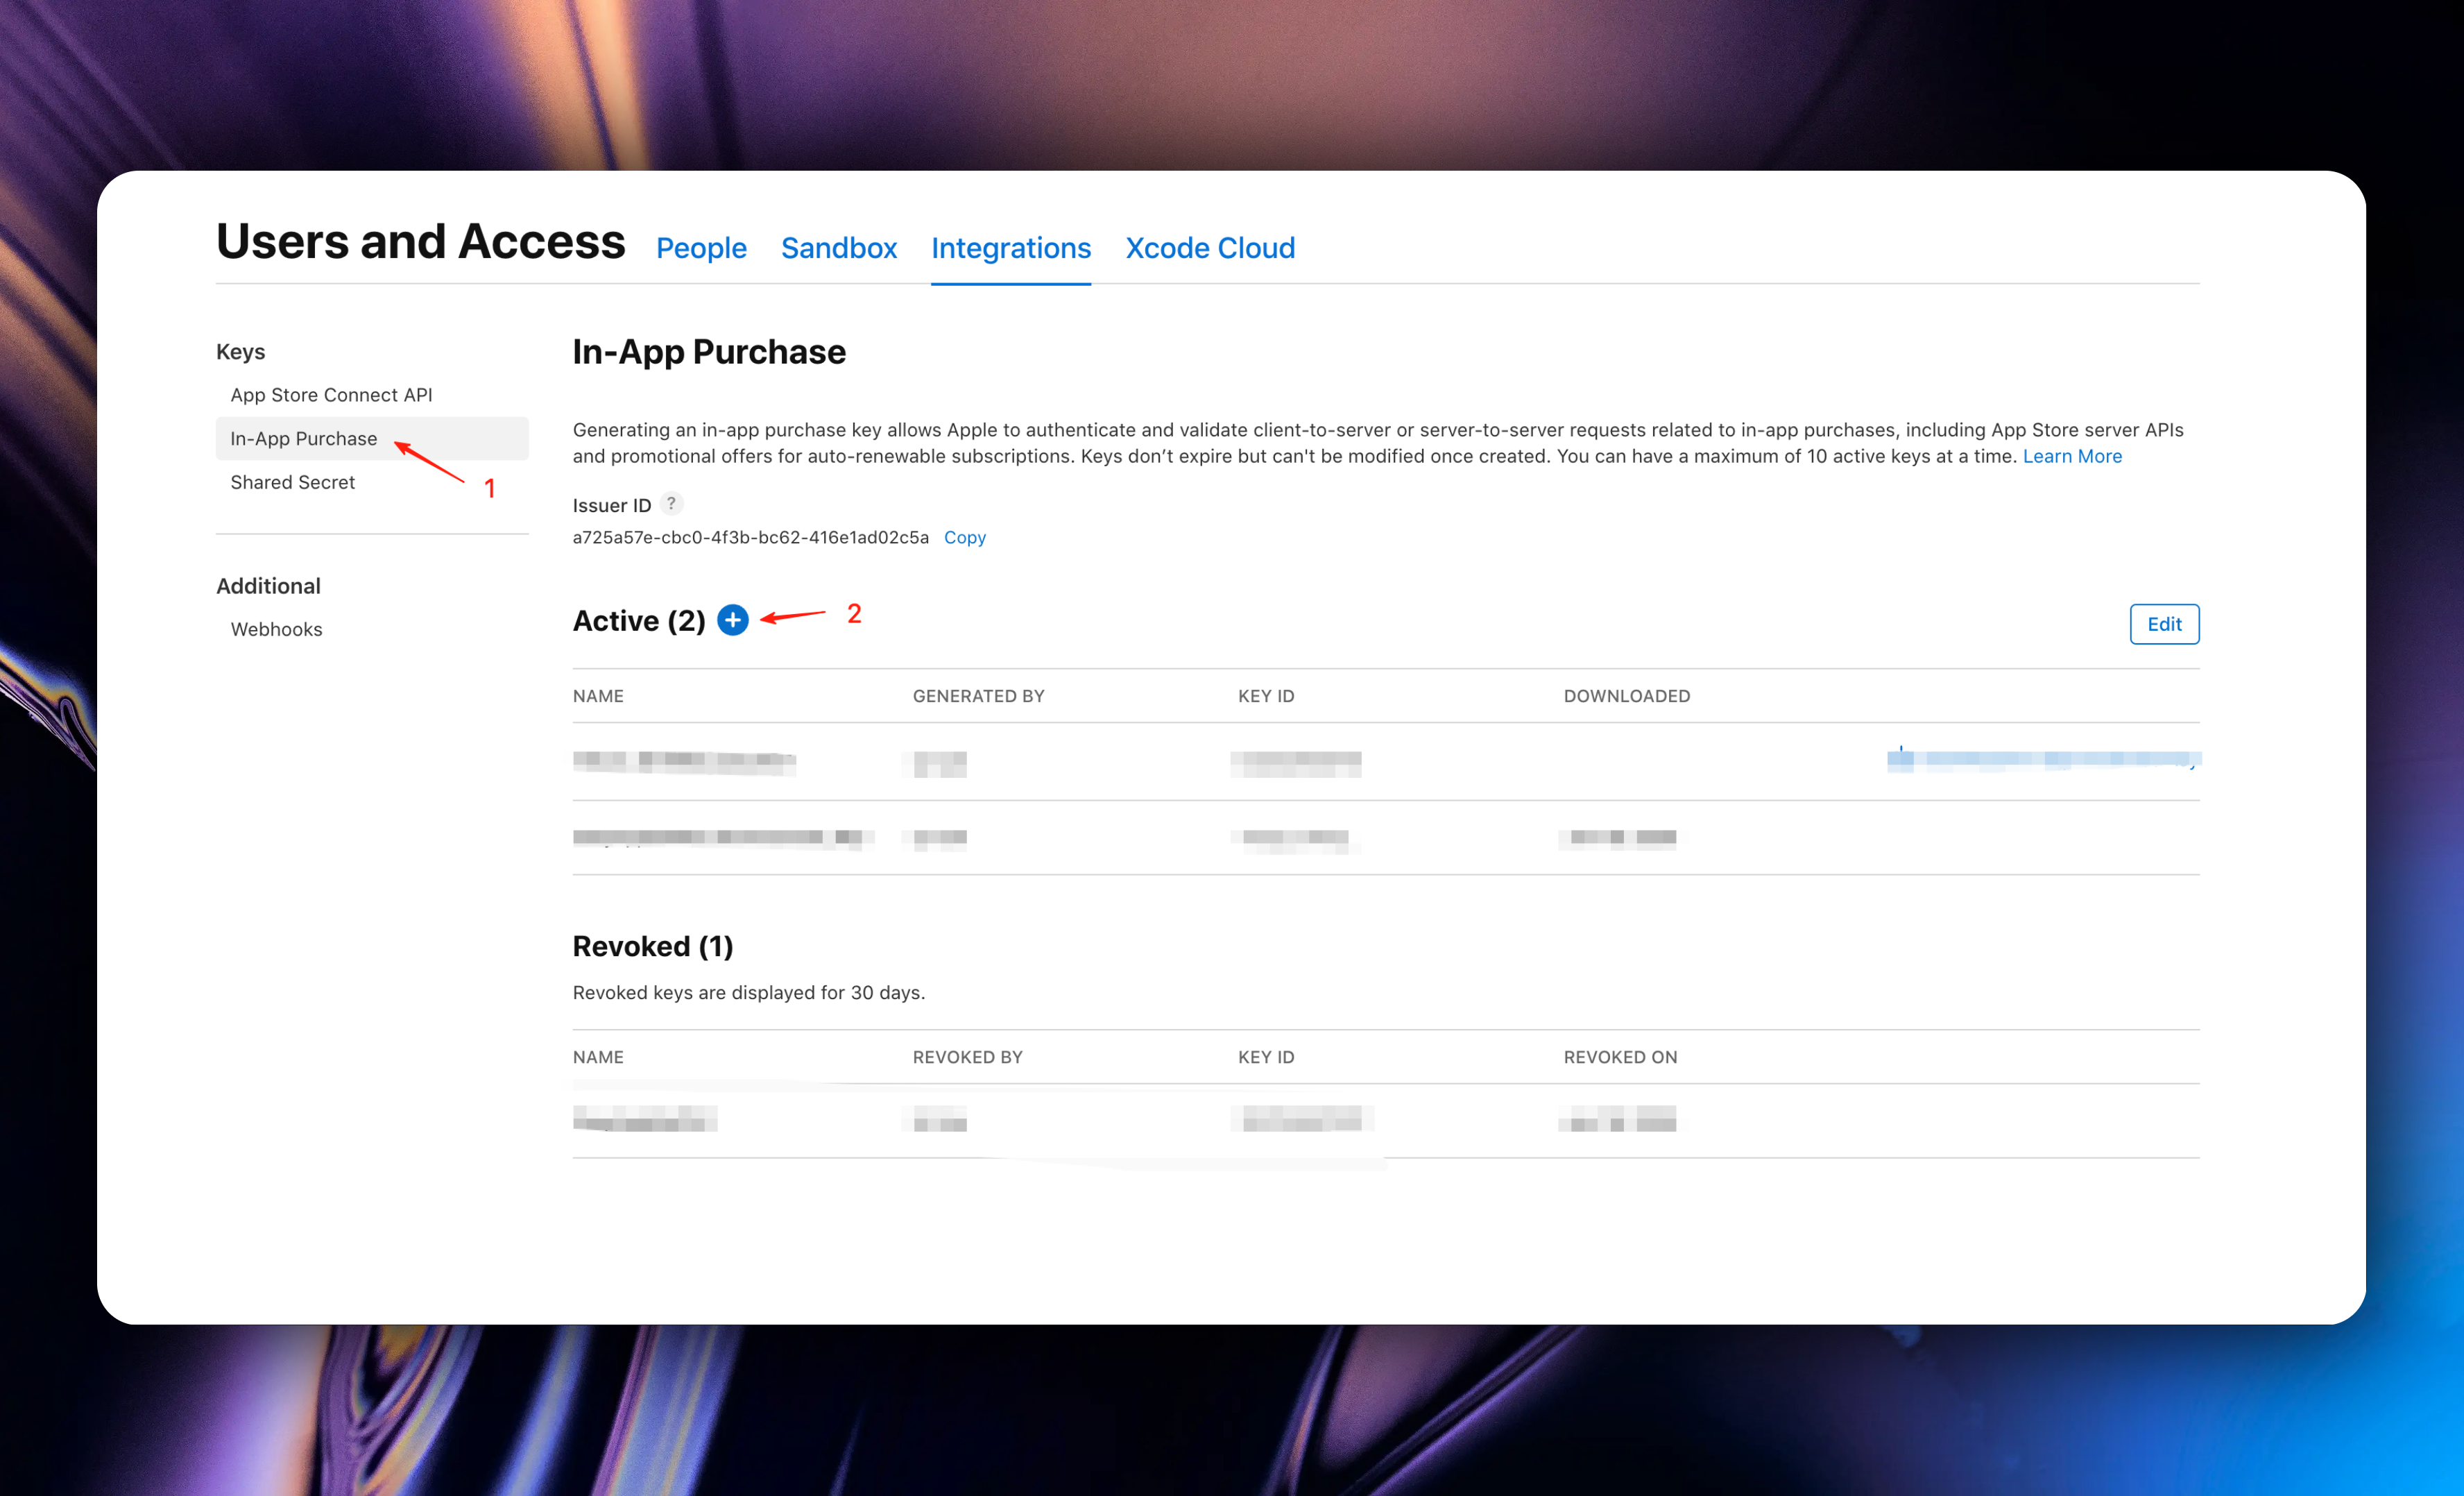
#### In-App Purchase Configuration
Following the previous step, come to this page, click the `Go to In-App Purchase Keys` button, which will automatically redirect to the App Store Connect In-App Purchase Keys page
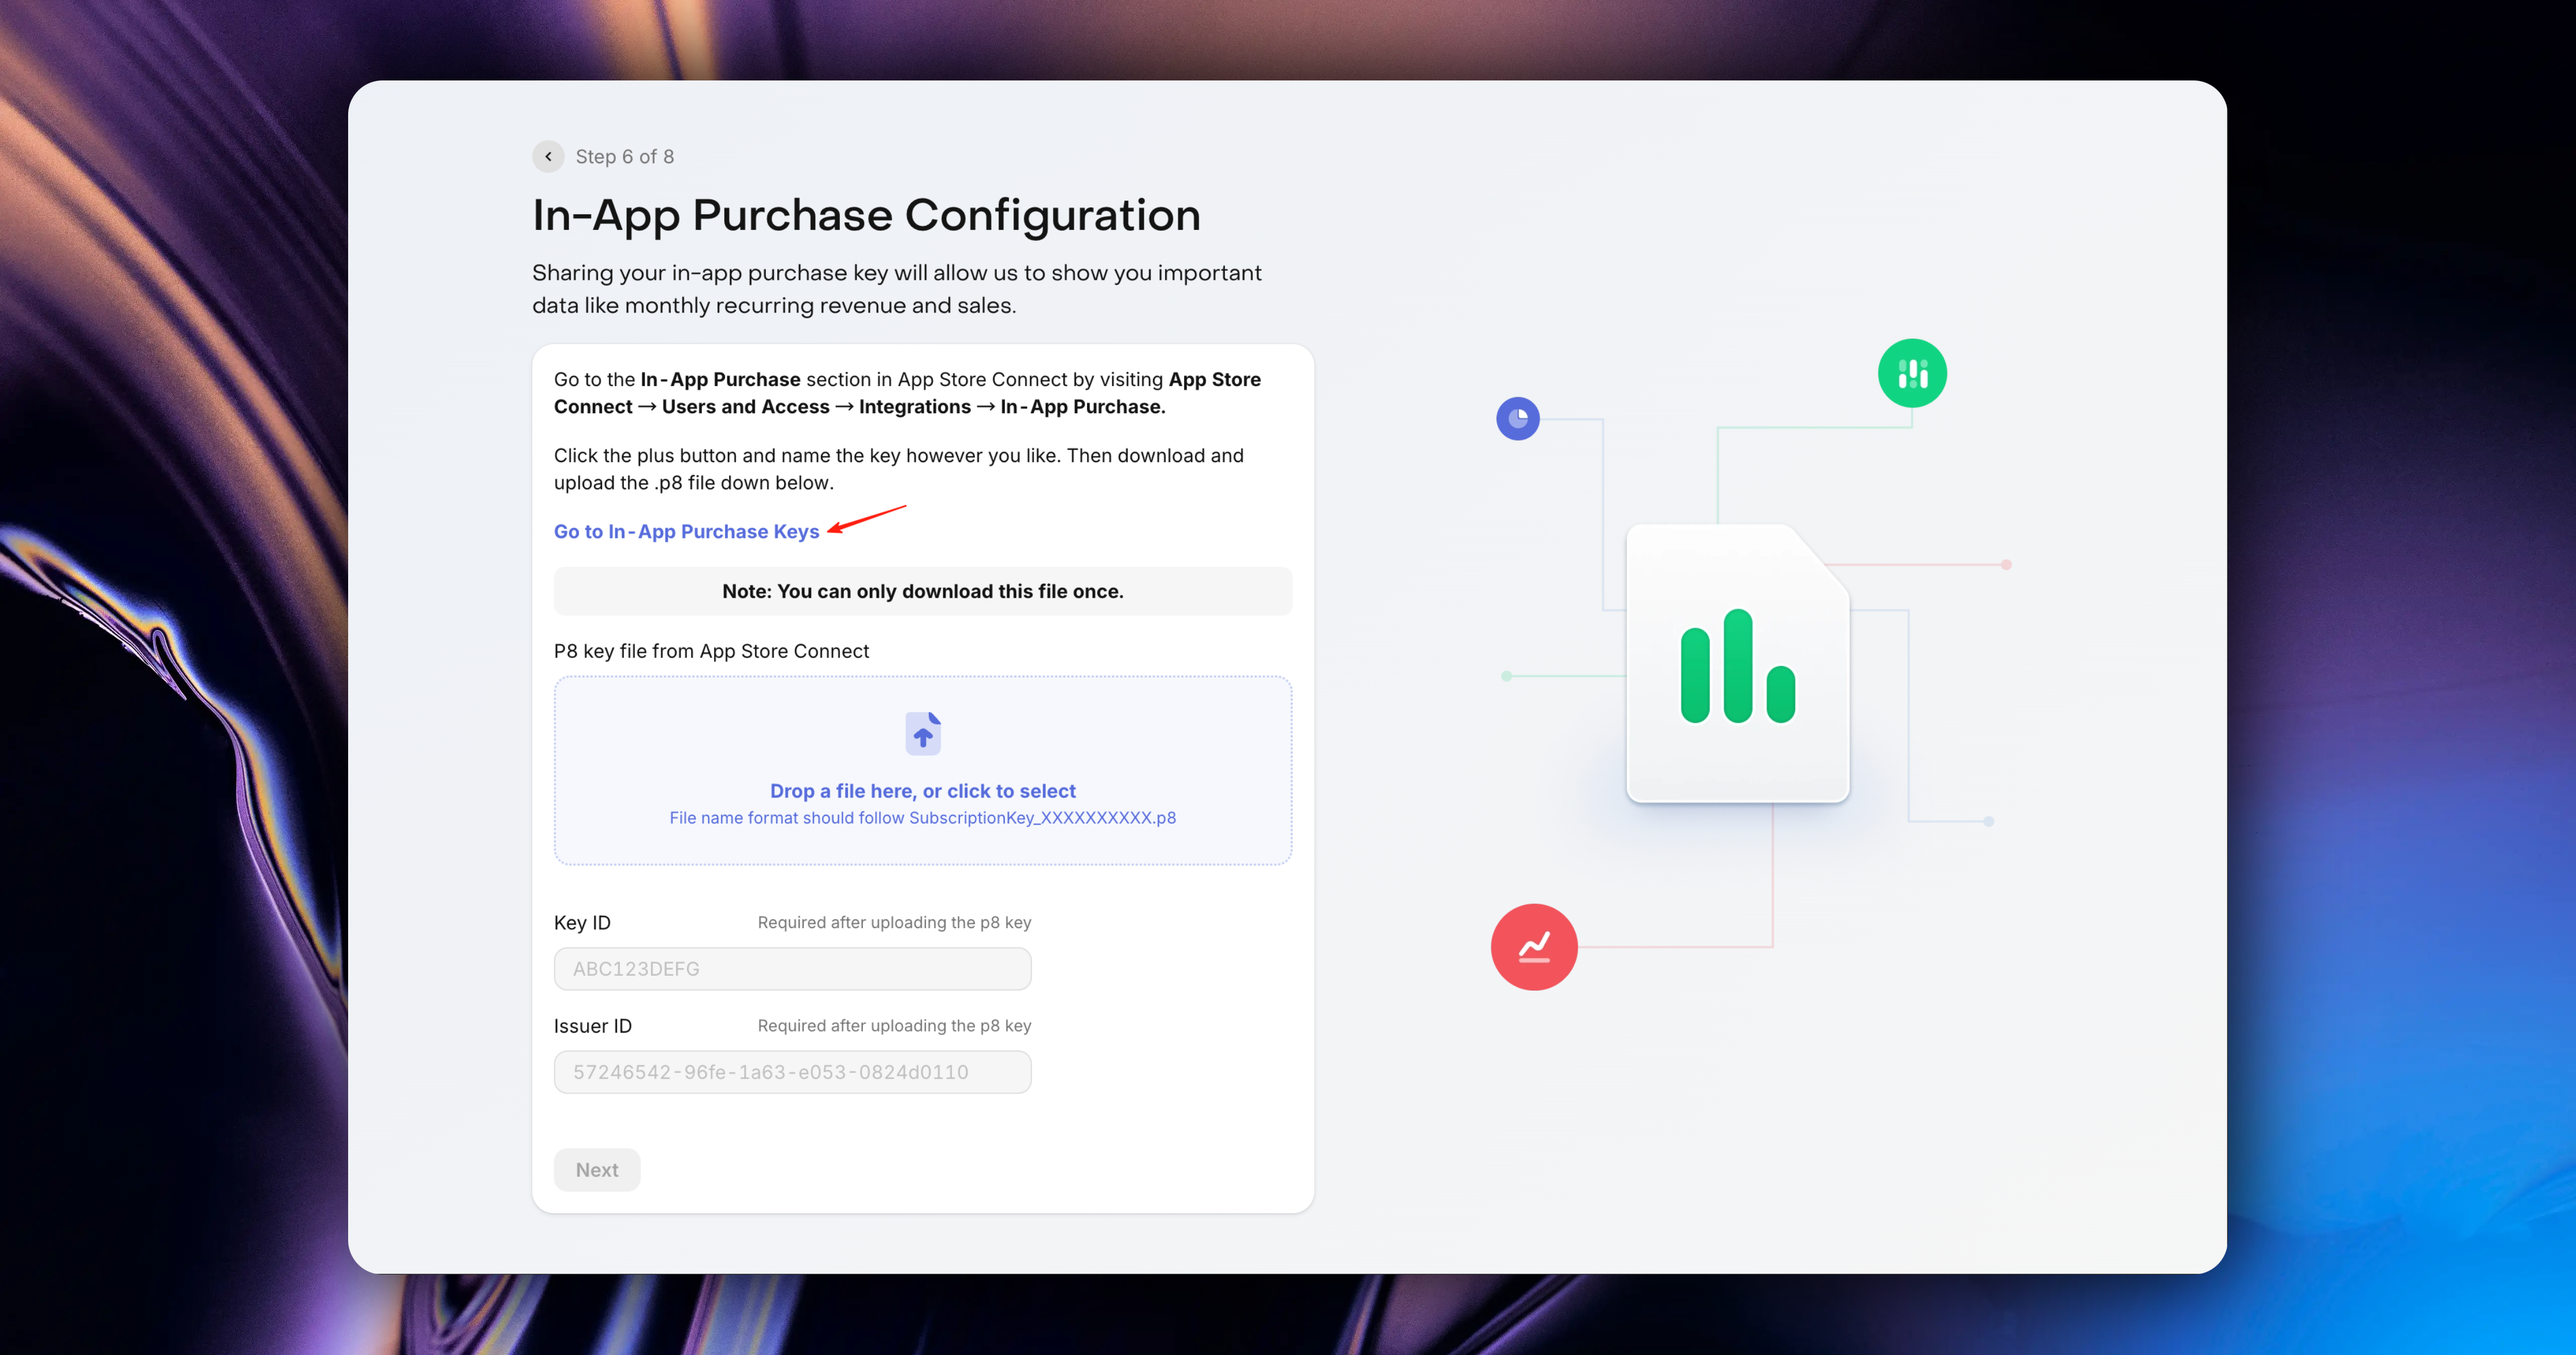
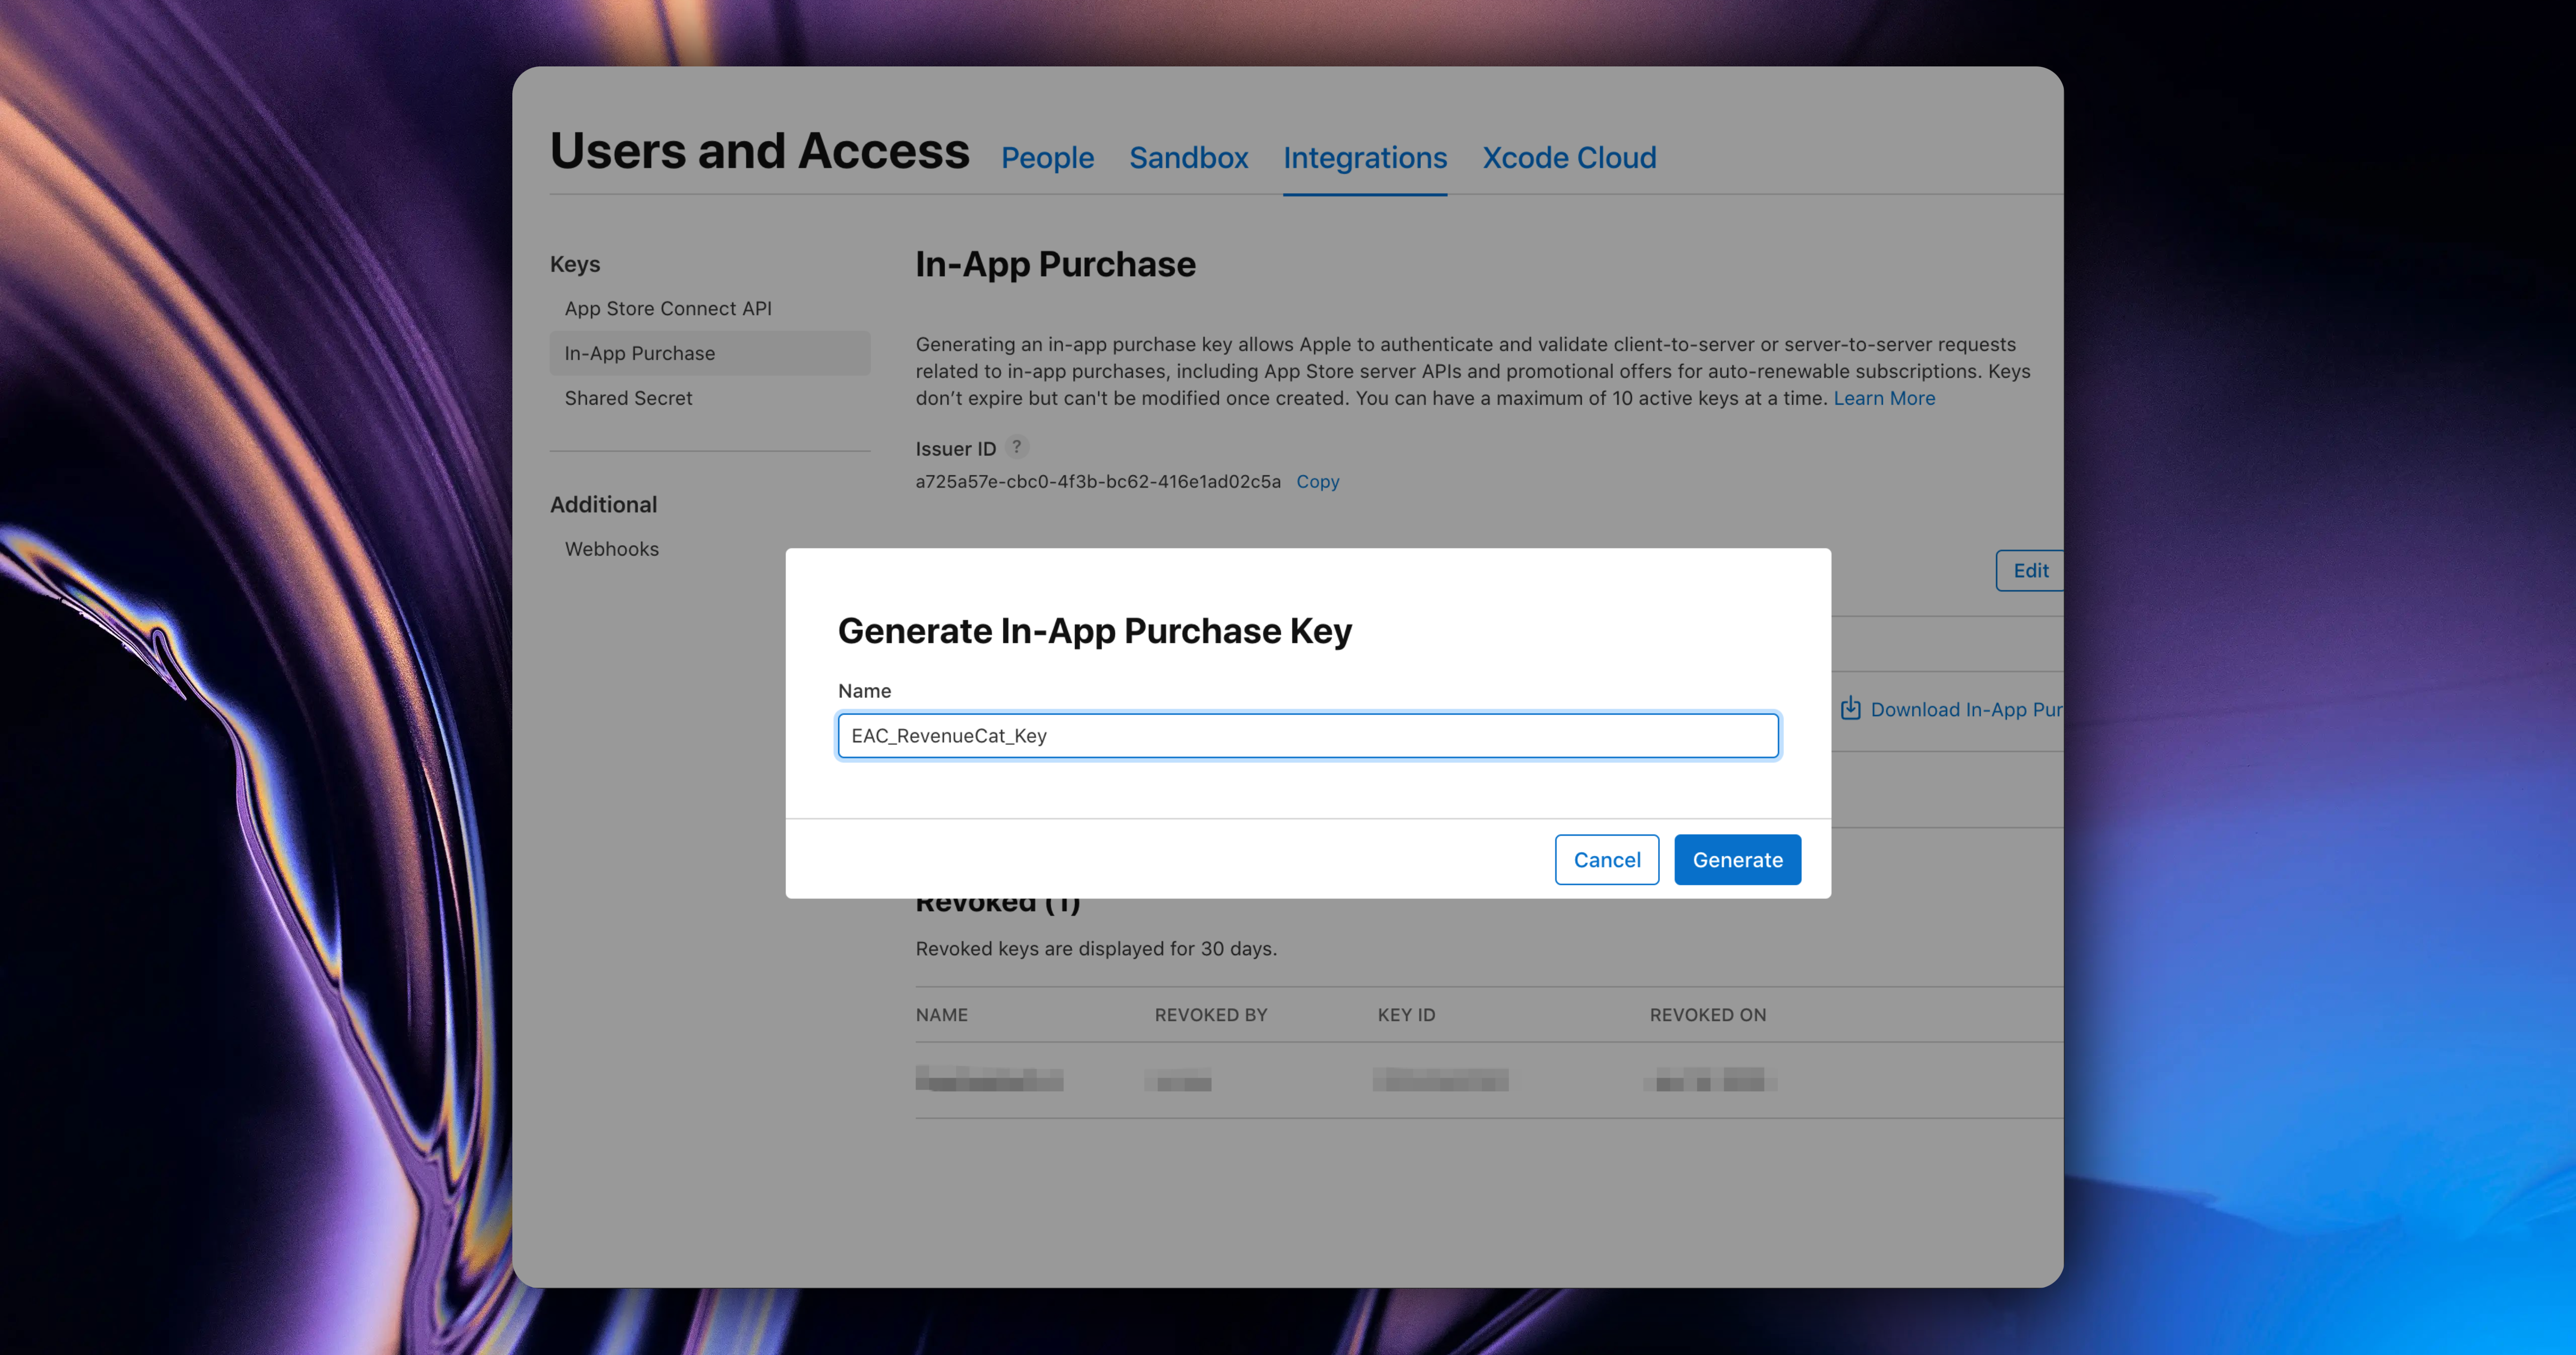
Click the `+` button to create a new In-App Purchase Key
In the popup, we enter the Key name. For better distinction, it's recommended to use a combination of your App name + RevenueCat + Key
Note: The Name cannot be too long, otherwise Apple's API will report an error 😂
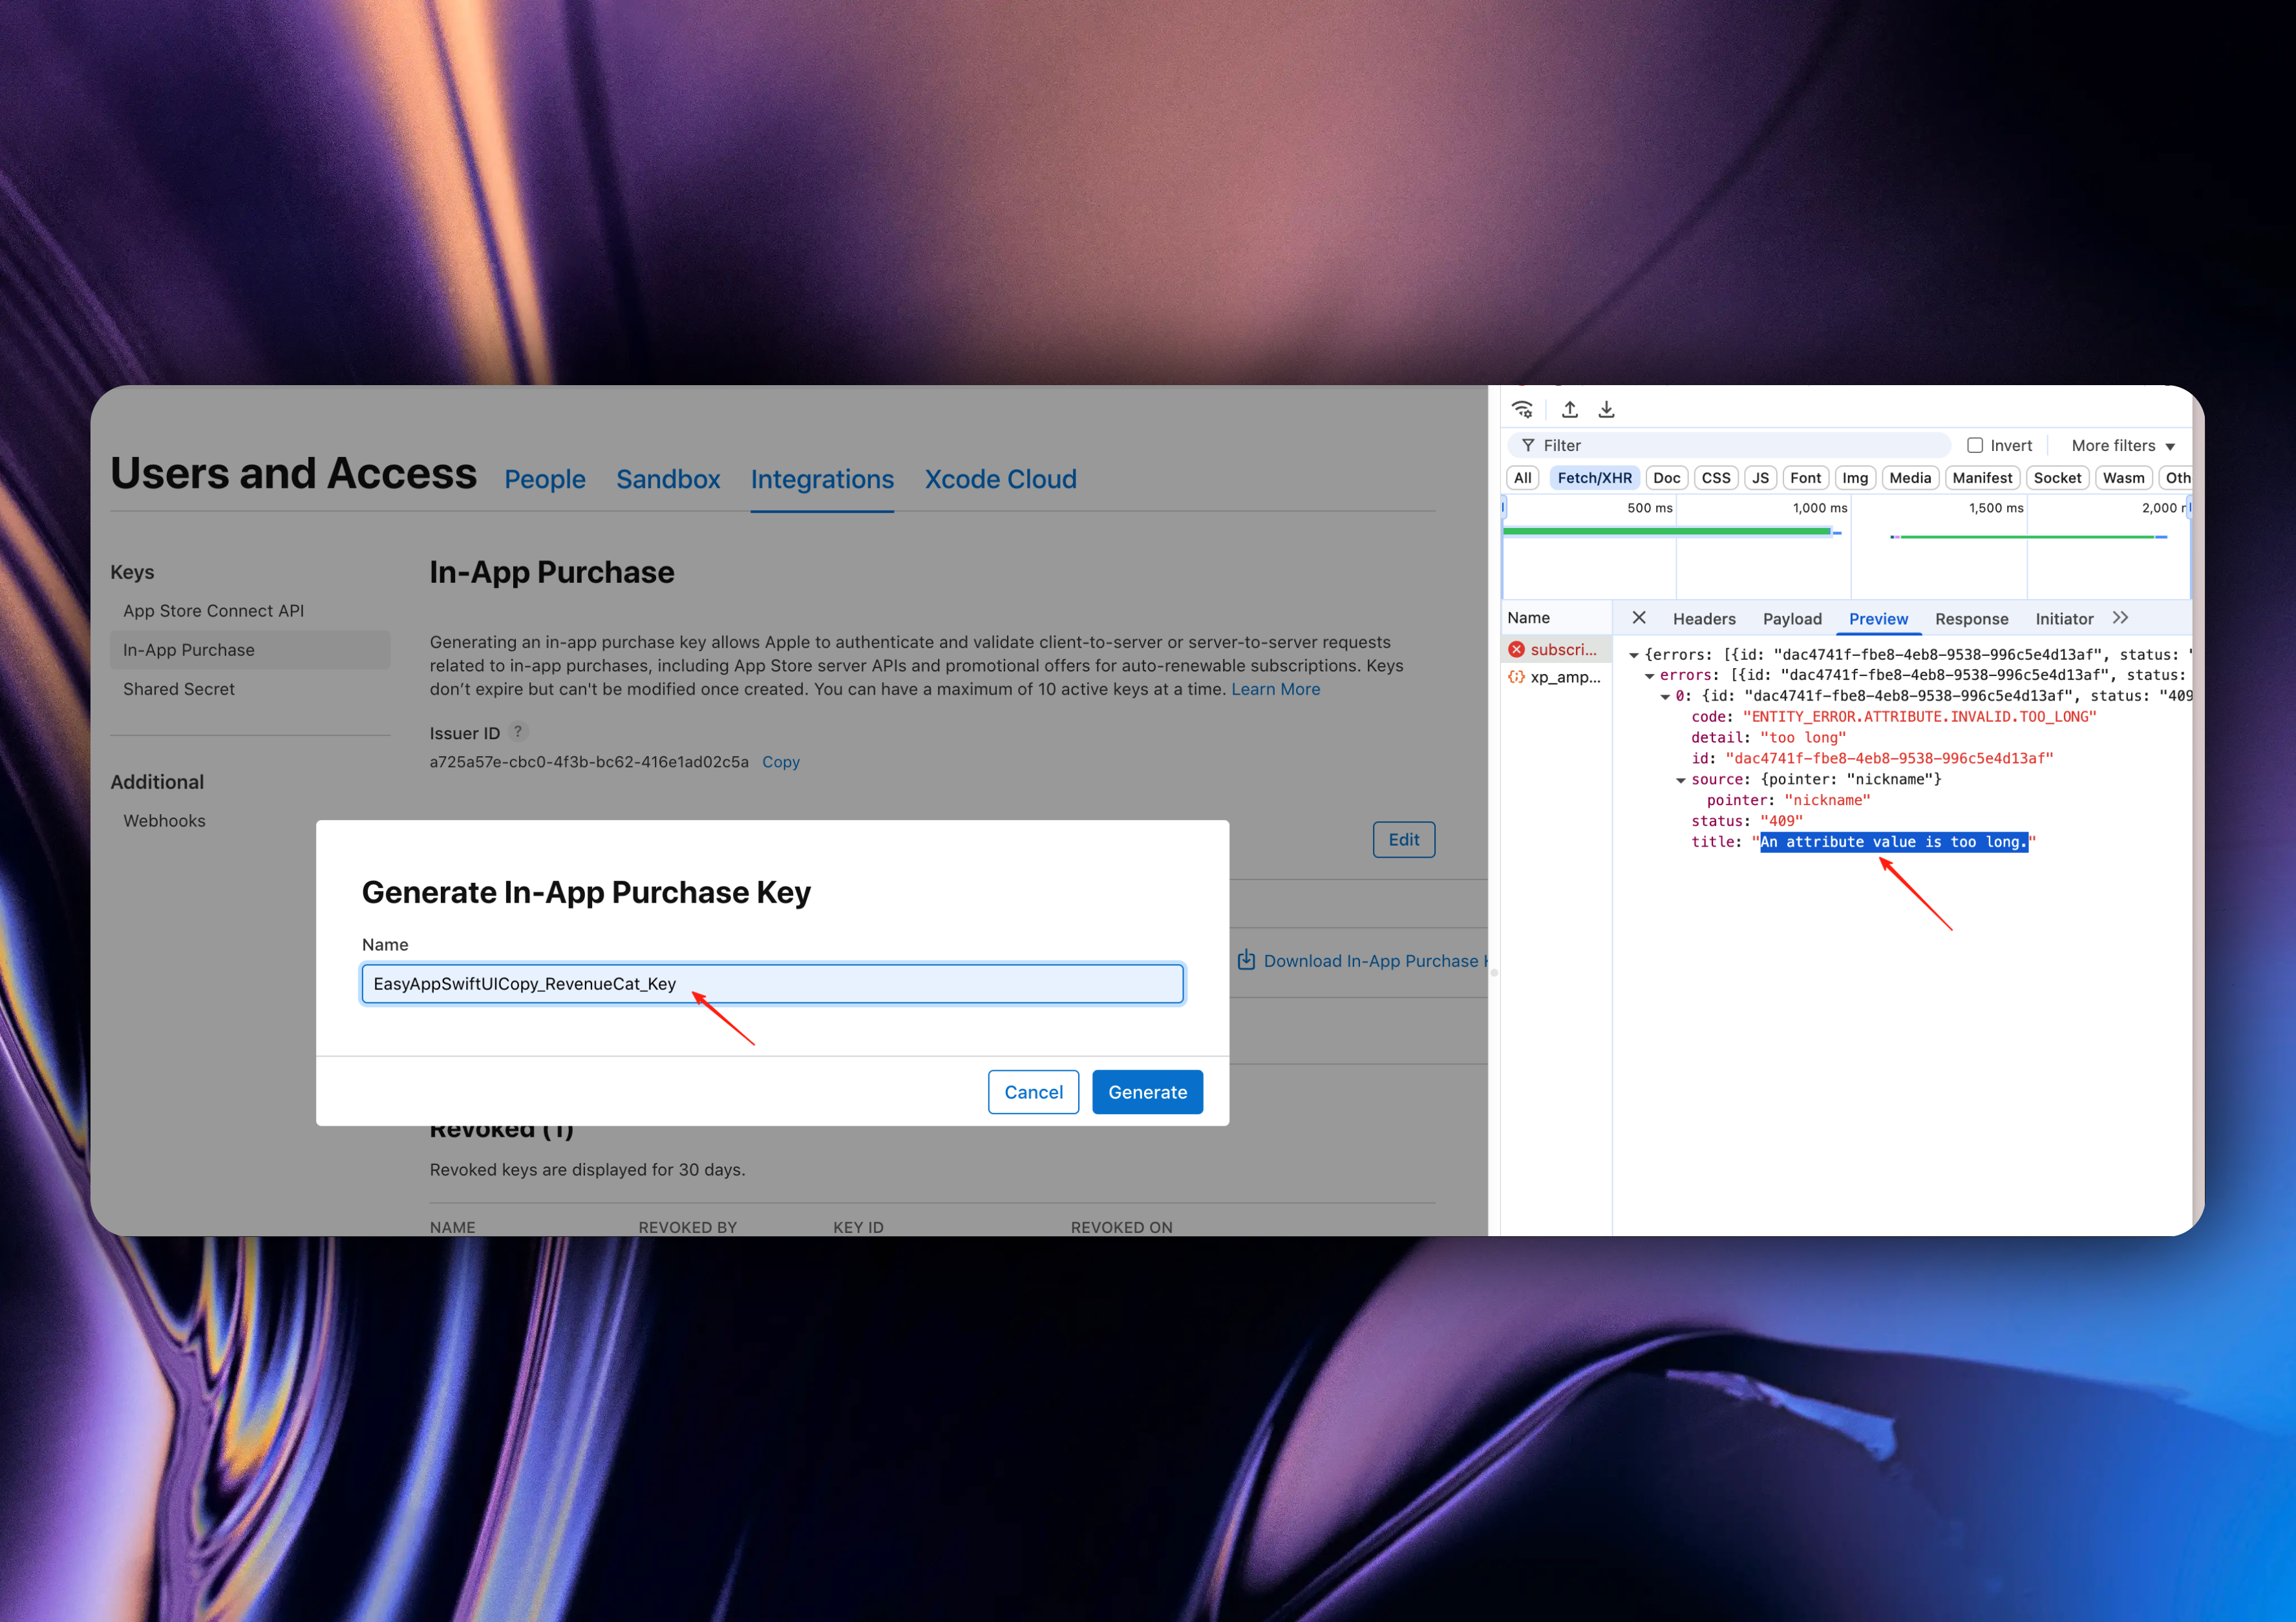
Click the `Generate` button
After success, you will see the Key you just created here, and click download

Note: This file can only be downloaded once, please keep it safe. If you accidentally lose it, please follow the above process to create a new Key.
After successful download, return to the RevenueCat page and upload the p8 private key file you just downloaded in the upload area. The `Key ID` and `Issuer ID` will be automatically filled
Click the `Next` button

RevenueCat will get your in-app purchase information from App Store Connect, you will see the following page:
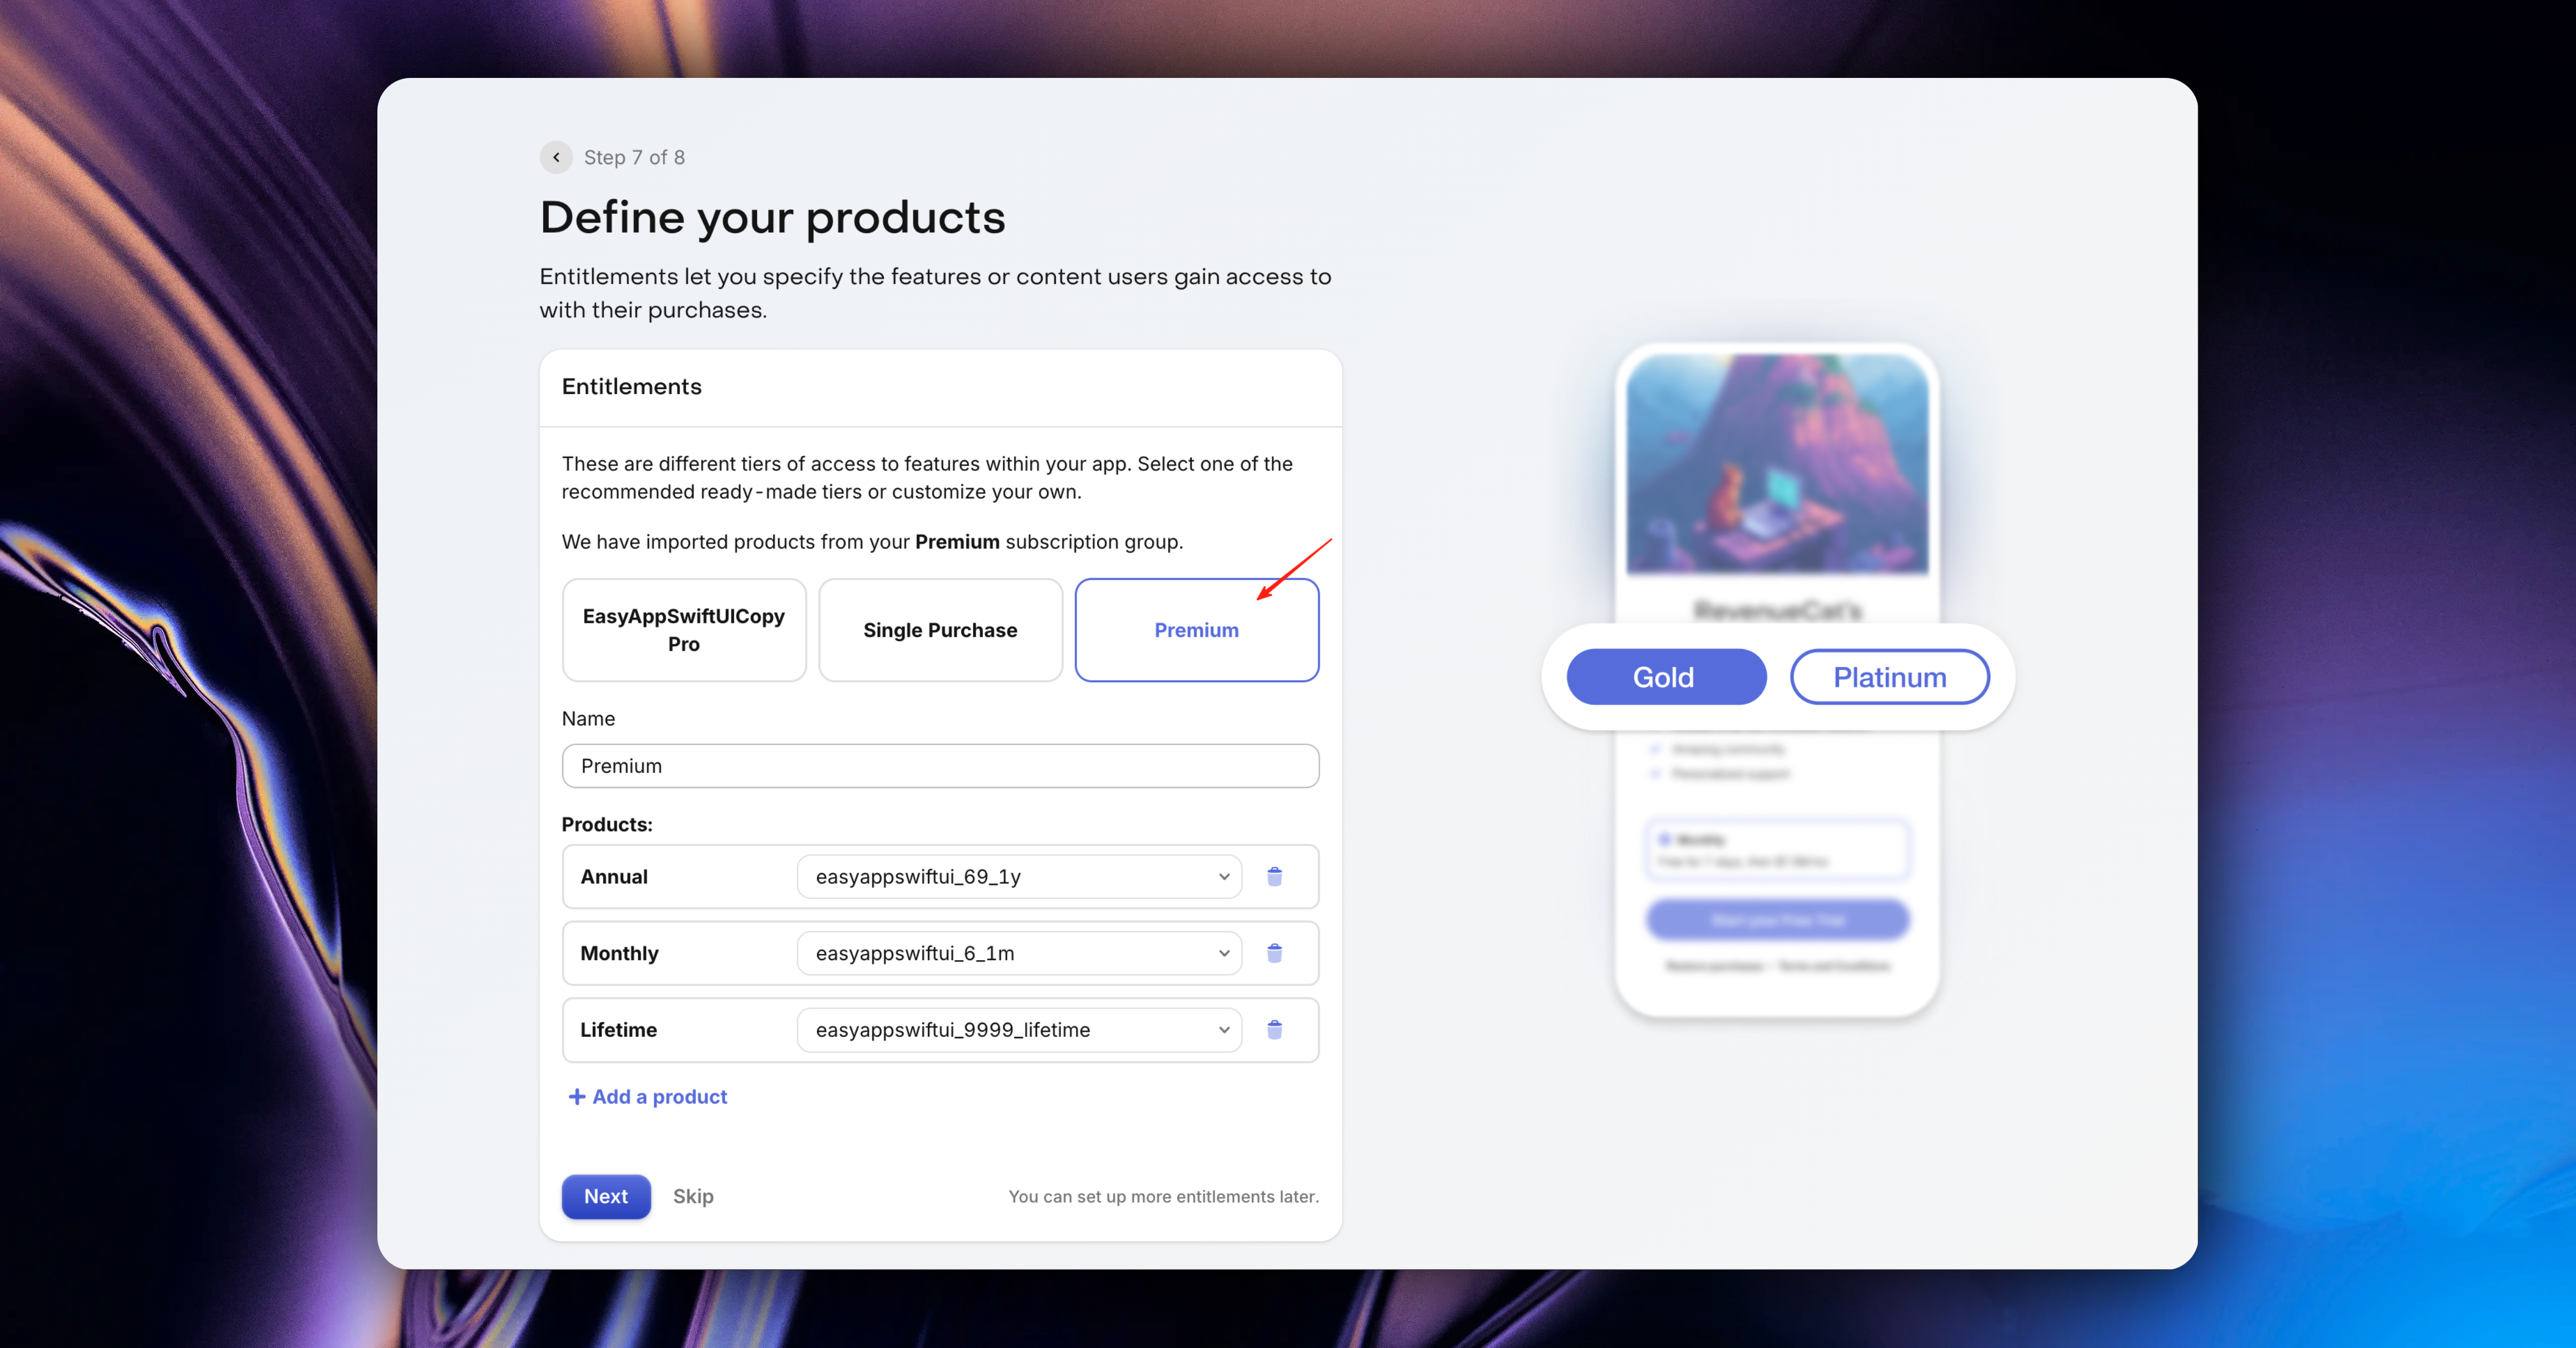
We'll use the default selected `Premium`, which includes all subscriptions we created: monthly subscriptions, annual subscriptions, one-time purchases, etc.
Click the `Next` button
At this point, you have completed RevenueCat integration 🎉🎉.
Next, we can experience the convenience of RevenueCat's in-app purchase page setup. (Of course, you can also skip this step and go directly to the RevenueCat Dashboard page, click the `Explore the Dashboard` area to enter the Dashboard page)
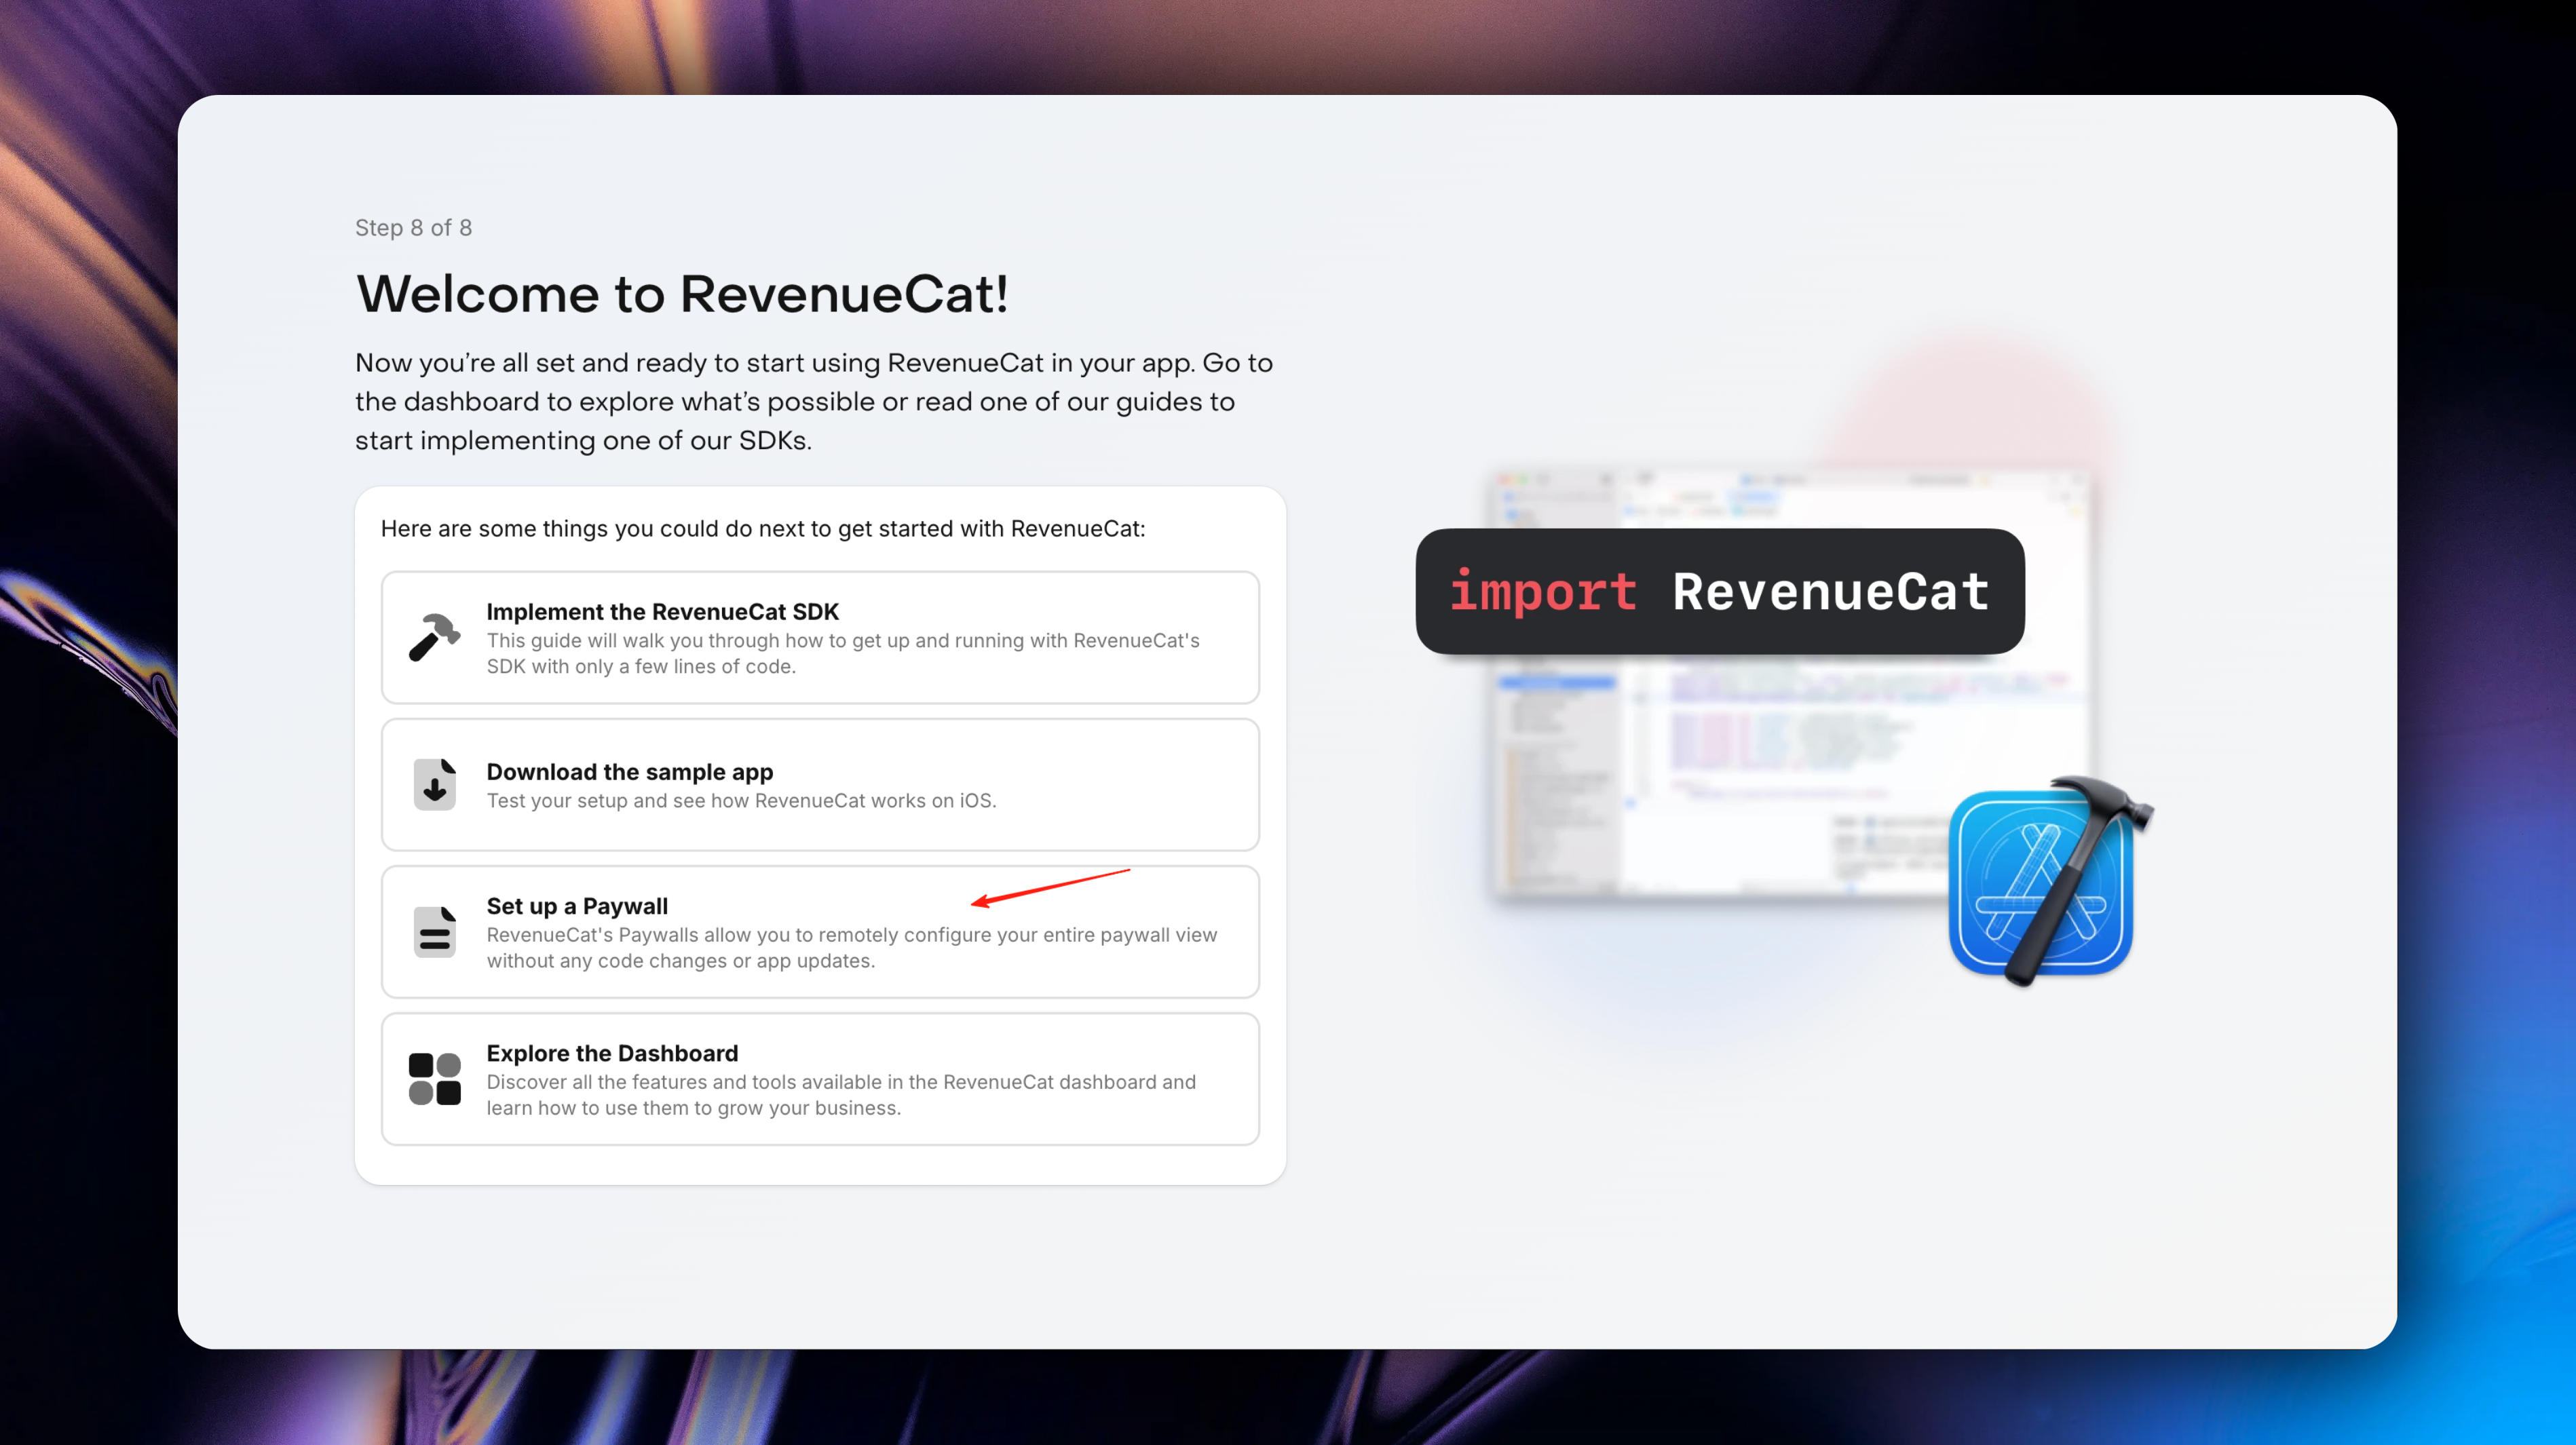
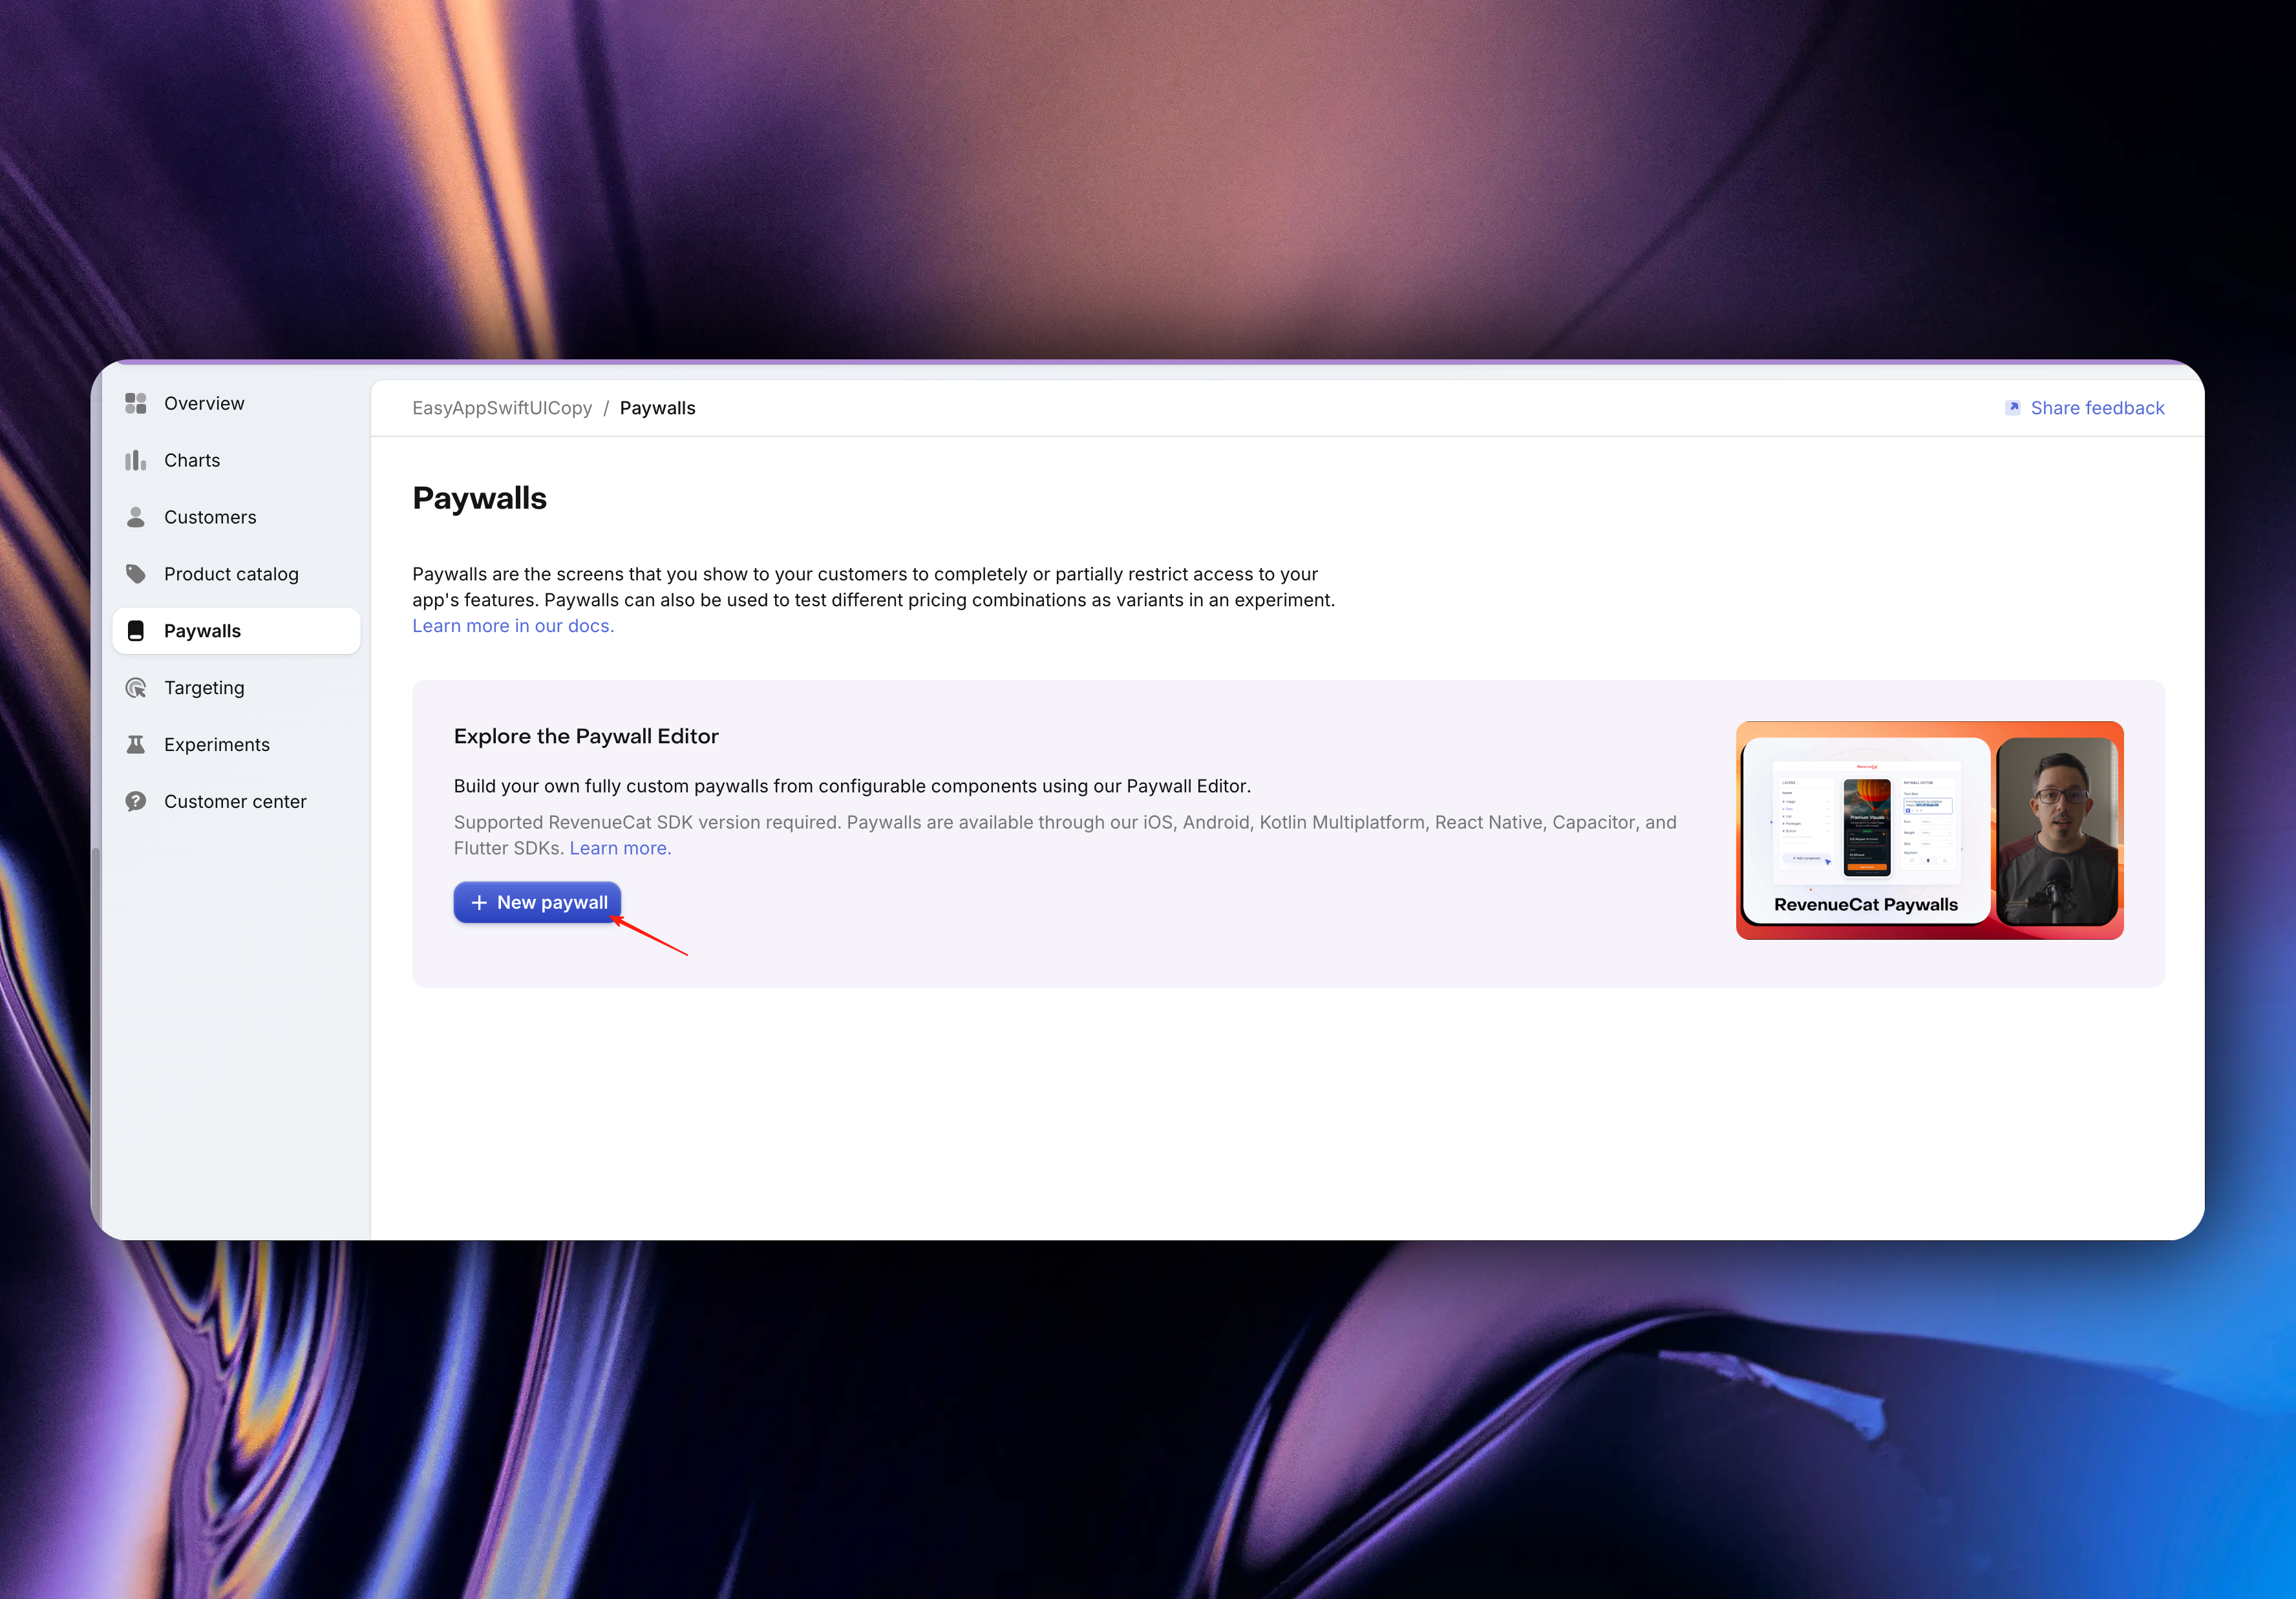
#### Set Up Paywall
Click the `New paywall` button
In the popup, select `default` for `Offering`. RevenueCat will create an `Offering` named `default` for us.
You can see many paywall styles here (of course, you can also create your own favorite paywall style from scratch)
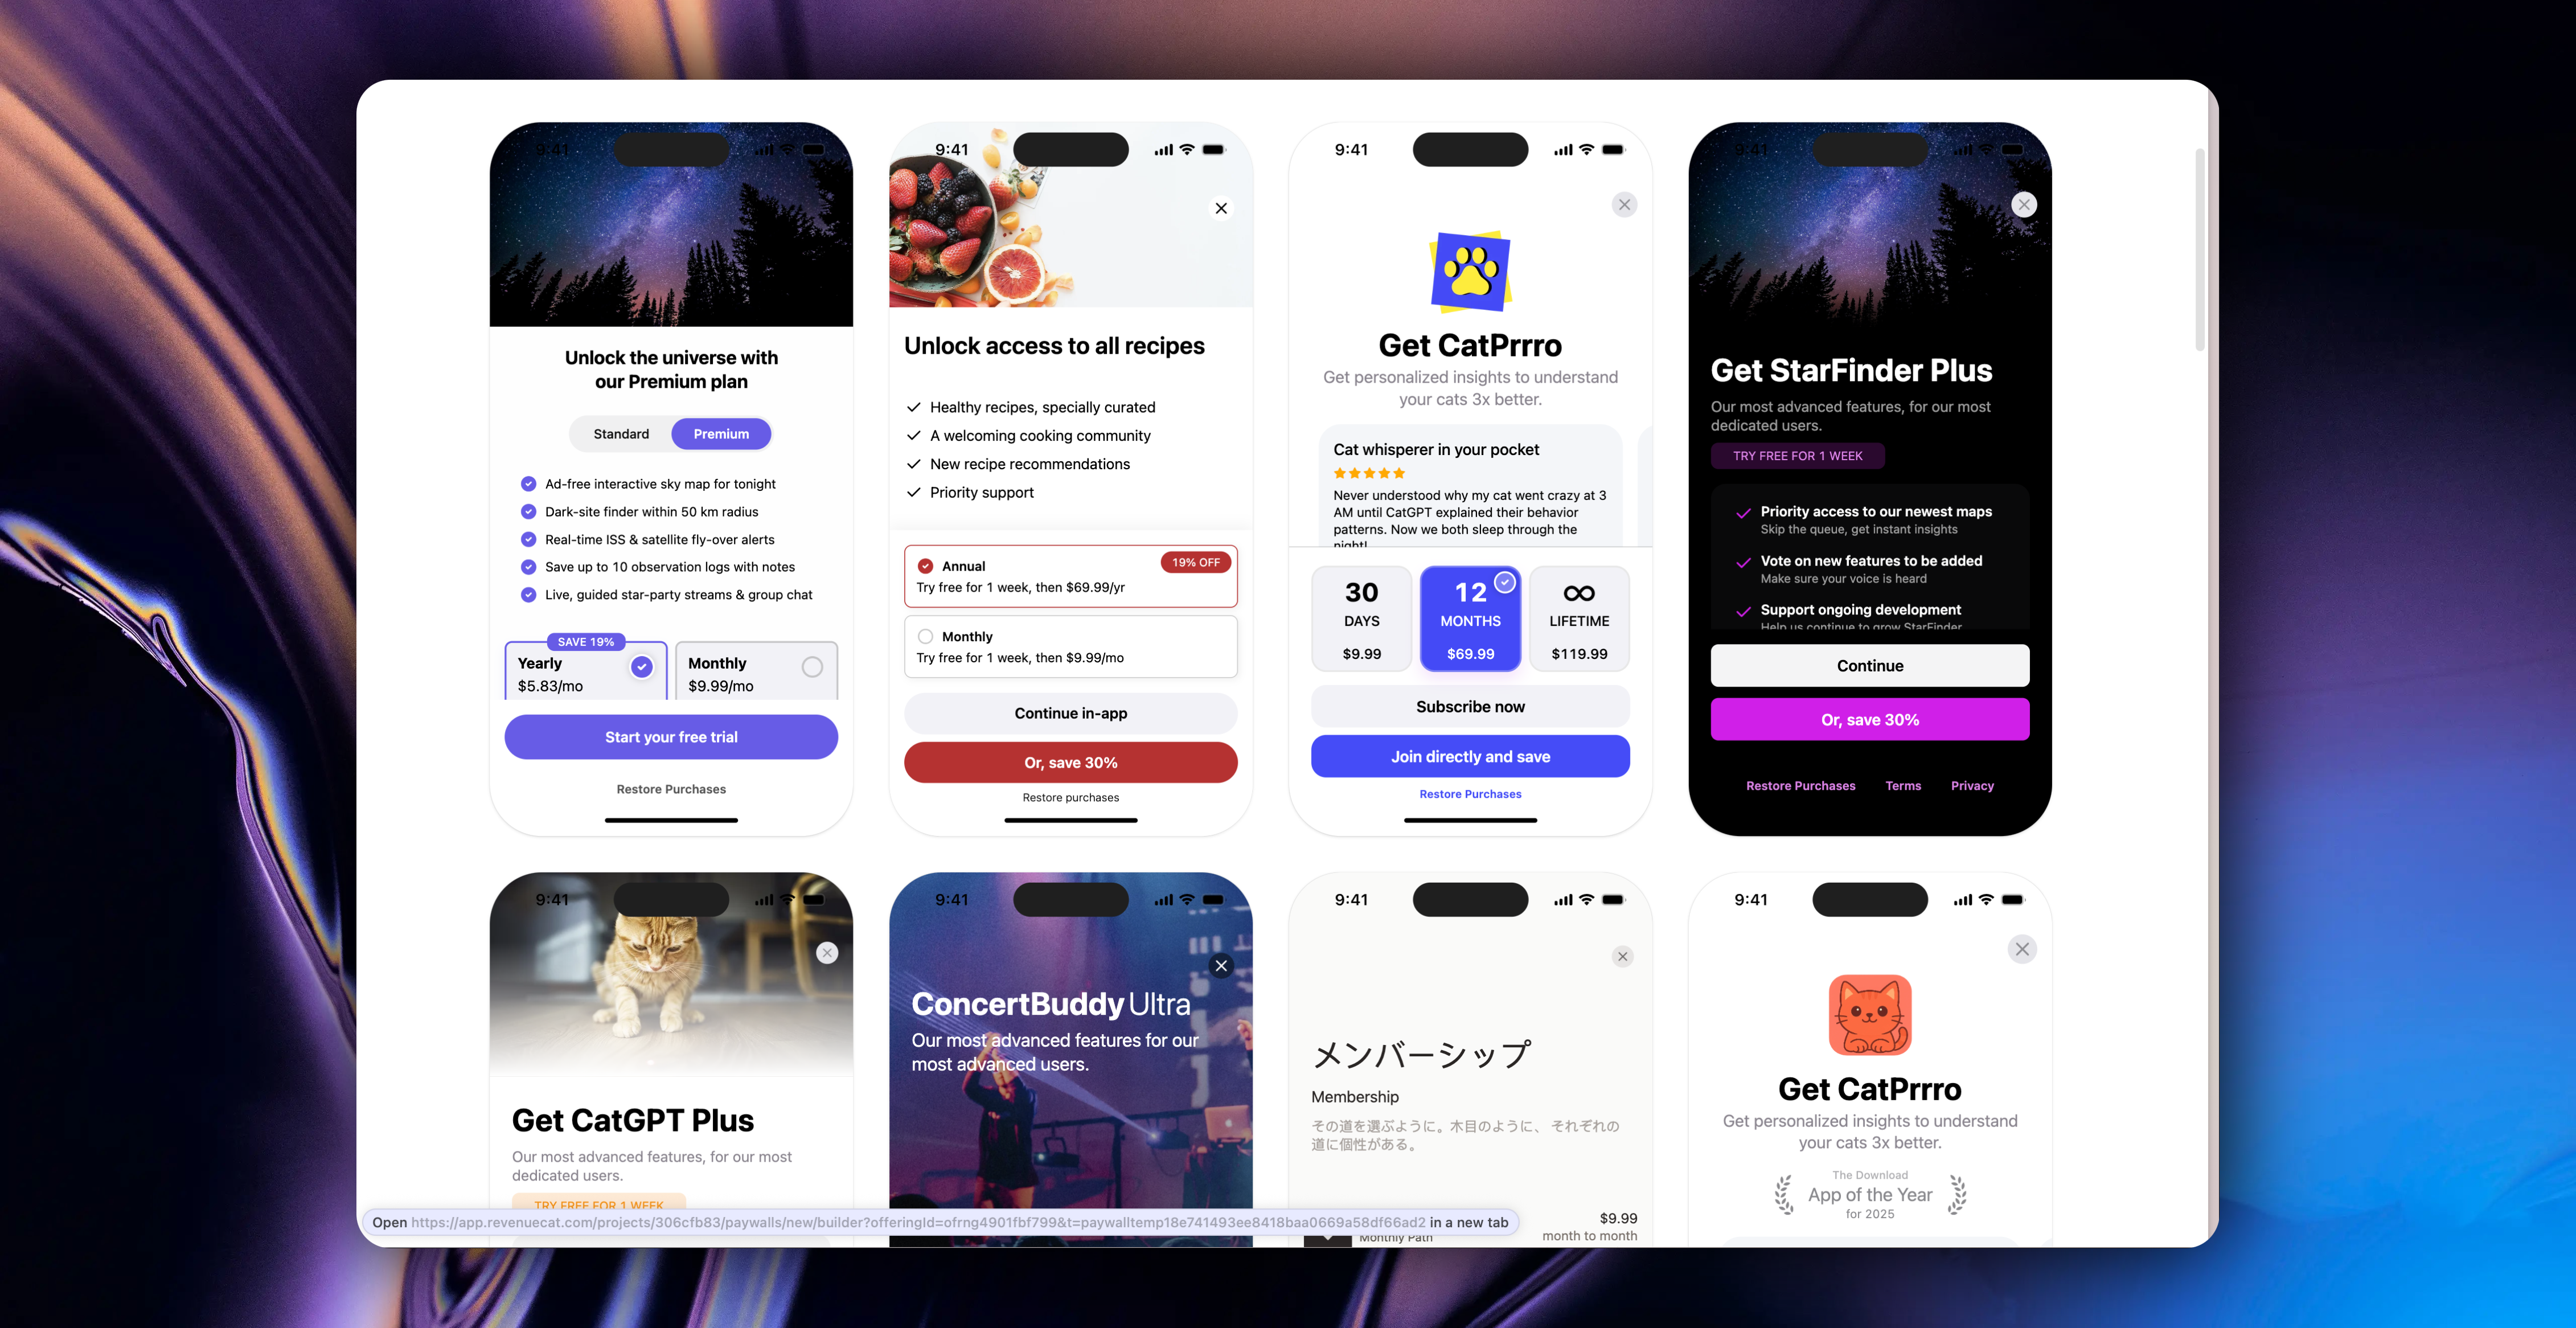
Scroll to the bottom of the page, we select the paywall style with privacy policy and terms of service for editing
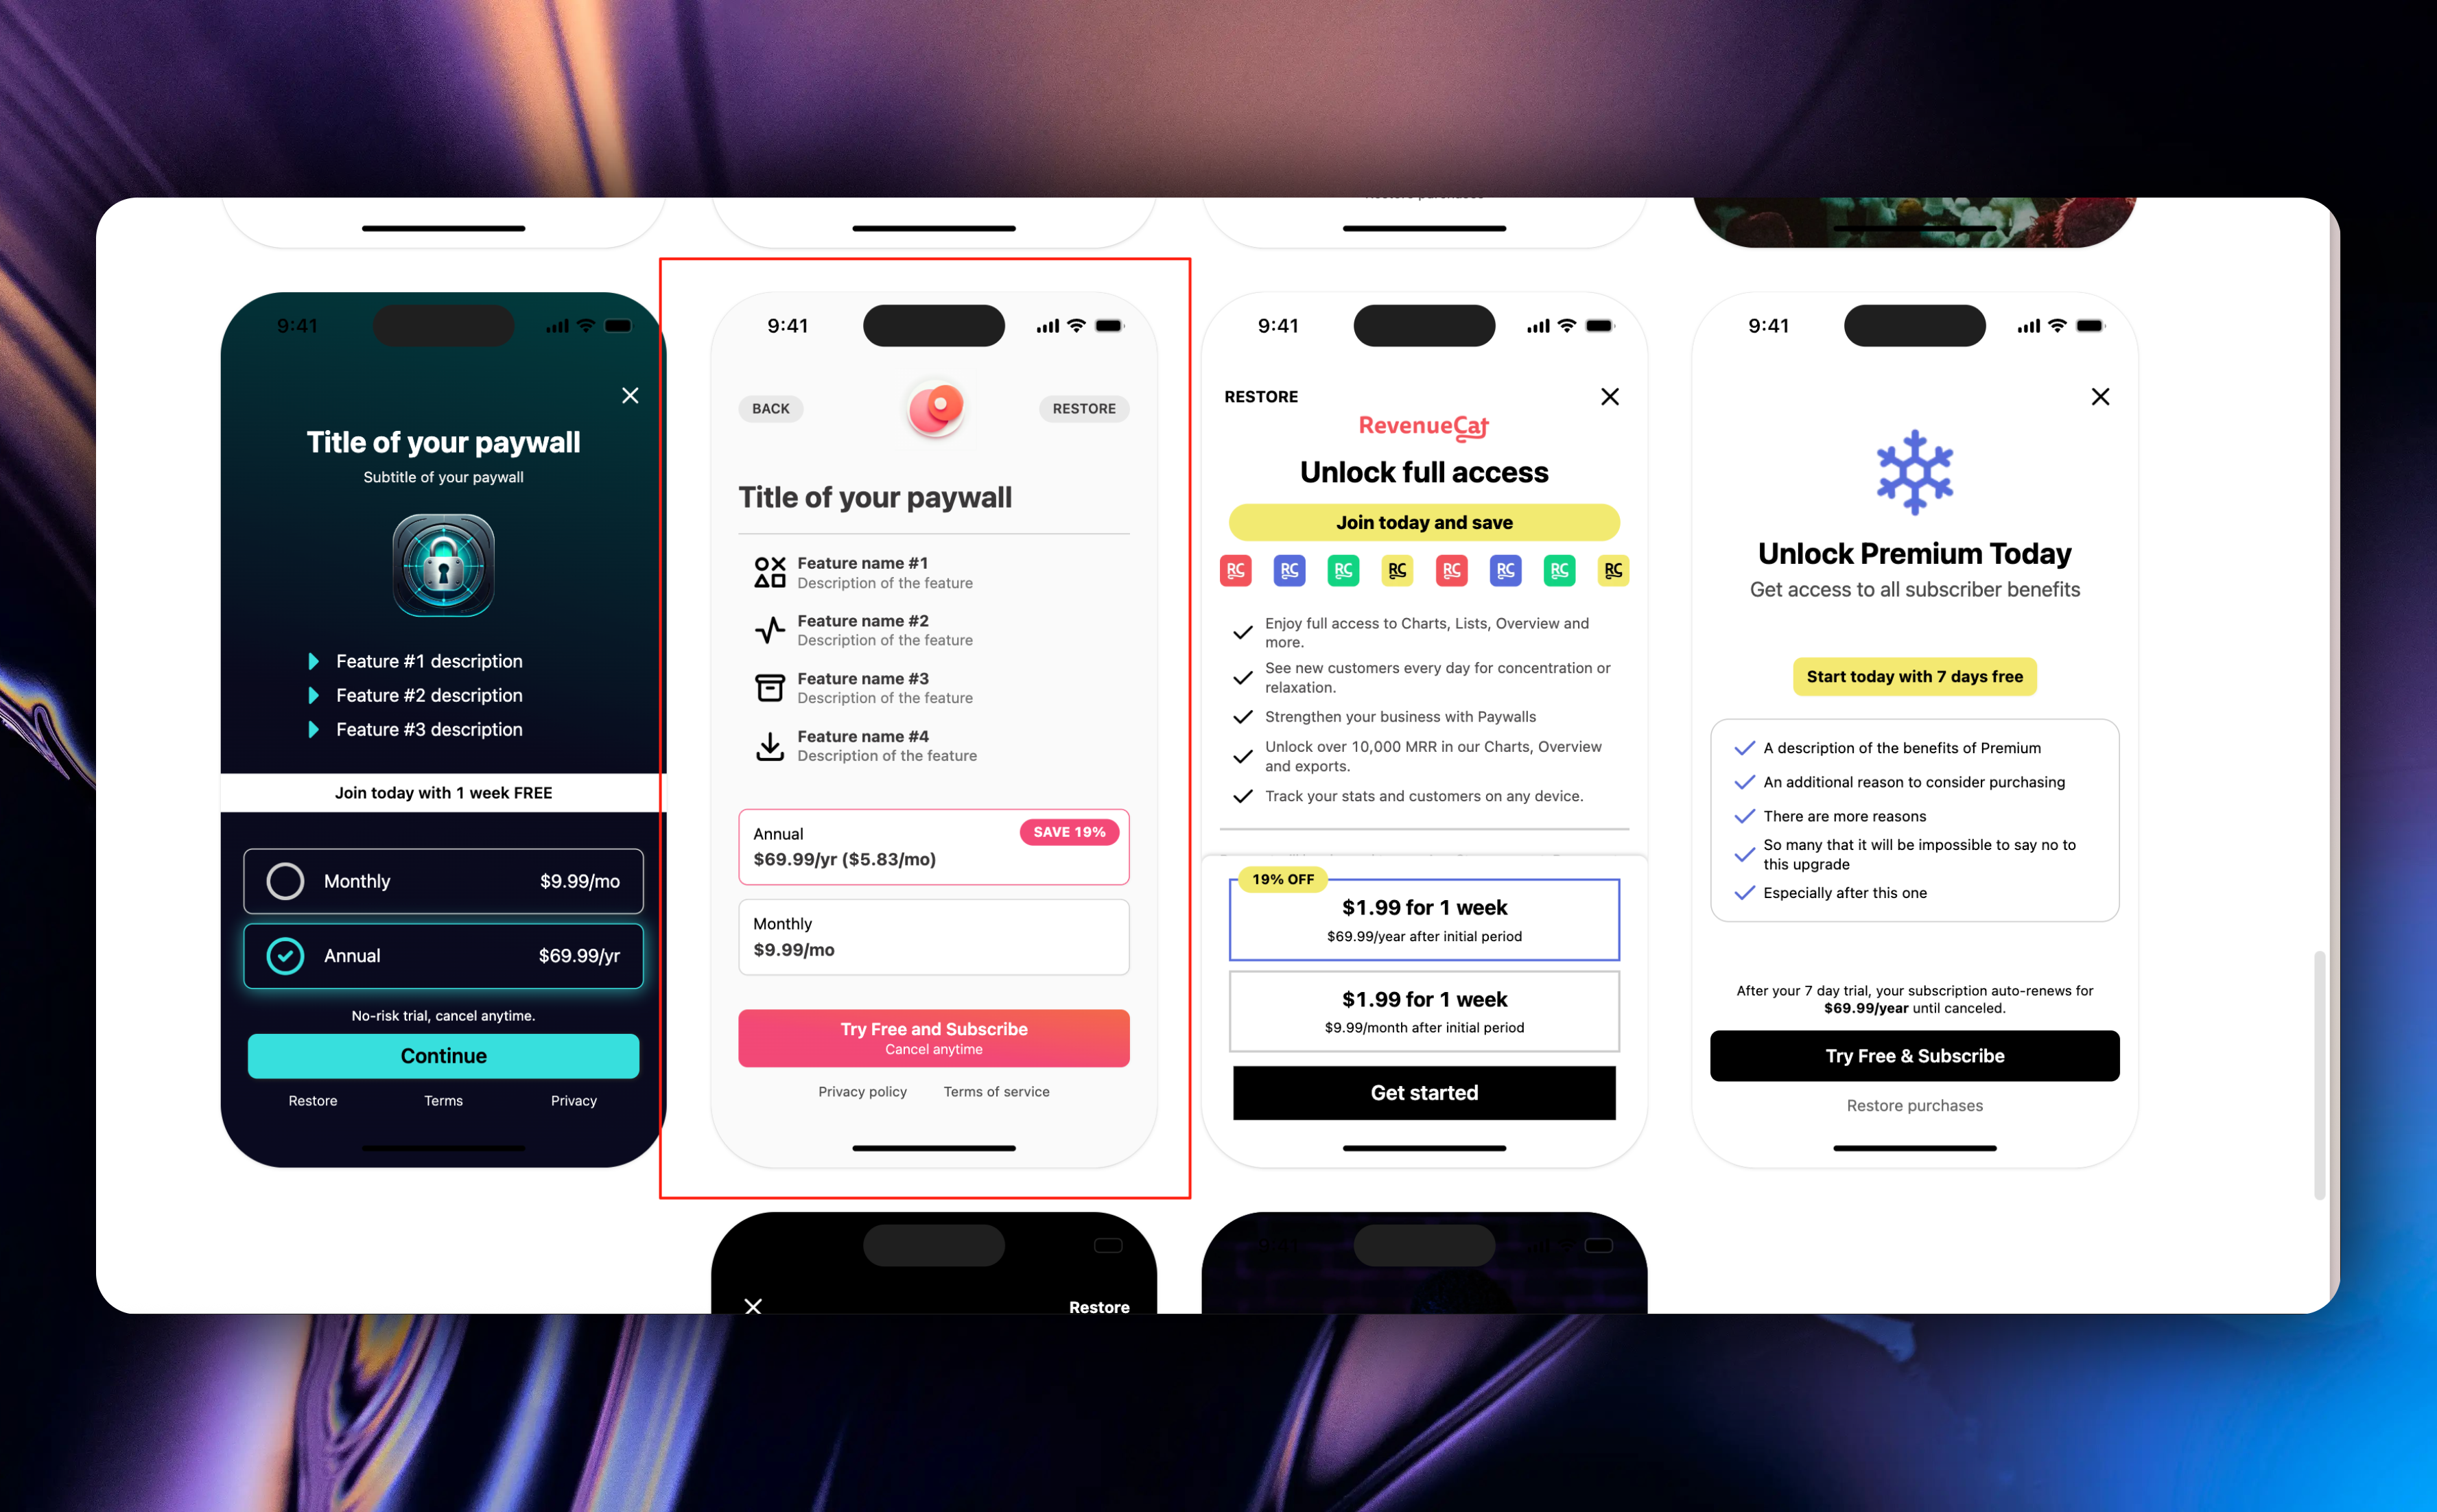
Very important:
According to App Store review guidelines, to avoid rejection, it's recommended to add your privacy policy and terms of service to the in-app purchase page.
* Enter the paywall editing page and set our paywall name
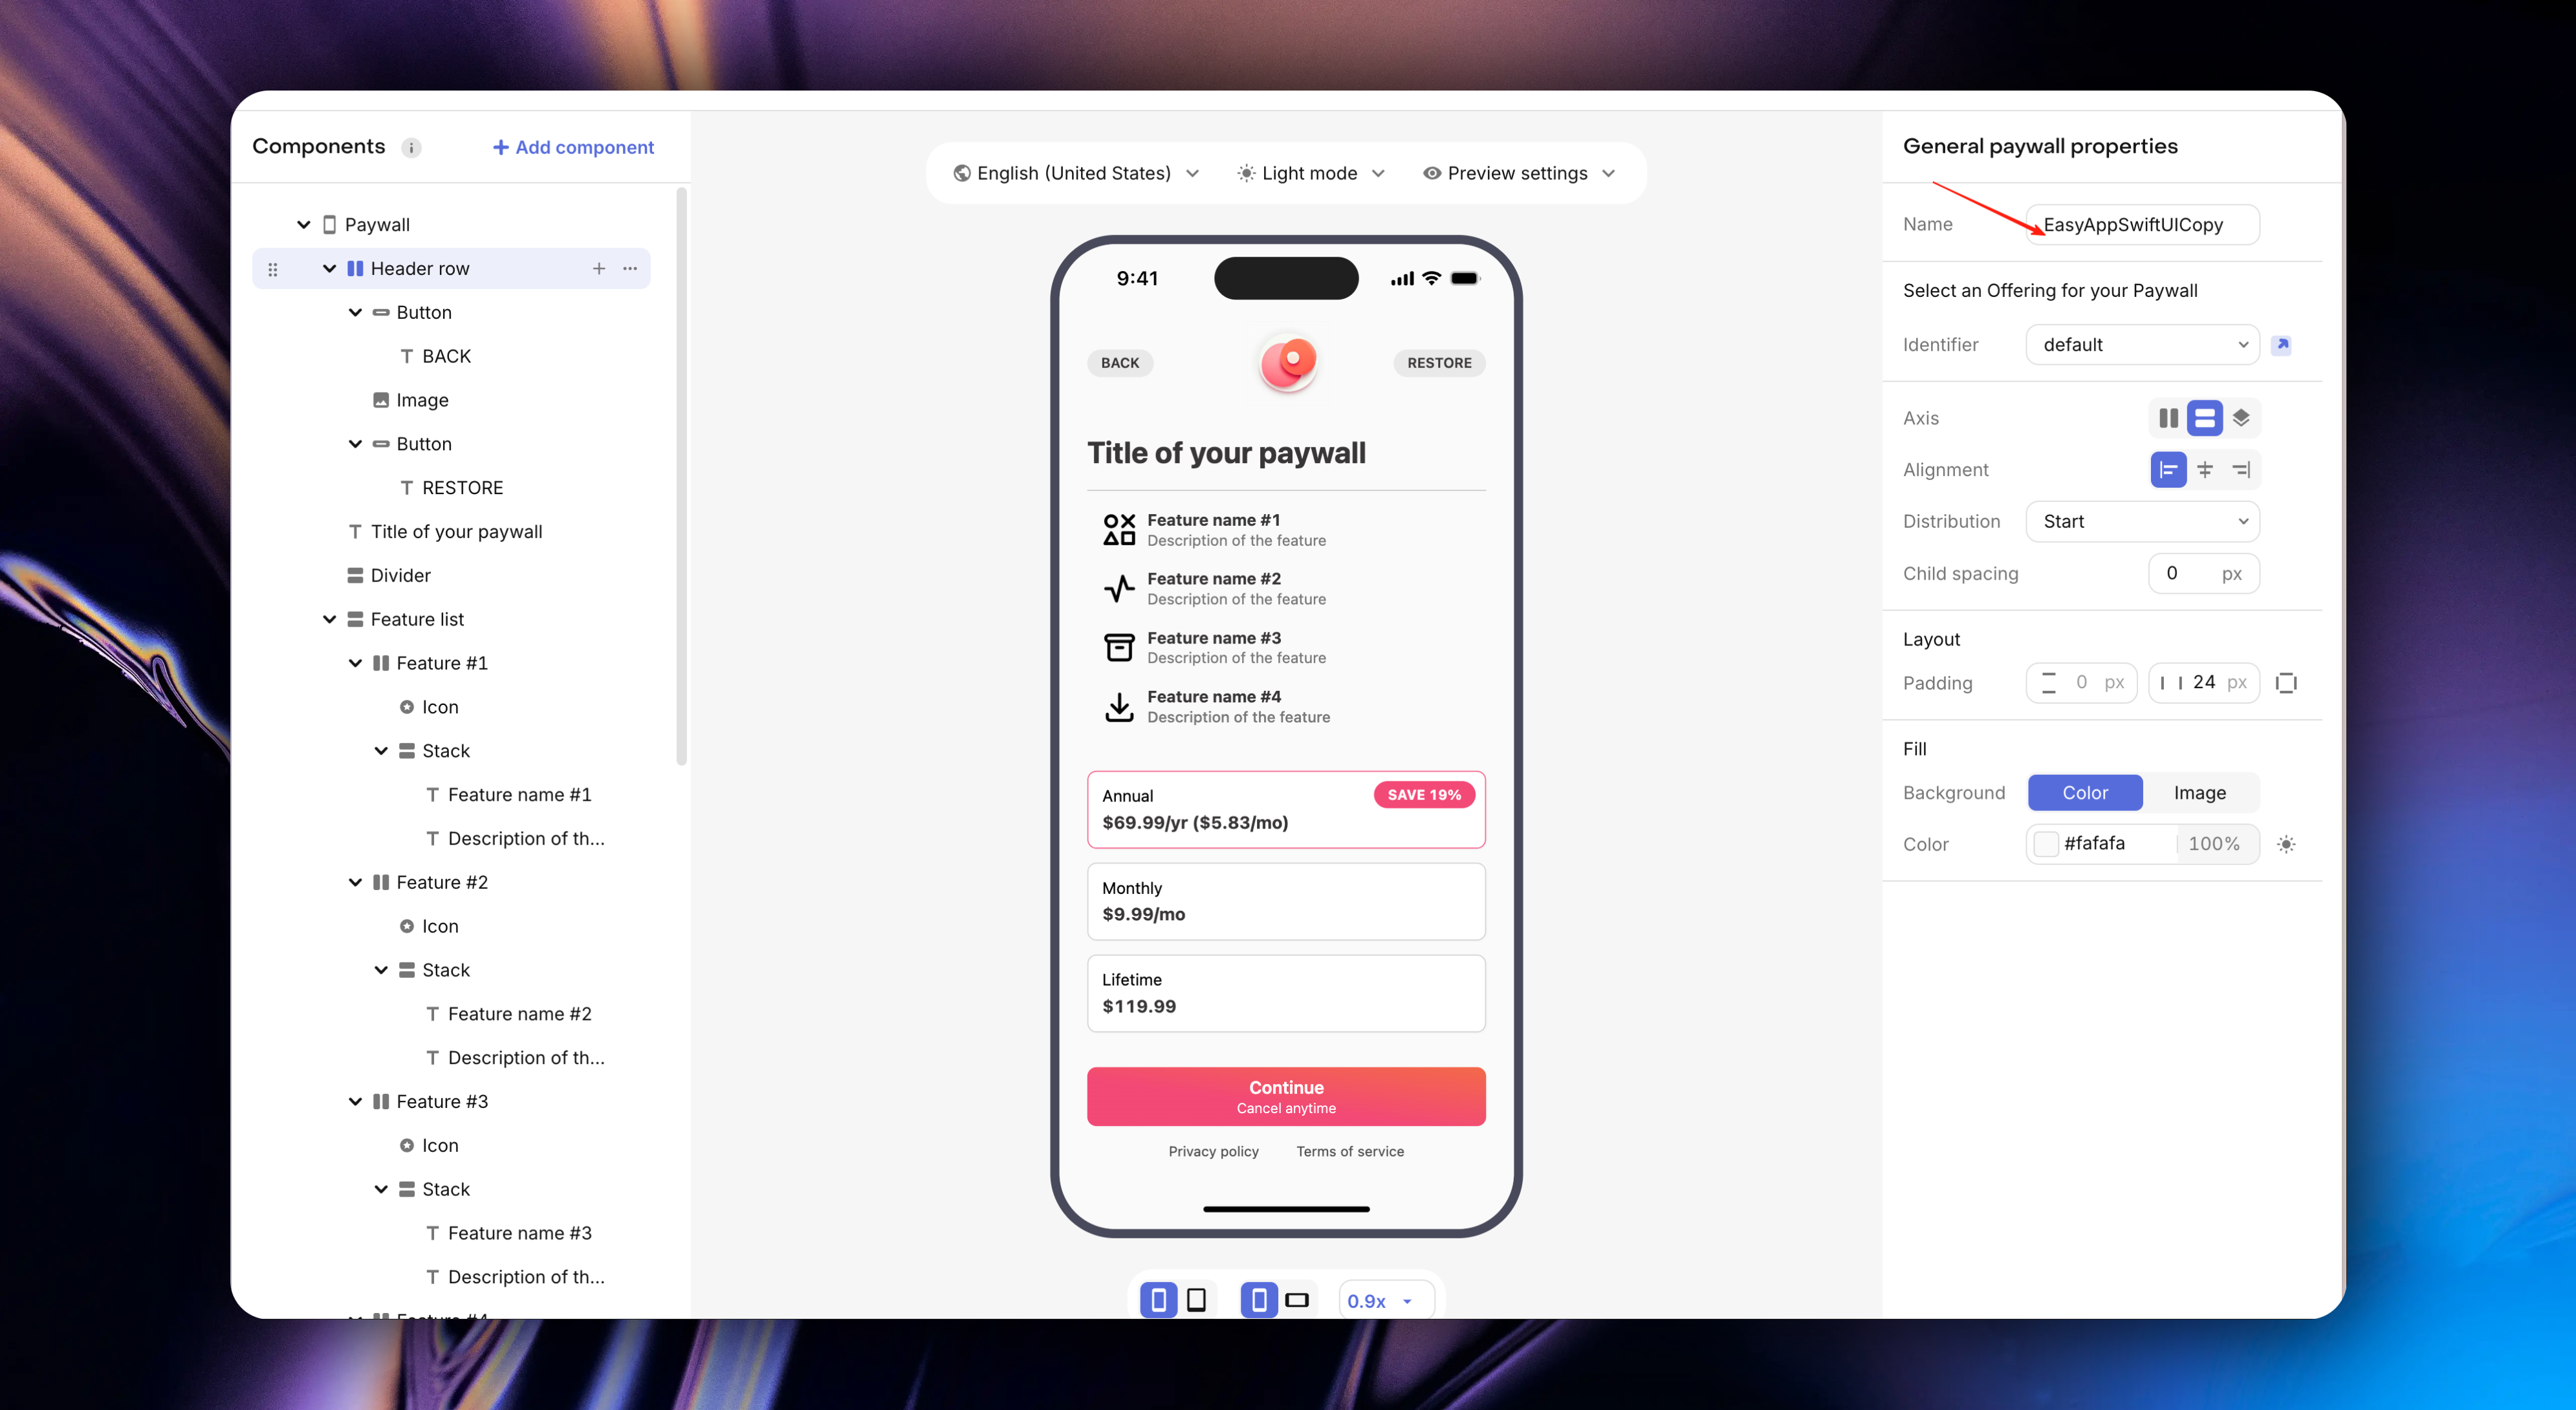
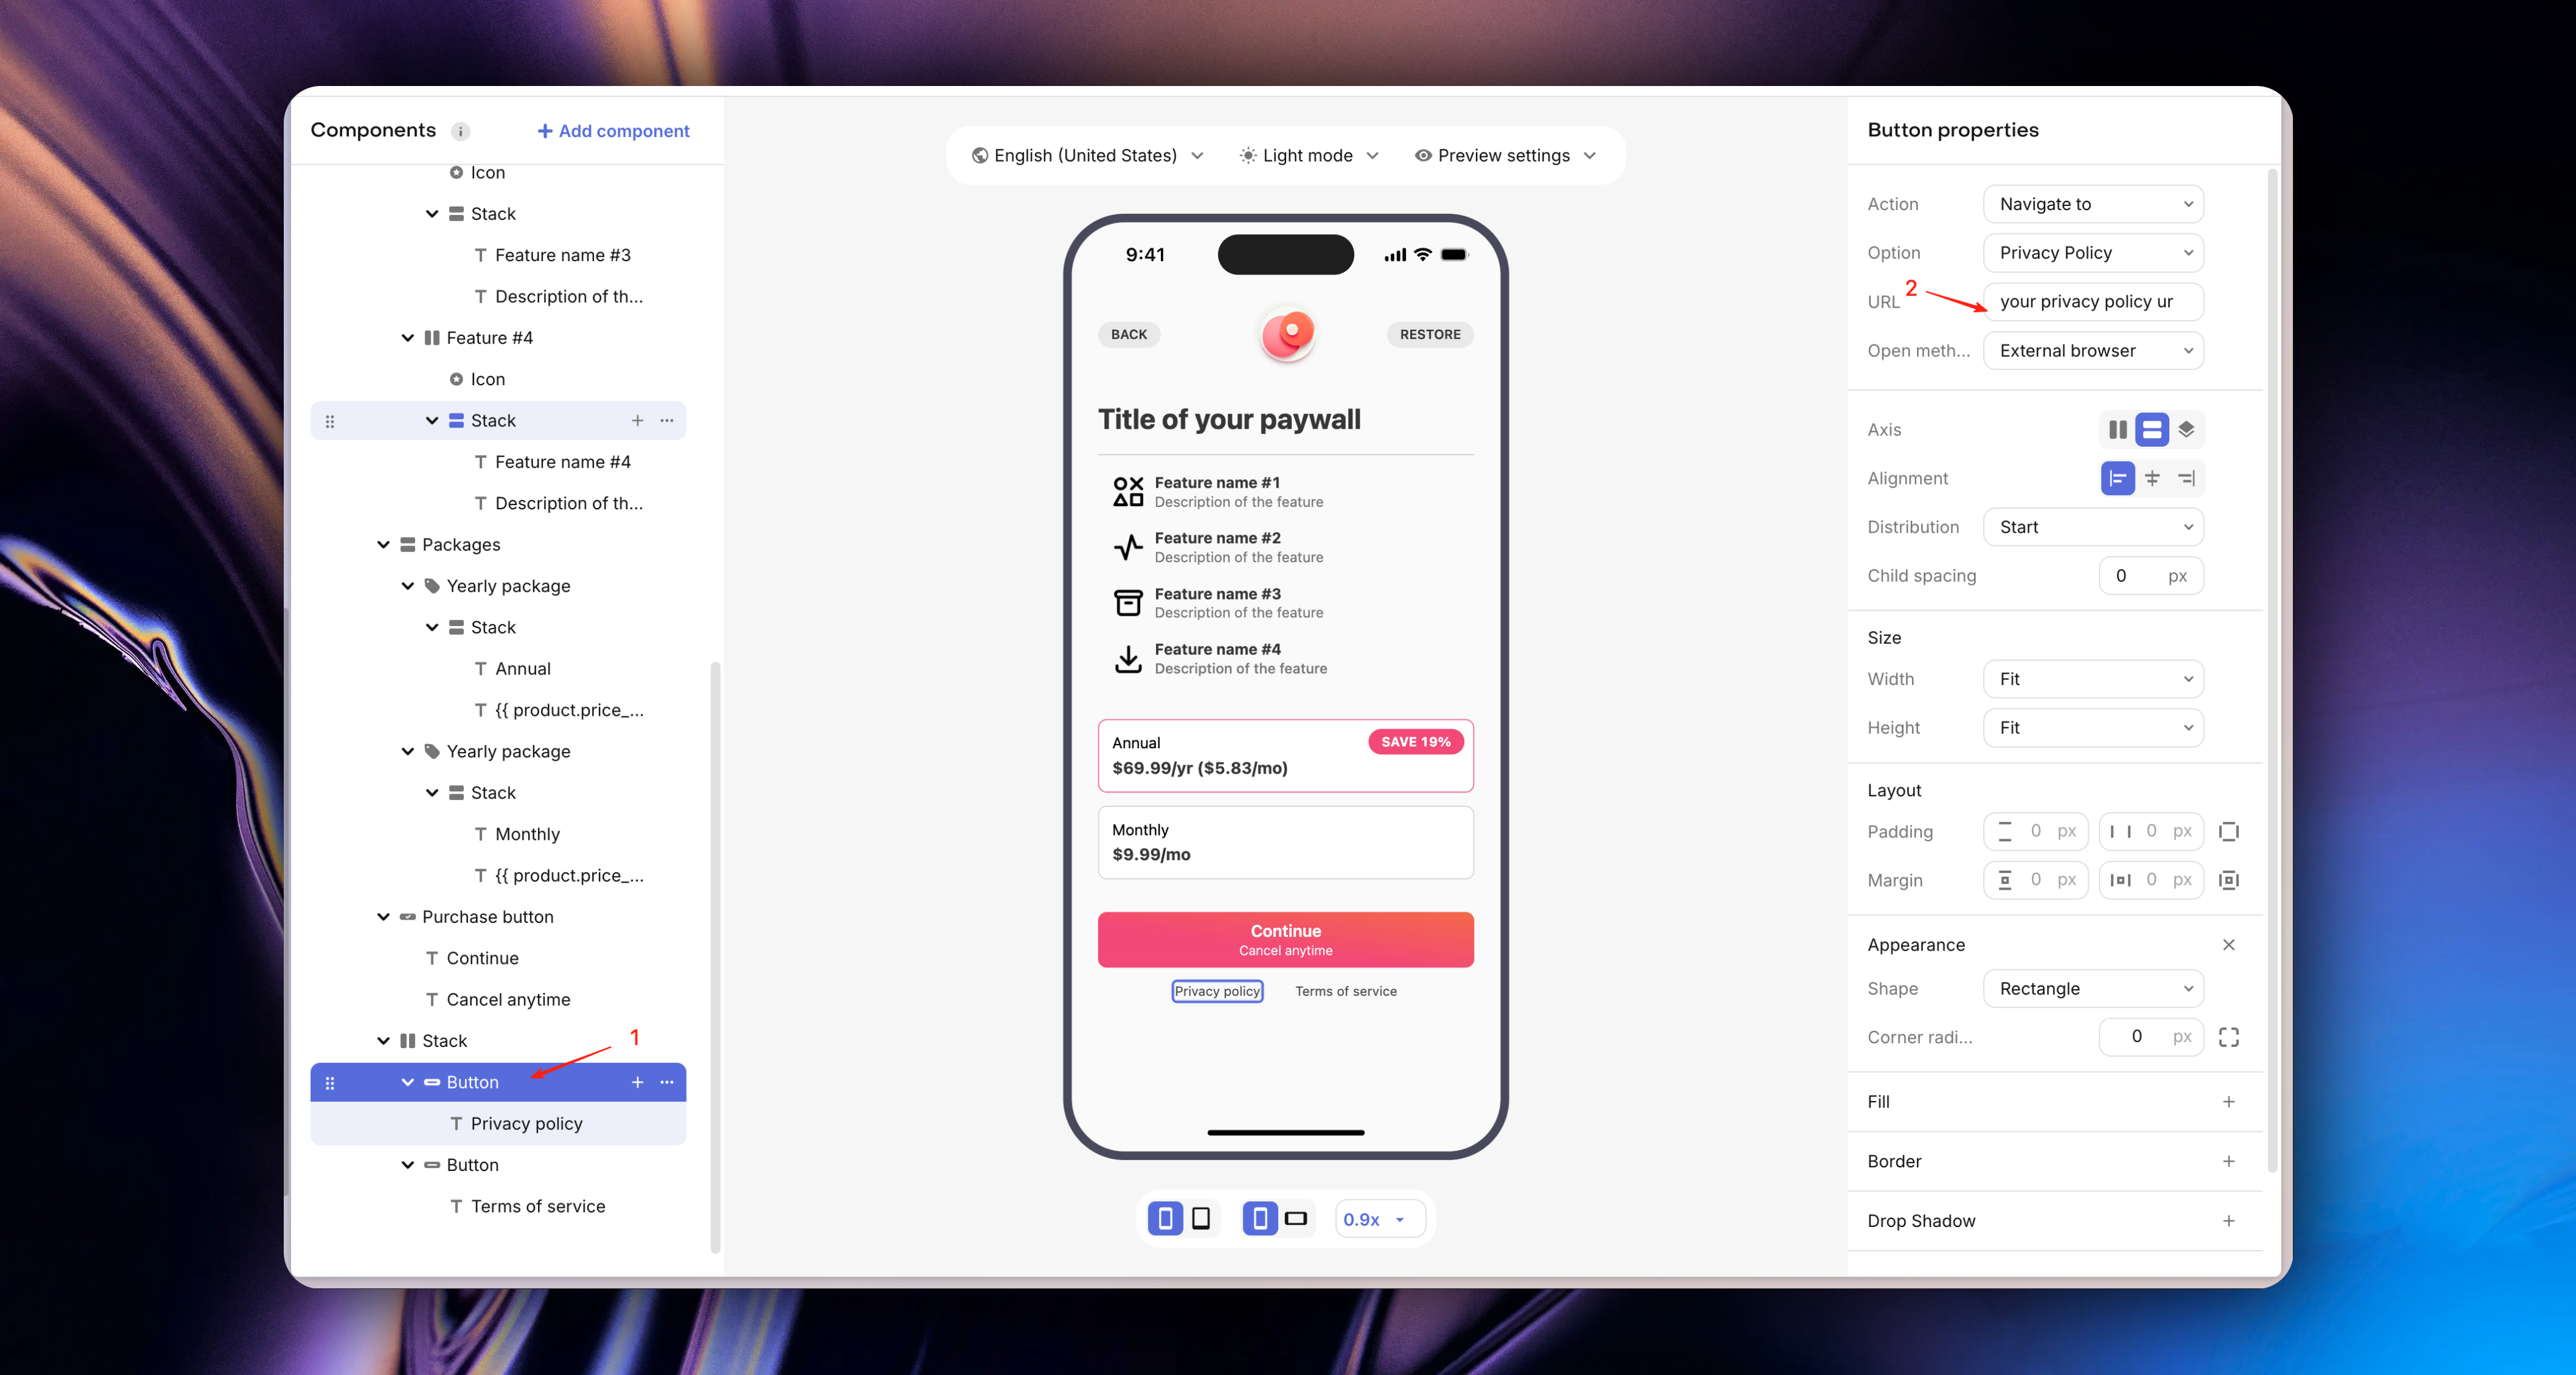
* Use the same method to set your privacy policy and terms of service respectively
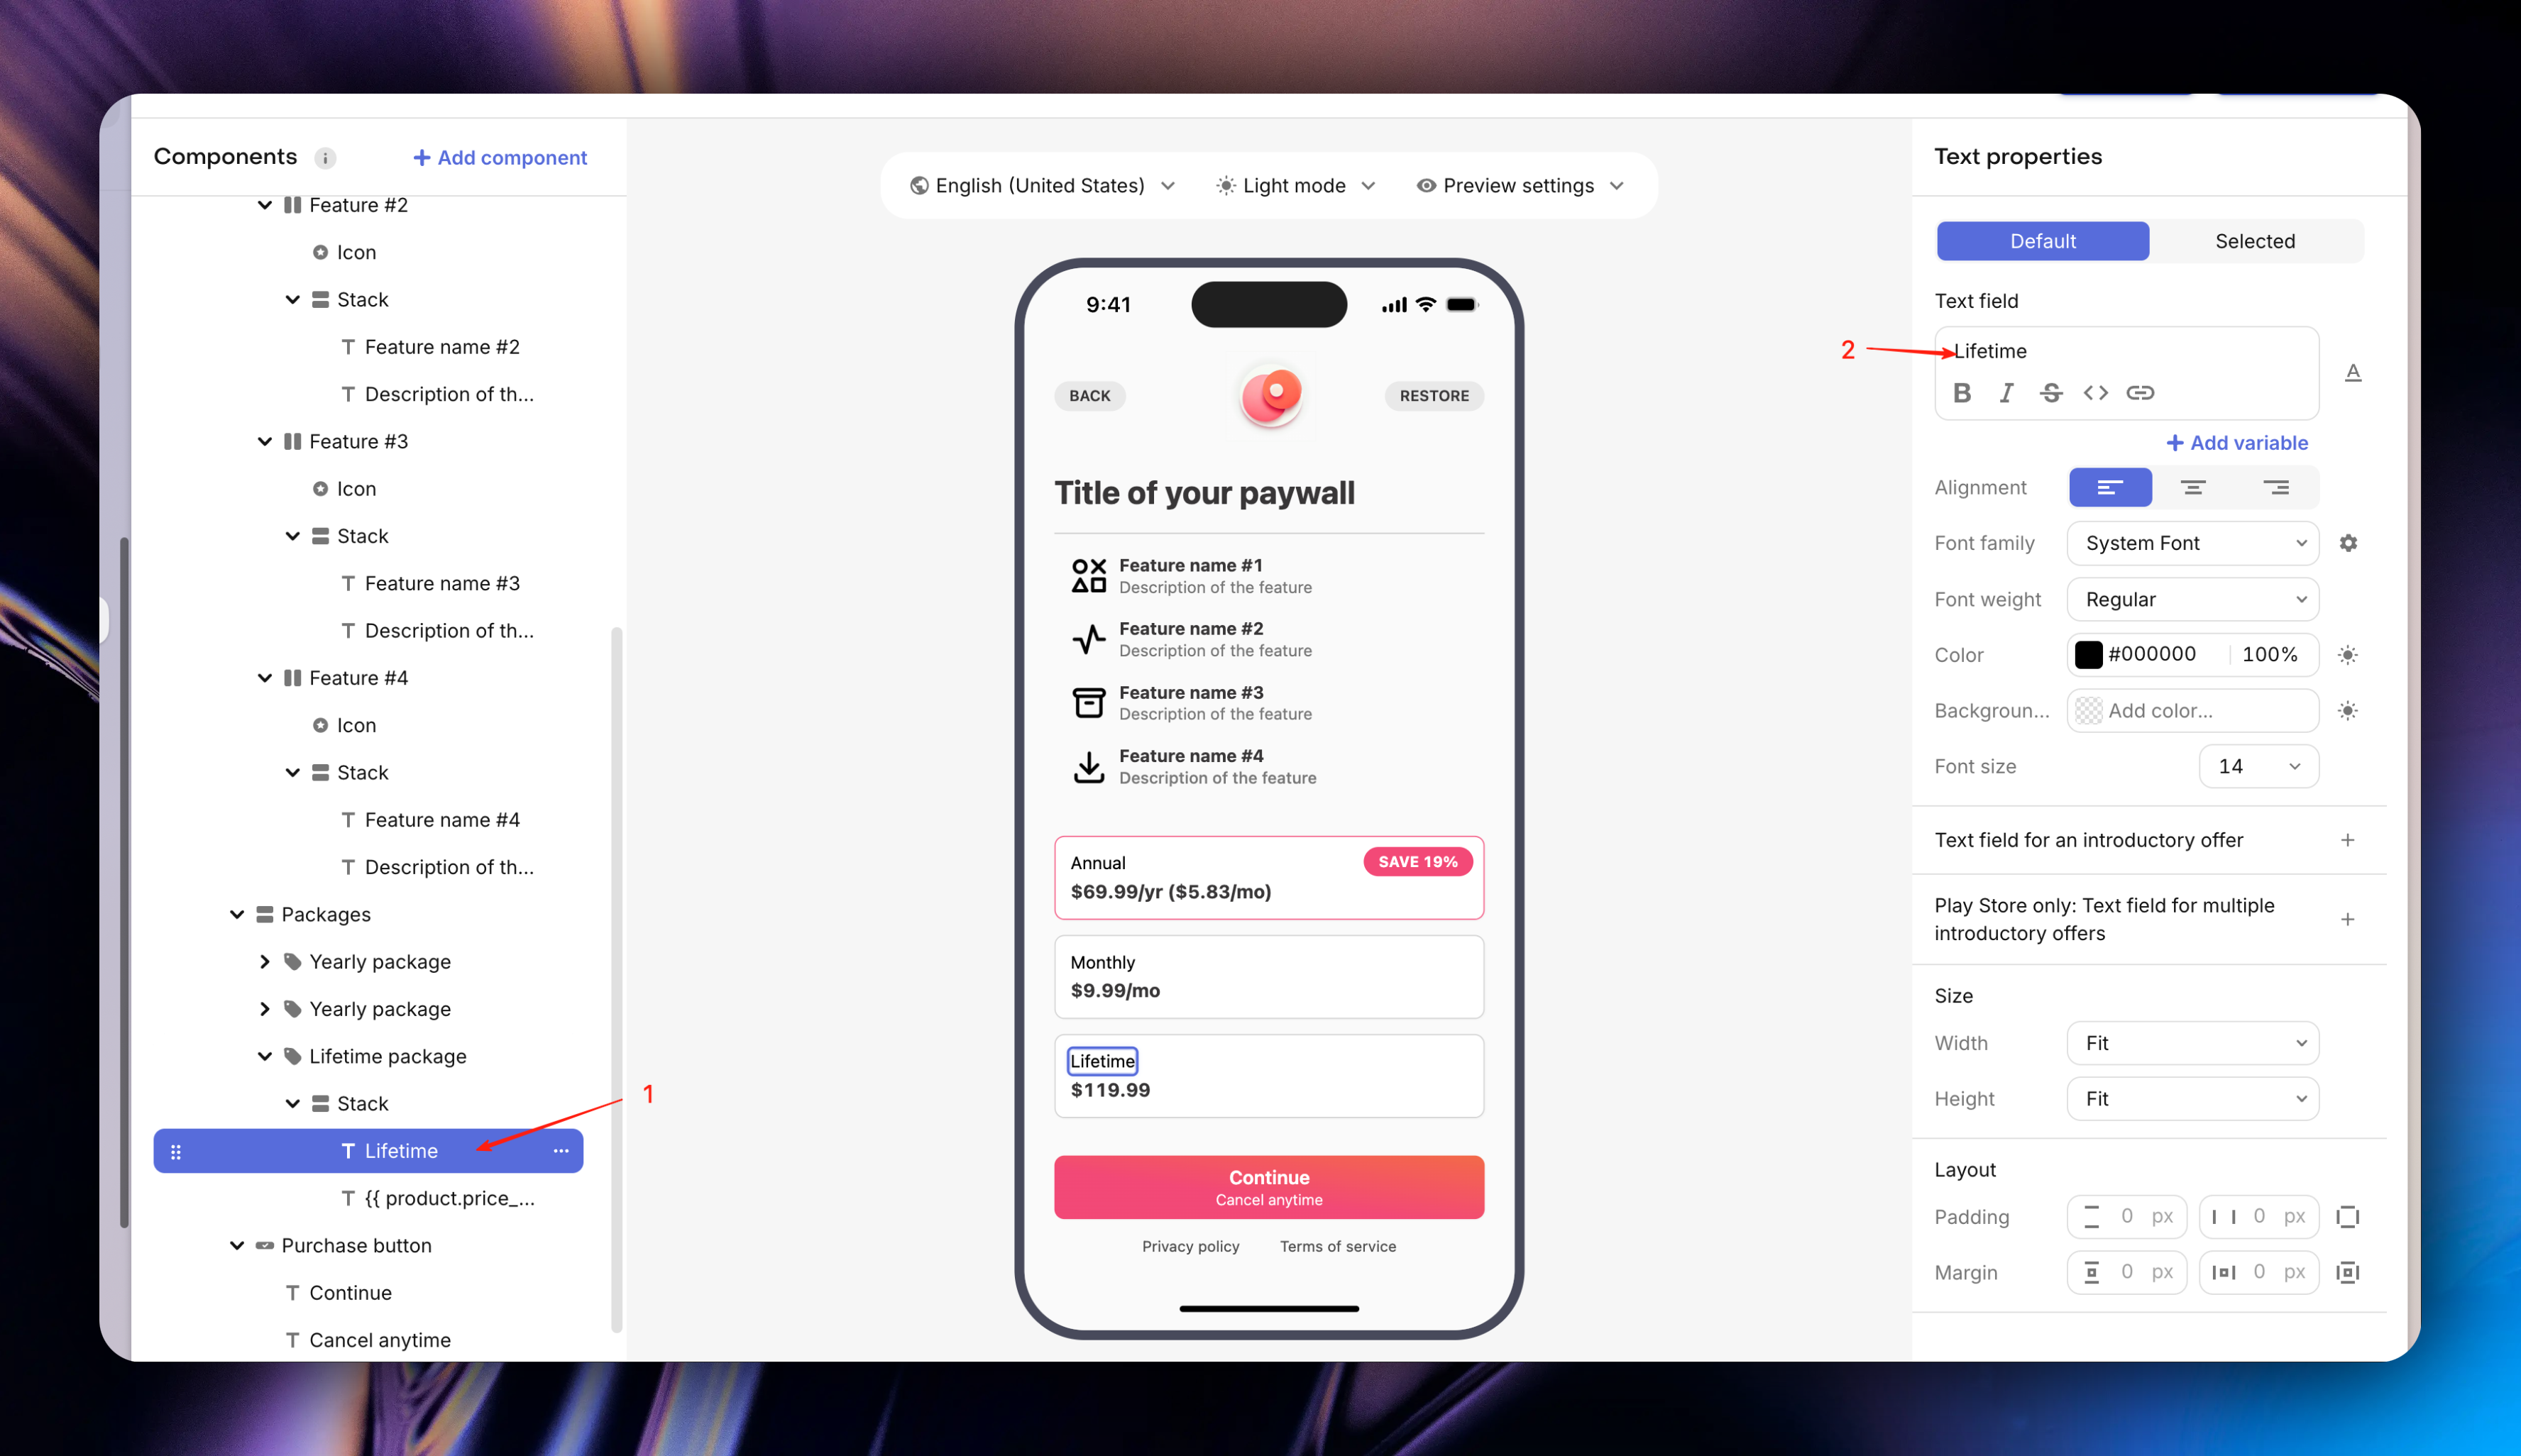
* We found that this paywall style doesn't have a lifetime membership option, we can duplicate a paywall style and then edit it
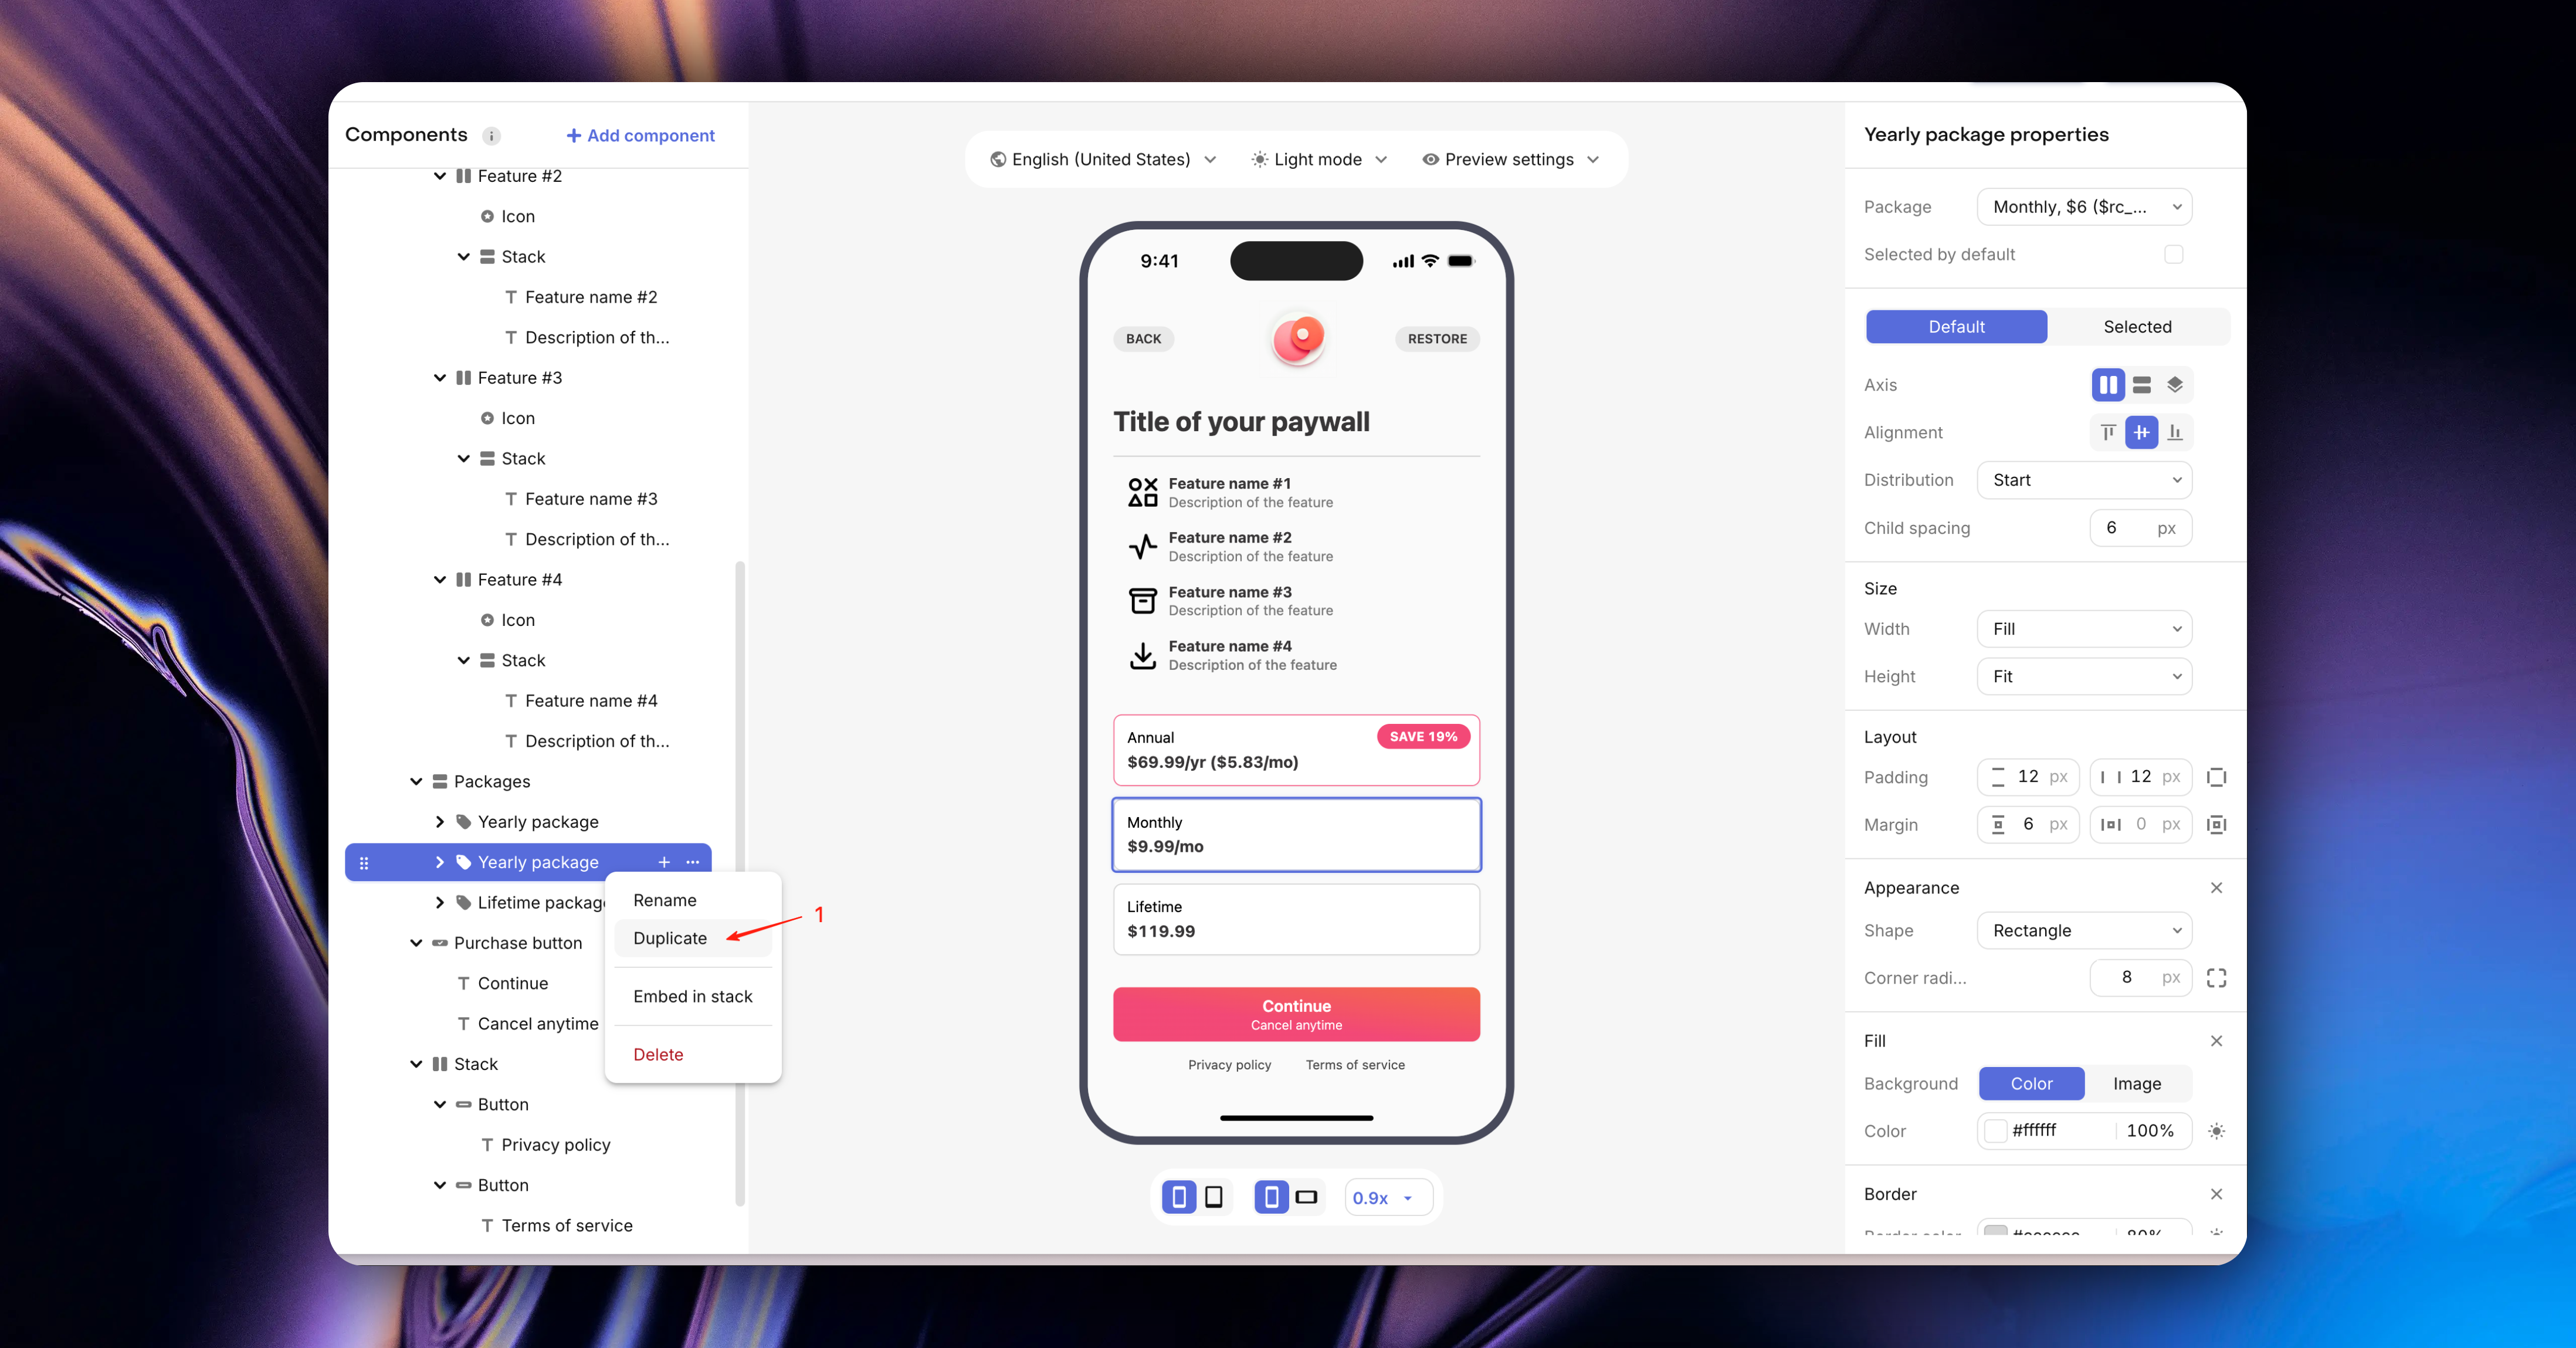
Select the `Package` area, pull down and select the `Lifetime` option
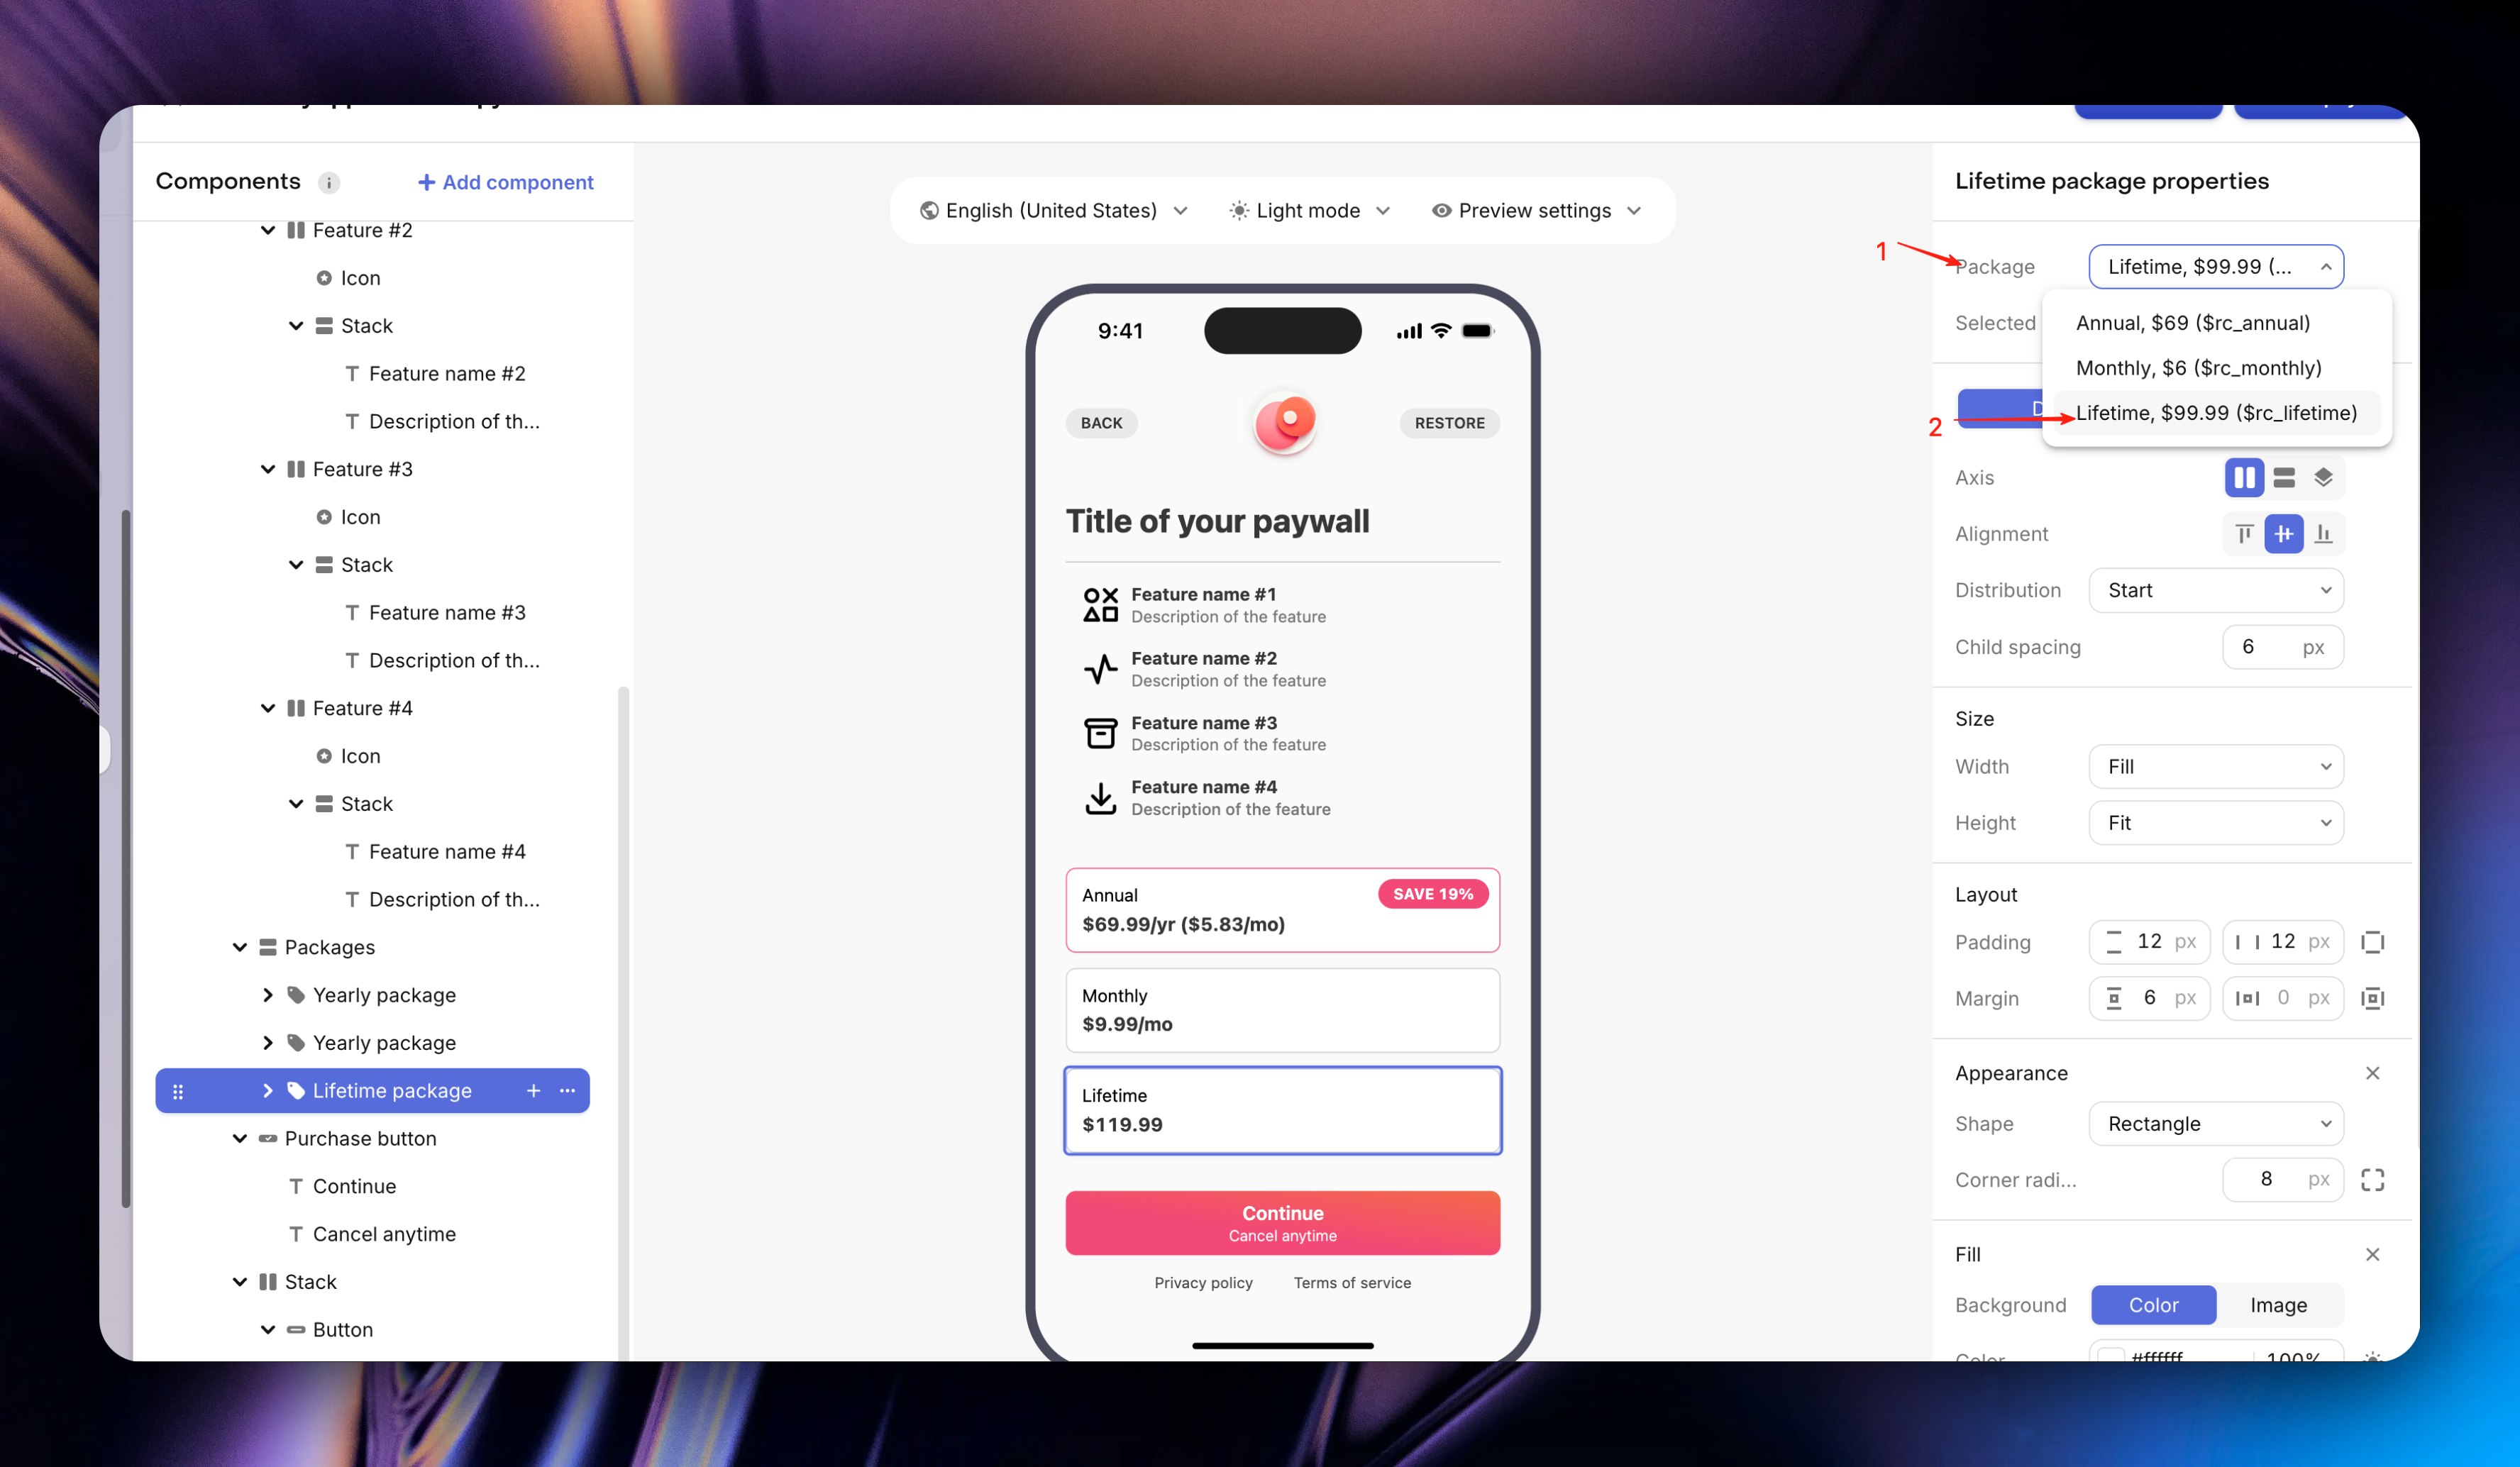
Then modify the copy
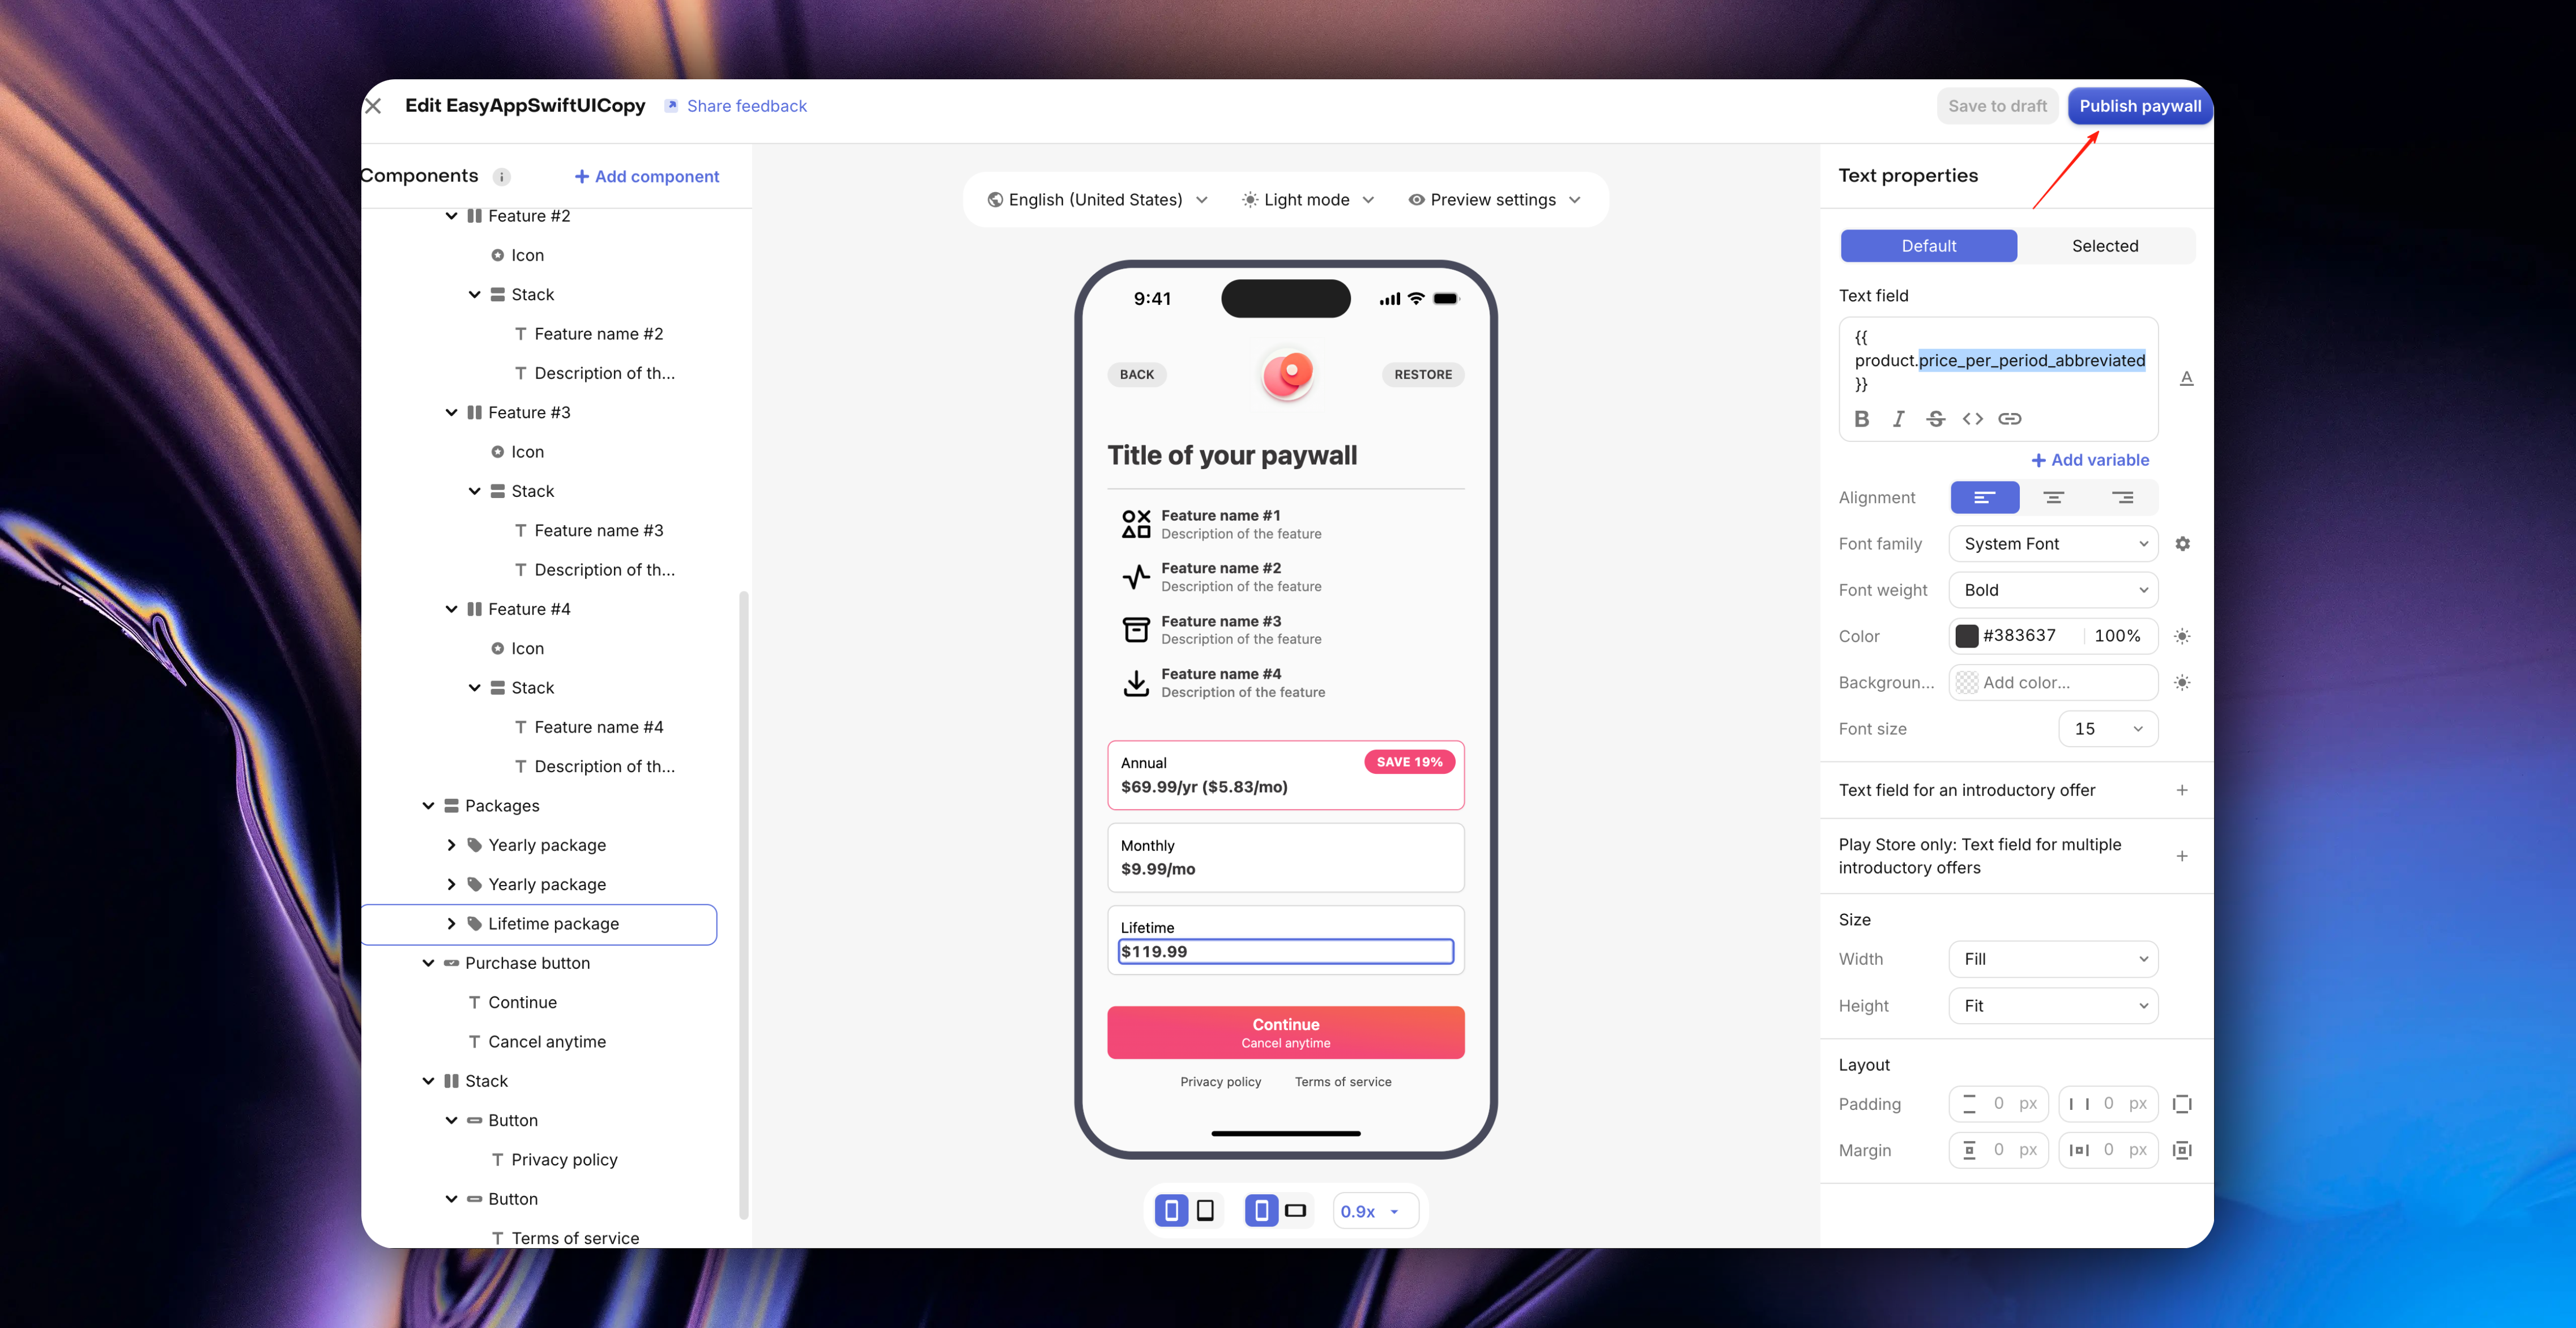
In addition, you can edit more in-app purchase styles/information and modify more price parameters. For details, refer to [Variables](https://www.revenuecat.com/docs/tools/paywalls/creating-paywalls/variables)
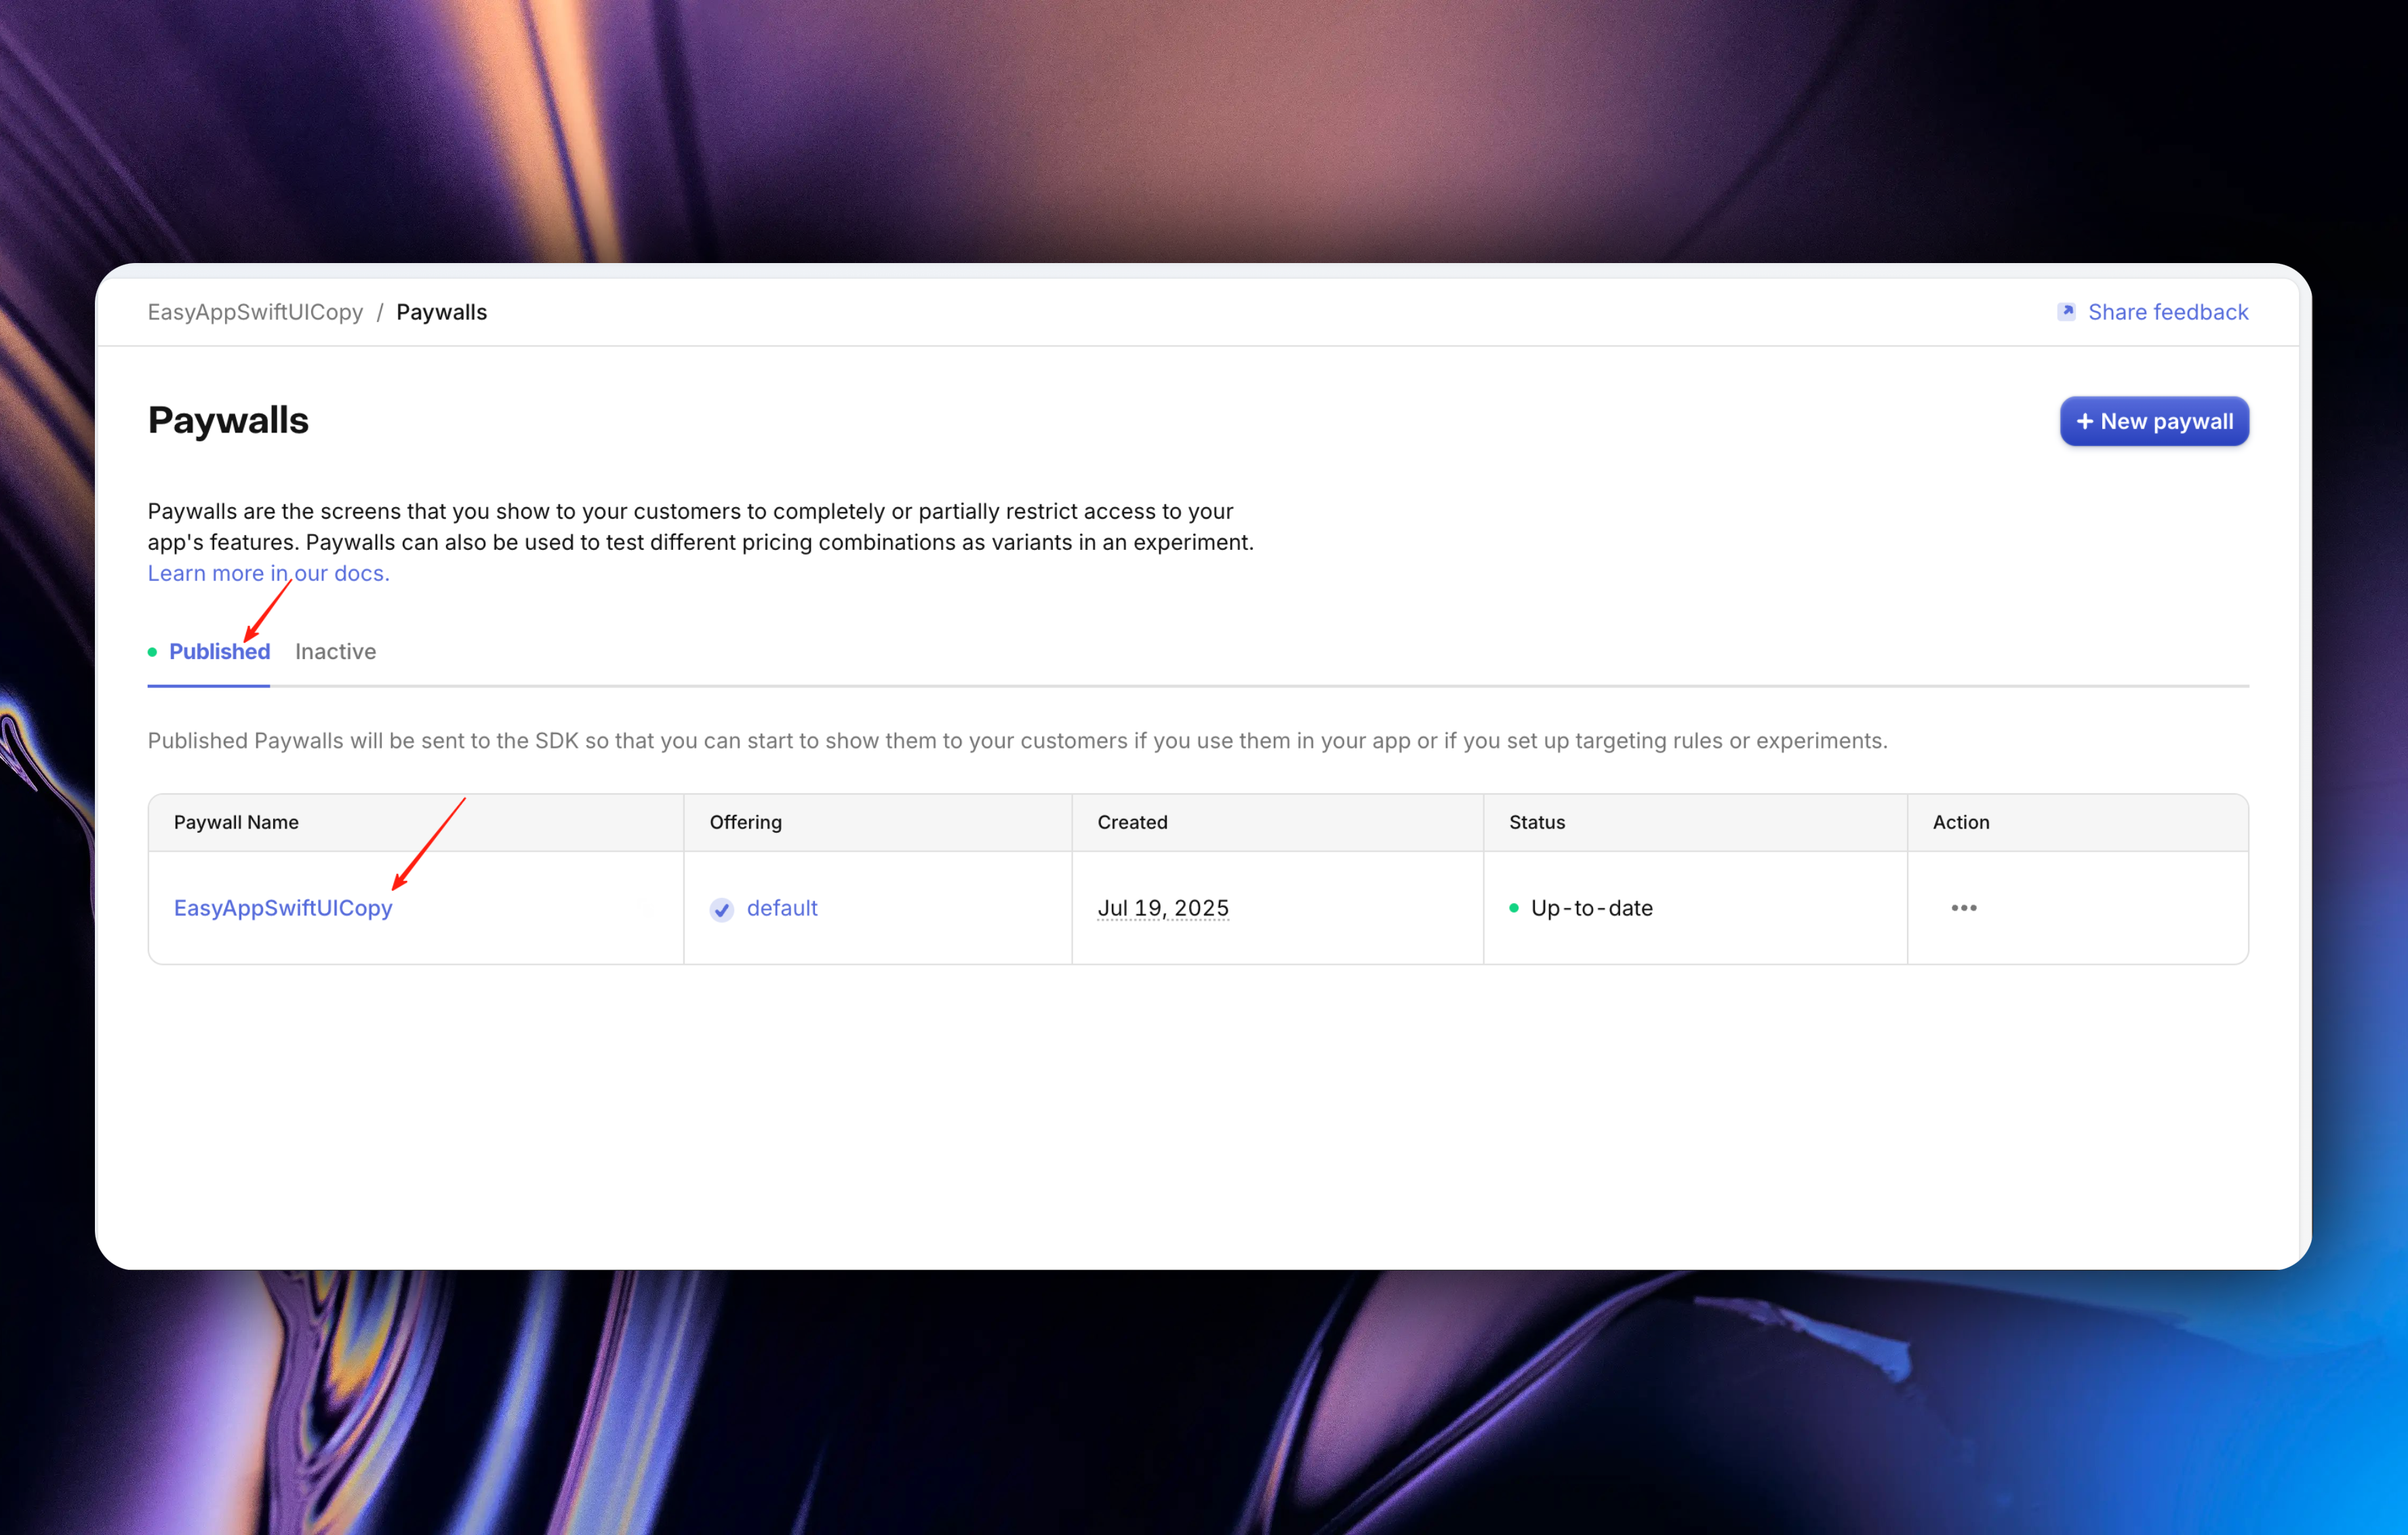
* Finally, publish our paywall, and after success, exit the editing page
If everything goes smoothly, you will see the following page
For more RevenueCat related knowledge, please refer to [RevenueCat Documentation](https://www.revenuecat.com/docs/welcome/overview)
#### Configure RevenueCat apiKey and entitlementID
* Get apiKey
Click `API Keys` in the left sidebar, then click `Show Key`
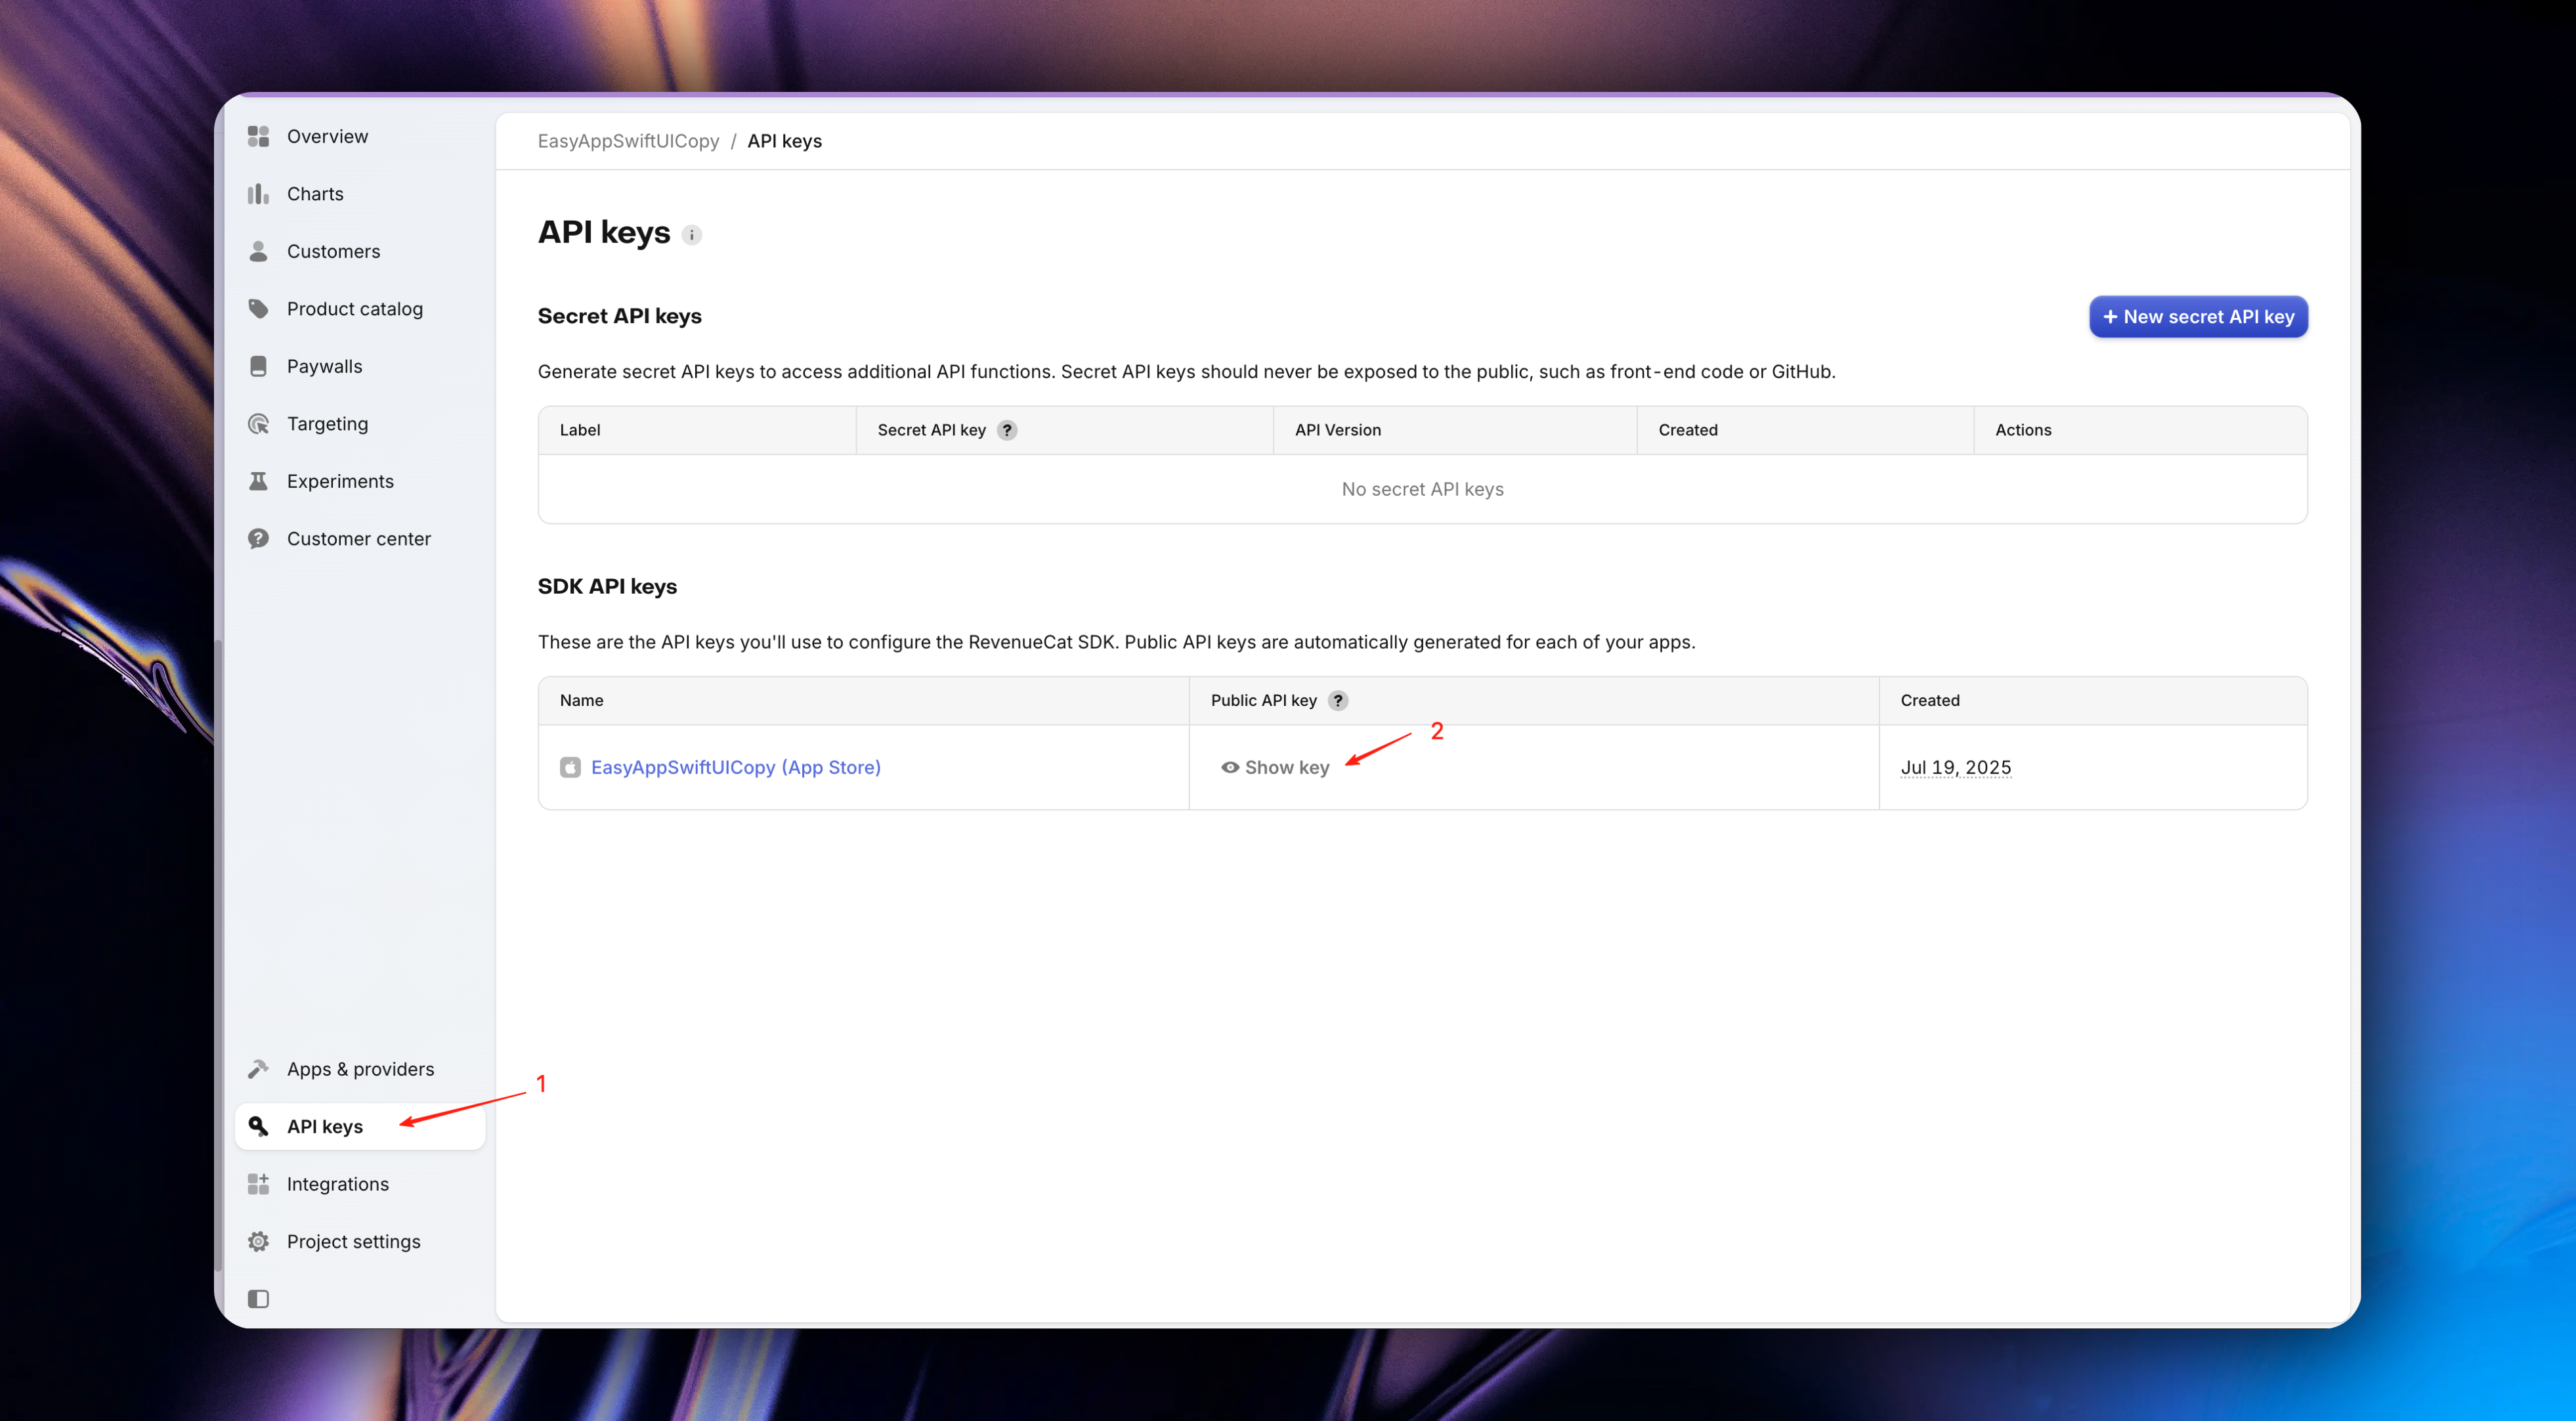
Click the `Copy` button, copy the apiKey, and paste it into your project
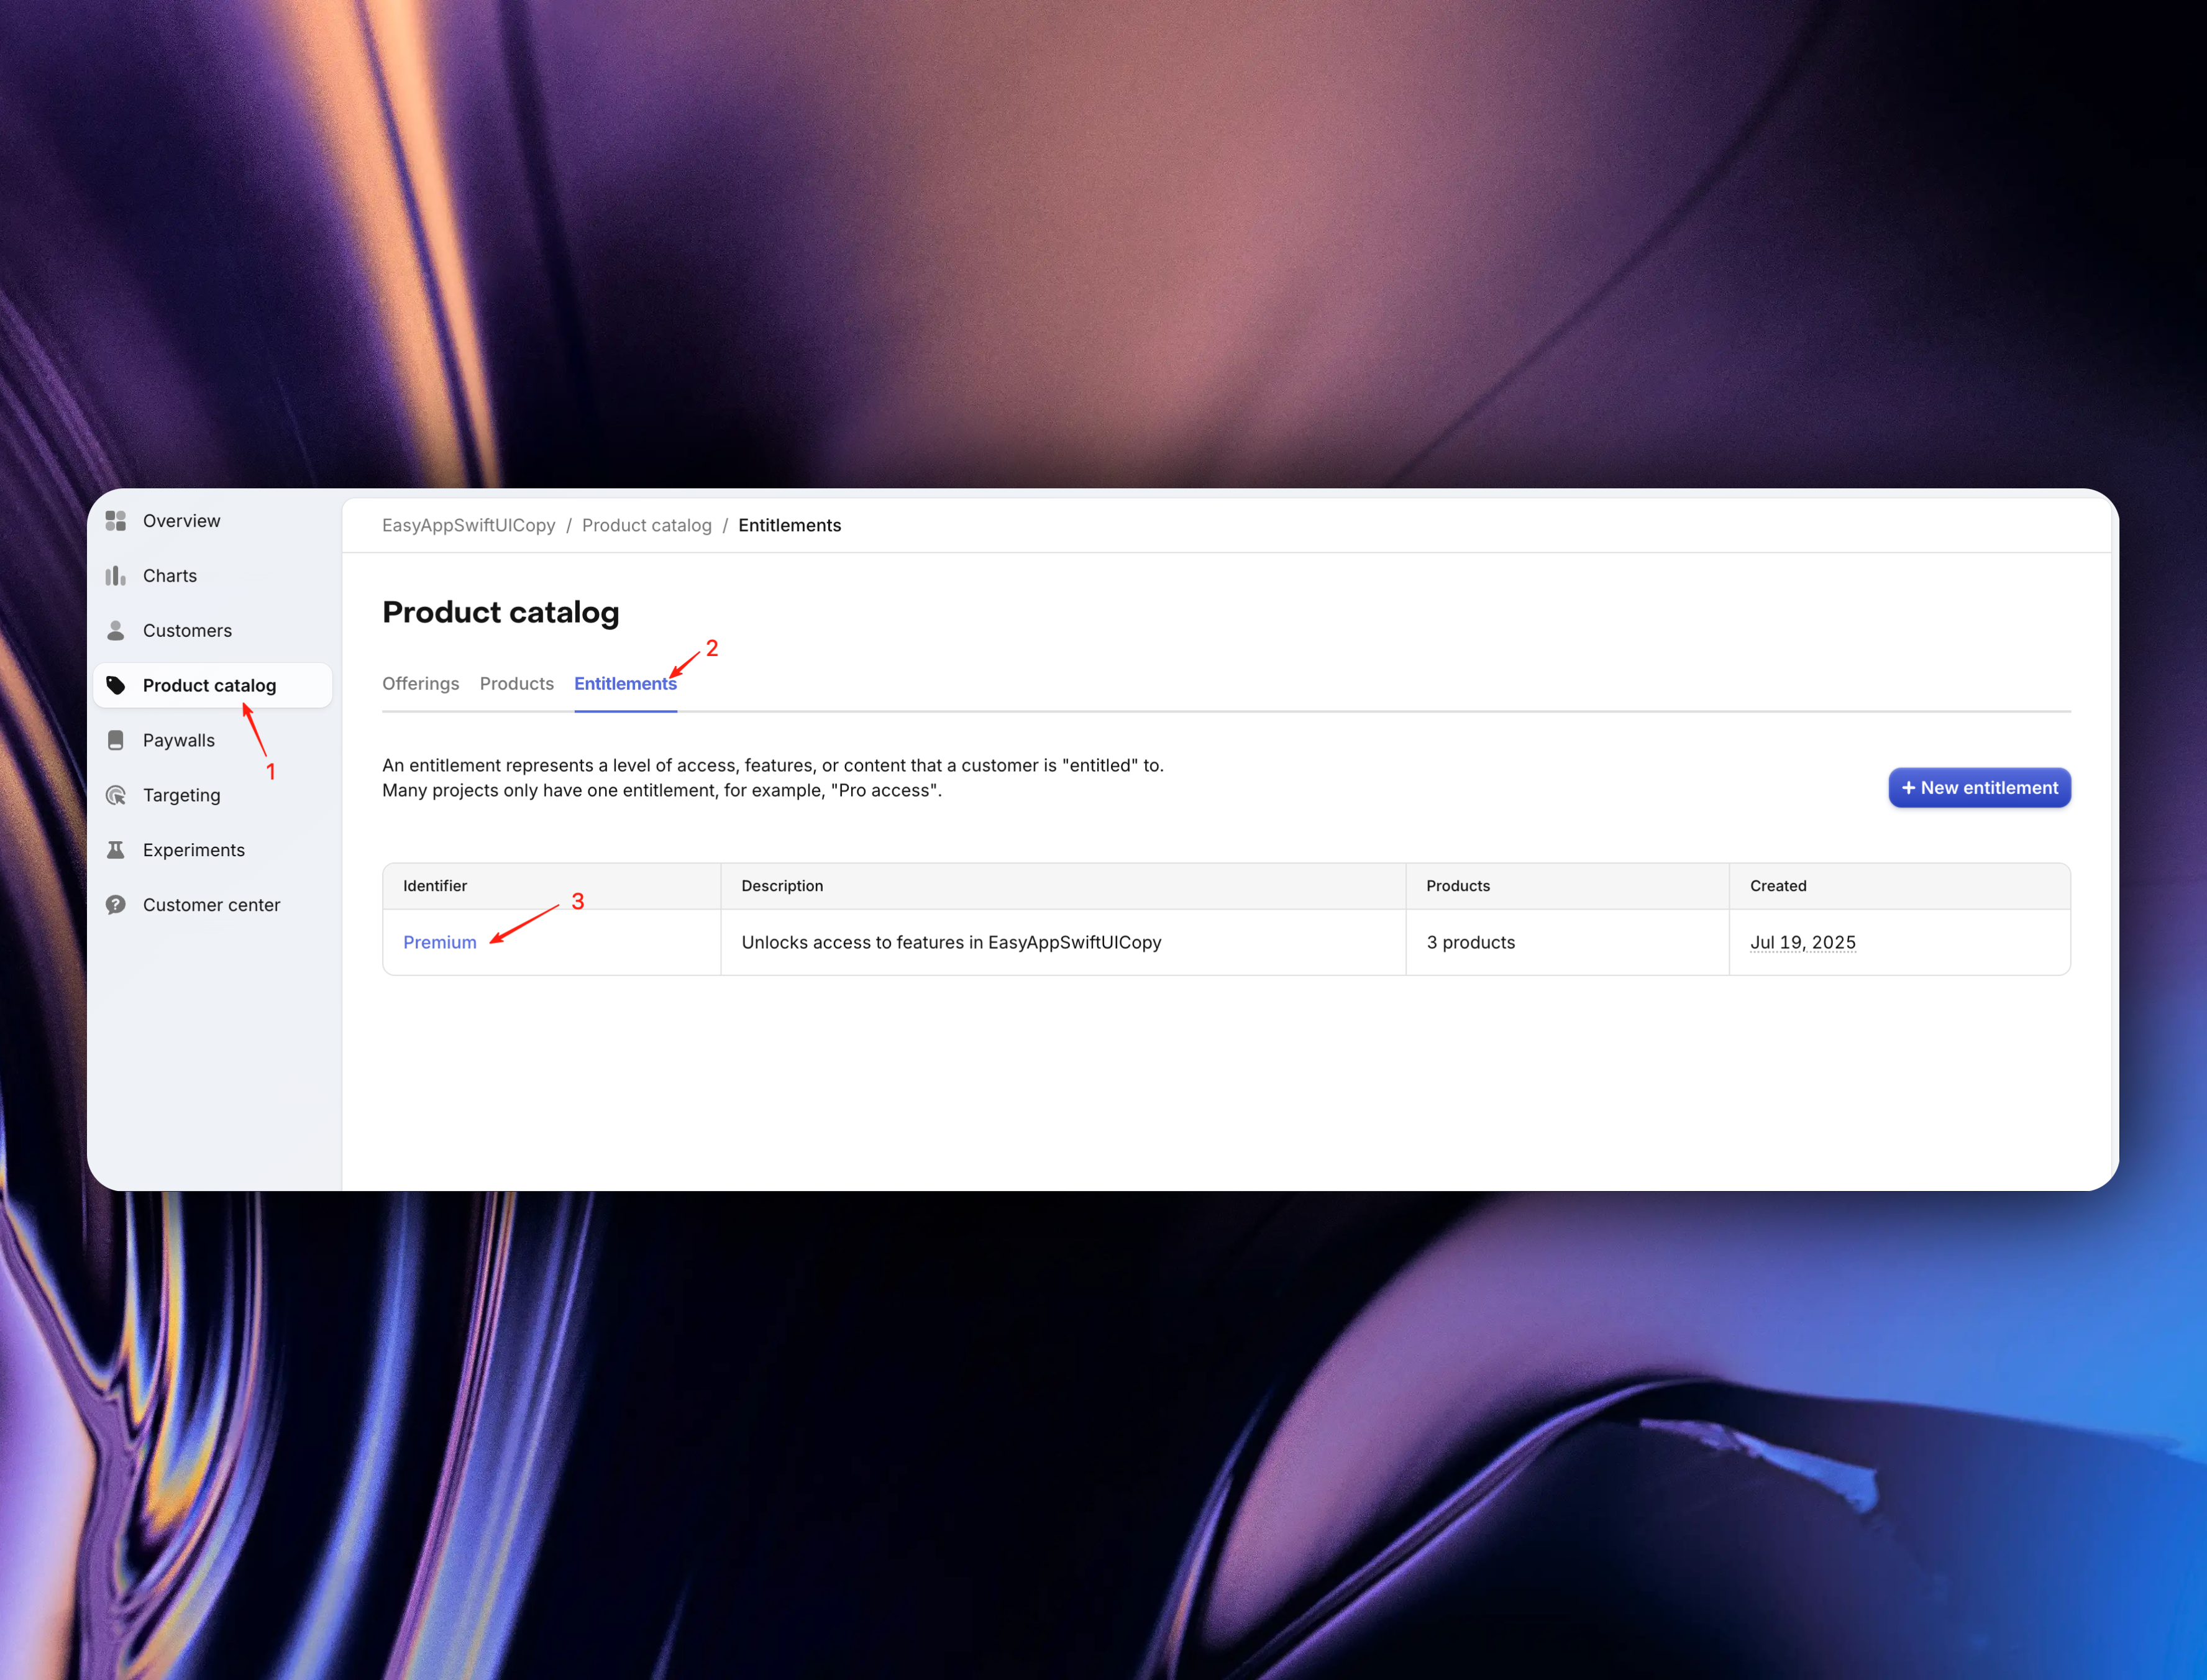
* Get entitlementID
Click `Products catalog` in the left sidebar, then click `Entitlements`, then copy the `Identifier` and paste it into your project
Let's review where we need to configure RevenueCat's apiKey and entitlementID:
} href="/docs/configuration/revenueCat">
RevenueCat Configuration
```swift title="EasyAppSwiftUI/Constants/Constants.swift"
enum Constants {
// ... other configurations
enum RevenueCat {
/// The API key for your app from the RevenueCat dashboard: https://app.revenuecat.com
static let apiKey = "your revenuecat api key"
/// The entitlement ID from the RevenueCat dashboard that is activated upon successful in-app purchase for the duration of the purchase.
static let entitlementID = "your revenuecat entitlement id"
// Proxies & configuration for users in Mainland China
// https://www.revenuecat.com/docs/getting-started/configuring-sdk
static let ChinaProxyURL = "https://api.rc-backup.com/"
}
// ... other configurations
}
```
Congratulations 🎉🎉🎉, you have completed RevenueCat integration.
Next, we need to test our results.
Friendly reminder: If you skipped the registration guide, please refer to the following steps to integrate RevenueCat service
{/* #### Register RevenueCat Account (if you skipped the RevenueCat registration guide and want to continue integrating RevenueCat service, please see here) */}
### Test In-App Purchases
During development, in-app purchases are tested in the sandbox. No actual charges will be made during purchases.
Please use a real device for testing, not the simulator.
* First, we need to create a sandbox test account in App Store Connect's [`Users and Access`](https://appstoreconnect.apple.com/access/users/sandbox)
If you already have a test account, follow the image below:
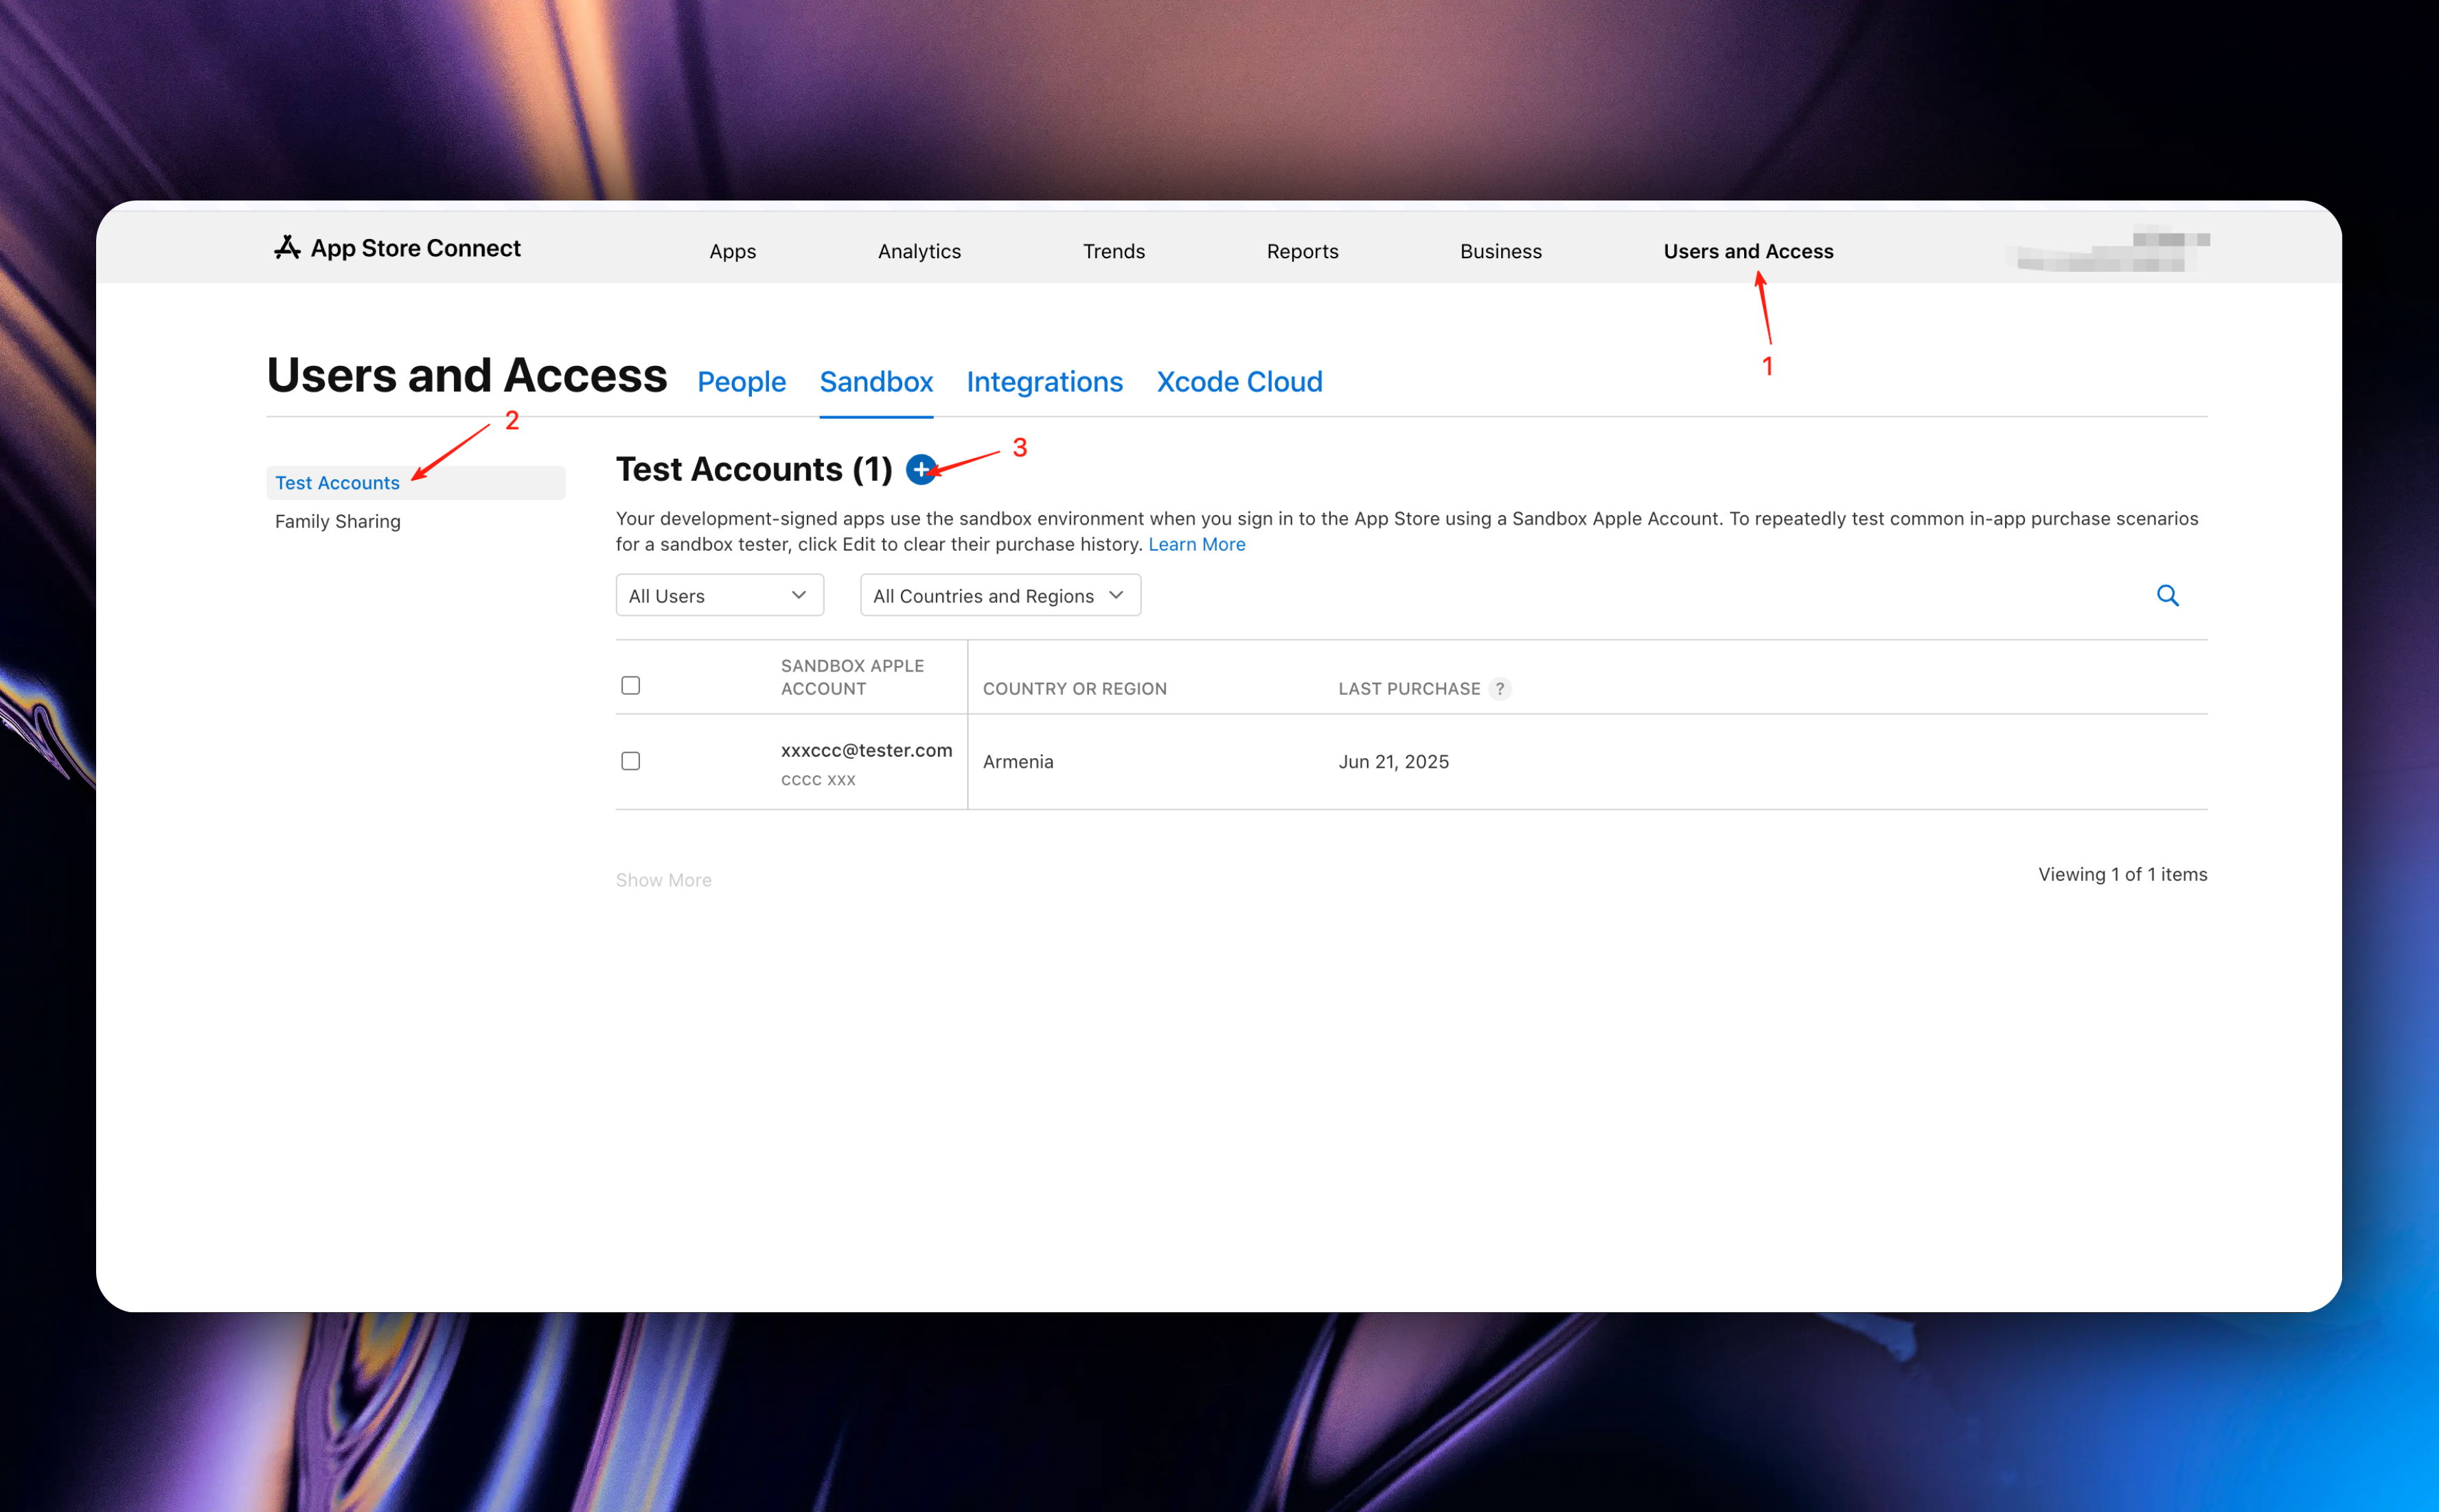
Click the `+` button to create a sandbox test account.
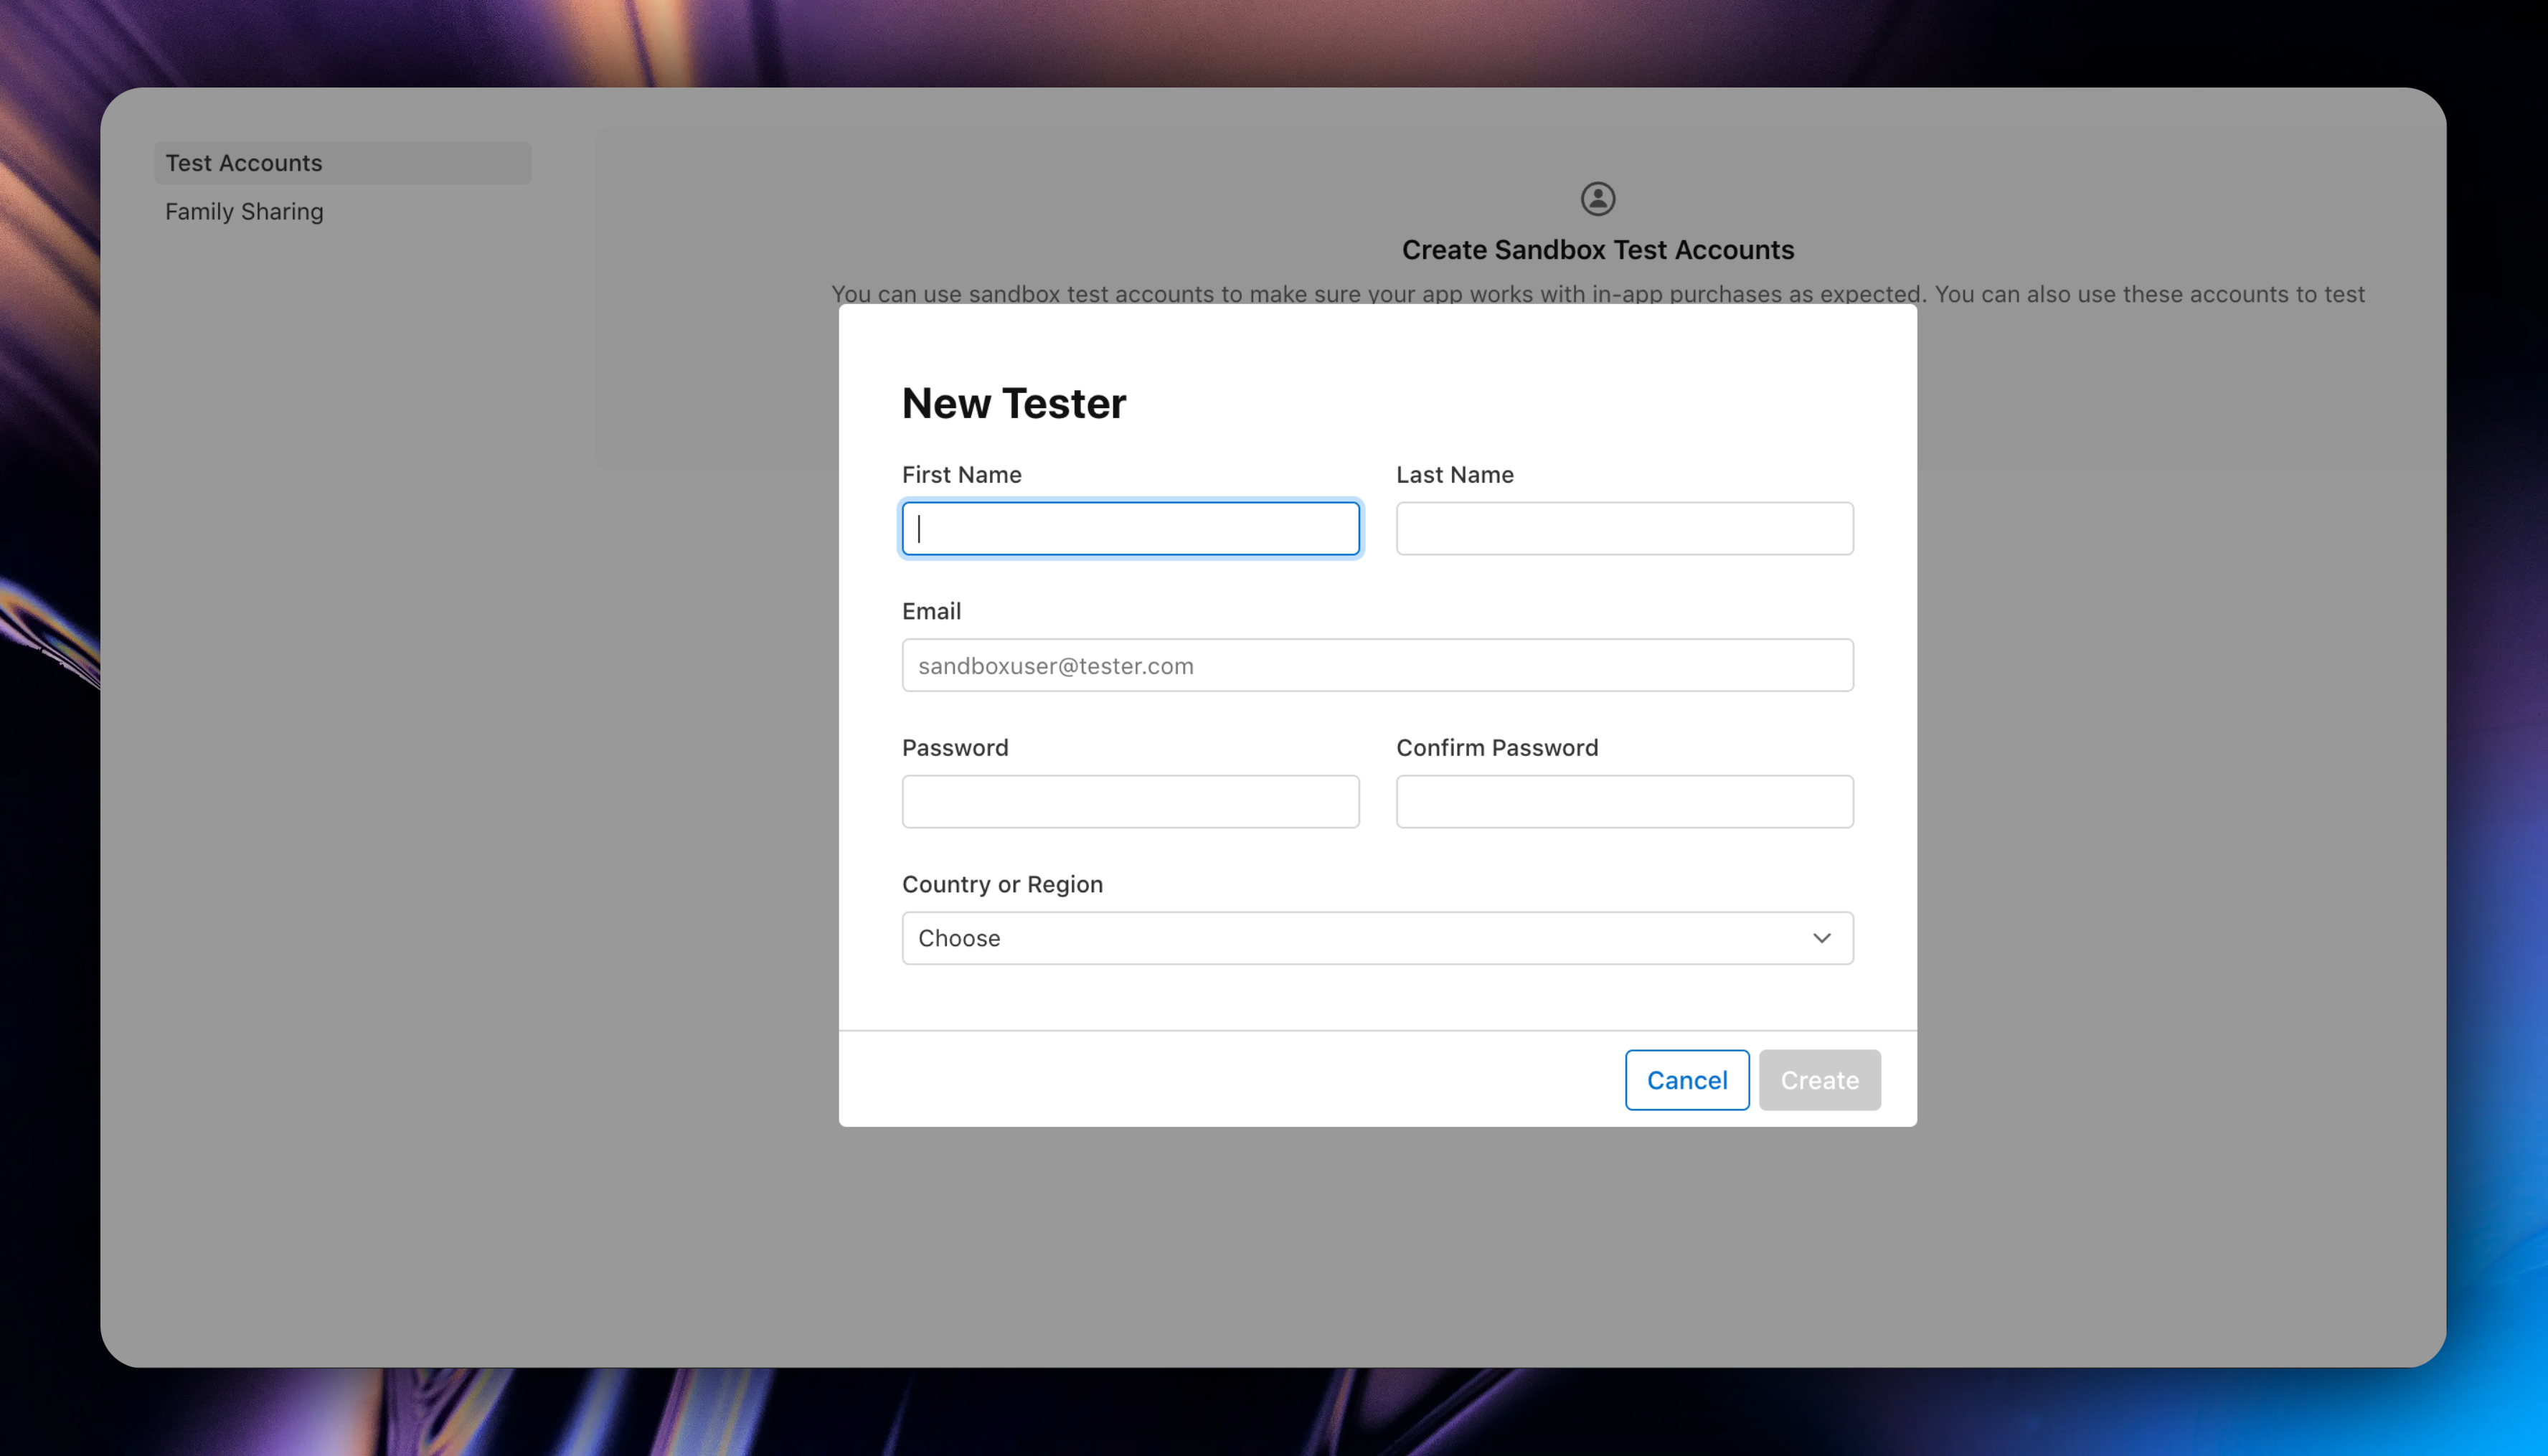
If you don't have a test account and are creating one for the first time, follow the image below:
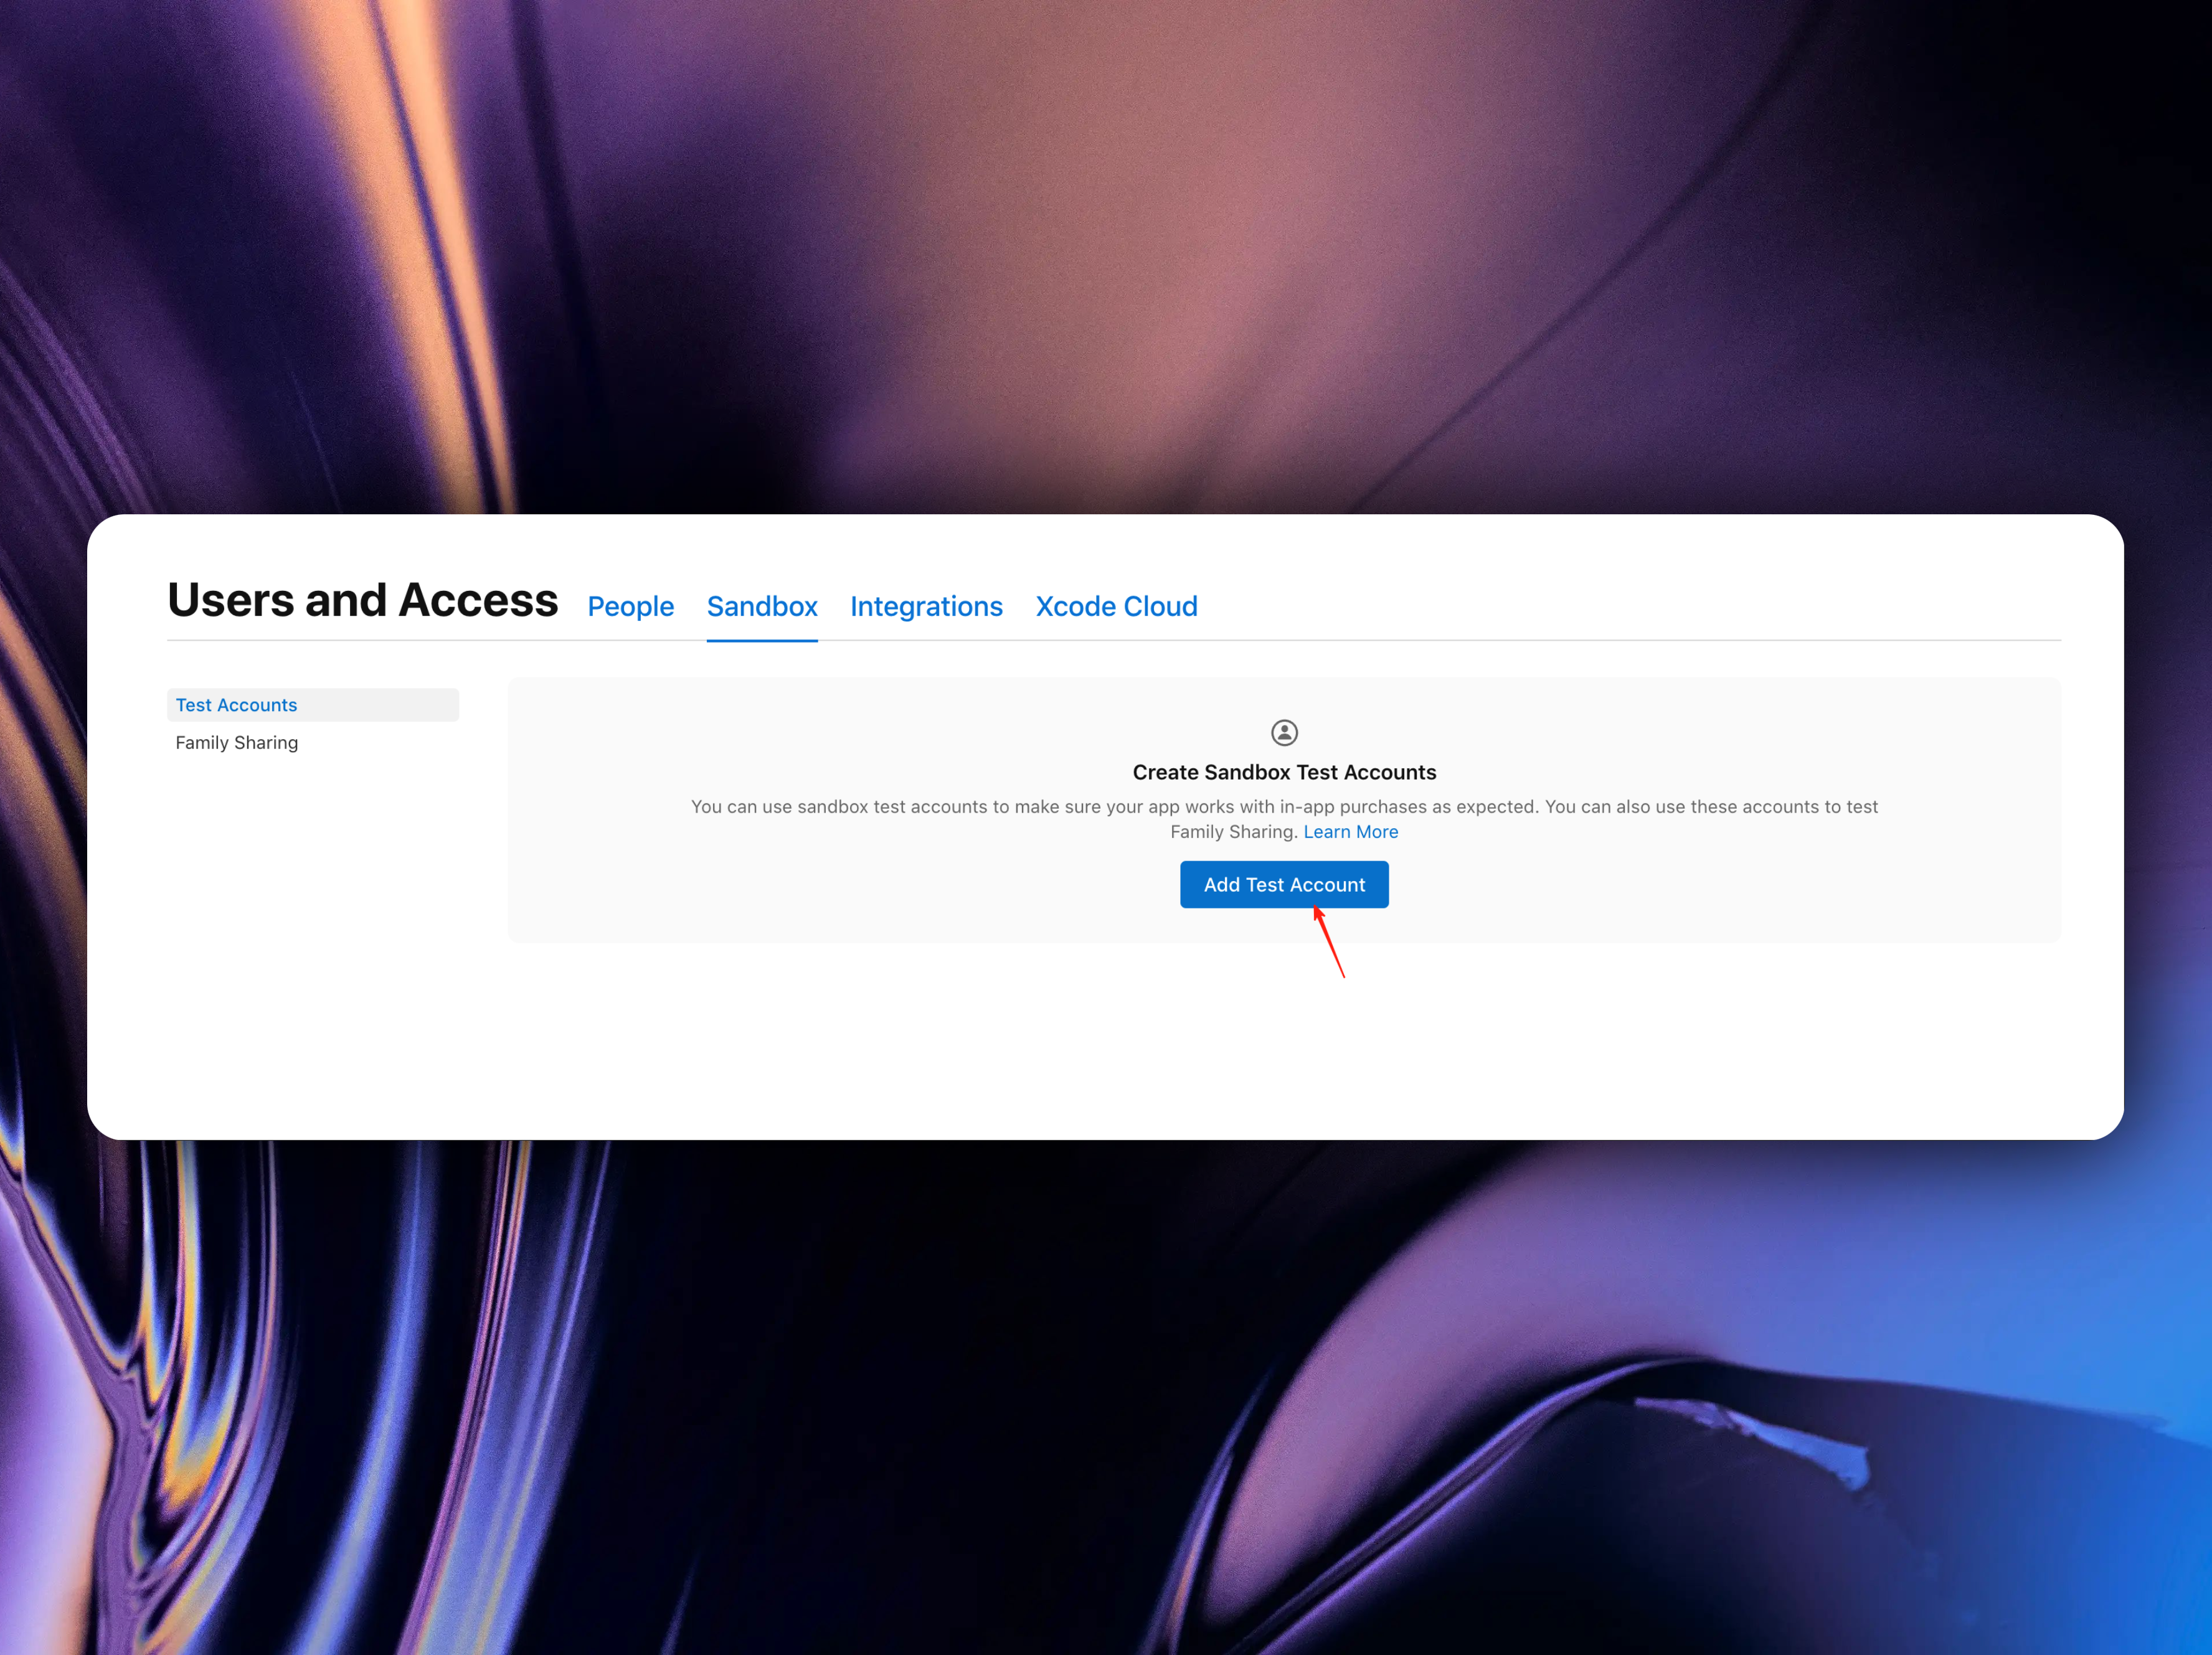
In the subsequent popup, enter your test account information and click the `Create` button to save.
* Run the app on a real device and test in-app purchases
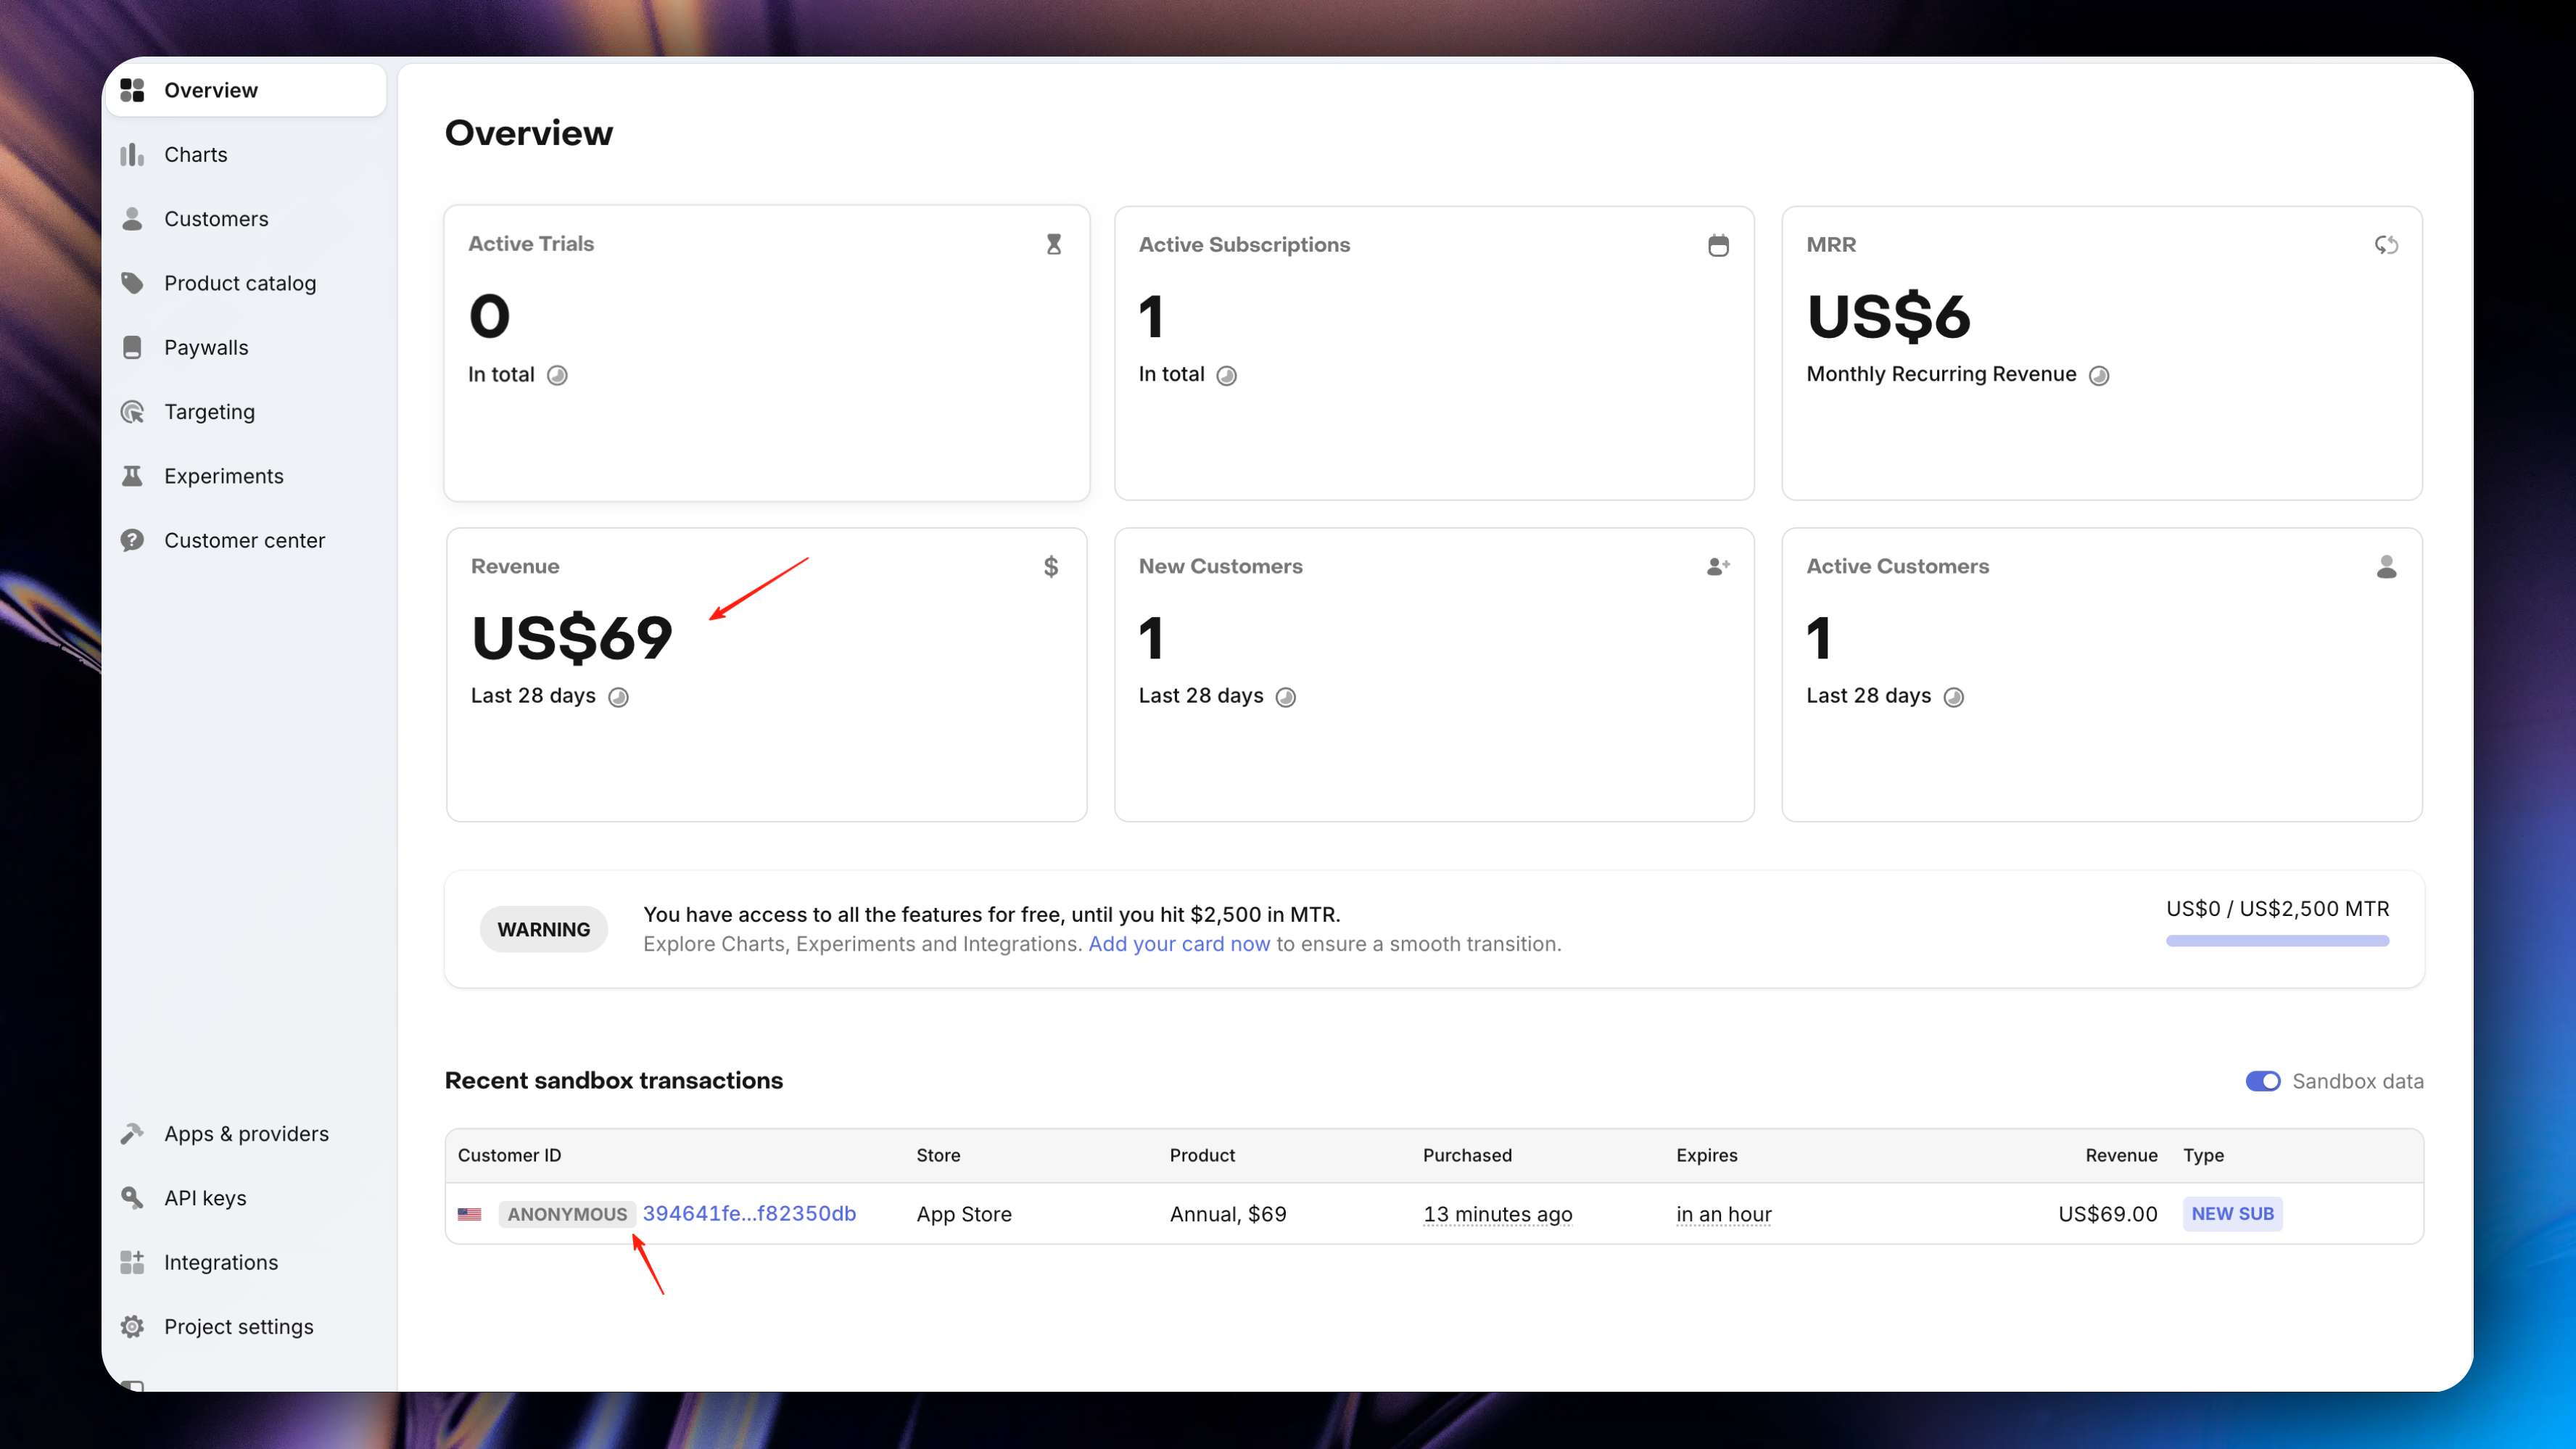
How to view subscription data in real-time?
Return to RevenueCat's [Dashboard](https://app.revenuecat.com/projects/306cfb83/overview) page, where you can see all your subscription information.
In the sandbox environment, you need to turn on the `Sandbox data` switch.
### Next Steps
} href="/docs/modules/InAppPurchase">
Learn more about the in-app purchase module
Finally, it's strongly recommended that you check the [App Store Connect Help](https://developer.apple.com/help/app-store-connect/) documentation ([App Store Connect Help Chinese Address](https://developer.apple.com/cn/help/app-store-connect/)) and [RevenueCat Documentation](https://www.revenuecat.com/docs/welcome/overview) to learn more about in-app purchases.
# StoreKit2
URL: https://easyapp.site/en/docs/Integrations/StoreKit2
Use StoreKit2 to manage your subscriptions.
***
title: StoreKit2
description: Use StoreKit2 to manage your subscriptions.
icon: WalletCards
-----------------
If you plan to use RevenueCat to manage your in-app purchases, you can skip this chapter and refer directly to the [RevenueCat documentation](/docs/Integrations/RevenueCat) to configure RevenueCat.
### Adding In-App Purchases in App Store Connect
StoreKit2 in-app purchases require you to configure in-app purchases in App Store Connect. For this part, please check the [RevenueCat documentation, Adding In-App Purchases in App Store Connect](/docs/Integrations/RevenueCat#adding-in-app-purchases-in-app-store-connect) section. After reading this section, please return to this chapter to continue reading.
### Configuring StoreKit2 in EasyApp
After completing the in-app purchase configuration in App Store Connect, you need to configure StoreKit2 productIDs in EasyApp.
Open the `EasyAppSwiftUI/Constants/Constants.swift` file, find the `Constants` -> `StoreKit2` enum, and configure your productIDs.
The `productIDs` are the in-app purchase productIDs you configured in App Store Connect.
```swift
title="EasyAppSwiftUI/Constants/Constants.swift"
enum Constants {
// ... other configurations
/// StoreKit2 product IDs
/// Enter the product ID from App Store Connect here
enum StoreKit2 {
static let productIDs = ["your product ids"]
}
// ... other configurations
}
```
### Testing In-App Purchases
During development, in-app purchases are tested in the sandbox environment. No actual charges will be made during purchases.
Please use a real device for testing, not the simulator.
* First, we need to create a sandbox test account in App Store Connect's [`Users and Access`](https://appstoreconnect.apple.com/access/users/sandbox)
If you already have a test account, follow the image below:

Click the `+` button to create a sandbox test account.
If you don't have a test account and are creating one for the first time, follow the image below:

In the subsequent popup, enter your test account information and click the `Create` button to save.

* Run the app on a real device and test in-app purchases
### Next Steps
} href="/docs/modules/InAppPurchase">
Learn more about the in-app purchase module
# Apple Login/Email Login
URL: https://easyapp.site/en/docs/Integrations/appleLogin
Learn how EasyAppSwiftUI project integrates Apple Login/Email Login
***
title: Apple Login/Email Login
description: Learn how EasyAppSwiftUI project integrates Apple Login/Email Login
icon: Apple
-----------
# Set up Apple Sign In (Recommended)
We recommend you use Apple Sign In. Compared to traditional registration and login processes, Apple Sign In provides a better overall user experience. of course, if you don't plan to use Apple Sign In, you can skip this step.
### Configure Apple Sign In
First, make sure you have an available Apple Developer account. If you haven't registered yet, please refer to the [official documentation](https://developer.apple.com/cn/help/account/membership/enrolling-in-the-app) to register.
After registration, log in to your developer account and go to the [`Identifiers`](https://developer.apple.com/account/resources/identifiers/list) page, click the `+` button
#### Step 1: Register Services ID
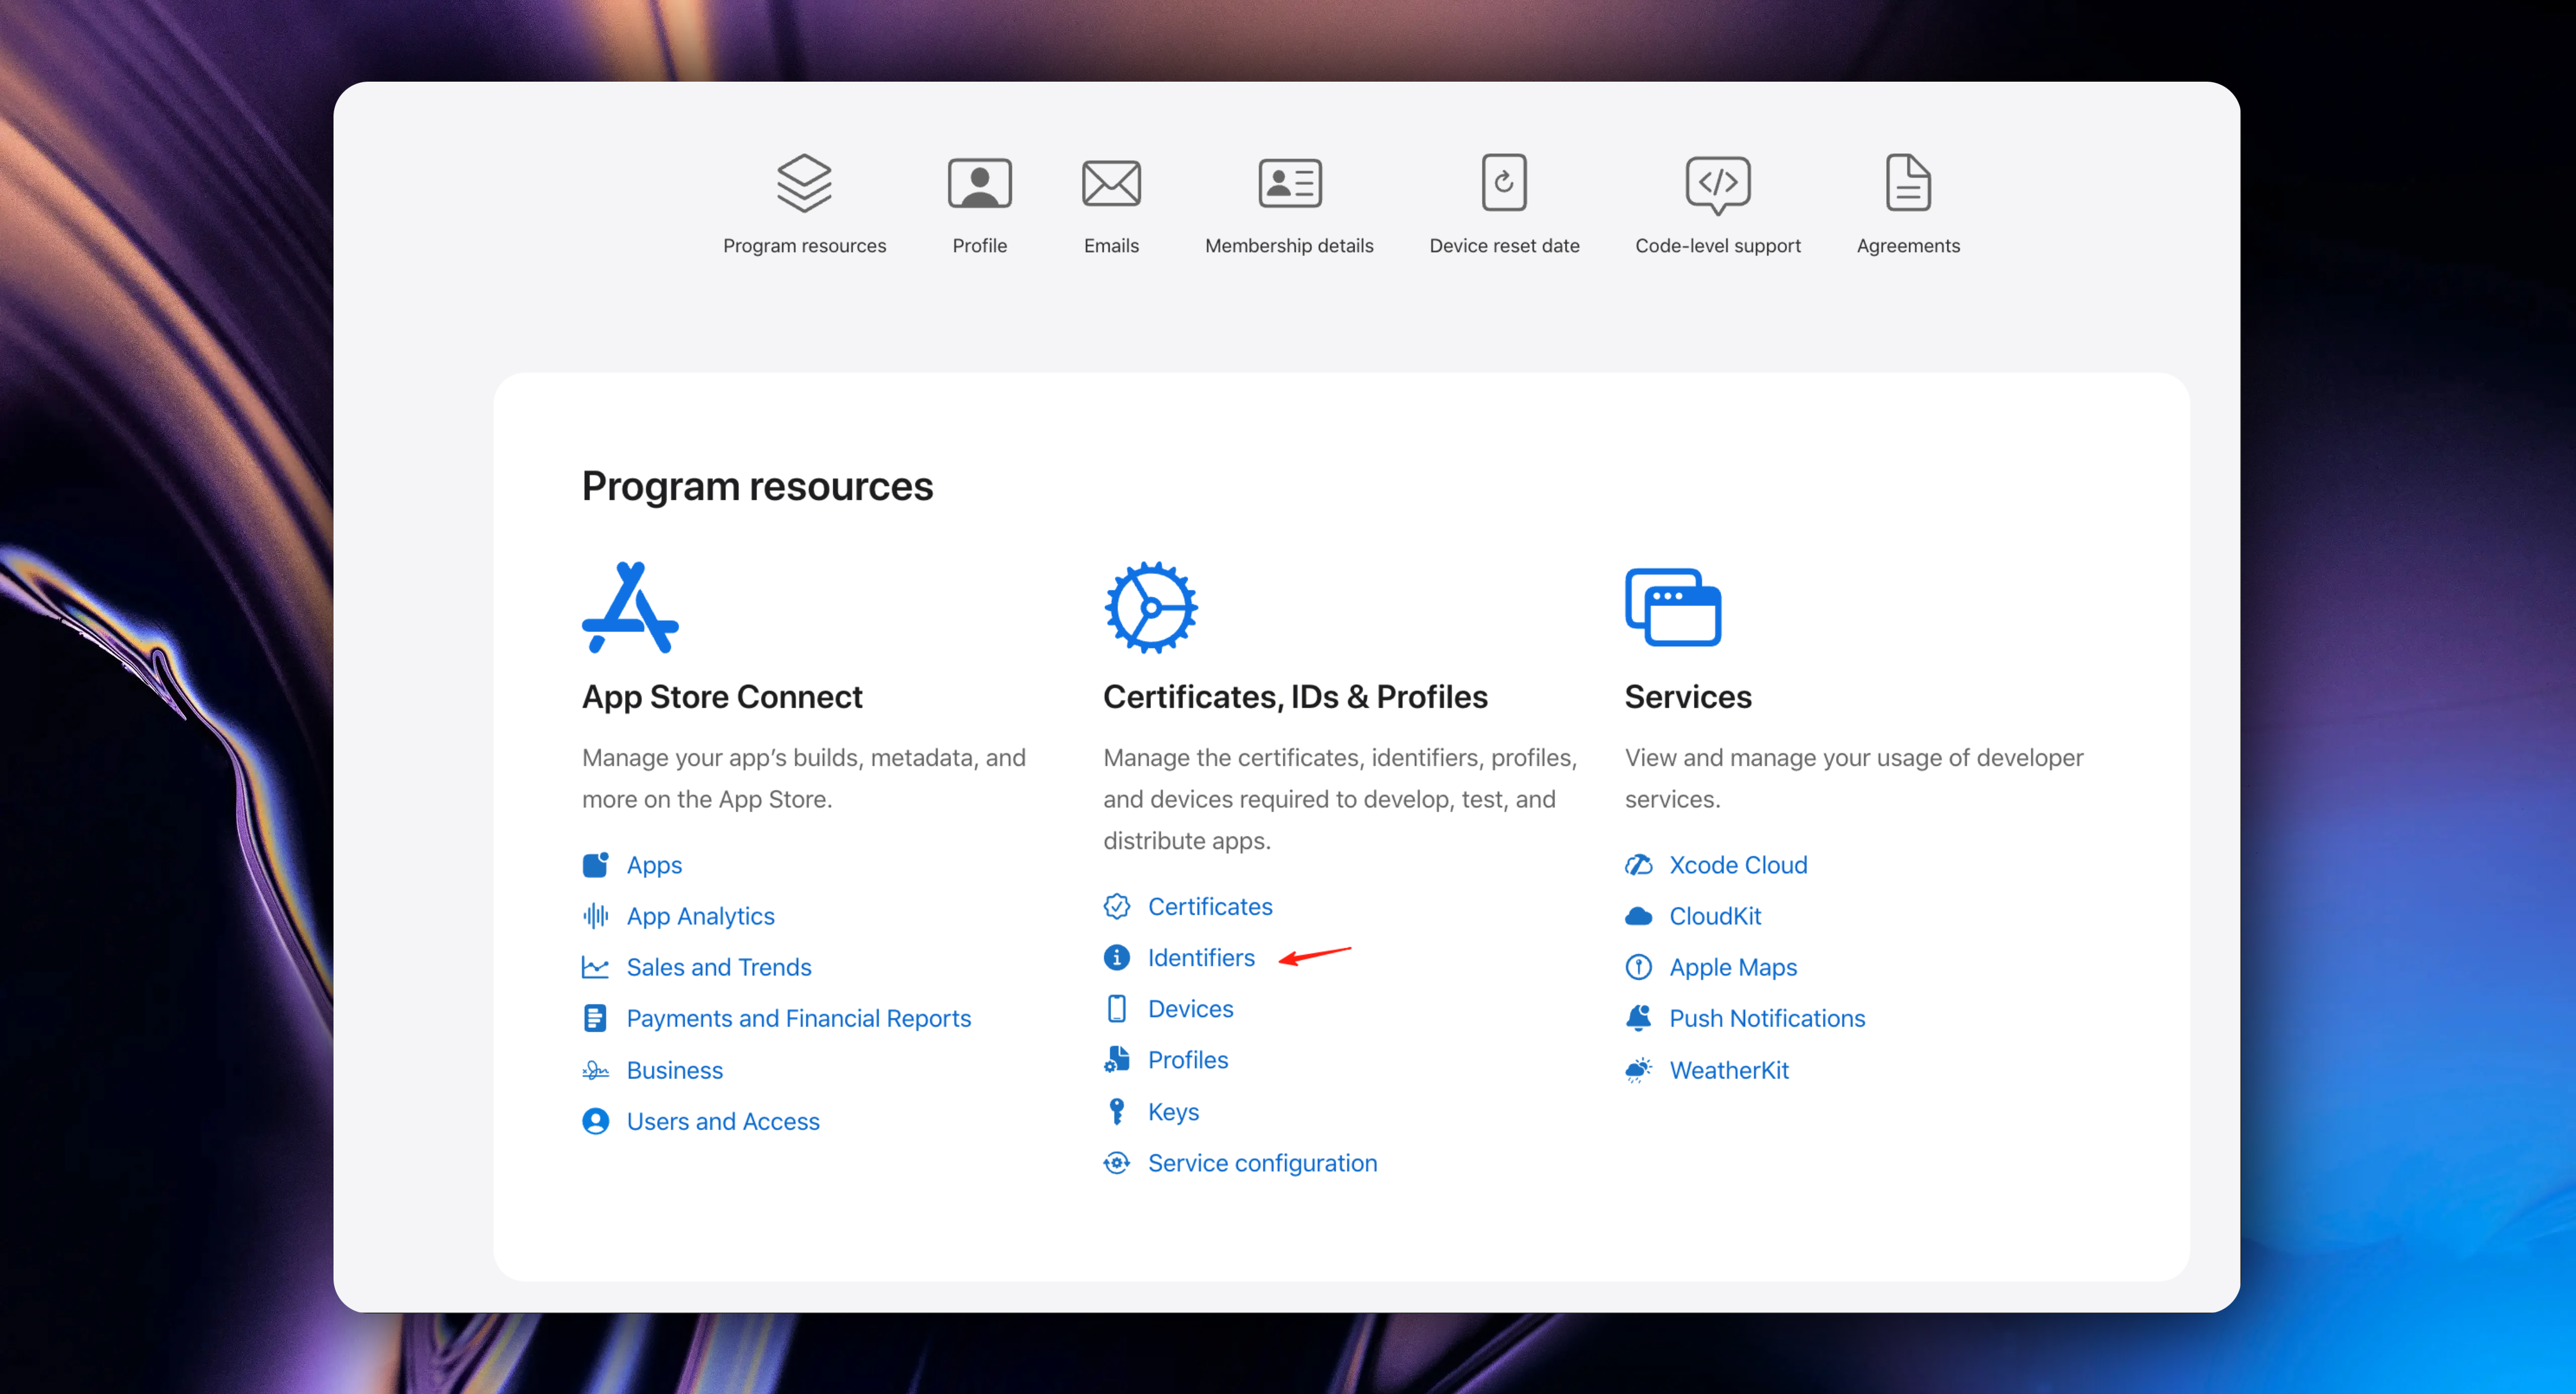
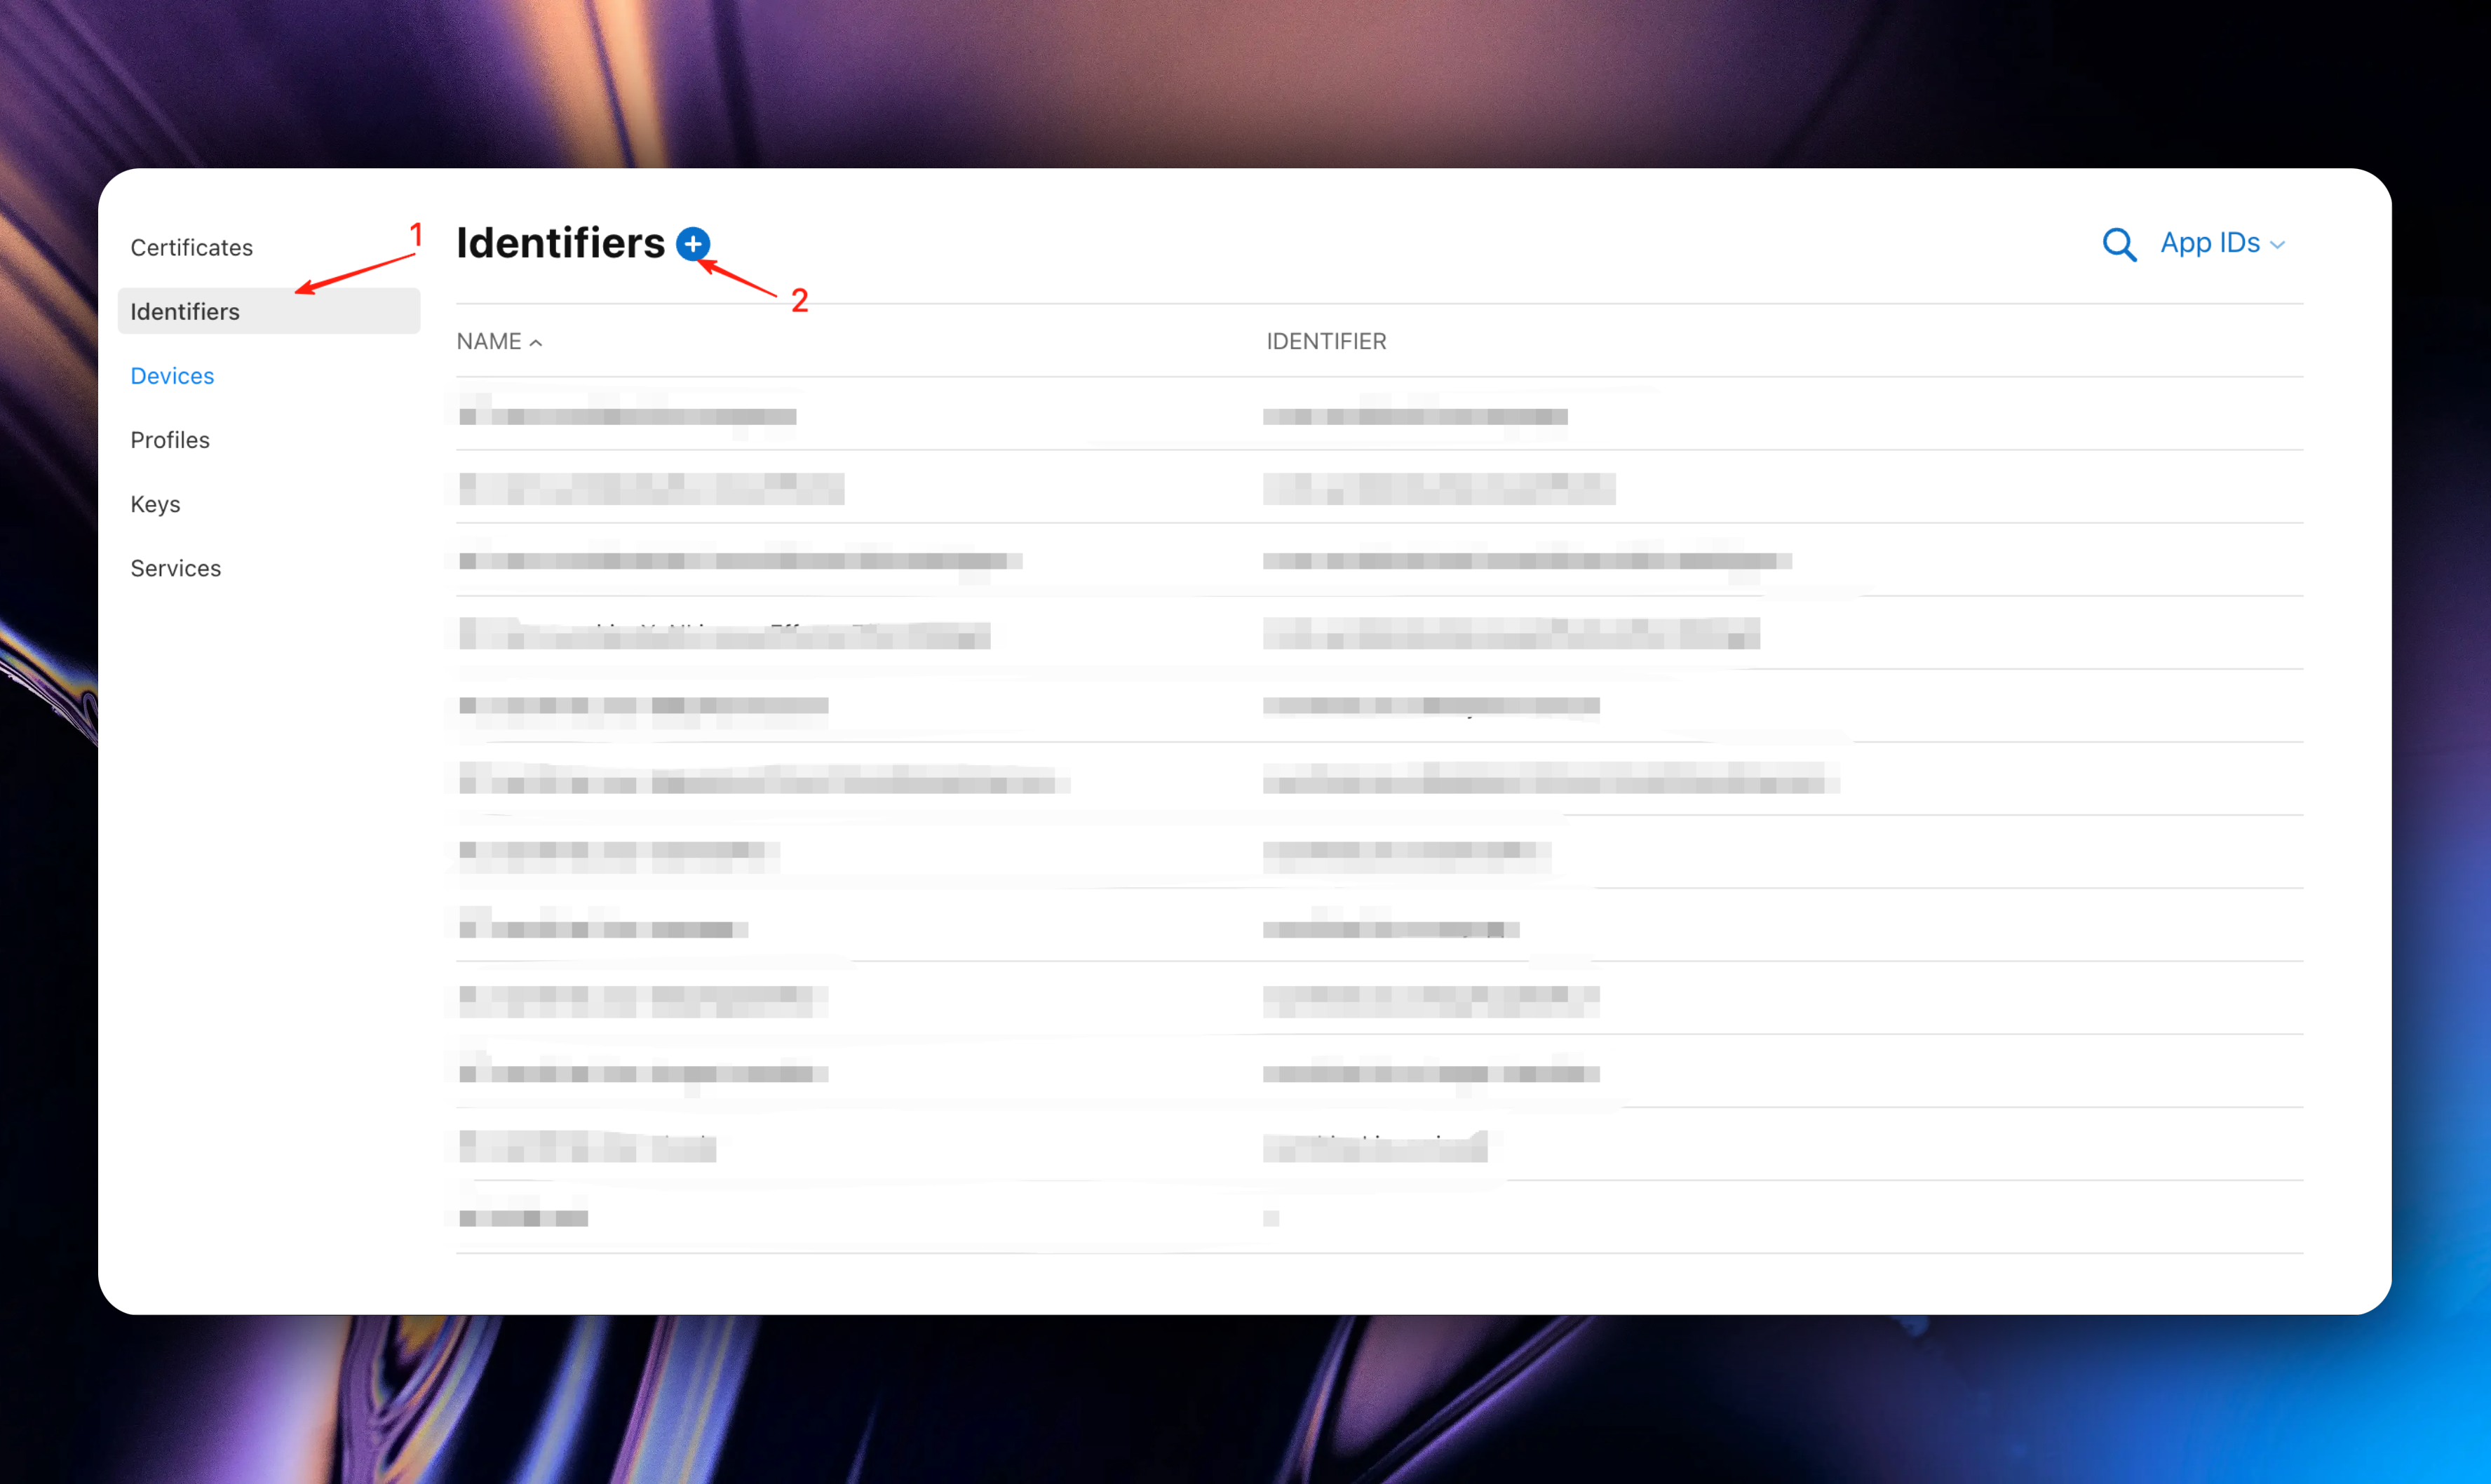
Select `Services IDs` and click the `Continue` button
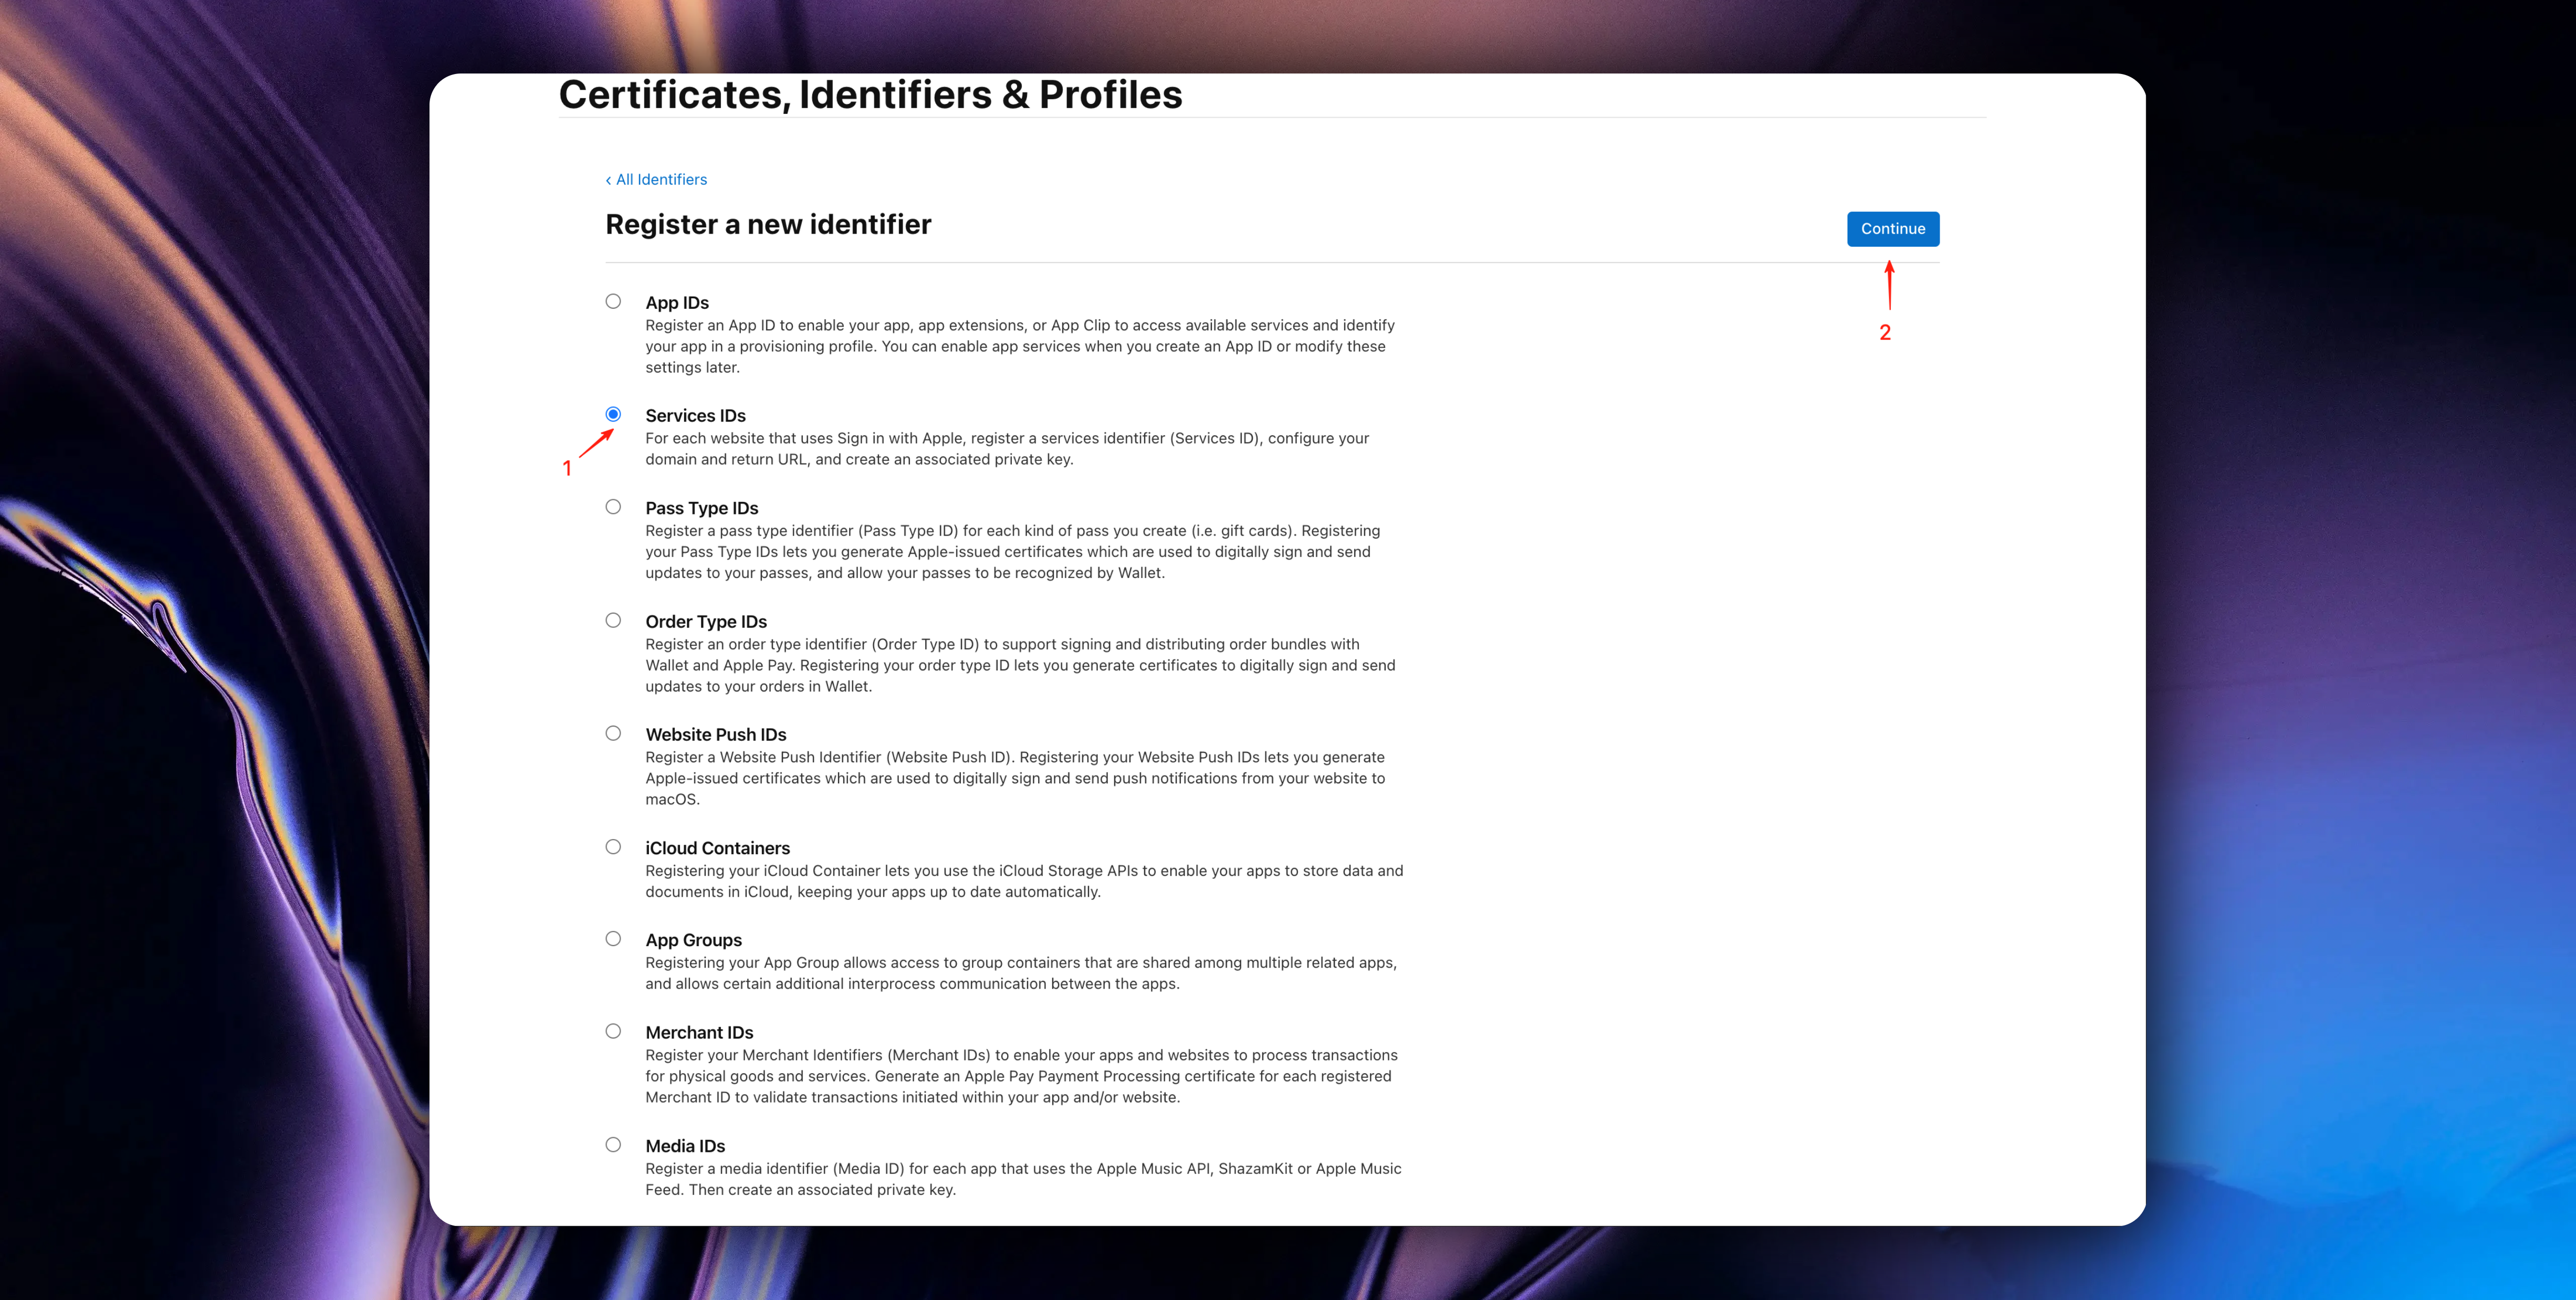
`Description` can be named using your app name + Services ID.
`Identifier` is recommended to be named as bundleID.ServicesID. Where bundleID is your app's unique identifier.
Click the `Continue` button
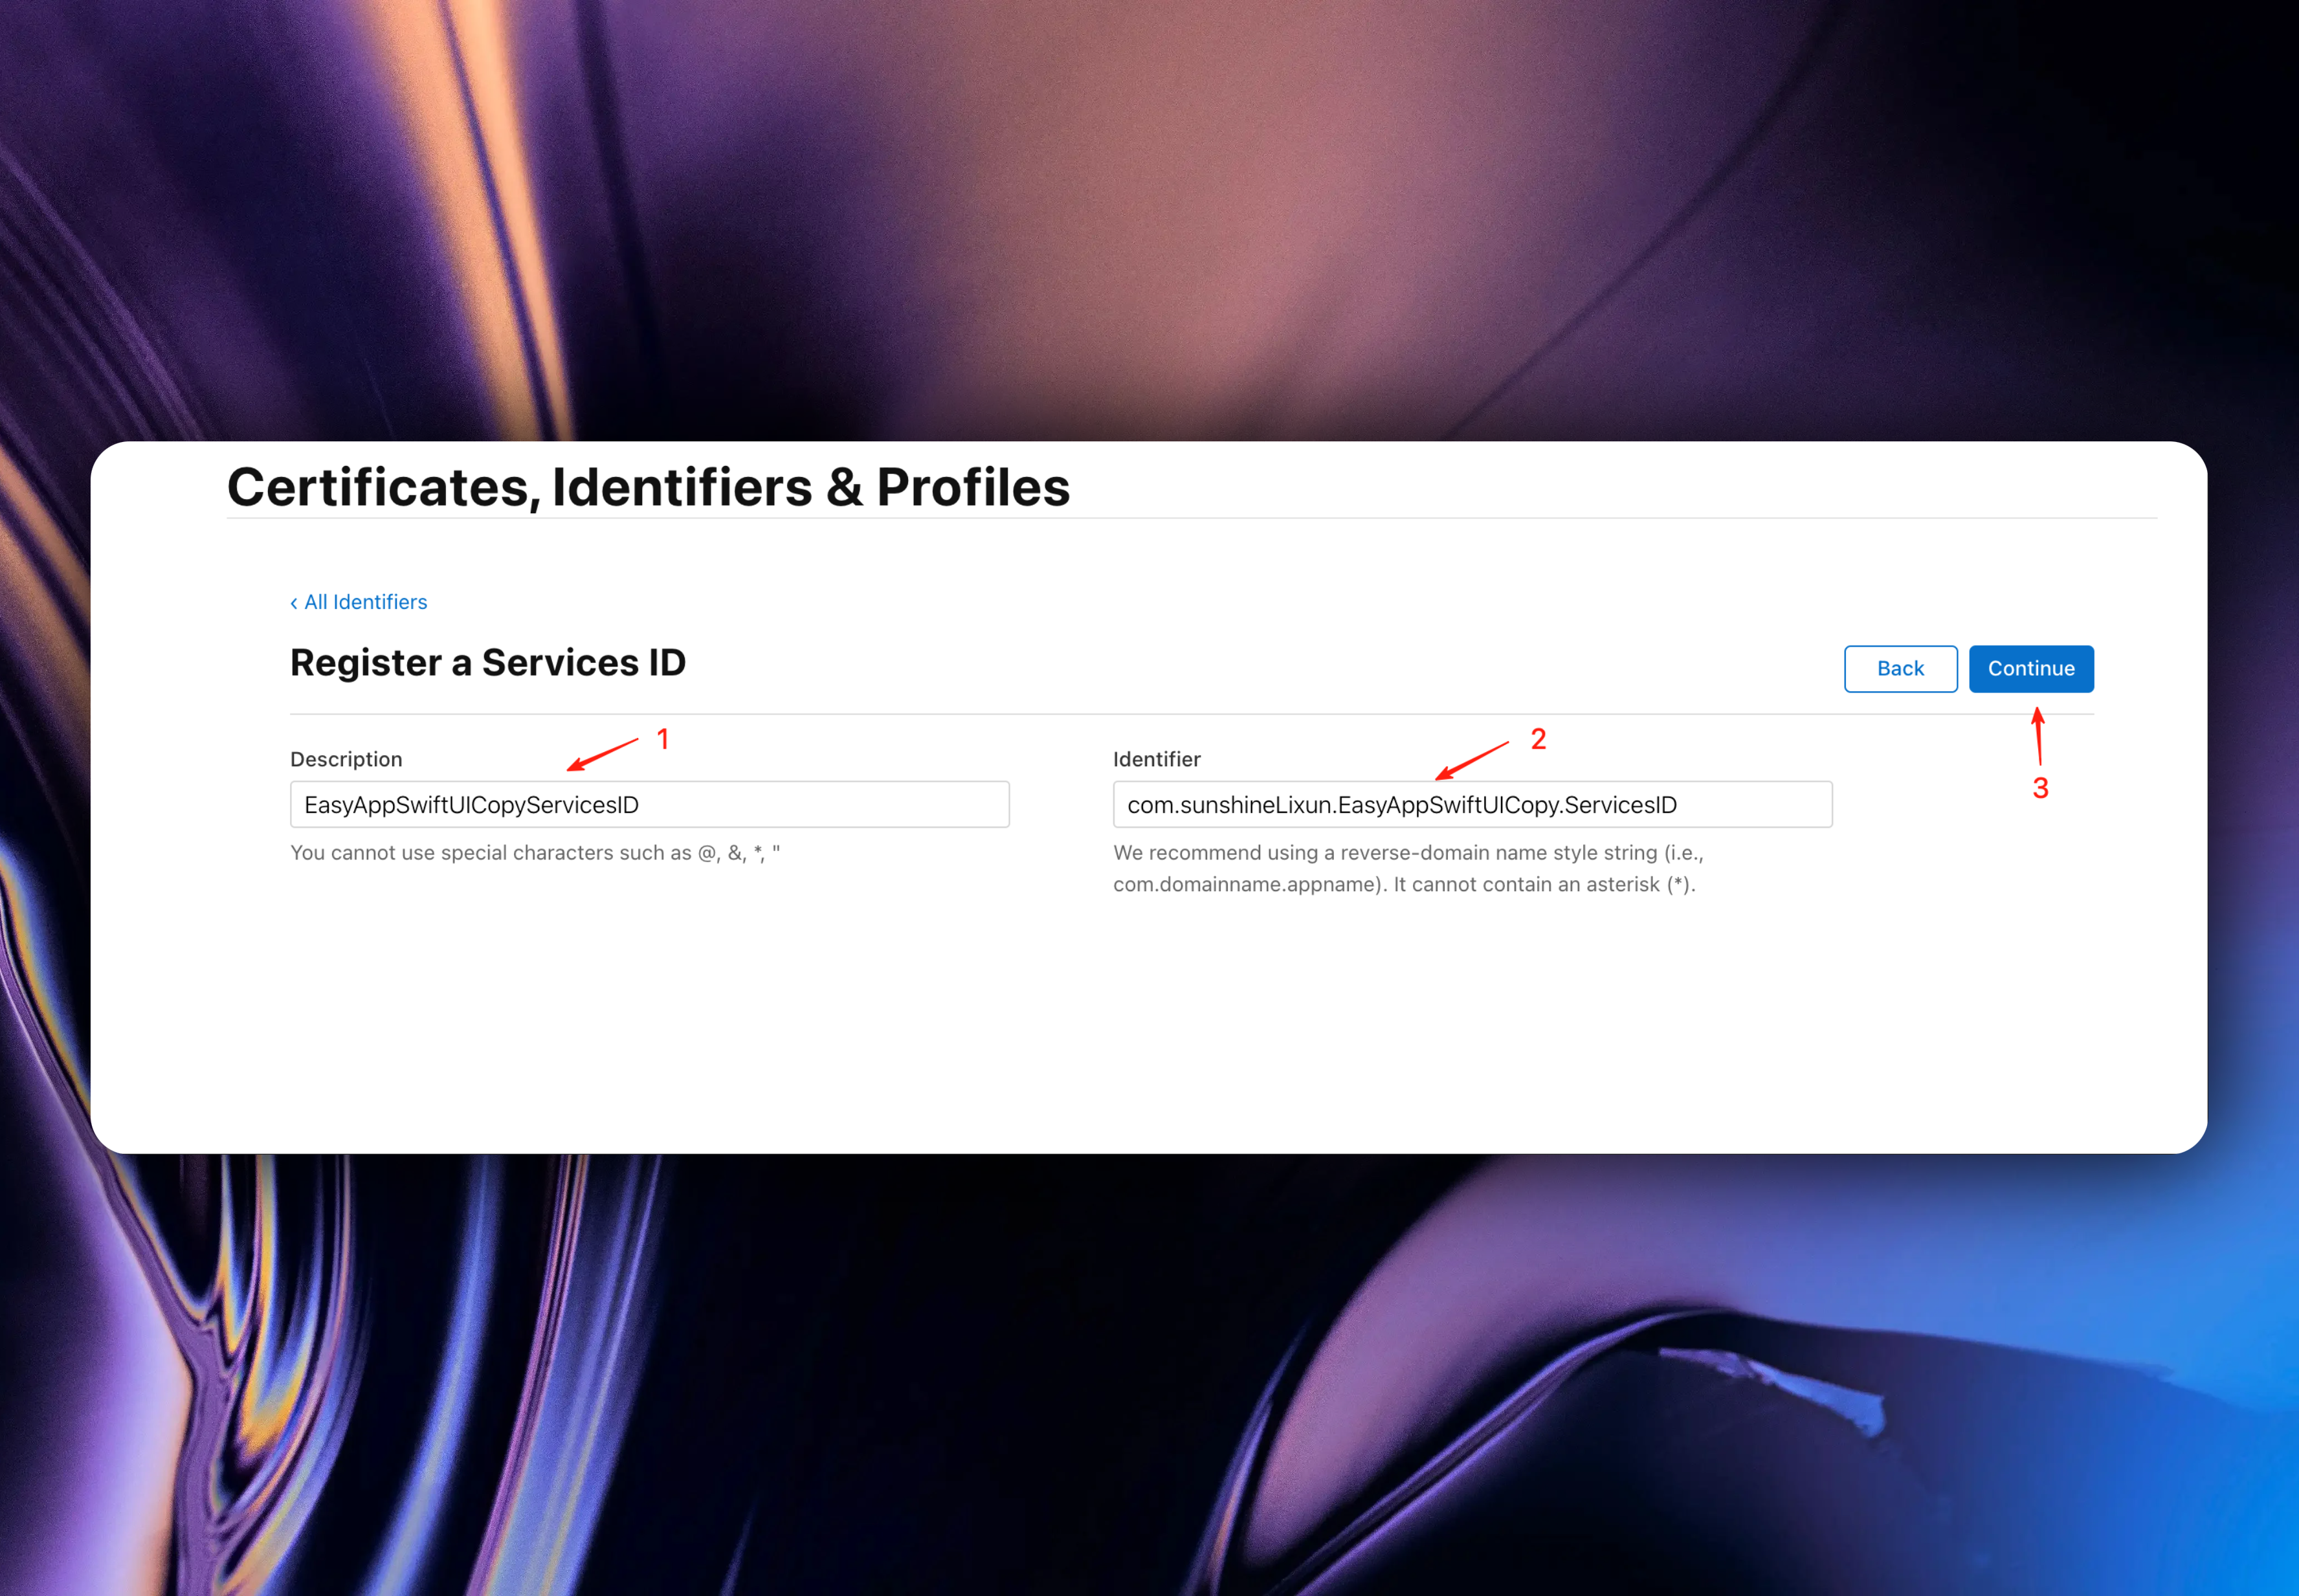
You can find bundleID in your Xcode project here.
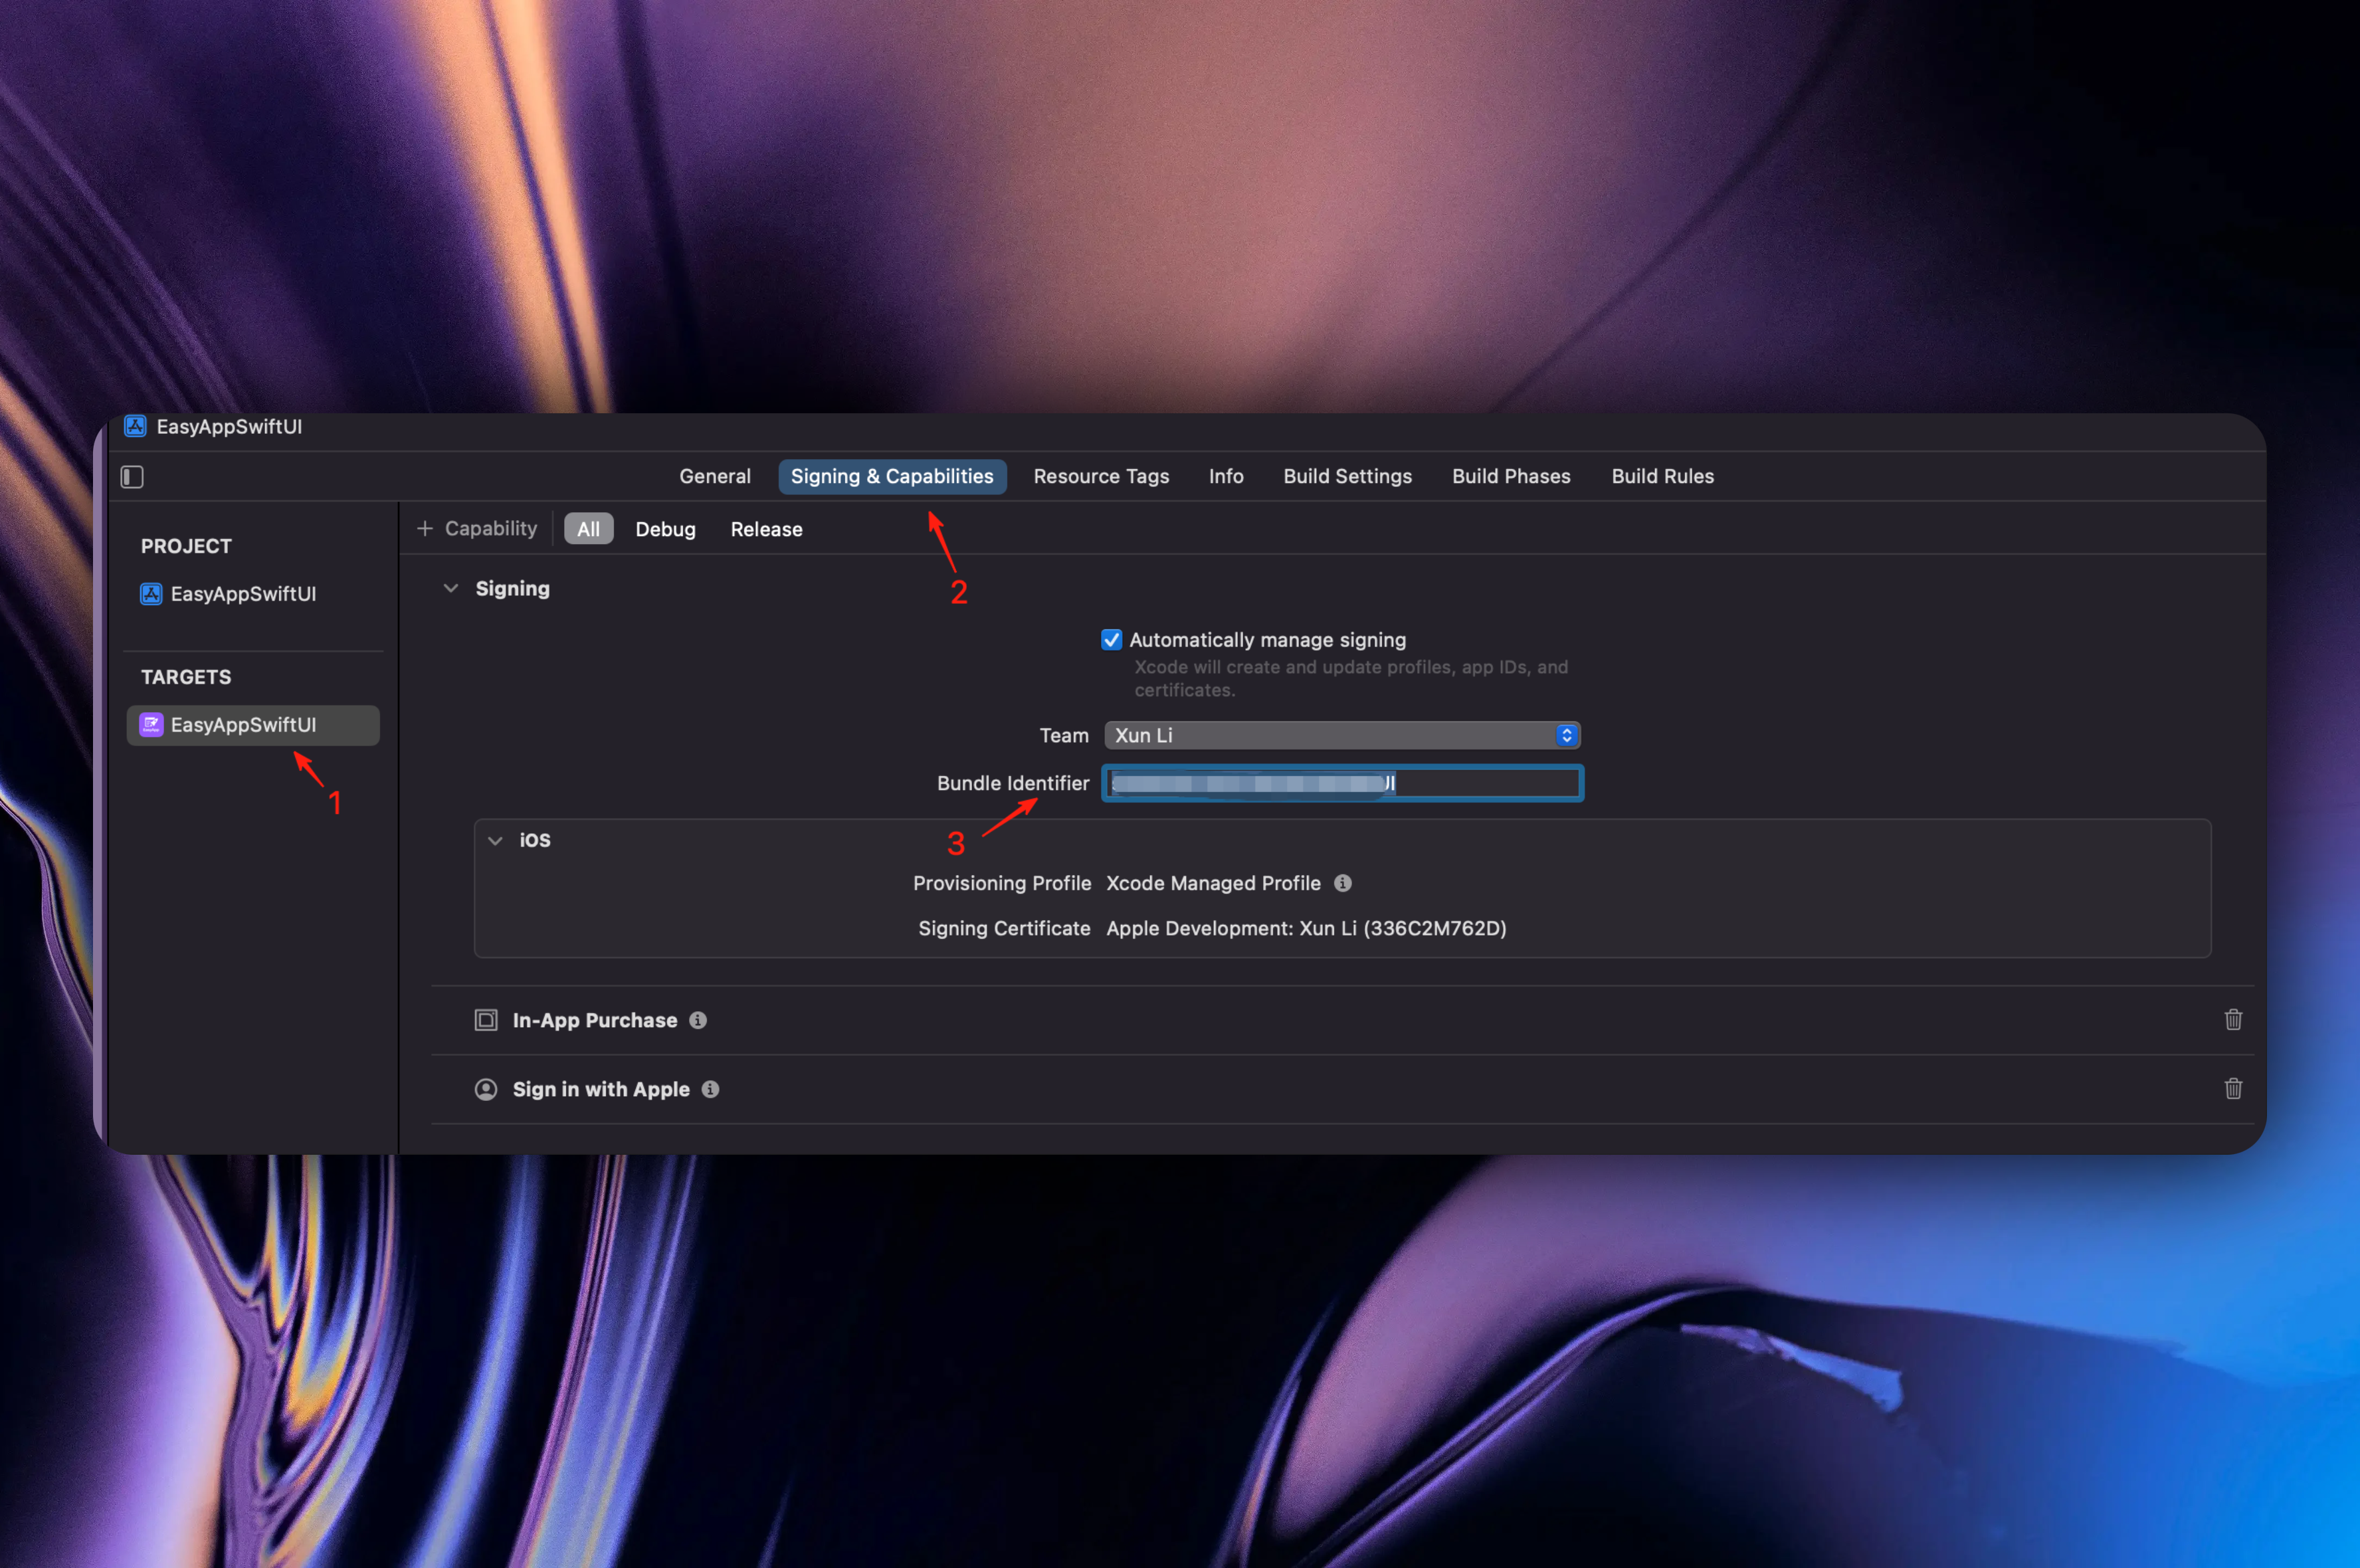
Click the `Register` button

After completion, return to the `Identifiers` page and click the `Services IDs` we just created
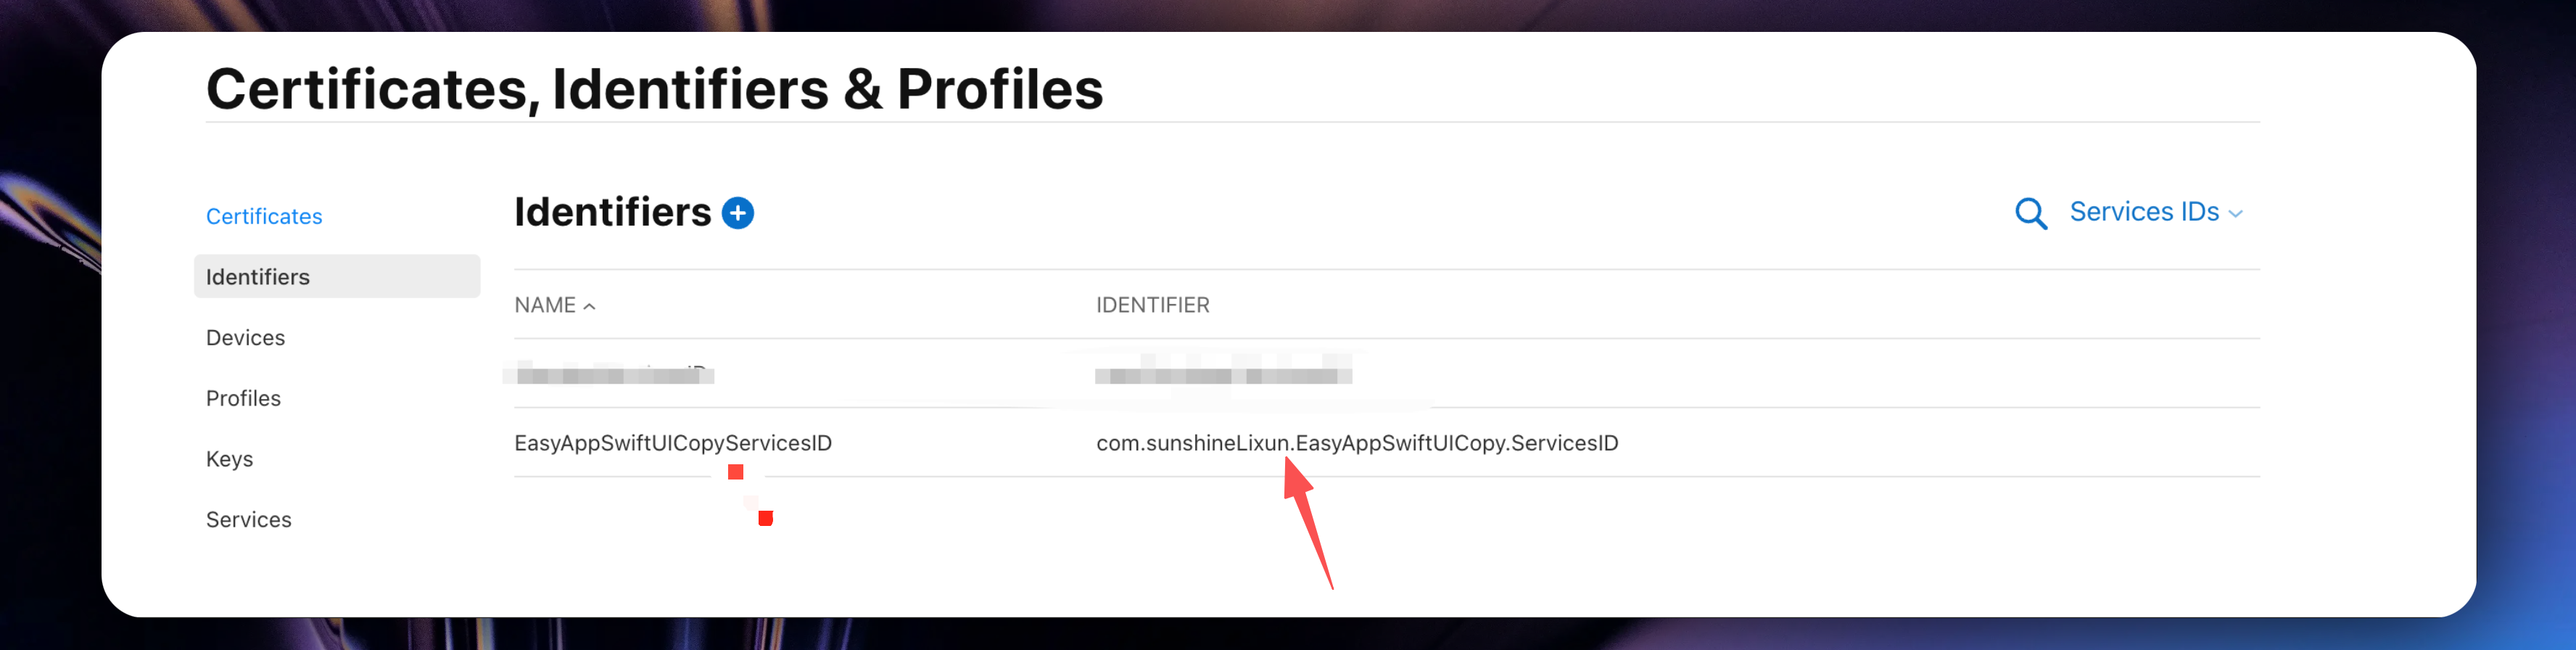
If you can't find the `Services IDs` we just created, filter as shown below
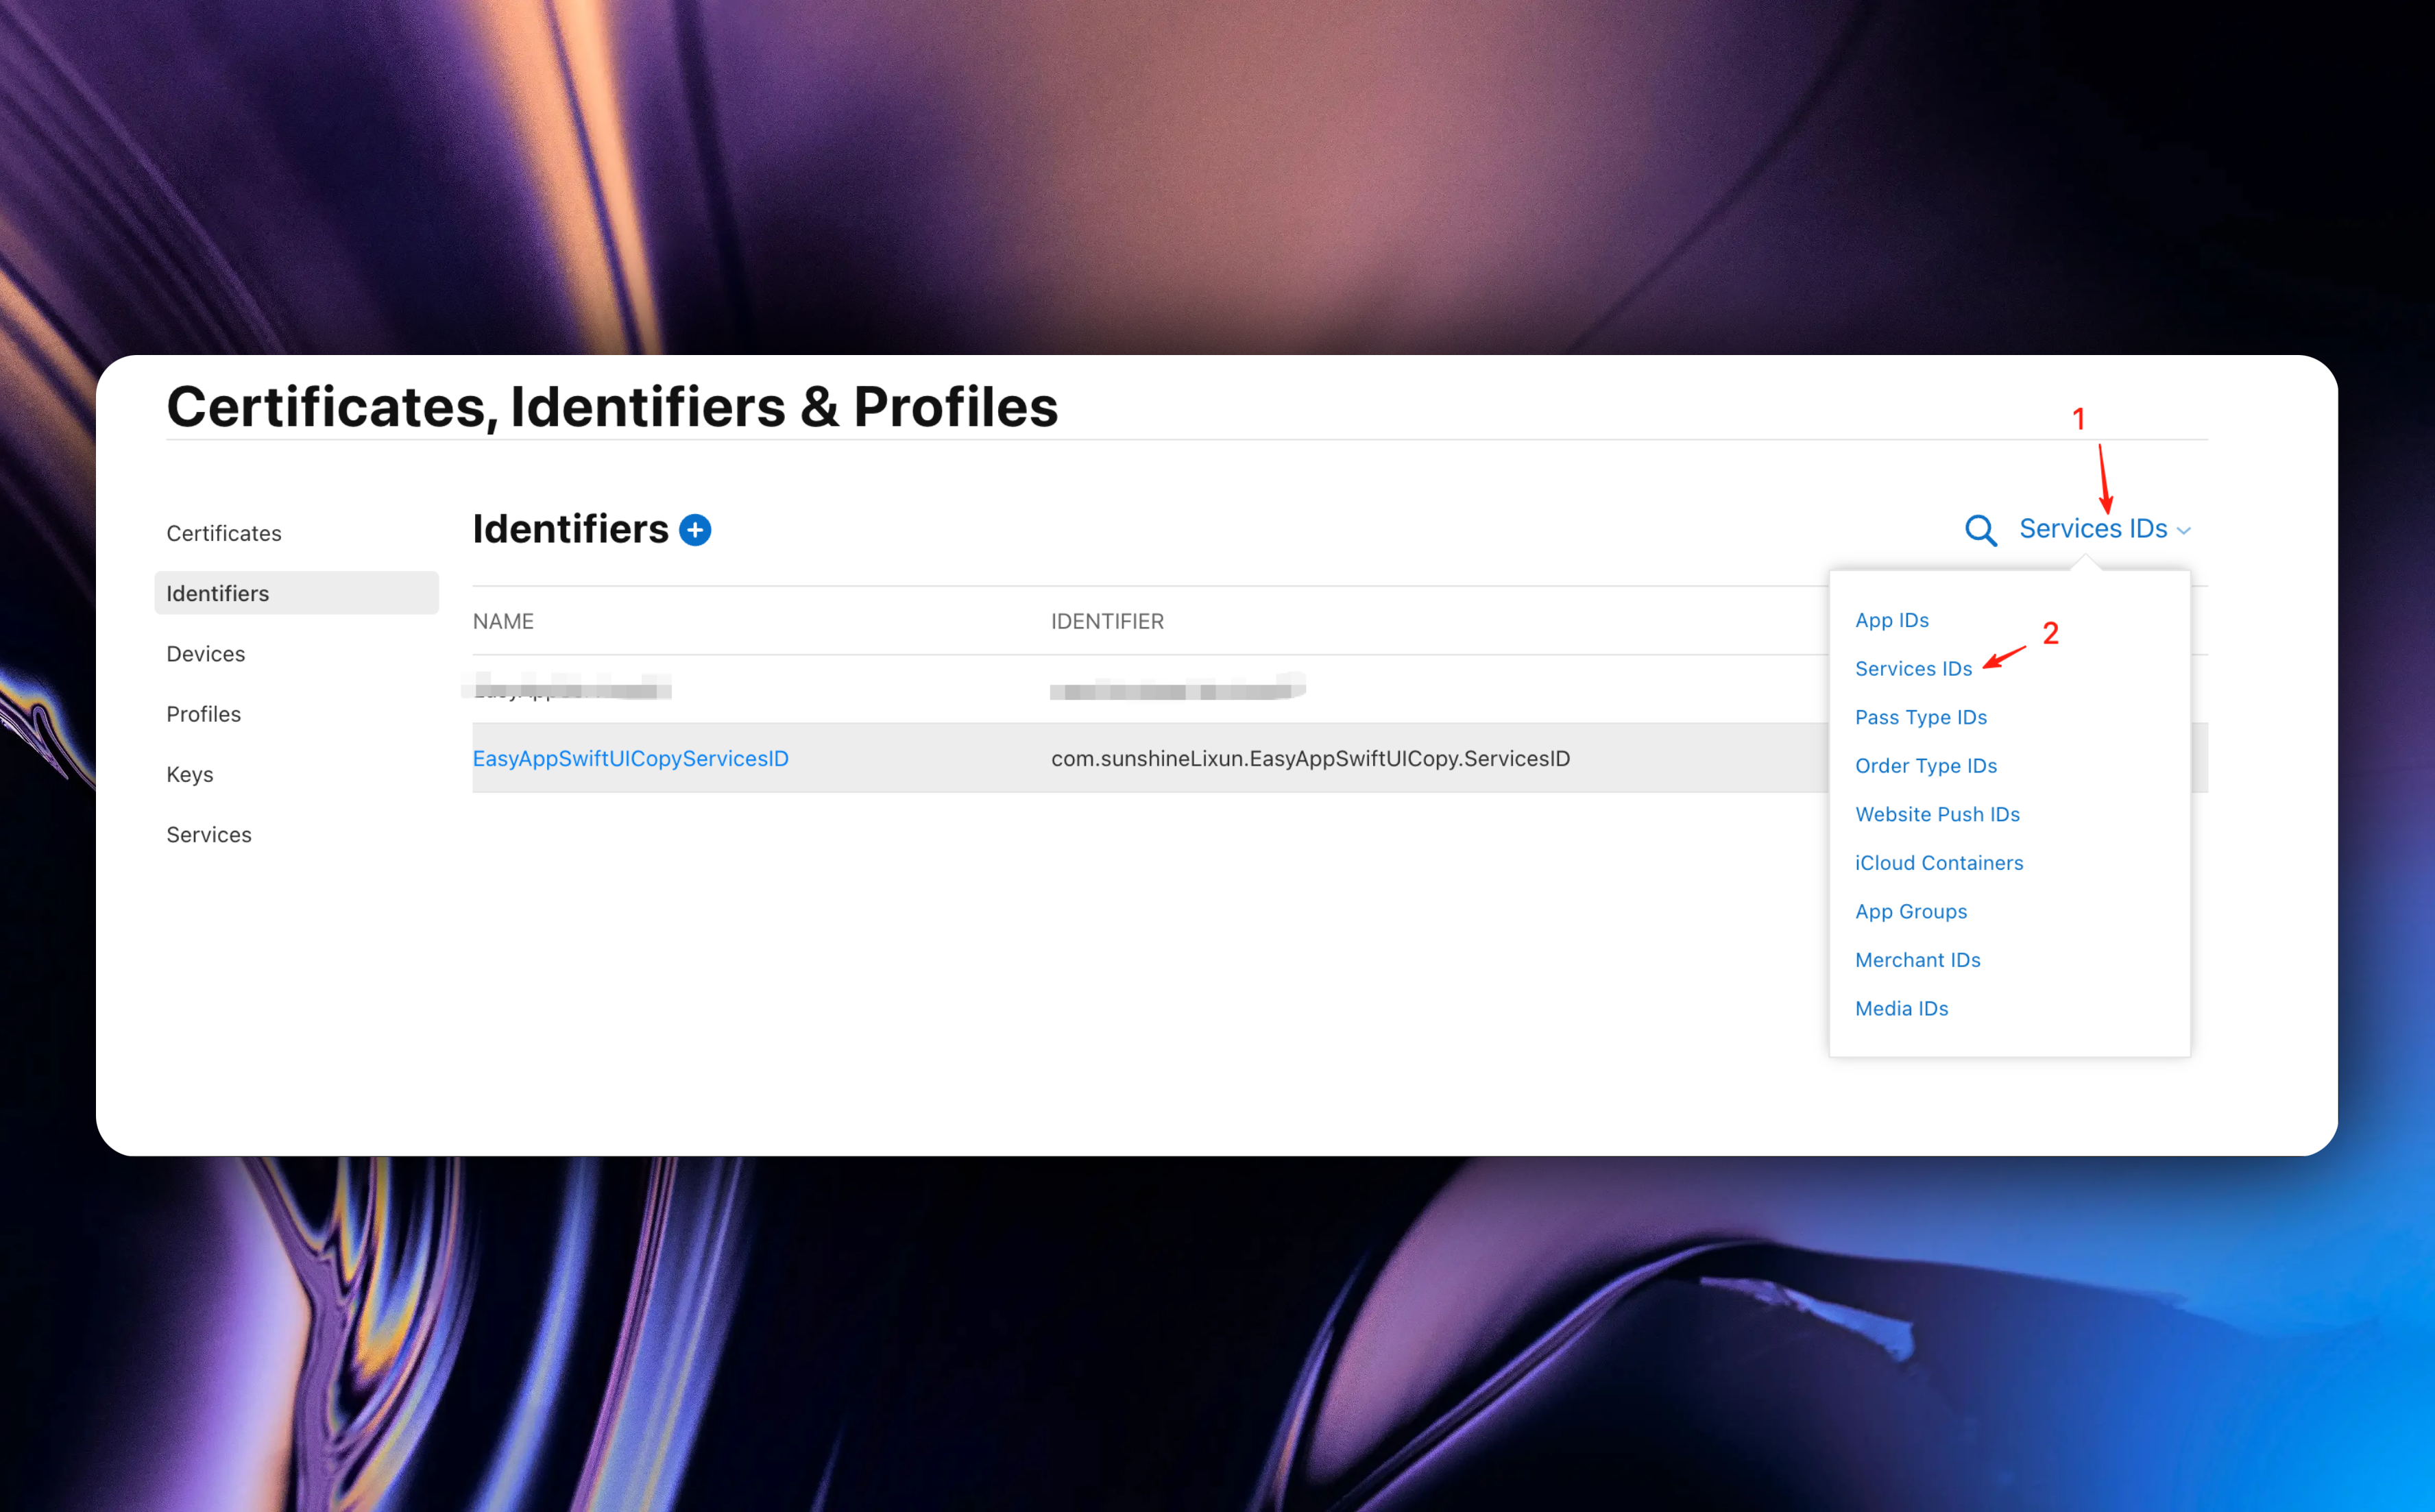
Enable `Sign in with Apple` function and click the `Configure` button
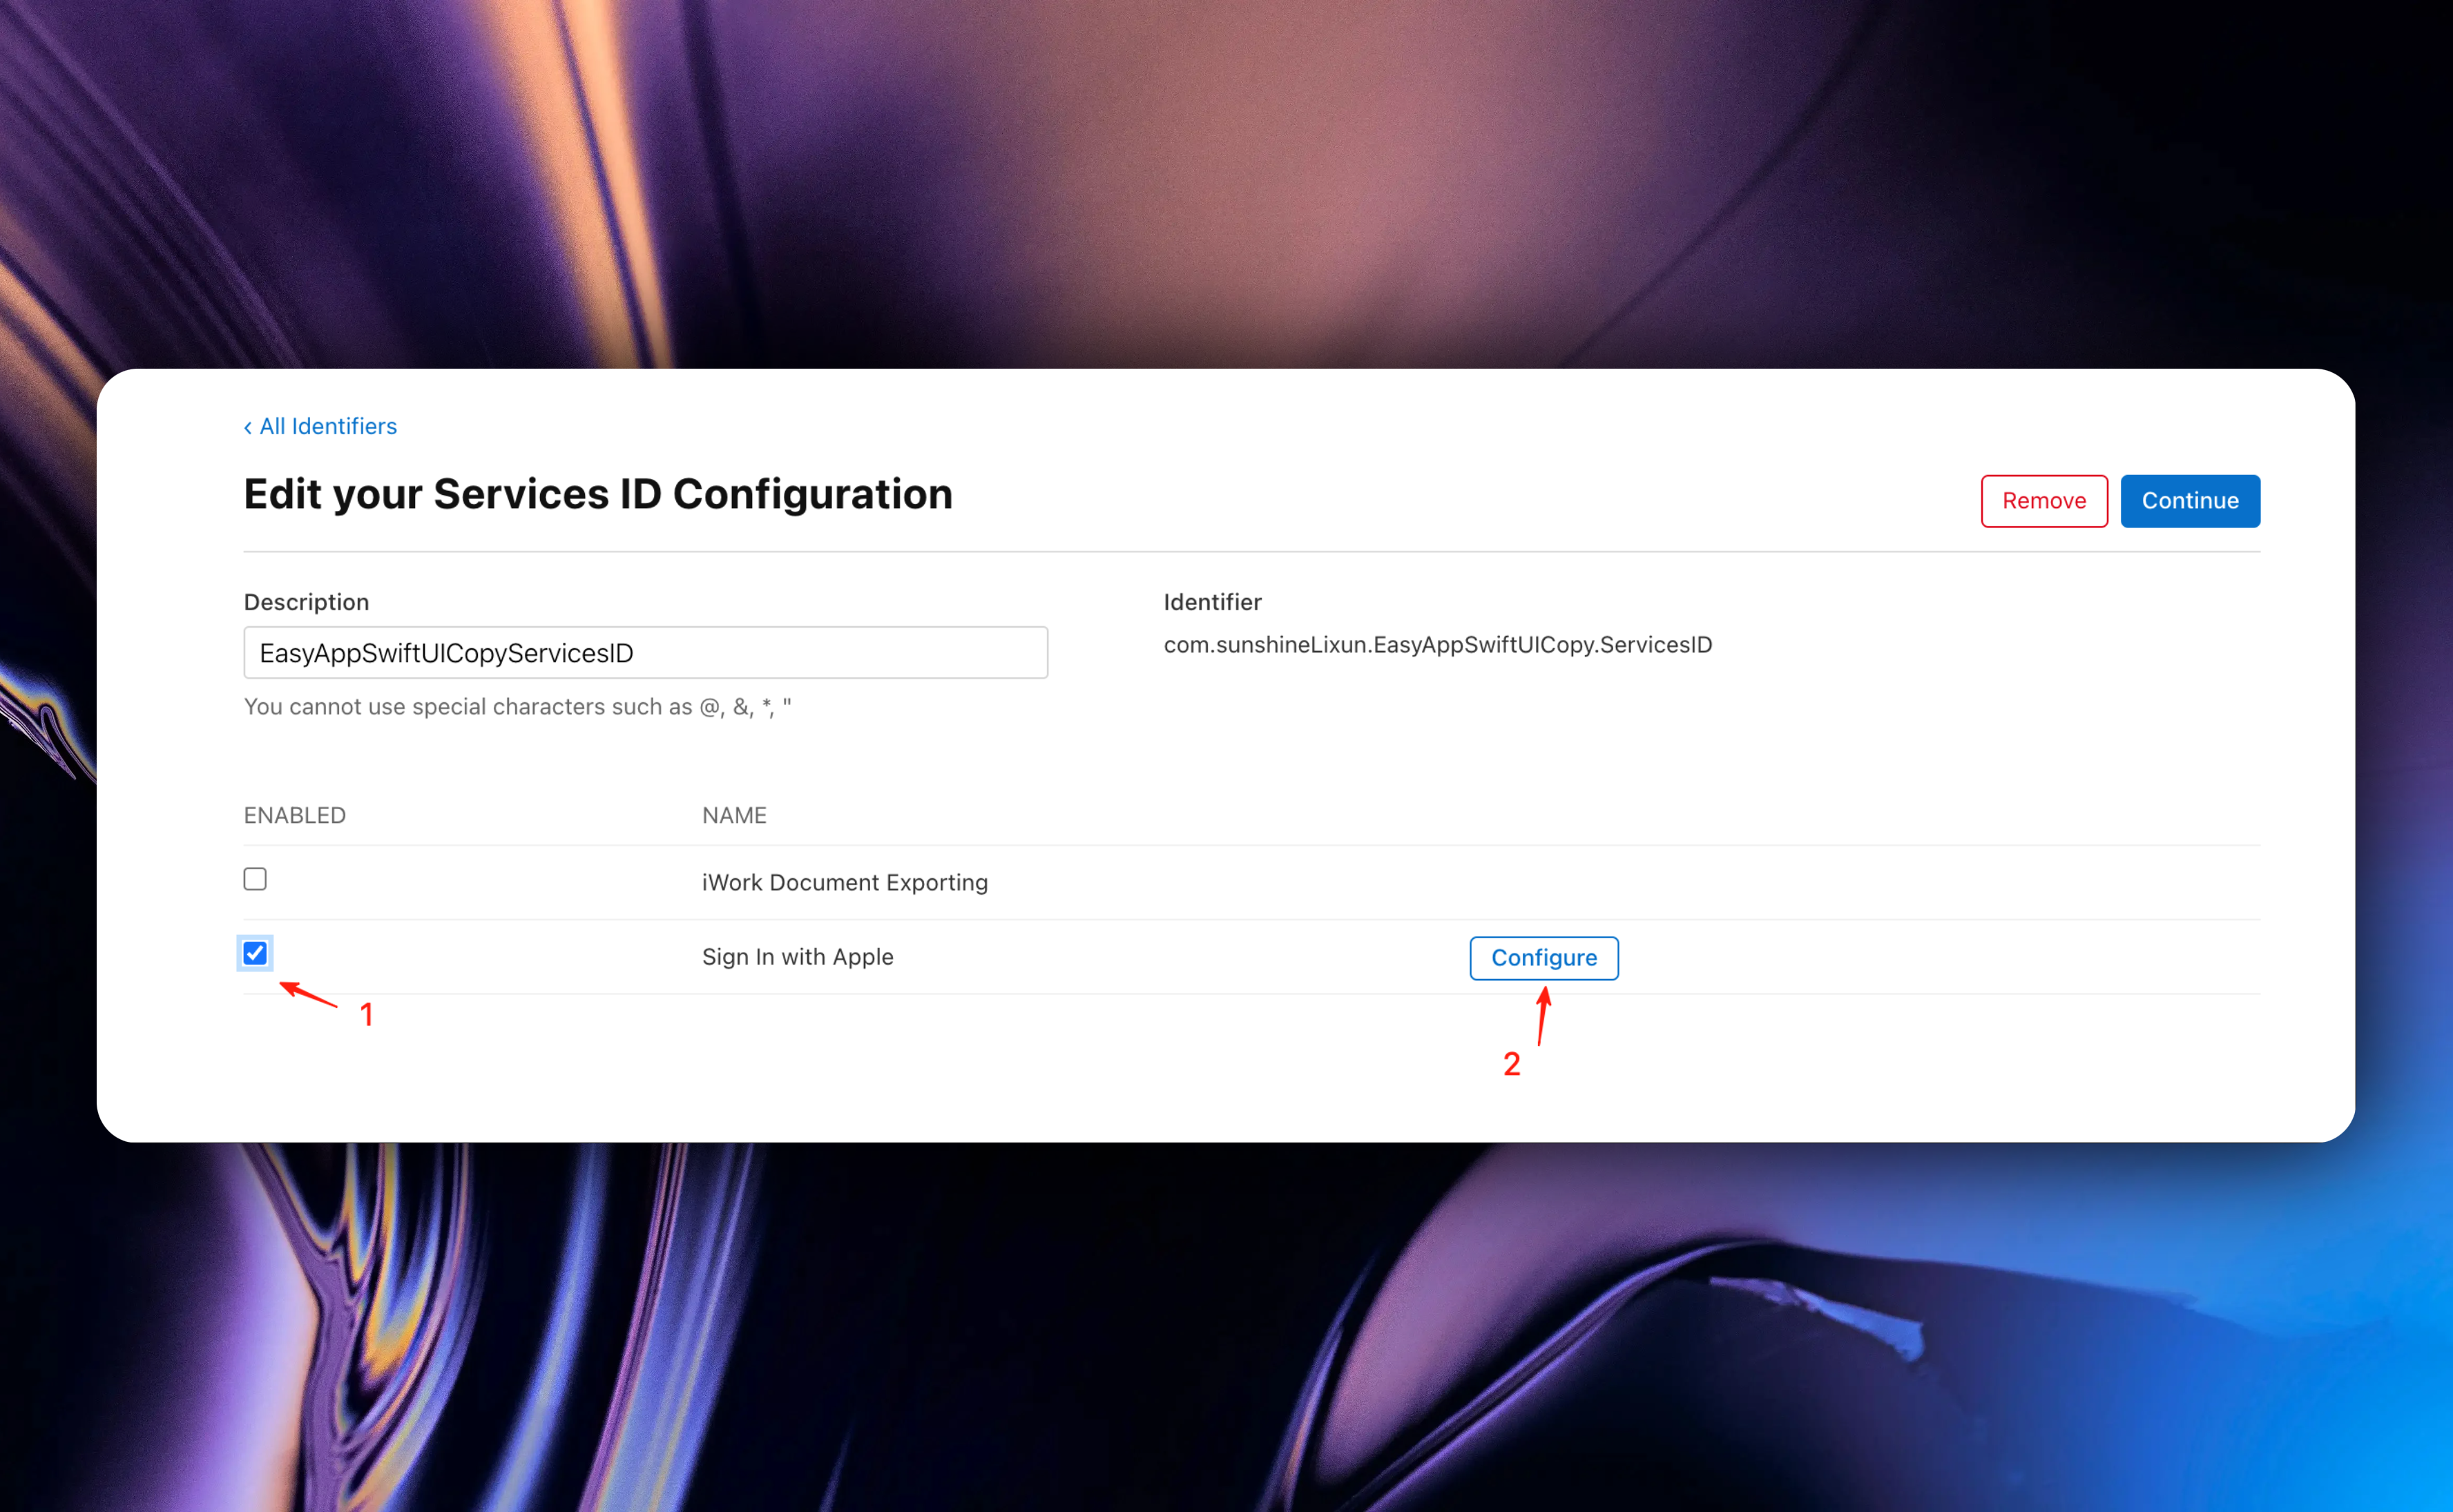
In the popup window, you need to configure the following options:
Please replace `SUPABASE_PROJECT_ID` with your Supabase project ID. You can find it here
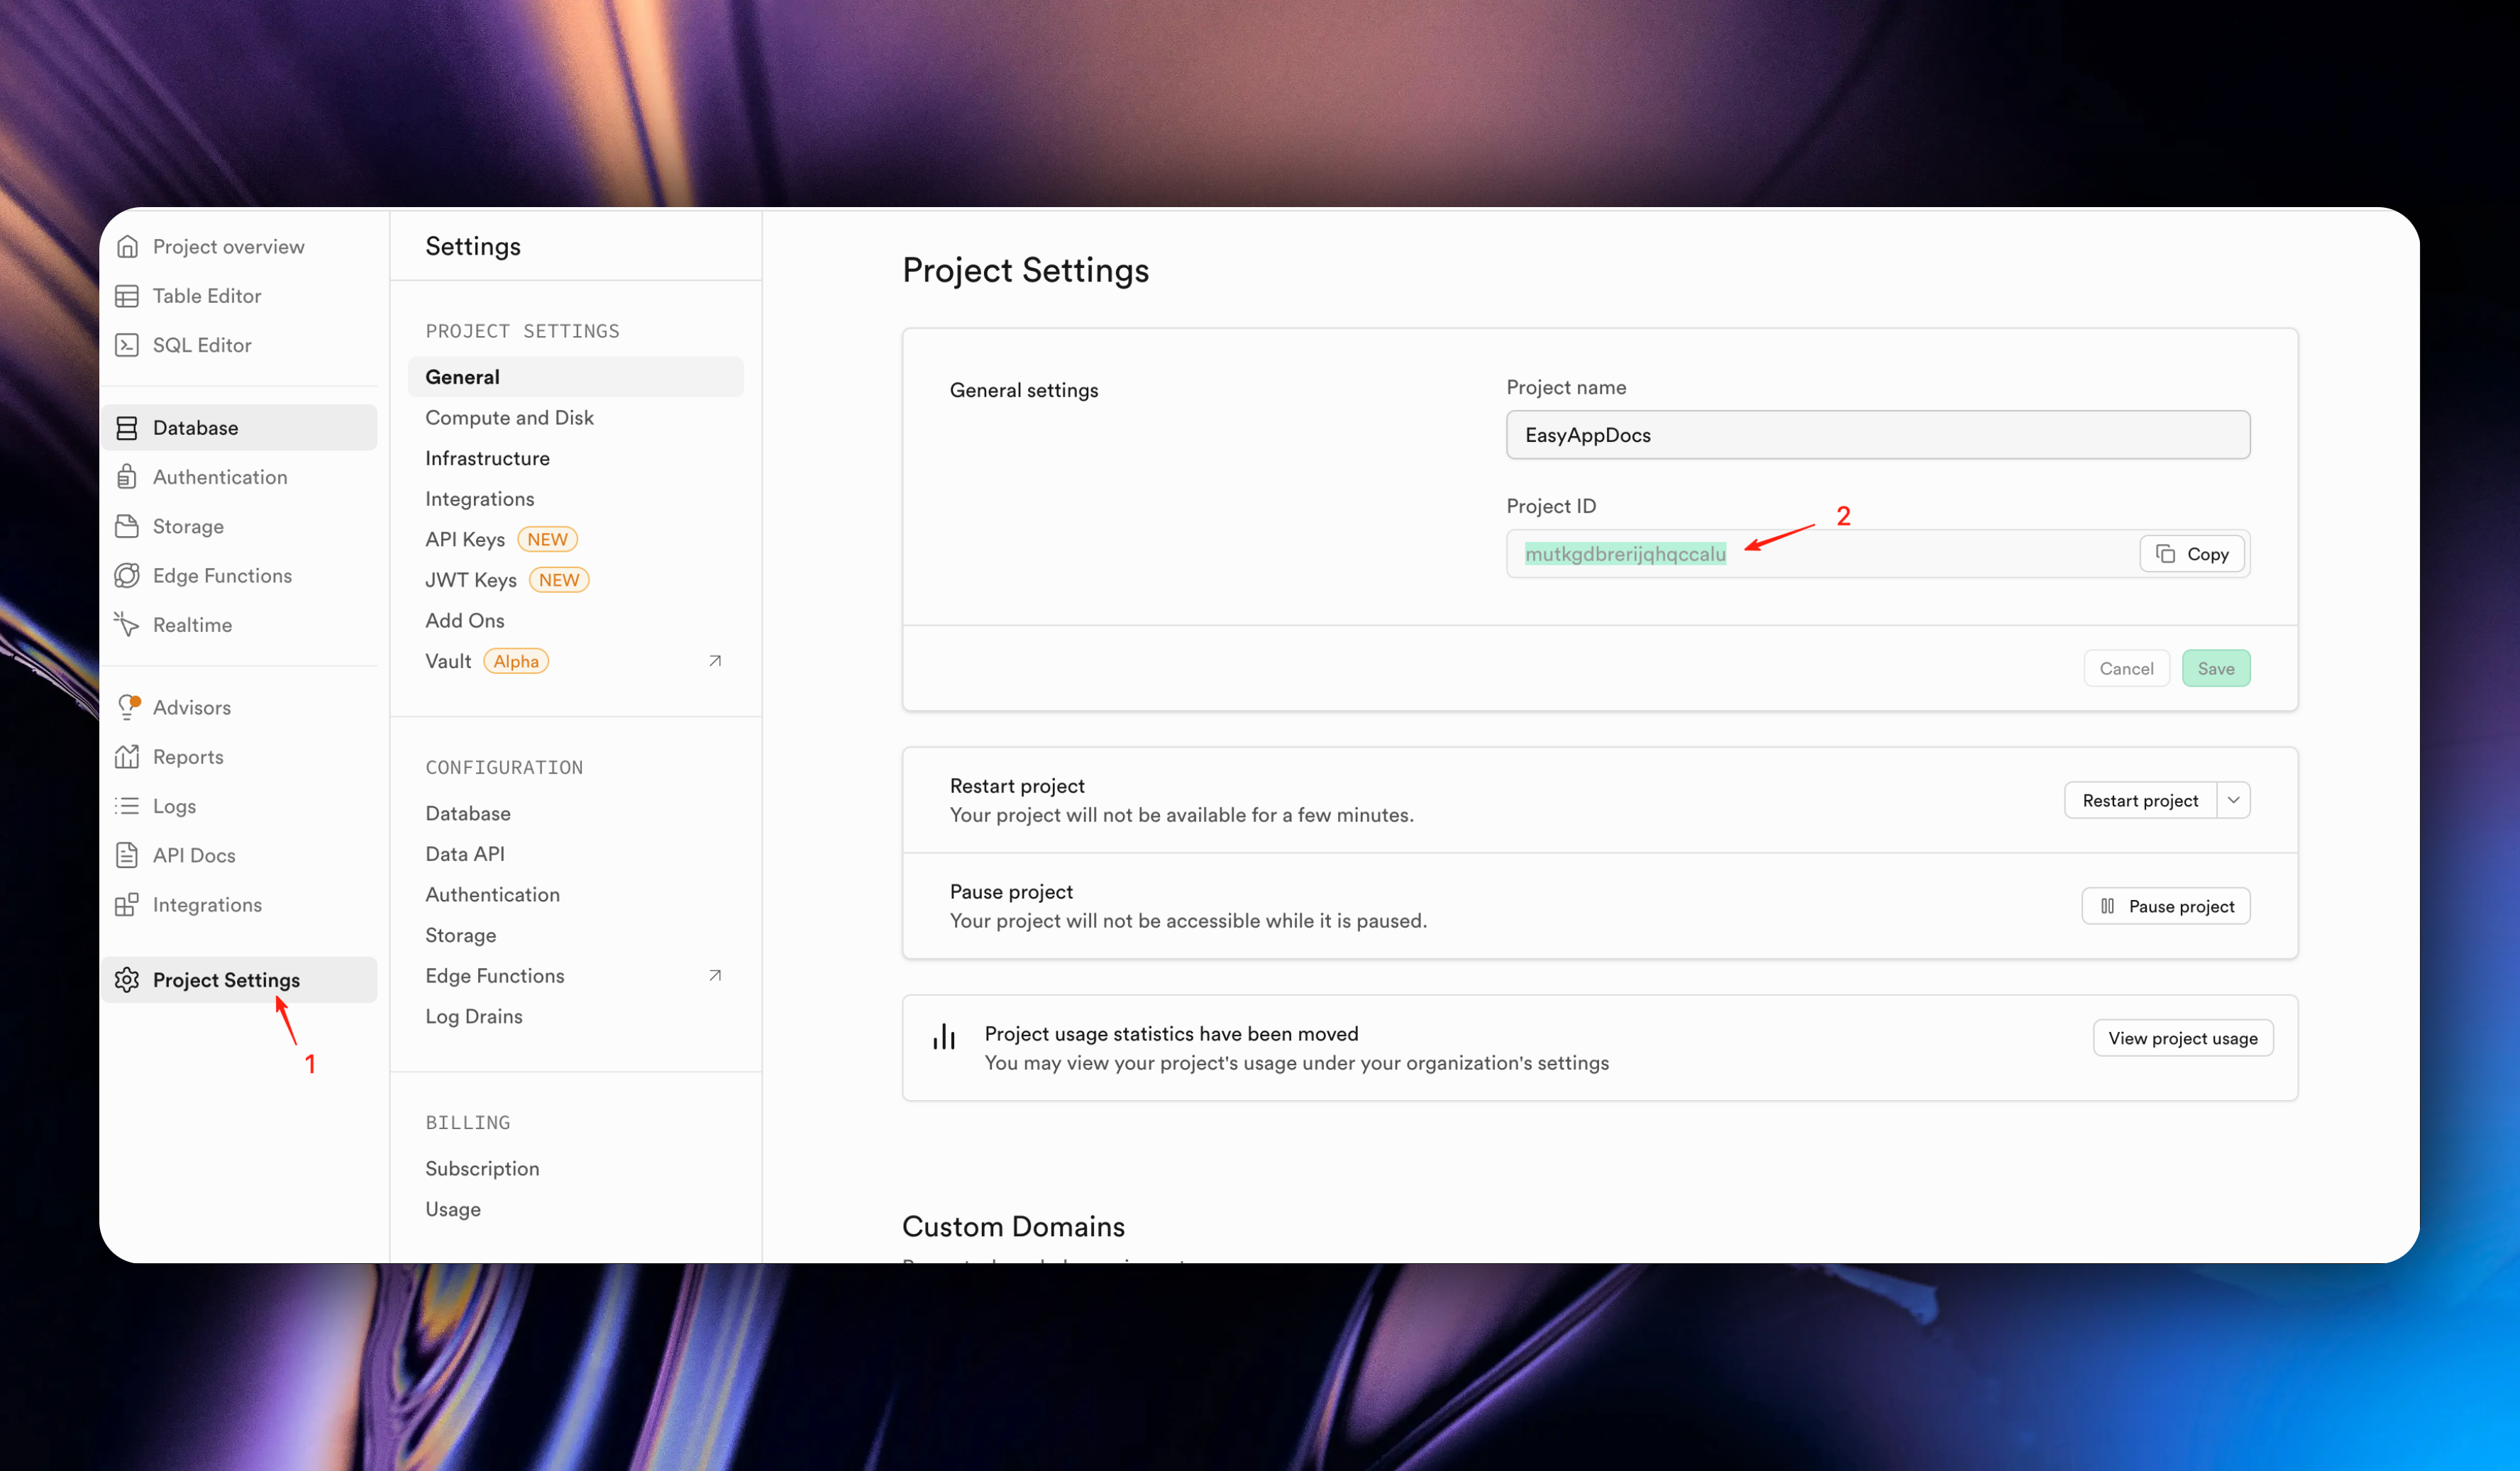
In the documentation example, our `SUPABASE_PROJECT_ID` is `mutkgdbrerijqhqccalu`.
1. In `Primary App ID`, select your App's `Bundle Identifier` from the dropdown.
2. In the `Domains and Subdomains` field, enter `supabase.co,SUPABASE_PROJECT_ID.supabase.co`
3. In the `Return URLs` field, enter `https://SUPABASE_PROJECT_ID.supabase.co/auth/v1/callback`
4. Click the `Next` button and `Done` button
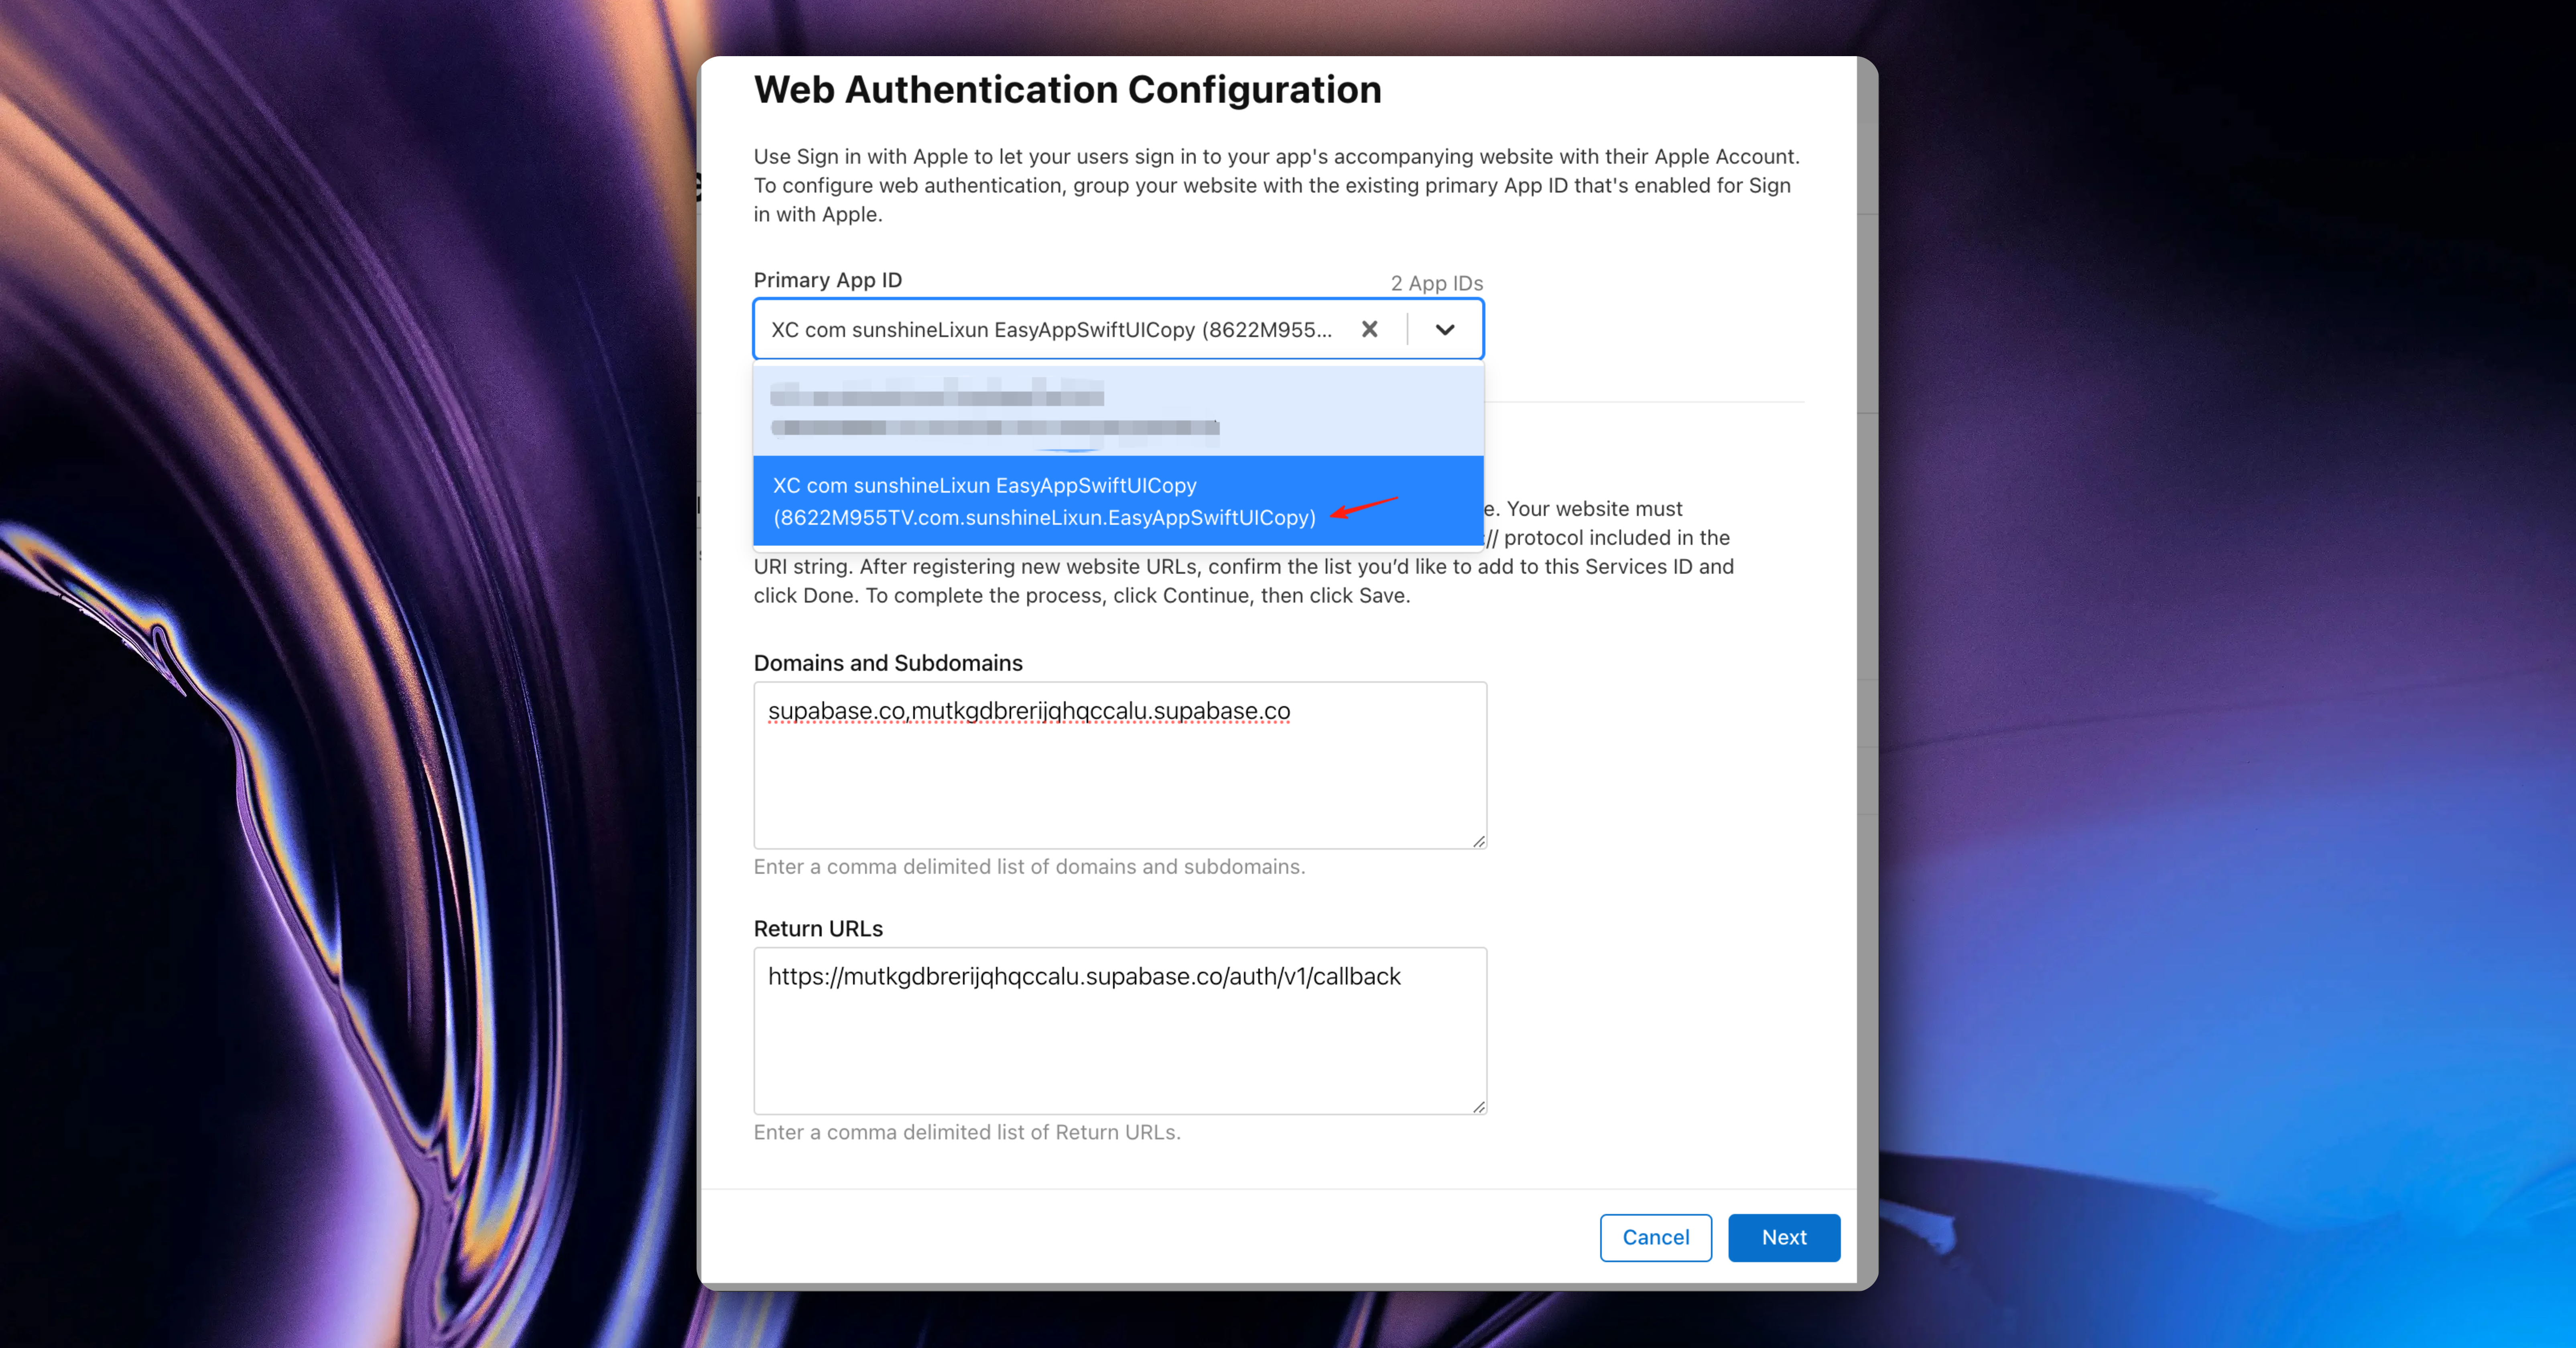
Click the `Continue` button and click the `Save` button
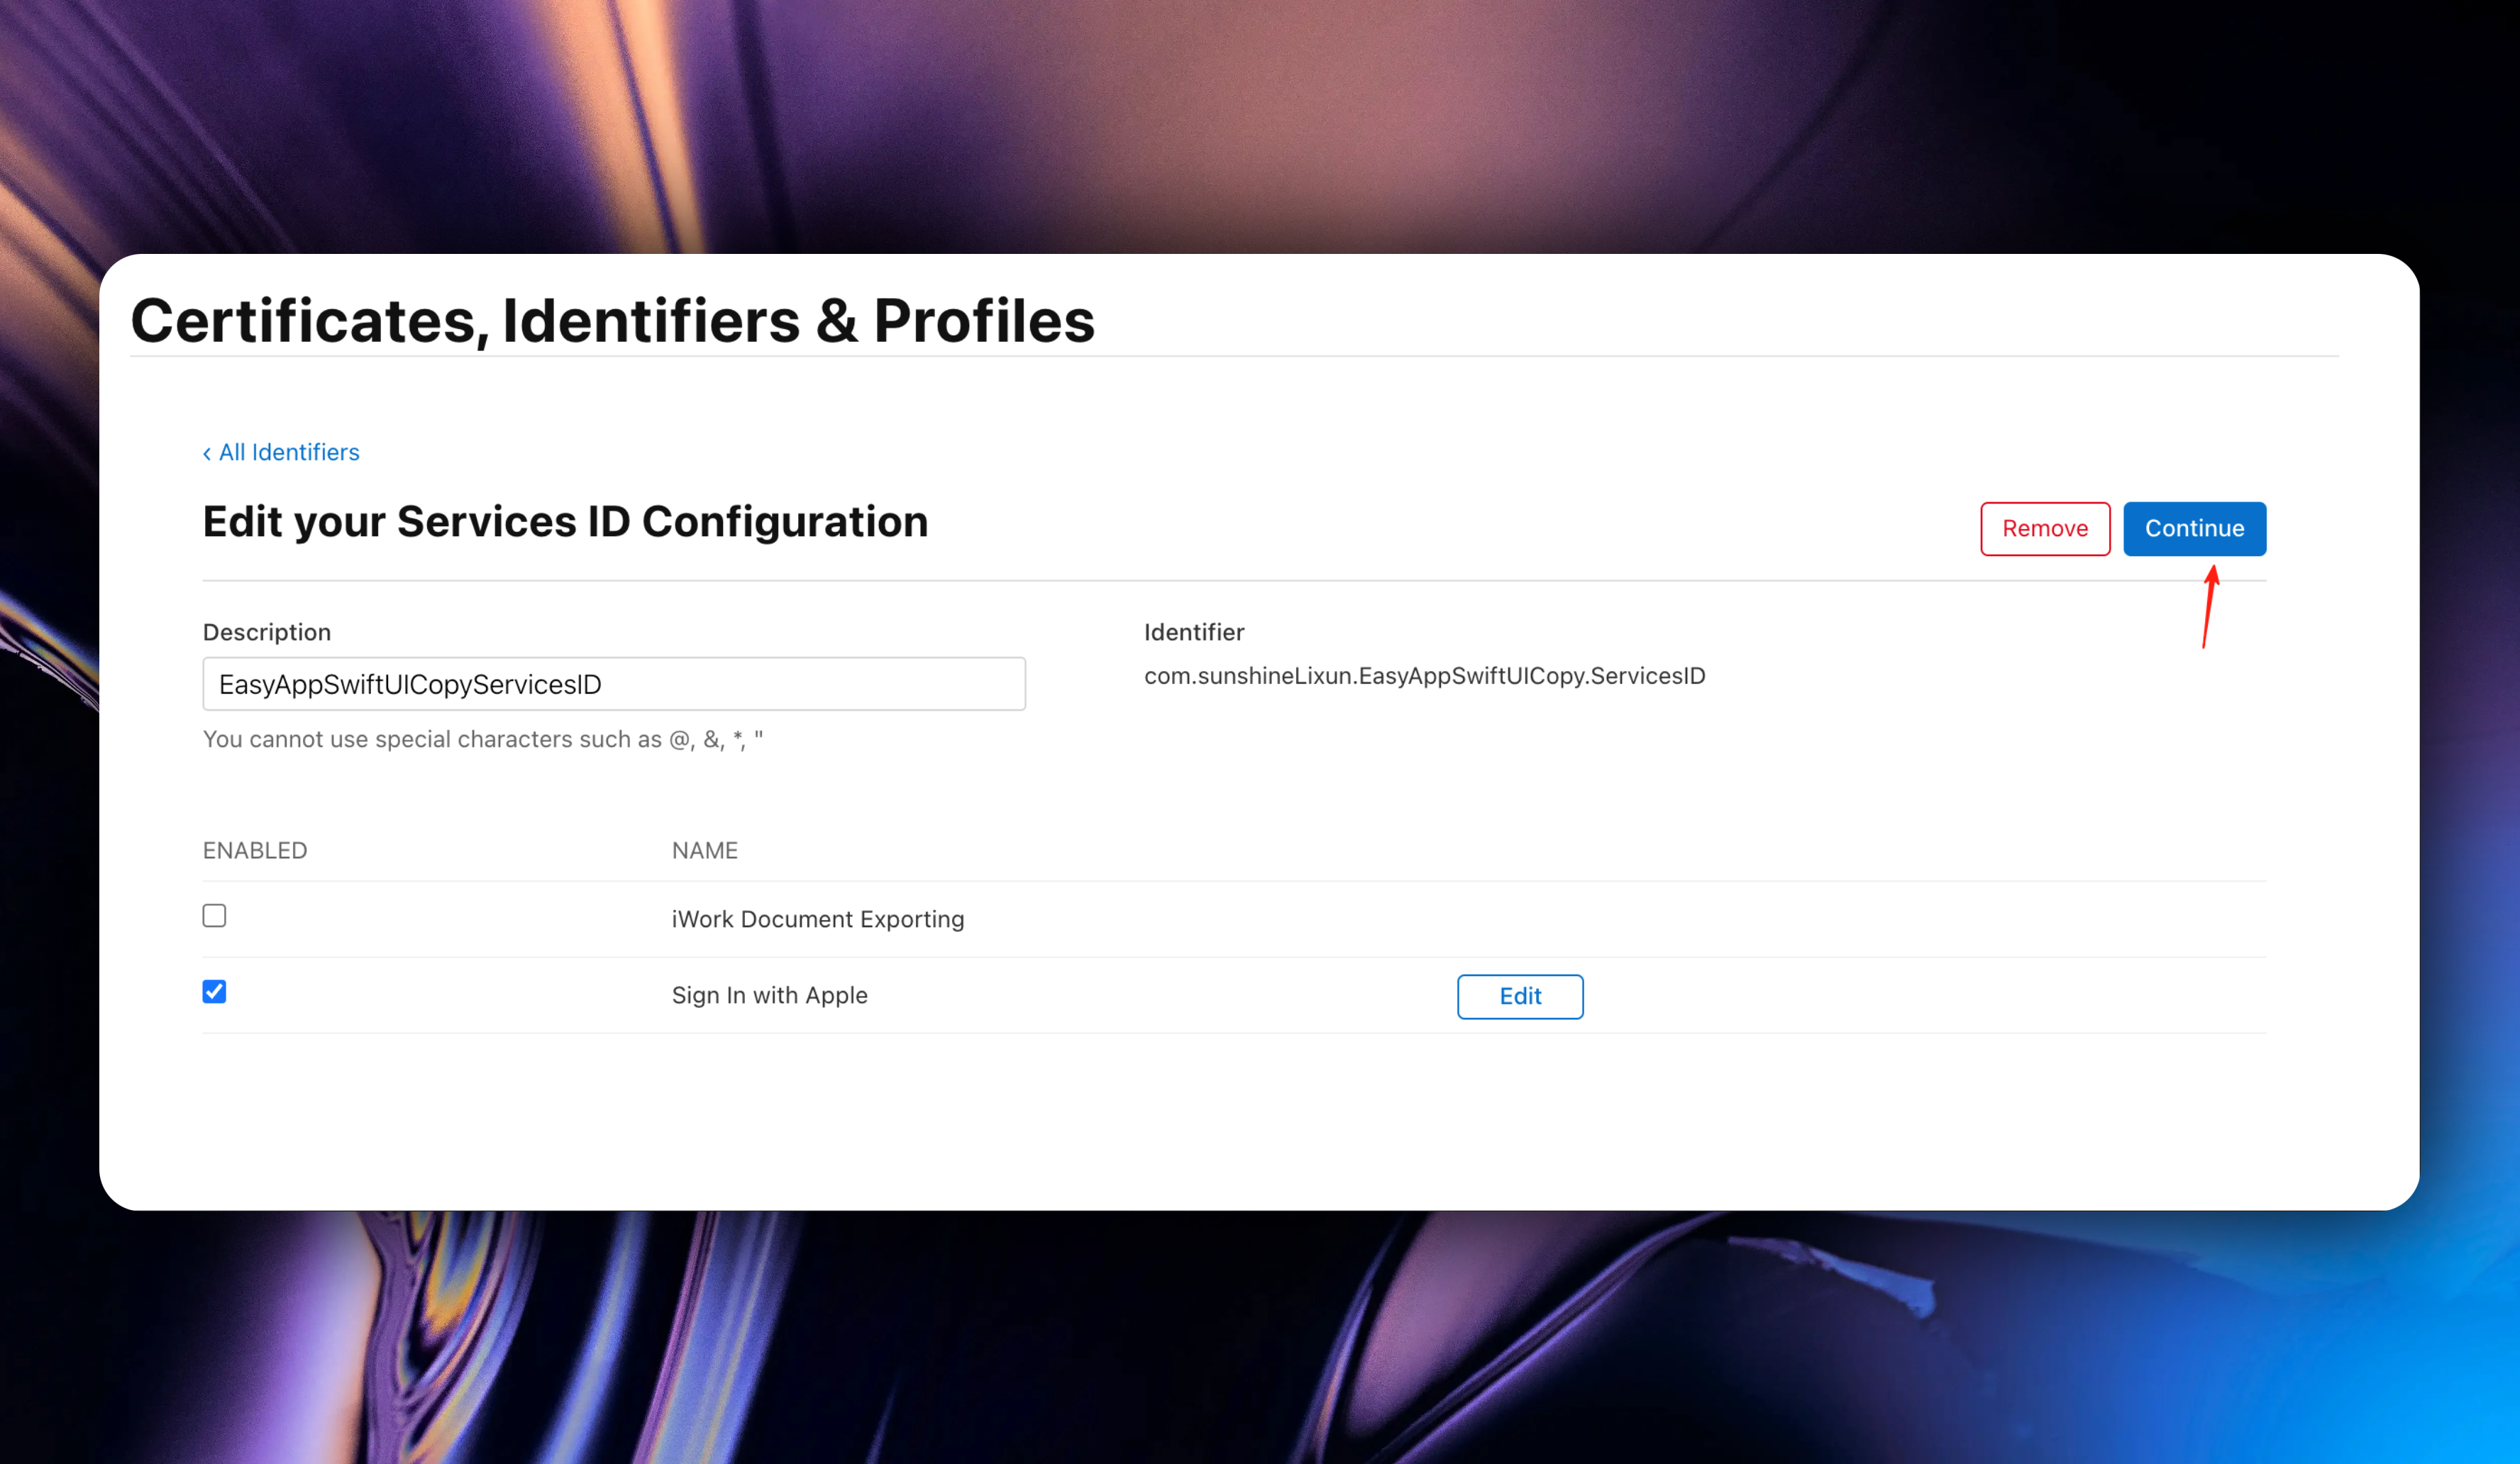
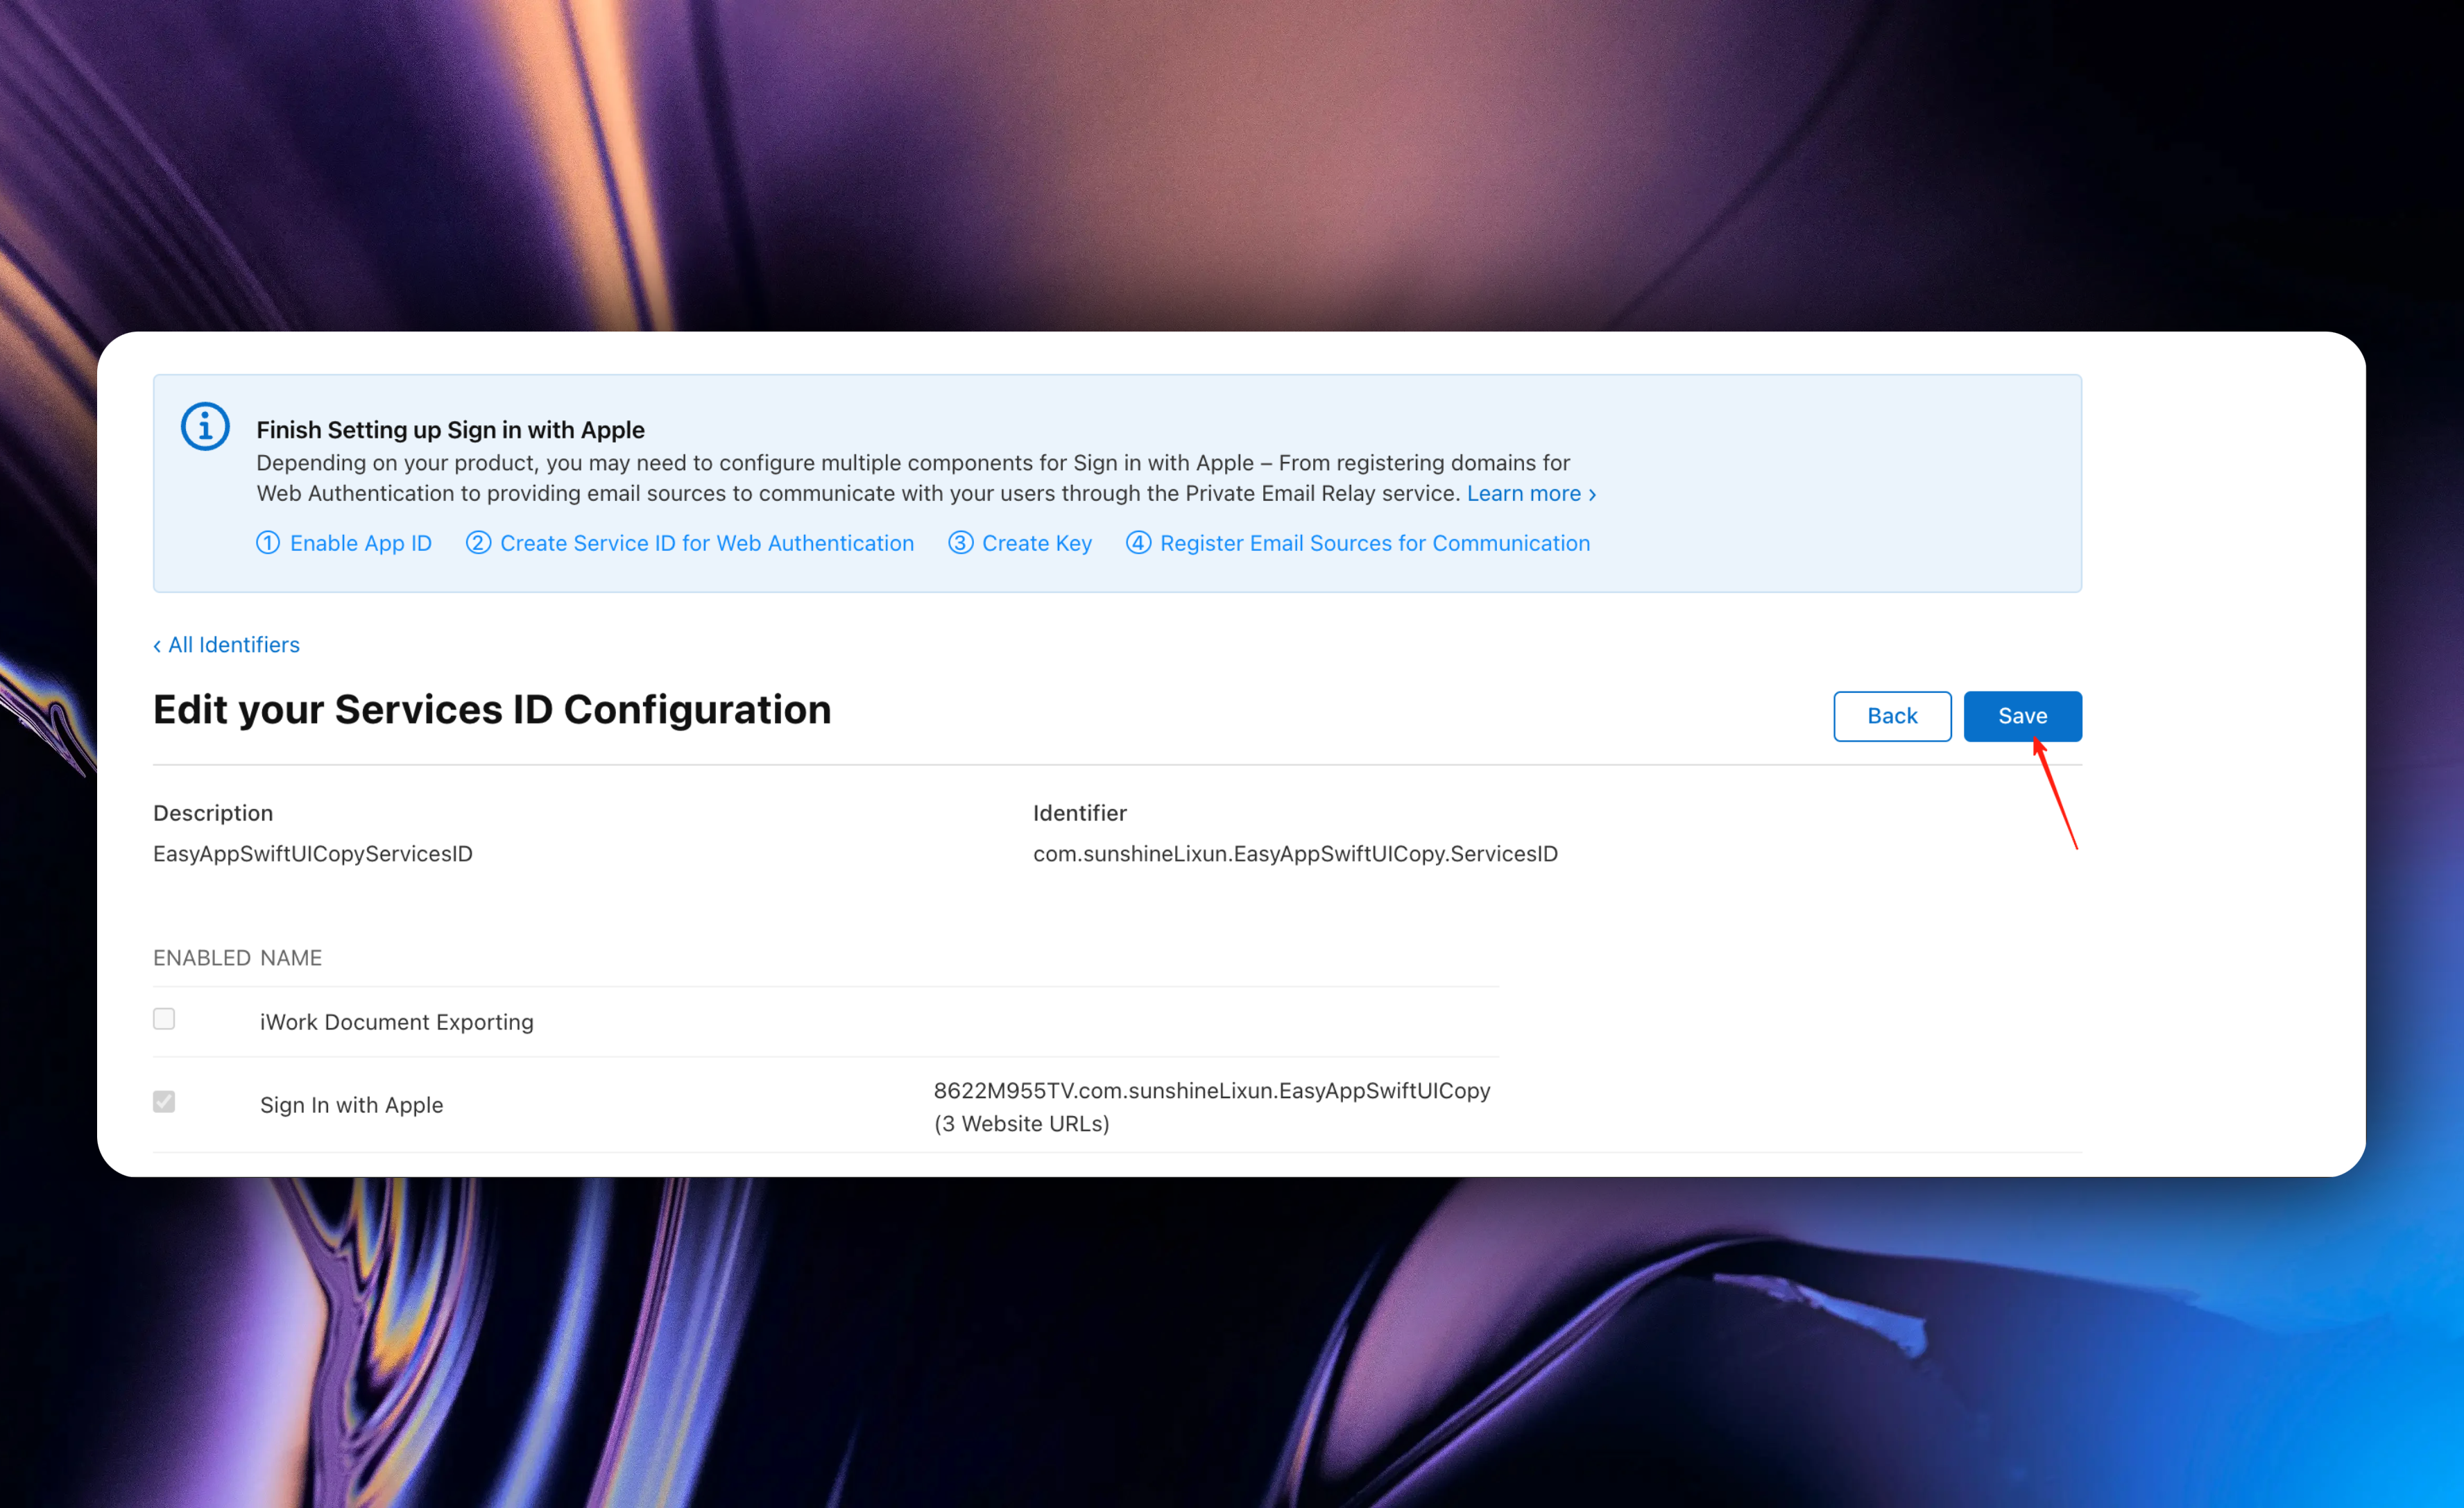
#### Step 2: Create .p8 Authentication Key for Apple Sign In
Go to the [`Keys`](https://developer.apple.com/account/resources/authkeys/list) page and click the `+` button
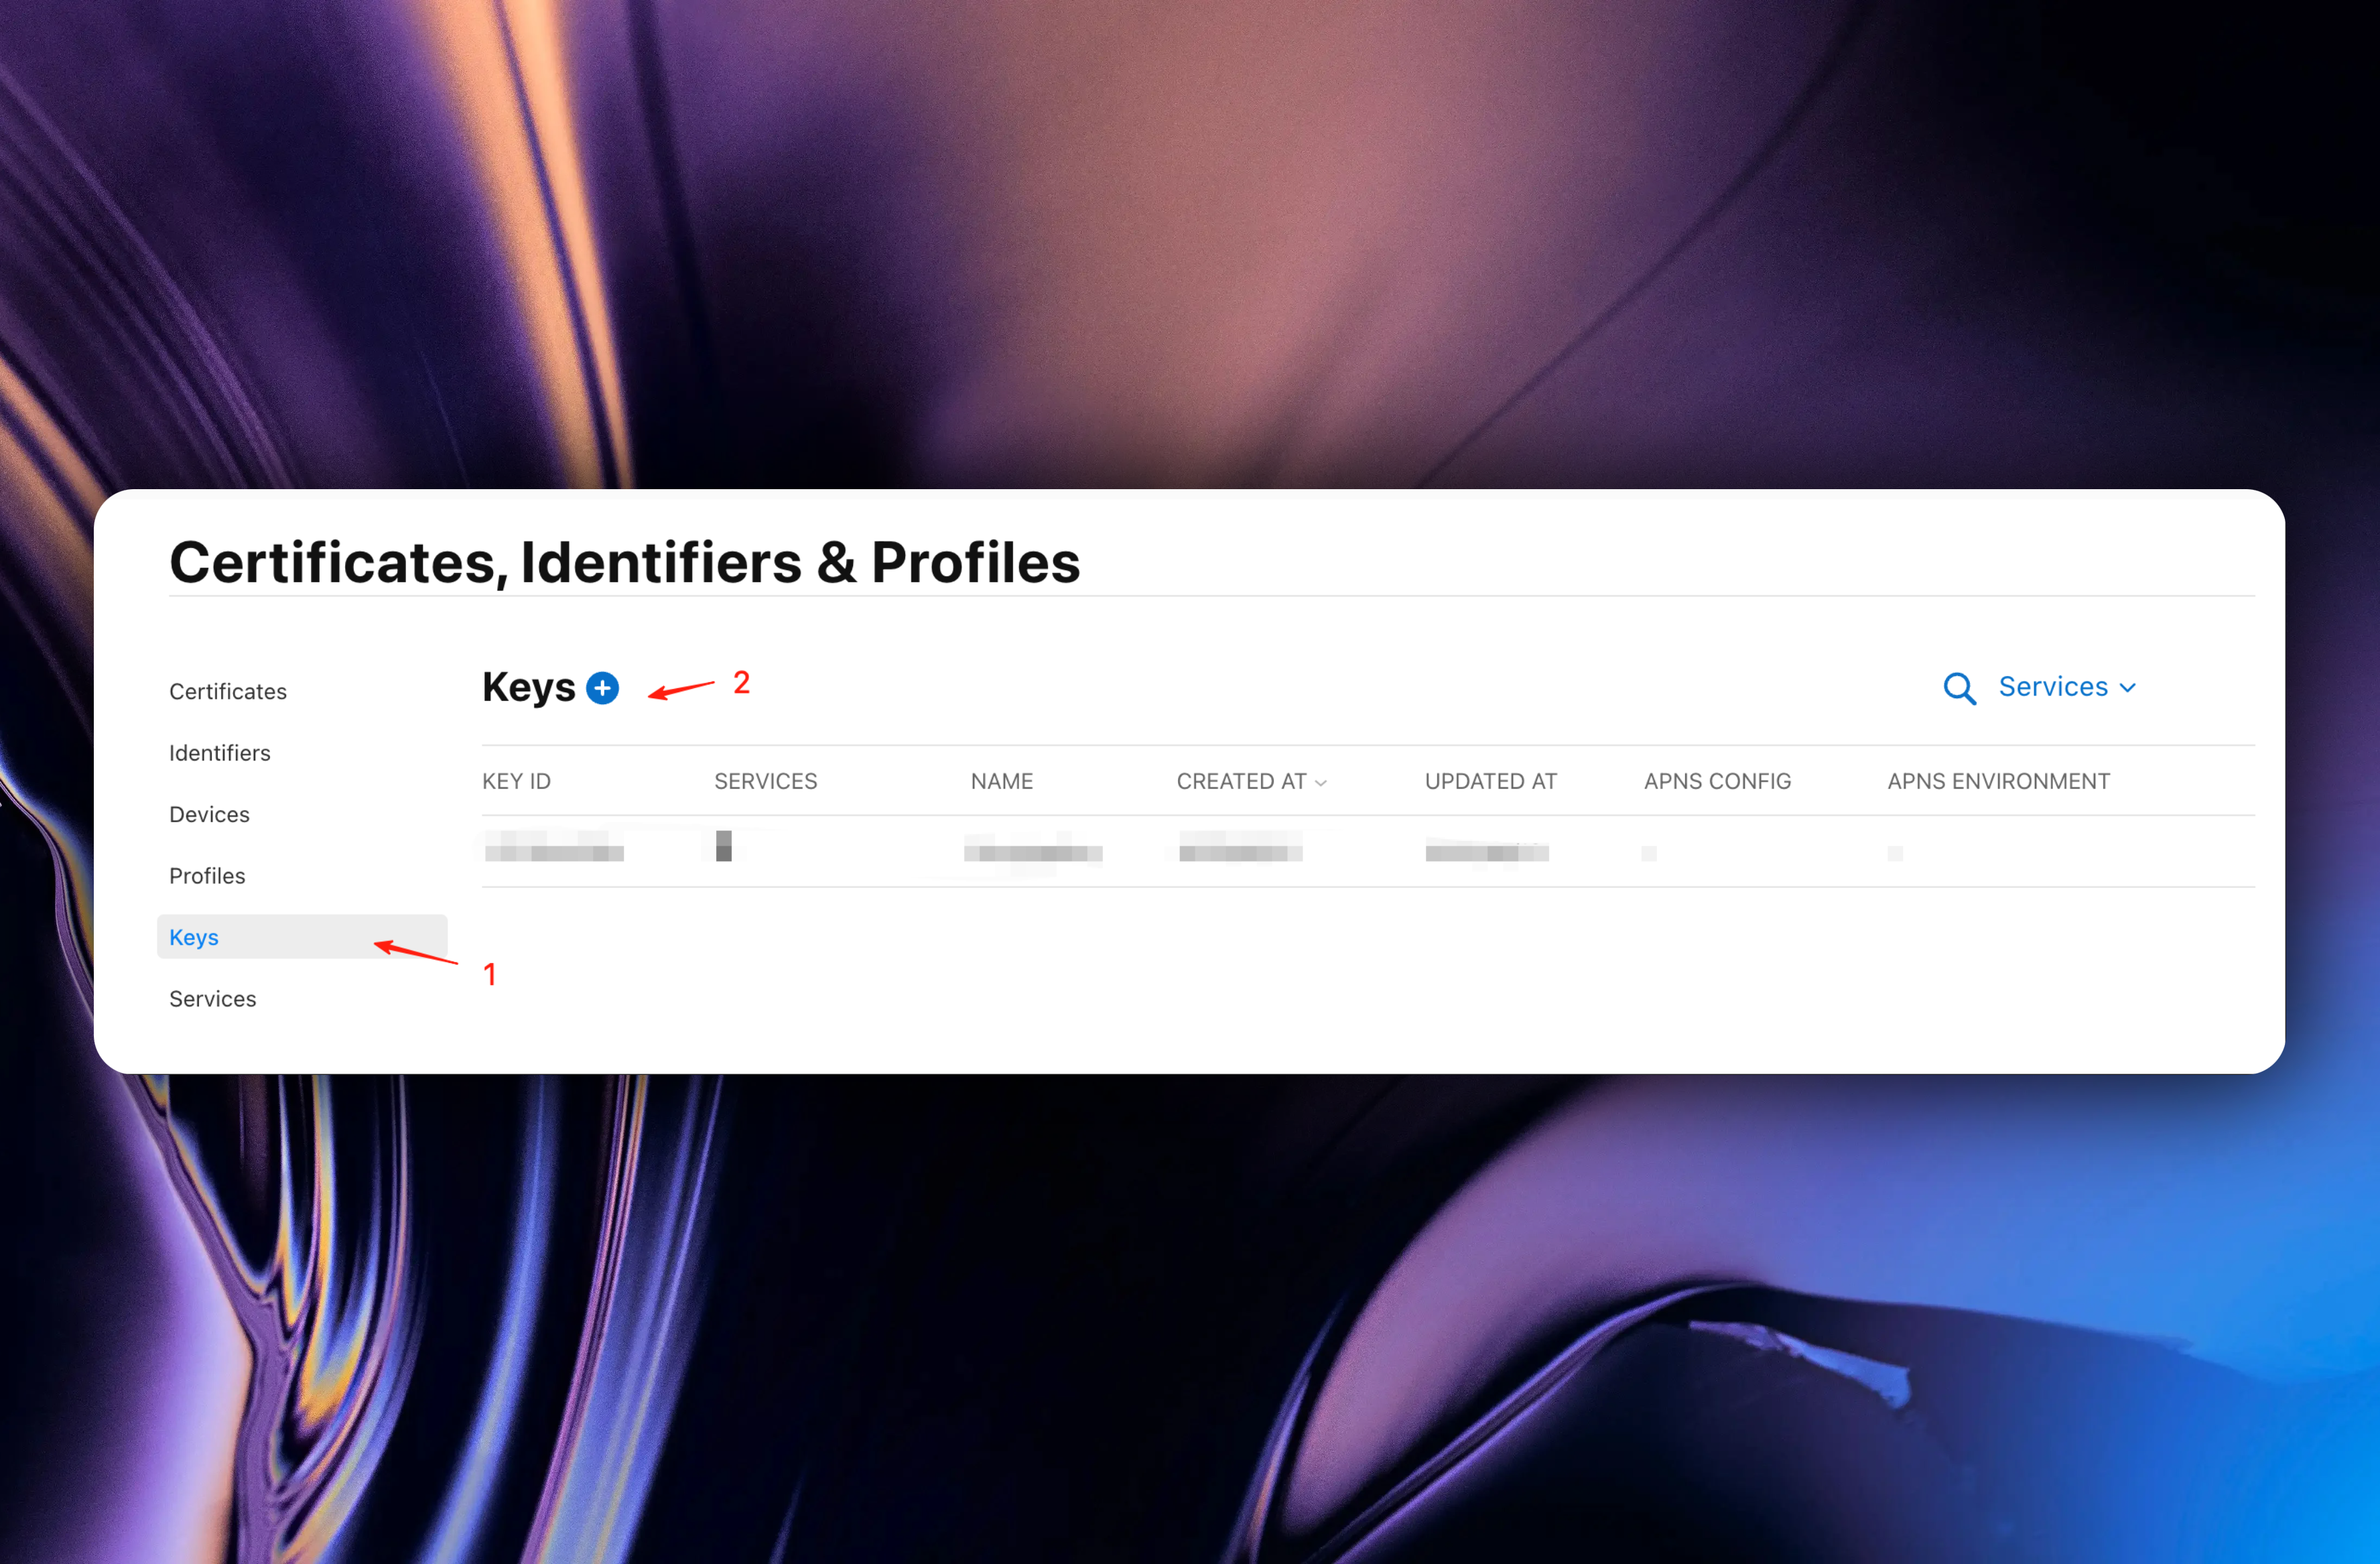
1. Enter your `Key Name`, for easier identification later, we recommend naming it with your app name + Keys.
2. Select `Sign in with Apple` function and click the `Configure` button.
3. After clicking the `Configure` button, select your `App ID` from the `Primary App ID` dropdown.
4. Click the `Save` button
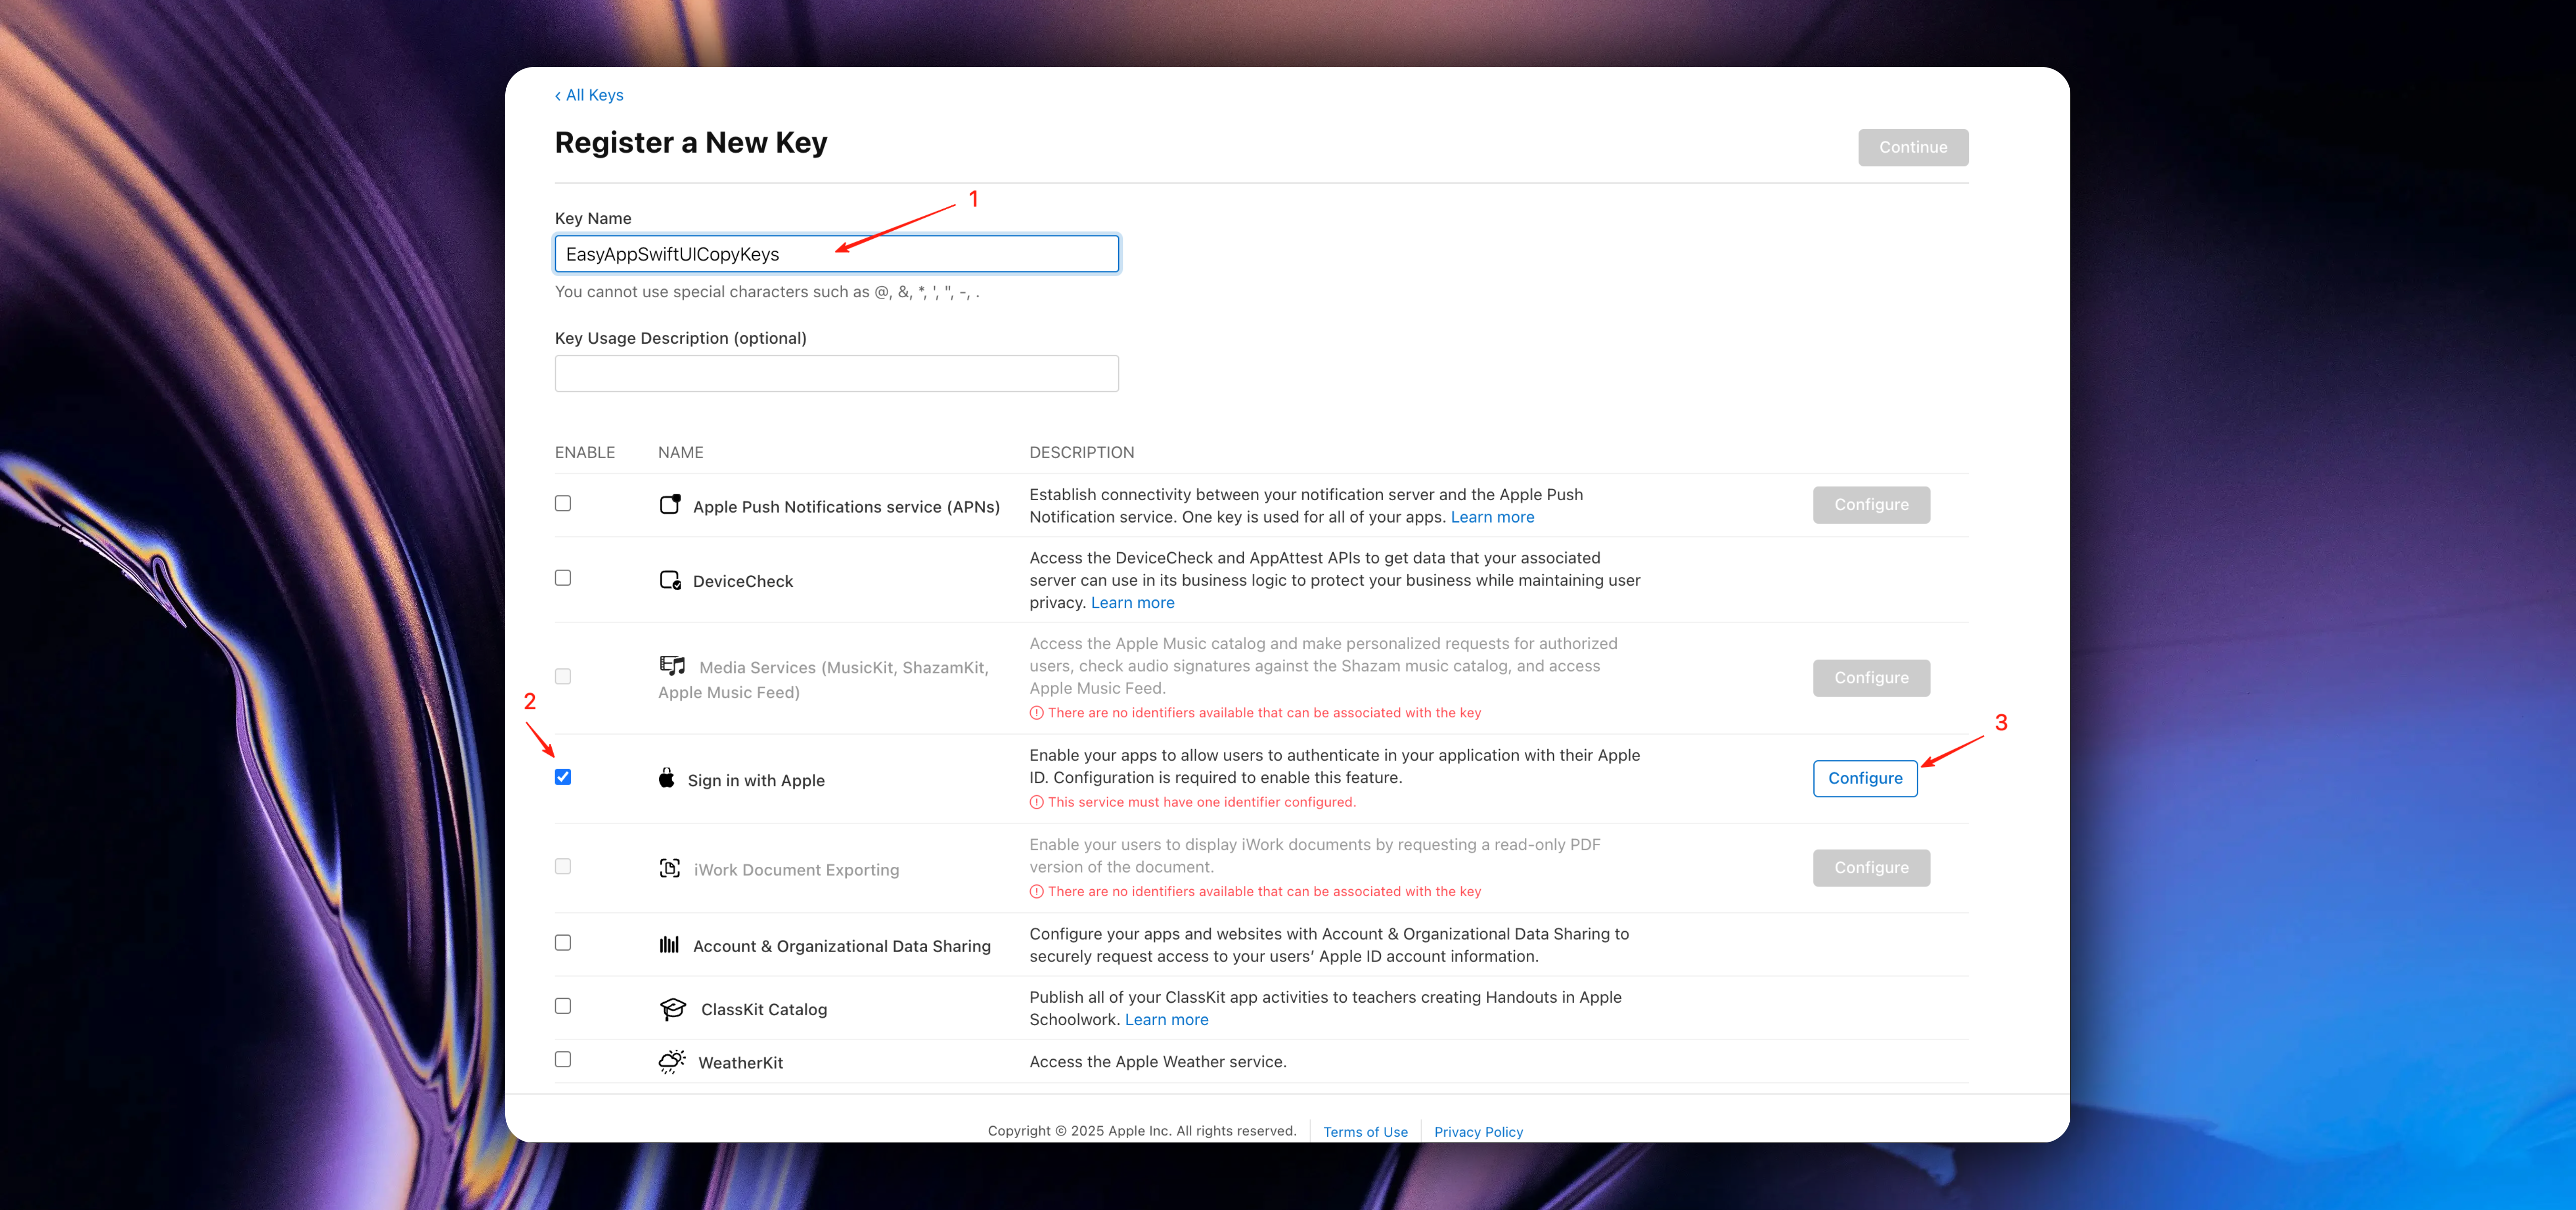
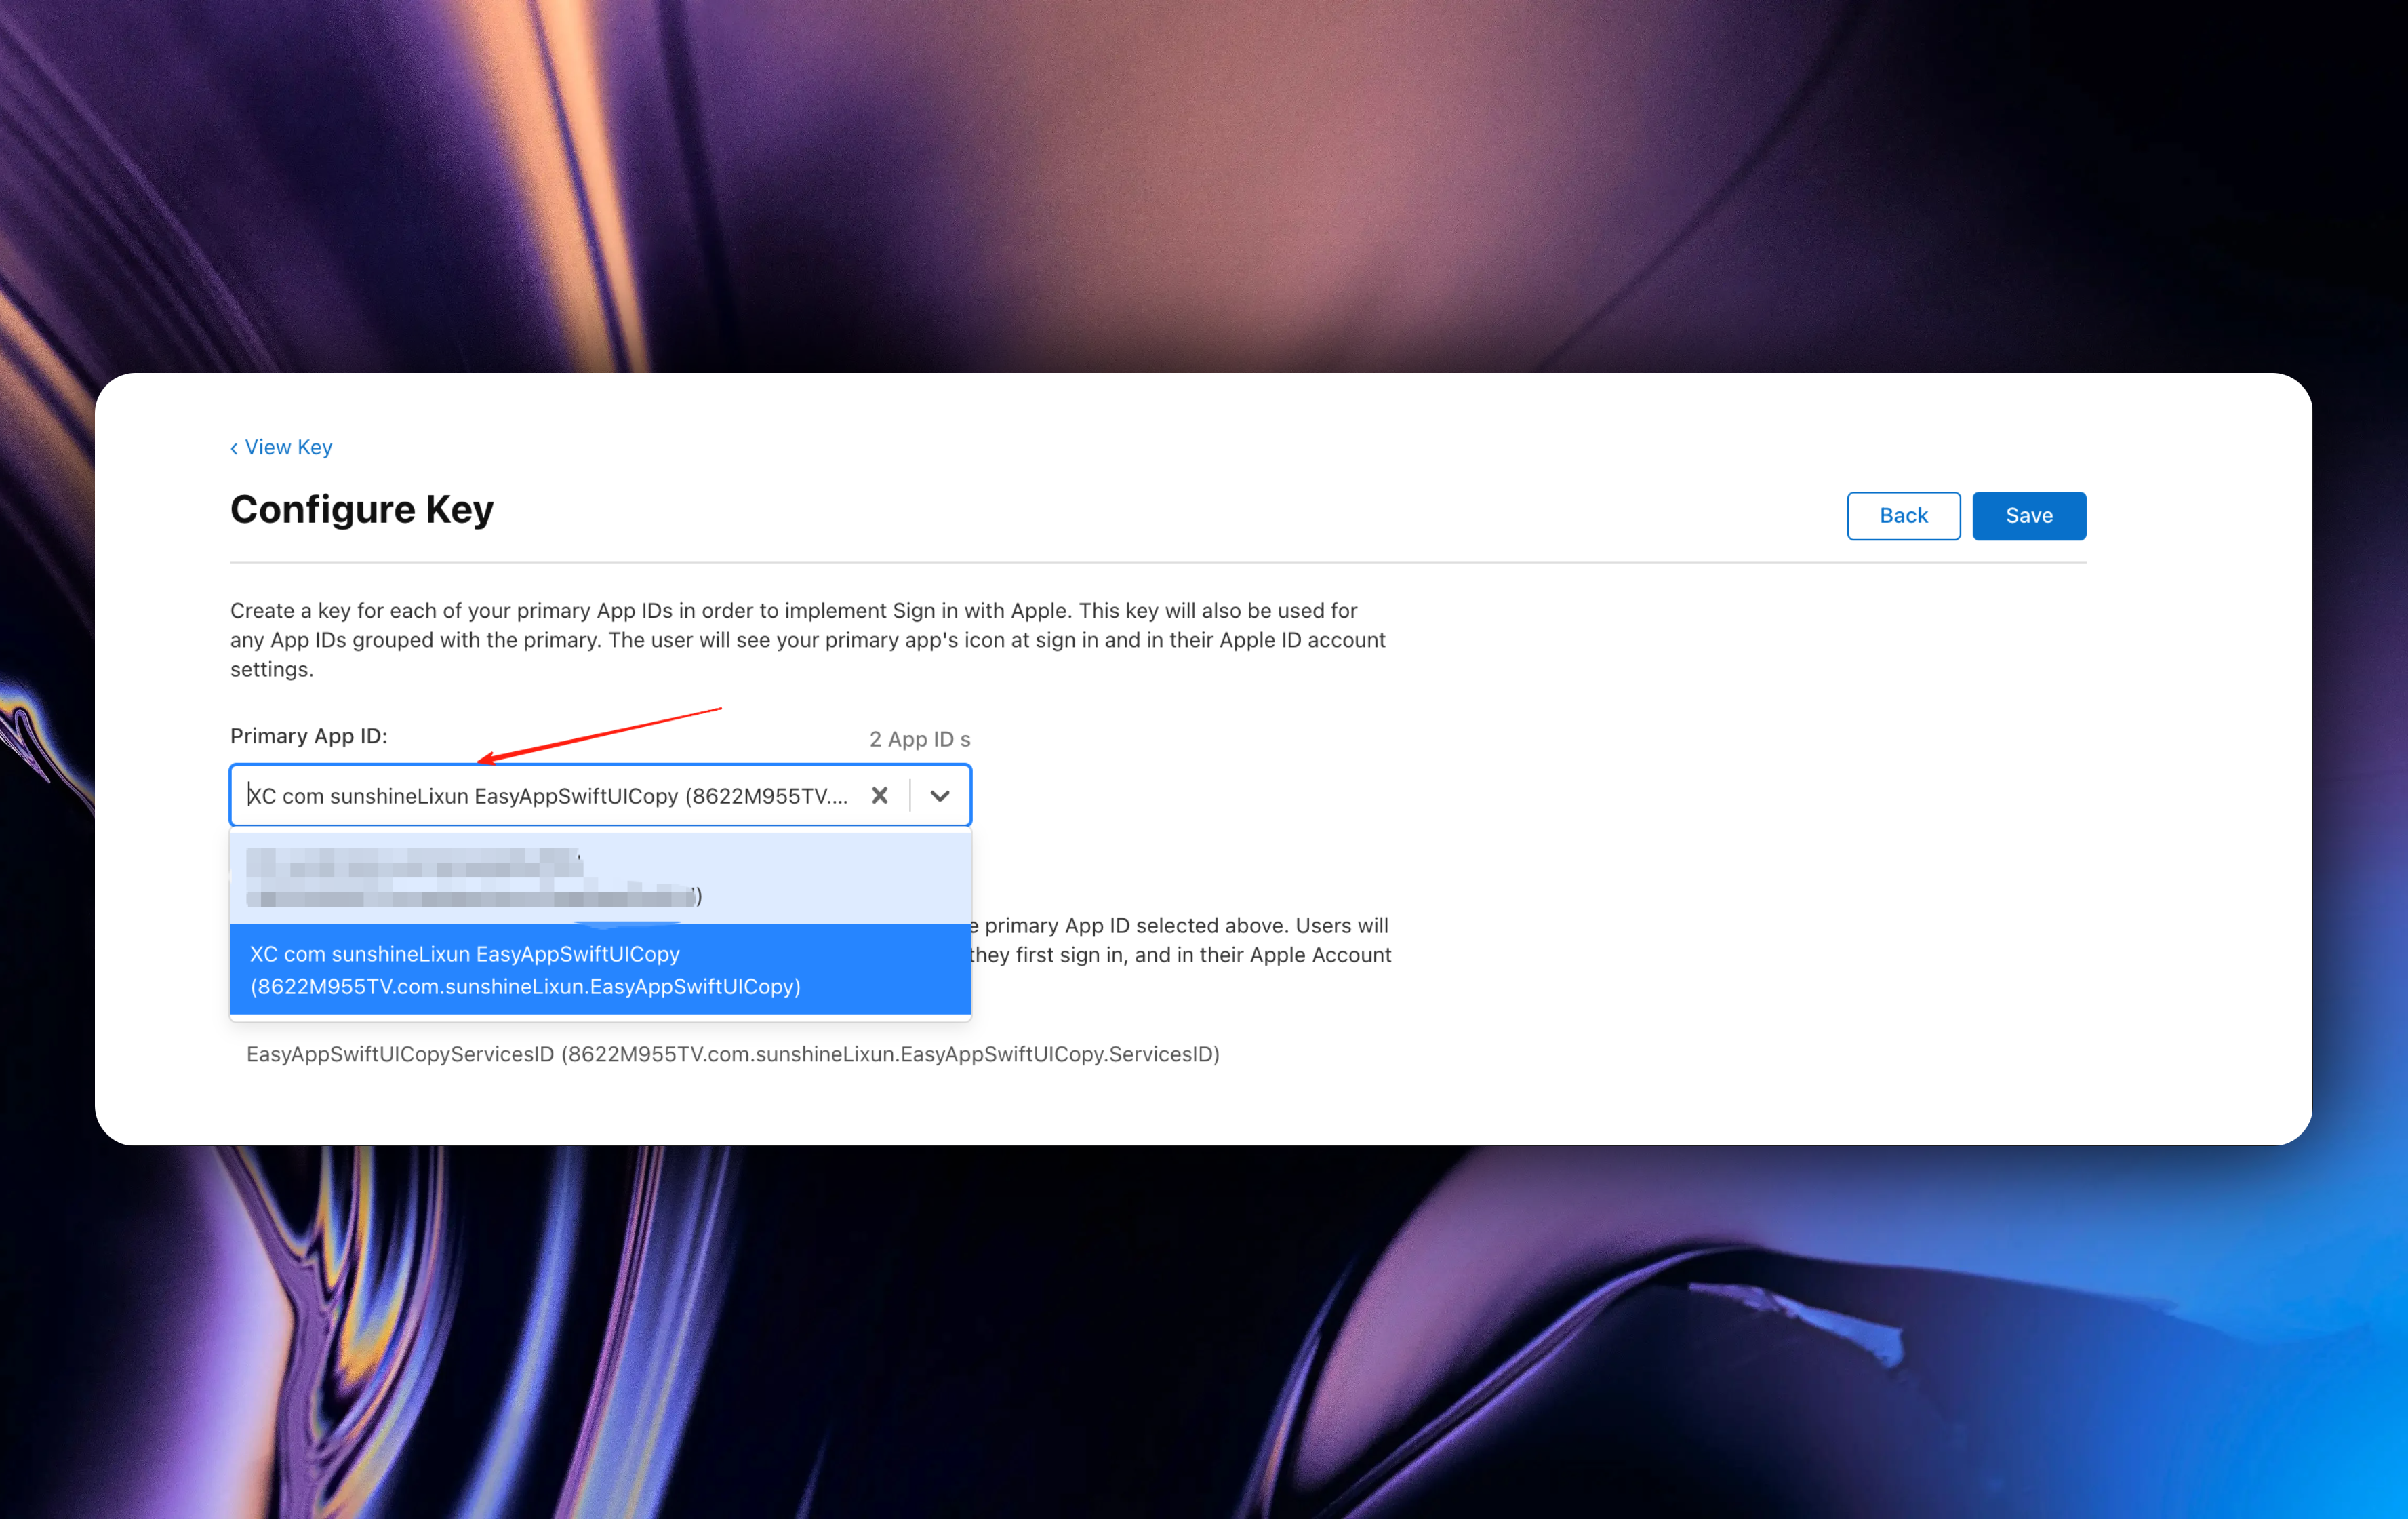
Then click the `Continue` button and click the `Register` button
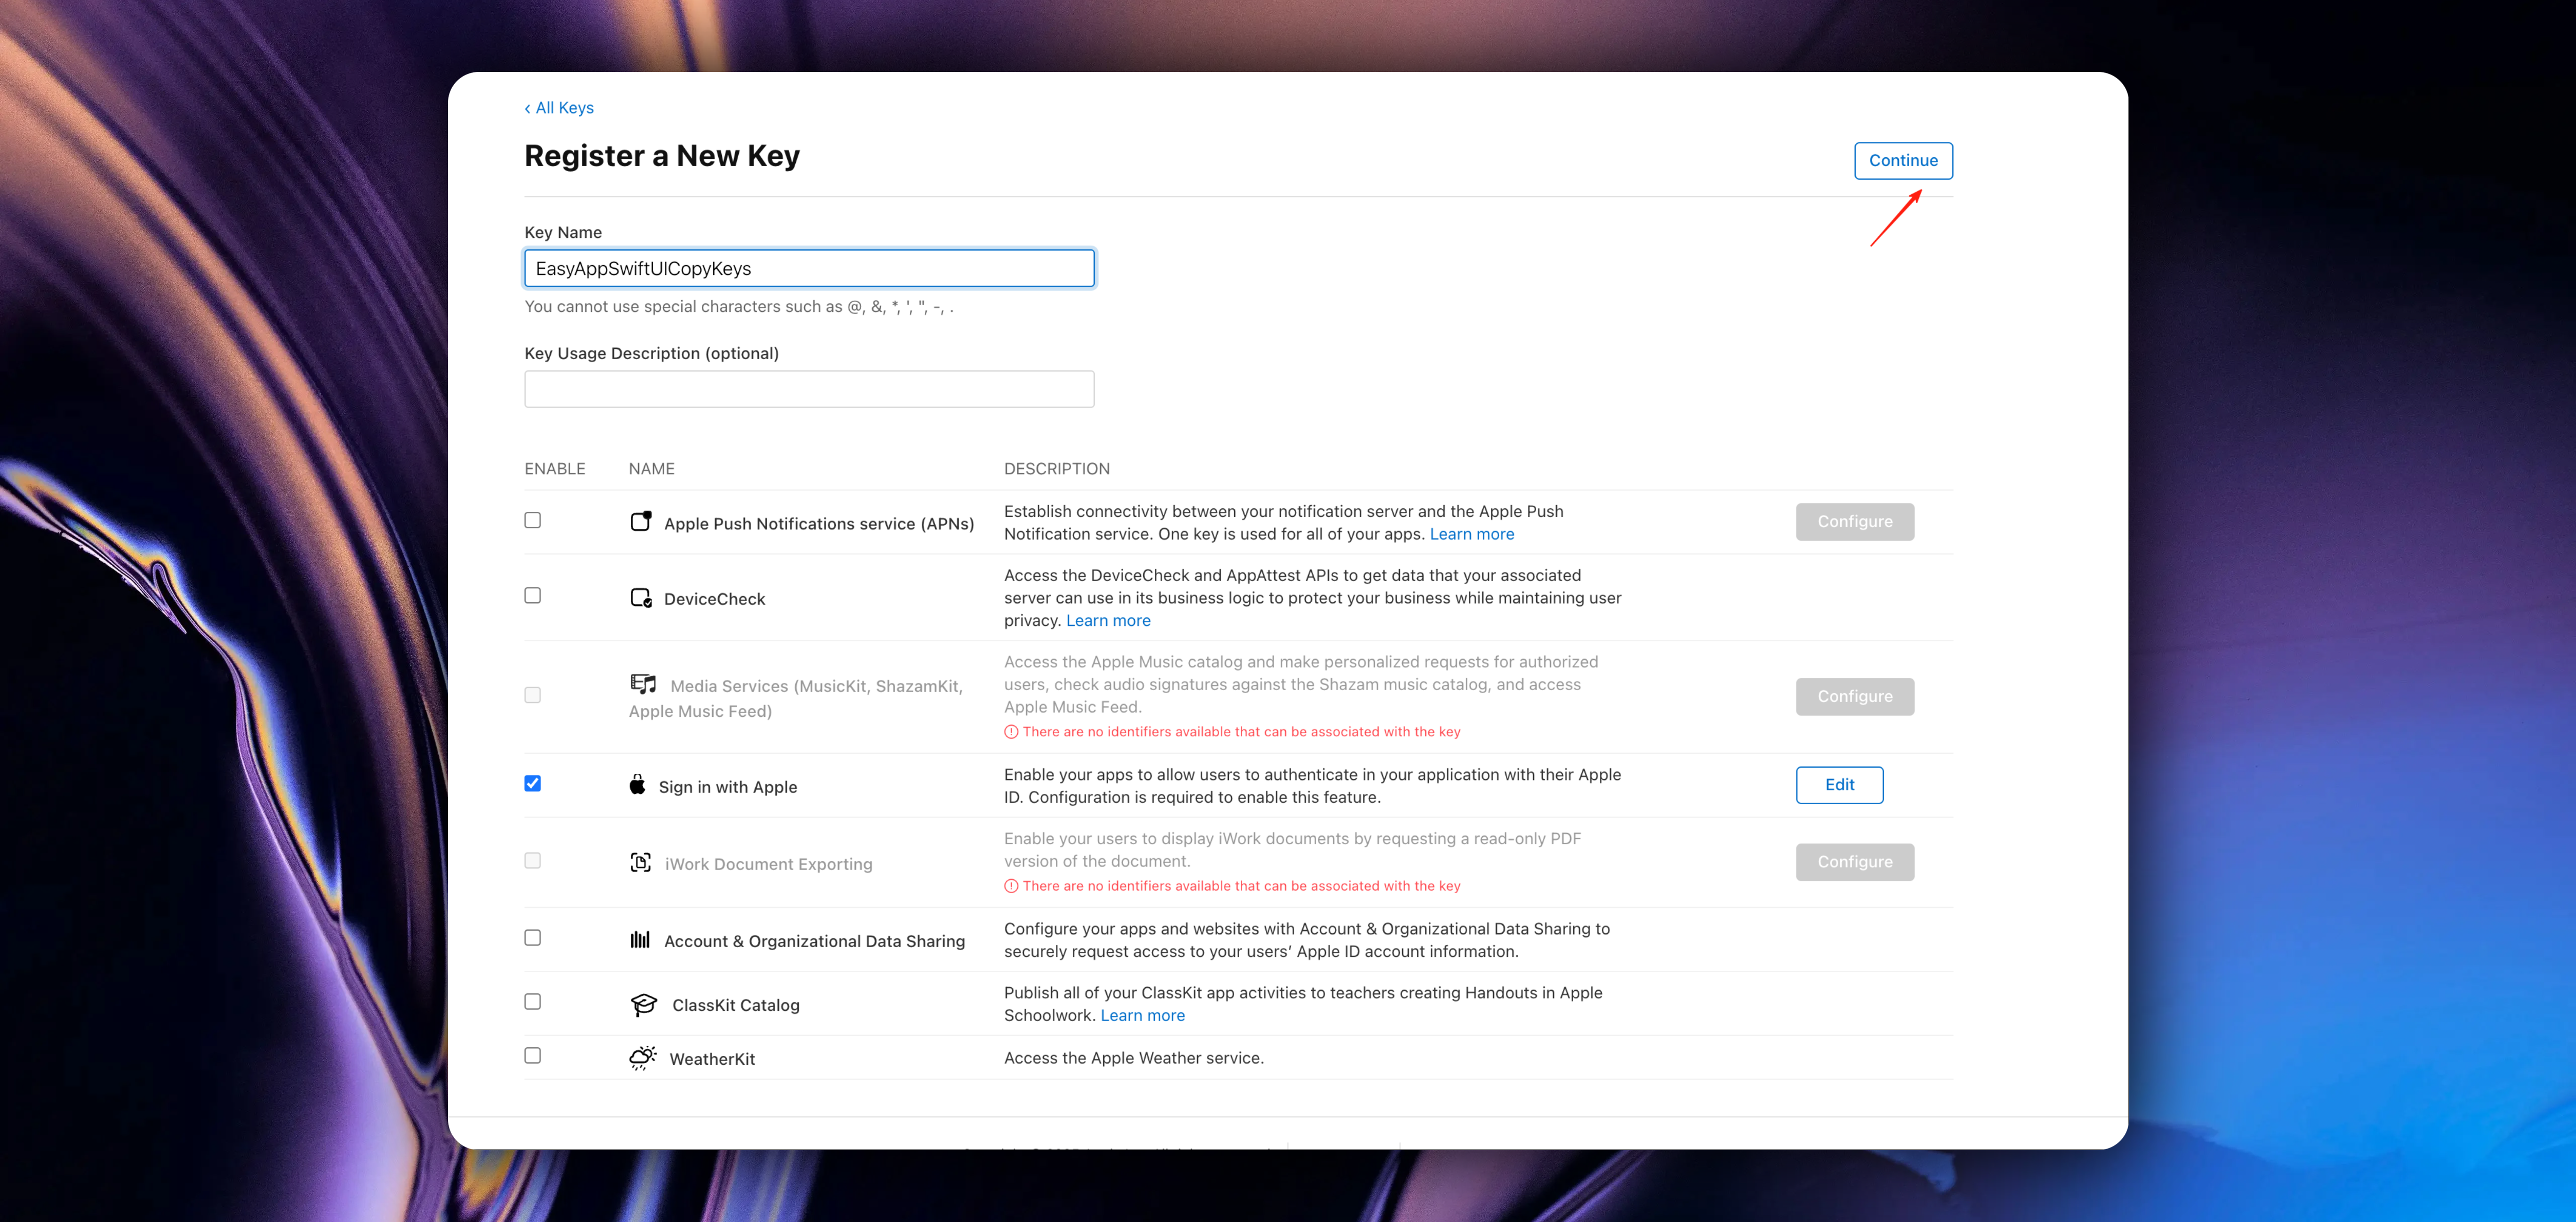

#### Step 3: Integrate Apple Sign In with Supabase
Go to your [`Supabase`](https://supabase.com/dashboard/project/mutkg233333dbrerijqhq22ccalu/auth/providers) project, click the sidebar `Authentication`, click `Sign In/Providers`, click the `Apple` button.
In the popup window, you need to configure the following information:
1. Enable `Enable Sign in with Apple` function
2. In the `Client IDs` field, enter your `Services ID` and your app's unique identifier `bundleID`. (separated by commas, no spaces)
The `Secret Key (for OAuth)` field can be left empty.
3. Click save
Forgot `Services ID` and `bundleID`? No problem, let's review again.
1. On the [`Identifiers`](https://developer.apple.com/account/resources/identifiers/list) page, find the `Services IDs` we just created.

2. In your Xcode project, find `Bundle Identifier`.

Or on the [`Identifiers`](https://developer.apple.com/account/resources/identifiers/list) page, you can also find it
#### Step 4: Test Apple Sign In
Apple Sign In testing needs to be done on a real device.
Go back to the `Supabase` console and check the `Users` table, you can see the user information from your Apple Sign In.
Congratulations 🎉🎉🎉, you have successfully integrated the Apple Sign In function.
### Support Email Verification Function
Supabase enables email authentication by default, and EasyApp of course supports it. But you need to configure Deep Linking. The configuration process is very simple.
1. Set `URL Type` in Xcode
In the screenshot, you need to fill in `identifier` and `URL Schemas`
* `identifier` is recommended to use Bundle Identifier.
* `URL Schemas` is recommended to use your App name.
2. Configure `Deep Linking` in Supabase
Next, go to the Supabase `Authentication` page and click the `URL Configuration` button.
Click the `Add URL` button and enter your App's URL.
When filling in Deep Linking, we recommend using the format `YourAppName://user?type=sign_up`.
Let me explain why we set it up this way, where `user` represents the module name, `type` represents the type, and `sign_up` represents email verification.
The user module has the following types:
* `sign_up`: email verification
* `reset_password`: password reset
So we use `type` to distinguish.
In `SwiftUI`, we distinguish through module name + `type`.
```swift
.onOpenURL { url in
let value = url.getEaspAppDeepLinkUrlParam(hostKey: "user", name: "type")
guard value == "reset_password" else { return }
/// Handle password reset logic
}
```
```swift
.onOpenURL { url in
let value = url.getEaspAppDeepLinkUrlParam(hostKey: "user", name: "type")
guard value == "sign_up" else { return }
/// Handle email verification logic
}
```
Add URL filling rules: URL Schemas + ://
The EasyApp template has already configured the email verification/password reset Deep Linking rules. You need to configure `identifier` and `URL Schemas` in Xcode.
Then configure `Deep Linking` in your `Supabase` as shown in the figure.
If you have other needs later, just follow this rule to configure
At this point, you can normally use Email authentication function.
Process: User registration successful -> Supabase sends email -> User clicks link in email -> Directly returns to the App -> Login successful.
3. Resend verification email
For user experience, we have made the following optimizations:
* After successful user registration, assuming the user does not verify the email in time, when they reopen the app at some point, we will check whether the current user has verified the email
If the user has not verified the email, we will prompt the user to verify the email.
So we provide a `VerifyEmailView`
This component will automatically pop up when the user has not verified the email and supports users to resend verification emails.
The Supabase platform provides a default email sending service for you to try. This service is limited to 2 emails per hour and only provides best-effort availability. For production use, we recommend configuring a custom SMTP server.
For specific operation guidelines, please refer to [Custom SMTP Configuration Guide](https://supabase.com/docs/guides/auth/auth-smtp)
### Disable Email Verification Function
If you don't plan to use Email authentication function, you can disable them.
If you disable the email verification function, after user registration is completed, to optimize the shortest login process: we will let the user log in directly successfully.
# Cloudflare R2 Storage
URL: https://easyapp.site/en/docs/Integrations/cfr2
How to use Cloudflare R2 storage
***
title: Cloudflare R2 Storage
description: How to use Cloudflare R2 storage
icon: Cloud
-----------
Although Supabase provides object storage service, the capacity is quite limited - only 1GB for the free tier. However, [Cloudflare R2](https://www.cloudflare.com/r2/) offers 10GB of storage space per month even in the free version.
Therefore, we strongly recommend using Cloudflare R2 for storage services.
In the EasyAppSupabase template, we have already provided a [Cloudflare R2](https://www.cloudflare.com/r2/) upload function. You just need to configure the environment variables.
You can find the upload function code in the `EasyAppSupabase/supabase/functions/oss-cf-r2` directory.
## Get R2 Credentials
1. Login to [Cloudflare Dashboard](https://dash.cloudflare.com)
2. Navigate to **R2** -> **Overview**
3. Click **Manage**
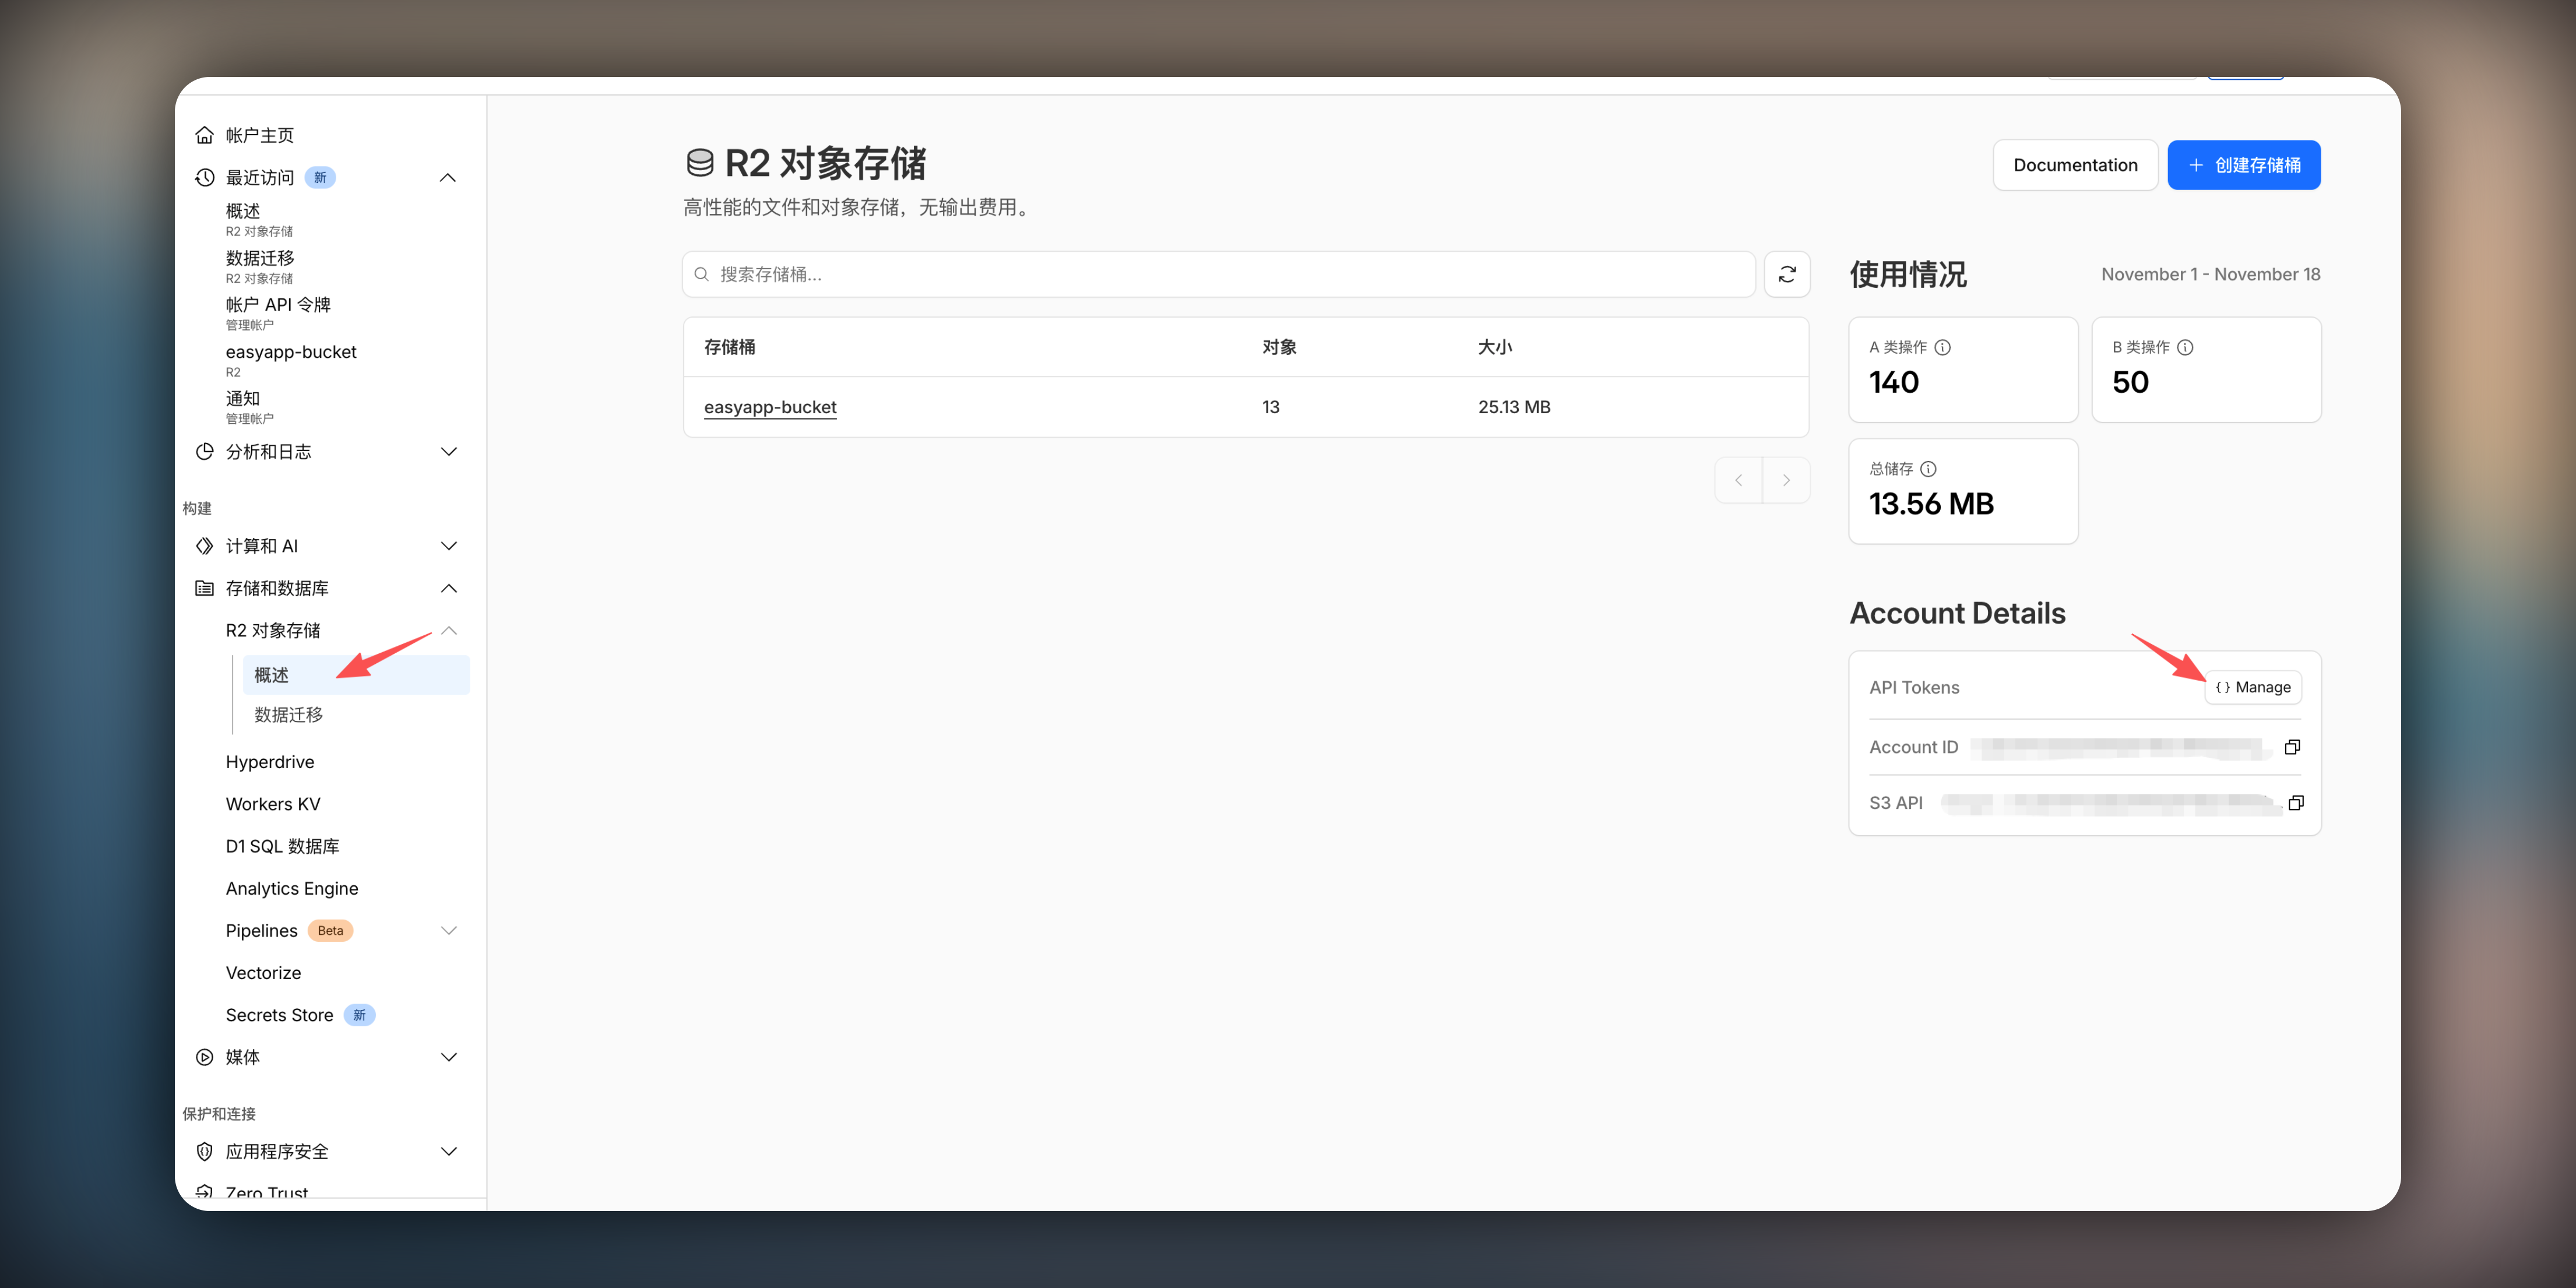
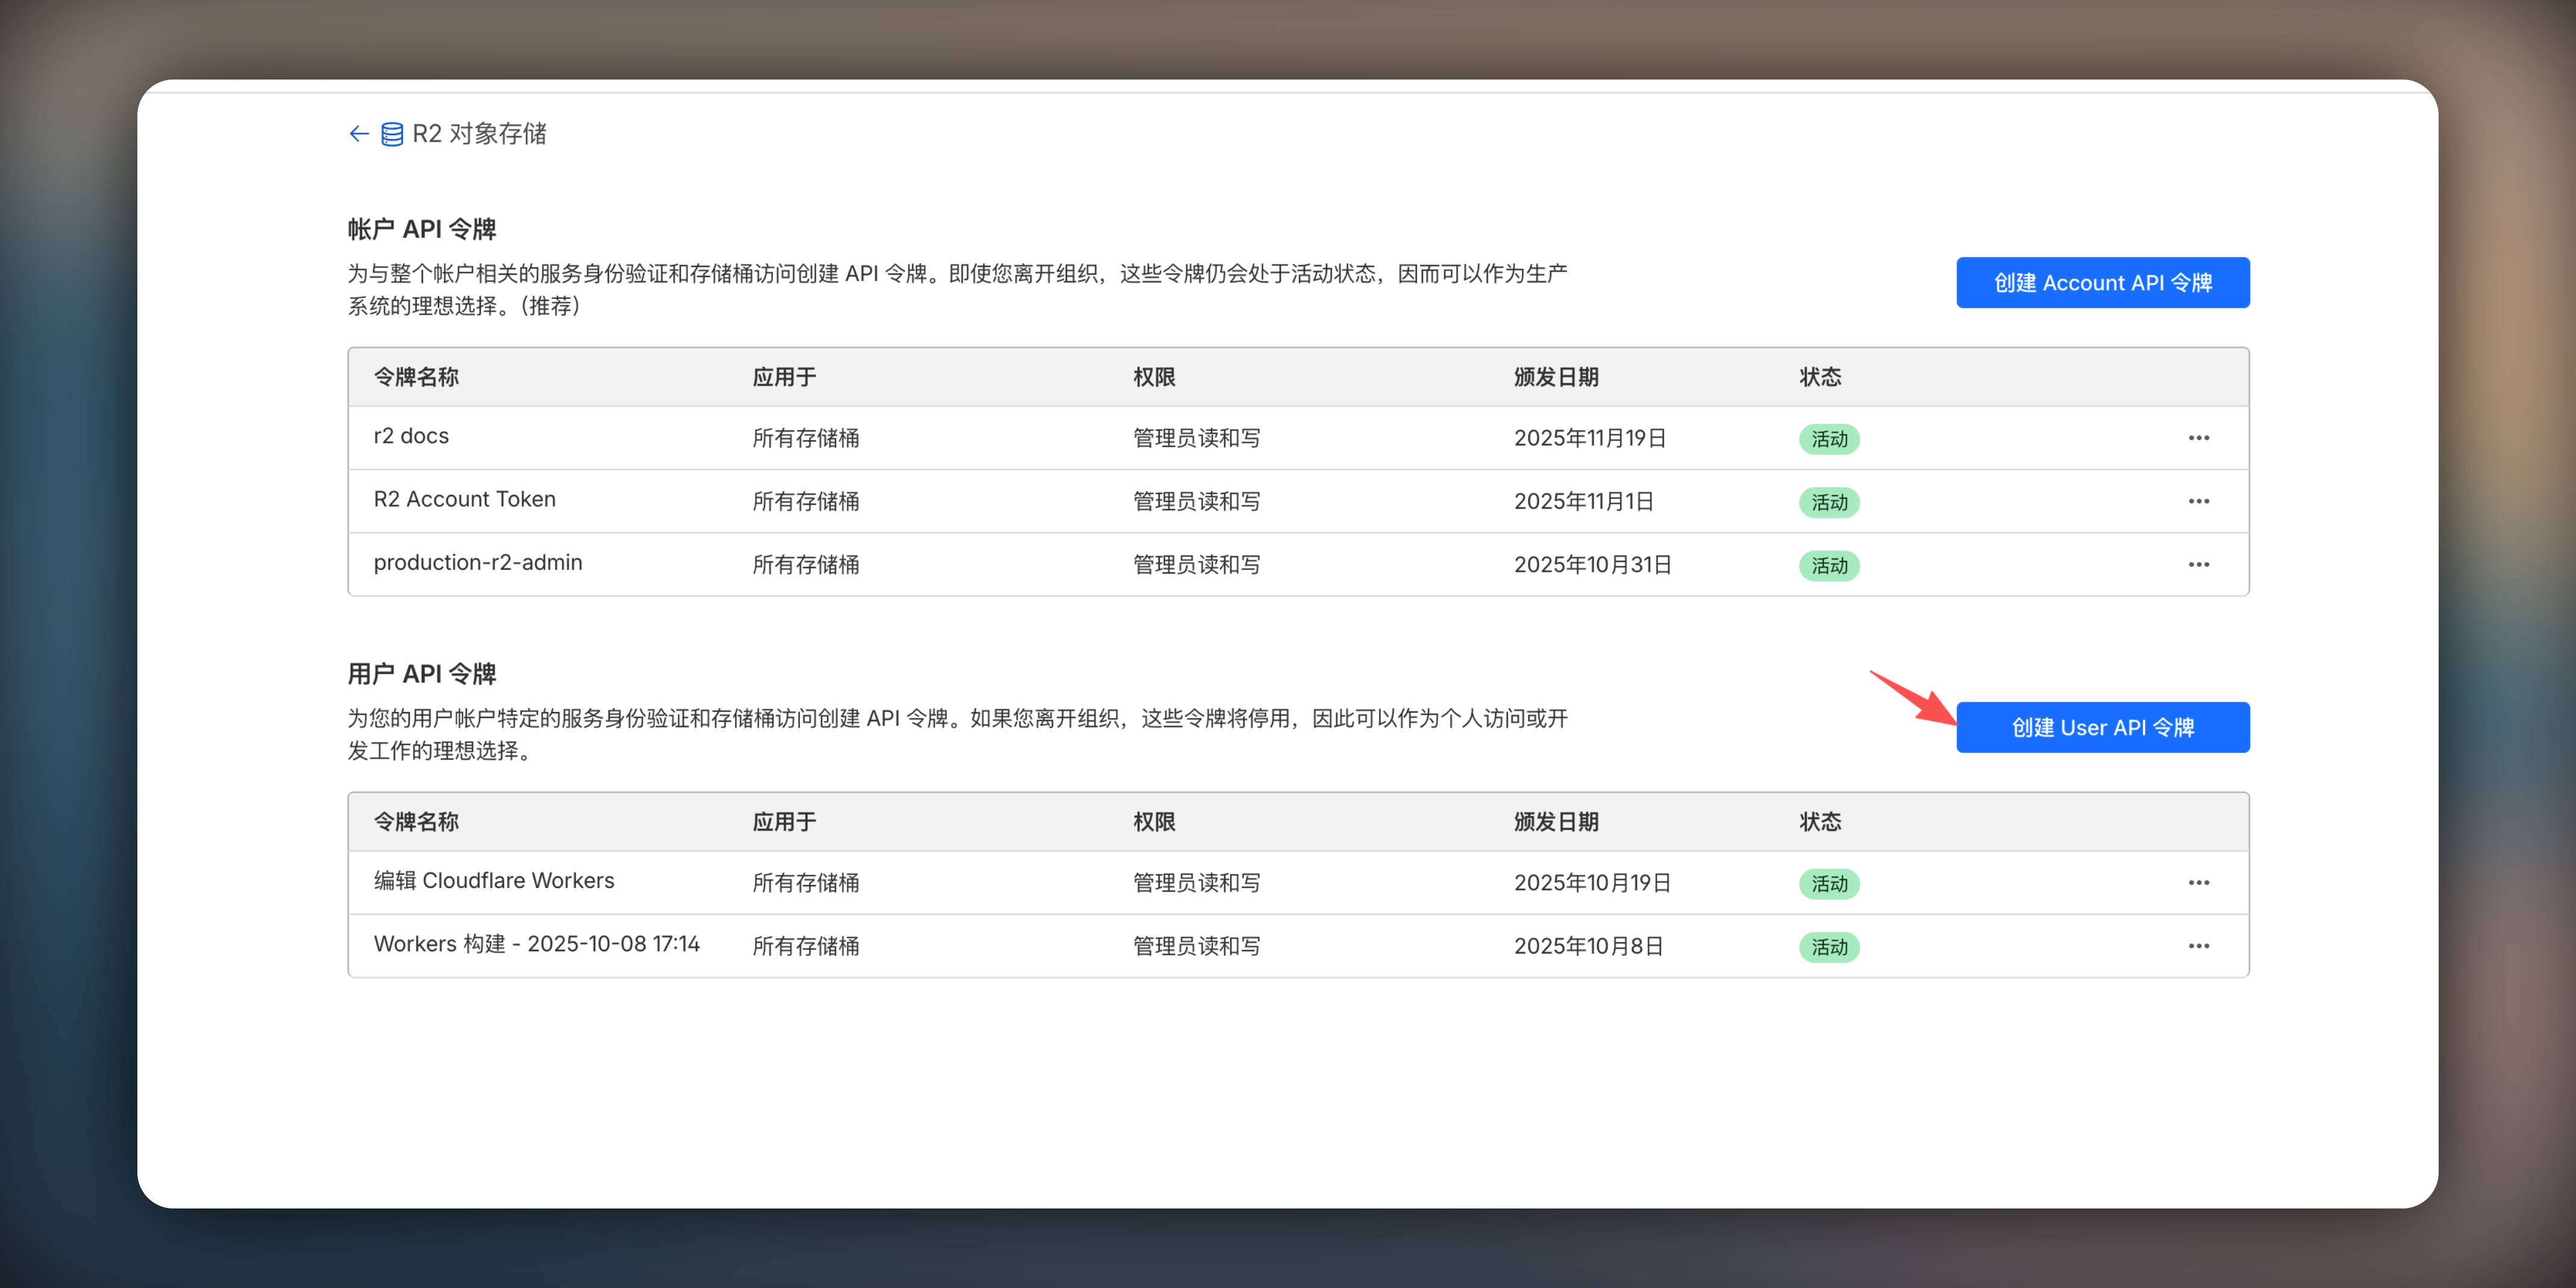
4. Create new API Token, enter name, select **Object Read & Write**, click **Create**
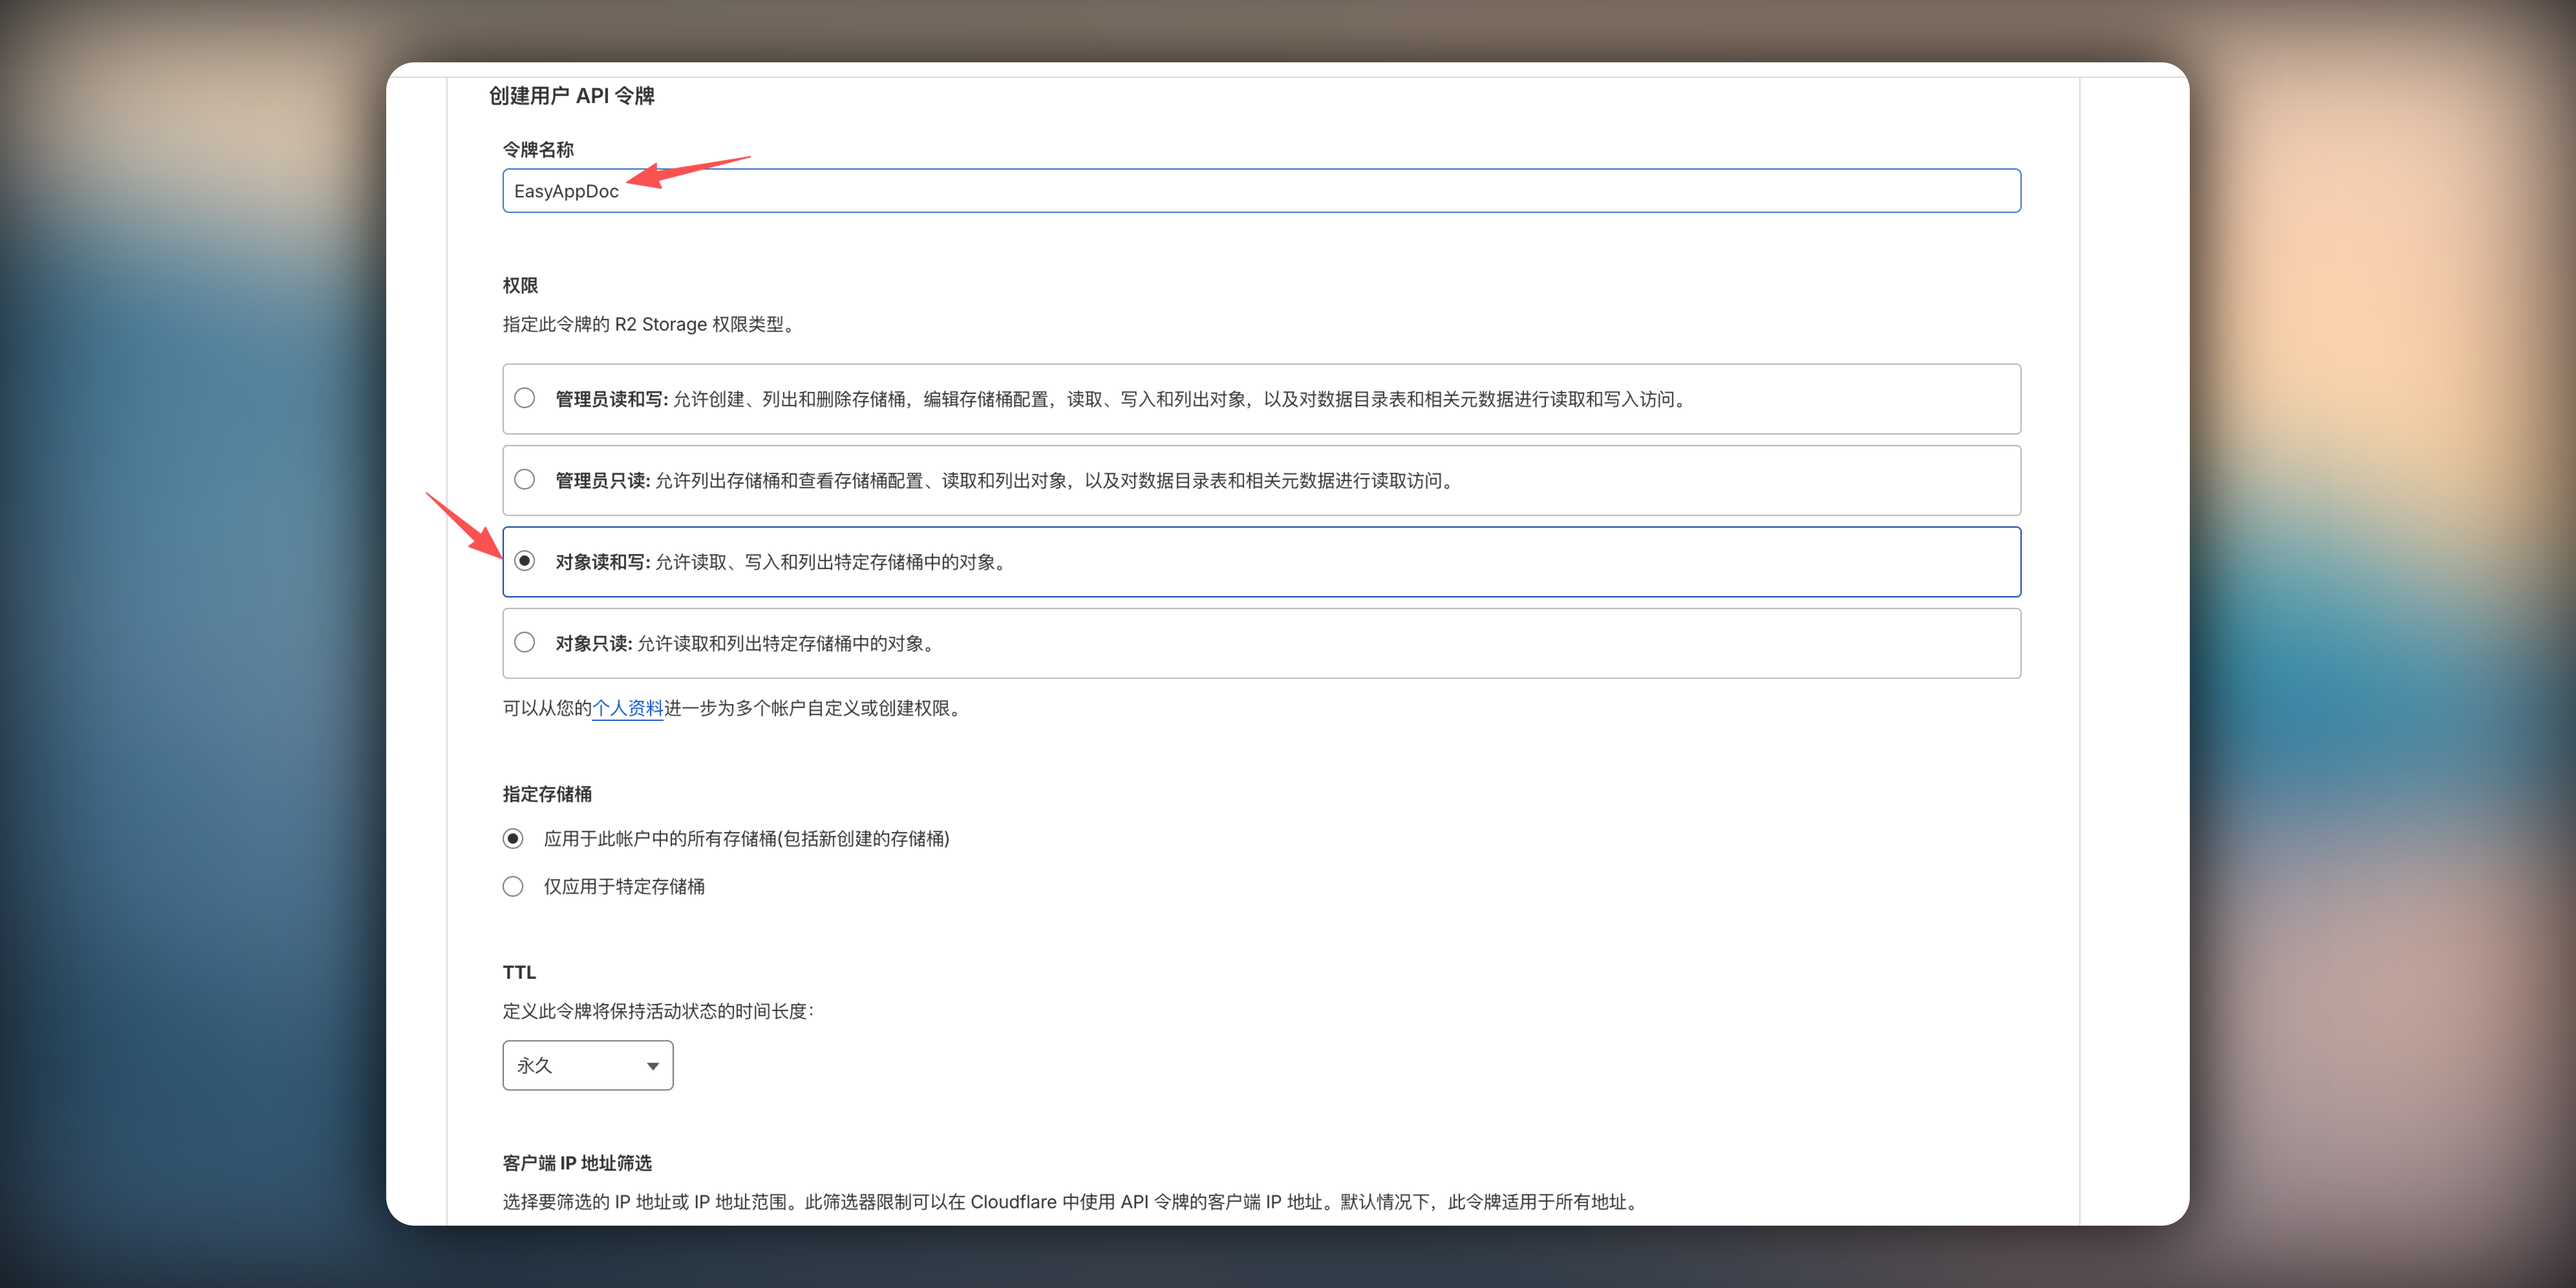
5. Copy `Access Key ID` and `Secret Access Key`
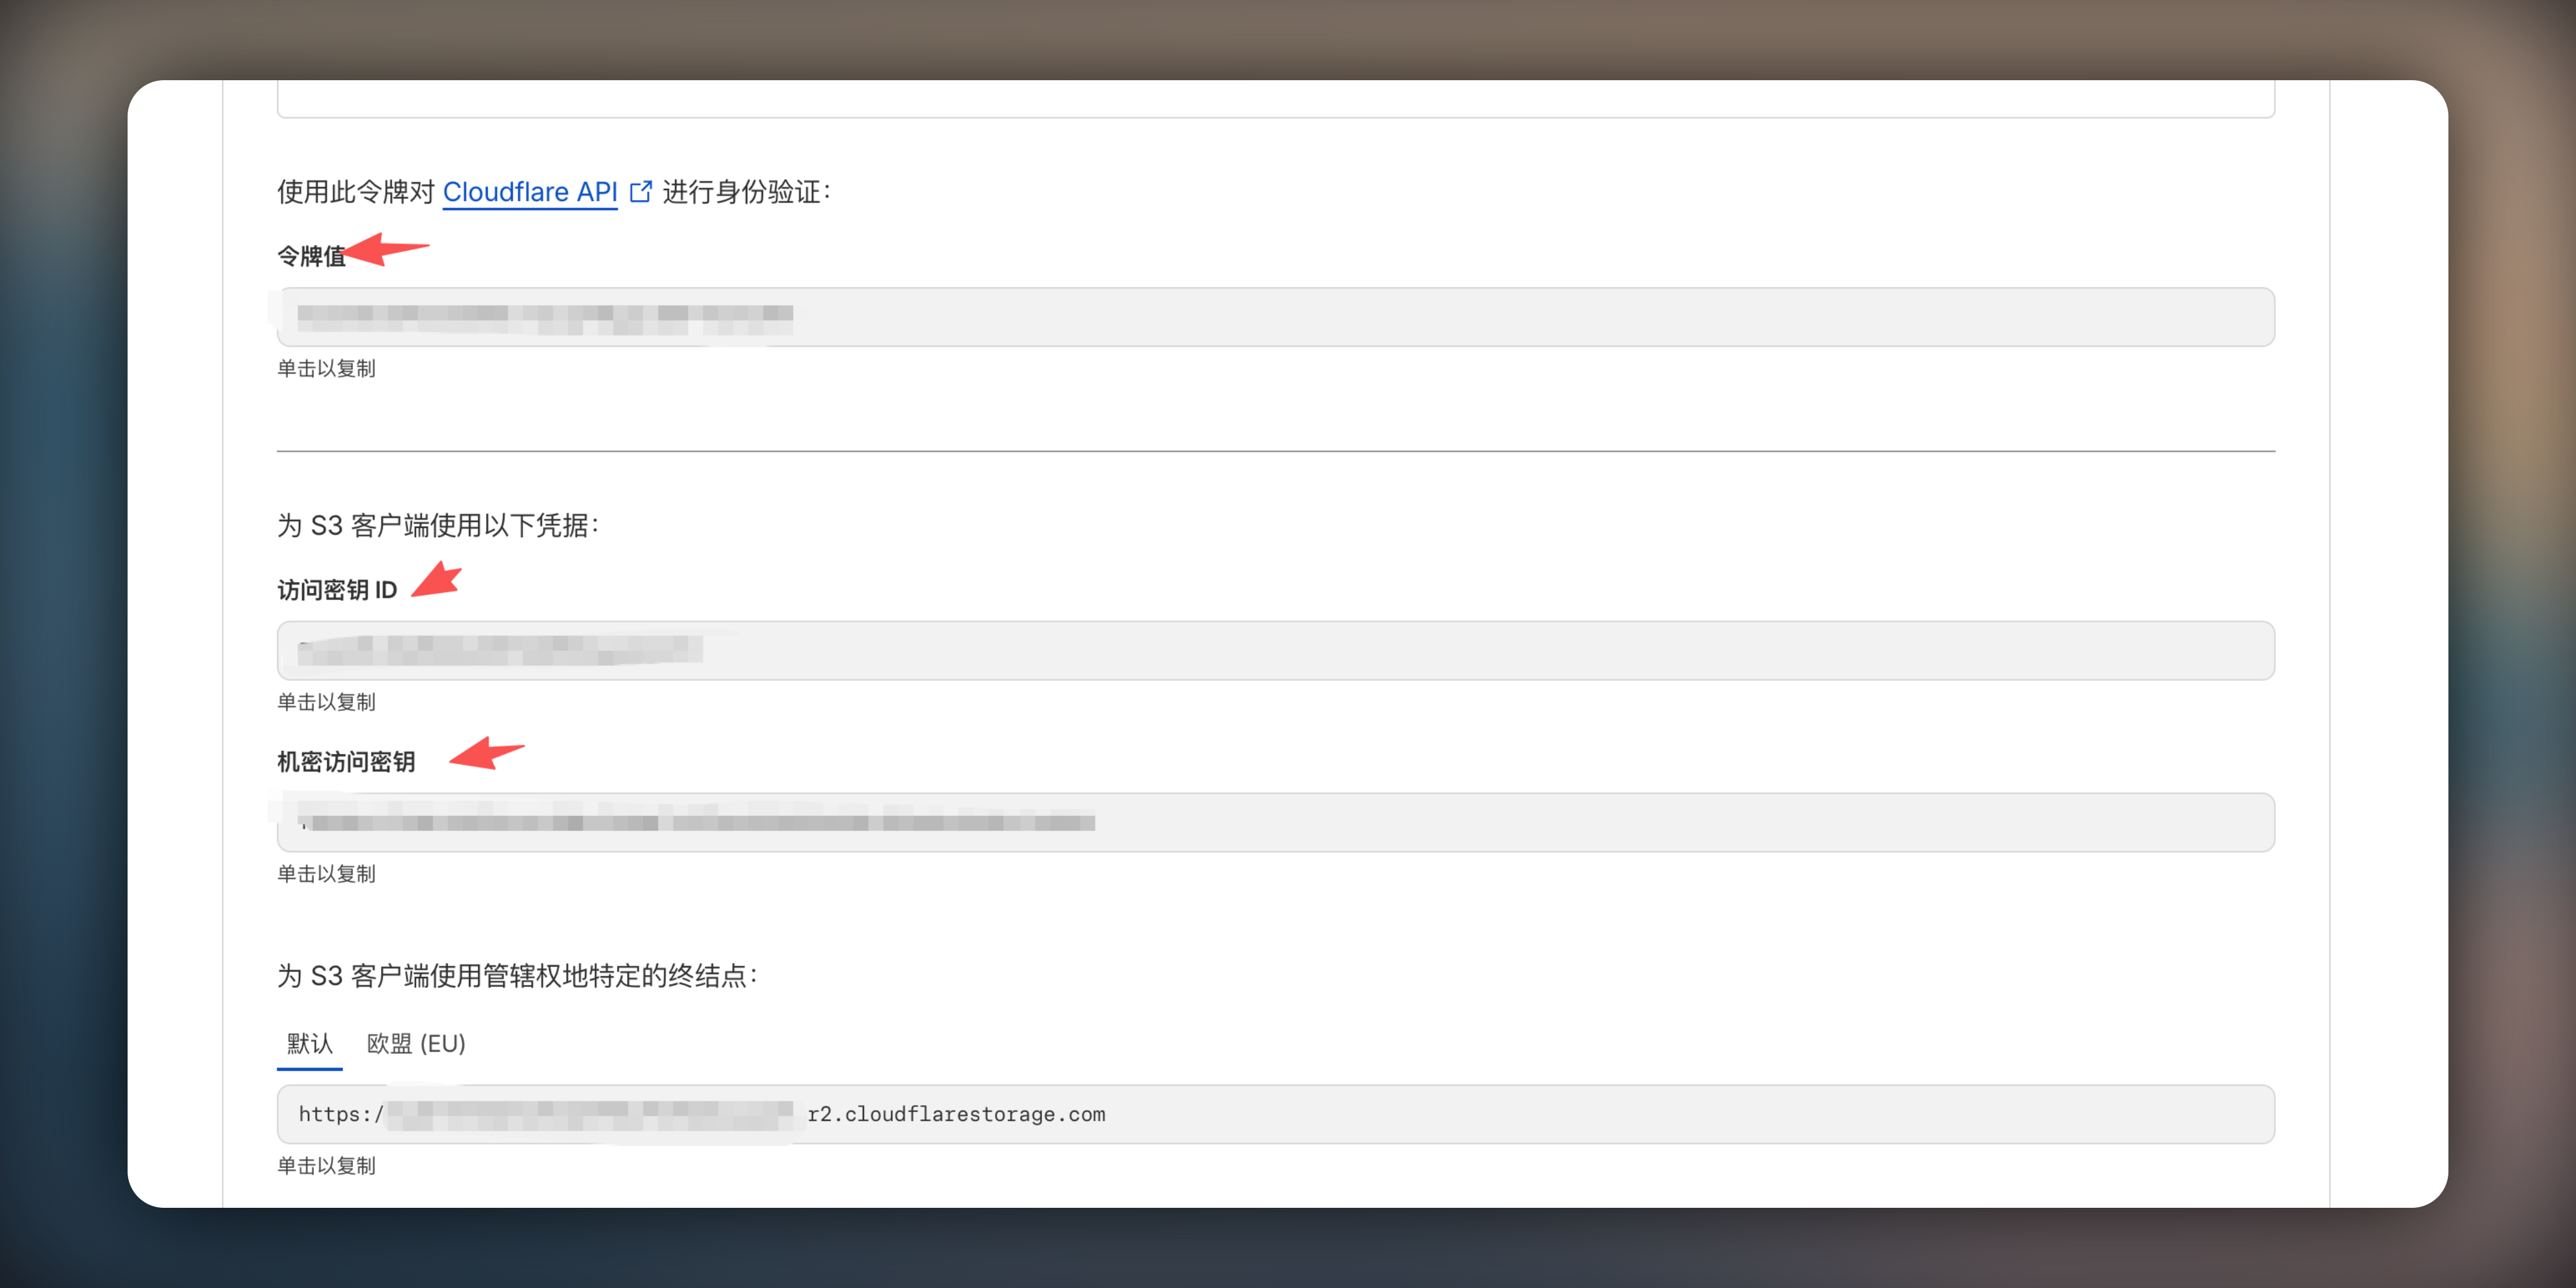
* `Token Value` is `CLOUDFLARE_API_TOKEN`
* `Access Key ID` is `R2_ACCESS_KEY_ID`
* `Secret Access Key` is `R2_SECRET_ACCESS_KEY`
6. Find your **Account ID** (displayed on the right side of R2 page)
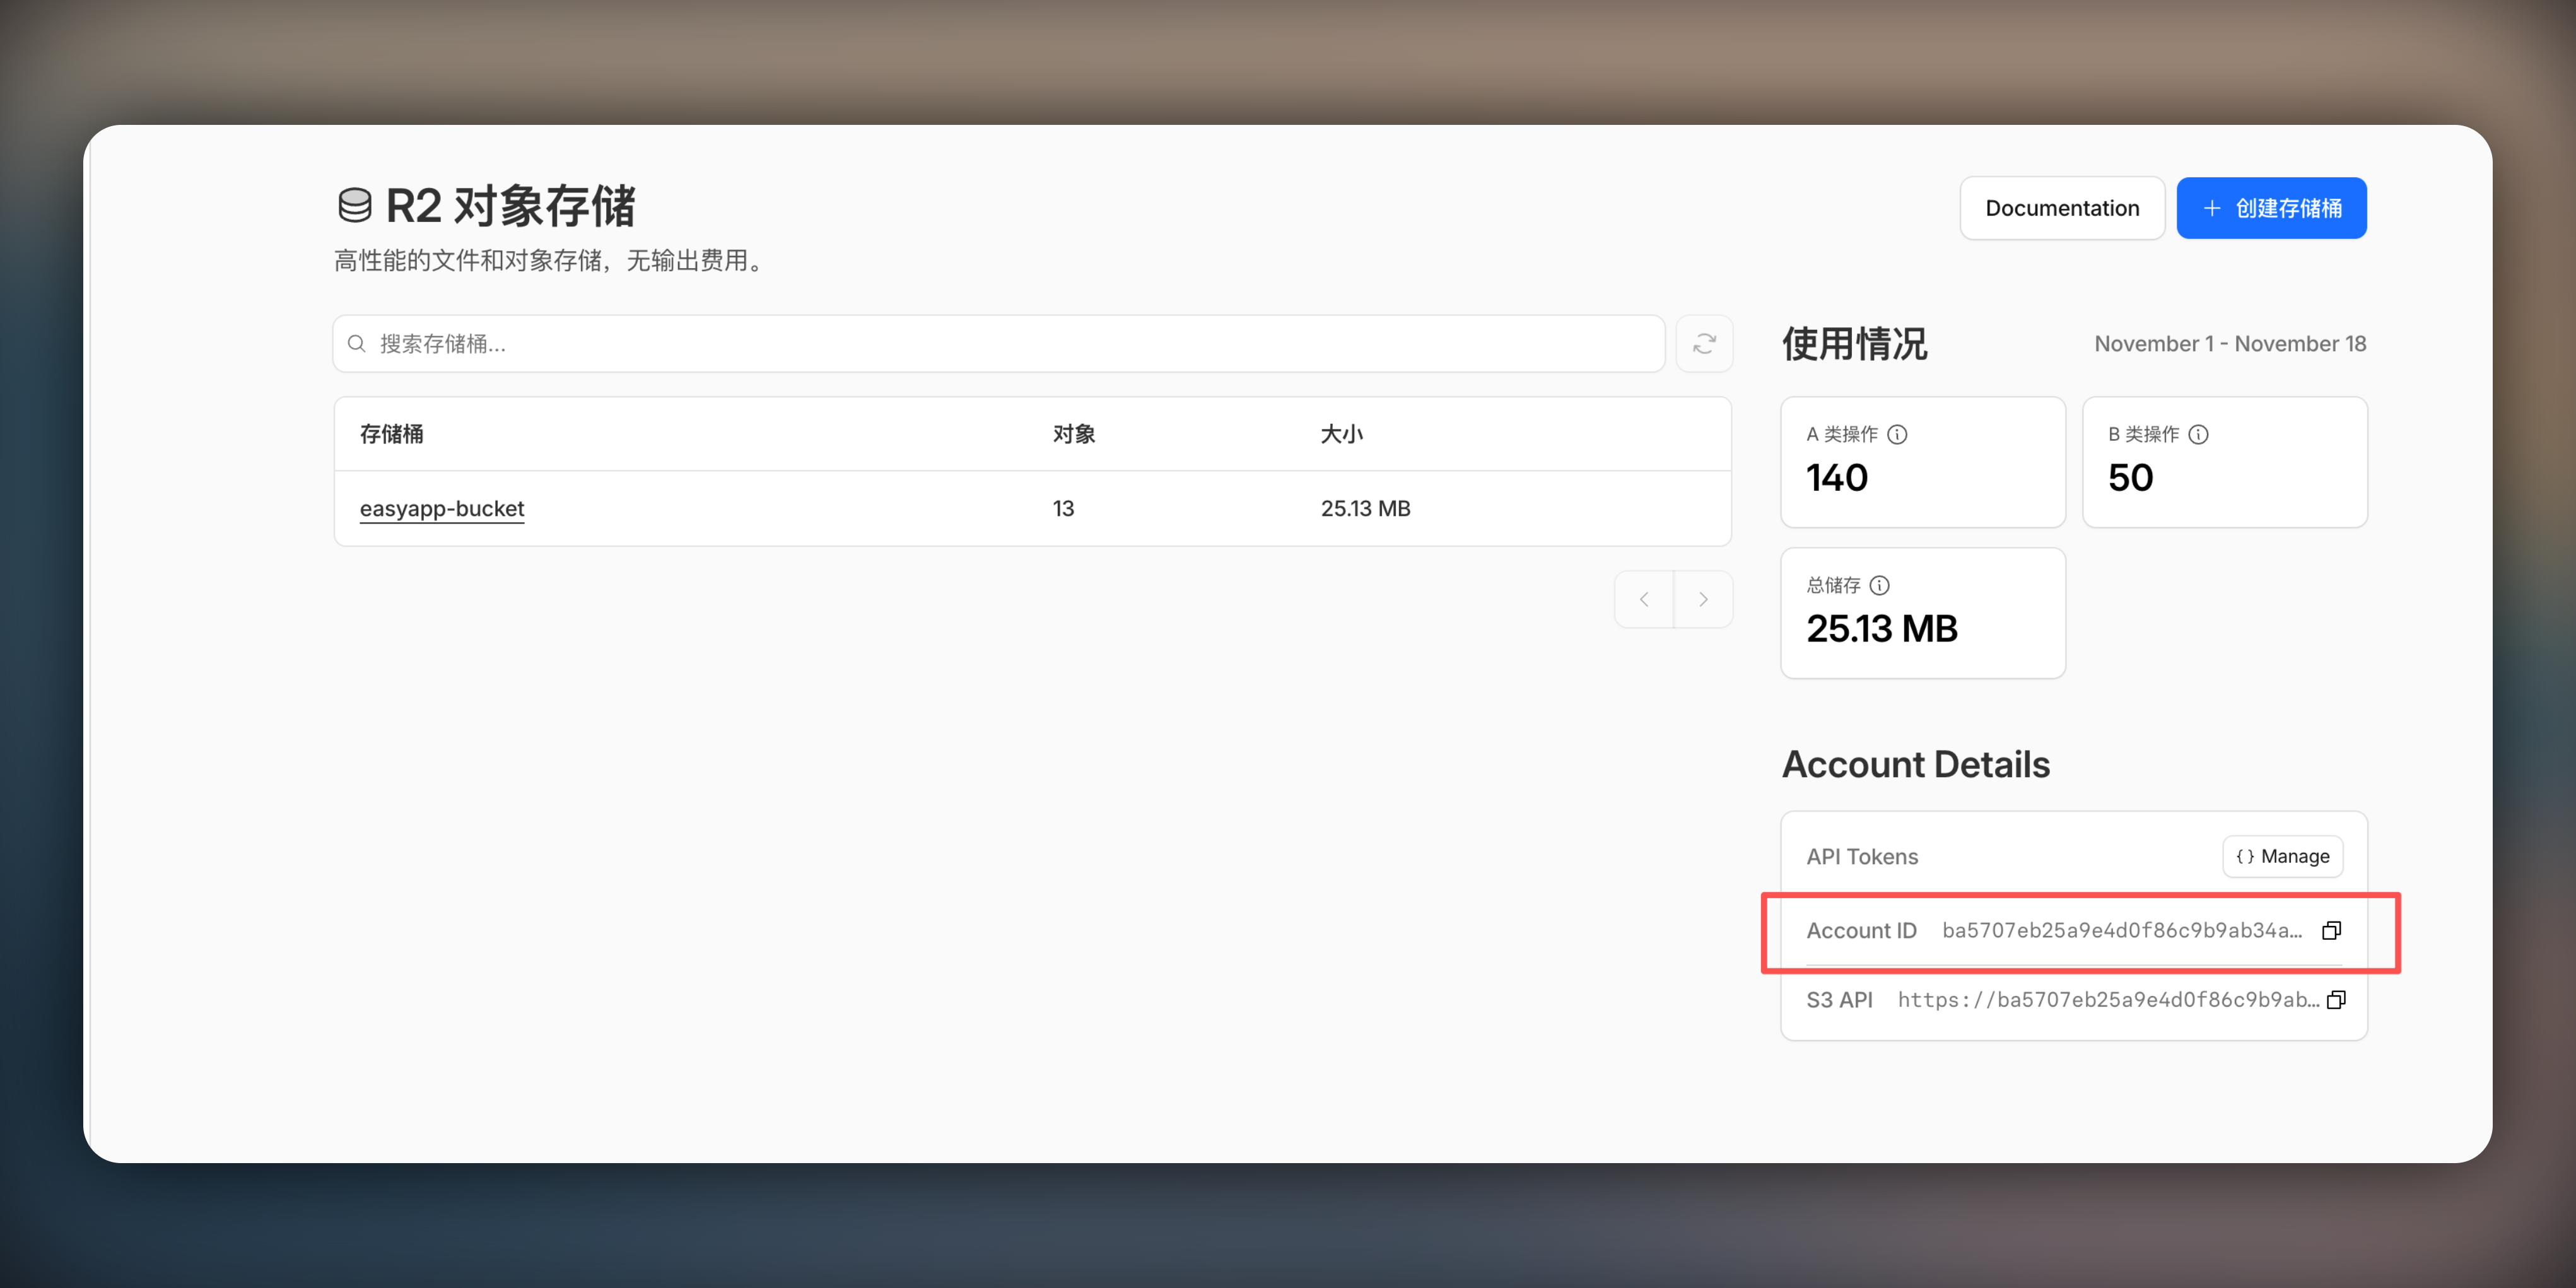
* `Account ID` is `CLOUDFLARE_ACCOUNT_ID`
## Create R2 Bucket
1. Navigate to **R2** -> **Overview**
2. Click **Create bucket**
3. Enter bucket name (e.g., `easyapp-bucket`)
4. Keep other configurations as default
5. Click **Create bucket**
* `Bucket Name` is `R2_BUCKET_NAME`
## Configure Public Access (Optional)
1. Enter your bucket settings
2. Click **Settings** -> **Public Development URL** -> Enable
3. Strongly recommend binding custom domain
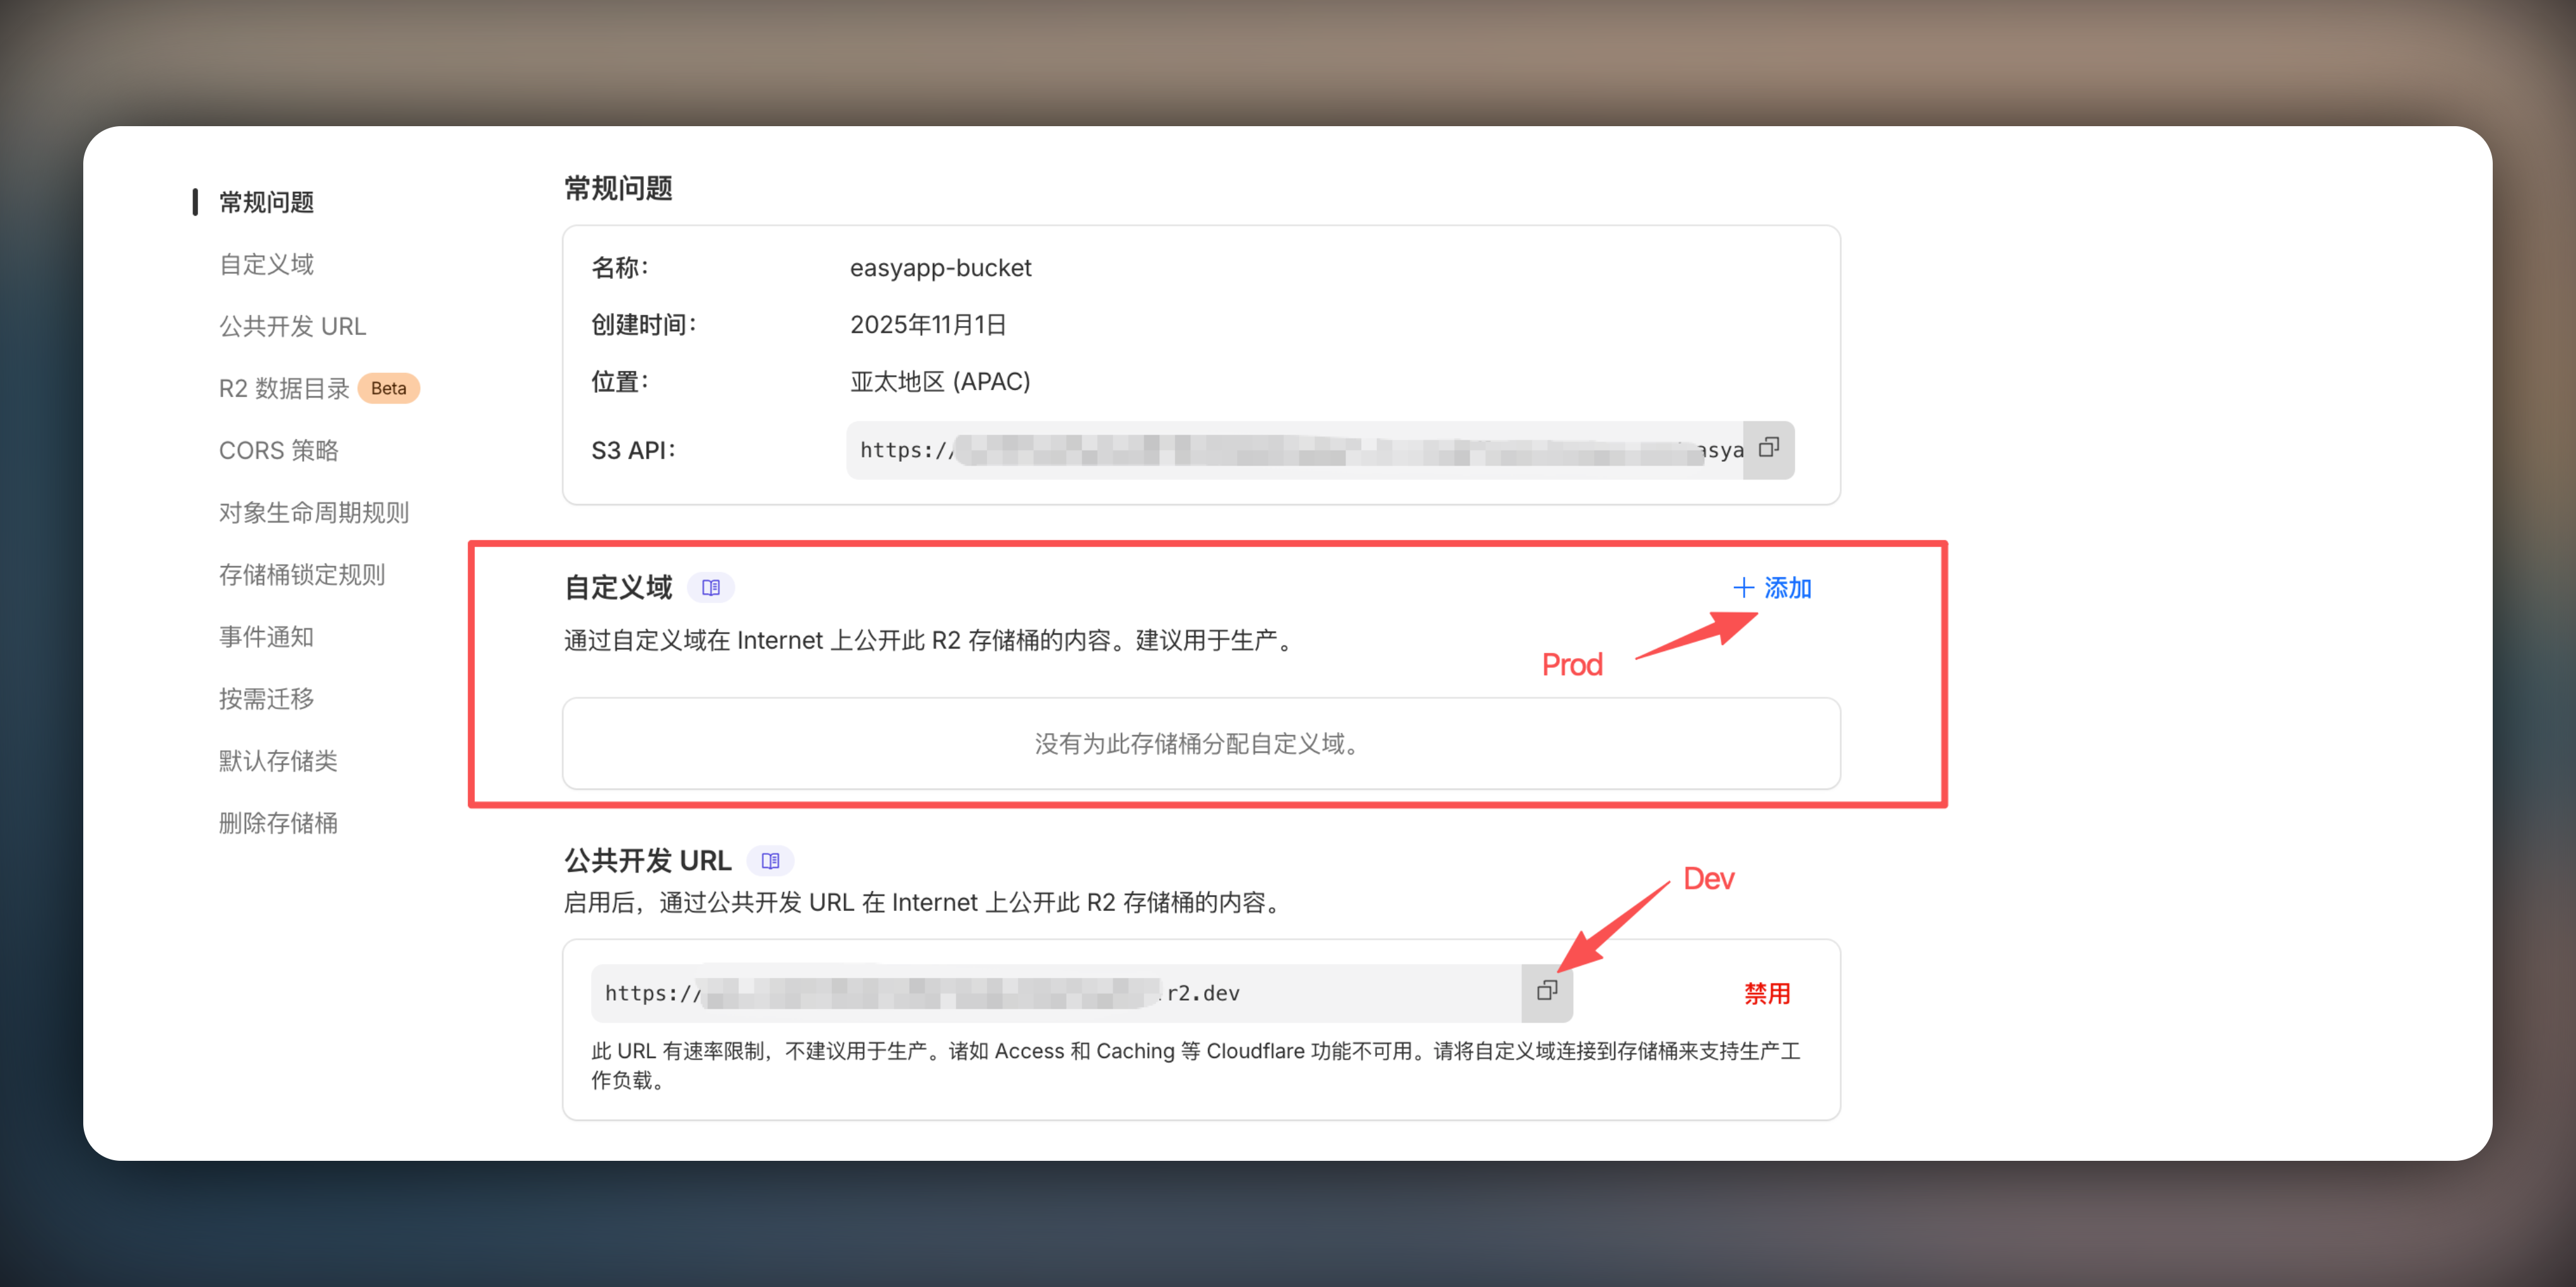
* `Custom Domain` is `R2_PUBLIC_URL`
Cloudflare officially recommends binding custom domains. Default domains have rate limits and are not recommended for production.
## Configure Environment Variables (for development)
Based on the above steps, add the following configuration in `supabase/.env.local`:
```bash
CLOUDFLARE_ACCOUNT_ID=your_account_id
CLOUDFLARE_API_TOKEN=your_api_token
R2_ACCESS_KEY_ID=your_access_key_id
R2_SECRET_ACCESS_KEY=your_secret_access_key
R2_BUCKET_NAME=easyapp-bucket
R2_PUBLIC_URL=https://your-bucket.your-domain.com
```
## Production Environment
Go to the EasyAppSupabase template, run `npm run deploy` command in the root directory. This command will automatically deploy functions and database to Supabase.
Next, we need to configure the environment variables you obtained in Edge Functions.
```bash
CLOUDFLARE_ACCOUNT_ID=your_account_id
CLOUDFLARE_API_TOKEN=your_api_token
R2_ACCESS_KEY_ID=your_access_key_id
R2_SECRET_ACCESS_KEY=your_secret_access_key
R2_BUCKET_NAME=easyapp-bucket
R2_PUBLIC_URL=https://your-bucket.your-domain.com
```
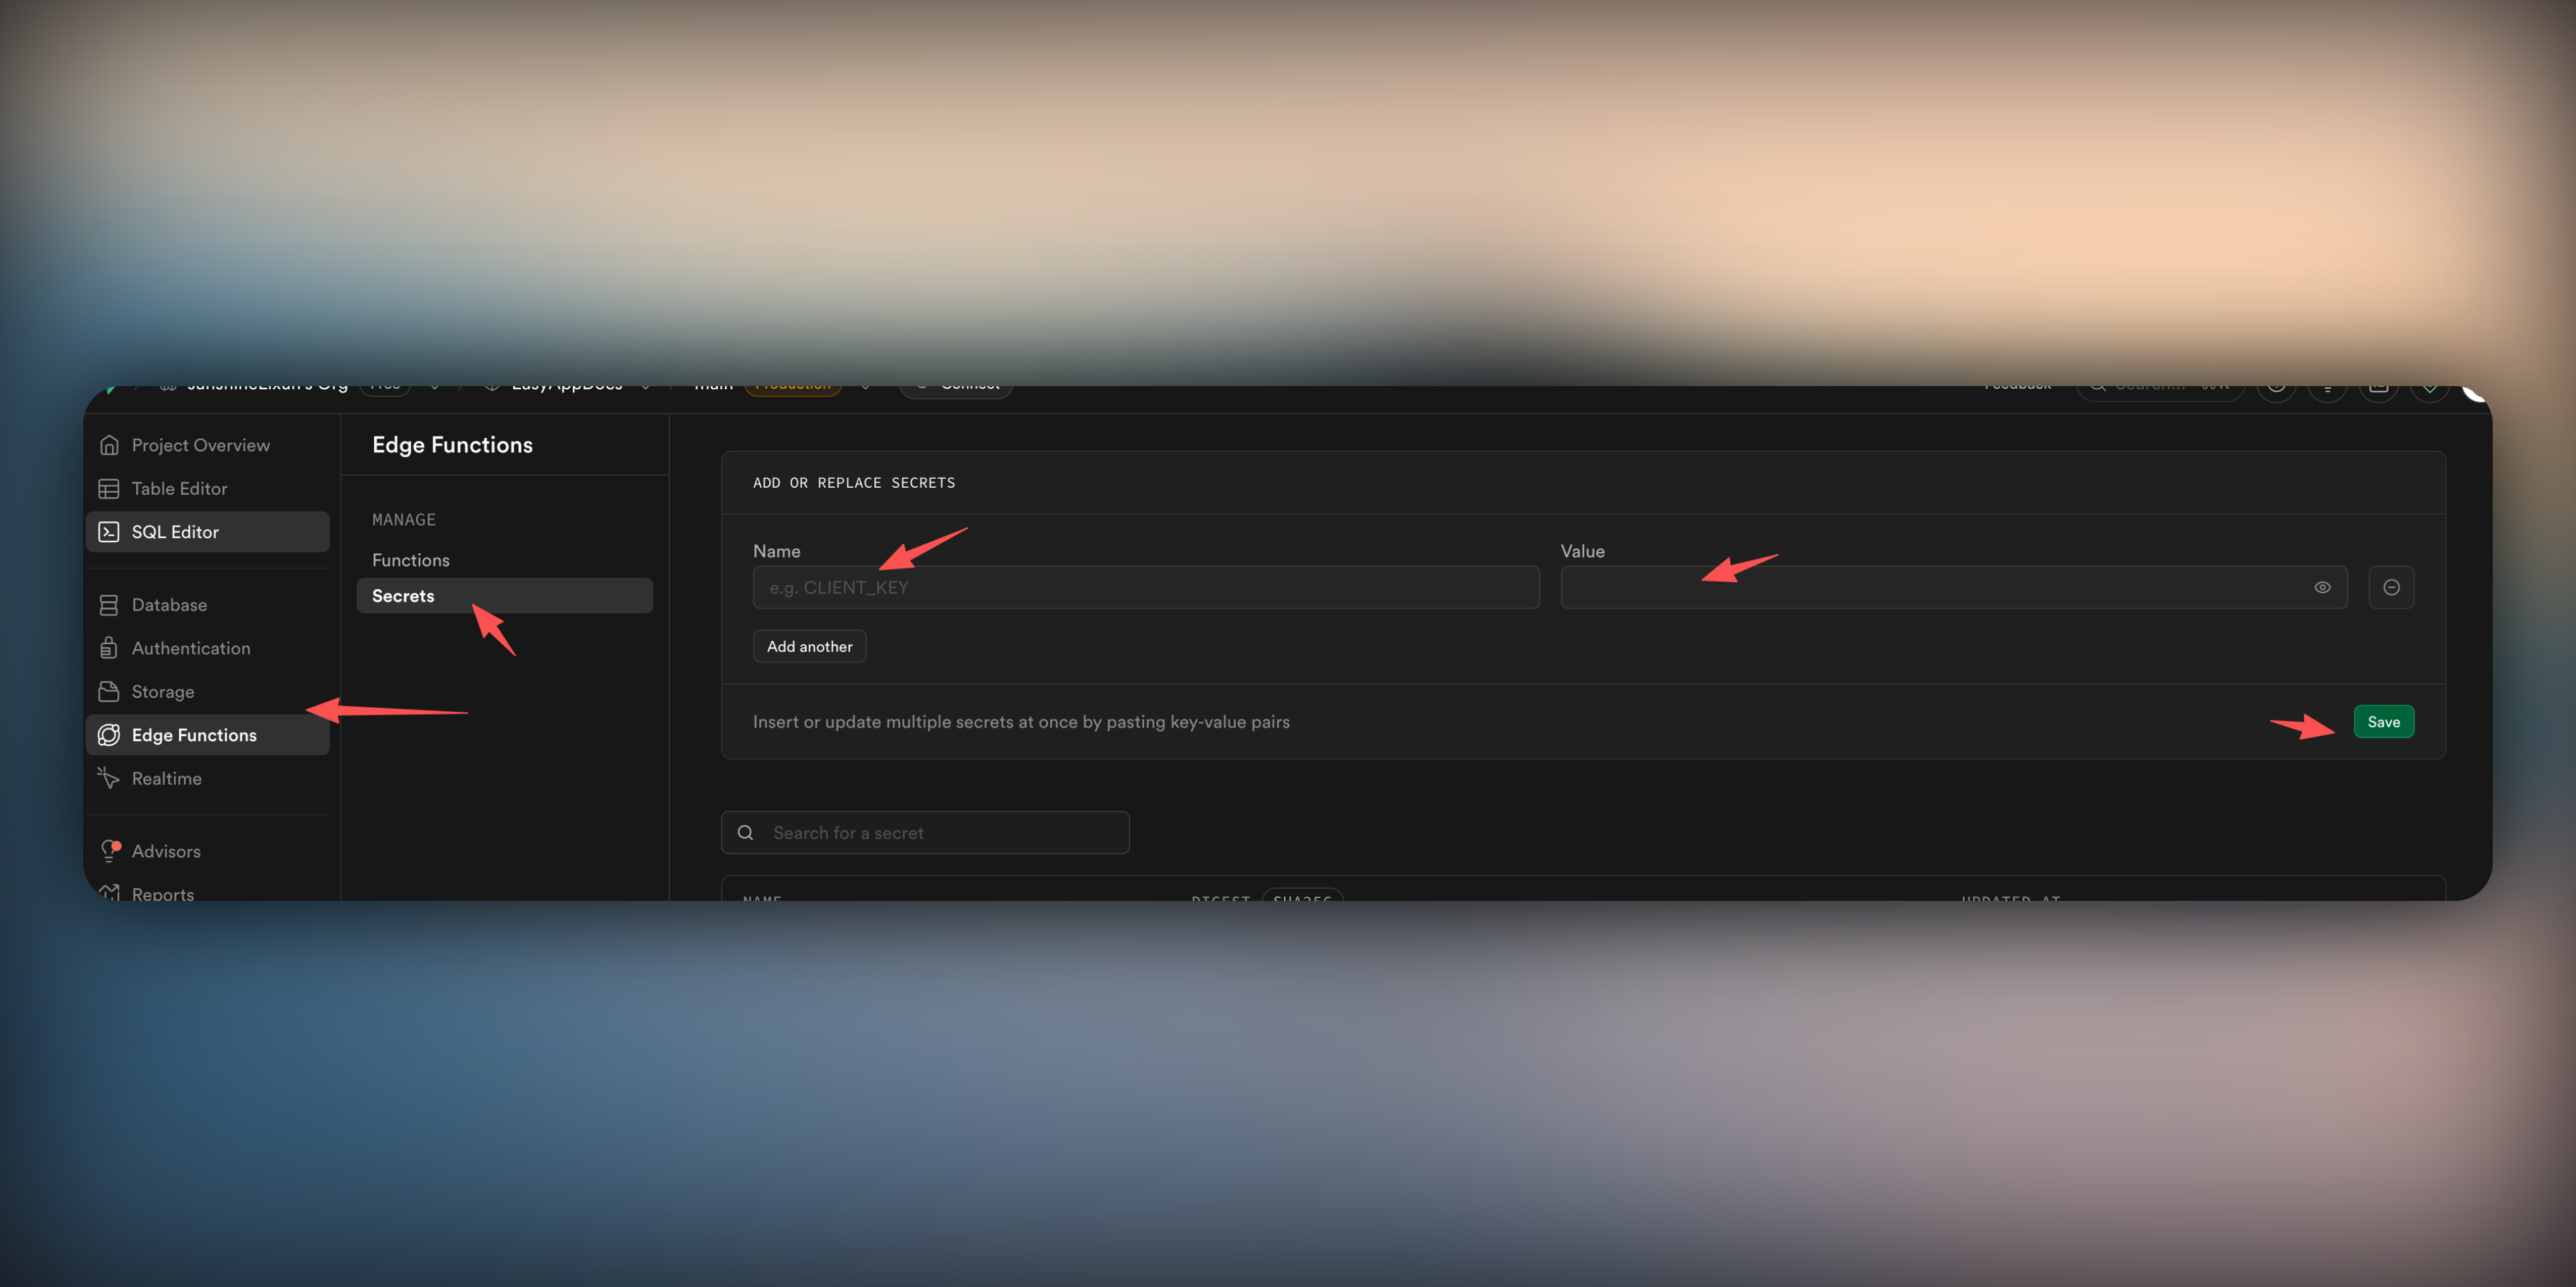
Reminder
* `Token Value` is `CLOUDFLARE_API_TOKEN`
* `Access Key ID` is `R2_ACCESS_KEY_ID`
* `Secret Access Key` is `R2_SECRET_ACCESS_KEY`
* `Account ID` is `CLOUDFLARE_ACCOUNT_ID`
* `Bucket Name` is `R2_BUCKET_NAME`
* `Custom Domain` is `R2_PUBLIC_URL`
Cloudflare officially recommends binding custom domains. Default domains have rate limits and are not recommended for production.
At this point, you have completed the Cloudflare R2 configuration. Next, you can experience the upload functionality in the EasyAppSwiftUI template.
This feature is implemented in `EasyAppSwiftUI/App/Developer/SubPages/OSSCfR2Bucket/View/OSSCfR2BucketView.swift`.
# Internationalization
URL: https://easyapp.site/en/docs/Integrations/i18n
Learn how to use Xcode to set up internationalization features
***
title: Internationalization
description: Learn how to use Xcode to set up internationalization features
icon: Globe
-----------
Refer to the [Xcode documentation](https://developer.apple.com/documentation/xcode/supporting-multiple-languages-in-your-app) to learn how to set up internationalization features.
In `EasyAppSwiftUI`, the internationalization file is located at:
# Push Notifications
URL: https://easyapp.site/en/docs/Integrations/notifications
Learn how to implement push notifications in EasyAppSwiftUI
***
title: Push Notifications
description: Learn how to implement push notifications in EasyAppSwiftUI
icon: Bell
----------
EasyAppSwiftUI uses [OneSignal](https://onesignal.com/) as the underlying push notification service. Even the free version of OneSignal generously provides unlimited push notifications.
It's recommended to test on a real device, as simulators may not receive notifications properly.
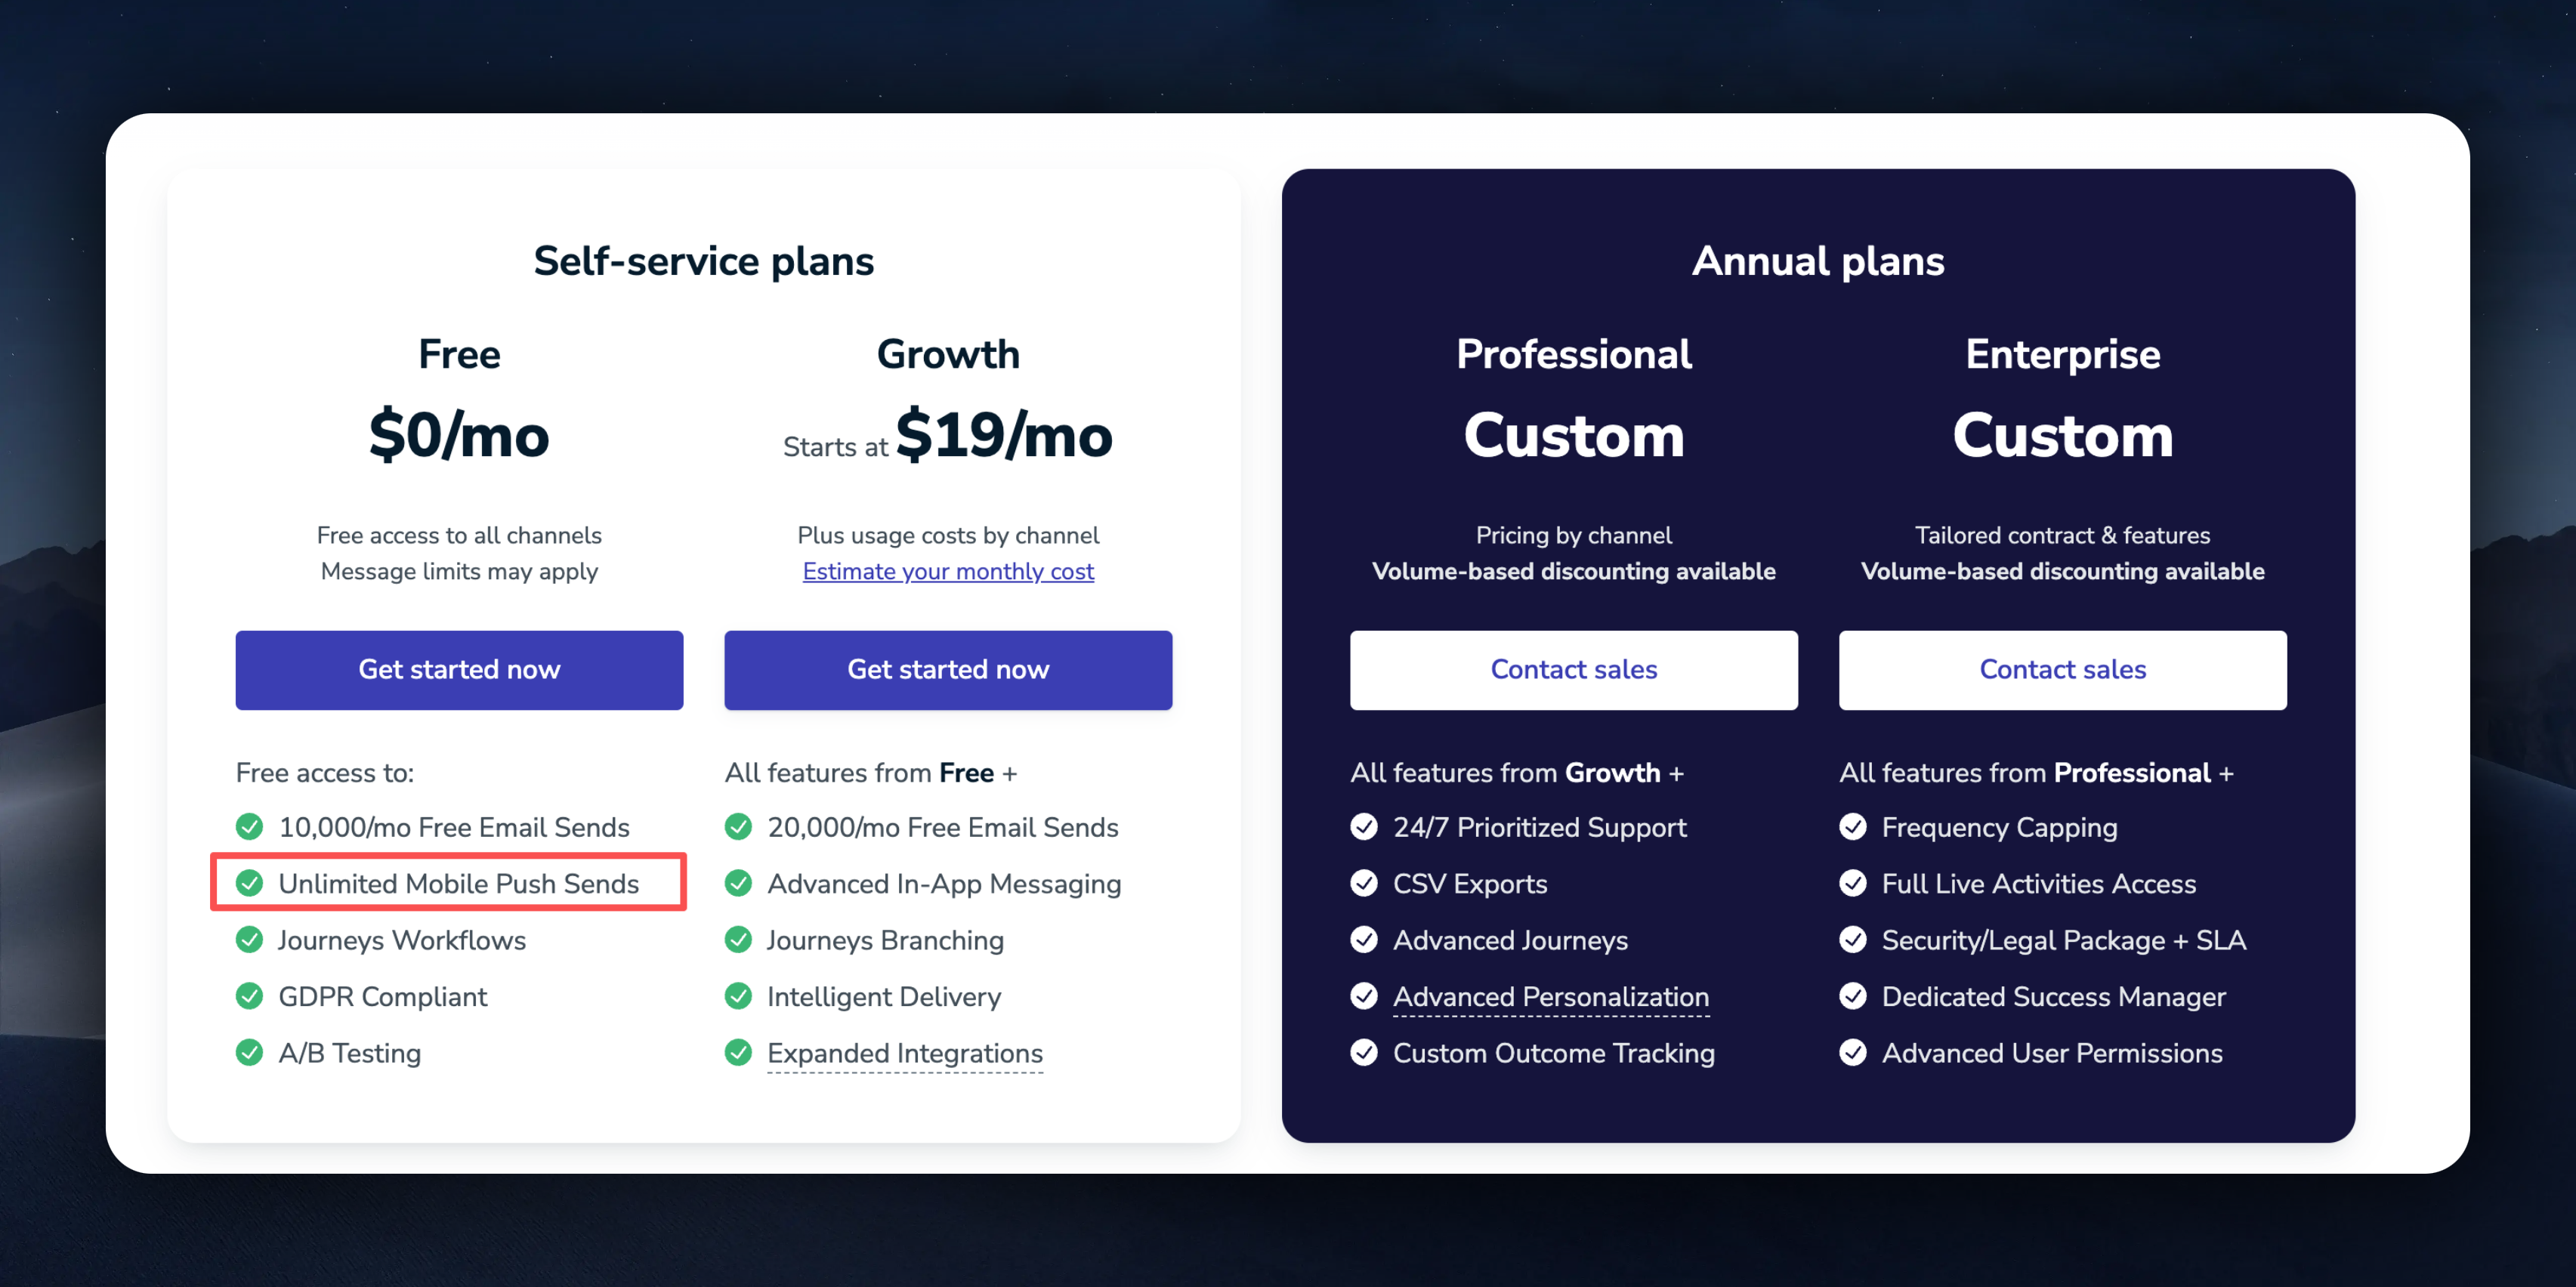
# OneSignal Integration
### 1. Create OneSignal Project
To integrate OneSignal, you need to create a OneSignal project first. You can visit the [OneSignal website](https://onesignal.com/) to register an account and create a project. OneSignal's documentation is very detailed. You can refer to the [official documentation](https://documentation.onesignal.com/docs/ios-sdk-setup#step-by-step-instructions-for-configuring-your-onesignal-app) to create the project.
### 2. Upload p8 Certificate
Uploading the p8 certificate is the most critical step. Please follow the [official documentation](https://documentation.onesignal.com/docs/ios-p8-token-based-connection-to-apns) to upload the p8 certificate.
### 3. Configure Xcode Push Capabilities
The EasyAppSwiftUI client template has already been configured for push notifications according to the [iOS setup](https://documentation.onesignal.com/docs/ios-sdk-setup#ios-setup), so you don't need to handle this step. However, a critical step is setting up your own App Groups identifier instead of using the template's default one.
How to modify:
1. First, uncheck the App Groups identifier configured in the template.
2. Then click the + button to add your own App Groups identifier. Please refer to the [OneSignal documentation](https://documentation.onesignal.com/docs/ios-sdk-setup#3-add-app-target-to-app-group) for this step.
Everything else remains unchanged.
### 4. EasyAppNotifyKit Integration
[EasyAppNotifyKit](https://github.com/FastEasyApp/EasyAppNotifyKit) is EasyAppSwiftUI's push integration library, internally implementing push functionality based on OneSignal's SDK. Since this library is a private library of the EasyApp template, if you're not an EasyApp customer, you won't be able to see this library.
EasyApp has integrated EasyAppNotifyKit using a **local SPM dependency** approach, eliminating the need to manually configure Xcode's Github account. All code is included in the project's `Packages` folder.
#### Using Local SPM Dependency
Since Xcode's built-in git tool often has issues pulling private libraries, we've adopted a local SPM dependency approach to resolve this problem.
**Project Structure:**
**How to Update Code:**
If you need to modify EasyAppNotifyKit code to meet your business requirements, you can directly edit the source code in the `EasyAppSwiftUI/Packages/EasyAppNotifyKit` folder.
***
Old Method: Pull via Github Account (Deprecated)
This method is no longer recommended. Due to frequent issues with Xcode pulling private libraries, we have switched to the local SPM dependency approach. The following content is for reference only.
**Step 1: Join FastEasyApp Organization**
First ensure your Github account belongs to the [FastEasyApp](https://github.com/FastEasyApp) organization. If you've already purchased EasyApp but haven't joined the organization yet, please contact us:
* Follow us on [X](https://x.com/ios_1261142602)
* Join us on [Discord](https://discord.gg/36UQMU6yKw)
* Contact our support team via [email](mailto:lixunemail@gmail.com)
**Step 2: Login to Github Account in Xcode**
Open Xcode settings:

Add Github account:
Enter your Github account and Token. To create a Token, click the `Create a Token on Github` button and follow the documentation:
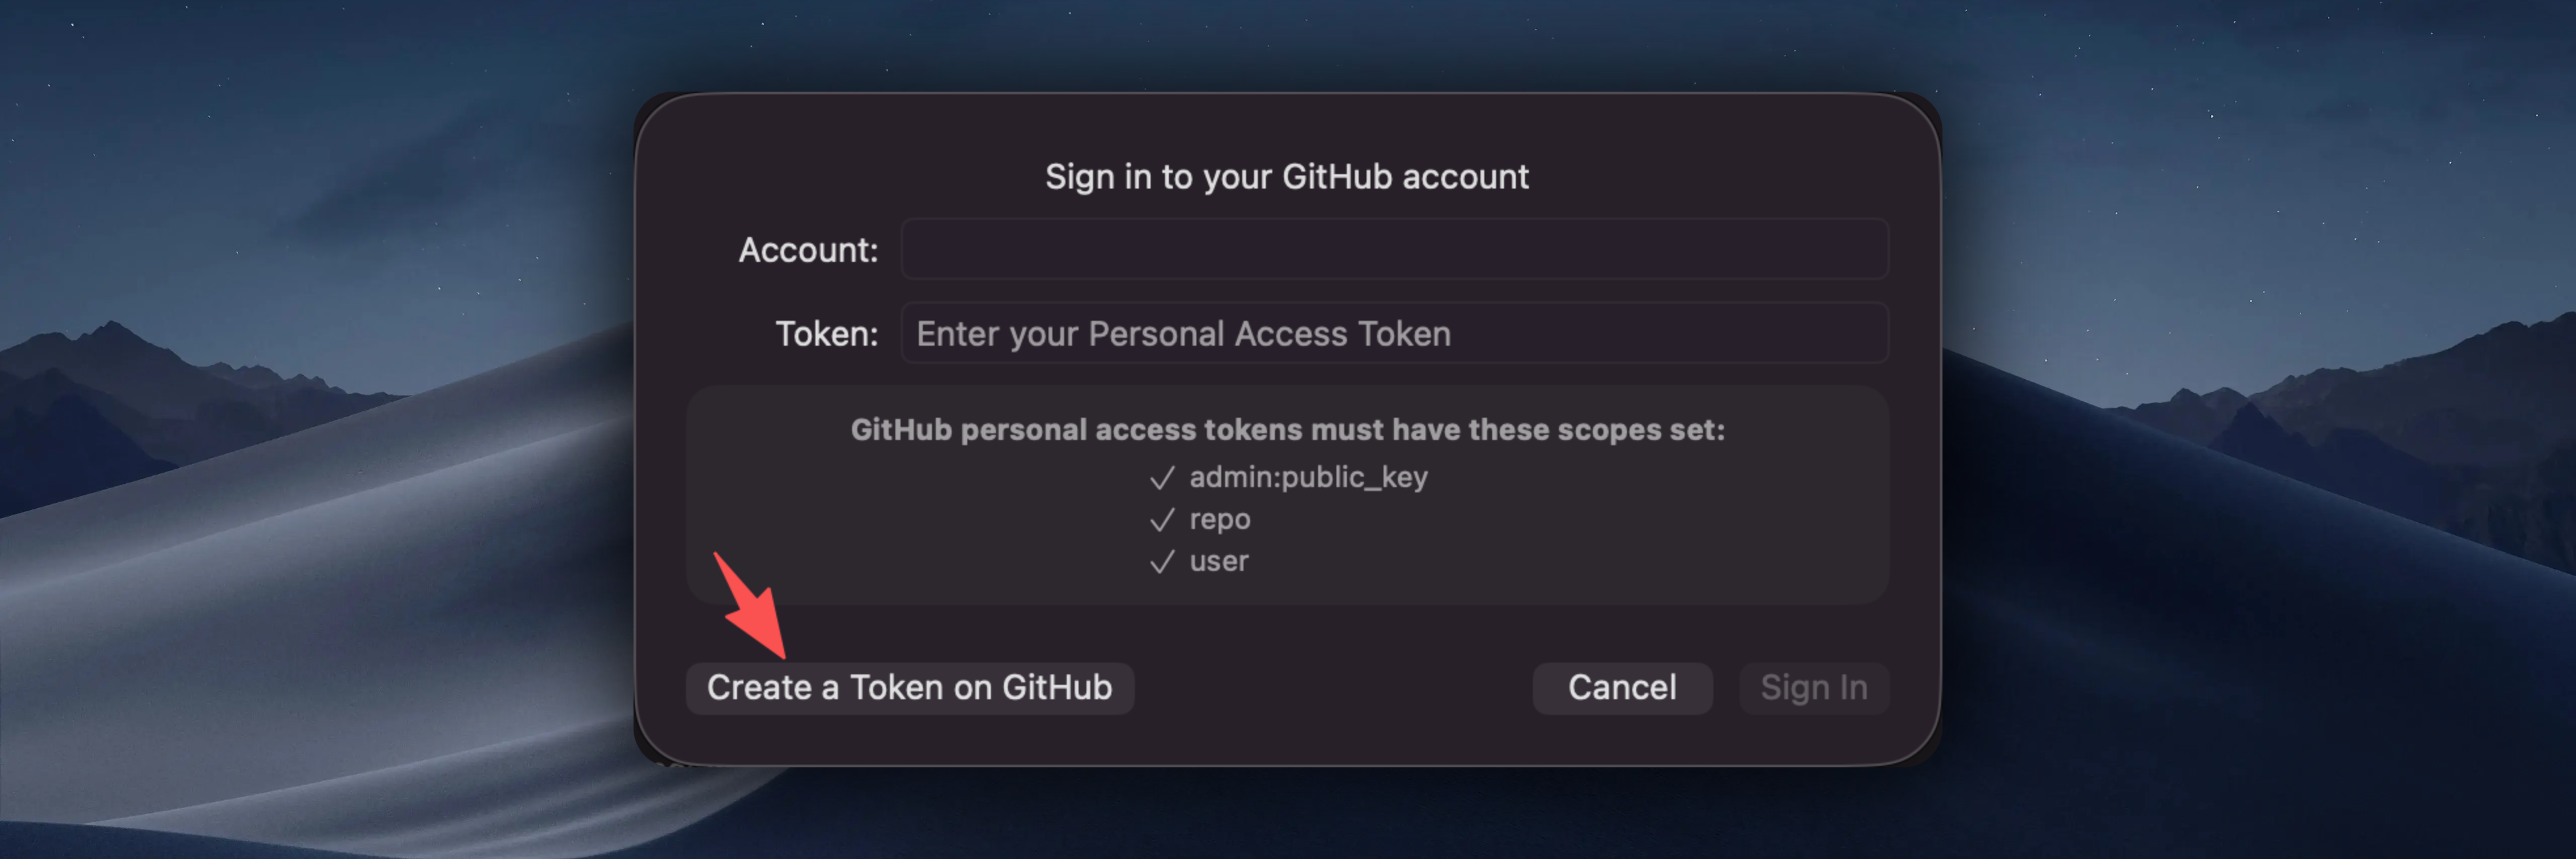
After successfully linking your Github account, you can pull [EasyAppNotifyKit](https://github.com/FastEasyApp/EasyAppNotifyKit).
### 5. Configure EasyAppNotifyKit
Configure your OneSignal
EasyApp enables push notifications by default. You can configure whether to enable it and the OneSignal app id here.
```swift title="EasyAppSwiftUI/Constants/Constants.swift"
enum Constants {
enum OneSignal {
/// is enabledNotification
static let isEnabledNotification = true
/// The app id for the OneSignal service
static let appId = " your one signal app id"
}
}
```
How to get your OneSignal app id:
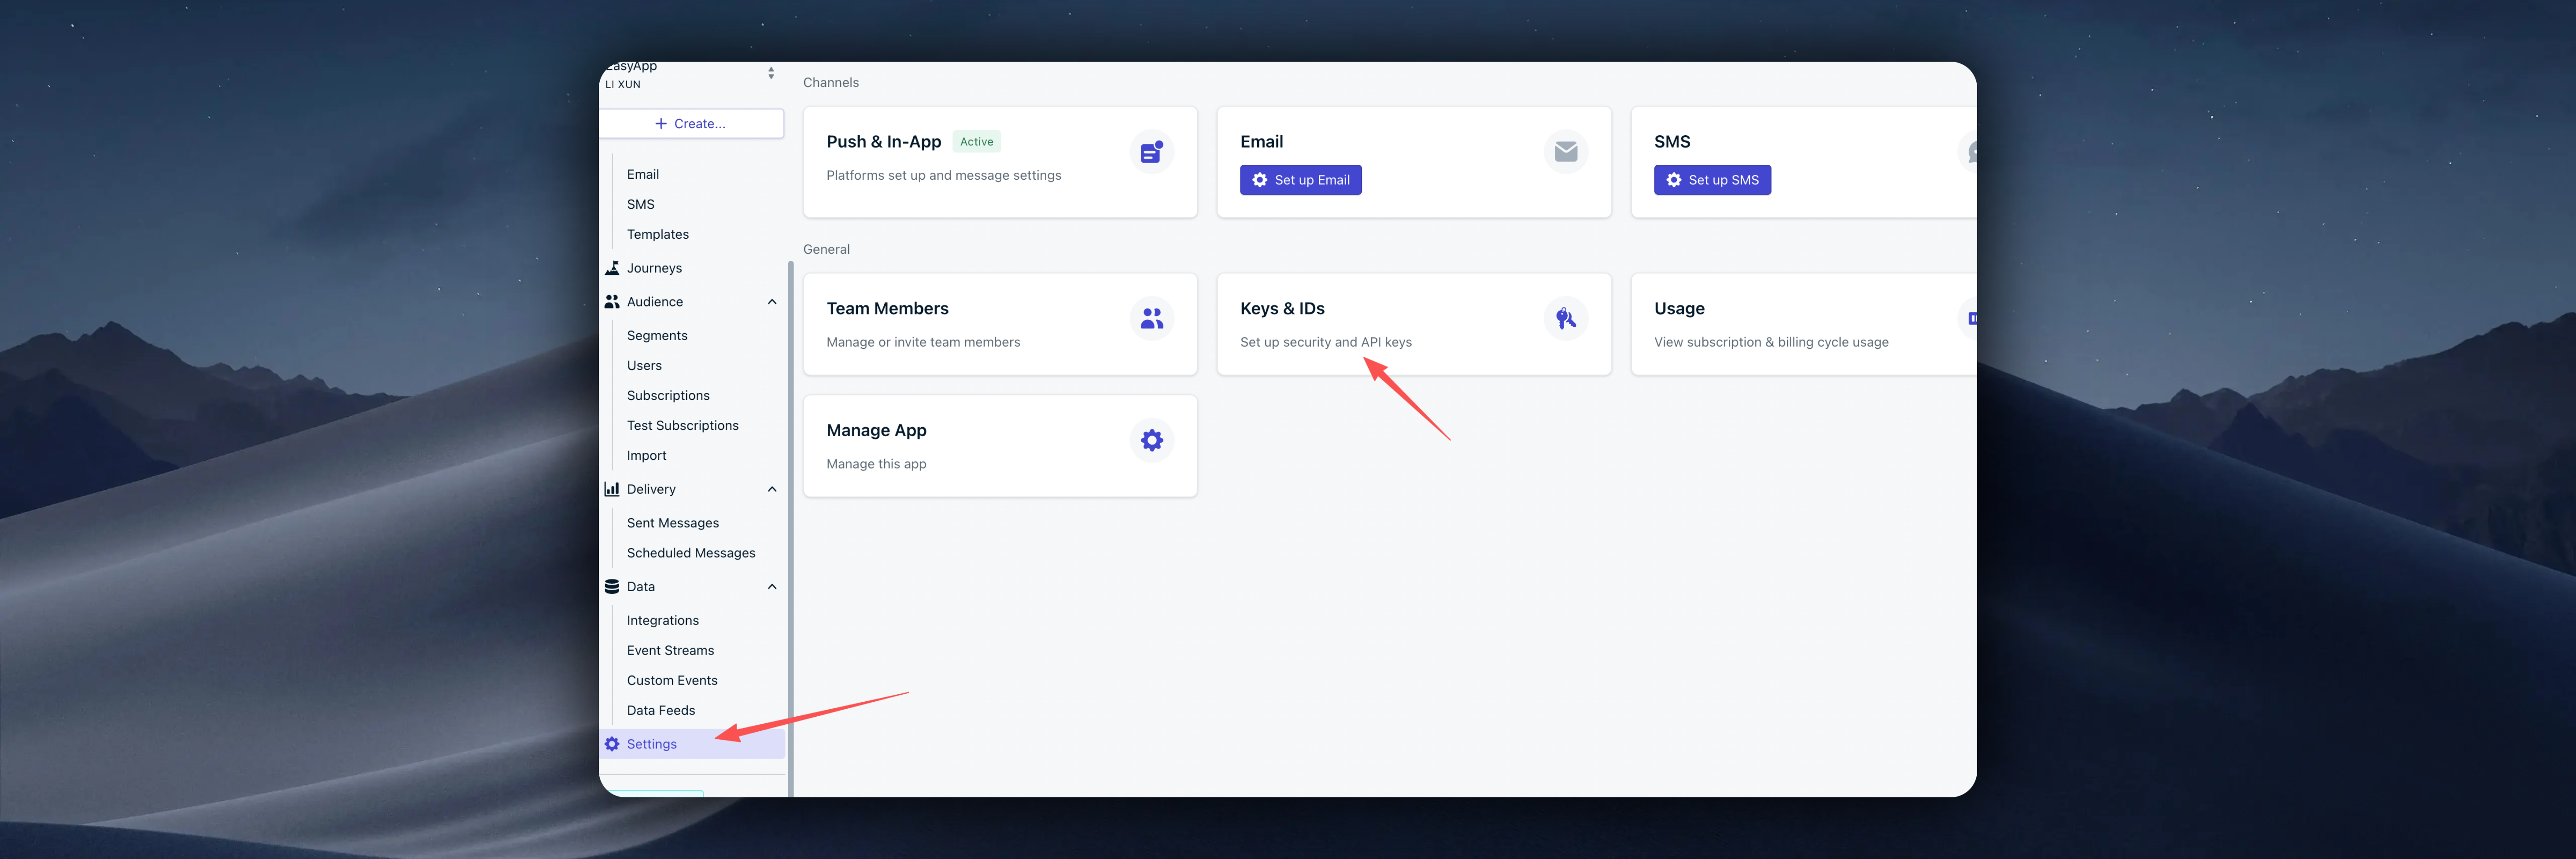
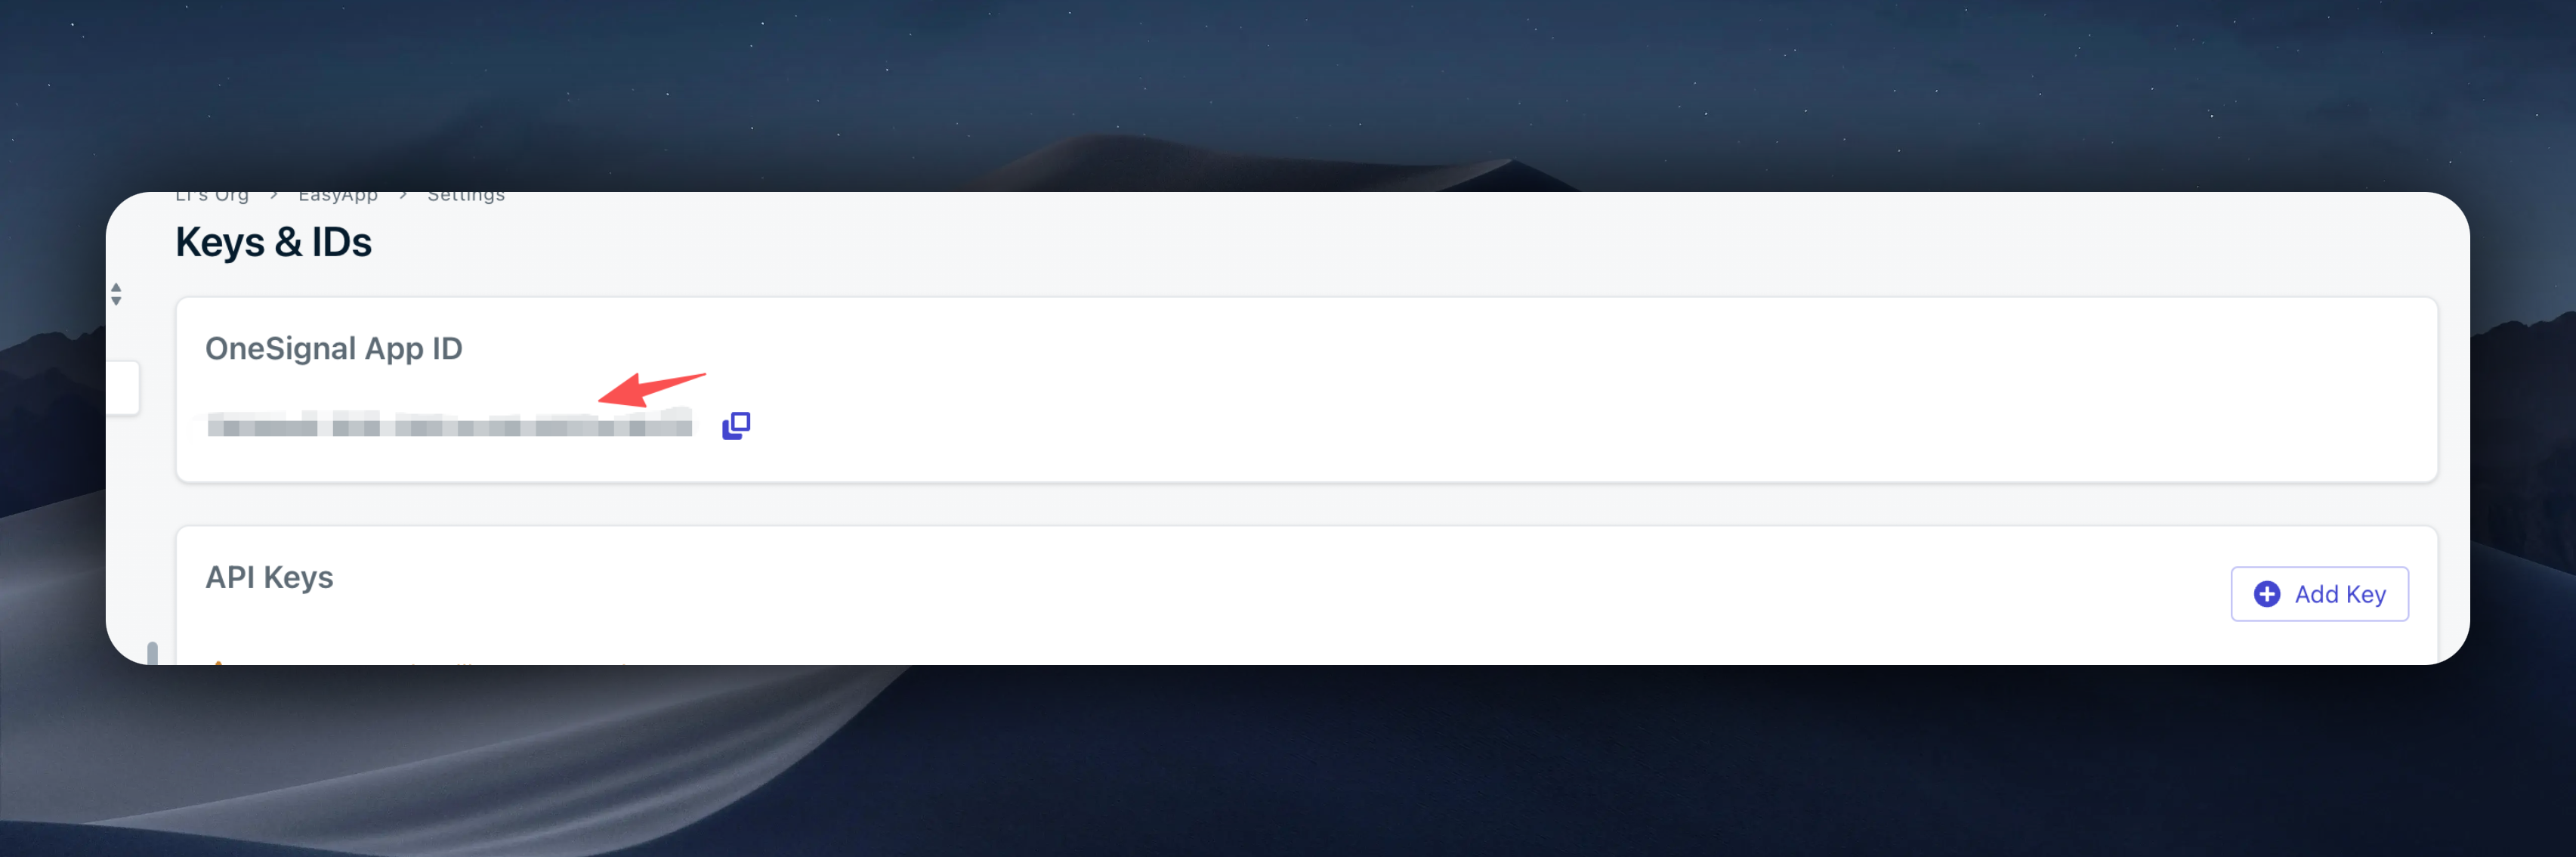
Paste it into your project.
At this point, you've configured OneSignal's push notification functionality.
Next, you need to familiarize yourself with the usage of [EasyAppNotifyKit](https://github.com/FastEasyApp/EasyAppNotifyKit).
# Using EasyAppNotifyKit
EasyAppNotifyKit abstracts the push notification interface, allowing you to freely switch between different push service providers. You just need to implement the `PushServiceProtocol` protocol.
```swift
public struct PushServiceConfiguration {
let appId: String
let launchOptions: [UIApplication.LaunchOptionsKey: Any]?
public init(appId: String, launchOptions: [UIApplication.LaunchOptionsKey: Any]?) {
self.appId = appId
self.launchOptions = launchOptions
}
}
public protocol PushServiceProtocol {
/// Initialize the push service
/// - Parameter configuration: The configuration to initialize the push service
func initialize(with configuration: PushServiceConfiguration)
/// Request permissions
func requestPermissions()
/// Get permissions status
/// - Returns: The permissions status
func getPermissionsStatus() -> UNAuthorizationStatus
/// Login user
/// - Parameter userId: The user id to login
func loginUser(with userId: String)
/// Logout user
func logoutUser()
}
```
If the protocol doesn't meet your current needs, you can extend it freely.
`PushManager` is a singleton that manages the current push service. You can configure and initialize the current push service through `PushManager`.
```swift
let oneSignalService = OneSignalService()
PushManager.shared.configure(with: oneSignalService)
let configuration: PushServiceConfiguration = PushServiceConfiguration(
appId: Constants.OneSignal.appId,
launchOptions: launchOptions
)
PushManager.shared.initialize(with: configuration)
```
### Request Permissions
Apple encourages users to actively request permissions when push notifications are needed. You can call the `requestPermissions` method to request permissions.
```swift
PushManager.shared.requestPermissions()
```
For a better user experience, EasyAppNotifyKit provides three views to help you manage push notification permissions.
```swift
NotificationsPermissions()
NotificationGrantedView()
NotificationDeniedView()
```
`NotificationsPermissions` view is used to request permissions.
`NotificationGrantedView` view is used to display when push notifications are authorized.
`NotificationDeniedView` view is used to display when push notifications are not authorized.
You can use these views freely or create custom views.
The EasyAppSwift client provides a Demo page specifically for testing notification permissions, located at:
```swift title="EasyAppSwiftUI/App/Developer/SubPages/Notifications/View/NotificationsDemo.swift"
import EasyAppNotifyKit
import SwiftUI
struct NotificationsDemo: View {
@State private var showNotificationStatus = false
@State private var showDeepLinkTest = false
var body: some View {
ScrollView {
VStack(spacing: 20) {
Button {
showNotificationStatus = true
} label: {
Label("dev_show_notification_status", systemImage: "bell")
}
.buttonStyle(.borderedProminent)
Text("dev_notifications_status_hint")
.font(.caption)
.foregroundColor(.secondary)
.multilineTextAlignment(.center)
.padding(.horizontal)
Divider()
// OneSignal test suite from EasyAppNotifyKit
OSNotificationTestsView()
.background(Color(.systemBackground))
.clipShape(RoundedRectangle(cornerRadius: 12))
// Backend OneSignal payload test harness
NavigationLink {
BackendSentNotificationTestView()
} label: {
Label(
"dev_backend_push_test", systemImage: "paperplane.fill")
}
.buttonStyle(.bordered)
// Manual open the deep link target page for quick test
Button {
showDeepLinkTest = true
} label: {
Label(
"dev_open_deep_link_test_page",
systemImage: "arrow.right.circle")
}
.buttonStyle(.bordered)
}
.padding(.bottom)
}
.navigationTitle("dev_notifications_demo_title")
.padding(.top, 40)
.sheet(isPresented: $showNotificationStatus) {
// Use the new NotificationStatusContainer that automatically determines which view to show
NotificationStatusContainer()
}
.sheet(isPresented: $showDeepLinkTest) {
OSDeepLinkTargetTestView()
}
}
}
```
### Sending Notifications
#### Using [OneSignal Dashboard](https://dashboard.onesignal.com/apps/79e7ade9-1616-4382-ac08-a5973e14b212/push/new?start_with_ai=true) to Send Notifications
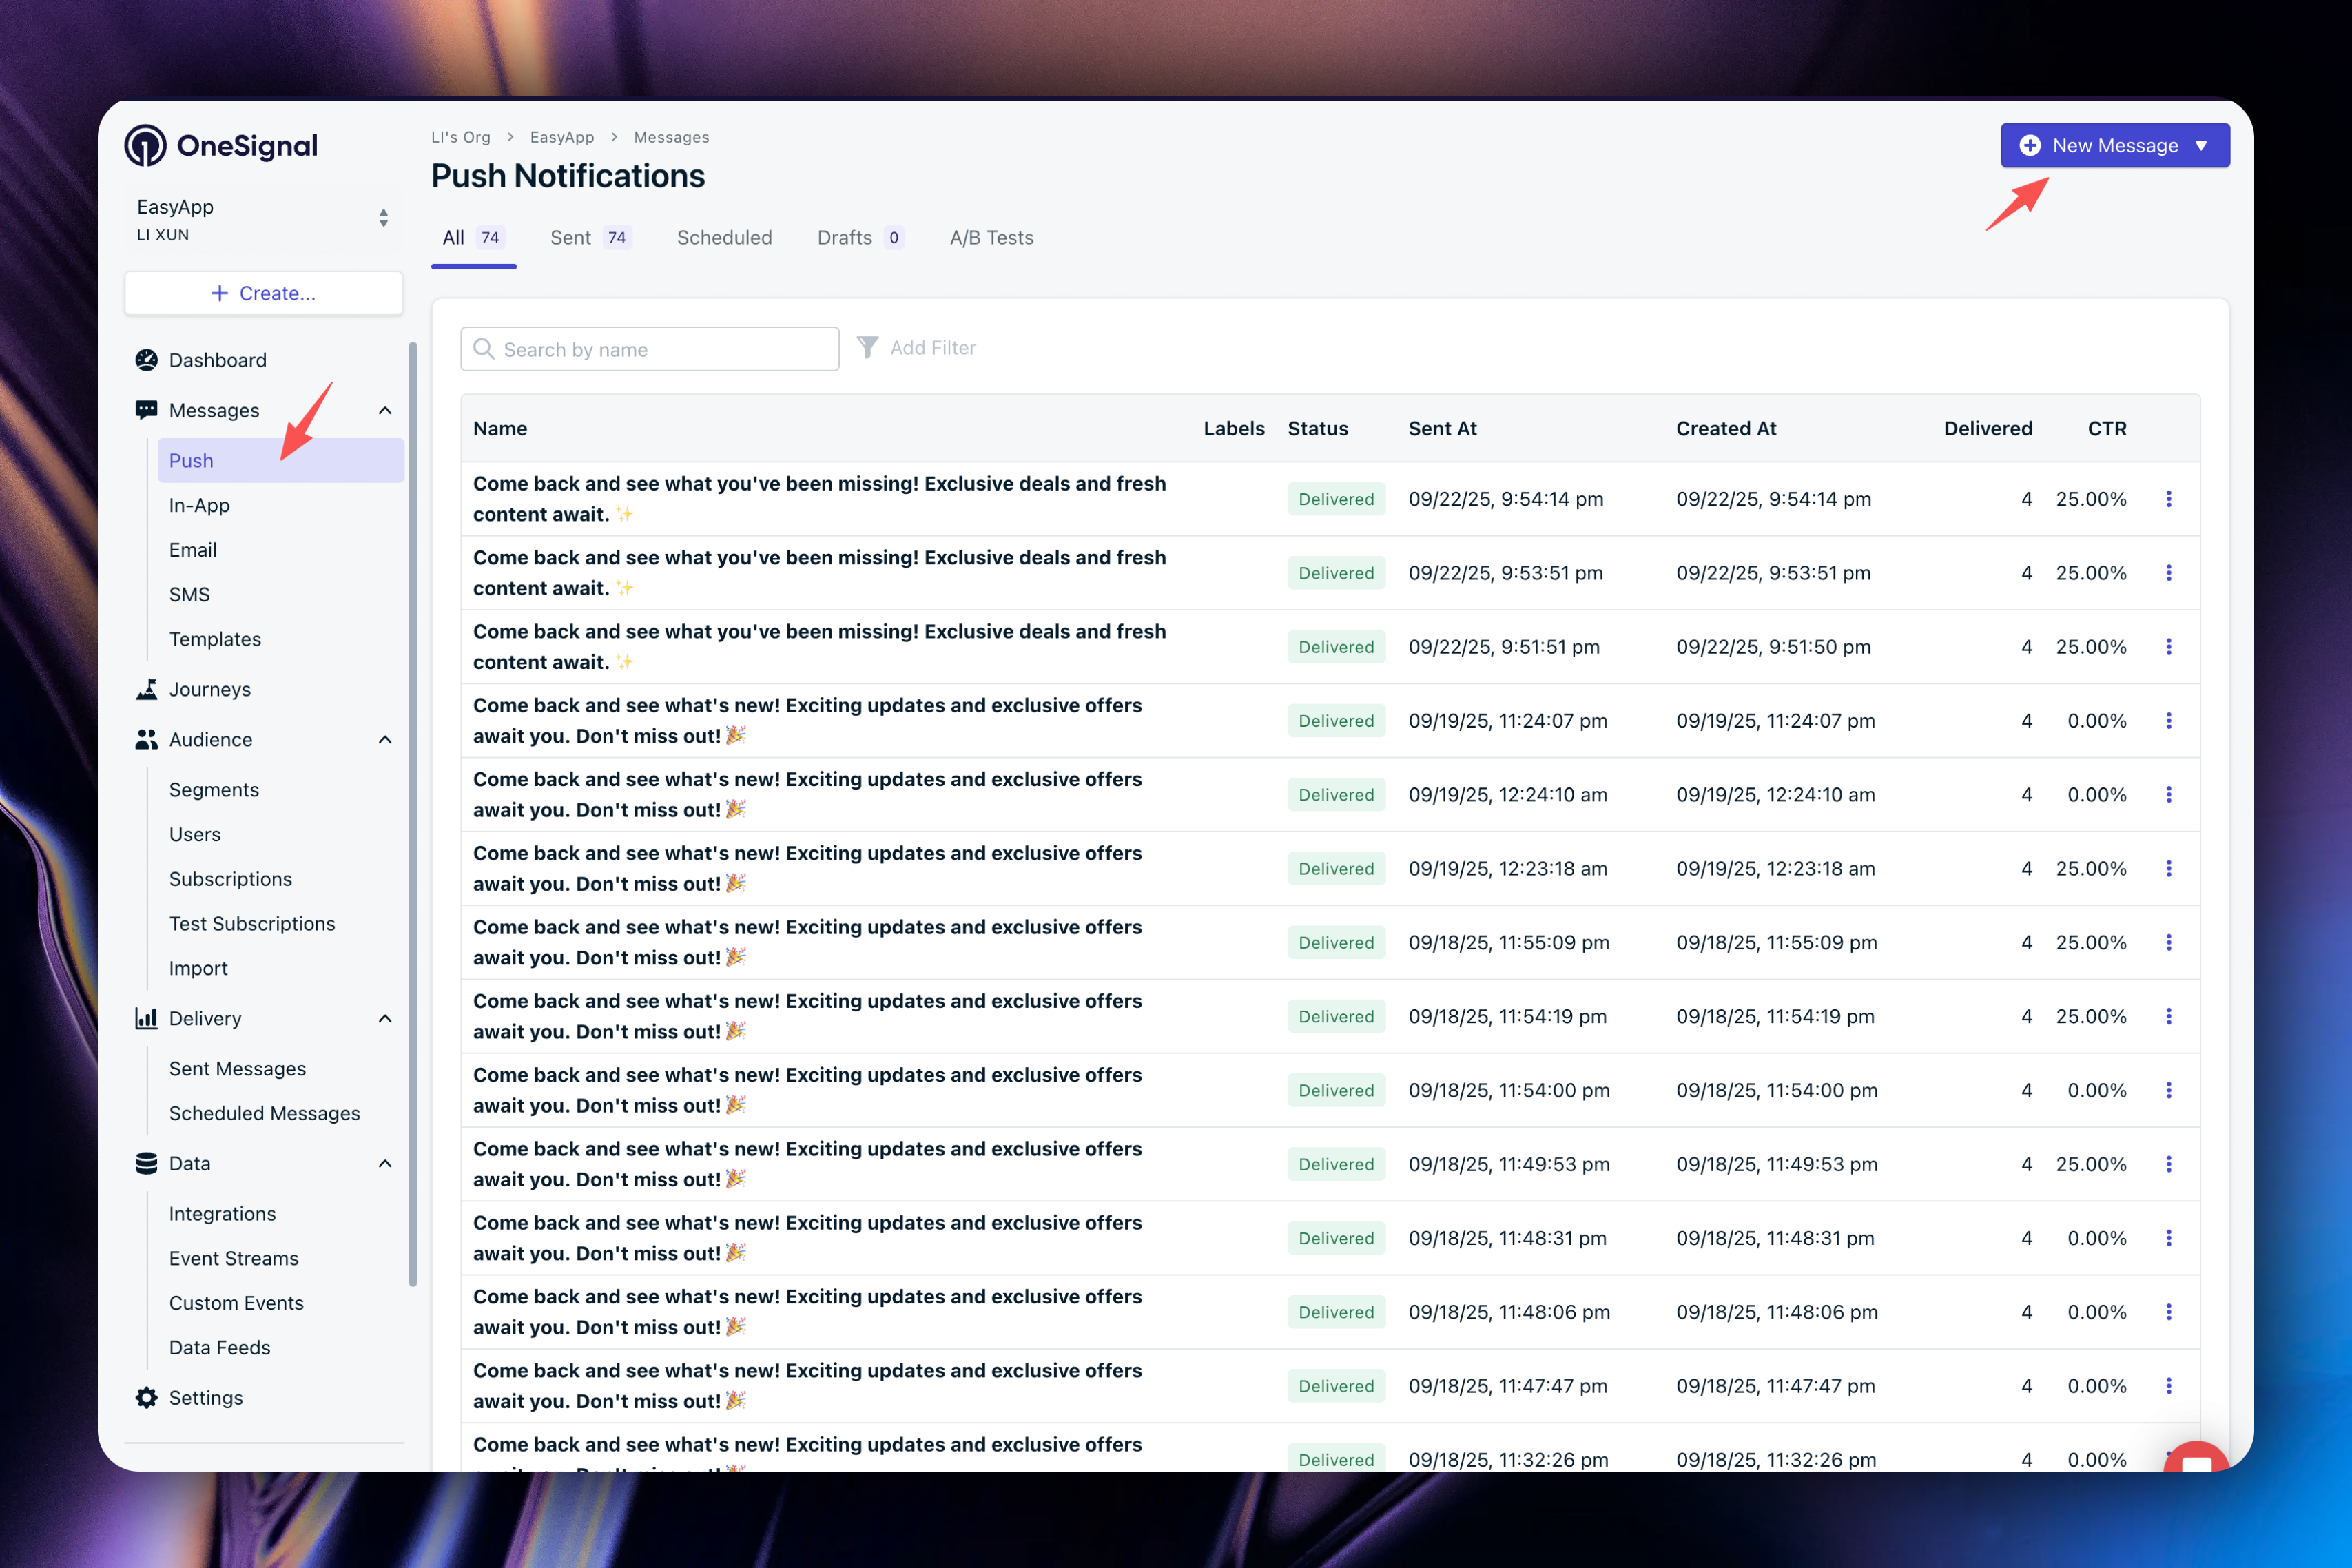
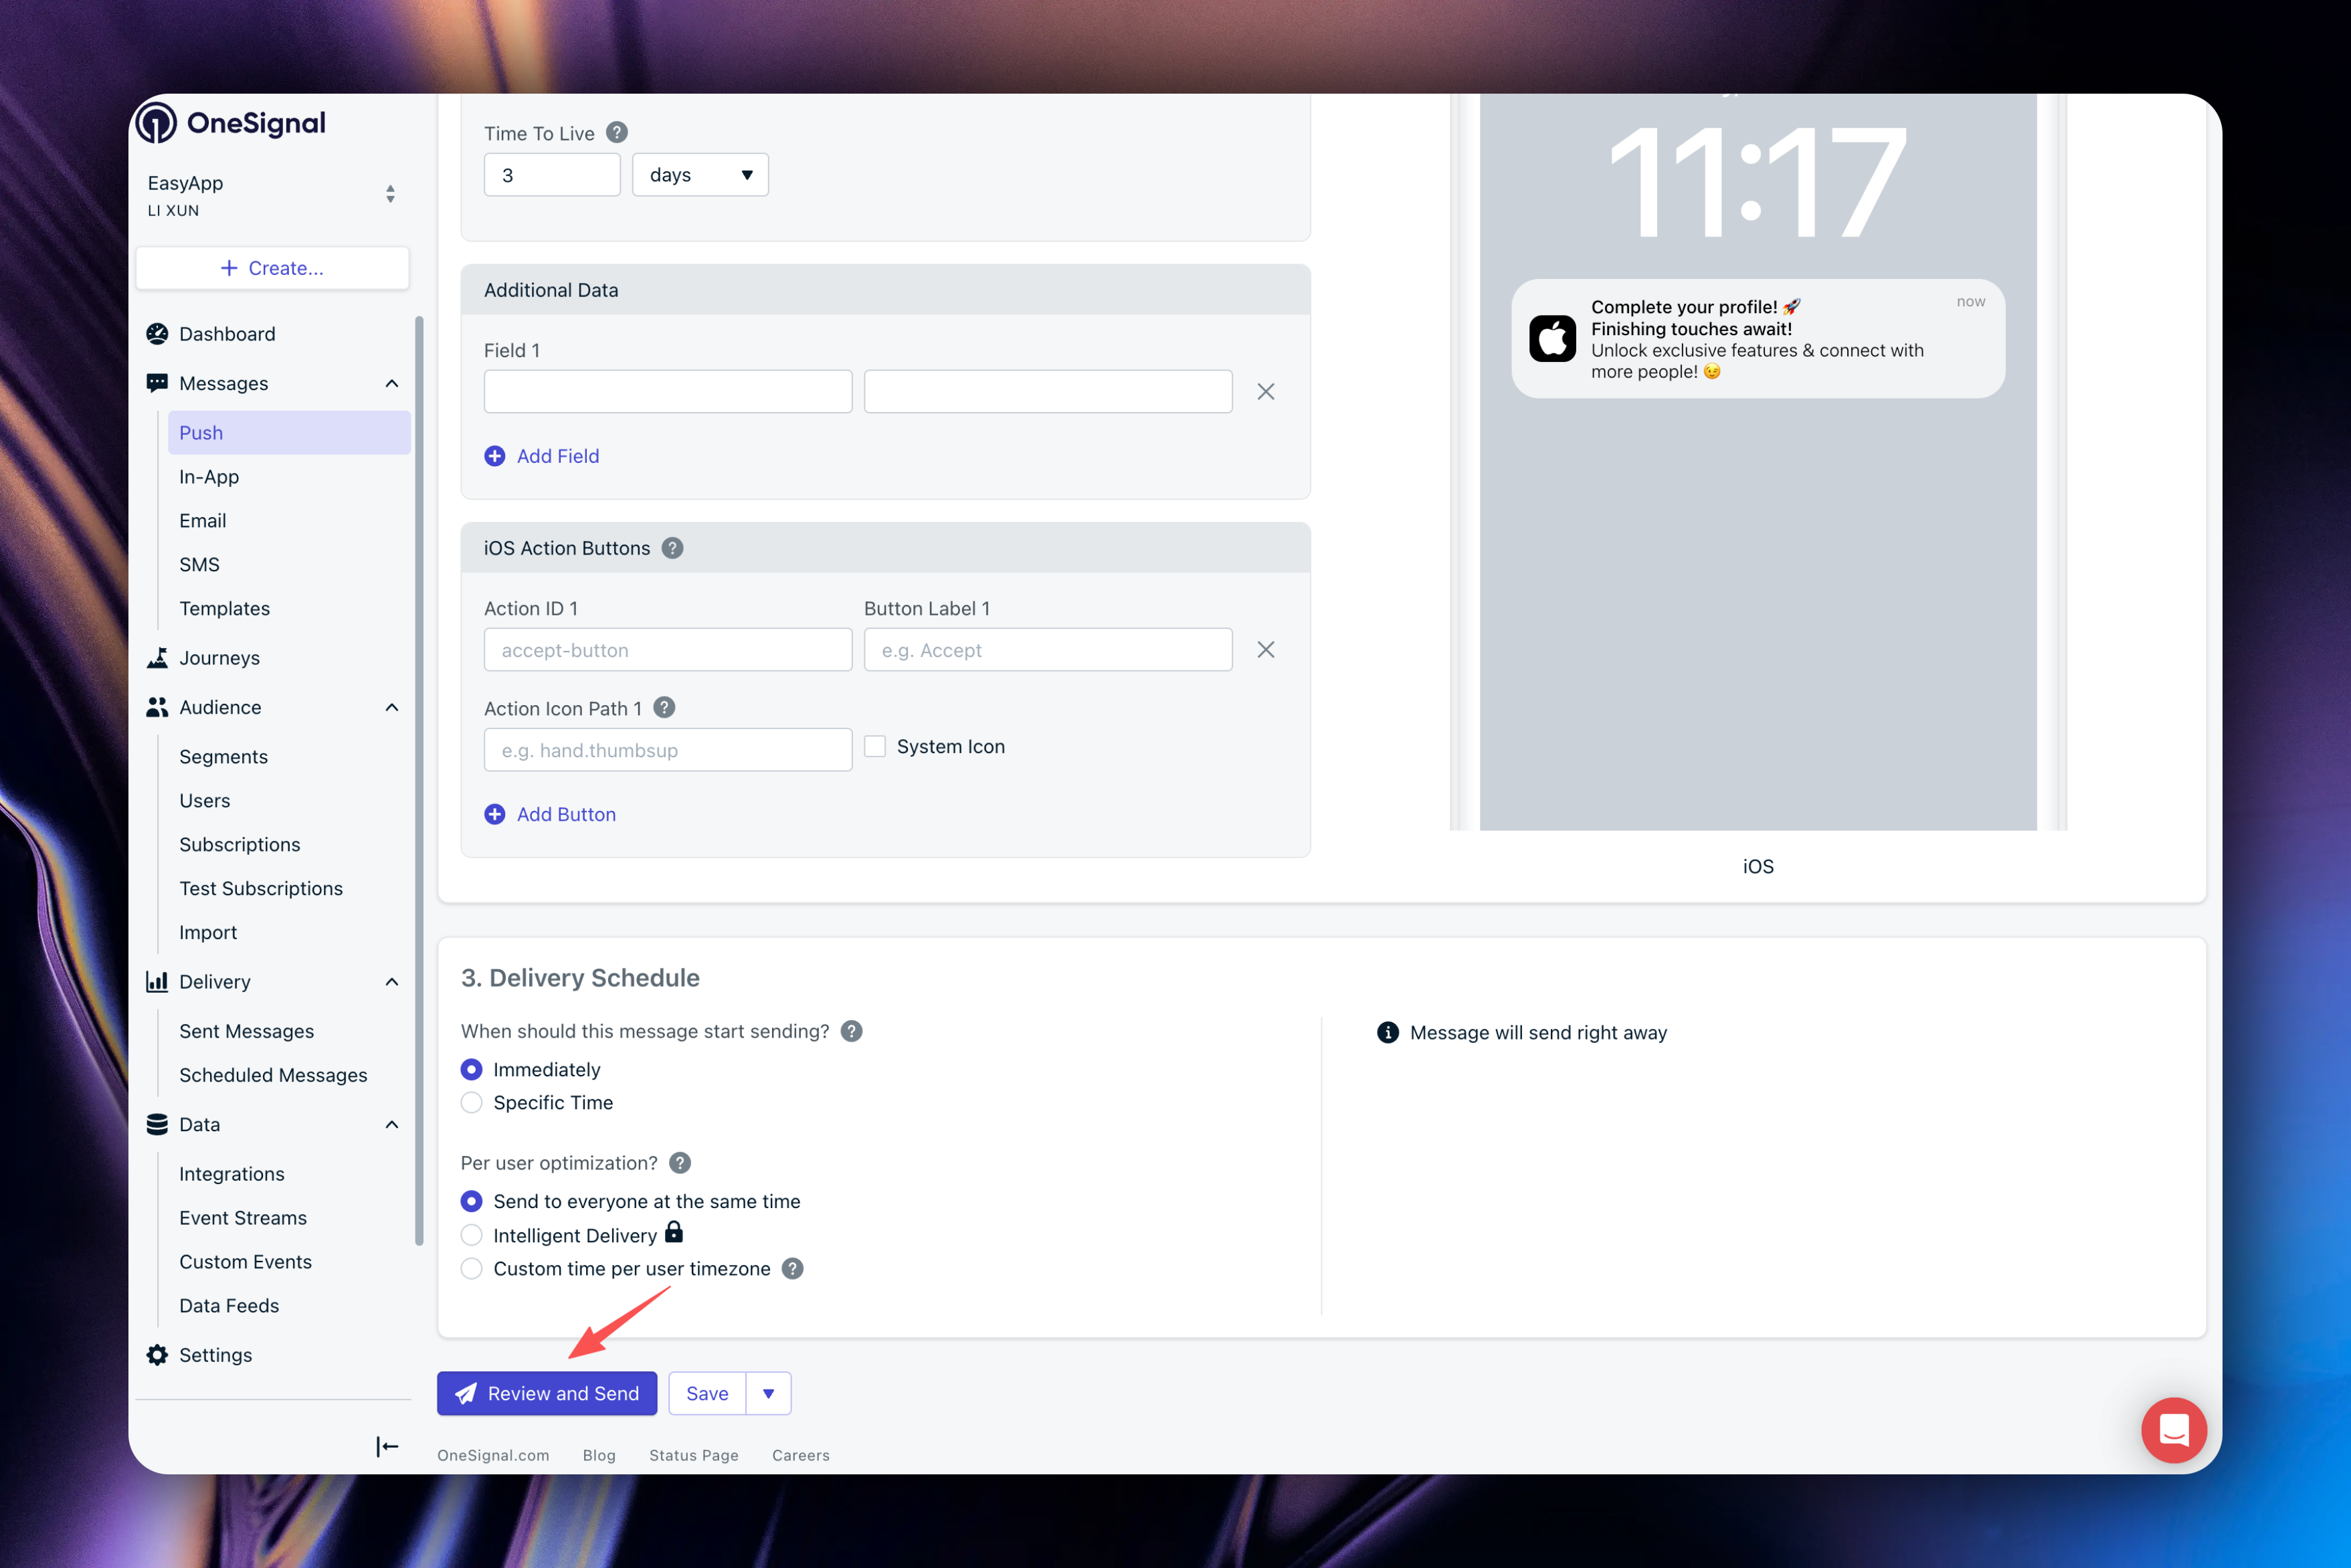
#### Using Supabase Edge Functions to Send Notifications (Recommended)
EasyApp provides server-side capability to send notifications, which gives you more flexibility by controlling notification sending through code. Combined with your business requirements, you can achieve granular push targeting. OneSignal supports very rich custom fields, allowing you to implement notifications targeting specific users/batch users, certain regions, certain time periods, and other events. For details, please refer to the [OneSignal documentation](https://documentation.onesignal.com/reference/push-notification).
Supabase provides the `send-onesignal-notification` edge function, which calls OneSignal's REST API to send notifications. Therefore, you need to configure OneSignal's REST API Key and App ID in the EasyAppSupabase project.
Here's how to get OneSignal's REST API Key and App ID:
Login to your OneSignal account, go to the Dashboard, then click `Settings`.

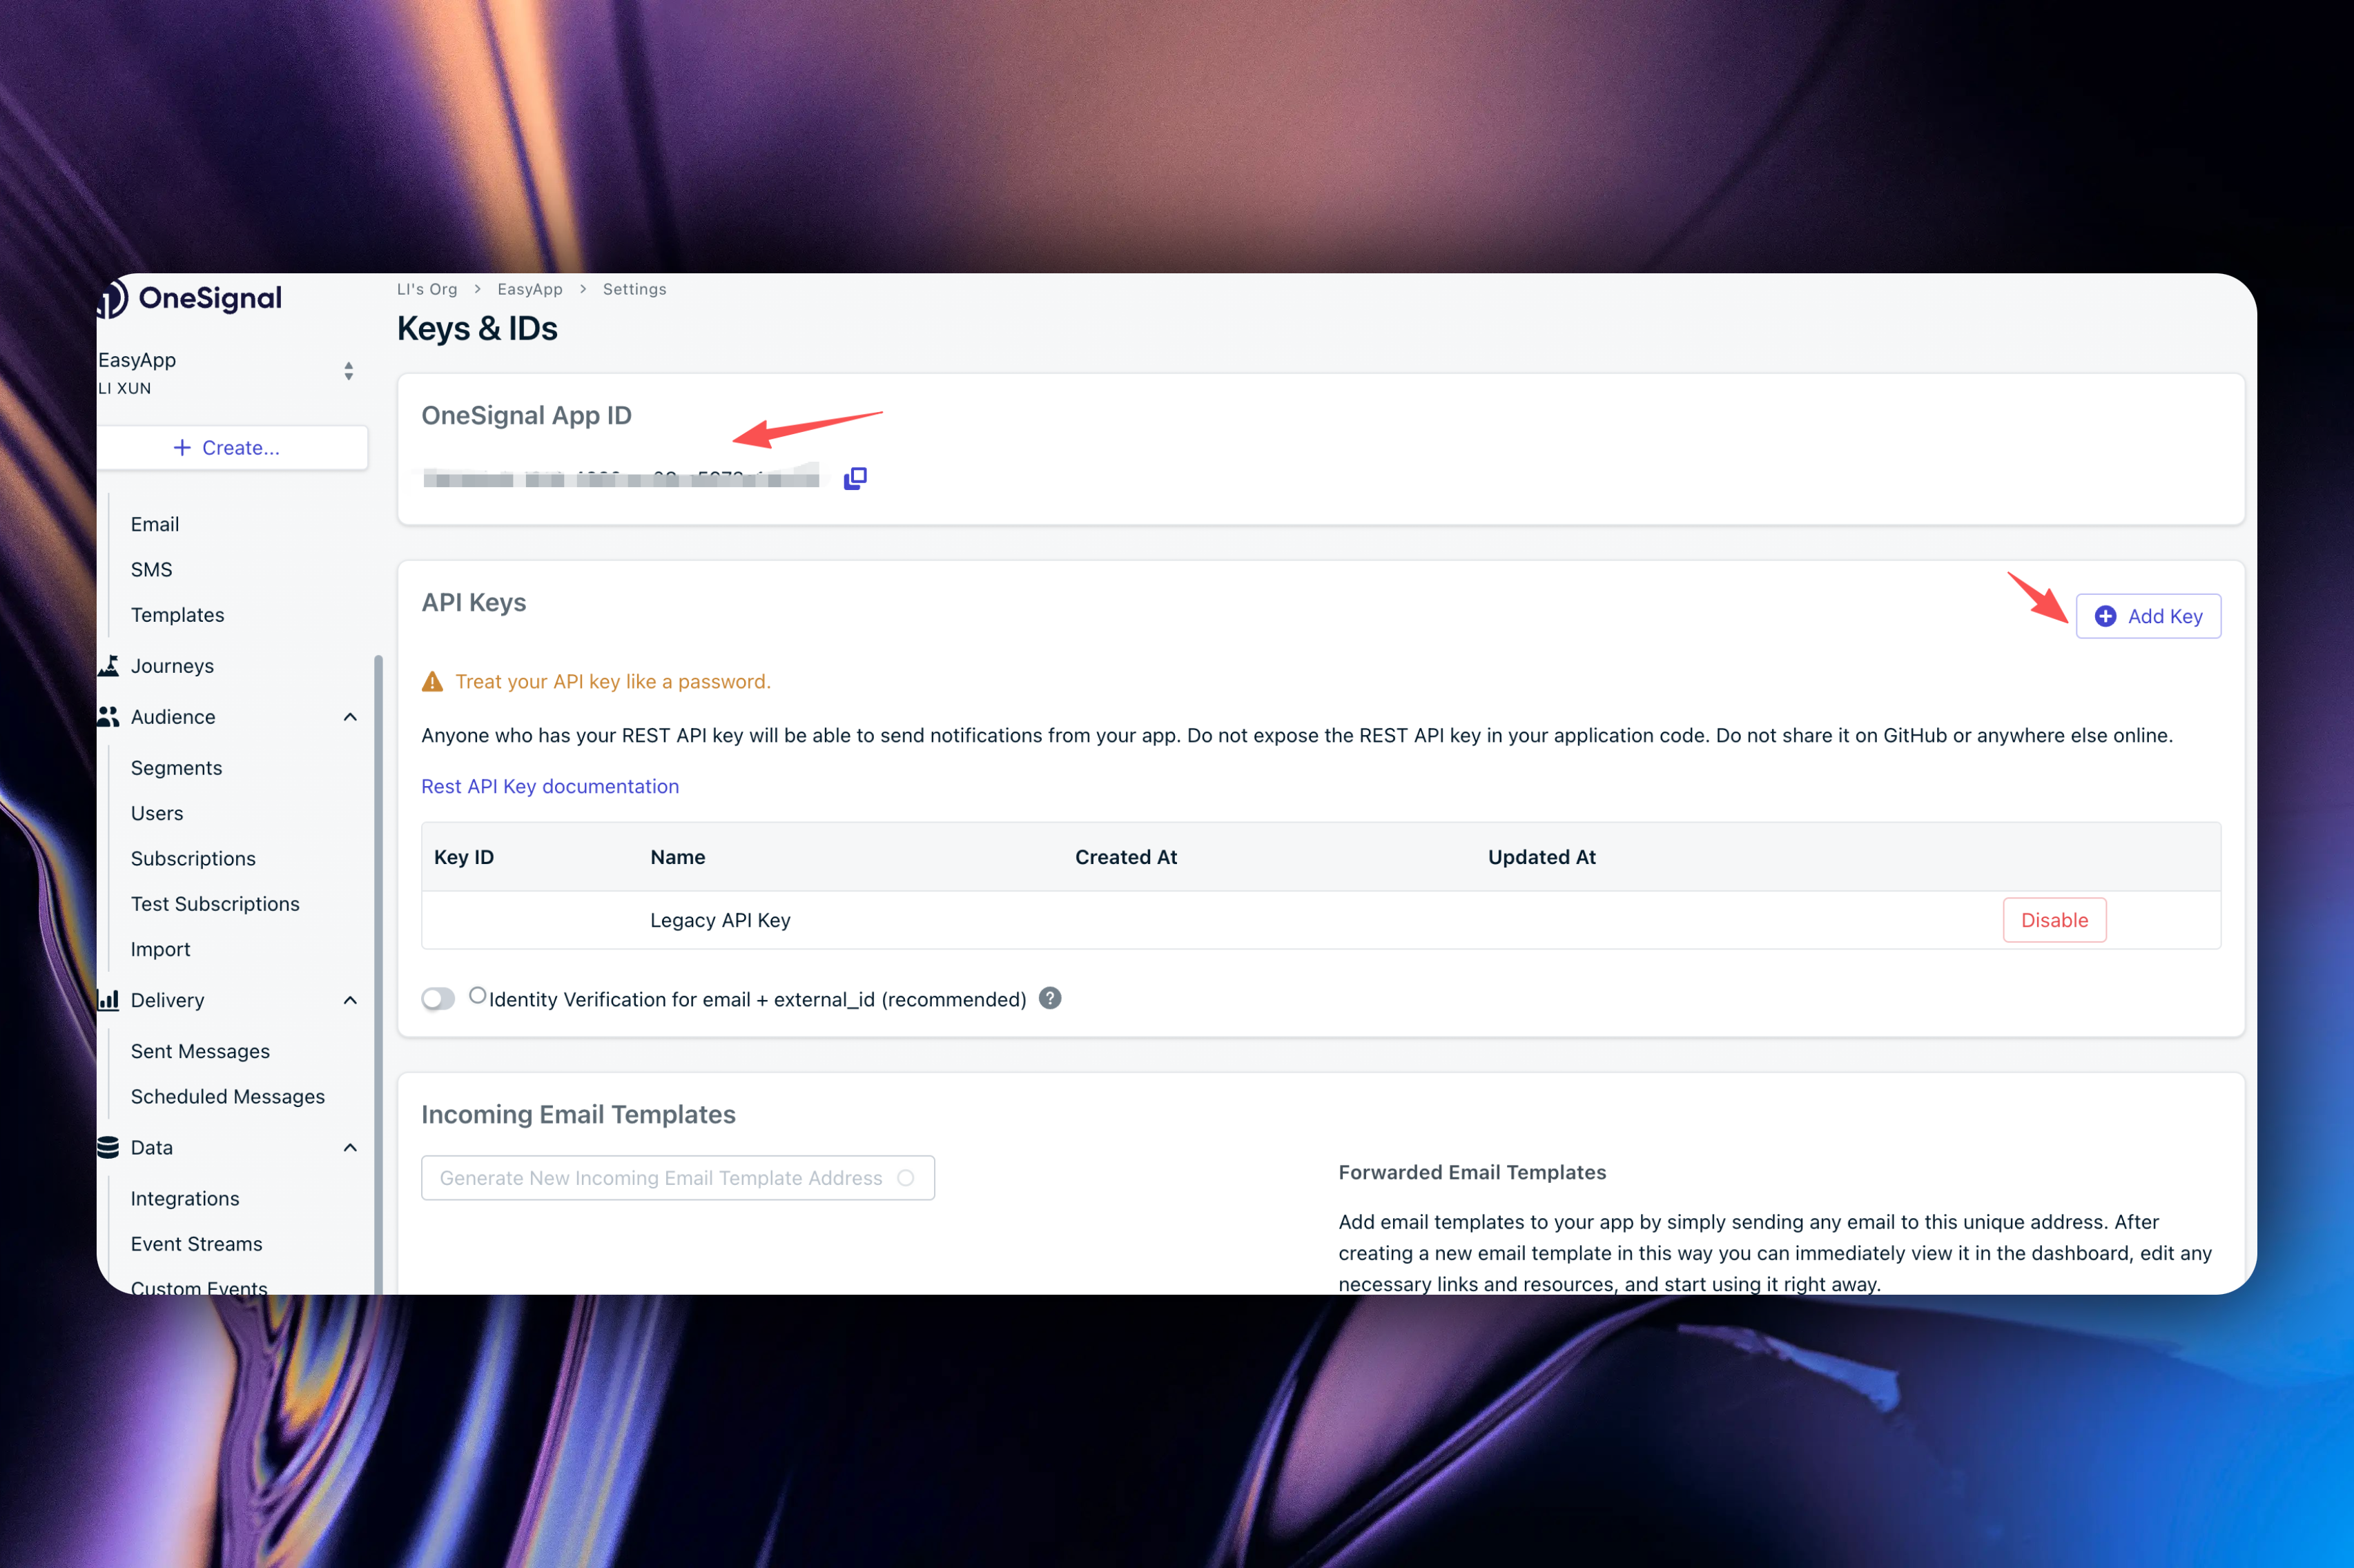
Copy the App ID and create a new REST API key.
Next, configure the App ID and REST API Key in the EasyAppSupabase project. In the project root directory, create a `.env.local` file and configure the following content:
```bash
# Configure App ID
export ONESIGNAL_APP_ID=your_onesignal_app_id
# Configure REST API Key
export ONESIGNAL_REST_API_KEY=your_onesignal_rest_api_key
```
After starting the local development environment, you can use edge functions to send notifications.
```bash
npm run dev:functions.env.local
```
Note: When deploying edge functions, make sure to configure `ONESIGNAL_APP_ID` and `ONESIGNAL_REST_API_KEY` in the environment variables.
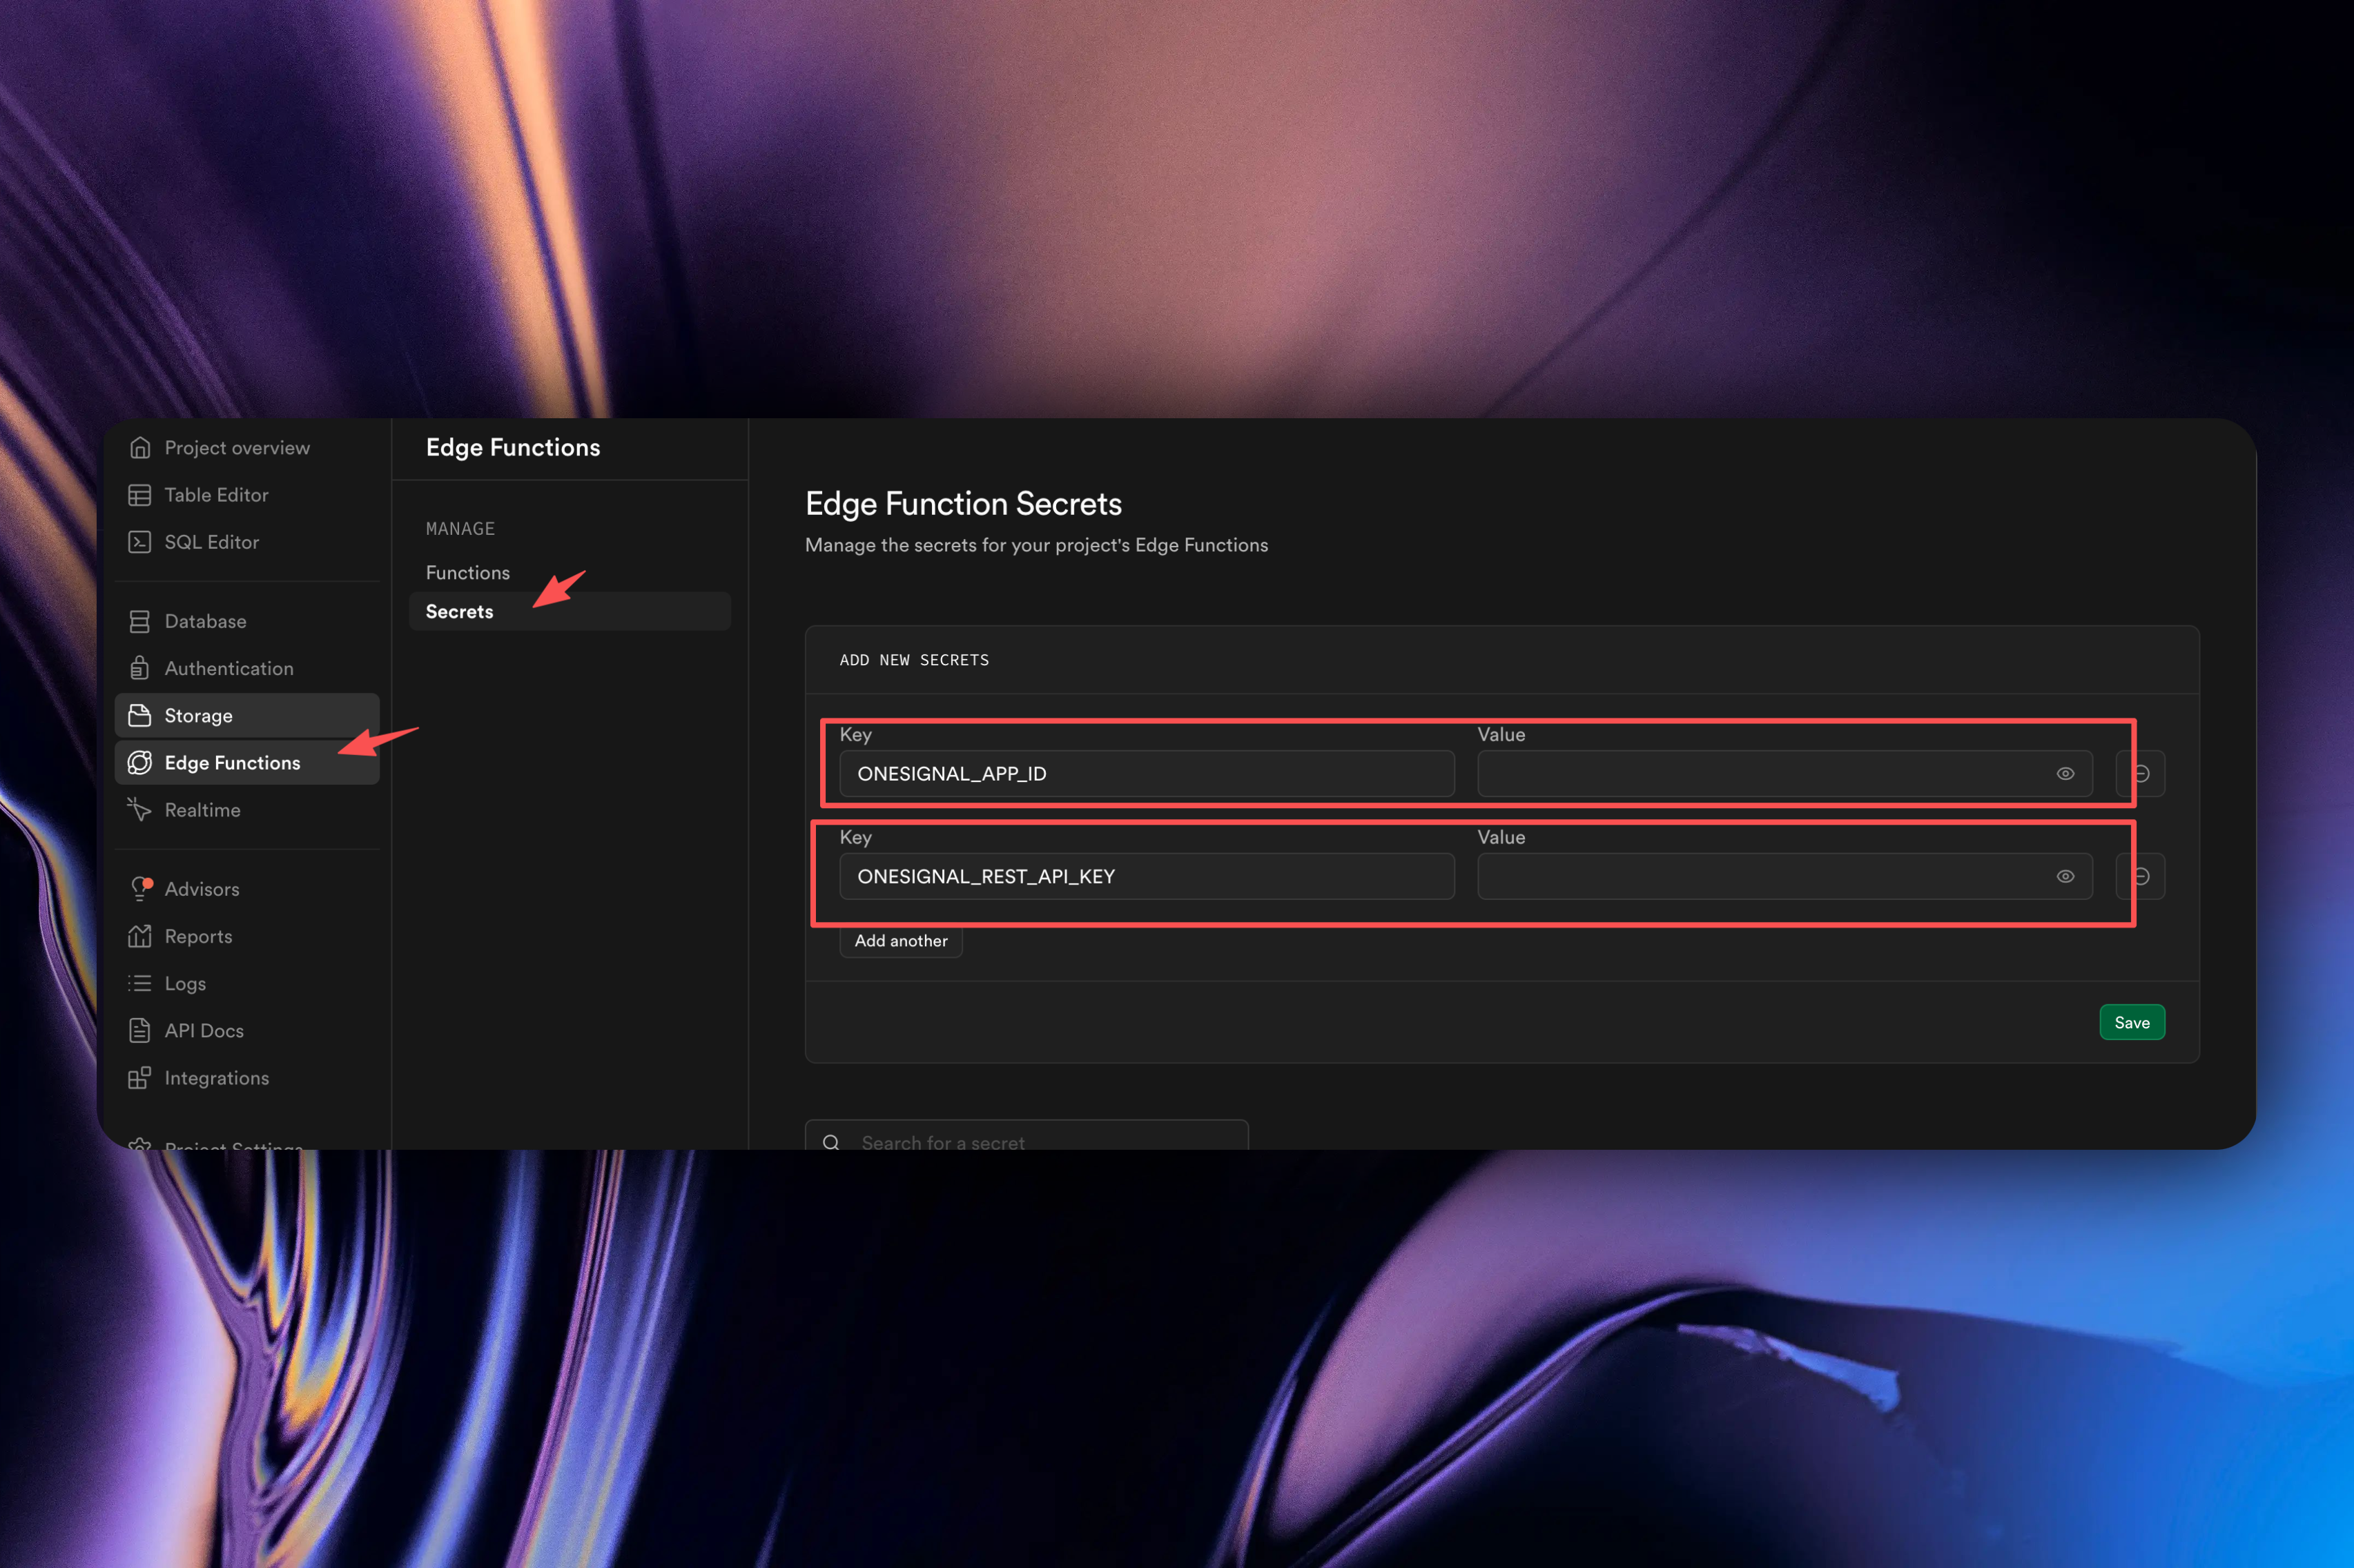
The EasyAppSwift client provides a dedicated page for testing notifications. You can test notification reception here. The file is located at `EasyAppSwiftUI/App/Developer/SubPages/Notifications/View/BackendSentNotificationTest.swift`.
#### In-App Notification Display
EasyApp supports in-app message display. This means when your app is being used/in the foreground, we can customize the notification display effect. This functionality is already built into the EasyAppSwift client.
In `AppDelegate`, the `addForegroundLifecycleListener` event is monitored. When a notification arrives, the `onWillDisplay` event is triggered, where we can customize the message display effect. However, we need to configure some extension parameters to distinguish system notifications.
Besides the required parameters `title` and `body`, we need to add the `additionalData` parameter, which is a dictionary for storing notification extension parameters. We define `symbolImage` and `status` parameters to distinguish system notifications.
* `symbolImage`: System notification icon
* `status`: System notification status
If `symbolImage` and `status` are not configured, the system will display notifications using the default effect.
How to configure:
1. In the [OneSignal Dashboard](https://dashboard.onesignal.com/apps/79e7ade9-1616-4382-ac08-a5973e14b212/push/new?notification_id=86fc4650-7954-4f9e-adef-1c9b57568ea4), configure the notification's extension parameters.
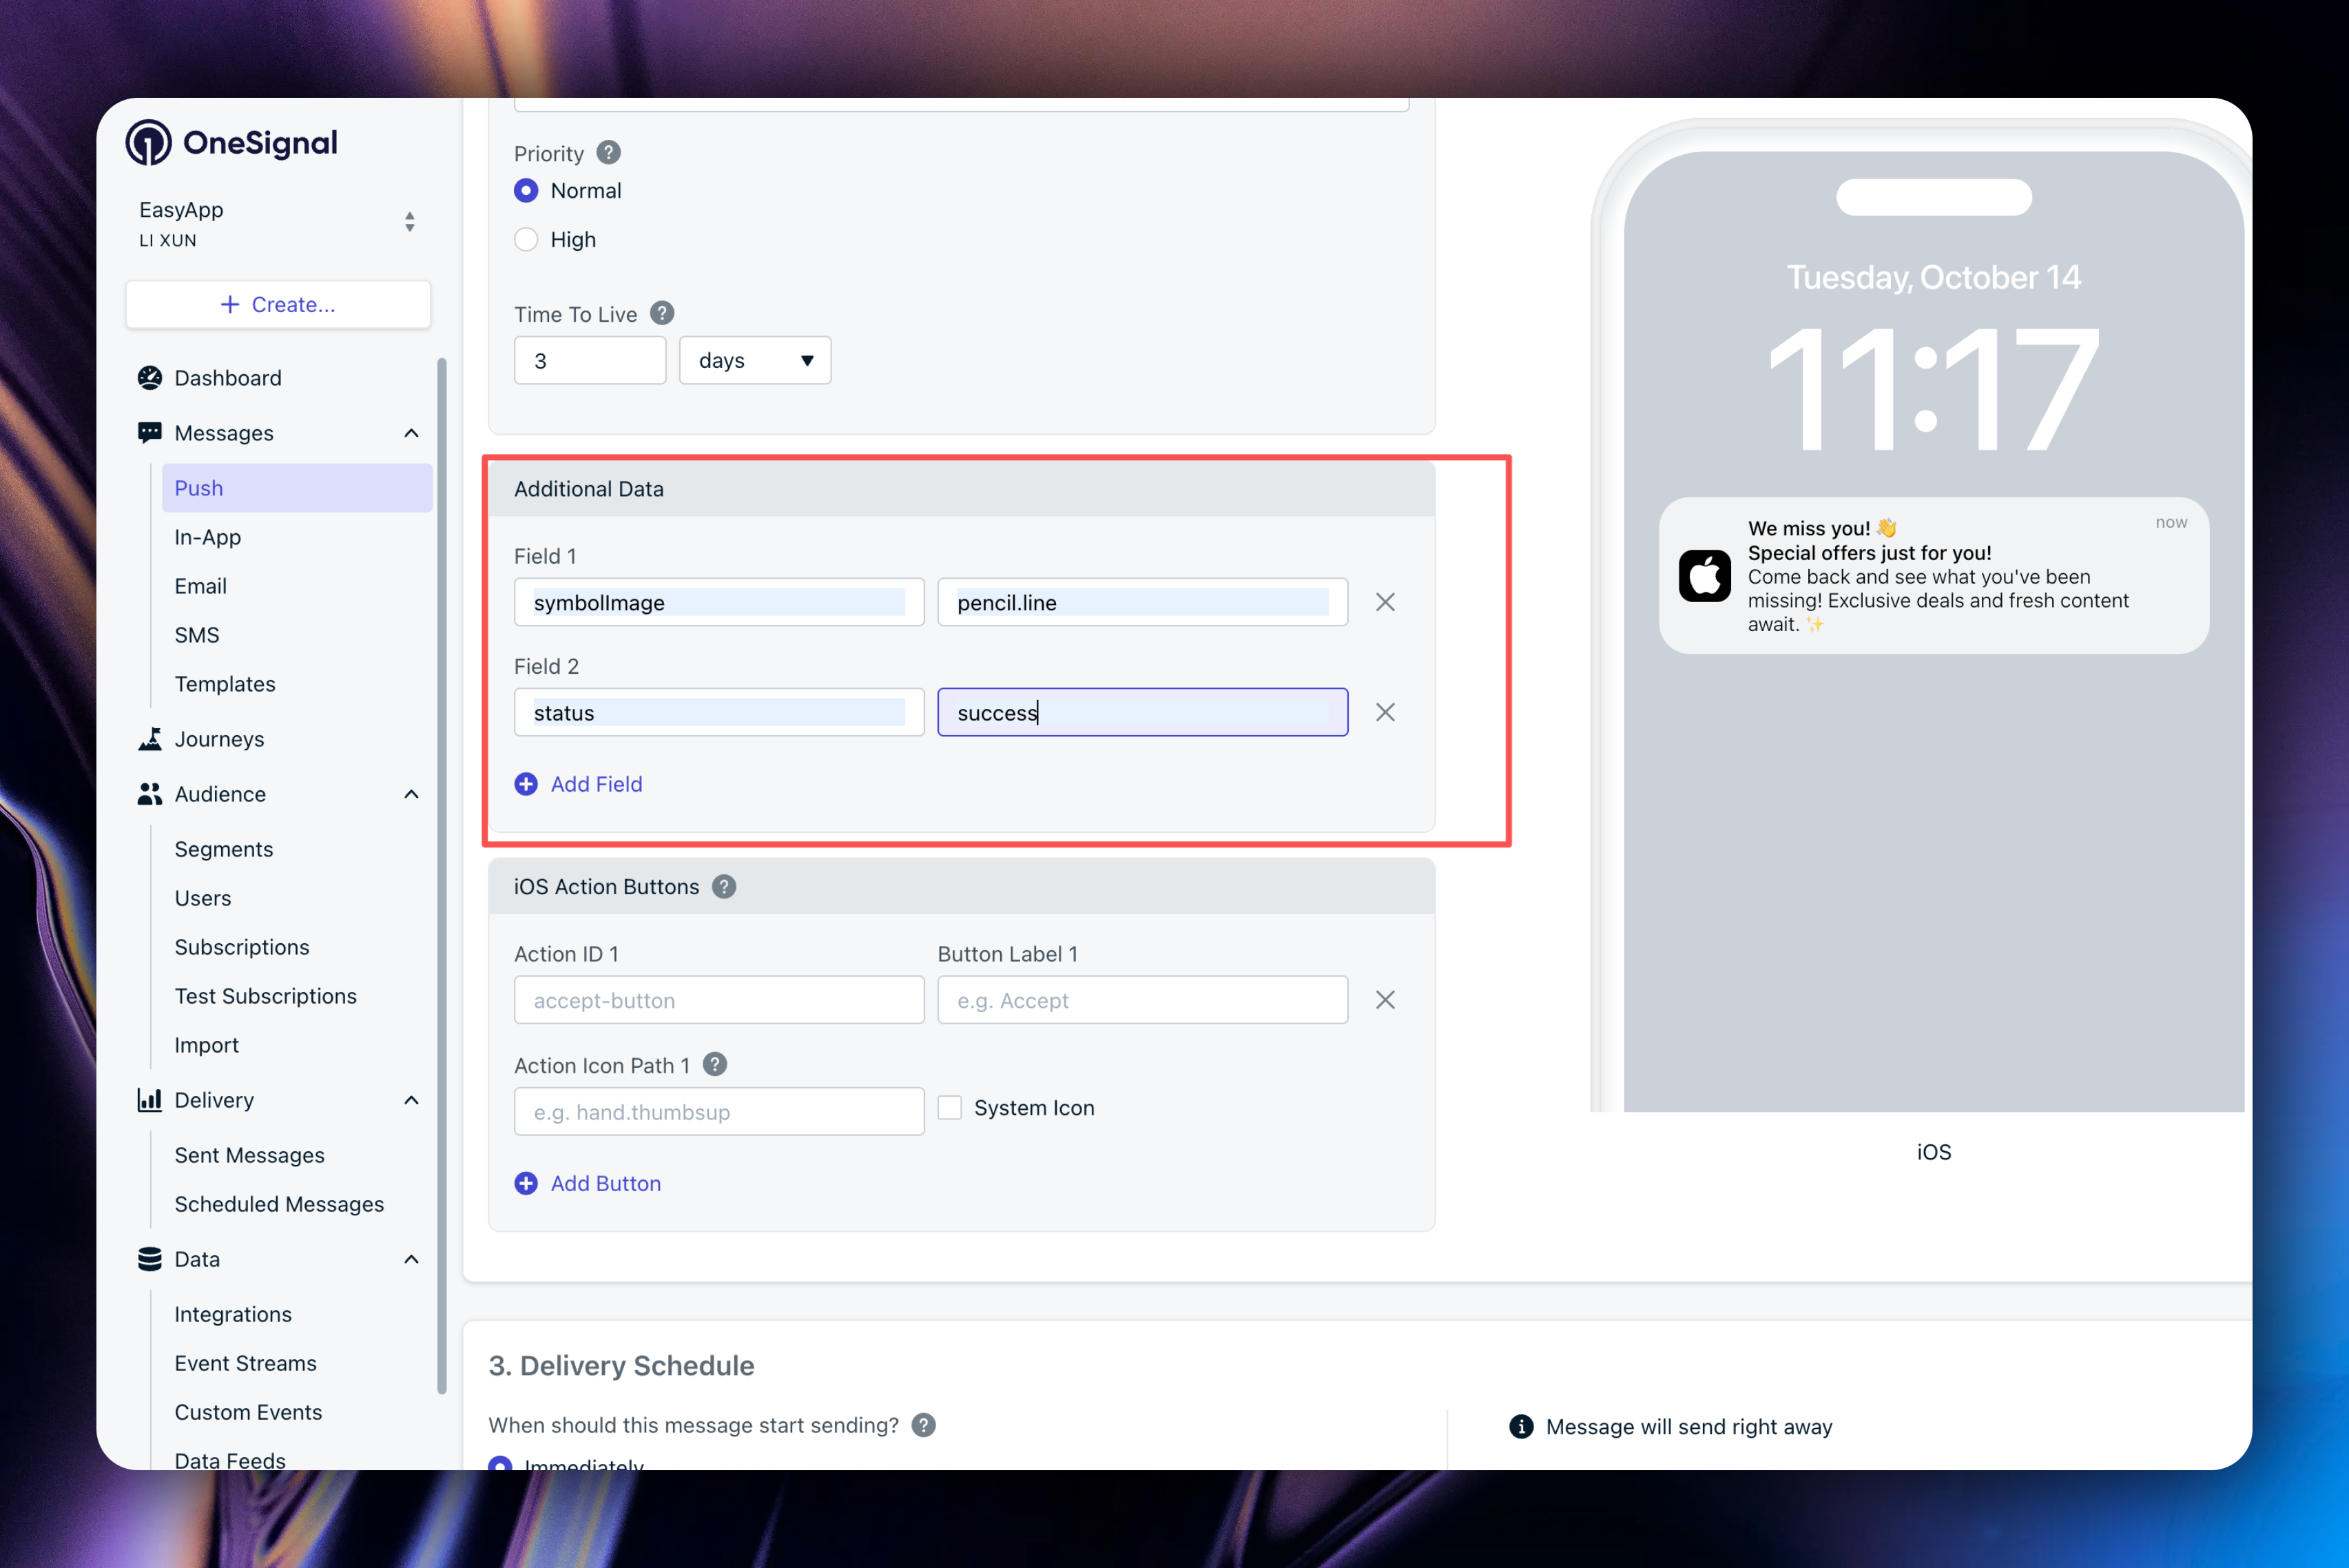
2. In Supabase edge functions, configure directly according to the [Rest API](https://documentation.onesignal.com/reference/push-notification) request parameters.
```ts title="EasyAppSupabase/supabase/functions/send-onesignal-notification/index.ts"
// Build OneSignal payload (target_channel enforced to 'push')
const onesignalPayload: Notification = {
app_id,
target_channel: "push",
// if you set include_aliases, you should delete included_segments parameter
// included_segments: ["Active Subscriptions"],
include_aliases: {
external_id: external_ids,
},
is_ios: true,
contents,
...(headings ? { headings } : {}),
...(data !== undefined ? { data } : {}),
...rest,
};
const result = await oneSignalClient.createNotification(onesignalPayload);
```
Note here: If you specify the `include_aliases` parameter, you need to delete the `included_segments` parameter. `included_segments: ["Active Subscriptions"]` means sending to all users who have agreed to notifications. `include_aliases` means you are sending notifications to specific users. In the EasyAppSwiftUI template, when users log in, the template associates the user's userId with OneSignal's externalId, so the externalId here is the user's userId.
For details, check the implementation of the `send-onesignal-notification` edge function.
```swift title="EasyAppSwiftUI/EasyAppSwiftUIApp.swift"
class AppDelegate: NSObject, UIApplicationDelegate {
func application(
_ application: UIApplication,
didFinishLaunchingWithOptions launchOptions: [UIApplication.LaunchOptionsKey: Any]? = nil
) -> Bool {
if Constants.OneSignal.isEnabledNotification {
OneSignal.Notifications.addForegroundLifecycleListener(self)
}
return true
}
}
extension AppDelegate: OSNotificationClickListener, OSNotificationLifecycleListener {
func onWillDisplay(event: OSNotificationWillDisplayEvent) {
devLogger.info("Foreground notification: \(event.notification.title ?? "No Title")")
event.preventDefault()
guard let notifTitle = event.notification.title,
let notifMessage = event.notification.body,
let additionalData = event.notification.additionalData,
let symbol = additionalData["symbolImage"] as? String
else {
event.notification.display() // Show notification as usual
return
}
var notifHaptics: UINotificationFeedbackGenerator.FeedbackType = .warning
if let size = additionalData["status"] as? String {
if size == "error" {
notifHaptics = .error
} else if size == "success" {
notifHaptics = .success
}
UINotificationFeedbackGenerator().notificationOccurred(notifHaptics)
}
ShowNotification.showInAppNotification(
title: notifTitle,
message: notifMessage,
isSuccess: notifHaptics == .success,
duration: .seconds(seconds: 5),
systemImage: symbol,
handleViewTap: {
self.handleViewTap(additionalData: event.notification.additionalData)
}
)
}
}
```
#### How to Send Notifications to Specific Users/Batch Users
1. First, EasyAppNotifyKit exposes OneSignal's external ID association API. We just need to bind the external ID when the user logs in/registers.
```swift
PushManager.shared.loginUser(userId)
```
2. When logging out/deleting a user, call the `logoutUser` method.
```swift
PushManager.shared.logoutUser()
```
3. After associating the external ID, we can use the `send-onesignal-notification` edge function and pass the `external_ids` parameter to send notifications to specific users/batch users.
* `external_ids`: String array type.
For detailed logic, please refer to the client `EasyAppSwiftUI/App/Developer/SubPages/Notifications/View/BackendSentNotificationTest.swift` and the edge function `EasyAppSupabase/supabase/functions/send-onesignal-notification/index.ts` implementations.
#### How to Navigate to Pages When Clicking Notification Messages
Clicking notification messages to navigate to pages is the most common scenario, and EasyApp already provides a demo.
Similarly, we rely on the `additionalData` parameter. We specify passing the `deeplink` parameter, with the `deeplink` value being: EasyApp\://notifykit?screen=osTests
For this logic, please refer to `EasyAppSwiftUI/App/Developer/SubPages/Notifications/View/BackendSentNotificationTest.swift`.
In `AppDelegate`, the `addClickListener` event is monitored. When a notification message is clicked, the `onClick` event is triggered, where we can handle the logic after clicking the notification message.
EasyApp broadcasts an `osNotificationClicked` event through `NotificationCenter`, which we can listen to elsewhere to handle the logic after clicking notification messages.
```swift
private func handleViewTap(additionalData: [AnyHashable: Any]? = nil) {
let ad = JSON(additionalData ?? [:])
let deeplink = ad["deeplink"].stringValue
if !deeplink.isEmpty {
// Broadcast click to allow host views to react (e.g., navigate)
NotificationCenter.default.post(
name: EasyAppNotifyKit.Notifications.osNotificationClicked,
object: nil,
userInfo: [
"deeplink": deeplink
]
)
}
}
```
For example, in the demo, we listen to this event. When a notification message is clicked, a test page opens.
```swift title="EasyAppSwiftUI/EasyAppSwiftUIApp.swift"
var body: some Scene {
WindowGroup {
ContentView()
#if DEBUG
.sheet(isPresented: $showDeepLinkTest) {
OSDeepLinkTargetTestView()
}
.onReceive(
NotificationCenter.default.publisher(
for: EasyAppNotifyKit.Notifications.osNotificationClicked)
) { notification in
let deeplink = notification.userInfo?["deeplink"] as? String
if let deeplink, deeplink == "EasyApp://notifykit?screen=osTests" {
withAnimation(.spring(response: 0.5, dampingFraction: 0.8)) {
showDeepLinkTest = true
}
}
}
#endif
}
}
```
Other cases follow the same pattern. If you have other business logic, you can put business parameters in the `additionalData` parameter, and when the client receives the parameters, you can handle them according to your business logic.
About App Store submission:
If you don't need push capabilities for now, it's recommended to remove notification-related code from the template. Remove the `EasyAppNotifyKit` dependency. Delete the entire `EasyAppSwiftUI/App/Developer` folder to avoid Apple reviewers mistakenly thinking you're using push capabilities.
# Analytics/Statistics
URL: https://easyapp.site/en/docs/Integrations/statistics
How to integrate analytics/statistics services in EasyApp
***
title: Analytics/Statistics
description: How to integrate analytics/statistics services in EasyApp
icon: ChartBar
--------------
You can view your app's analytics data in [App Store Connect](https://appstoreconnect.apple.com), including downloads, user retention, user activity, and more.
However, App Store Connect isn't perfect - its statistics data isn't real-time, and it can't track detailed user behavior data. Therefore, we need to integrate real-time data analytics services to work alongside App Store Connect for a more comprehensive understanding of your app's usage.
EasyApp uses [OpenPanel](https://openpanel.dev) as its data analytics service.
OpenPanel has the following advantages:
* Completely open source, can be self-hosted
* Cost-friendly pricing
* Simple integration and easy to use
EasyApp template enables OpenPanel by default. If you don't need analytics services, you can disable OpenPanel.
Open the `EasyAppSwiftUI/Constants/Constants.swift` file, find the `Constants` -> `OpenPanel` enum, and configure `isEnabledOpenPanel` to `false`.
```swift
enum Constants {
// ... other configurations
/// OpenPanel is enabled
static let isEnabledOpenPanel = false
// ... other configurations
}
```
### Configure OpenPanel
First, register an [OpenPanel](https://openpanel.dev) account.
Then, click `Create a Project` to create a project.
Enter your project name, select `App`, and click `Create project`.
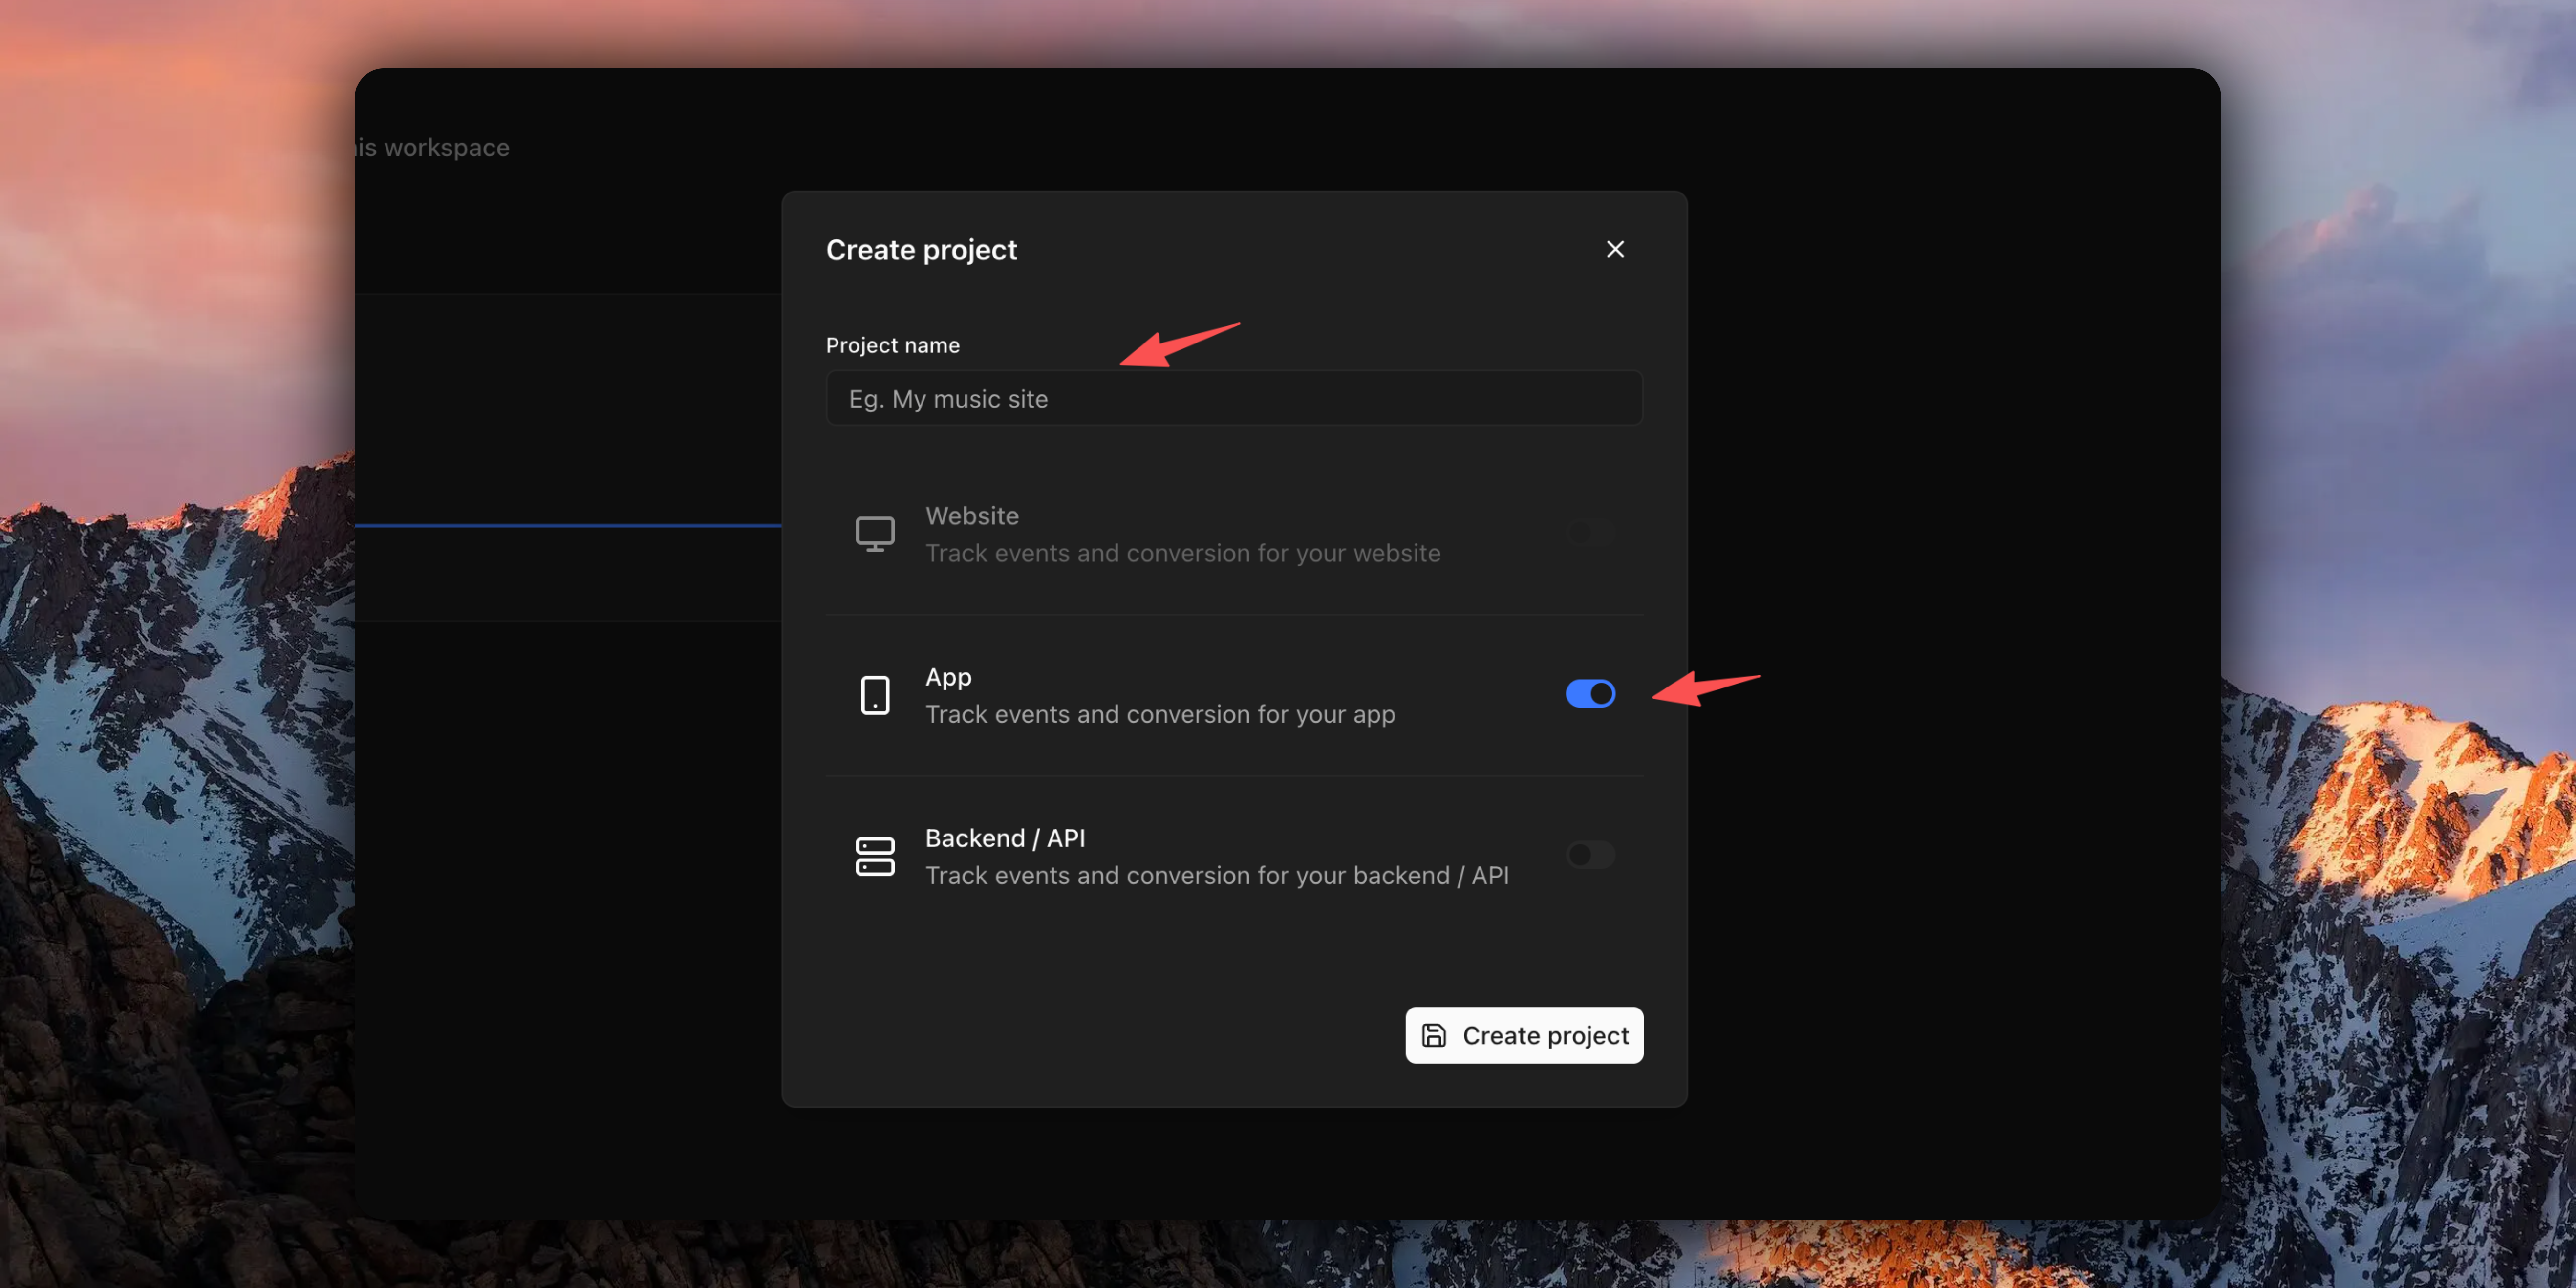
Next, copy the `Client ID` and `Secret`.
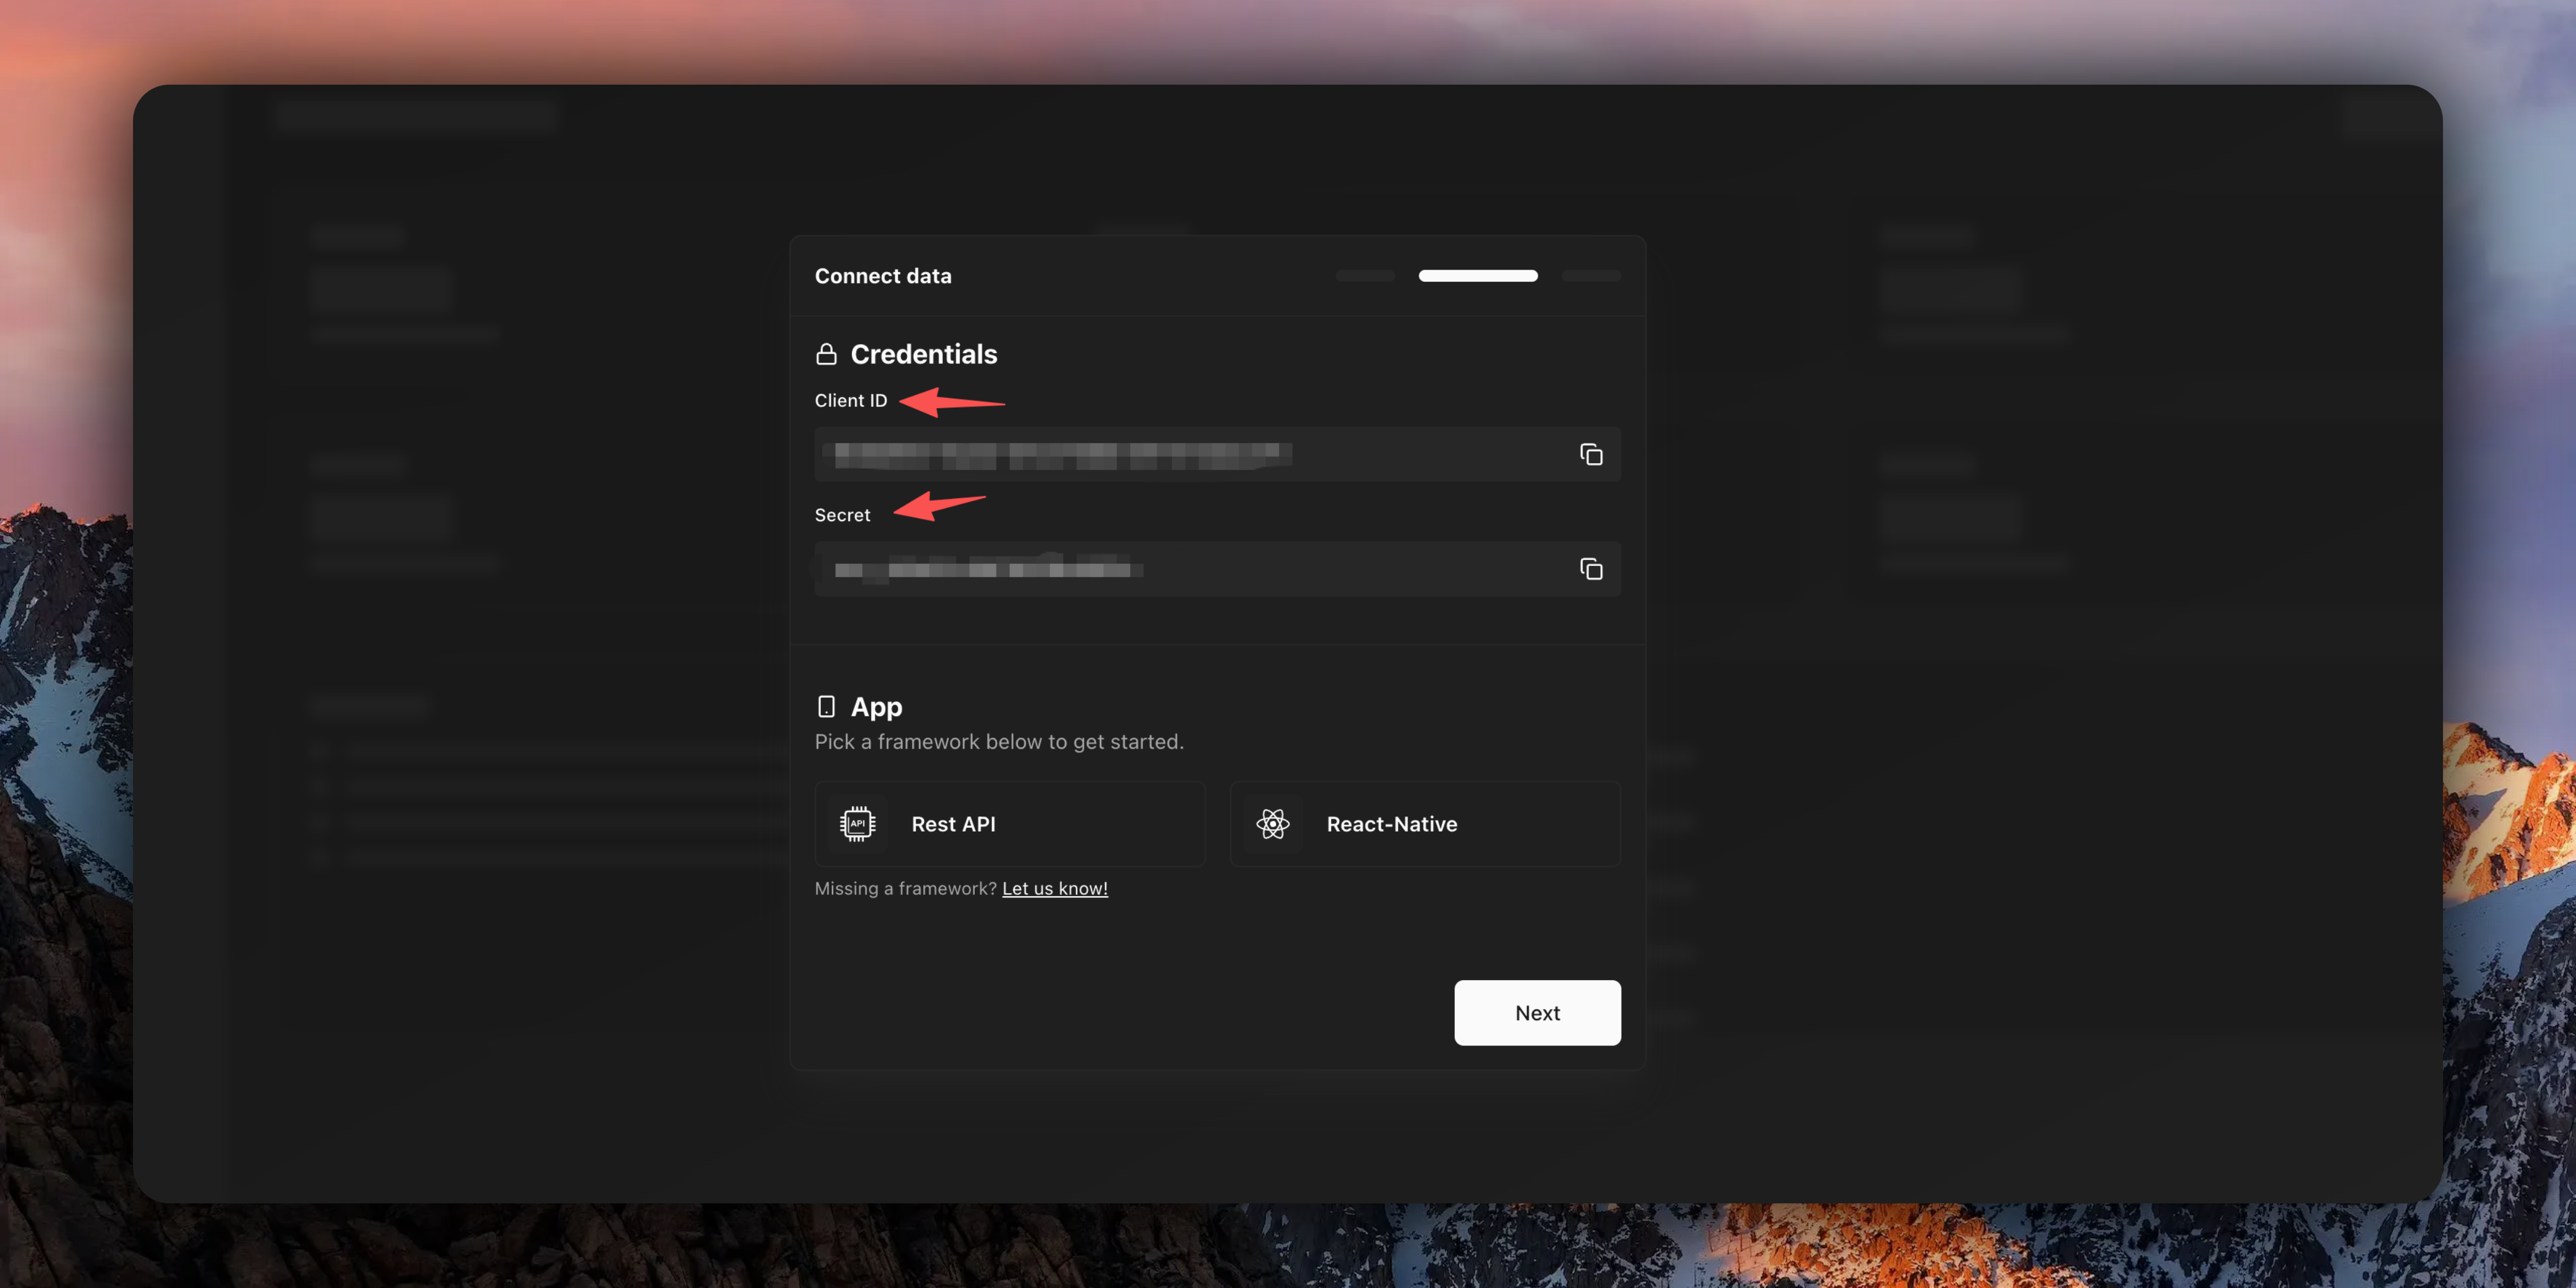
Complete the remaining steps.
### Configure EasyApp
Open the `EasyAppSwiftUI/Constants/Constants.swift` file, find the `Constants` -> `OpenPanel` enum, and configure the `clientID` and `secret` you just copied.
```swift
enum Constants {
// ... other configurations
/// OpenPanel client ID
static let clientID = "your client id"
/// OpenPanel secret
static let secret = "your secret"
// ... other configurations
}
```
EasyApp enables automatic event tracking by default. If you don't have specific requirements for detailed event tracking in your app, you can start using OpenPanel after completing the above configuration steps.
If you need more detailed event tracking, user property settings, and other features, you can refer to the [OpenPanel documentation](https://openpanel.dev/docs/sdks/swift). This article won't go into further detail on those topics.
# Develop Supabase Backend Service
URL: https://easyapp.site/en/docs/Integrations/supabaseEdgeFuncton
Learn how to develop Supabase backend service in the EasyAppSupabase project
***
title: Develop Supabase Backend Service
description: Learn how to develop Supabase backend service in the EasyAppSupabase project
icon: DatabaseBackup
--------------------
{/* ## Why Choose Supabase Cloud Functions?
Using Supabase Cloud Functions as a middleware layer for AI services has the following significant advantages:
No additional server maintenance costs, pay-as-you-go model
API Keys are securely stored on the server side, avoiding client-side packet capture risks
Easy access to user information, facilitating permission control and data management
## Introduction
The EasyAppSupabase template, as the backend/server-side template for EasyAppSwiftUI, has already integrated Supabase Cloud Functions. This guide will show you how to integrate, develop, test, and deploy Edge Functions in your EasyAppSupabase project.
The Supabase Cloud Functions project is located in the [`EasyAppSupabase`](https://github.com/FastEasyApp/easyapp-subapase) repository.
Similarly, you can follow the EasyAppSwiftUI approach to download the project. First fork the repository, then clone the project to your computer.
This template provides very convenient deployment features, database migration features, and Edge Function development, testing, and deployment features.
## Project Structure
The EasyAppSupabase project is already configured with Supabase and has the following structure:
Supabase configuration fileLocal environment variables configurationEach server interfaceDatabase migration files
EasyApp has built-in all the required tables, storage buckets, and APIs for the EasyAppSwiftUI App. You can directly execute the following command to deploy to production. Before that, you need to install [Supabase CLI](#1-environment-setup).
```bash
cd EasyAppSupabase
npm run deploy
```
## 1. Environment Setup
### Install Supabase CLI
We recommend using Supabase CLI to manage Supabase services.
```bash
npm install supabase --save-dev
```
For more Supabase CLI usage, please refer to [Supabase CLI documentation](https://supabase.com/docs/guides/local-development).
### Verify Installation
```bash
npx supabase --version
```
### Login to Supabase
```bash
npx supabase login
```
Please follow the prompts during the login process.
### View Project List
```bash
npx supabase projects list
```
### Connect to Project
```bash
npx supabase link --project-ref YOUR_PROJECT_ID
```
YOUR_PROJECT_ID is your project ID on the Supabase Dashboard, which can be found here
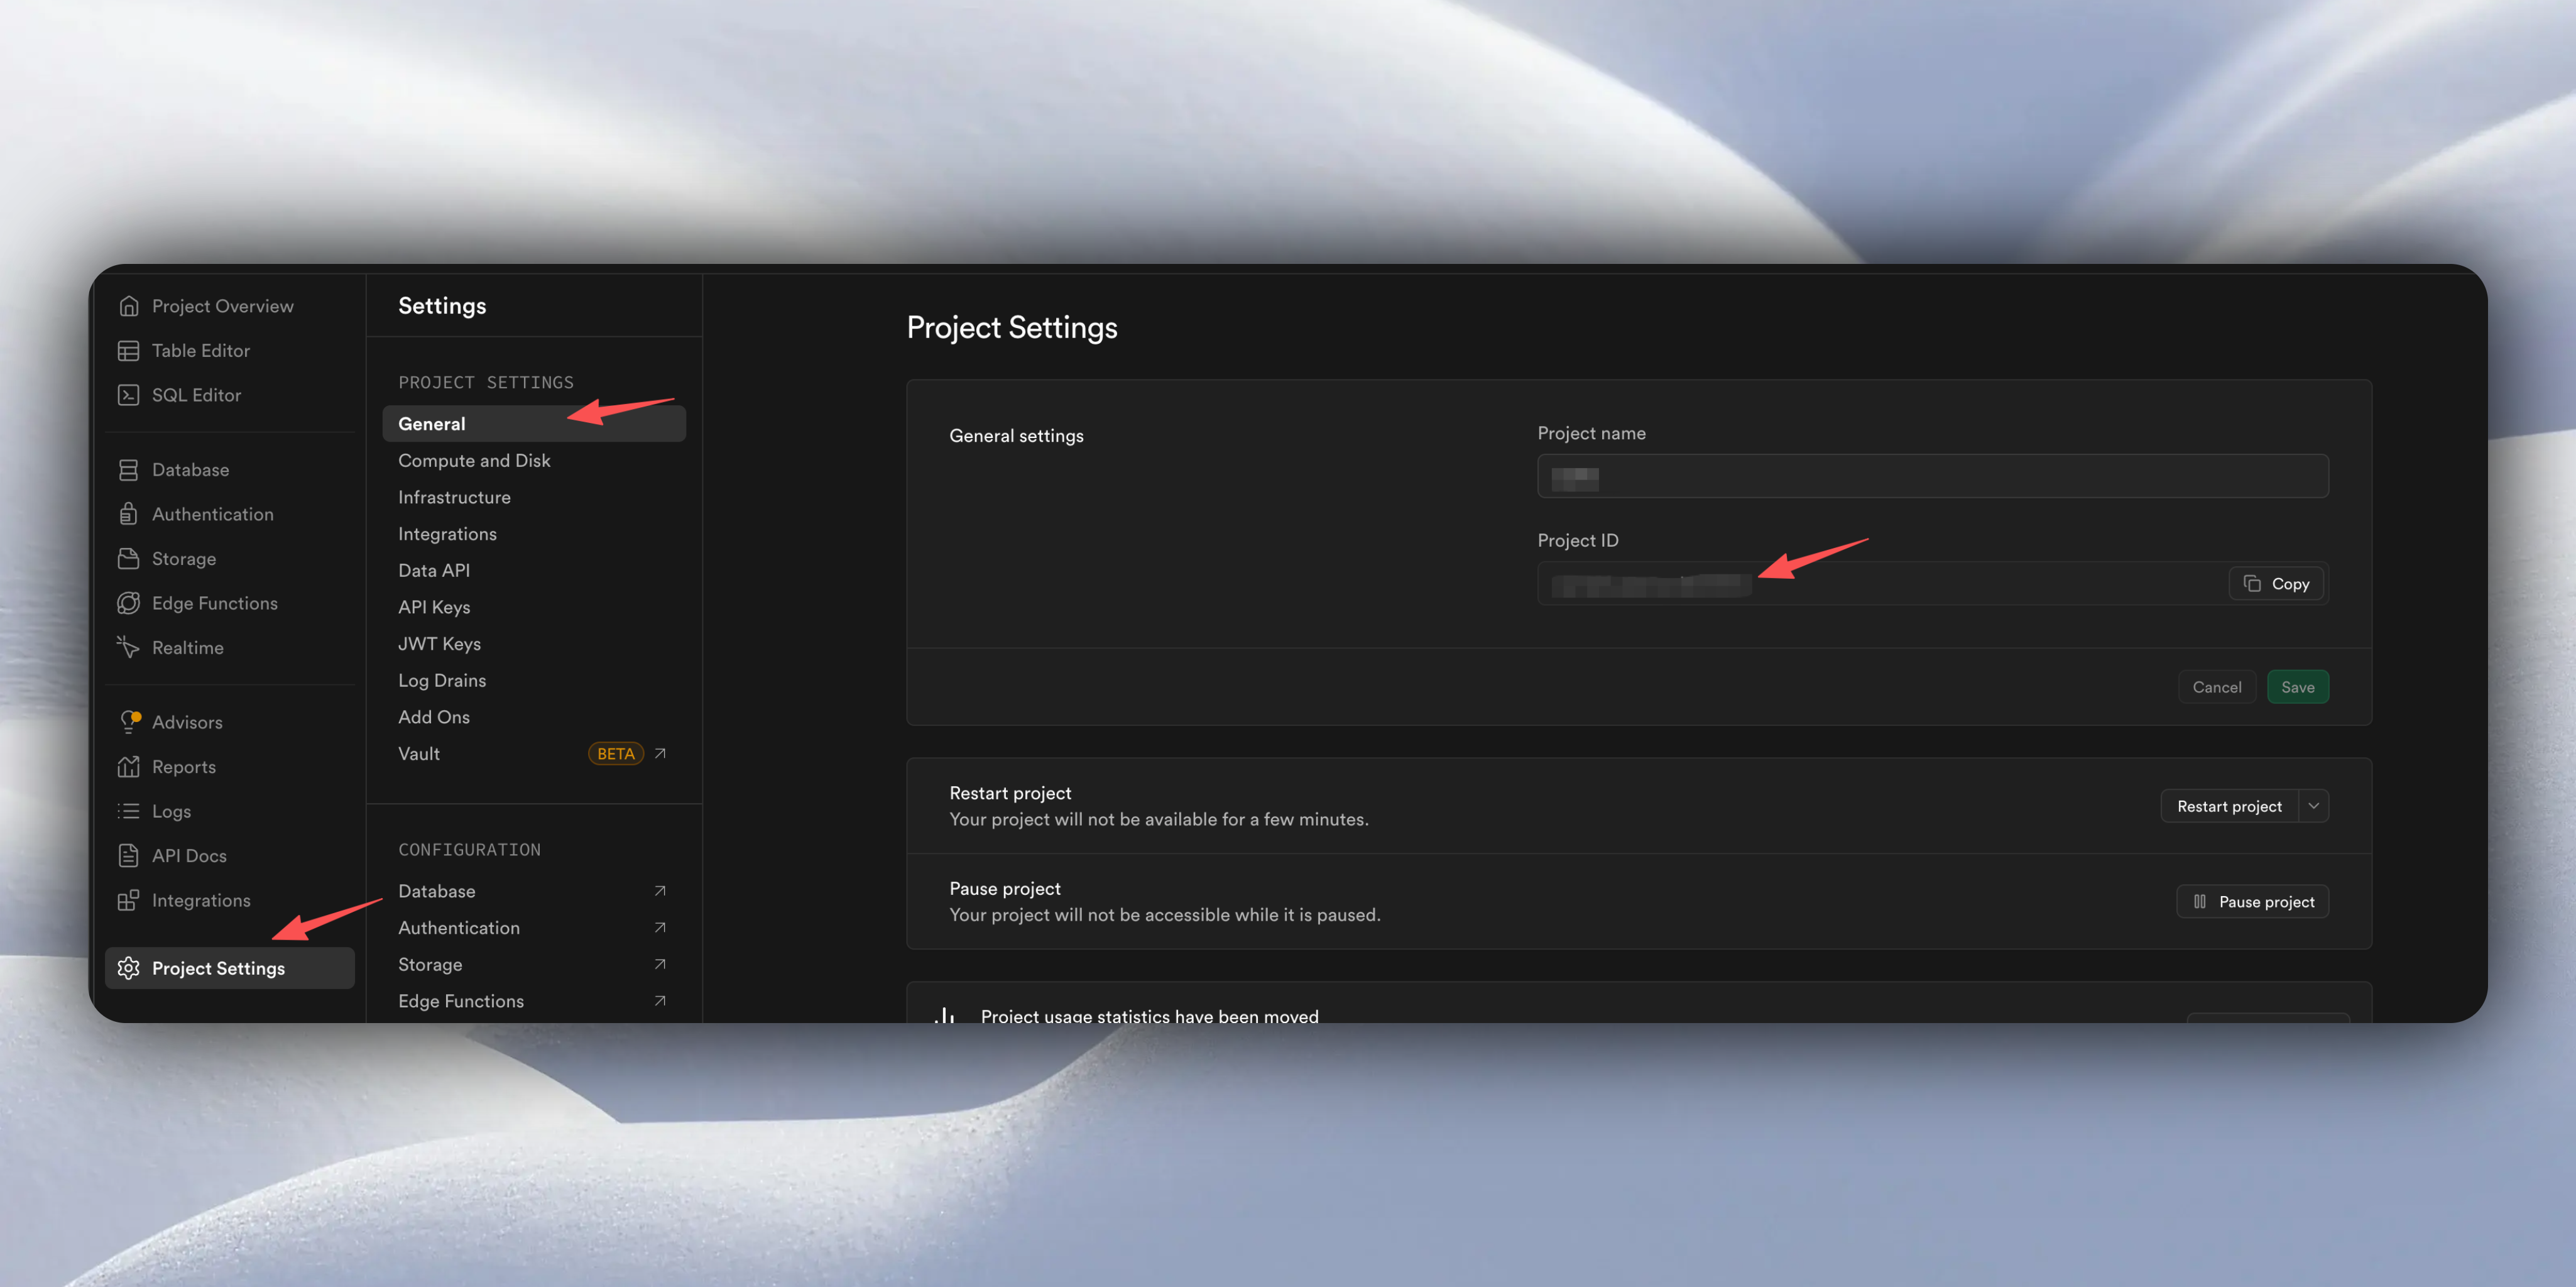
If you are not familiar with Supabase Cloud Functions, we strongly recommend deploying directly to production and testing in the online environment. This way you can avoid the complexity of local development and test directly in production.
## 2. Deploy to Production (Recommended)
1. Automatic Deployment (Recommended)
In EasyAppSupabase, we have built-in deployment scripts. You just need to execute the following command to deploy the Supabase template features to production.
```bash
cd EasyAppSupabase
npm run deploy
```
`npm run deploy` will automatically deploy all Edge Functions and database to production.
We also provide other deployment commands you can refer to:
```bash
"migrate": "supabase db push", // Migrate database
"functions:deploy": "supabase functions deploy", // Deploy functions
"functions:logs": "supabase functions logs", // View function logs
"start": "supabase start", // Start local service (if not started)
"stop": "supabase stop", // Stop local service
"reset": "supabase db reset", // Reset database
"status": "supabase status" // View service status
```
Whenever you modify tables or database, you need to execute the following command to migrate the database.
```bash
npm run migrate
```
Whenever you modify/add Edge Functions, you need to execute the following command to deploy functions.
```bash
npm run functions:deploy
```
Or you can directly execute `npm run deploy` to deploy both the database and functions at the same time.
After successful deployment, you also need to add environment variables in Edge Functions.
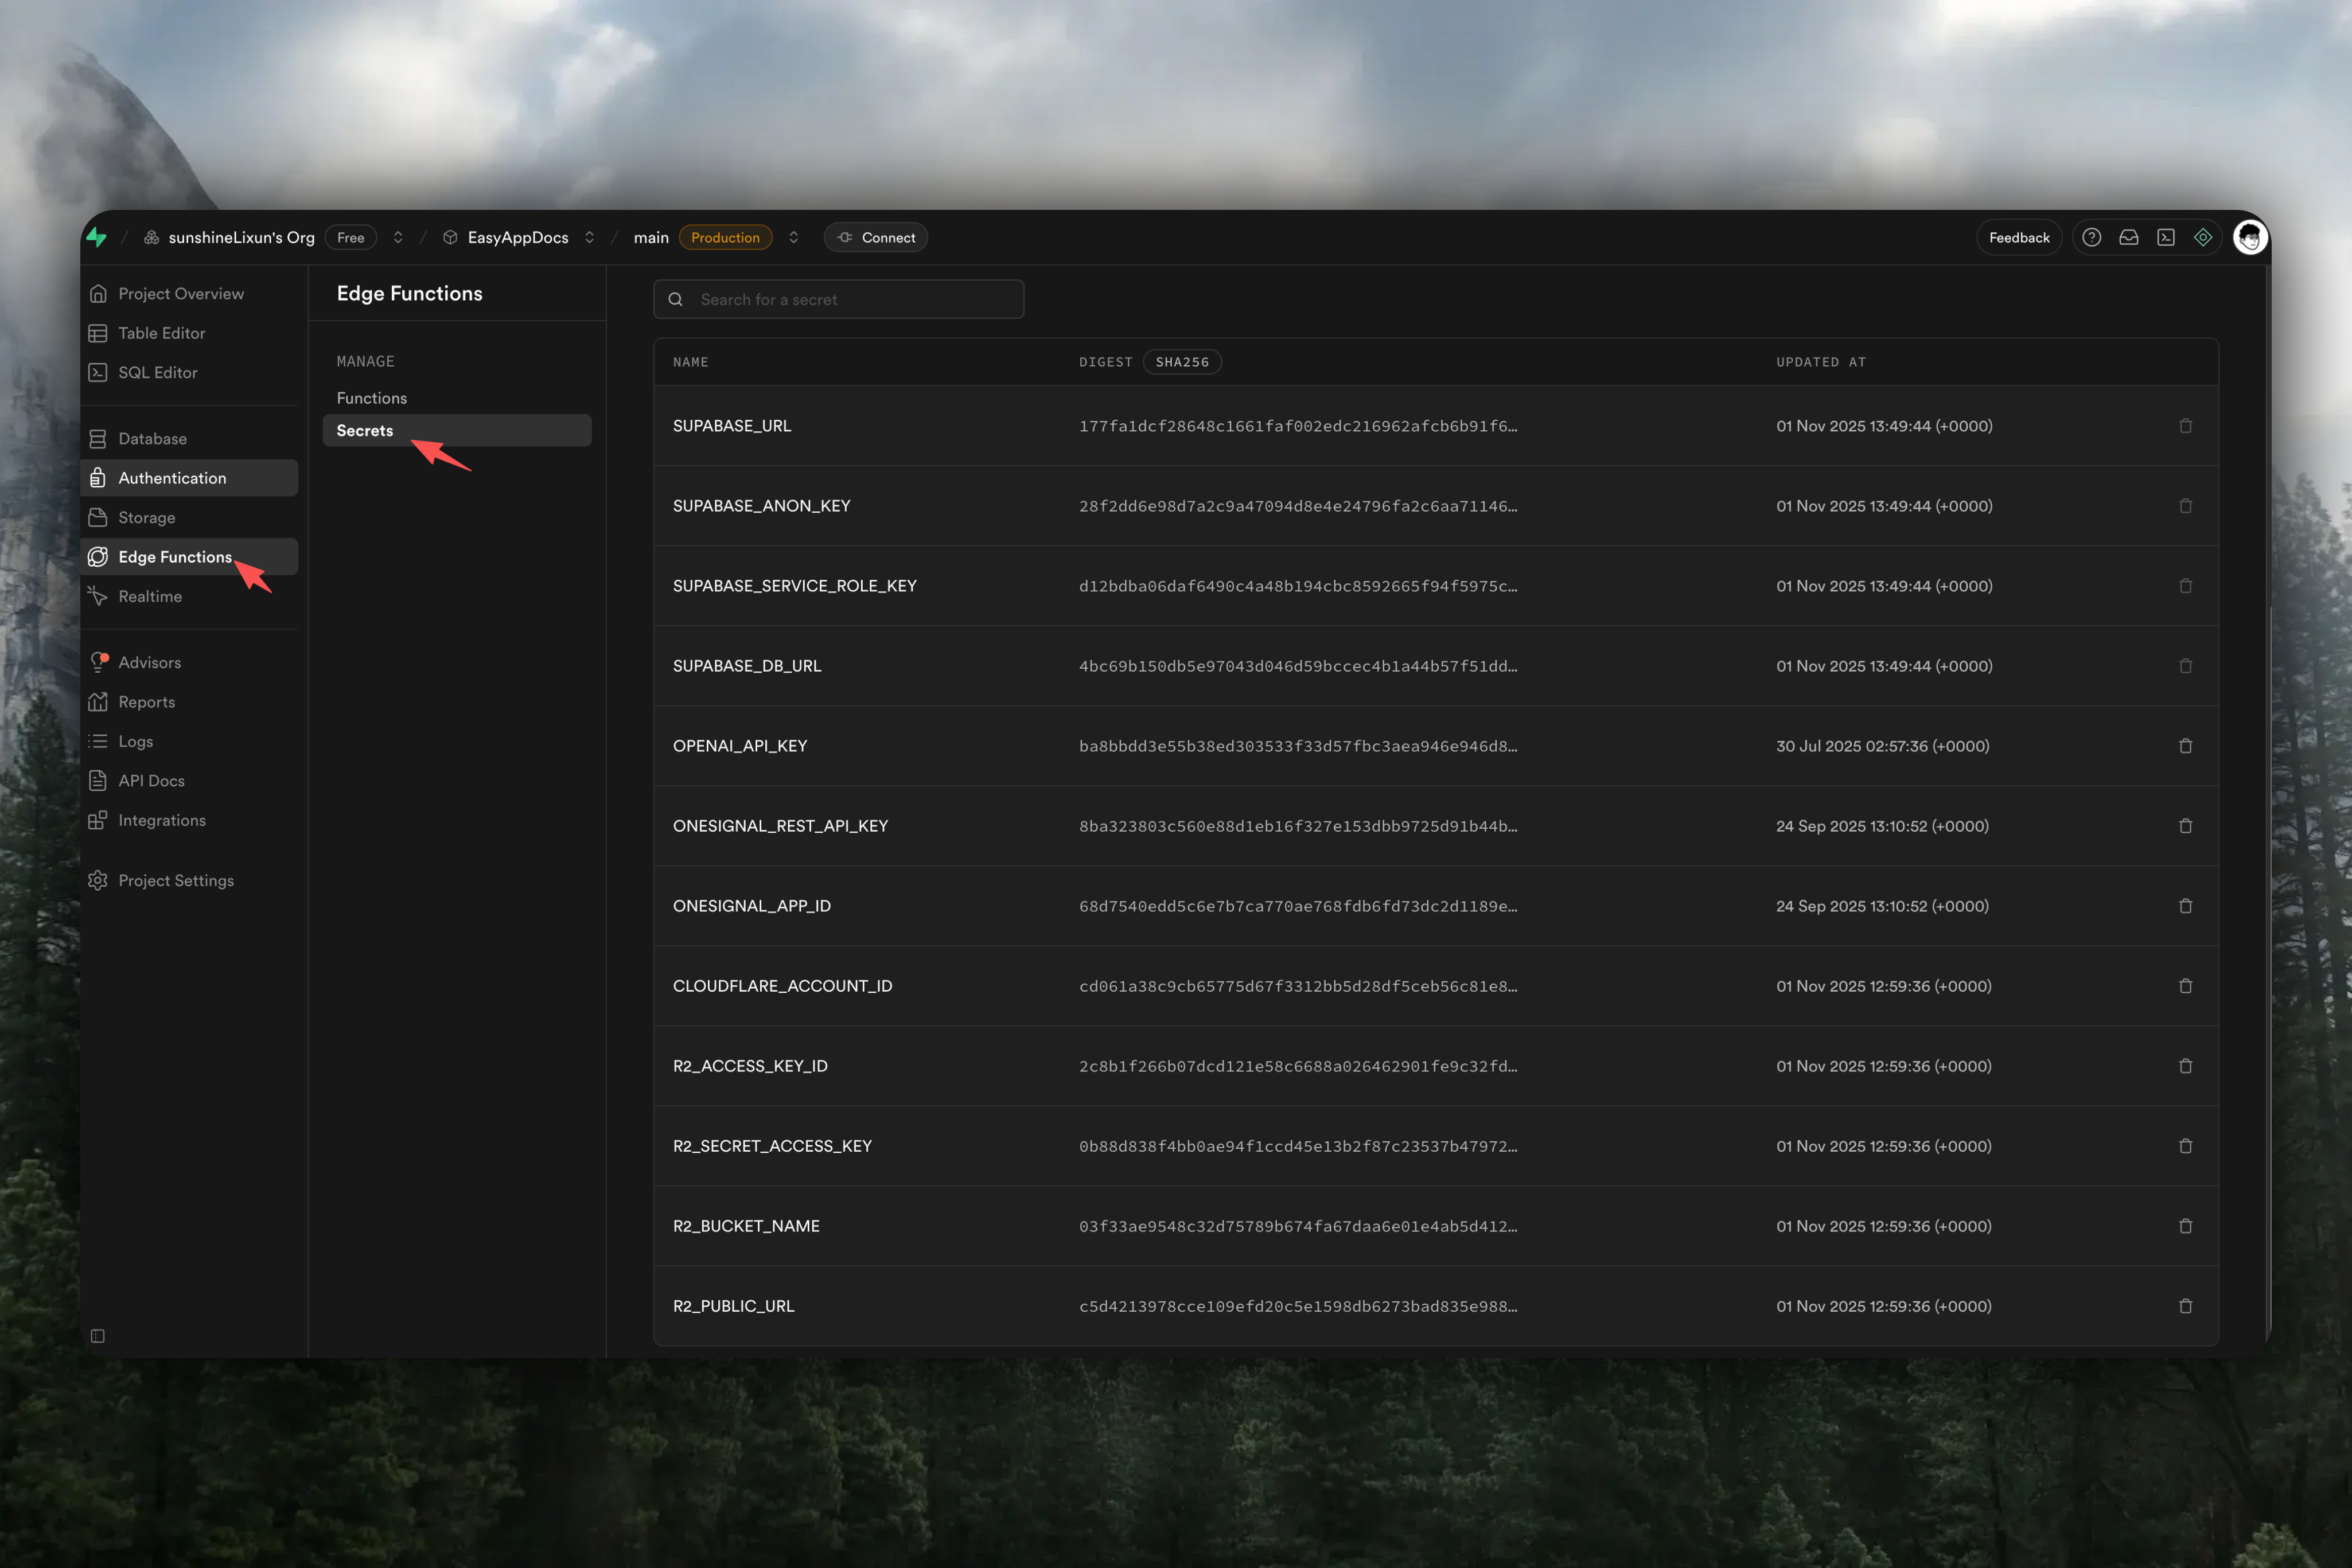
How to obtain them, see below:
- Get Supabase URL. Click the "Connect" button in the top navigation bar. In the popup, select Mobile Framework, select Swift in Framework. Copy supabaseURL.
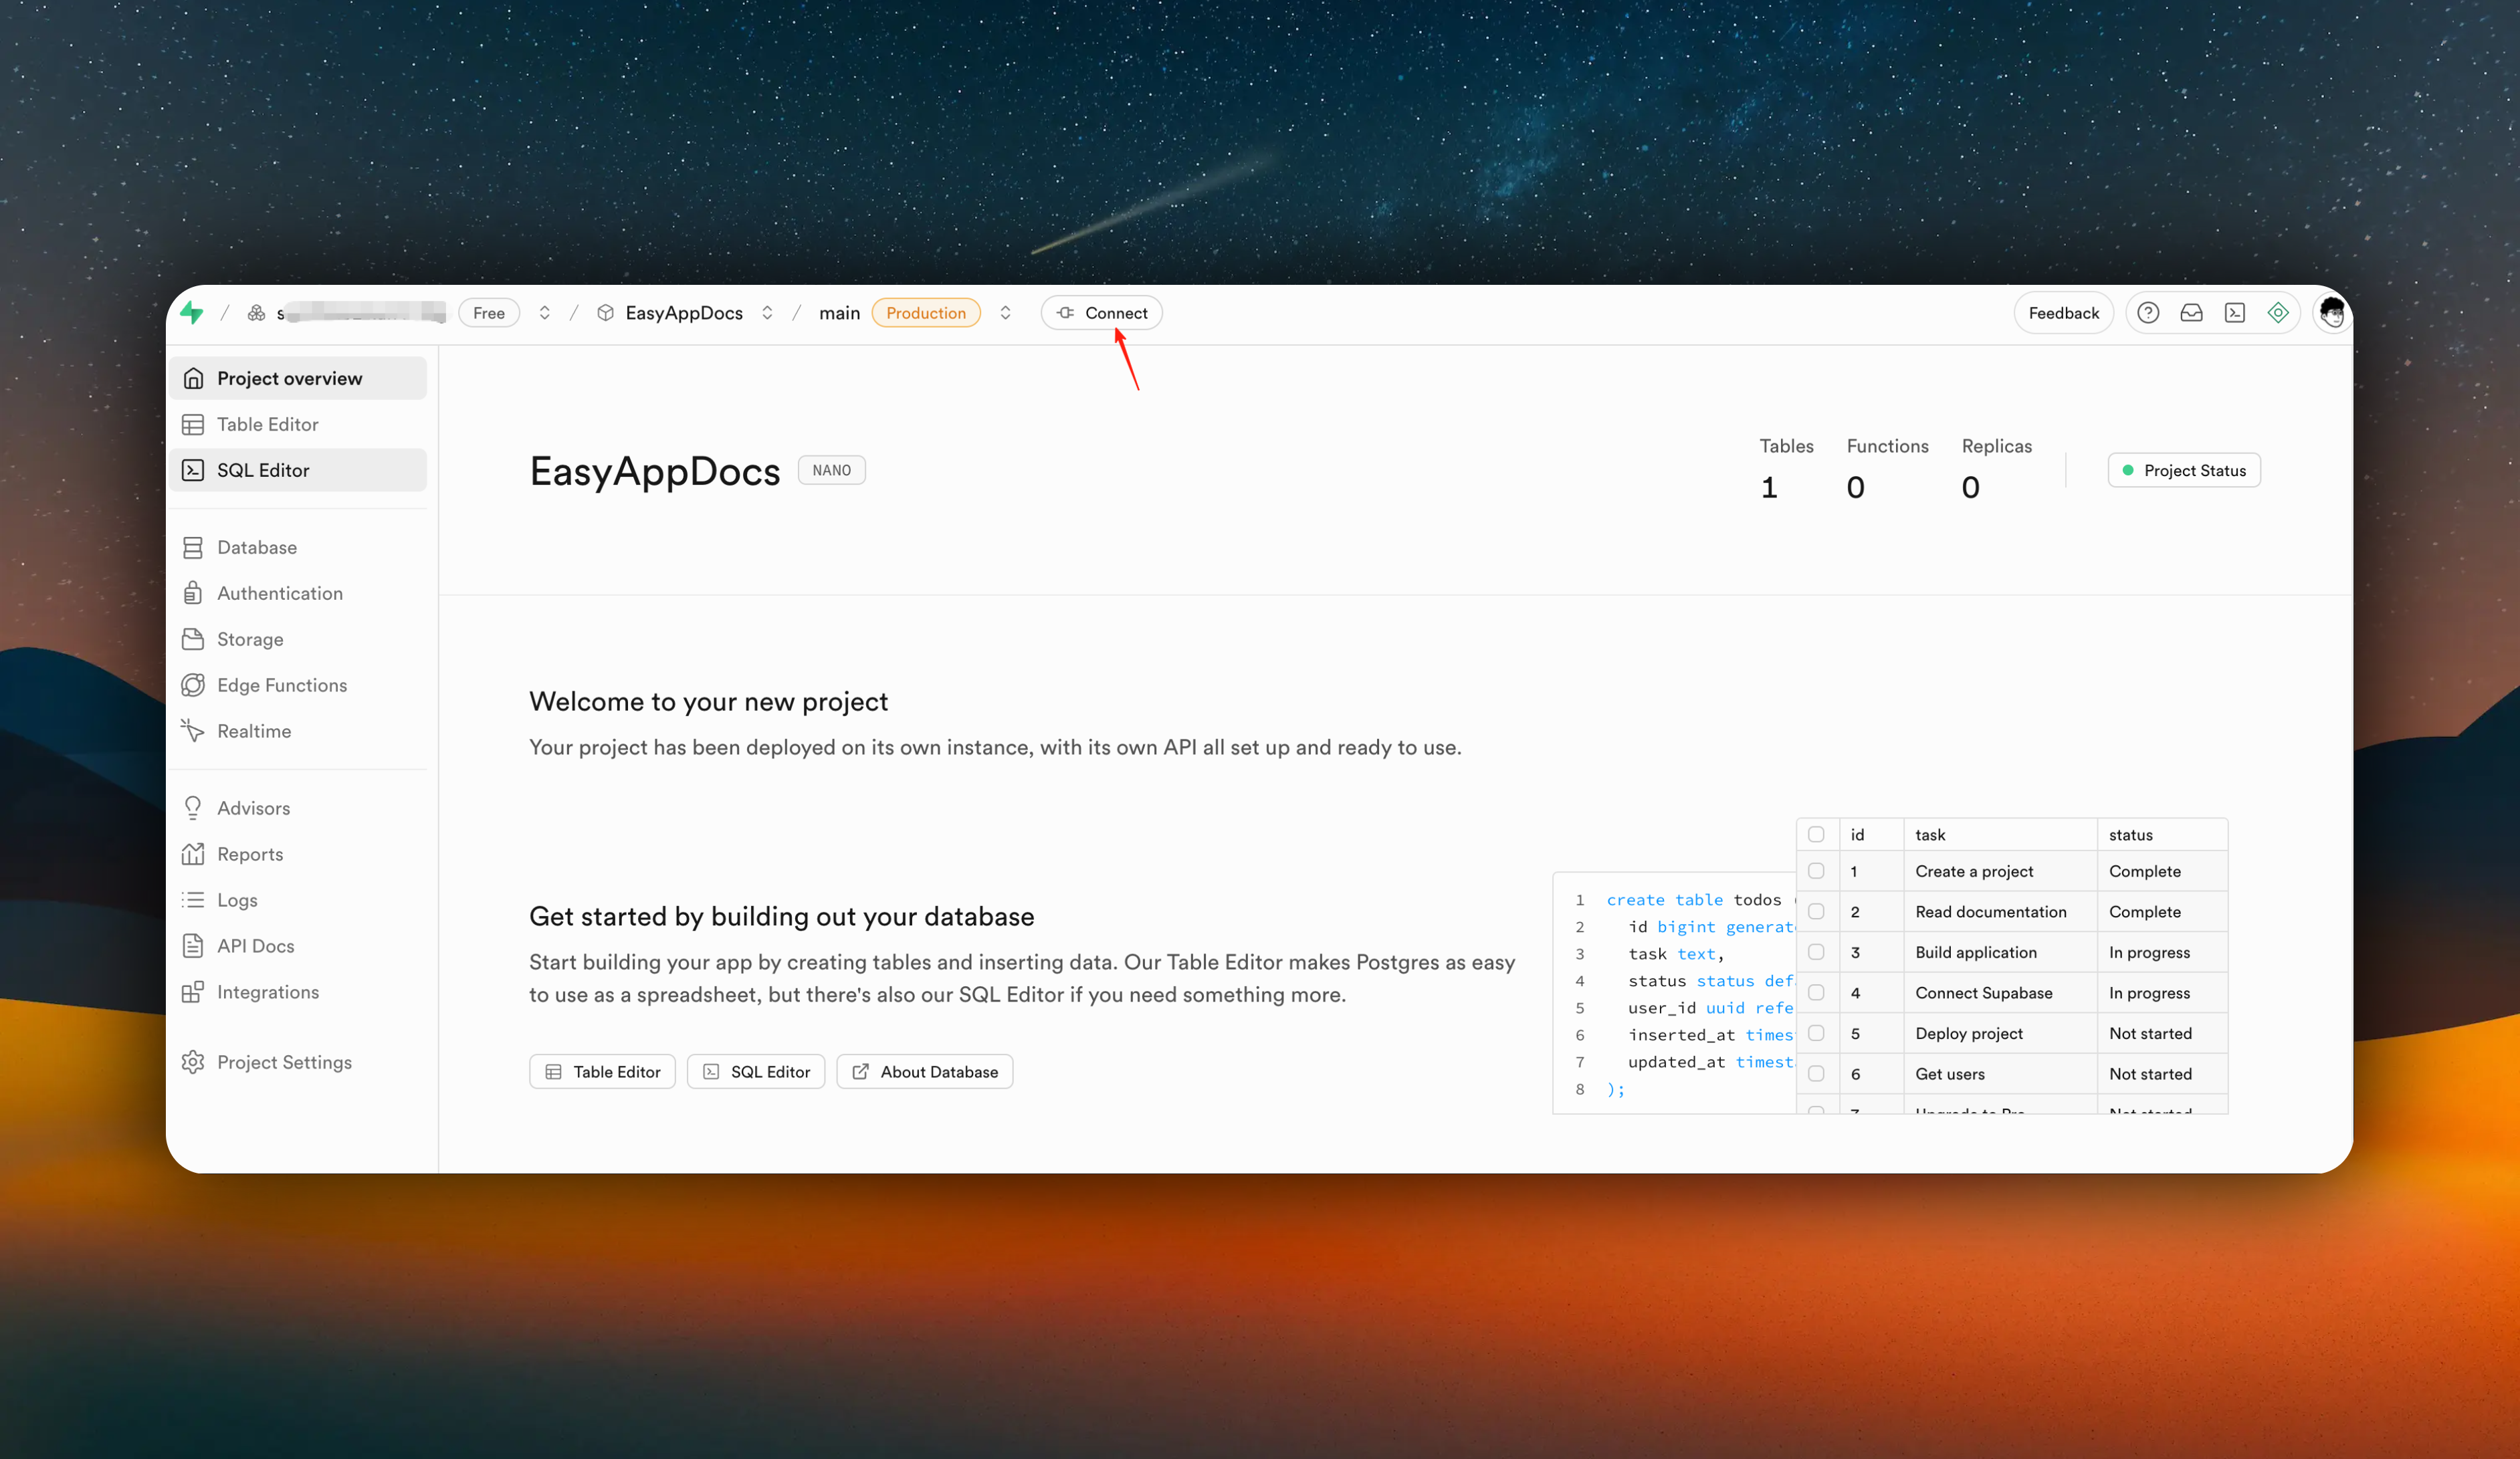
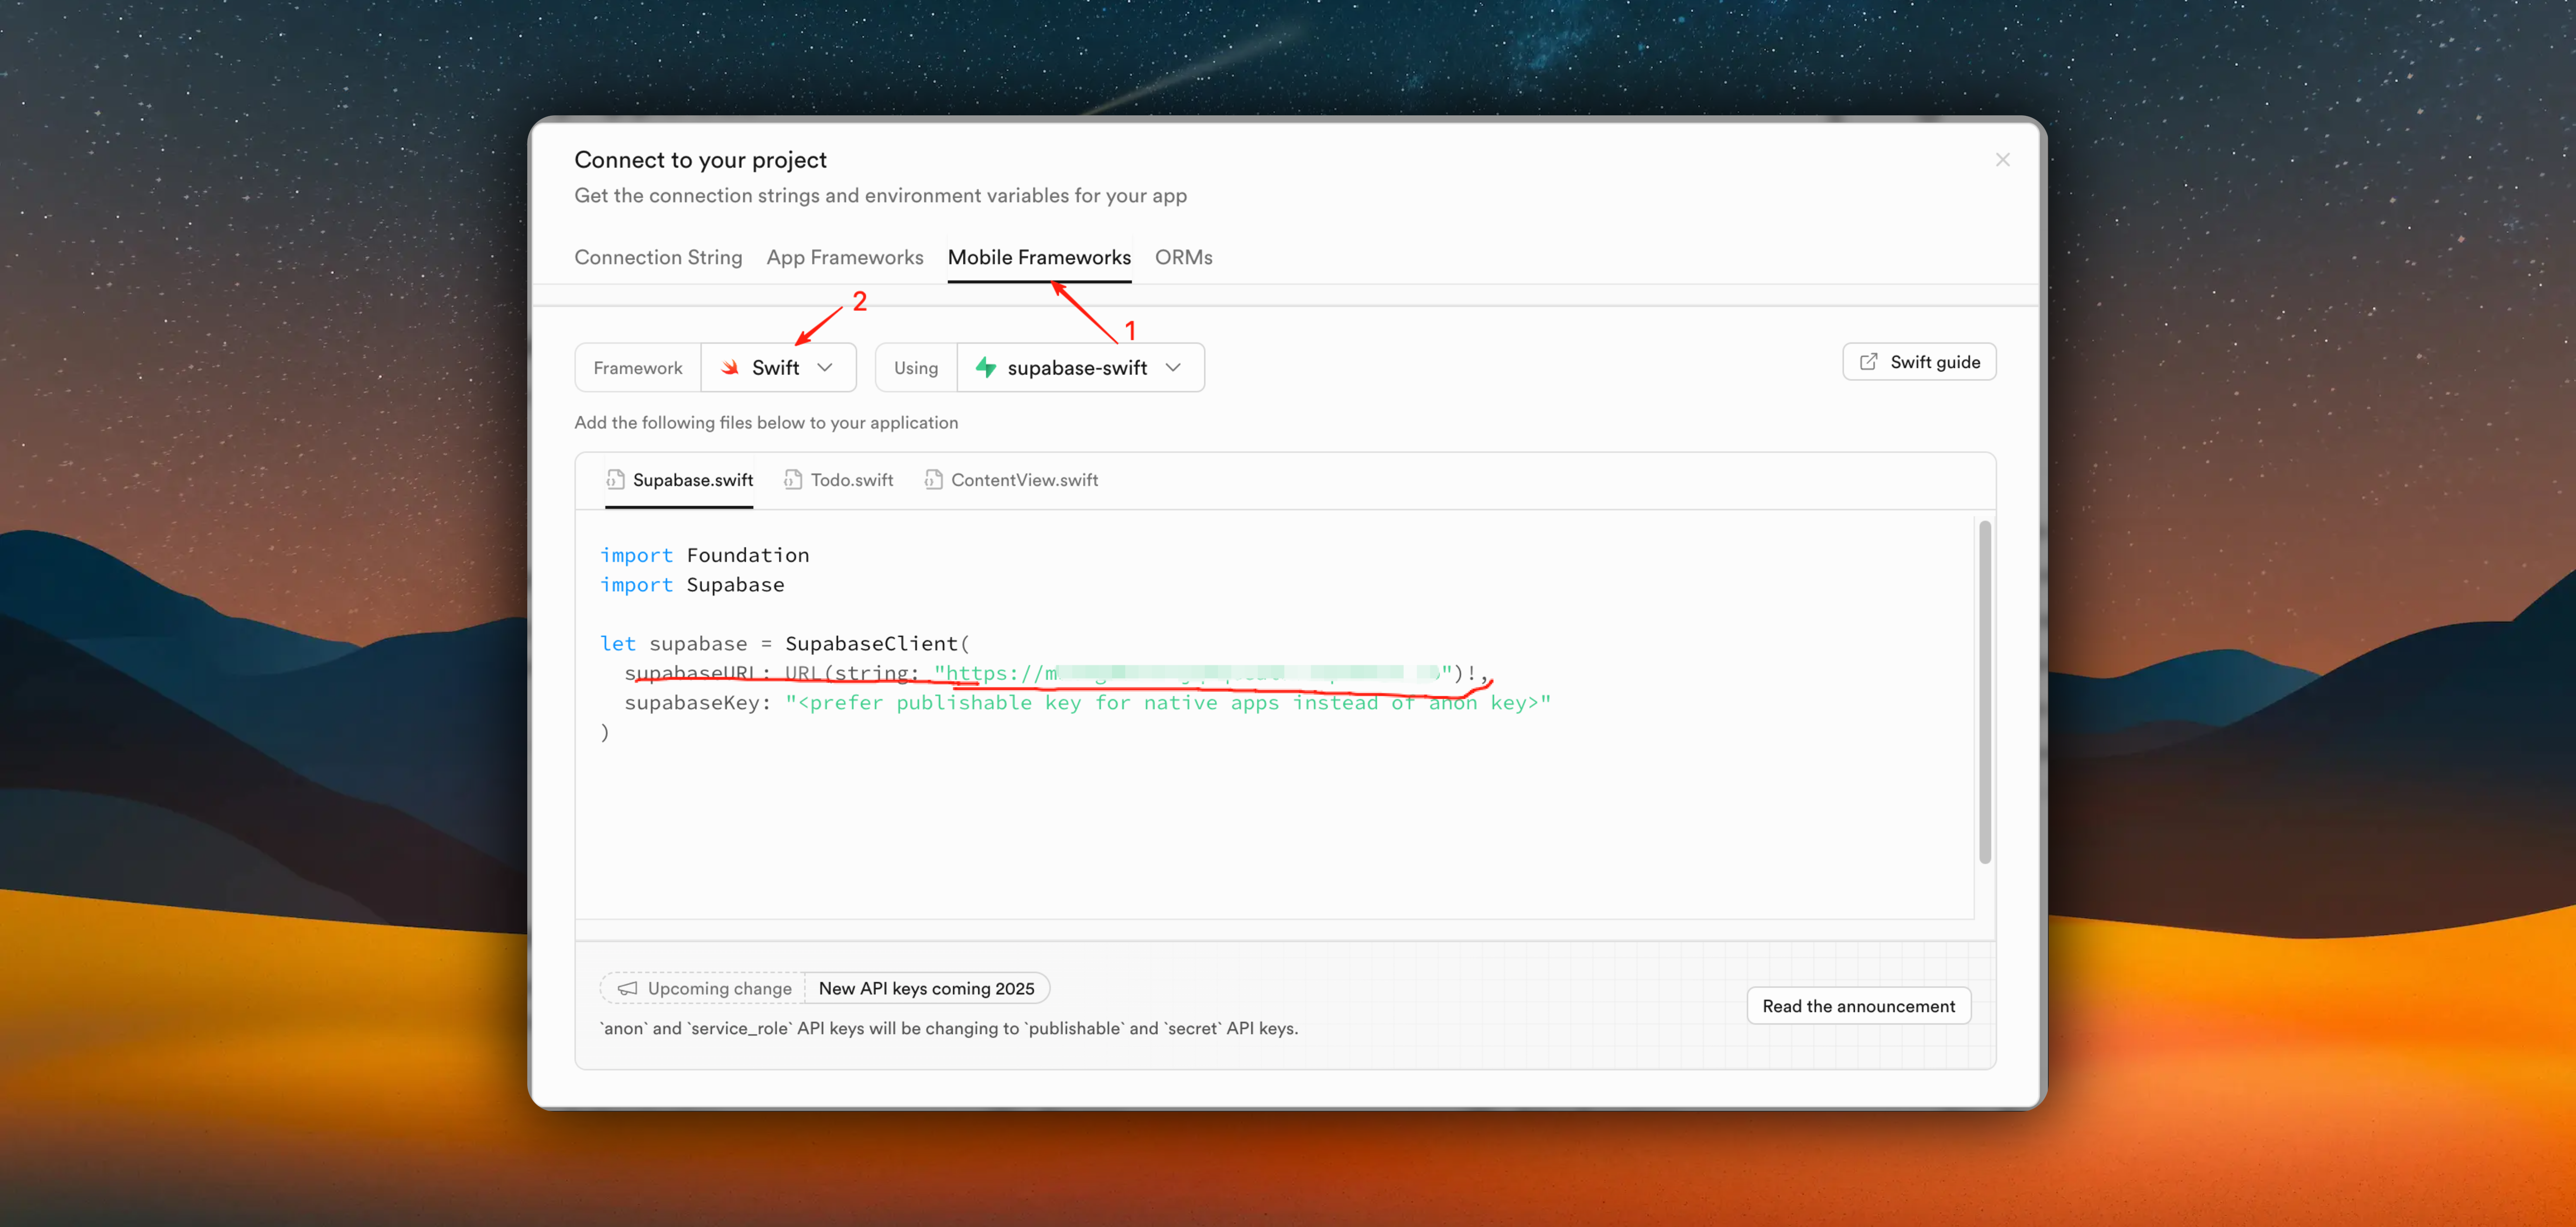
- Get Supabase API key. Click the "Project Settings" button in the sidebar, click the "API Keys" button. Click the "Copy" button.
Copy `service_role`.
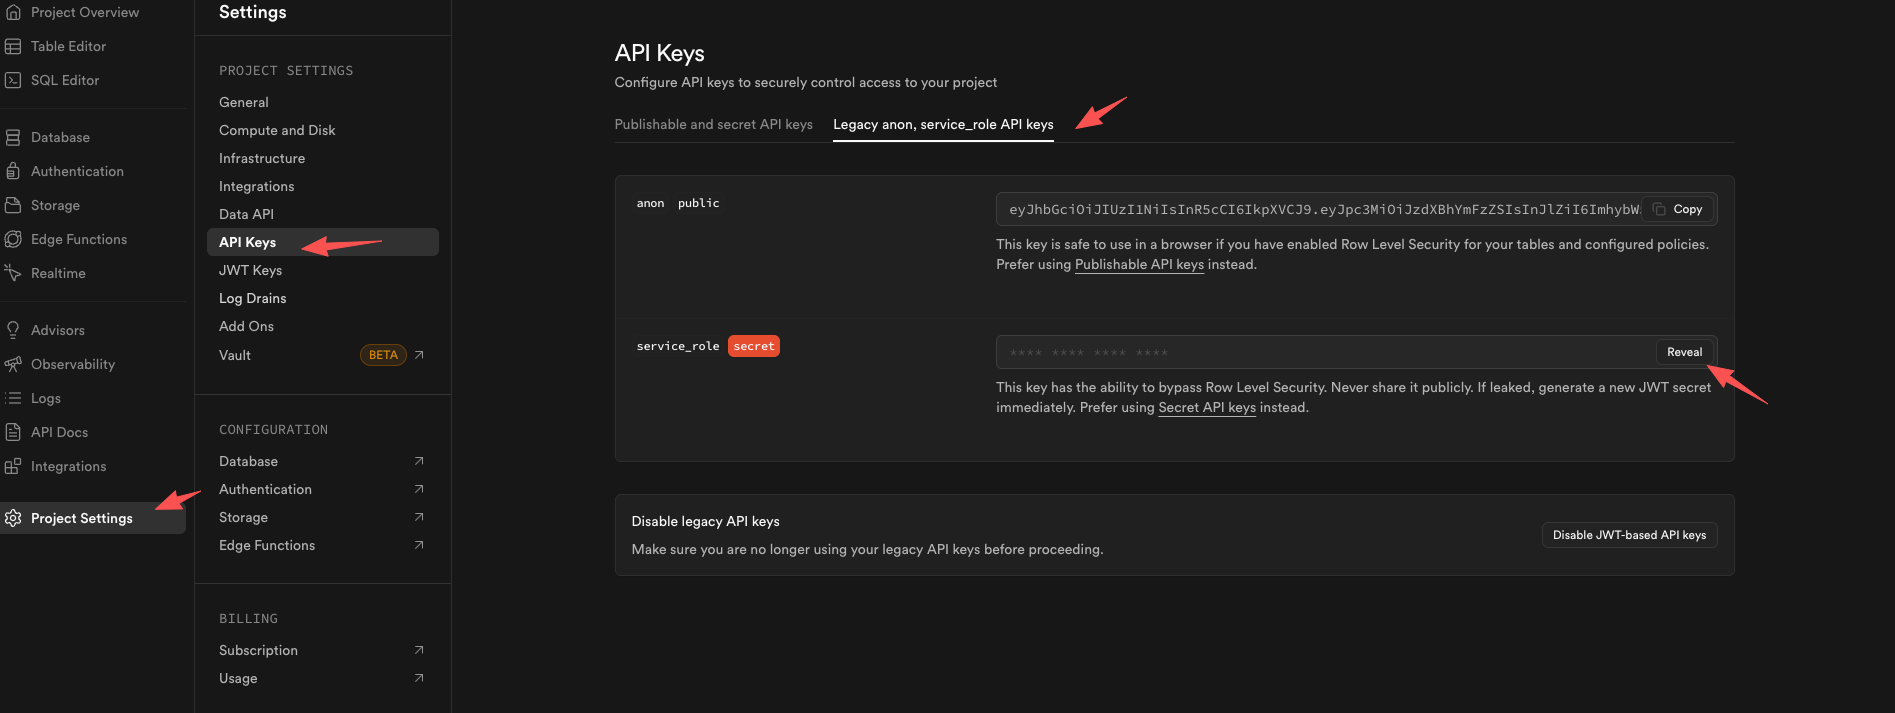
After obtaining `url` and `service_role`, fill in the corresponding `SUPABASE_URL` and `SUPABASE_SERVICE_ROLE_KEY`.
For other environment variables, you need to set them according to your needs. If you use OpenAI service, you need to add `OPENAI_API_KEY`.
If you use OneSignal push service, you need to add `ONESIGNAL_REST_API_KEY`, `ONESIGNAL_APP_ID`, and `ONESIGNAL_APP_KEY`.
How to integrate OneSignal? Please refer to
}
href="/docs/Integrations/notifications"
>
OneSignal integration documentation
If you use CF R2 storage service, you need to add `CLOUDFLARE_ACCOUNT_ID`, `R2_ACCESS_KEY_ID`, `R2_SECRET_ACCESS_KEY`, `R2_BUCKET_NAME`, and `R2_PUBLIC_URL`.
At this point, you have started the backend service in your Supabase project. You don't need to read the following content. Next, we need to configure Apple login and user registration/login process.
}
href="/docs/Integrations/appleLogin"
>
Apple login integration documentation
*/}
## Local Development Environment Setup
### Start Local Supabase Service
Run in the EasyAppSupabase directory:
```bash
cd EasyAppSupabase
npx supabase start
```
Before downloading Docker images, we recommend installing [Docker Desktop](https://docs.docker.com/desktop/)
The first run will download Docker images, which may take a few minutes.
### Check Service Status
```bash
npx supabase status
```
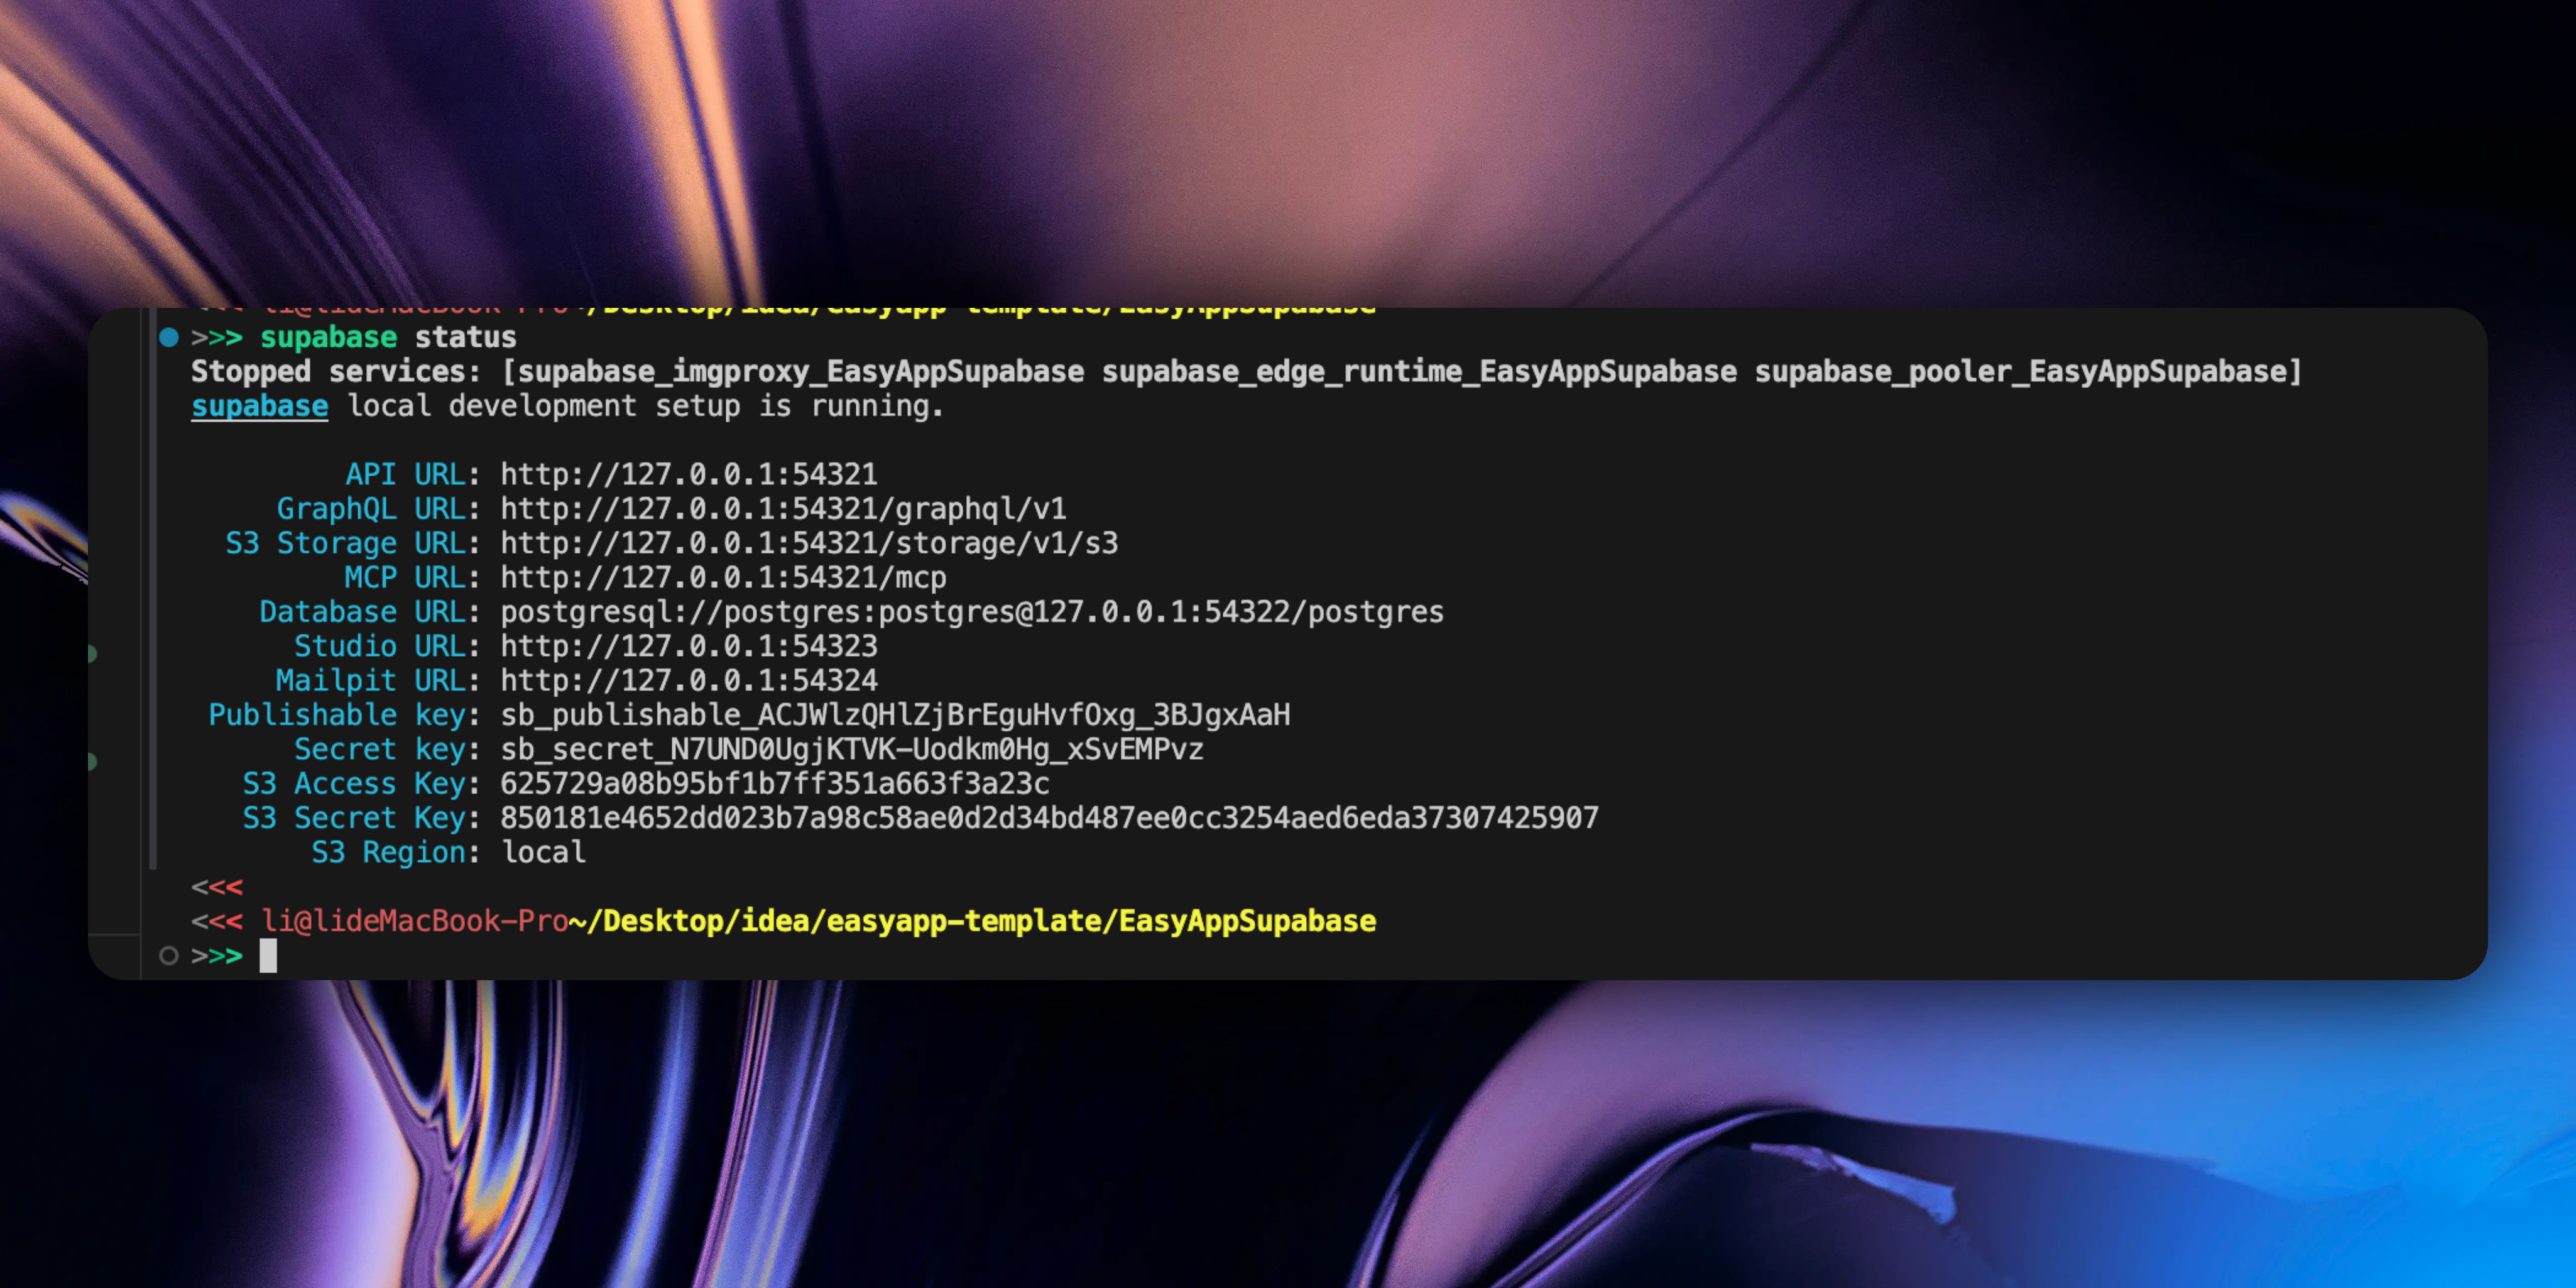
This will display URLs and keys for all services, including:
* API URL: `http://localhost:54321`
* Database URL: `postgresql://postgres:[PASSWORD]@localhost:54322/postgres`
* Secret key: For client requests
Then add the `API URL` and `Secret key` to the EasyAppSwiftUI/Constants/Constants.swift file.
```swift
enum Supabase {
/// Development supabase url
#if DEBUG
static let url = "http://localhost:54321"
/// The anon key
static let key ="your_anon_key_here"
#else
}
```
## Developing Edge Functions
The SupabaseEdgeFunction project already has built-in all the Edge Functions required for the easyapp template. You can refer to these functions to create your own functions.
### Generate Function Using CLI
```bash
npx supabase functions new my-function
```
This creates a basic template in the `supabase/functions/my-function/` directory:
```typescript
// supabase/functions/my-function/index.ts
import "jsr:@supabase/functions-js/edge-runtime.d.ts"
Deno.serve(async (req) => {
const { name } = await req.json()
const data = {
message: `Hello ${name}!`,
}
return new Response(
JSON.stringify(data),
{ headers: { "Content-Type": "application/json" } },
)
})
```
### Configure Dependencies
Create a `deno.json` file to manage dependencies:
```json
{
"imports": {
"@supabase/supabase-js": "jsr:@supabase/supabase-js@^2.50.2",
"@openai/openai": "jsr:@openai/openai@^5.8.1"
}
}
```
### Access Environment Variables
In your function, you can access environment variables through `Deno.env.get()`:
```typescript
// Get environment variables
const apiKey = Deno.env.get("OPENAI_API_KEY")
const customVar = Deno.env.get("YOUR_CUSTOM_VARIABLE")
```
### Using Shared Tools
EasyAppSupabase provides pre-configured shared tools that can be used directly in your functions:
### Using Supabase Client
```typescript
import {
supabaseServiceRoleKey,
supabaseUrl,
} from "../_shared/SupabaseClient.ts";
import { createClient } from "@supabase/supabase-js";
Deno.serve(async (req) => {
const supabaseClient = createClient(
supabaseUrl,
supabaseServiceRoleKey,
);
// Get user authentication info
const authHeader = req.headers.get("Authorization");
if (!authHeader) {
return new Response("Unauthorized", { status: 401 });
}
const token = authHeader.replace("Bearer ", "");
const { data: user } = await supabaseClient.auth.getUser(token);
if (!user) {
return new Response("Invalid token", { status: 401 });
}
// Database operations
const { data, error } = await supabaseClient
.from('your_table')
.select('*')
.eq('user_id', user.user.id);
return new Response(JSON.stringify(data), {
headers: { "Content-Type": "application/json" }
});
});
```
### Using OpenAI Client
```typescript
import { openAIClient } from "../_shared/OpenAIClient.ts";
import { createClient } from "@supabase/supabase-js";
Deno.serve(async (req) => {
const { prompt } = await req.json();
const response = await openAIClient.chat.completions.create({
model: "gpt-3.5-turbo",
messages: [{ role: "user", content: prompt }],
});
return new Response(JSON.stringify({
result: response.choices[0].message.content
}), {
headers: { "Content-Type": "application/json" }
});
});
```
### Local Testing
### Configure Environment Variables
Configure your environment variables in the `supabase/.env.local` file:
```bash
# supabase/.env.local
# OpenAI
OPENAI_API_KEY=your_openai_api_key_here
# Supabase
# supabase local development uses LOCAL_DEV prefix
LOCAL_DEV_SUPABASE_URL=http://127.0.0.1:54321
LOCAL_DEV_SUPABASE_SERVICE_ROLE_KEY=your_supabase_service_role_key_here
# Other environment variables
```
LOCAL\_DEV\_SUPABASE\_SERVICE\_ROLE\_KEY can be obtained from here
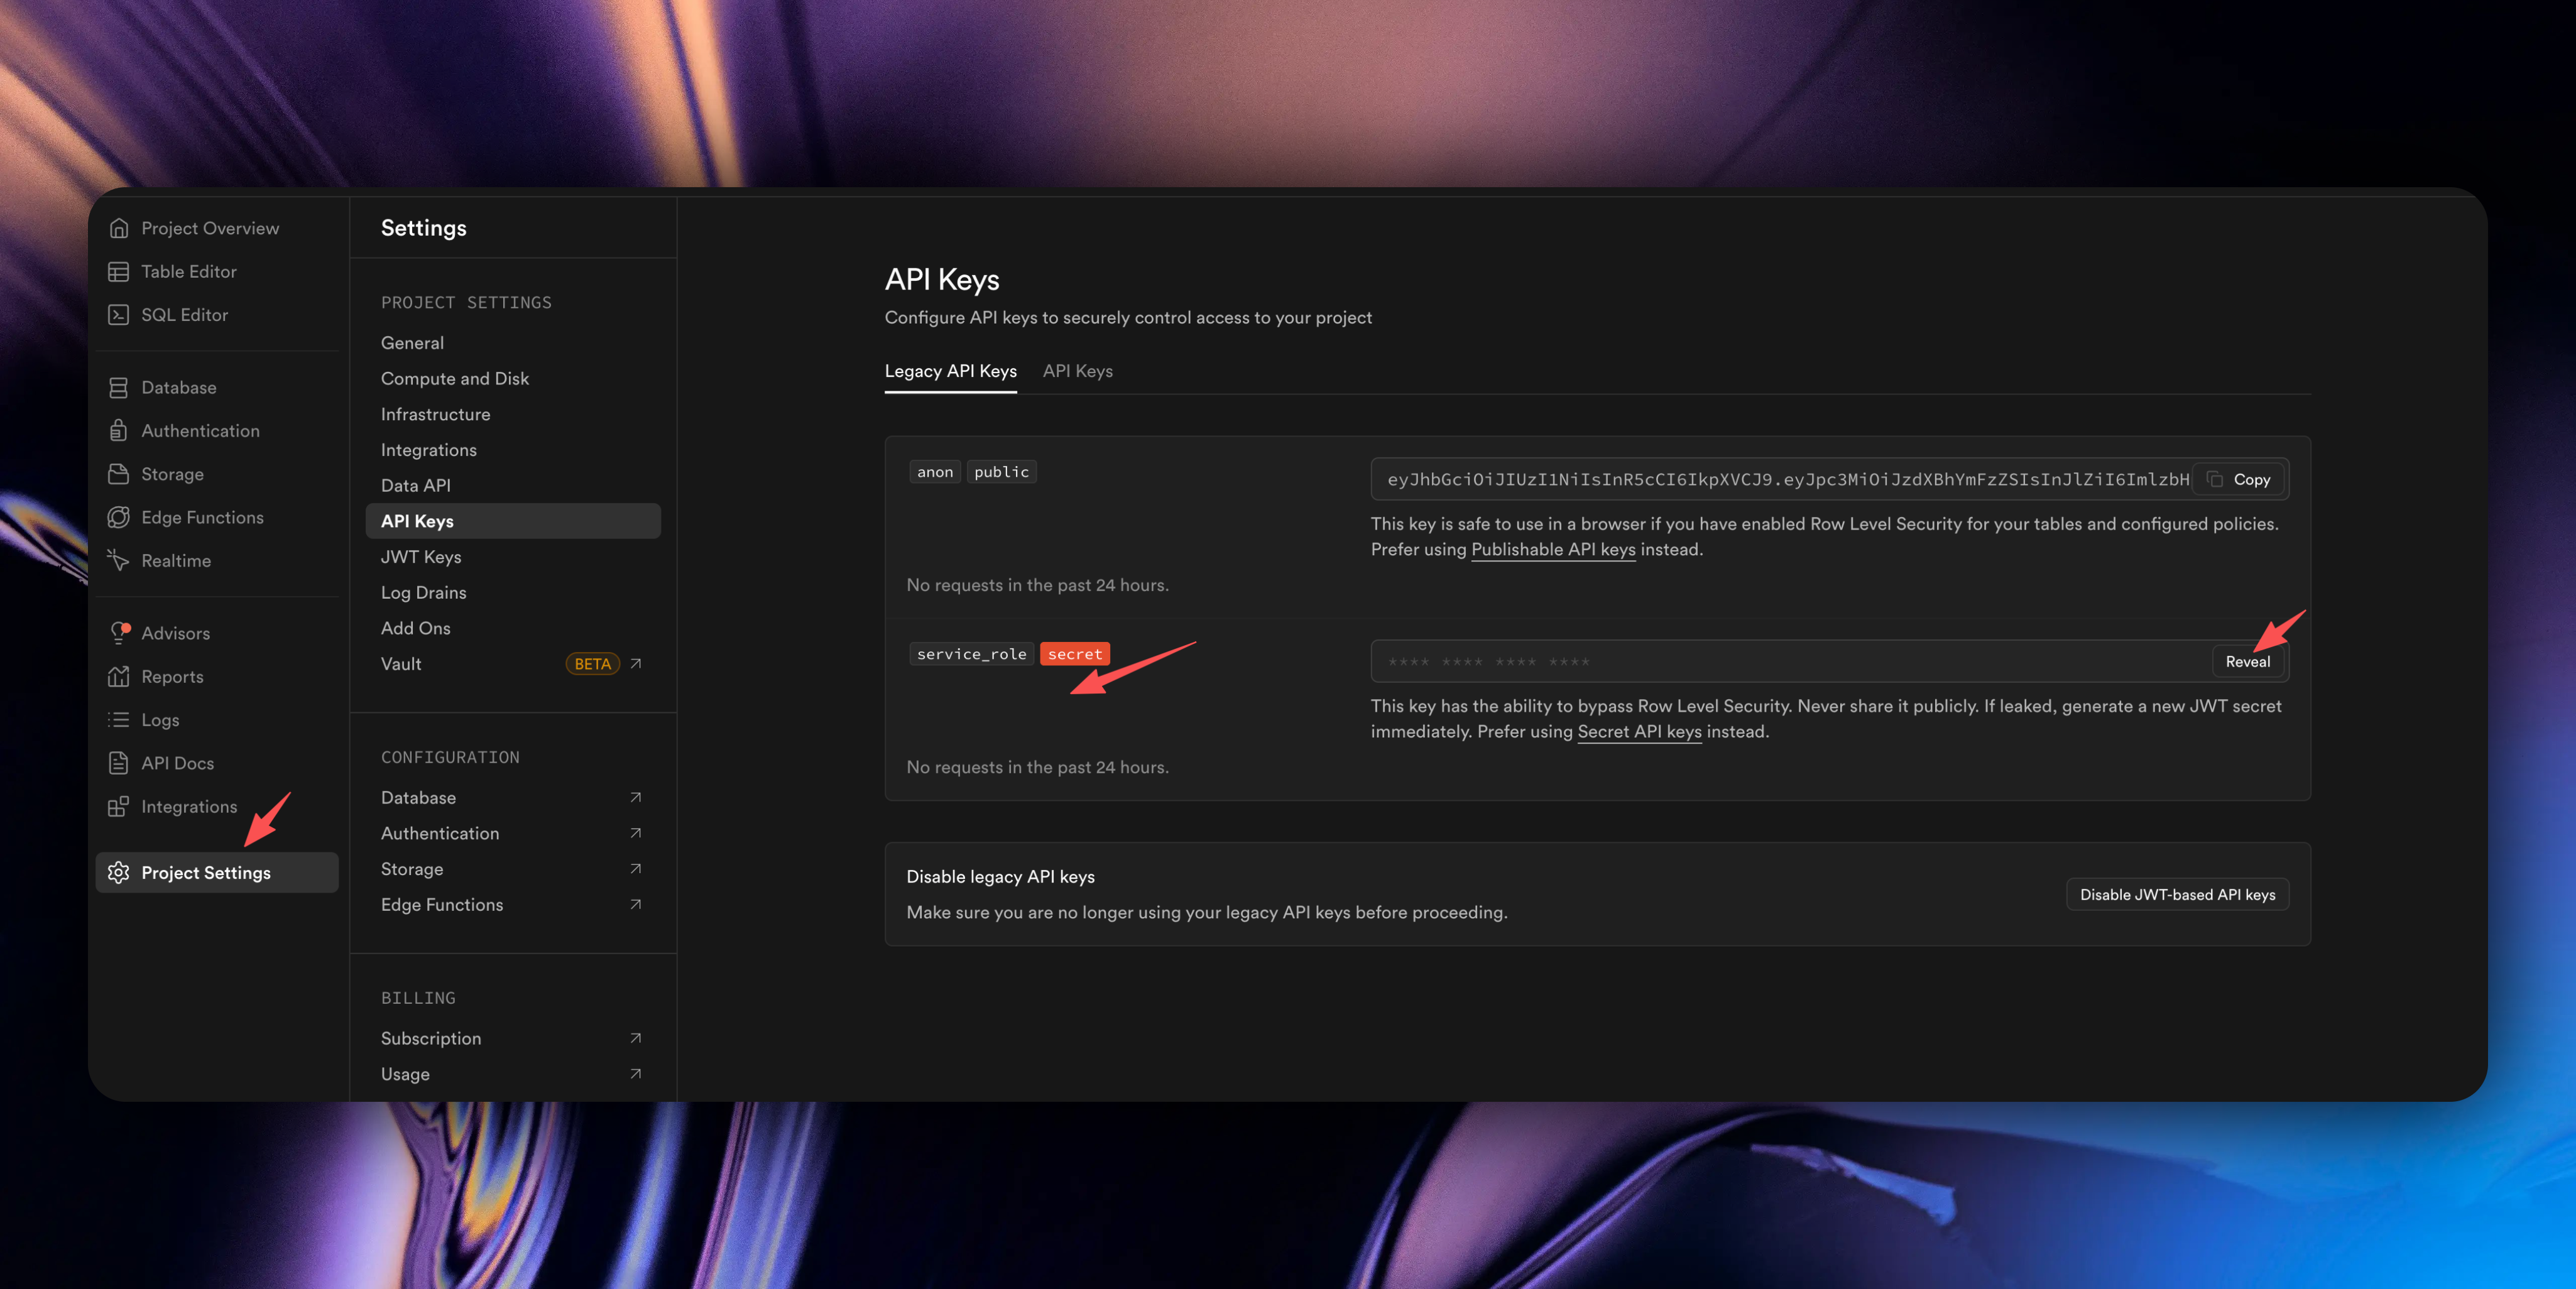
### Configure Database Tables
1. Create a new migration file:
```bash
npx supabase migration new your_migration_name
```
2. Edit the generated SQL file in `supabase/migrations/`
3. Apply migration:
```bash
npx supabase db push
```
### Start Function Service
```bash
# Start specific function and load environment variables
npx supabase functions serve my-function --env-file ./supabase/.env.local
# Start all functions and load environment variables
npx supabase functions serve --env-file ./supabase/.env.local
```
The function will run at `http://localhost:54321/functions/v1/my-function`.
### Test Function
Use curl to test your function:
```bash
# Get local anon key
npx supabase status
# Test function
curl -i --location --request POST 'http://localhost:54321/functions/v1/my-function' \
--header 'Authorization: Bearer YOUR_LOCAL_ANON_KEY' \
--header 'Content-Type: application/json' \
--data '{"name":"World"}'
```
### View Logs
Function logs will display in real-time in the terminal to help you debug issues.
## Best Practices
### Security
* Always verify user identity (unless it's a public Webhook)
* Use environment variables to store sensitive information (API keys, database connection strings, etc.)
* Implement proper error handling
## Troubleshooting
### Common Issues
**Function won't start**
* Make sure Docker is running
* Run `supabase stop` then `supabase start` to restart services
**Port conflicts**
* Check `supabase status` to see occupied ports
* Stop other Supabase instances
**Deployment fails**
* Check function code syntax
* Ensure all dependencies are properly configured
* Verify environment variable settings
**Environment variables can't be read**
* Ensure `.env.local` file format is correct (`KEY=value`)
* Use `--env-file` parameter when starting functions
* Check if environment variable names are spelled correctly
### View Logs
```bash
# View function logs
npx supabase functions logs my-function
# View logs in real-time
npx supabase functions logs my-function --follow
```
Through this guide, you should be able to successfully create, test, and deploy Supabase Cloud Functions in your EasyAppSupabase project.
# Essential Considerations Before Development
URL: https://easyapp.site/en/docs/beforeDev/design
Learn about essential considerations before development to avoid Apple review risks
***
title: Essential Considerations Before Development
description: Learn about essential considerations before development to avoid Apple review risks
icon: ListChecks
----------------
## UI Design
Apple encourages original, high-quality apps. Every app should have its own unique UI design. Apple discourages copying other apps, one-to-one imitation of other apps, and does not allow shell apps to be listed. Therefore, we recommend you design a style that belongs to your own app.
Even when competitors already exist, you can learn from their ideas and interactions. On the basis of competitors' apps, add your own features and differentiated functions, optimize user experience, and fix all the shortcomings of competitors. This not only avoids plagiarism but also creates an app that is better than competitors.
Apple also discourages using template-included UI designs. If many people use the same set of template UI designs, it will be considered plagiarism during review, with a high risk of rejection. You can modify the page theme and layout based on this.
* **Have UI Design**: Use your own UI design, core logic can reuse template code
* **No UI Design**: Use the rich component code provided by EasyApp, visit [Component Library](https://www.easyapp.site/en/components/onboarding) to see all available components
We continuously update our component library to ensure multiple components are available for every business scenario.
We have also compiled some UI design resources and component libraries for your reference to help you get design inspiration. You can also let AI generate UI designs - Claude Opus 4.5 / Claude Sonnet 4.5 now have good design capabilities.
***
Next, we recommend you quickly understand the EasyApp project configuration
} href="/docs/configuration">
Quick understanding of EasyApp project configuration
# Using AI IDE for Swift/SwiftUI Development
URL: https://easyapp.site/en/docs/codebase/IDESetup
Learn how to use AI IDE for Swift/SwiftUI development, say goodbye to Xcode
***
title: Using AI IDE for Swift/SwiftUI Development
description: Learn how to use AI IDE for Swift/SwiftUI development, say goodbye to Xcode
icon: Salad
-----------
You can use popular AI IDEs available in the market to develop Swift/SwiftUI projects. You can experience all the features of AI IDEs while still relying on Xcode to build and run your applications.
Xcode is the foundation for building/running apps, you still need to install [Xcode](https://developer.apple.com/xcode/).
Next, we'll use Cursor as an example to introduce how to use AI IDE for Swift/SwiftUI development.
## Using Sweetpad for Swift/SwiftUI Development
If you want to open only one editor at a time and avoid the need to switch between Xcode and Cursor, you can use extensions like Sweetpad to integrate Cursor directly with Xcode's underlying build system.
[Sweetpad](https://sweetpad.hyzyla.dev/) is a powerful extension that allows you to build, run, and debug Swift projects directly in Cursor without compromising Xcode's functionality.
Open terminal and run:
```bash
# Build projects without opening Xcode
brew install xcode-build-server
# Beautify and print `xcodebuild` command output to Cursor's terminal
brew install xcbeautify
# Swift/SwiftUI code formatting
brew install swiftformat
```
Next, install the [Swift Language Support](https://www.swift.org/documentation/articles/getting-started-with-vscode-swift.html) plugin in Cursor. This will provide you with syntax highlighting and basic language features out of the box.
Then, we can install the [Sweetpad](https://github.com/sweetpad-dev/sweetpad) plugin to integrate Cursor with Xcode. Sweetpad wraps a bunch of shortcuts around the `xcodebuild` CLI (and more features) and allows you to scan simulators/real devices, select devices, build and run applications, just like Xcode. Additionally, it will set up Xcode Build Server for your project so you get all the above features.
### Using Sweetpad
After installing Sweetpad, open the EasyApp project in Cursor and first run the `Sweetpad: Generate Build Server Config` command. This will generate a `buildServer.json` file in the project root directory, allowing Xcode Build Server to work with your project.
If you still have issues after performing the above steps, such as code errors, you can re-execute `Reload Window` to resolve this problem.
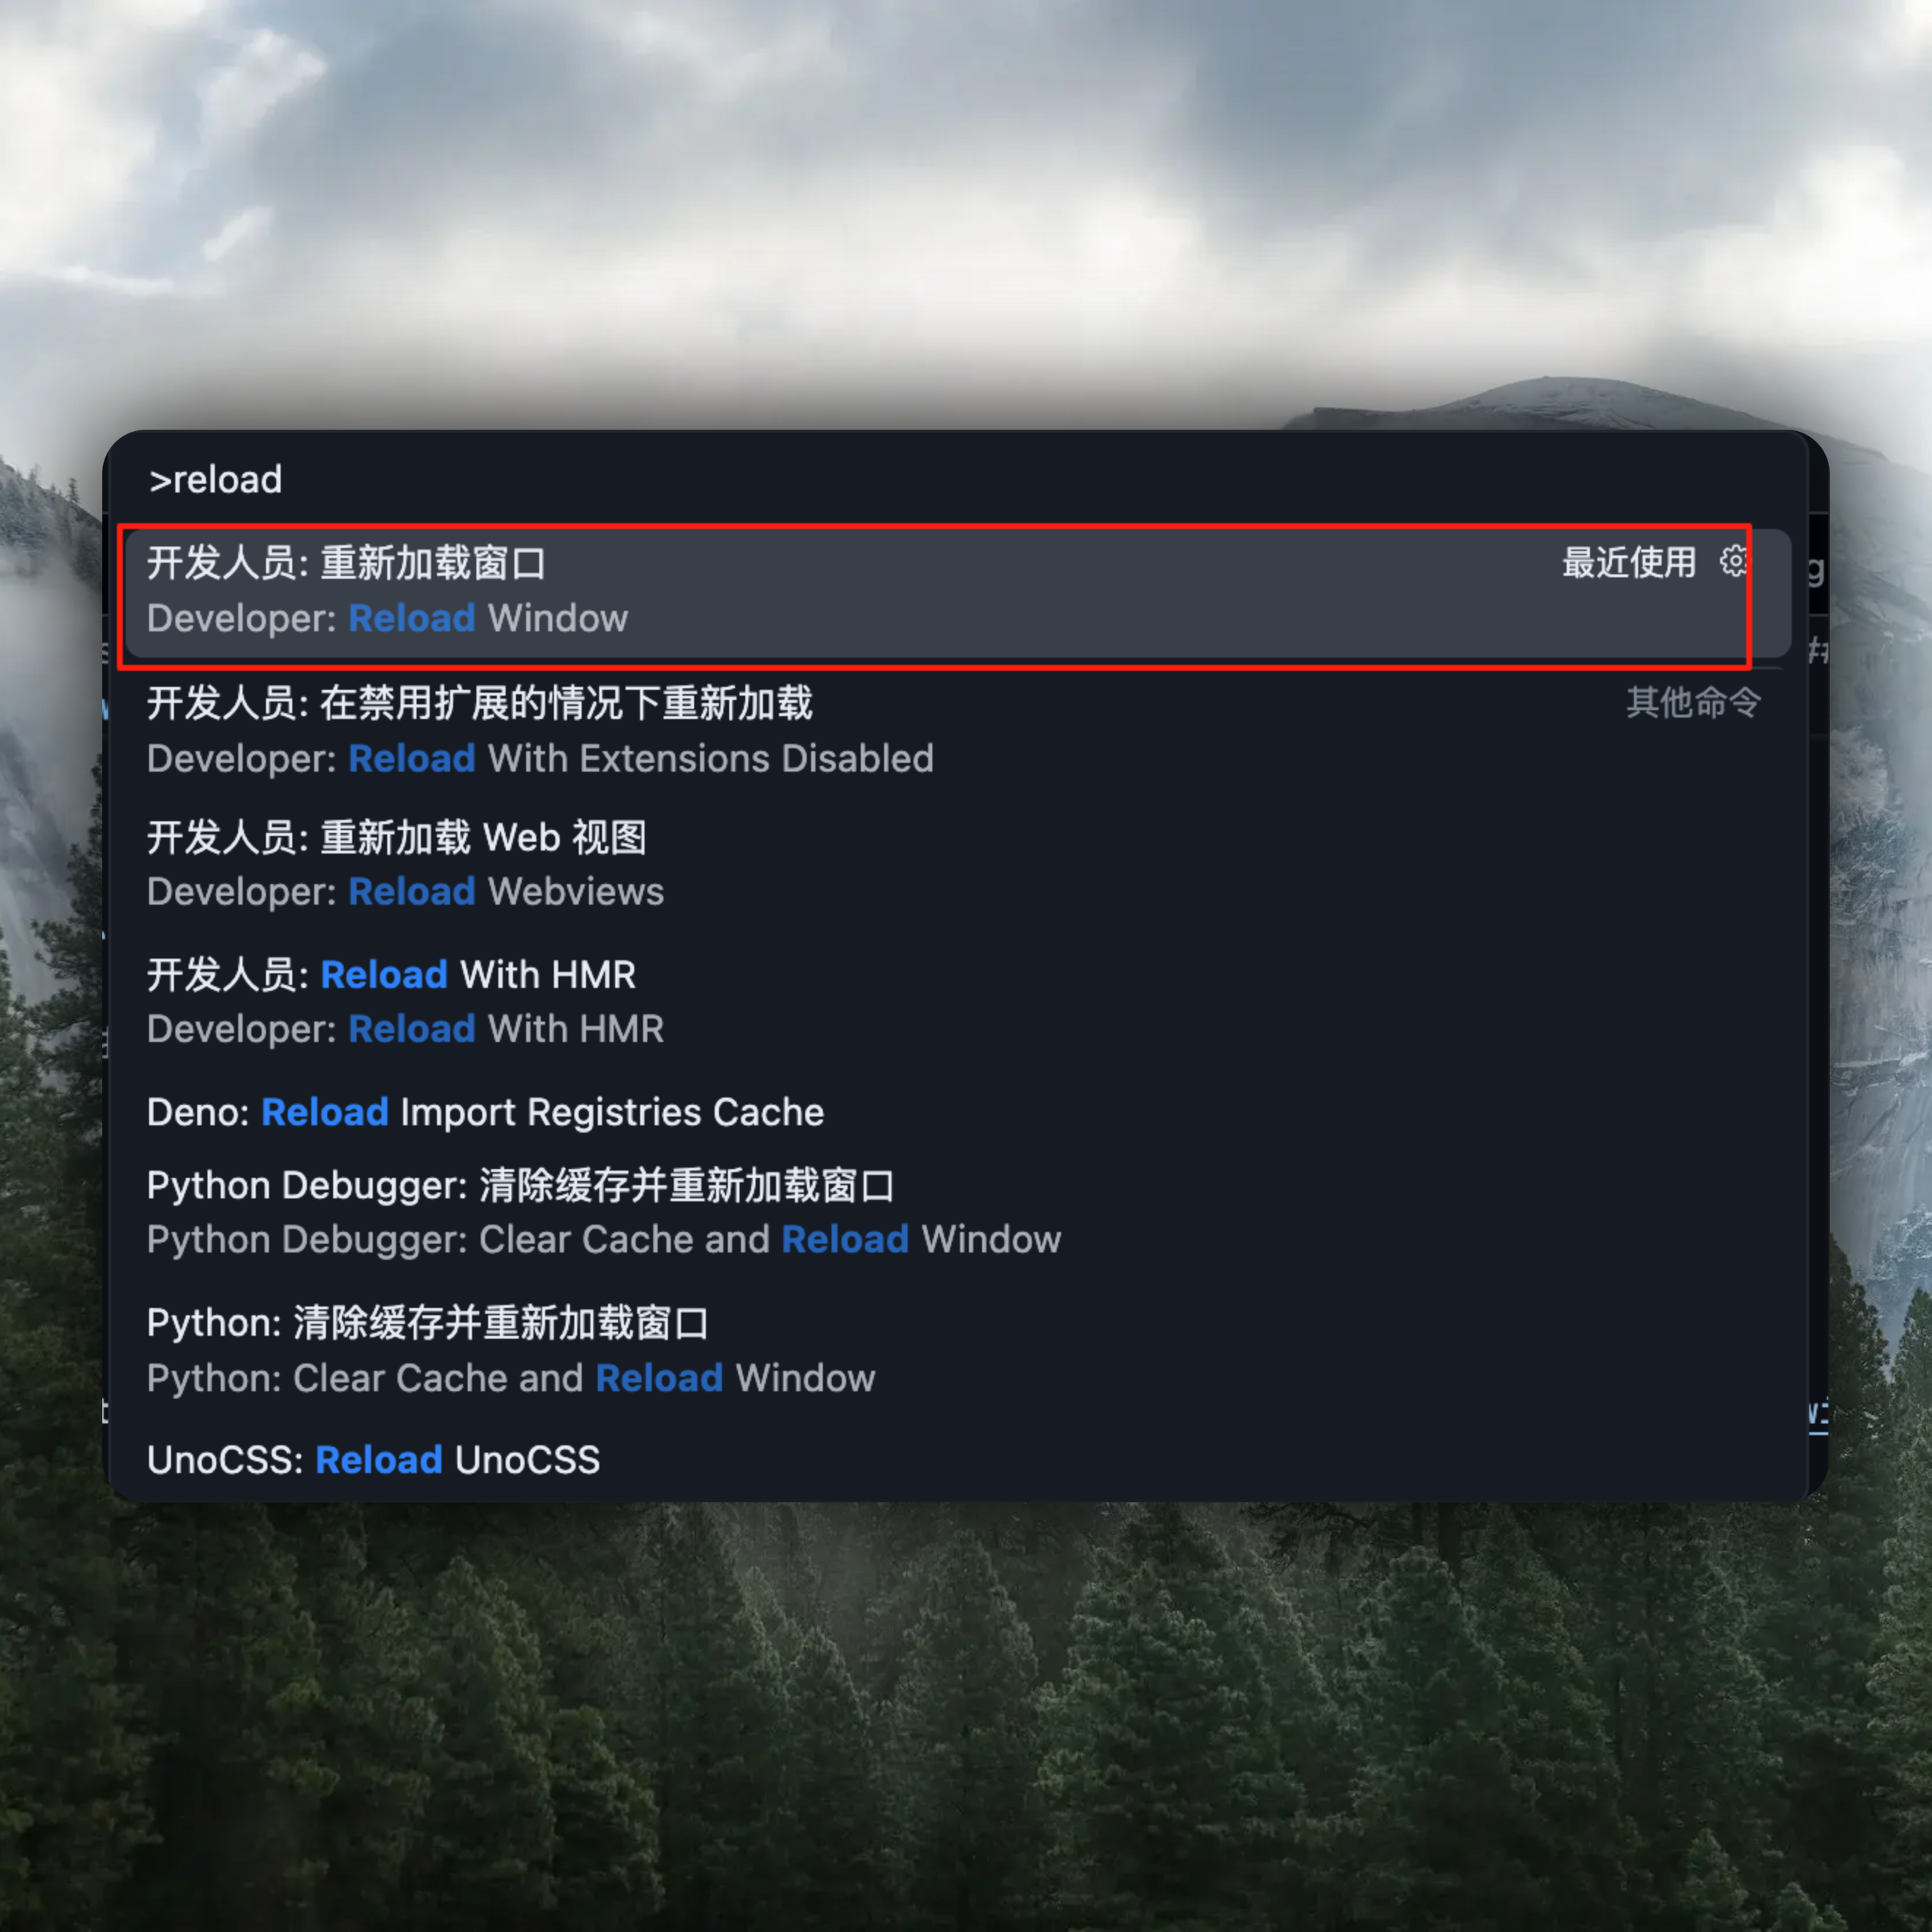
Select the default build project
1: Click here
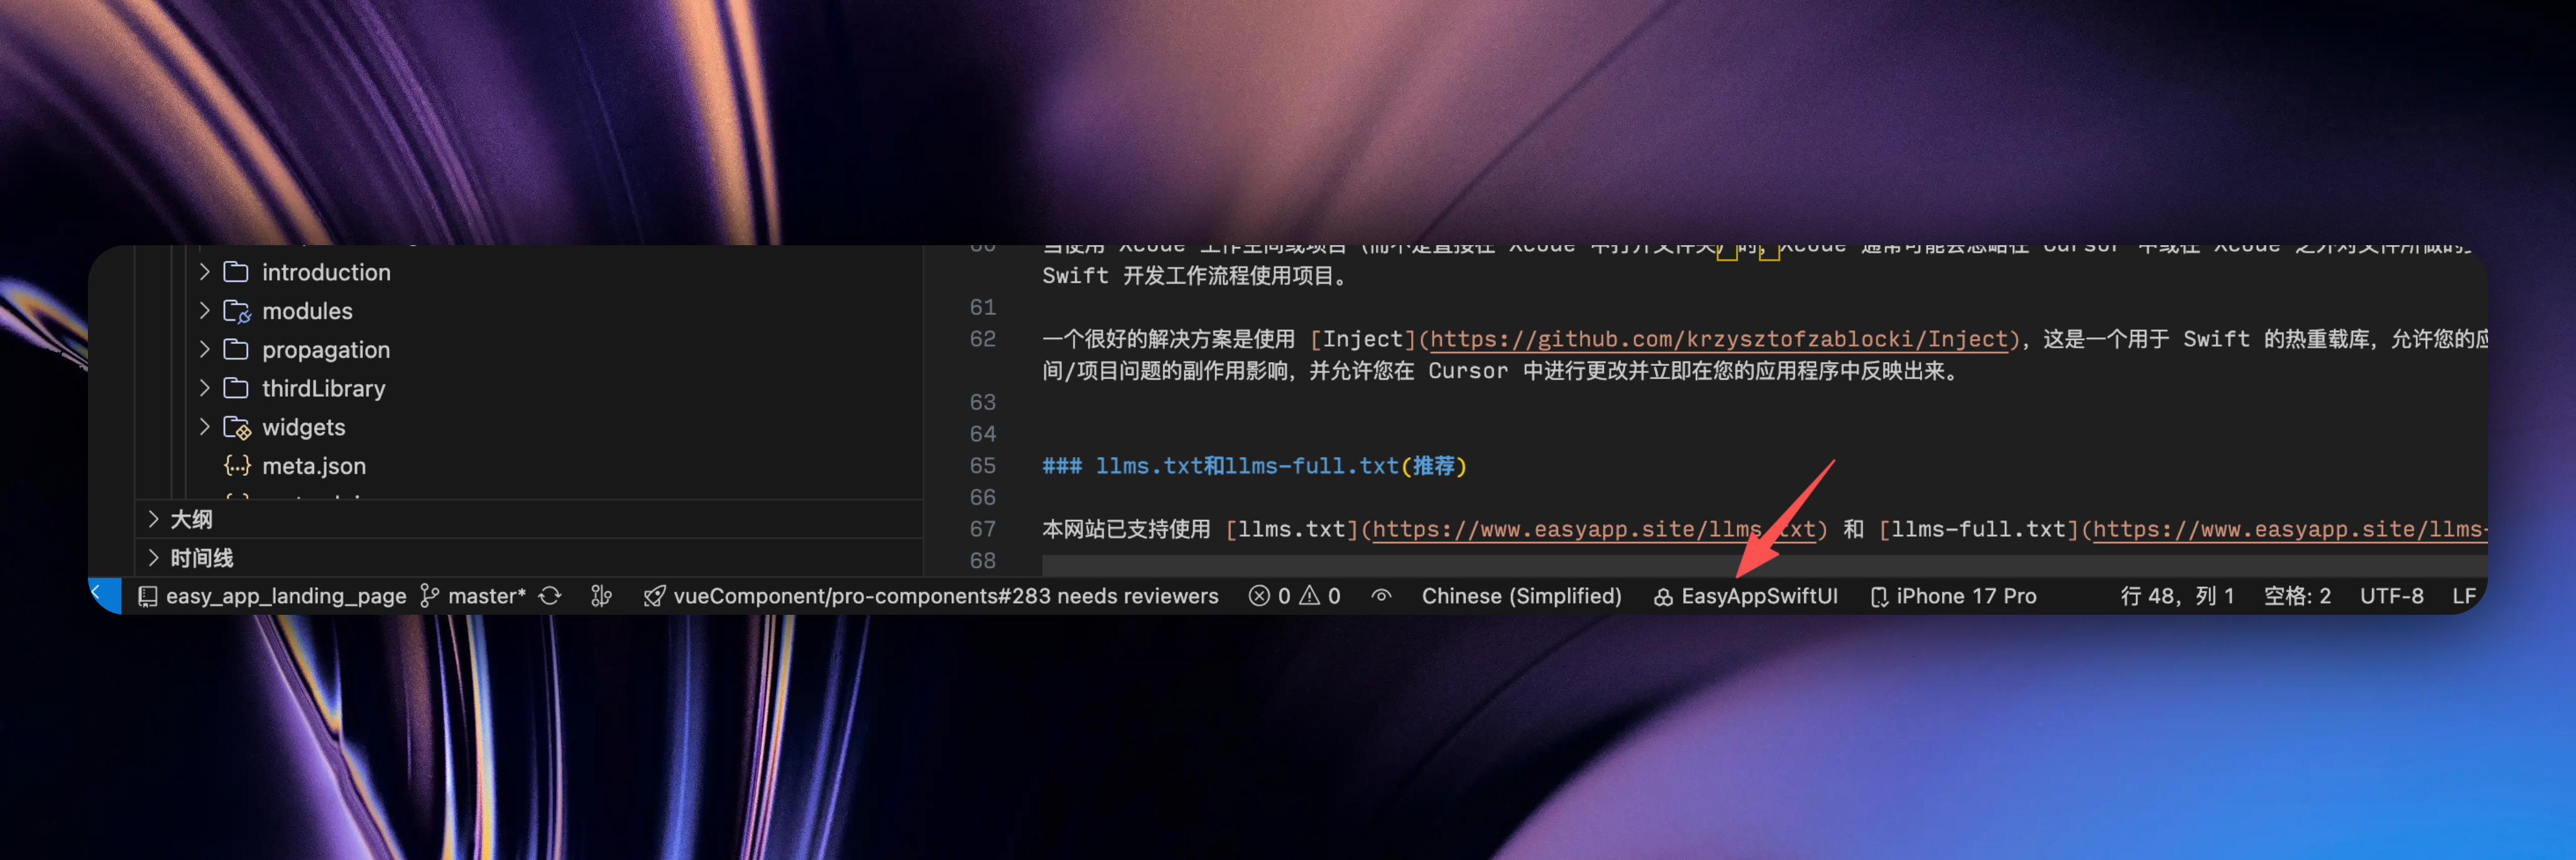
2: Select the default build project
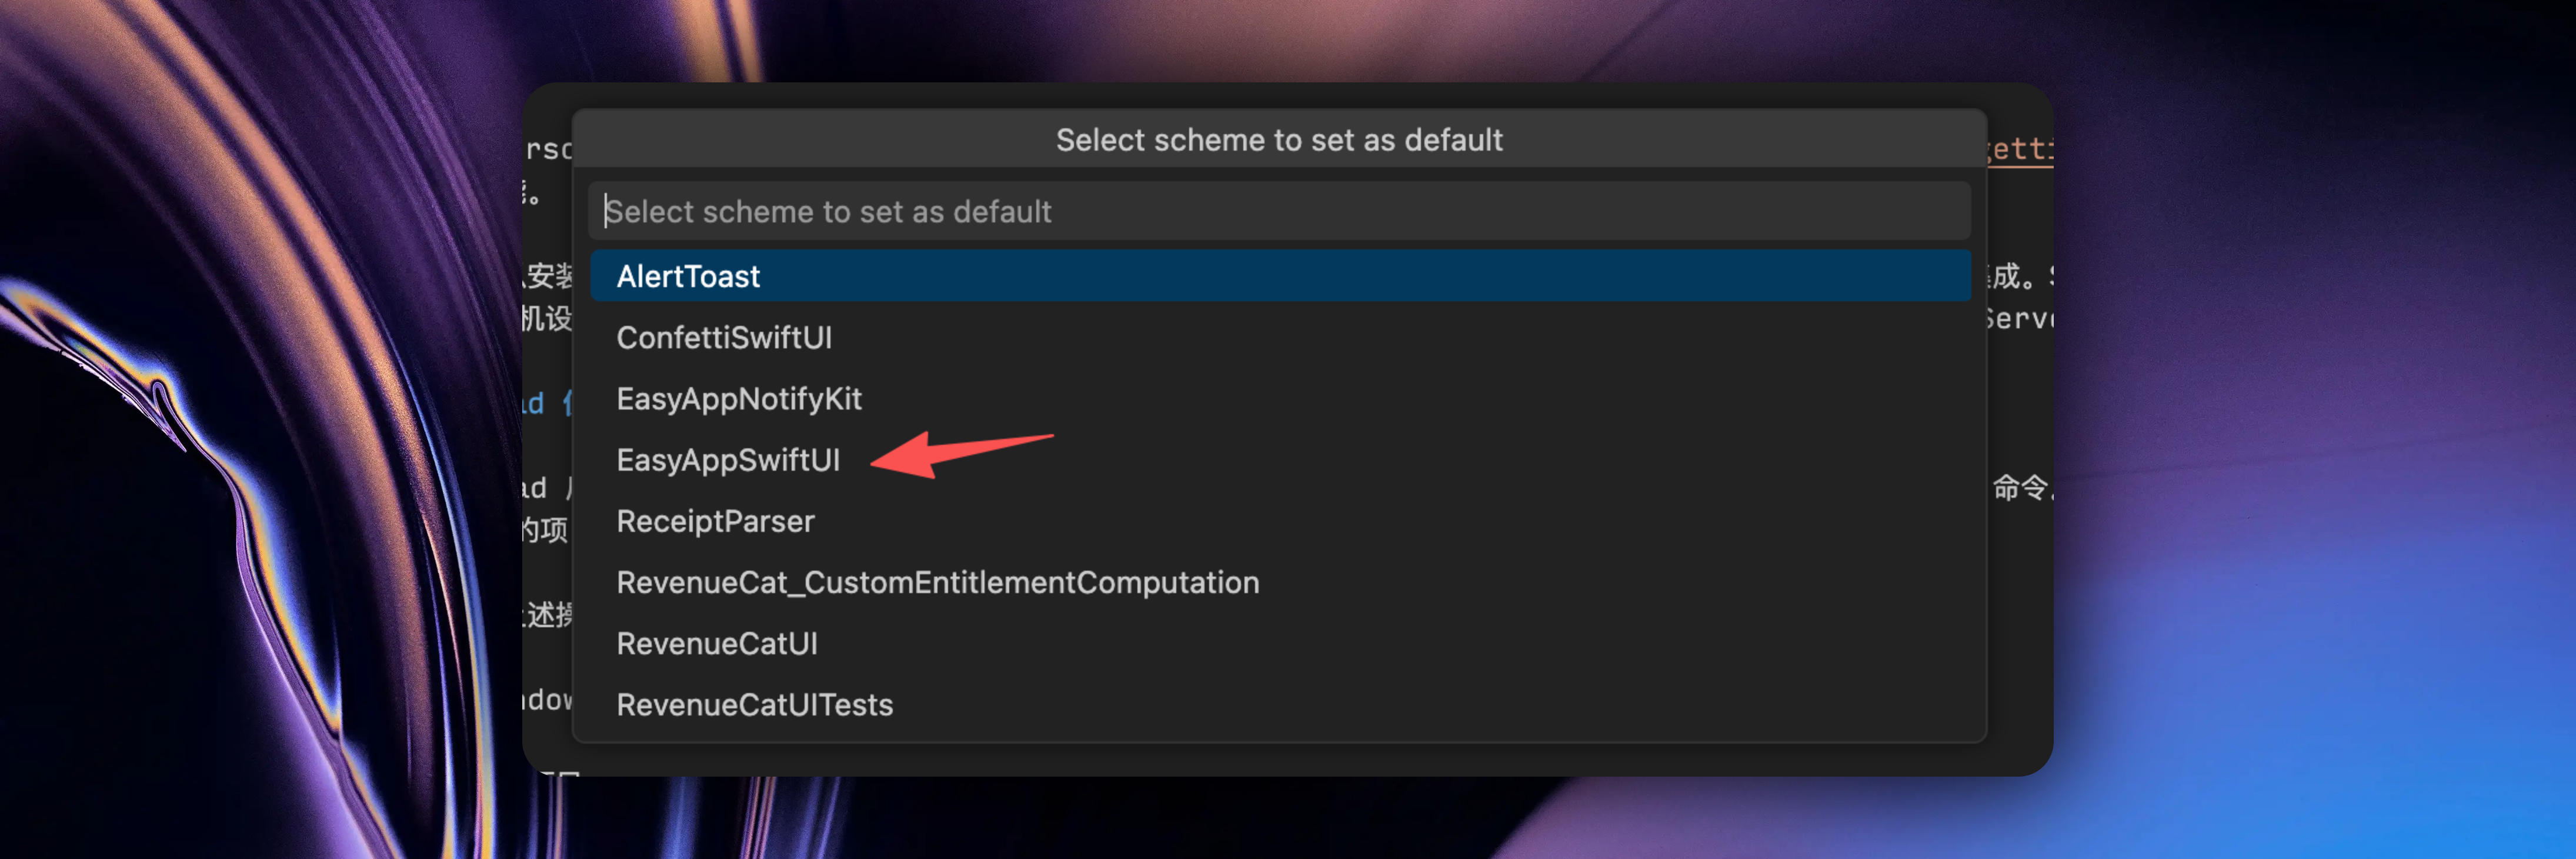
Then, from the command palette or Sweetpad sidebar, you can select the simulator/real device you want to build and run on.
For more Sweetpad information, please refer to:
* [Sweetpad Website](https://sweetpad.hyzyla.dev/docs/intro)
### Hot Reload
The current hot reload experience is not perfect yet. There are still some issues. This can be used as an alternative option, but we mainly recommend using Xcode Preview to preview your App.
When working with Xcode workspaces or projects (rather than opening folders directly in Xcode), Xcode may typically ignore changes made to files in Cursor or outside of Xcode. While you can open folders in Xcode to resolve this issue, you may need to use projects for Swift development workflows.
A great solution is to use [Inject](https://github.com/krzysztofzablocki/Inject), a hot reload library for Swift that allows your application to "hot reload" and update immediately after live changes. This is not affected by the side effects of Xcode workspace/project issues and allows you to make changes in Cursor and immediately reflect them in your application.
### llms.txt and llms-full.txt (Recommended)
This site supports using [llms.txt](https://www.easyapp.site/llms.txt) and [llms-full.txt](https://www.easyapp.site/llms-full.txt).
`llms-full.txt` contains all documentation content, while `llms.txt` contains a subset. Using these llms files can improve the accuracy of Cursor's AI model responses. They help the AI better understand the project context and code style/conventions, so during Vibe coding the generated code is less likely to go off track.
`llms-full.txt` contains more content than `llms.txt`, so when inputting into the AI context, it generally exceeds the context limit and gets truncated. Therefore, in most cases, we recommend using `llms.txt`.
There are several ways to use them:
#### 1. Quick Use
In the chat window, enter the following content and Cursor will use EasyApp's llms.txt/llms-full.txt.
```sh
@web https://www.easyapp.site/llms.txt
```
Or use llms-full.txt:
```sh
@web https://www.easyapp.site/llms-full.txt
```
#### 2. Permanent Setup
1. Press ⌘ CMD + ⇧ Shift + P
2. Type "Add new custom docs"
3. Add the following content:
```sh
https://daisyui.com/llms.txt
```
Or:
```sh
https://www.easyapp.site/llms-full.txt
```
4. Now in the chat window, you can type `@docs` and select EasyApp to provide EasyApp documentation for Cursor
#### 3. Project-Level Permanent Setup
Now EasyApp template supports project-level permanent setup, which you can view in the root directory `.cursor/rules`.
### Apple Docs MCP (Recommended Installation)
[Apple Docs MCP](https://github.com/kimsungwhee/apple-docs-mcp) - Access Apple's official development documentation, frameworks, APIs, SwiftUI, UIKit, and WWDC videos through the Model Context Protocol. Use AI natural language queries to search iOS, macOS, watchOS, tvOS, and visionOS documentation. Get Swift/Objective-C code examples, API references, and technical guides instantly in Claude, Cursor, or any MCP-compatible AI assistant.
### XcodeBuildMCP MCP (Recommended Installation)
[XcodeBuildMCP](https://github.com/cameroncooke/XcodeBuildMCP) - XcodeBuildMCP is a Model Context Protocol (MCP) server that exposes Xcode operations as tools and resources for AI assistants and other MCP clients. It's built with a modern plugin architecture, providing a comprehensive set of independent tools organized into directories by workflow, and offers MCP resources for efficient data access, enabling programmatic interaction with Xcode projects, simulators, devices, and Swift packages through a standardized interface.
## Summary
By combining Cursor with Xcode or Sweetpad, you can get a powerful AI-assisted development environment while maintaining all the necessary tools for Swift development. Whether you choose a simple editor switching workflow or a fully integrated Sweetpad solution, Cursor can significantly enhance your Swift development experience.
Next, we recommend you read \[Essential Considerations Before Development] to avoid Apple review risks.
} href="/docs/beforeDev/design">
Learn about essential considerations before development to avoid Apple review risks.
# Code Formatting
URL: https://easyapp.site/en/docs/codebase/codeFormatting
Code Formatting
***
title: Code Formatting
description: Code Formatting
icon: FileCode
--------------
Building 🚧 ...
# Project Structure
URL: https://easyapp.site/en/docs/codebase/projectStructure
Overview of the EasyAppSwiftUI boilerplate file and folder organization
***
title: Project Structure
description: Overview of the EasyAppSwiftUI boilerplate file and folder organization
icon: Folder
------------
## Project Overview
Since Apple has not officially provided a best practice for SwiftUI project structure so far, EasyApp has referenced numerous open-source projects and WWDC sample code, combined with our own experience, to provide a complete project structure that facilitates future iterability and maintainability of the entire project.
## Root Directory Structure
Main application modules containing all business logic pages
AI functionality example module
In-app purchase functionality module
User authentication module
Main interface module
User onboarding module
Settings page module
Core functionality library containing app's core services
Authentication management library
In-app purchase management library
Supabase integration library
Reusable UI component library
SwiftUI view modifiers
Swift type extensions
Utility classes and helper functions
Common modules and shared state
Application constant definitions
Color theme definitions
Custom style definitions
Application resource files
Localization resources
API requests
## Directory Descriptions
### Core Directories
* **App/**: Main functional modules of the application, divided into different subdirectories by functionality
* `AIExample/`: AI functionality examples and related pages
* `InAppPurchases/`: In-app purchase functionality implementation
* `LoginAndSignUp/`: User authentication flow
* `MainView/`: Application main interface
* `Onboarding/`: User onboarding flow
* `Settings/`: Application settings pages
* **Lib/**: Core functionality library providing basic services for the application
* `Auth/`: User authentication management
* `InAppPurchases/`: In-app purchase management (supports RevenueCat and StoreKit2)
* `Supabase/`: Supabase backend service integration
### UI Components and Styles
* **Components/**: Reusable UI component library
* **ViewModifier/**: SwiftUI view modifiers providing common view behaviors
* **Styles/**: Custom style definitions
* **Colors/**: Application color themes
### Tools and Extensions
* **Extension/**: Extension functionality for Swift native types
* **Utils/**: Utility classes and helper functions
* **Common/**: Common modules and application state management
* **Constants/**: Application constants and configuration
### Resource Files
* **Assets.xcassets/**: Application icons, images, and other resources
* **Resource/**: Localized string resources
# AppData Configuration
URL: https://easyapp.site/en/docs/configuration/AppData
Learn about AppData configuration
***
title: AppData Configuration
description: Learn about AppData configuration
icon: Cog
---------
## App Basic Information Configuration
* In EasyApp, we place some basic App information configuration in the enum `AppData`. In addition to the basic App information configured in the example, you can configure the keys you need here, such as other social platforms, contact information, etc.
* For appVersion, appBuildNumber, appName, appIdentifier, appDisplayName, you don't need to modify their values. They are generally used in the App's settings page, such as App version number, build version number, App name, App bundle identifier, App display name, etc.
}>
appVersion - App version number
appBuildNumber - App build version number
appName - App name
appIdentifier - App bundle identifier
appDisplayName - App display name
}>
supportEmail - Support email
xURL - X (Twitter) URL
websiteURL - App website URL
}>
privacyPolicyURL - Privacy policy URL
userAgreementURL - User agreement URL
termsOfServiceURL - Terms of service URL
```swift title="EasyAppSwiftUI/Constants/Constants.swift"
enum AppData {
// MARK: - Version
// This is a string value that is used to store the version of the app.
public static let appVersion =
Bundle.main.infoDictionary?["CFBundleShortVersionString"] as! String
// MARK: - Build Number
// This is a string value that is used to store the build number of the app.
public static let buildNumber = Bundle.main.infoDictionary?["CFBundleVersion"] as! String
// MARK: - App Name
// This is a string value that is used to store the name of the app.
public static let appName = Bundle.main.infoDictionary?["CFBundleName"] as! String
// MARK: - App Identifier
// This is a string value that is used to store the identifier of the app.
public static let appIdentifier = Bundle.main.infoDictionary?["CFBundleIdentifier"] as! String
// MARK: - App Build Number
// This is a string value that is used to store the build number of the app.
public static let appBuildNumber = Bundle.main.infoDictionary?["CFBundleVersion"] as! String
// MARK: - App Display Name
// This is a string value that is used to store the display name of the app.
public static let appDisplayName = Bundle.main.infoDictionary?["CFBundleDisplayName"] as! String
// MARK: - supportEmail
// your support email
public static let supportEmail = "your support email"
// MARK: - Website
// your website
public static let websiteURL = "app website url"
// MARK: - X
// your X
public static let xURL = "X(Twitter) url"
// MARK: - Privacy Policy
// your privacy policy
public static let privacyPolicyURL = "privacy policy url"
// MARK: - User Agreement
// your user agreement
public static let userAgreementURL = "user agreement url"
// MARK: - Terms of Service
// your terms of service
public static let termsOfServiceURL = "terms of service url"
// Your other configurations
...
}
```
Next, we recommend you read how to integrate more services
} href="/docs/Integrations/supabaseEdgeFuncton">
Learn how EasyApp integrates more services
# Basic Configuration Overview
URL: https://easyapp.site/en/docs/configuration
Introduction to EasyApp's basic configuration, including configuration files, configuration file structure, and usage.
***
title: Basic Configuration Overview
description: Introduction to EasyApp's basic configuration, including configuration files, configuration file structure, and usage.
icon: Folder
------------
Configuration file location
EasyApp's basic configuration is divided into two categories
* Business configuration
* App basic information configuration
## Business Configuration
Business configuration includes cache key definitions, RevenueCat configuration, Supabase configuration, StoreKit2 configuration, notification configuration, and other business requirements.
} href="/docs/configuration/userDefaults">
Configure cache keys for common user settings and the cache keys used by EasyApp.
} href="/docs/configuration/revenueCat">
Configure RevenueCat settings
} href="/docs/configuration/supabase">
Supabase configuration
## App Basic Information Configuration
App basic information configuration includes App version number, build version number, App name, App bundle identifier, App display name, App support email, App website URL, App X URL, App privacy policy URL, App user agreement URL, App terms of service URL, etc.
} href="/docs/configuration/AppData">
App basic information configuration
# Notifications
URL: https://easyapp.site/en/docs/configuration/notifications
How to centrally manage NotificationCenter notification names
***
title: Notifications
description: How to centrally manage NotificationCenter notification names
icon: Bell
----------
When using [NotificationCenter](https://developer.apple.com/documentation/foundation/notificationcenter), you need to configure notification names.
```swift
NotificationCenter.default.post(
name: "your notification name",
object: nil,
userInfo: ["your notification userInfo"]
)
```
We don't want the `NotificationCenter` `name` to be scattered throughout various parts of the project. We want to manage them centrally for better code organization. We agreed to put all `NotificationCenter` `name` in the project in the `EasyAppSwiftUI/Constants/Constants.swift` file.
```swift
enum Constants {
enum Notifications {
static let yourNotificationName = Notification.Name("your notification name")
}
}
```
# RevenueCat
URL: https://easyapp.site/en/docs/configuration/revenueCat
Learn how to configure RevenueCat apiKey, entitlementID, and ChinaProxyURL in the project
***
title: RevenueCat
description: Learn how to configure RevenueCat apiKey, entitlementID, and ChinaProxyURL in the project
icon: CreditCard
----------------
### Where to Configure RevenueCat Related Keys
The configuration code for RevenueCat is also in the `EasyAppSwiftUI/Constants/Constants.swift` file. Here you mainly need to understand where to configure RevenueCat apiKey, entitlementID, and ChinaProxyURL.
How to integrate RevenueCat step by step will be detailed in the [Integrations/RevenueCat](/docs/Integrations/RevenueCat) documentation.
```swift title="EasyAppSwiftUI/Constants/Constants.swift"
enum Constants {
// ... other configurations
enum RevenueCat {
/// The API key for your app from the RevenueCat dashboard: https://app.revenuecat.com
static let apiKey = "your revenuecat api key"
/// The entitlement ID from the RevenueCat dashboard that is activated upon successful in-app purchase for the duration of the purchase.
static let entitlementID = "your revenuecat entitlement id"
// Proxies & configuration for users in Mainland China
// https://www.revenuecat.com/docs/getting-started/configuring-sdk
static let ChinaProxyURL = "https://api.rc-backup.com/"
}
// ... other configurations
}
```
If you are a user in mainland China, you need to configure the ChinaProxyURL value.
```swift title="EasyAppSwiftUI/Constants/Constants.swift"
enum RevenueCat {
// This value is the proxy address officially provided by RevenueCat for using RevenueCat services in mainland China. Please do not modify.
static let ChinaProxyURL = "https://api.rc-backup.com/"
}
```
For more information about this, please refer to the [RevenueCat documentation](https://www.revenuecat.com/docs/getting-started/configuring-sdk#proxies--configuration-for-users-in-mainland-china).
### Learn More About RevenueCat Integration
} href="/docs/Integrations/RevenueCat">
Integrate RevenueCat service
# StoreKit2
URL: https://easyapp.site/en/docs/configuration/storeKit2
Learn how to configure StoreKit2 productIDs in the project
***
title: StoreKit2
description: Learn how to configure StoreKit2 productIDs in the project
icon: WalletCards
-----------------
If you don't want to use [RevenueCat](/docs/configuration/revenueCat) service, EasyApp also supports using the native StoreKit2 API to manage your in-app purchases.
### Where to Configure StoreKit2 Related Keys
The configuration code for StoreKit2 service is in the `EasyAppSwiftUI/Constants/Constants.swift` file. Here you mainly need to understand where to configure StoreKit2 productIDs.
How to integrate StoreKit2 step by step will be detailed in the [Integrations/StoreKit2](/docs/Integrations/StoreKit2) documentation.
```swift title="EasyAppSwiftUI/Constants/Constants.swift"
enum Constants {
// ... other configurations
/// StoreKit2 product IDs
/// Enter the product ID from App Store Connect here
enum StoreKit2 {
static let productIDs = ["your product ids"]
}
// ... other configurations
}
```
### Learn More About StoreKit2 Integration
} href="/docs/Integrations/StoreKit2">
Integrate StoreKit2 service
# Supabase
URL: https://easyapp.site/en/docs/configuration/supabase
Learn how to configure Supabase interface URL and key in the project
***
title: Supabase
description: Learn how to configure Supabase interface URL and key in the project
icon: Database
--------------
### Where to Configure Supabase Related Keys
The configuration code for Supabase service is in the `EasyAppSwiftUI/Constants/Constants.swift` file. Here you mainly need to understand where to configure Supabase URL and key.
How to integrate Supabase step by step will be detailed in the [Integrations/Supabase](/docs/Integrations/Supabase) documentation.
```swift title="EasyAppSwiftUI/Constants/Constants.swift"
enum Constants {
// ... other configurations
enum Supabase {
#if DEBUG
/// Local development supabase url
static let url = "http://127.0.0.1:54321"
#else
/// Production supabase url
static let url = "your supabase url"
#endif
/// The API key of your Supabase project
static let key = "your supabase api key"
}
// ... other configurations
}
```
During development, it's recommended to set up a local Supabase service with a fixed URL of `http://127.0.0.1:54321`.
If you use a real device for testing, you need to replace the url with your ip address `http://your_ip_address:54321`.
After the development phase is complete, you need to go through the process in the production environment to ensure that the Supabase service can be used normally in the production environment. The production environment URL is the URL you applied for on the Supabase official website.
How to set up local Supabase service and how to integrate Supabase service will be detailed in the [Integrations/Supabase](/docs/Integrations/Supabase) documentation.
### Learn More About Supabase Integration
} href="/docs/Integrations/Supabase">
Integrate Supabase service
# UserDefaults
URL: https://easyapp.site/en/docs/configuration/userDefaults
Configure cache keys for common user settings and the cache keys used by EasyApp.
***
title: UserDefaults
description: Configure cache keys for common user settings and the cache keys used by EasyApp.
icon: User
----------
EasyApp uses UserDefaults to store common user settings. For example, whether the onboarding flow has been shown, the current user's login status, the current user's selected language, etc.
Throughout the App's lifecycle, EasyApp uses the @AppStorage property wrapper to store UserDefaults values and injects them into the entire App using the .environmentObject method in the root view.
You can use the @EnvironmentObject property wrapper to access your stored UserDefaults in any view of the App.
Thanks to the @AppStorage feature, you can also modify UserDefaults values in any view, so when other views use a certain property, the page will automatically update.
Of course, you can also customize the keys that your business needs to cache. You just need to add them to EasyApp's configuration file.
```swift title="EasyAppSwiftUI/Constants/Constants.swift"
enum Constants {
// MARK: - UserDefaults
enum UserDefaults {
// MARK: - isOnboarding
// This is a boolean value that is used to store whether the user has completed the onboarding process.
static let onboardingState = "onboardingState"
// MARK: - accessToken
// This is a string value that is used to store the user's access token.
static let accessToken = "accessToken"
// MARK: - selectedTab
// This is an integer value that is used to store the selected tab.
static let selectedTab = "selectedTab"
}
// MARK: - Other Keys
}
```
# ICP Filing
URL: https://easyapp.site/en/docs/deployment/ICPFiling
Learn about the ICP filing process for Apps in Mainland China.
***
title: ICP Filing
description: Learn about the ICP filing process for Apps in Mainland China.
icon: HardDriveUpload
---------------------
## Policy Background
In July 2023, the Ministry of Industry and Information Technology (MIIT) issued the [Notice on Carrying Out Mobile Internet Application Filing Work](https://www.gov.cn/zhengce/zhengceku/202308/content_6897341.htm), requiring all mobile applications providing services within China to complete filing. Apps without filing will not be allowed to provide services.
### Filing Requirements
According to the official notice, App organizers need to handle the process as follows:
* **Filing Location**: Submit procedures to the provincial communications administration bureau where the organizer's residence is located
* **Filing Method**: Through network access service providers or App distribution platforms, using the National Internet Basic Resource Management System for online applications
* **Processing Flow**: Online submission of applications and verification review
## Filing Solution Options
### Self-Service Filing vs Service Provider Agency
Theoretically, you can handle the process directly through the National Internet Basic Resource Management System. However, due to the complex procedures, extensive documentation requirements, and high error rates for first-time applicants, this often leads to application failures.
**Recommended Solution**: Choose agency services through "Network Access Service Providers" such as Alibaba Cloud, Tencent Cloud, Huawei Cloud, etc.
### Service Provider Selection Recommendations
* If you already have domains or servers with a cloud service provider, choose that platform directly
* If not, you can choose any provider for processing
The following uses Alibaba Cloud as an example to introduce the specific operation process.
## Preliminary Preparation
### Required Resources
Two basic resources need to be prepared before processing:
1. **Domain**: Purchase from Alibaba Cloud Wanwang
2. **Cloud Server**: Purchase cloud resources that meet requirements
> 📝 **Important Reminder**: These resources are only necessary conditions for processing and don't necessarily need to be actually used.
### Domain Purchase Guide
**Selection Strategy**:
* For actual use: Carefully select and purchase domains that meet your needs
* For filing purposes only: Choose the cheapest option, such as .top domains (annual fee of a few yuan)
⚠️ **Important Notes**: Read the instructions carefully when purchasing to avoid selecting domain suffixes that cannot be used for filing.
### Cloud Server Procurement
Refer to the "Cloud Servers Supporting ICP Filing and Internet Information Service Quantity Table" to select appropriate configurations.
**Recommended Configuration**:
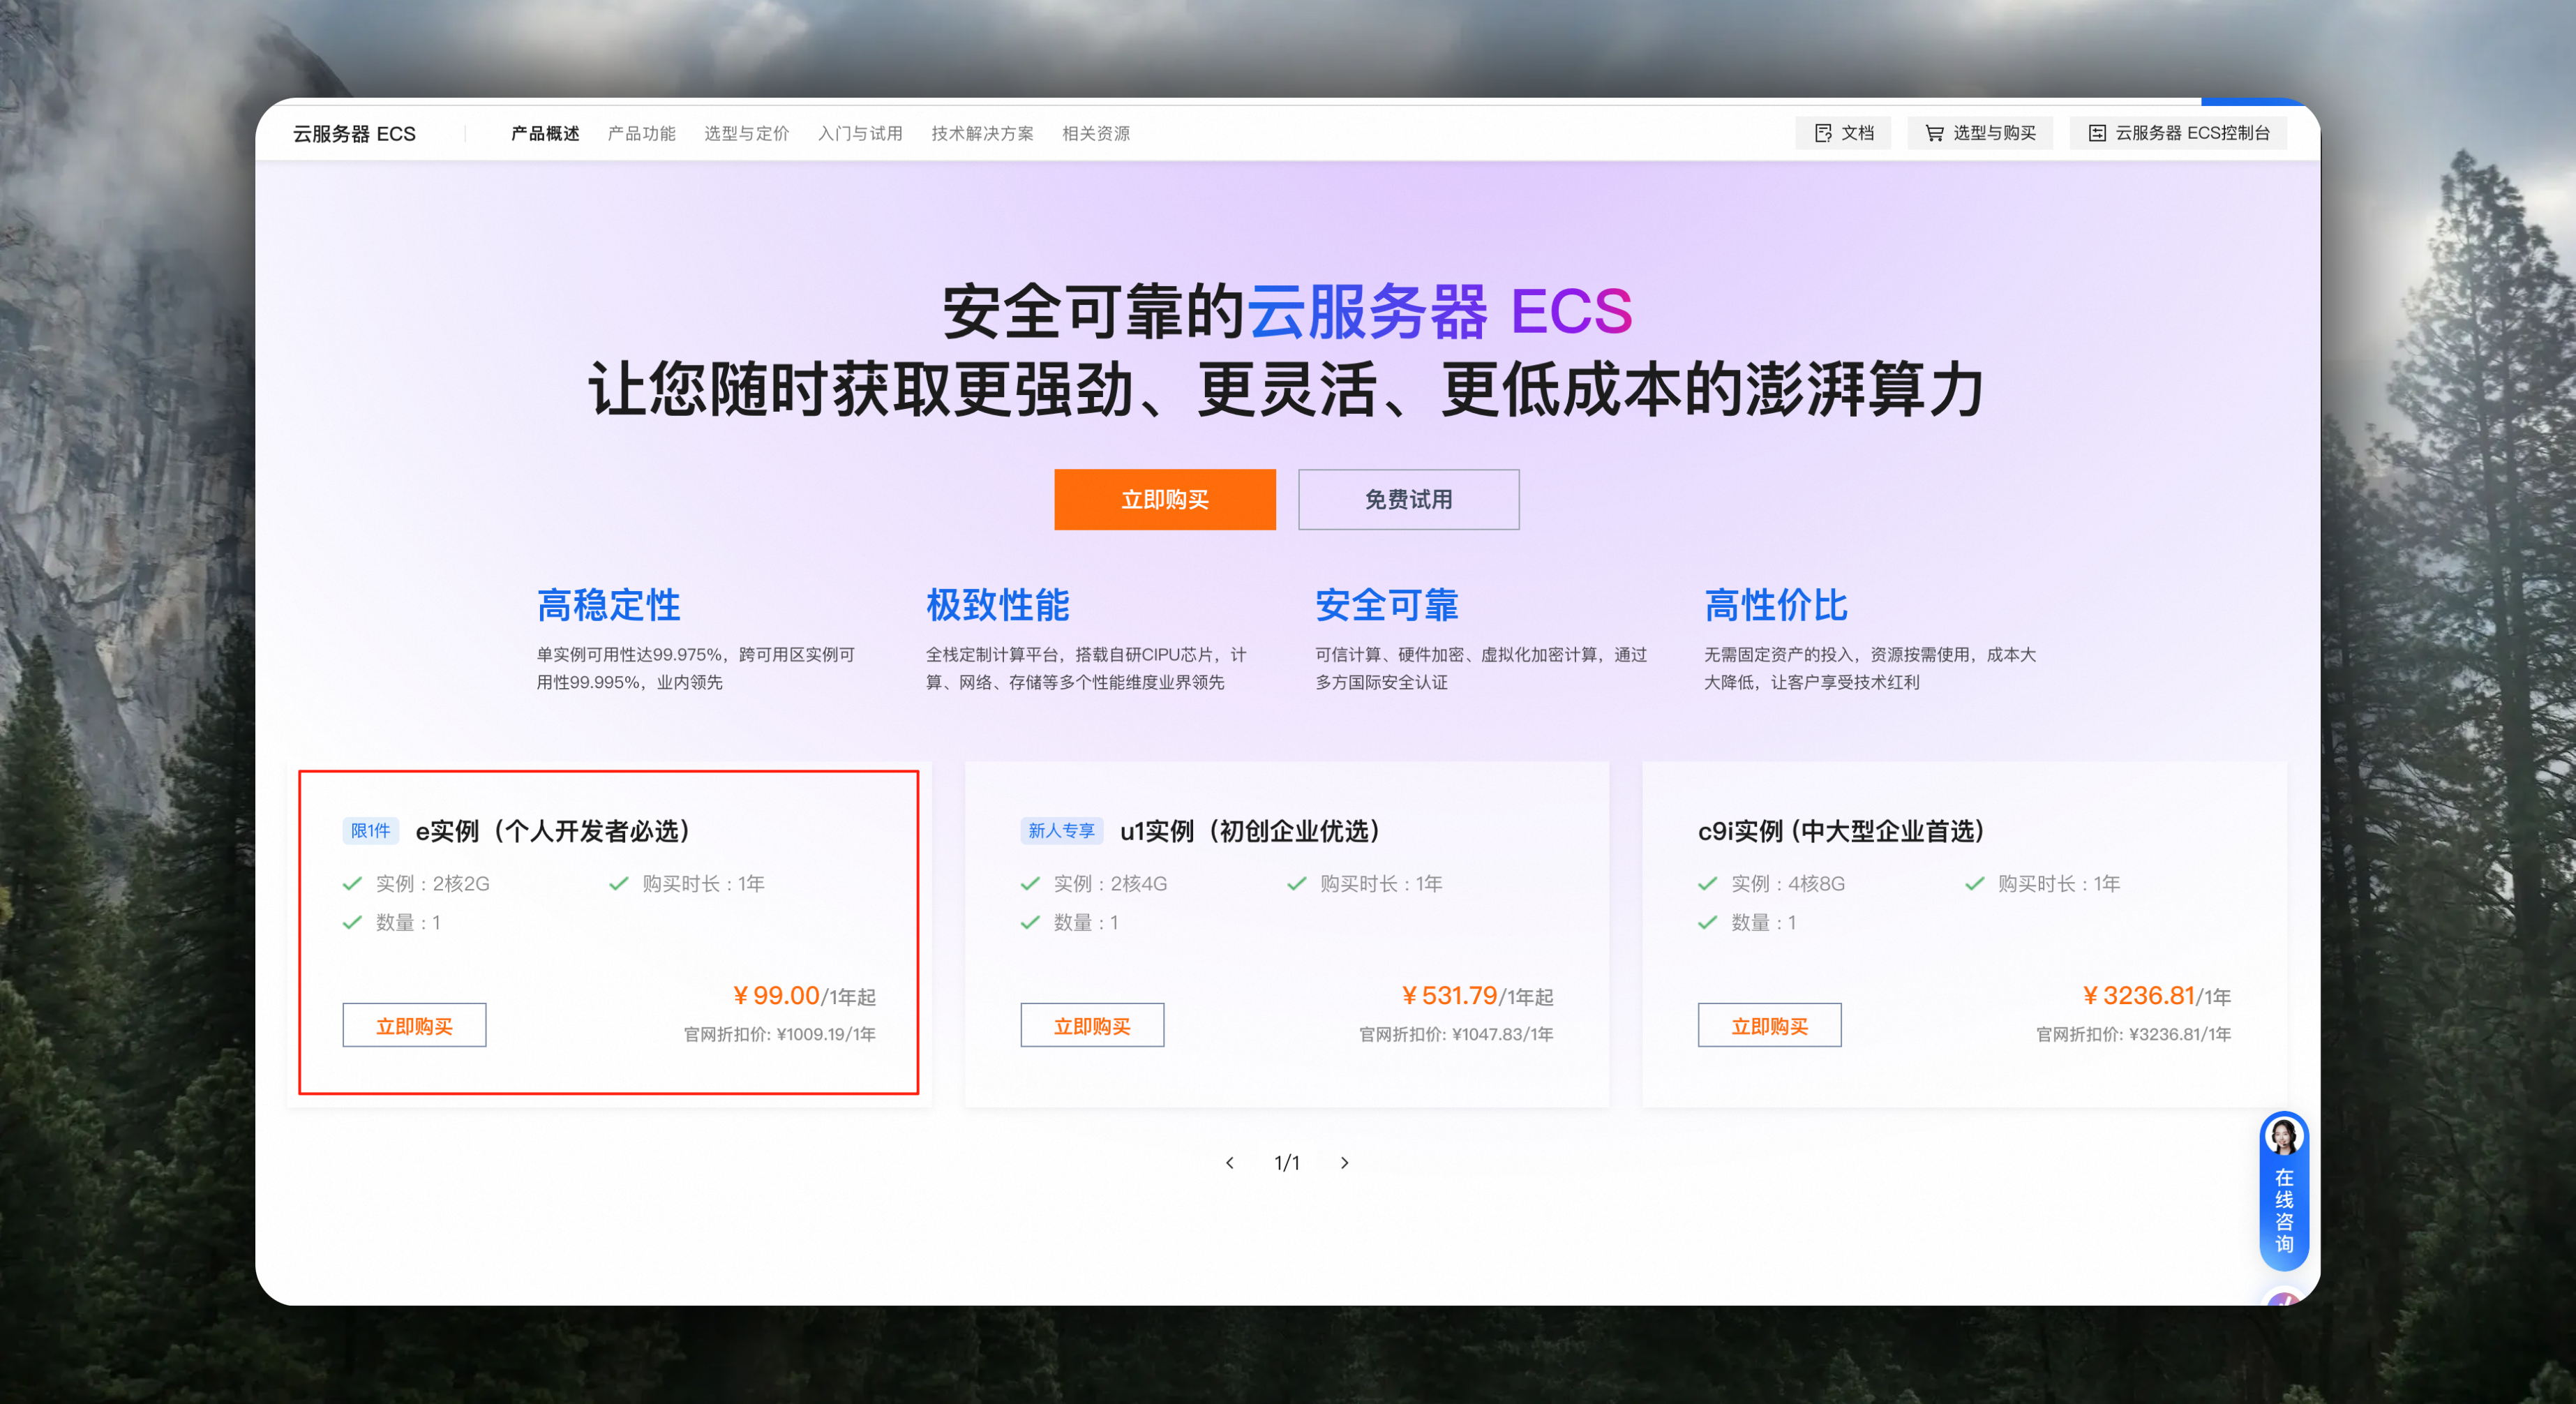
* **Lightweight Application Server**: 2-core 2GB configuration meets requirements, 99 yuan/year for new users, cheaper if you can get flash sale prices
* **Cost-effectiveness**: One server can be associated with up to 5 Apps
💰 **Total Cost Estimate**: Domain + cloud server approximately 100 yuan
## Operation Process
### Step 1: Submit Application
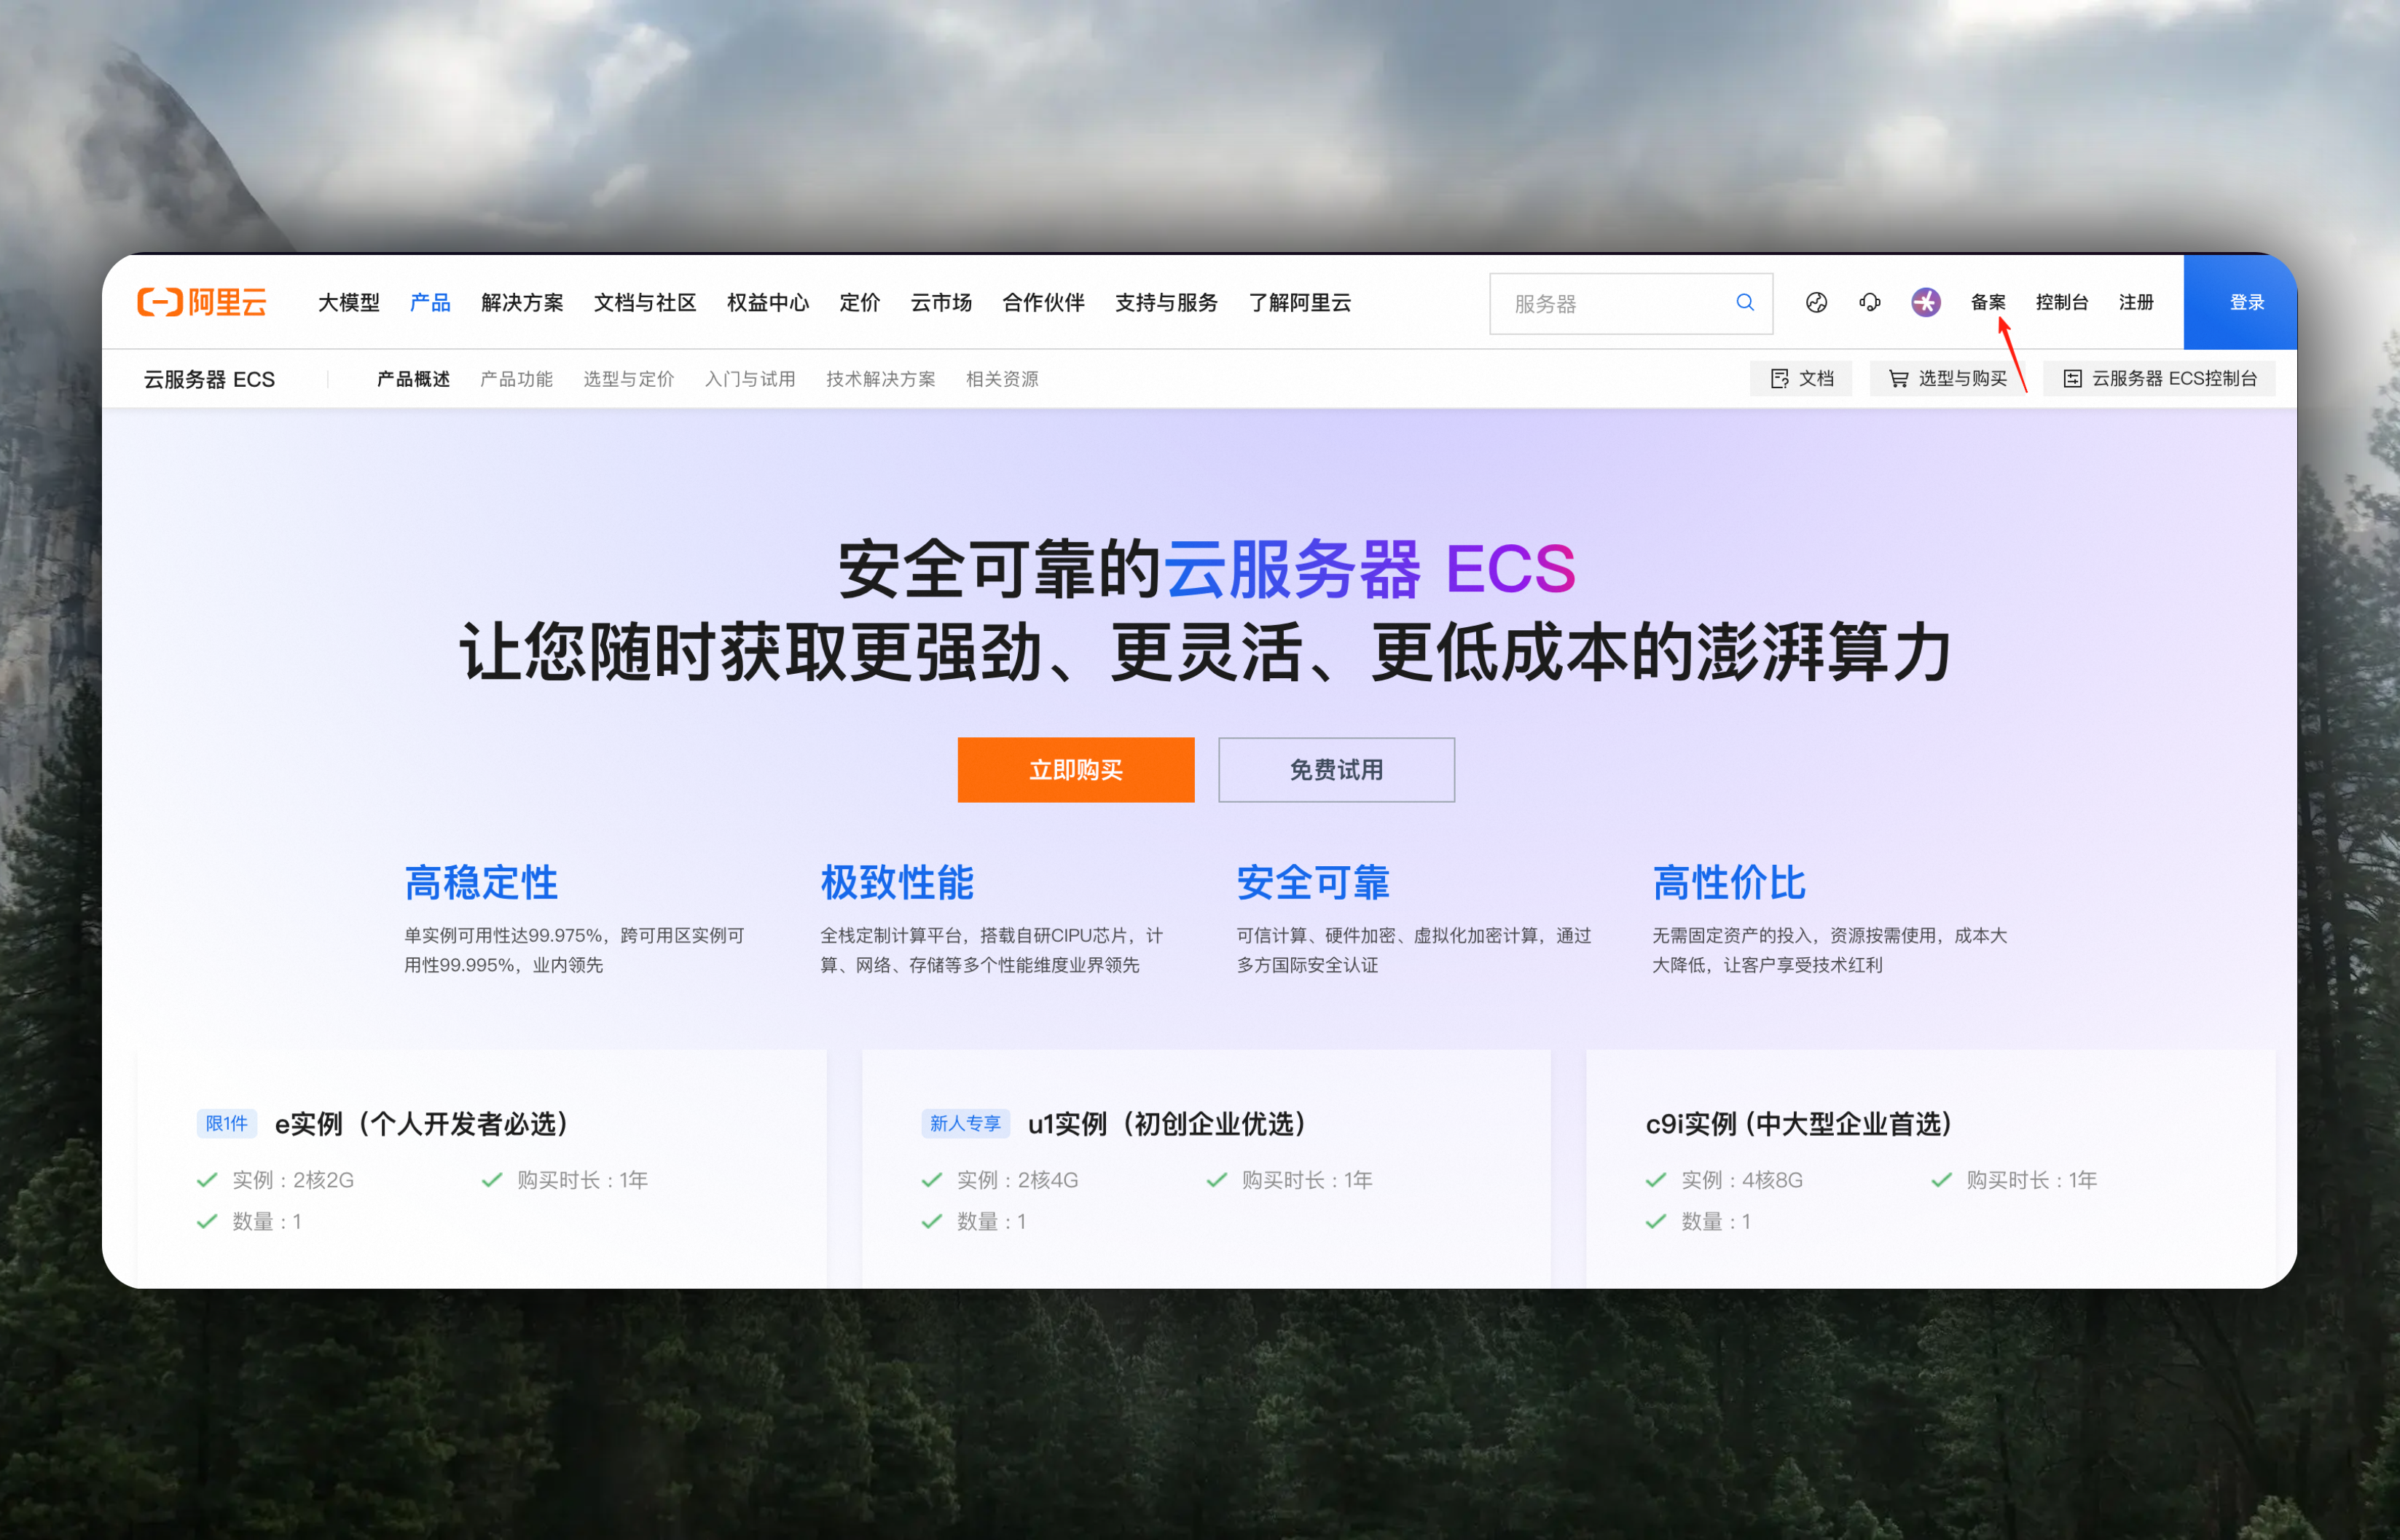
1. Visit Alibaba Cloud official website, click "Filing" button in the upper right corner
2. Fill in relevant information following page guidance
3. Associate purchased domains and cloud resources
4. Complete real-person authentication
5. Submit application materials
### Step 2: Wait for Review
**Review Stages**:
1. **Initial Review Call**: Alibaba Cloud customer service will call to verify information
2. **Data Synchronization**: Newly purchased resources may need to wait 2 days for data synchronization
3. **Bureau Review**: Alibaba Cloud submits to the bureau for final review
4. **Result Notification**: Review results are notified via SMS
The advantage of choosing professional service providers is simplified processes, reduced error rates, and good cooperative relationships with bureaus, theoretically eliminating application failures.
## App Store Configuration
### Final Step: Fill in Filing Information
The filing name must match the App name in App Store Connect exactly, including spaces and punctuation marks. This is very important, otherwise your filing number will not pass App Store Connect verification.
When entering the filing number in App Store Connect, pay special attention:
**Common Issue**: Directly filling in the number from the bureau SMS may prompt "ICP filing number does not match Ministry of Industry and Information Technology (MIIT) records."
**Solution**:
1. Visit the MIIT filing query system
2. Query your filing information
3. Copy the complete filing number from "ICP Filing Service Information" (usually with -1A suffix)
4. Enter the complete filing number into App Store Connect
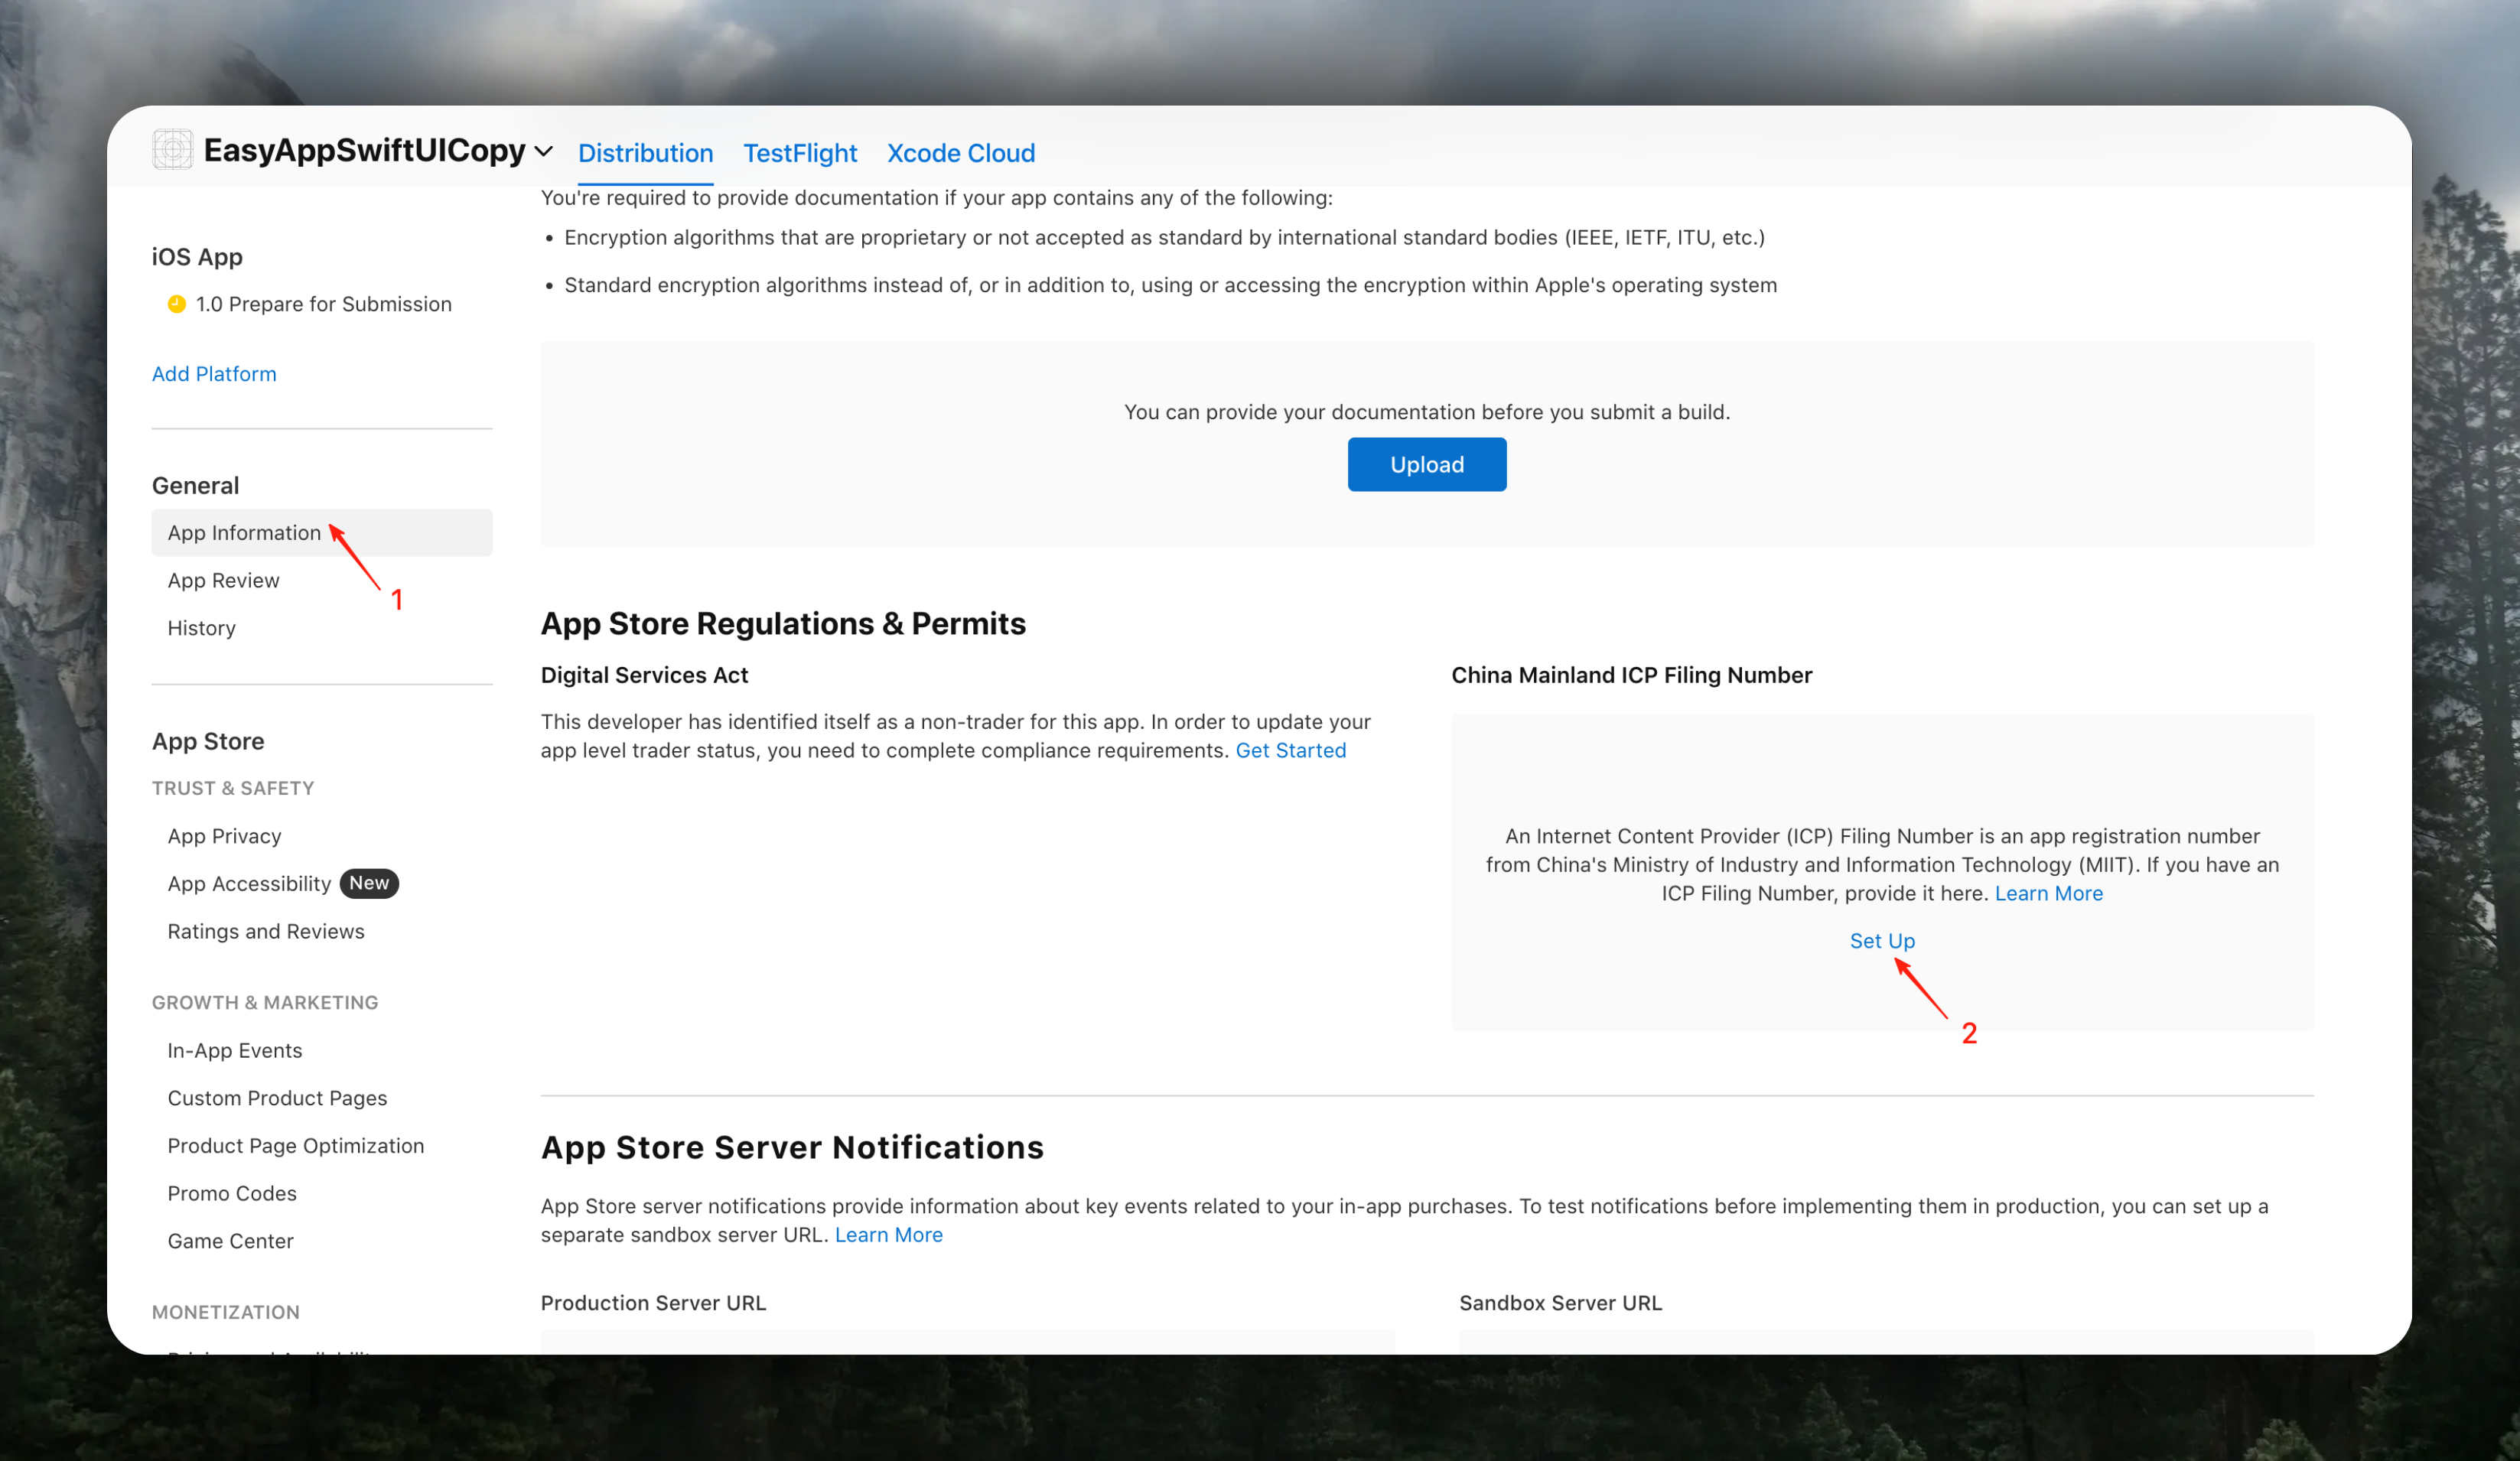
At this point, your App Store mainland China ICP filing process is completely finished.
# Publish Your App to App Store
URL: https://easyapp.site/en/docs/deployment/appstore
Publish Your App to App Store
***
title: Publish Your App to App Store
description: Publish Your App to App Store
icon: Apple
-----------
Before reading this chapter, please ensure you have completed [Building Your App](/docs/deployment/buildApp).
## Publishing Process Overview
| Step | Action | Jump |
| :--: | :----------------------------------- | :-------------------------------------------------- |
| 1 | Upload App to App Store Connect | [View Details](#1-upload-app) |
| 2 | Select Build Version | [View Details](#2-select-build-version) |
| 3 | Configure Encryption Declaration | [View Details](#3-configure-encryption-declaration) |
| 4 | Fill App Metadata | [View Details](#4-fill-app-metadata) |
| 5 | Configure Agreement Links (Required) | [View Details](#5-configure-agreement-links) |
| 6 | Submit for Review | [View Details](#6-submit-for-review) |
***
## 1. Upload App
After completing [Building Your App](/docs/deployment/buildApp), click `App Store Connect` and Xcode will handle the upload automatically.
After Xcode finishes uploading, you will see the following interface:
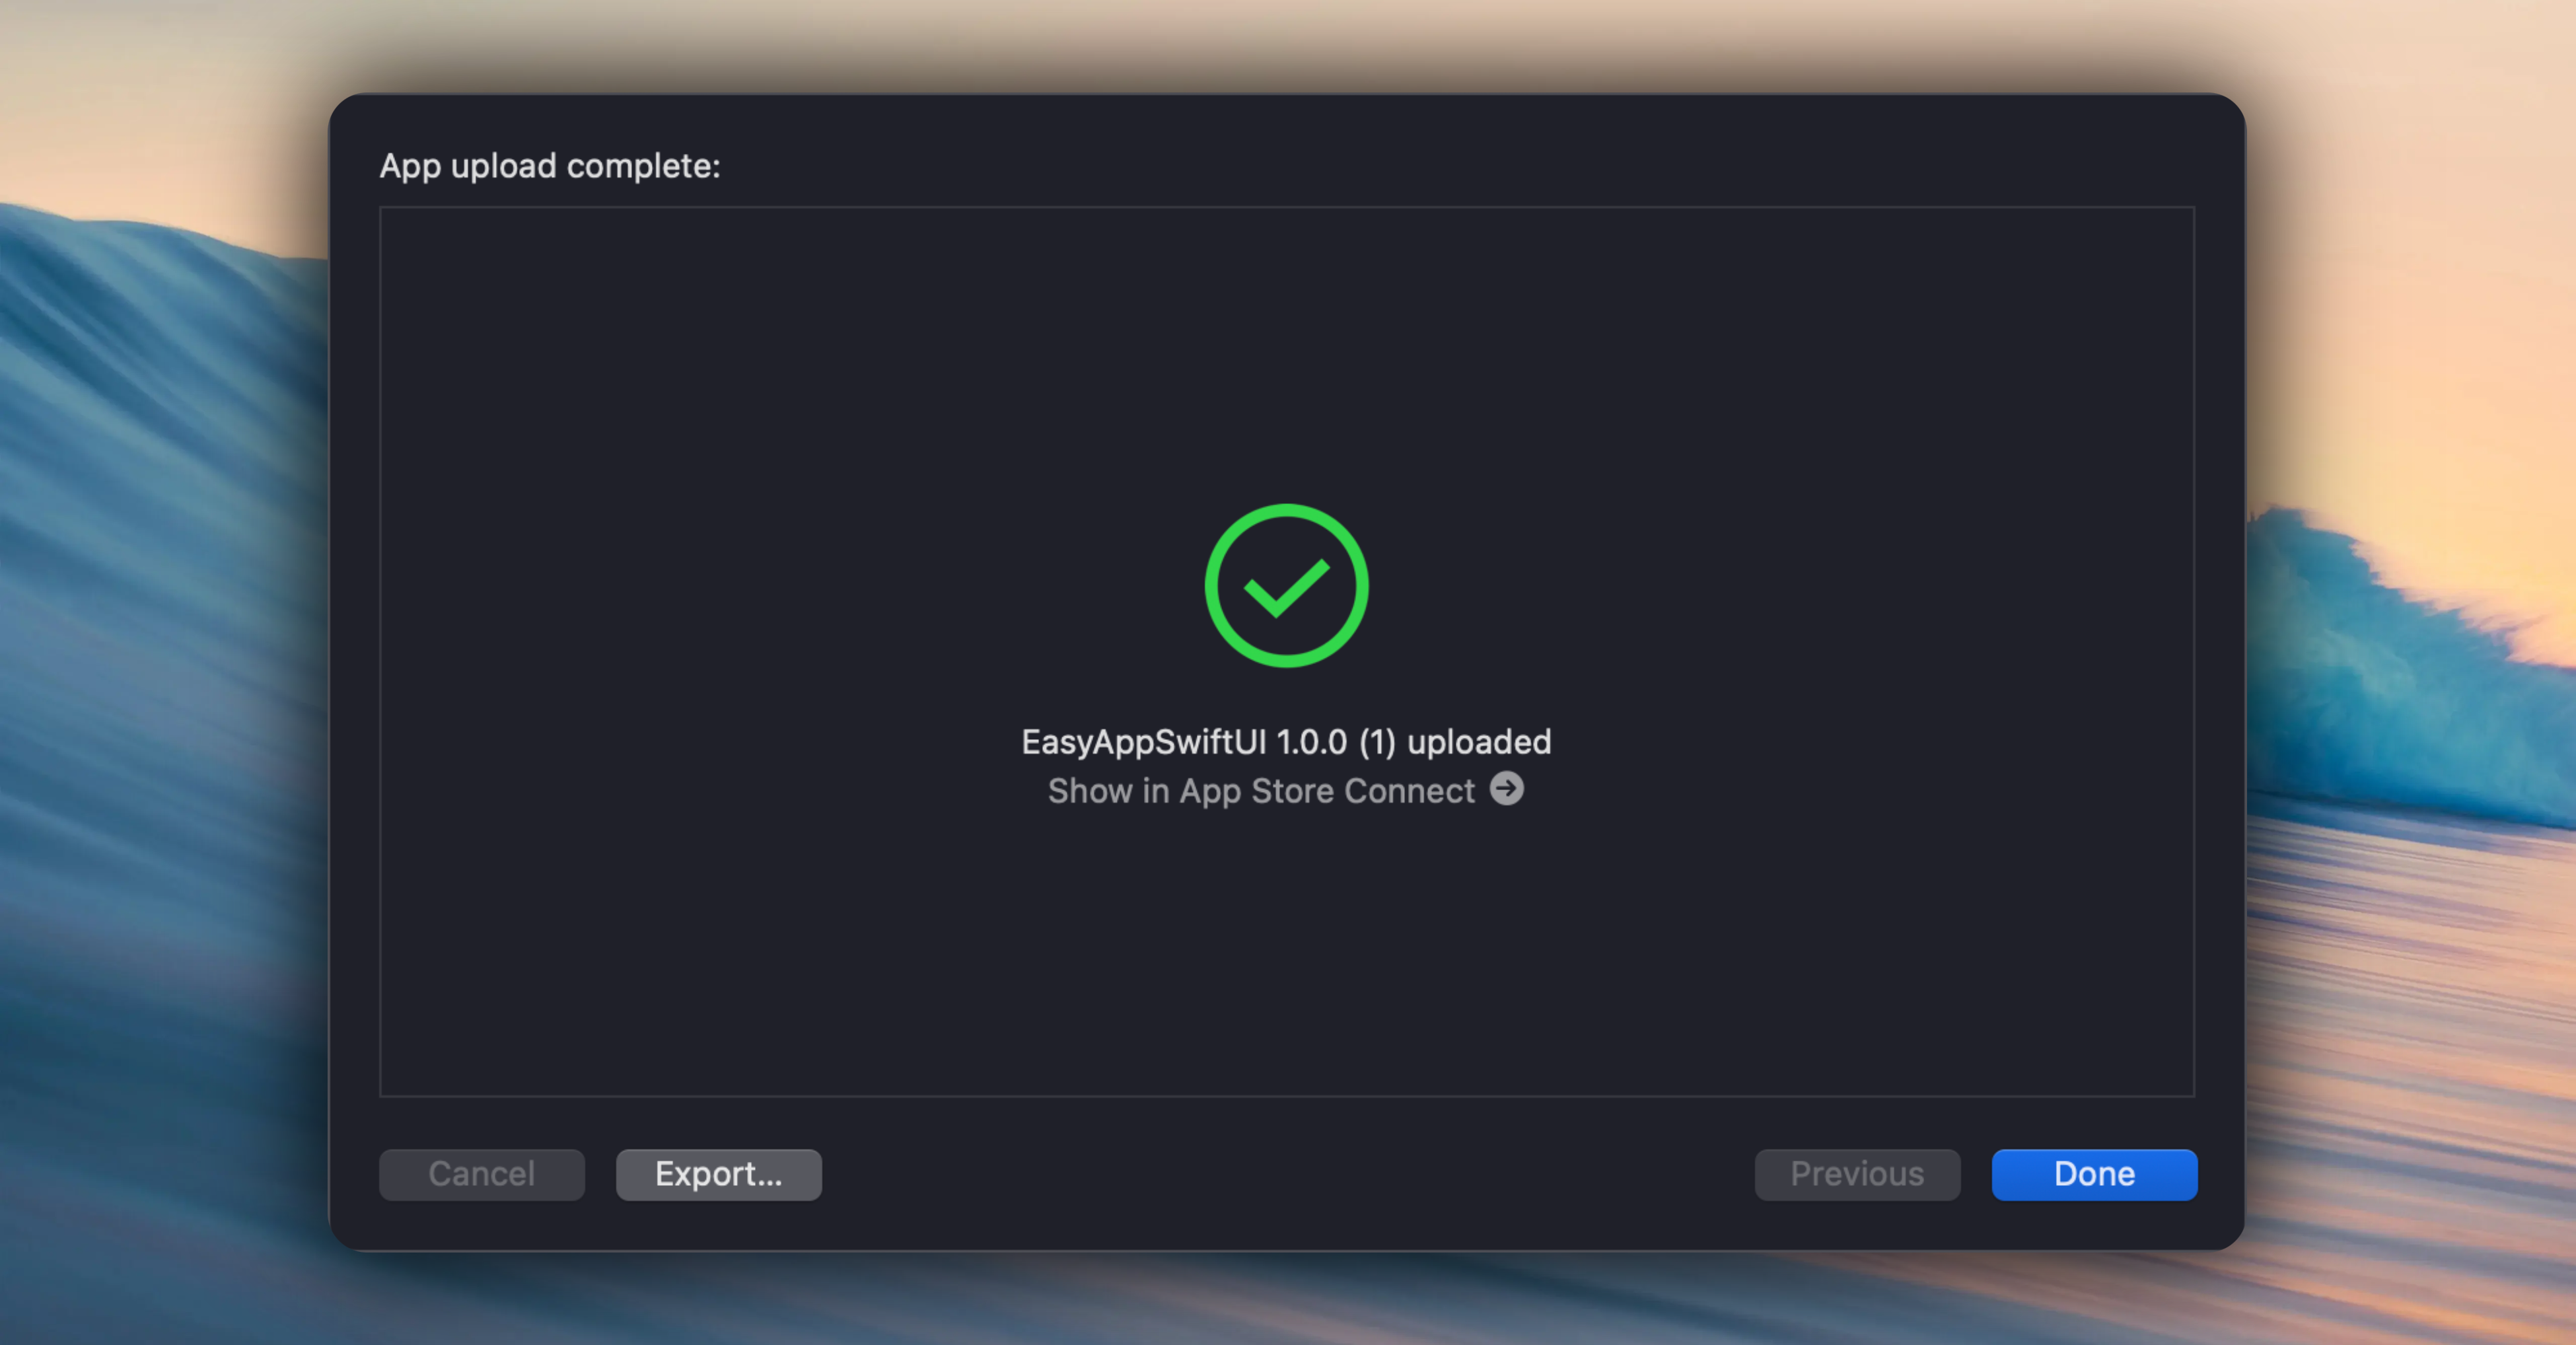
***
## 2. Select Build Version
Since we already created an App in the [In-App Purchases](/docs/Integrations/RevenueCat) chapter, we only need to add necessary information for review.
### 2.1 Select the successfully uploaded Build version

### 2.2 Click the `Done` button to confirm
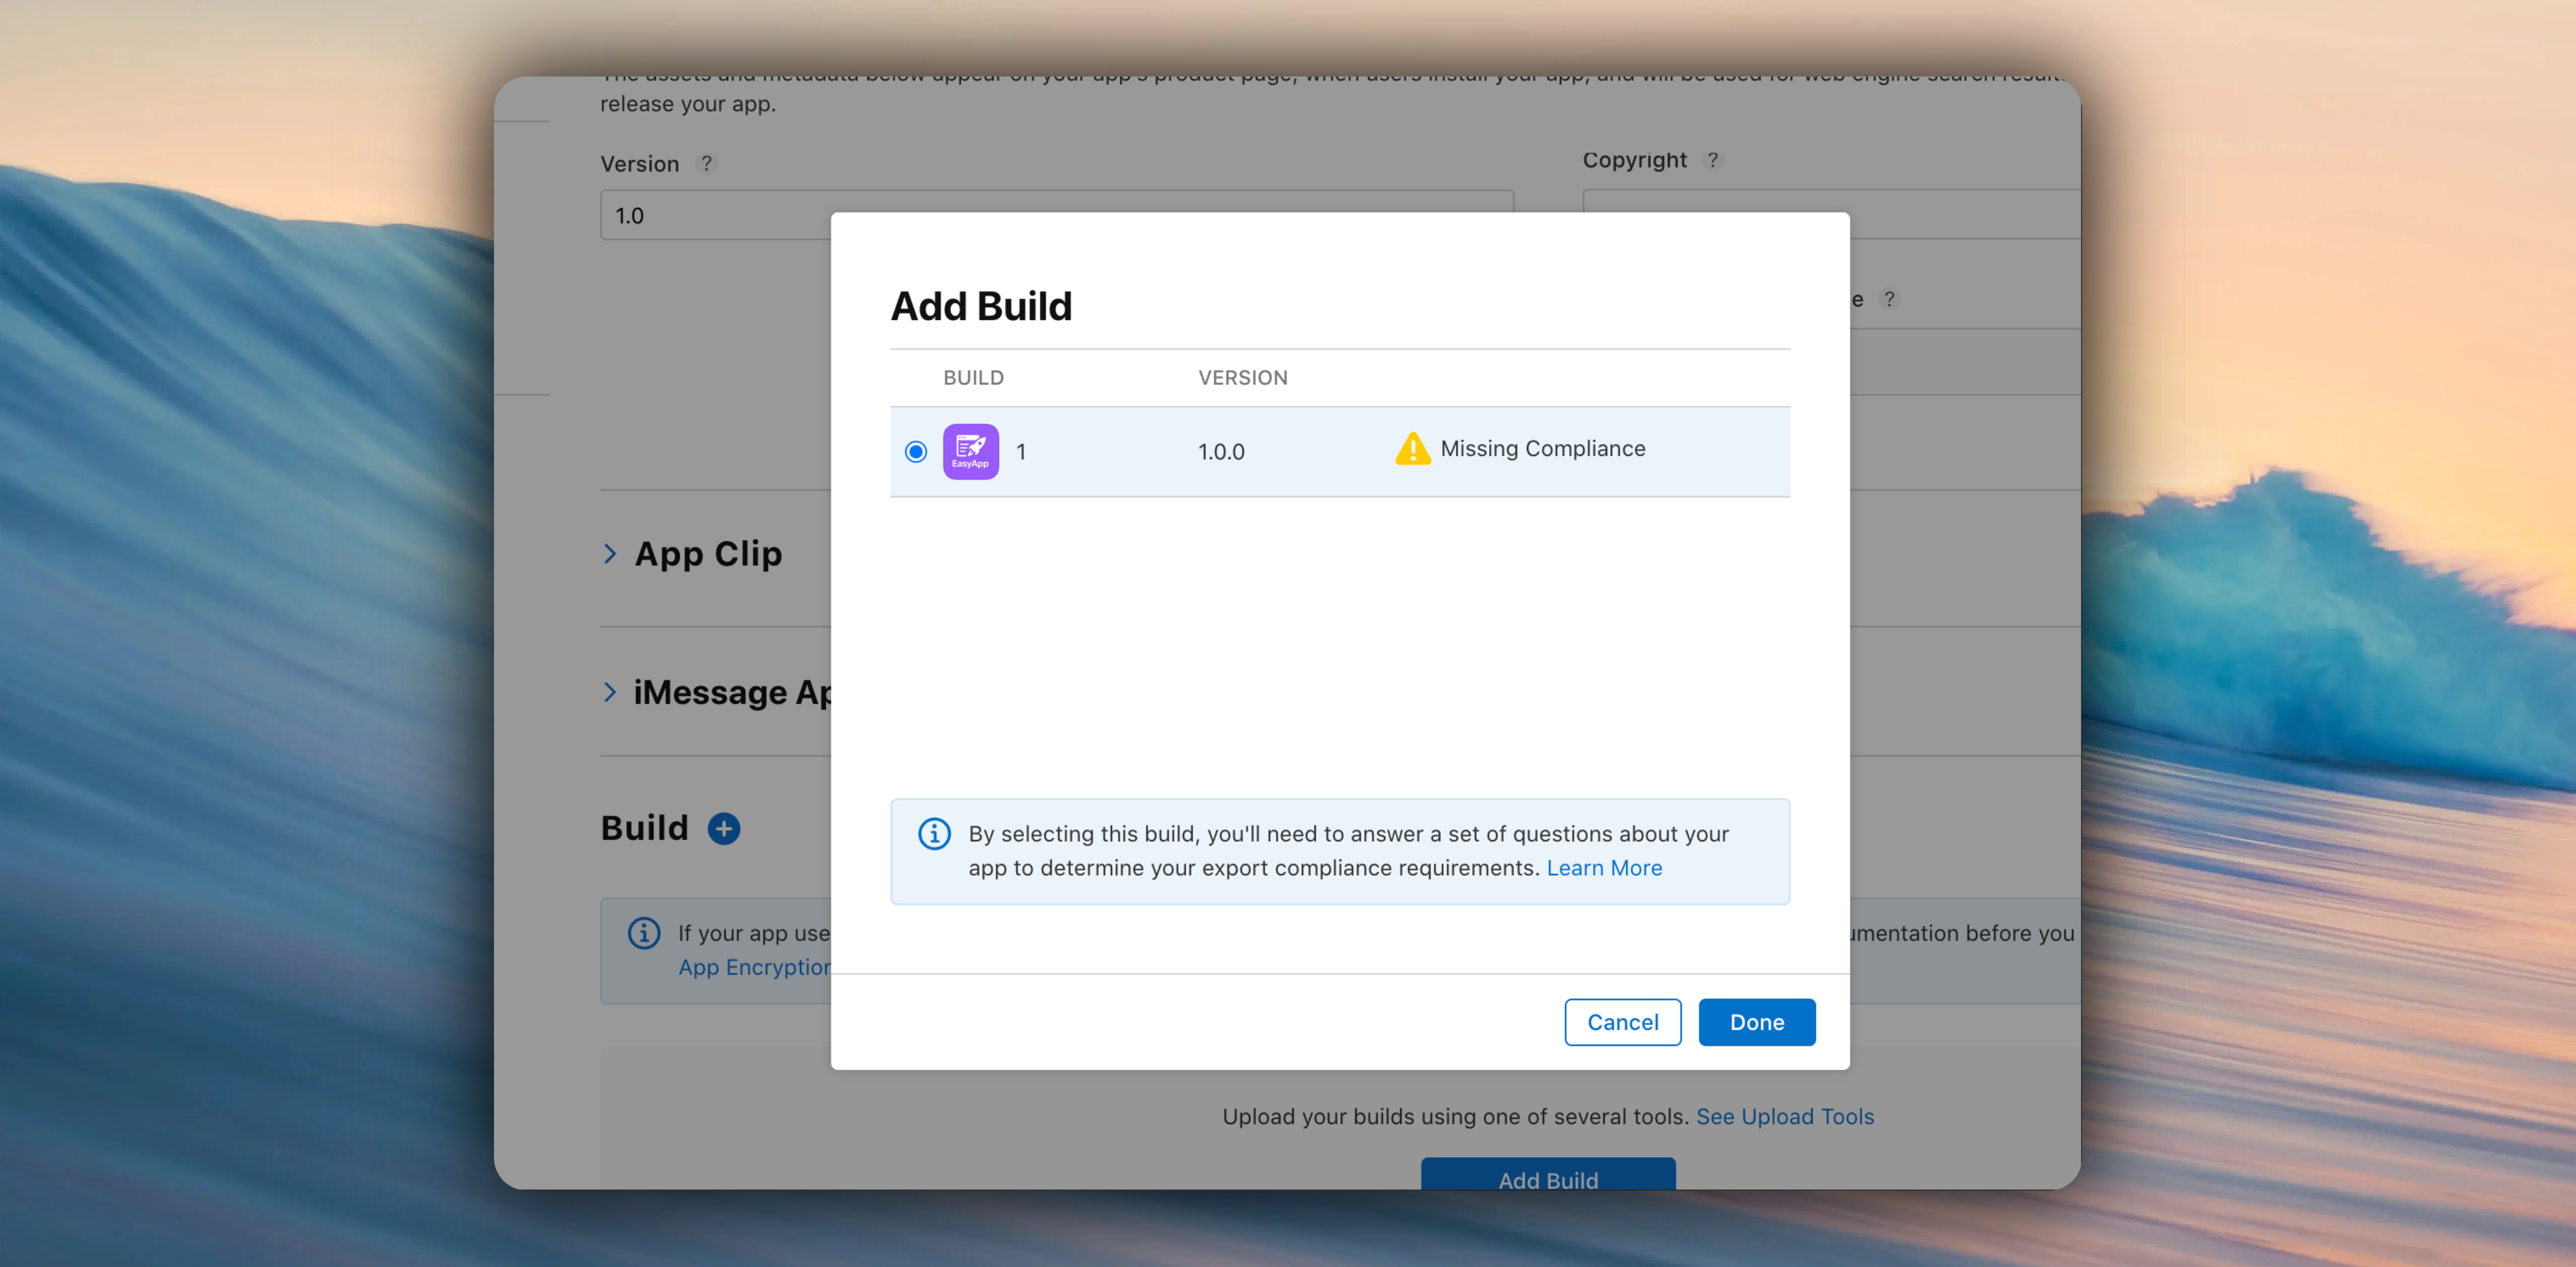
***
## 3. Configure Encryption Declaration
Usually choose **None of the algorithms mentioned above** unless your application uses special encryption algorithms.
***
## 4. Fill App Metadata
You need to fill in your App's name, description, screenshots, videos, price, regions, languages, categories, keywords, etc. For details, refer to the [App Store Connect official documentation](https://developer.apple.com/help/app-store-connect/manage-app-information/upload-app-previews-and-screenshots).
### Recommended Tools
Recommended using [appicongenerator](https://www.appicongenerator.org/) to design App Icon, completely free.
**Figma Template**
**Online Tools**
Information like descriptions, screenshots, videos, price, regions, languages, categories, keywords can be generated using AI. Reference prompt:
> Based on this App's functionality, generate information for App Store Connect review, promotional text, descriptions, keywords, etc.
This is very helpful for the first version's quick launch, you can modify it later according to your App's actual situation. This also involves ASO (App Store Optimization) optimization.
} href="/docs/propagation/aso">
Learn More ASO Techniques
***
## 5. Configure Agreement Links
You must include links to your Privacy Policy and User Agreement in App Store Connect, otherwise there's a high chance of rejection.
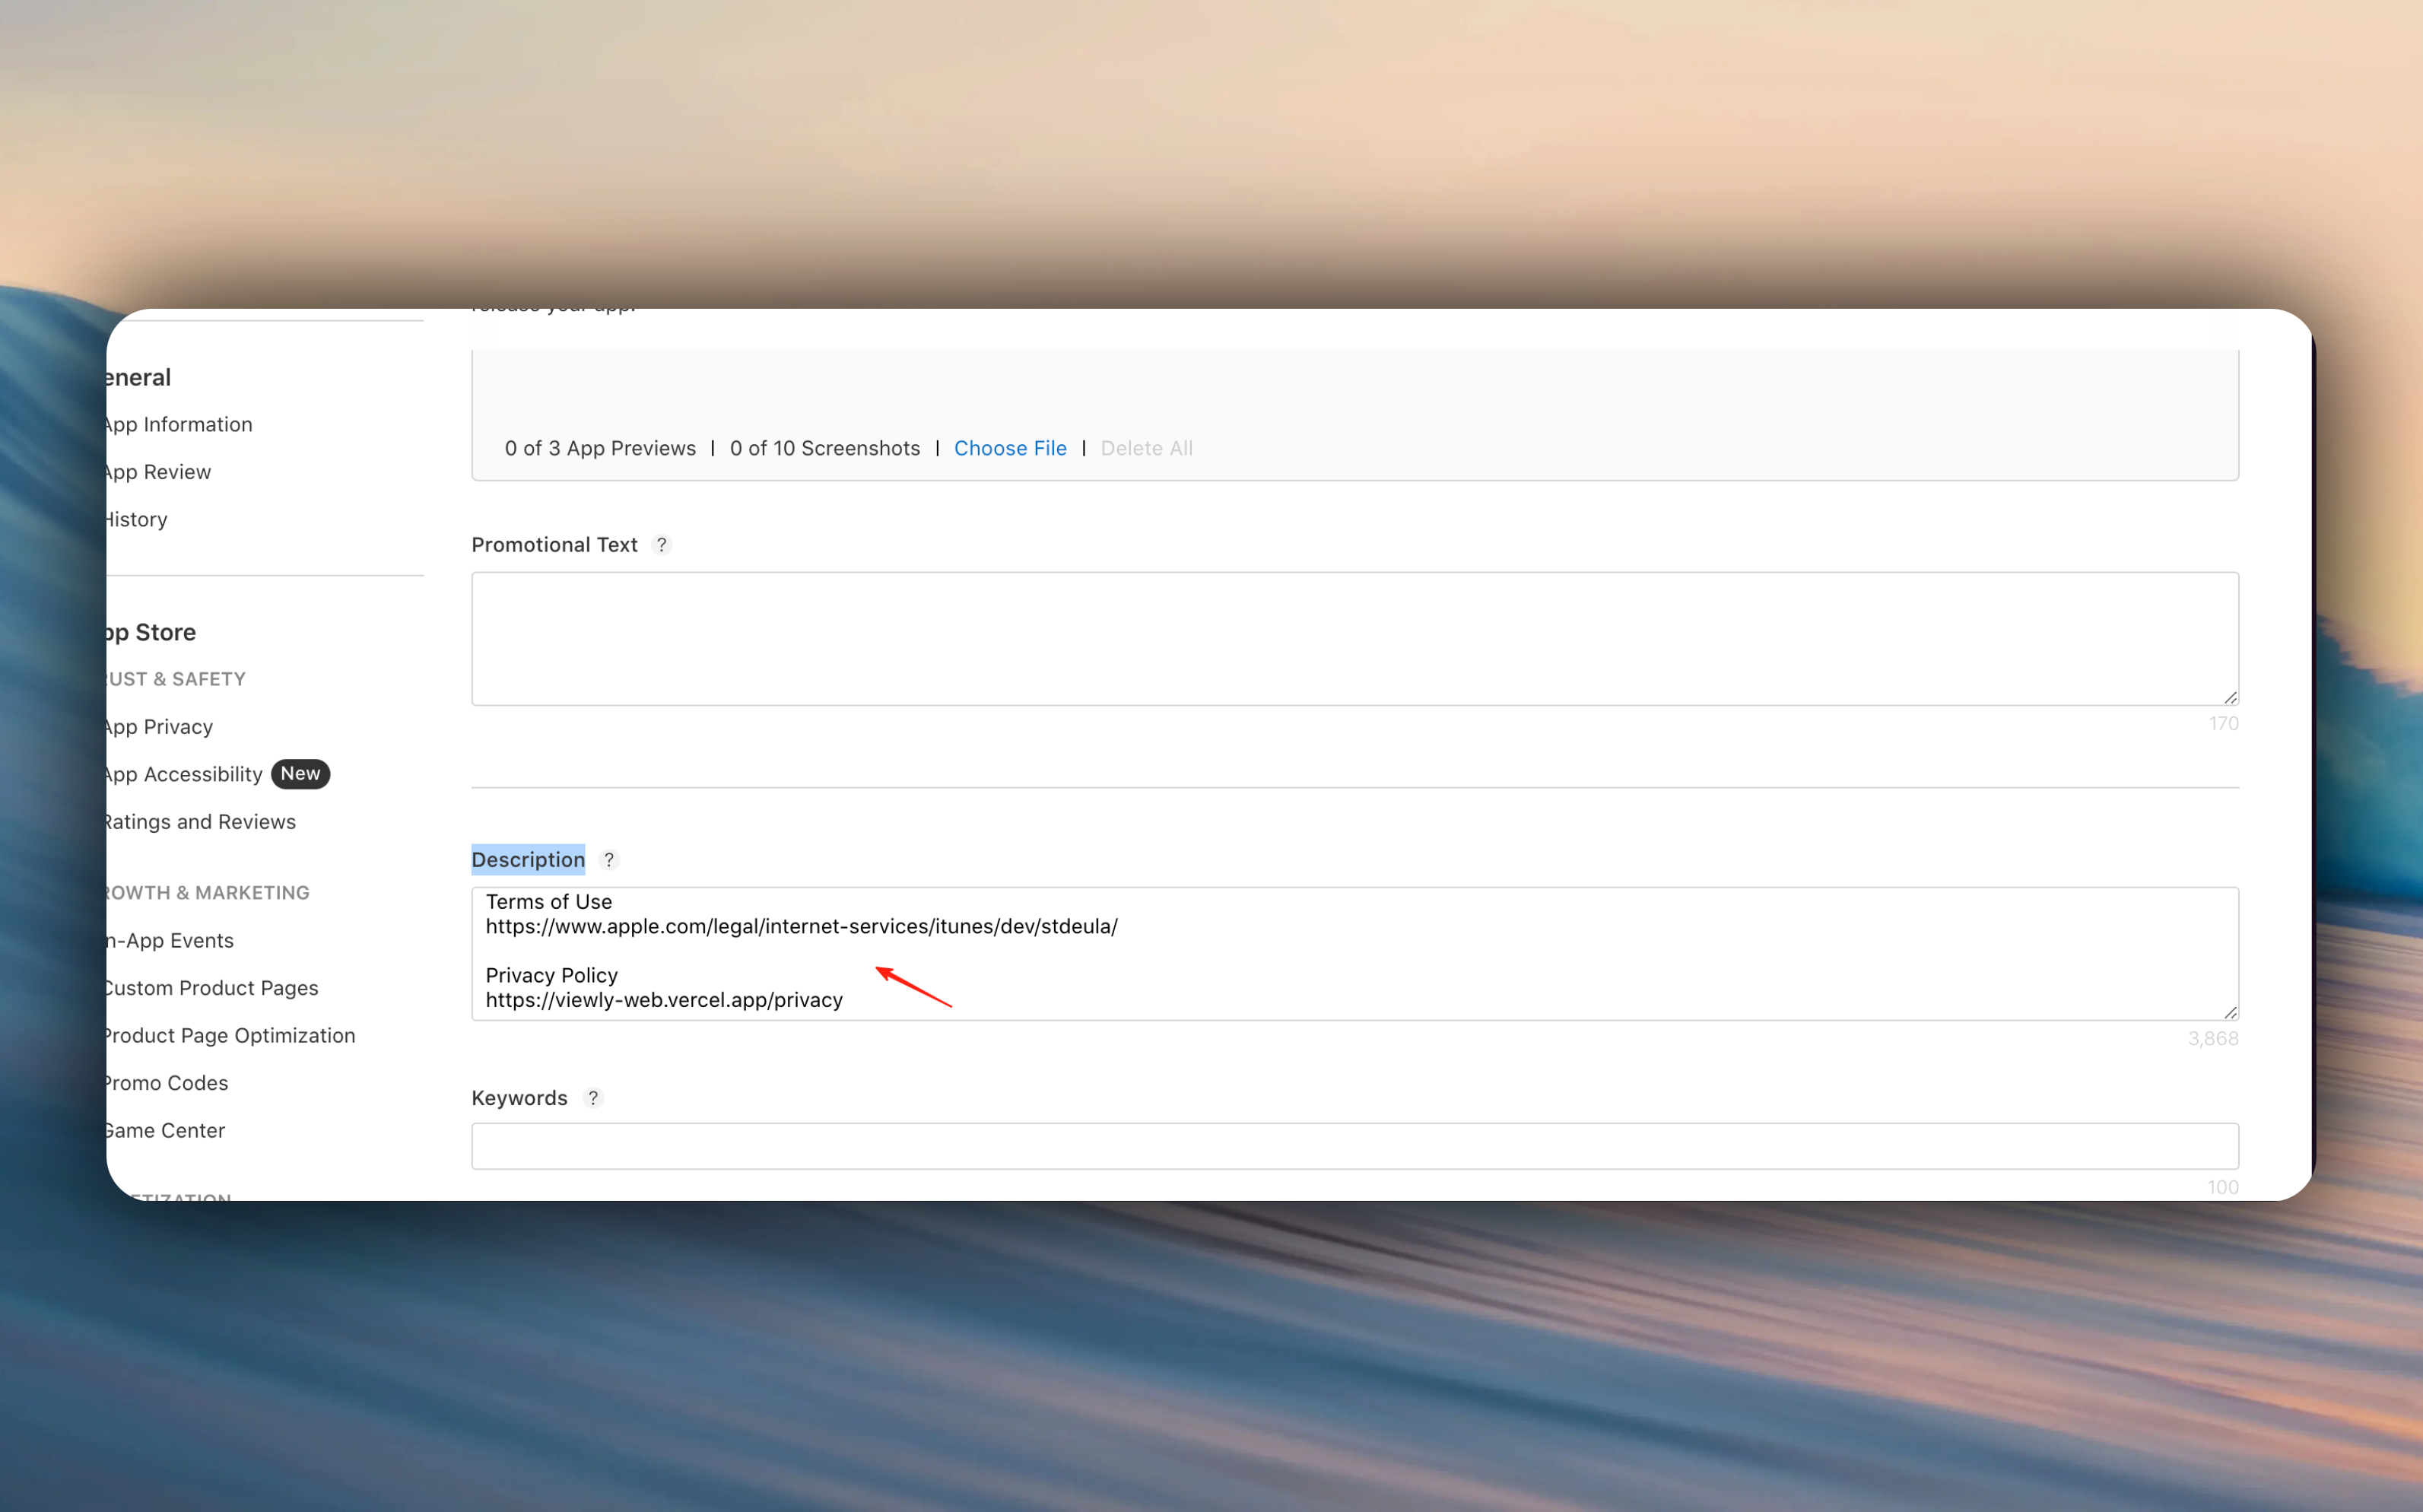
| Agreement Type | Content to Fill |
| :-------------------------- | :----------------------------------------------------------------------------------------------------------------------------------------------- |
| **Terms of Service (EULA)** | `https://www.apple.com/legal/internet-services/itunes/dev/stdeula/` |
| **Privacy Policy** | Fill in the address of the privacy policy you generated on [freePrivacyPolicy](https://www.freeprivacypolicy.com/free-privacy-policy-generator/) |
| **User Agreement** | Fill in the address of the user agreement you generated on [freePrivacyPolicy](https://www.freeprivacypolicy.com/free-privacy-policy-generator/) |
***
## 6. Submit for Review
After completing the above steps, click submit for review.
App Store Connect has many useful features. For more information, refer to the [App Store Connect official documentation](https://developer.apple.com/help/app-store-connect/).
***
## 🎉 After Successful Publishing
Congratulations! Your App has been successfully published! Next, you may need to learn more promotion and operation techniques:
} href="/docs/propagation/socialMedia">
Promote/Market Your App
} href="/docs/propagation/aso">
Learn More ASO Techniques
} href="/docs/propagation/socialMedia">
Withdraw Your Earnings
# Work Required Before App Submission
URL: https://easyapp.site/en/docs/deployment/beforeRelease
Work required before app submission
***
title: Work Required Before App Submission
description: Work required before app submission
icon: ListTodo
--------------
To ensure your app can successfully pass App Store review, please carefully read the following key points.
## Review Checklist Overview
| # | Check Item | Priority | Jump |
| :-: | :------------------------------------------------------- | :------: | :------------------------------------------------- |
| 1 | Add subscription description text to paywall | ⭐⭐⭐ | [View Details](#1-paywall-text--agreements) |
| 2 | Add Privacy Policy and Terms of Service links to paywall | ⭐⭐⭐ | [View Details](#1-paywall-text--agreements) |
| 3 | Replace Review Information screenshot | ⭐⭐⭐ | [View Details](#2-replace-review-screenshot) |
| 4 | Delete Developer debug folder | ⭐⭐⭐ | [View Details](#3-clean-up-sample-code) |
| 5 | Remove unused components and code | ⭐⭐ | [View Details](#3-clean-up-sample-code) |
| 6 | Prepare submission description | ⭐⭐ | [View Details](#4-submission-description-template) |
***
## 1. Paywall Text & Agreements
The paywall page must include subscription description text and agreement links, otherwise it will be rejected.
### Subscription Description Text
Can be directly copied to your app:
> Subscriptions are billed annually or monthly. If you do not intend to renew, please manually cancel your subscription 24 hours before the subscription period ends. Renewal fees will be charged within 24 hours before the subscription period ends. You can manage your subscriptions in your App Store account.
### Agreement Links
The paywall page needs to display the following two links:
| Agreement Type | Description |
| :--------------- | :-------------------------------------------- |
| Privacy Policy | Describes how user data is collected and used |
| Terms of Service | Describes service usage terms and conditions |
As shown in the blue box below:
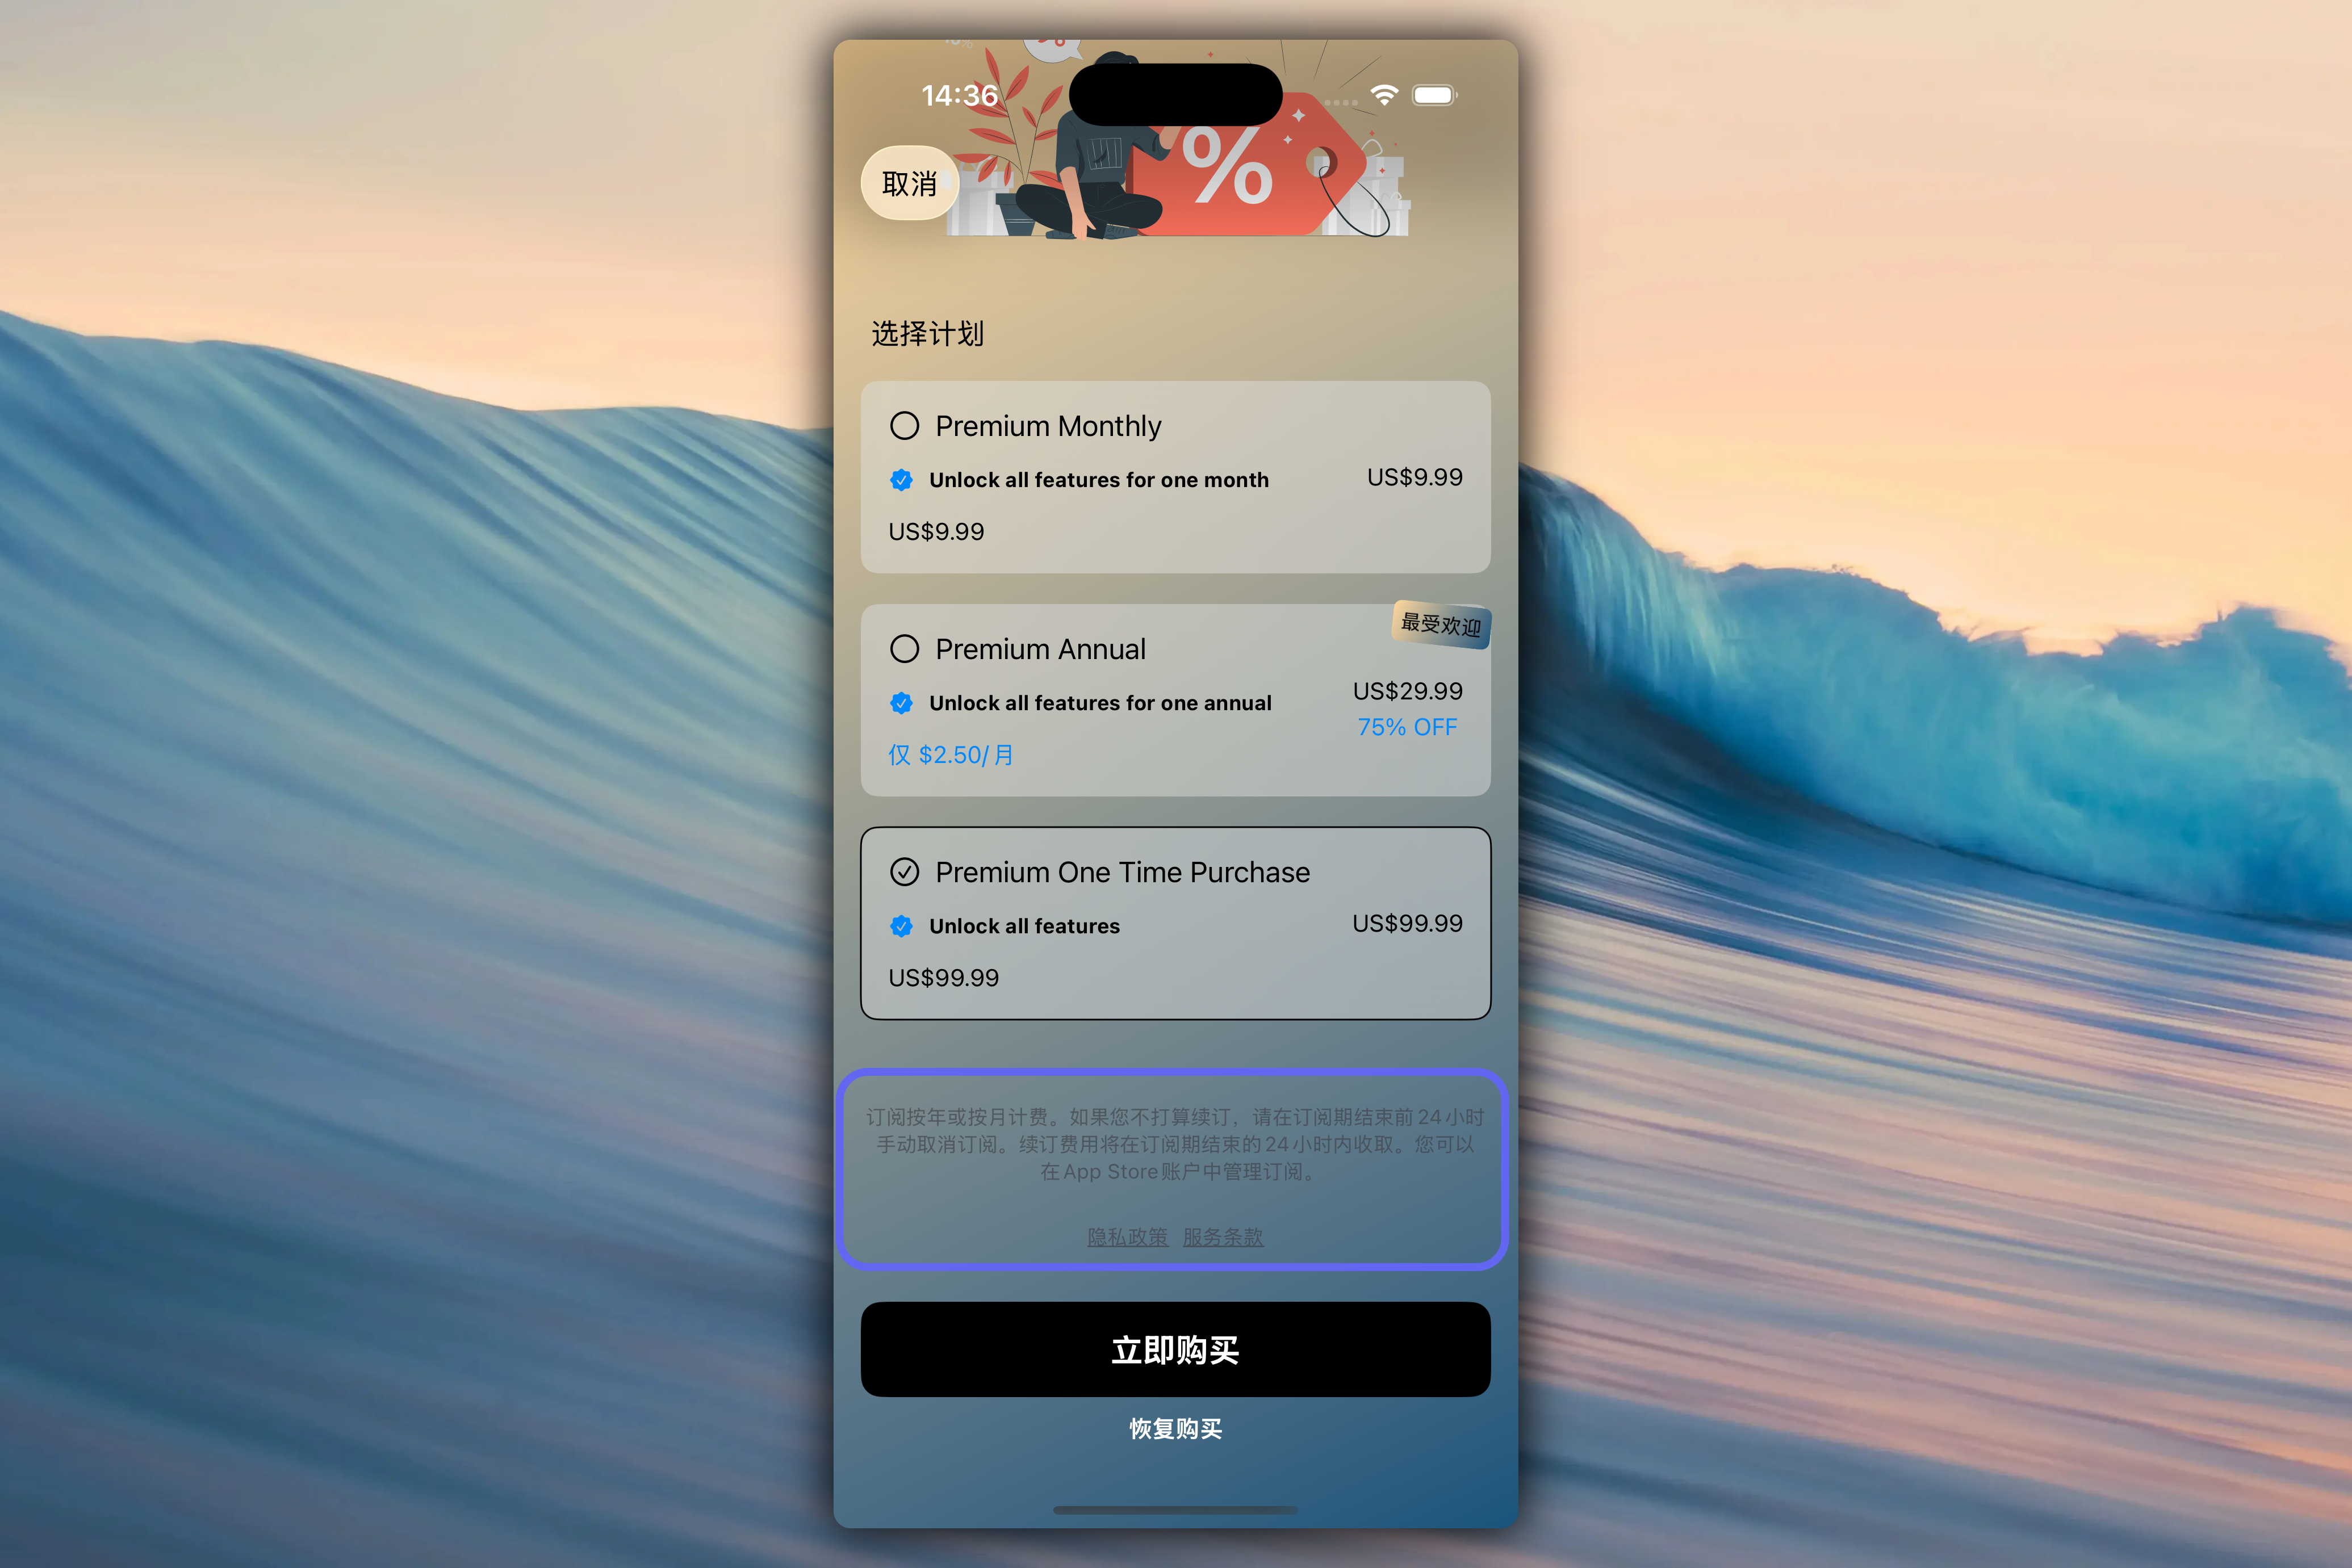
### Generate Agreement Documents
We recommend using [freePrivacyPolicy](https://www.freeprivacypolicy.com/free-privacy-policy-generator/) to generate Privacy Policy and Terms of Service.
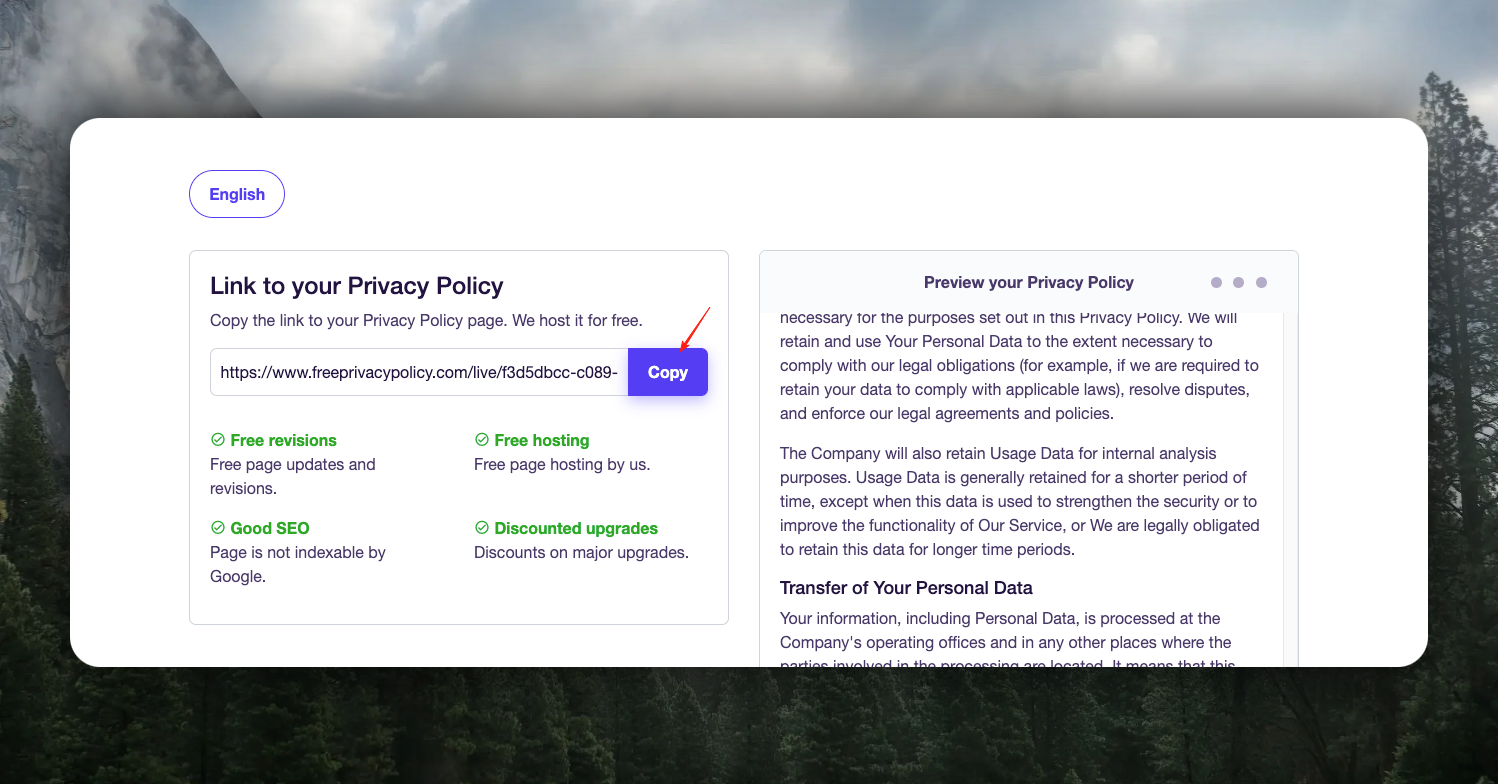
After generation, go to [AppData Configuration](/docs/configuration/AppData) to fill in the agreement links.
***
## 2. Replace Review Screenshot
Remember the placeholder Review Information screenshot we set in the [In-App Purchase](/docs/Integrations/RevenueCat) section? **You must replace it with your current paywall page screenshot**.
***
## 3. Clean Up Sample Code
### Delete Developer Folder
Before packaging and building your app, **you must delete** the `Developer` folder and all code within it. This folder is only for development and debugging and should not appear in the production version.
### Remove Unused Components
EasyApp provides a rich set of business templates and components. For parts not used in your actual business, it is recommended to delete them:
* **Reduce Size**: Decrease app installation package size
* **Pass Review**: Avoid review issues caused by redundant code
* **Code Cleanliness**: Keep the project codebase clean
***
## 4. Submission Description Template
Describe the app's main features and highlights to reviewers to help them quickly understand your app.
This app is a subscription management and work time tracking tool with the following main features:
* **Subscription Management**: Users can add various AI subscription services, and the app calculates subscription cost consumption in real-time
* **Real-time Consumption Tracking**: Based on user-added subscription info, calculates and displays current cost consumption with second-level precision
* **Data Visualization**: Displays subscription spending data through bar charts, pie charts, timelines, and other chart formats
* **Work Time Recording (Vibe Coding)**: Users can record work hours and set hourly rates, the app calculates work earnings to help users compare subscription spending with income
Vibe Coding in this app doesn't execute any task—it's just a label that records the user's work time, similar to focus-type features. For example: when a developer is coding in Xcode, they open this app, tap \[Start Vibe Coding Now], and the app records the developer's work time.
**Data Storage**
All data is stored locally on the user's device using the SwiftData framework, with no network transmission or cloud storage involved.
**Privacy Statement**
The app does not collect any user data, contains no third-party SDKs, and requires no network permissions.
**Test Account**
No test account needed—the app can be used with all features without logging in.
**Testing Steps**
1. Open the app and tap the "Add Subscription" button
2. Enter subscription name (e.g., Cursor), monthly fee (e.g., $30), expiration date
3. After saving, you can see real-time consumption tracking on the main screen
4. Tap "Start Working" to record work hours and earnings
5. Switch to the "Charts" tab to view data visualization
Ensuring your app's uniqueness will basically guarantee it passes the review.
# Build Your App
URL: https://easyapp.site/en/docs/deployment/buildApp
Build Your App
***
title: Build Your App
description: Build Your App
icon: Hammer
------------
Ensure you have completed all feature development and testing.
## Build Process Overview
| Step | Action | Jump |
| :--: | :---------------------------------- | :------------------------------------- |
| 1 | Set version number and Build number | [View Details](#1-set-version-number) |
| 2 | Select build device | [View Details](#2-select-build-device) |
| 3 | Execute Archive build | [View Details](#3-execute-archive) |
| 4 | Distribute App | [View Details](#4-distribute-app) |
***
## 1. Set Version Number
We recommend following the [Semantic Versioning](https://semver.org/) specification.
### Version Number Rules
| Type | Description | Example |
| :---------- | :------------------------------------------ | :---------------------------------------------- |
| **Version** | Must be greater than current online version | If online is `1.0.0`, set to `1.0.1` or higher |
| **Build** | Must be different for each build | `10.0.1`, `10.0.2`, `10.0.3` etc. incrementally |
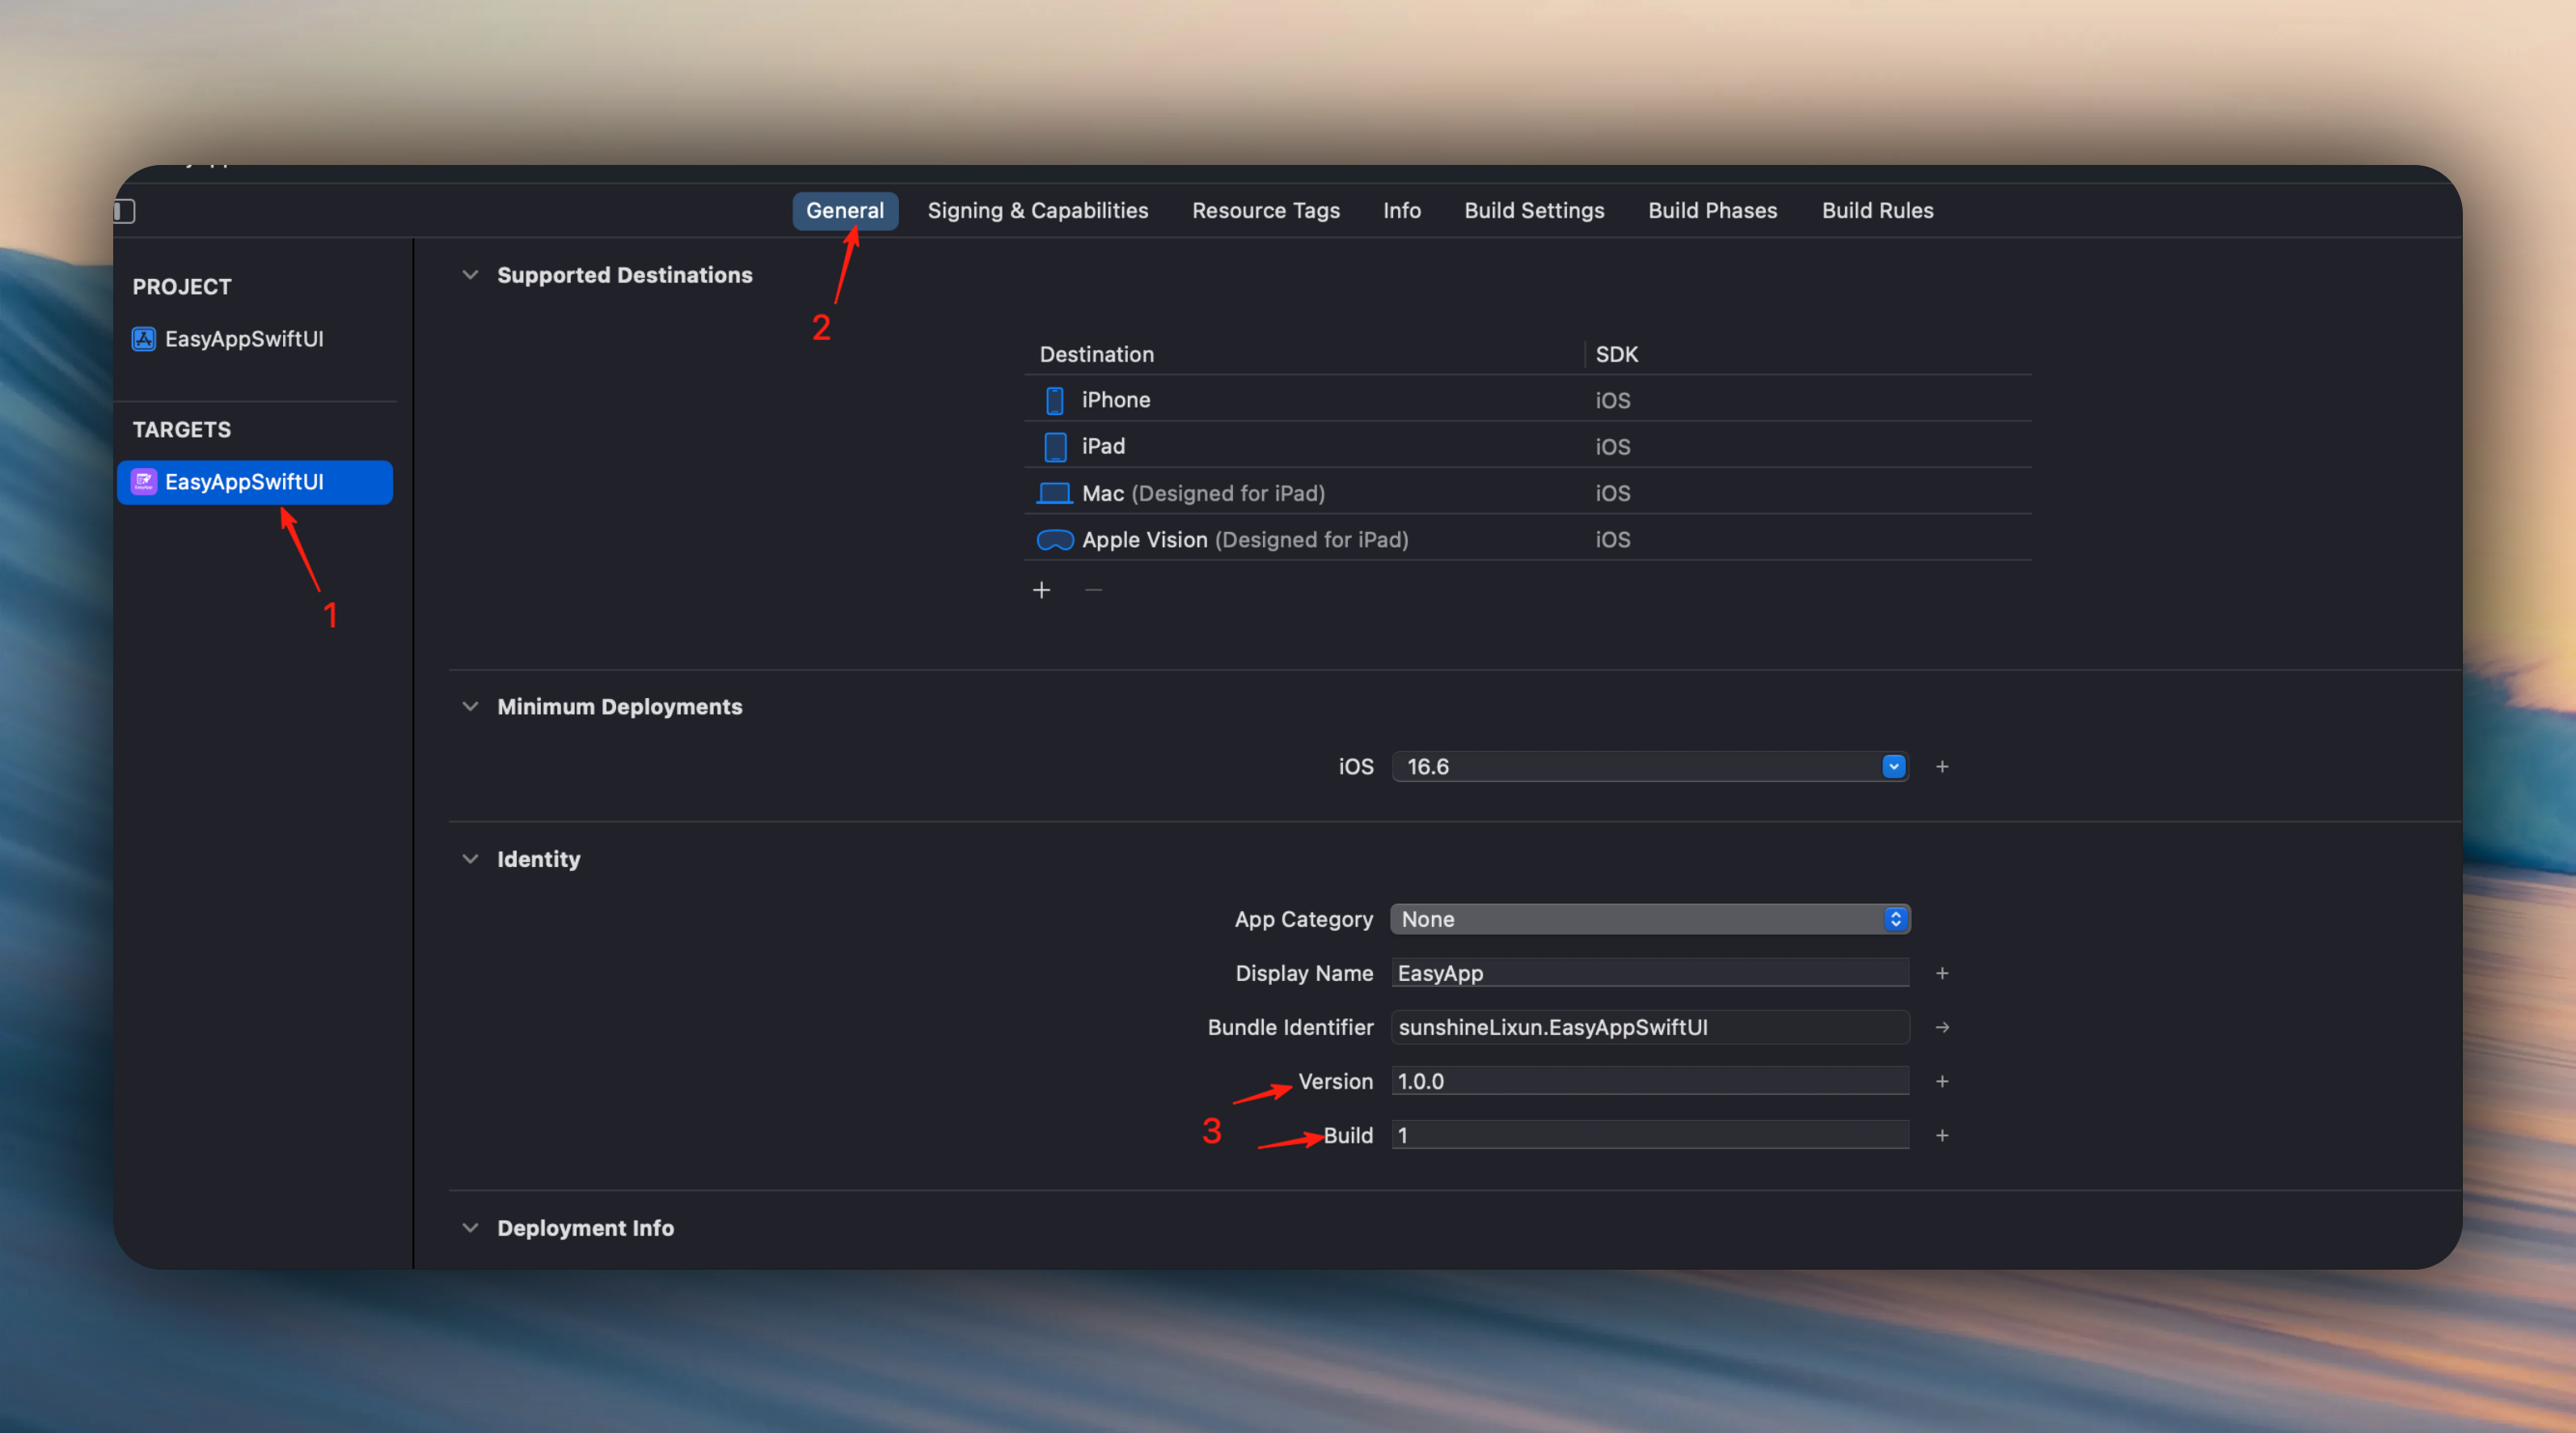
***
## 2. Select Build Device
We recommend choosing **Any iOS Device (arm64)** to support all real devices.
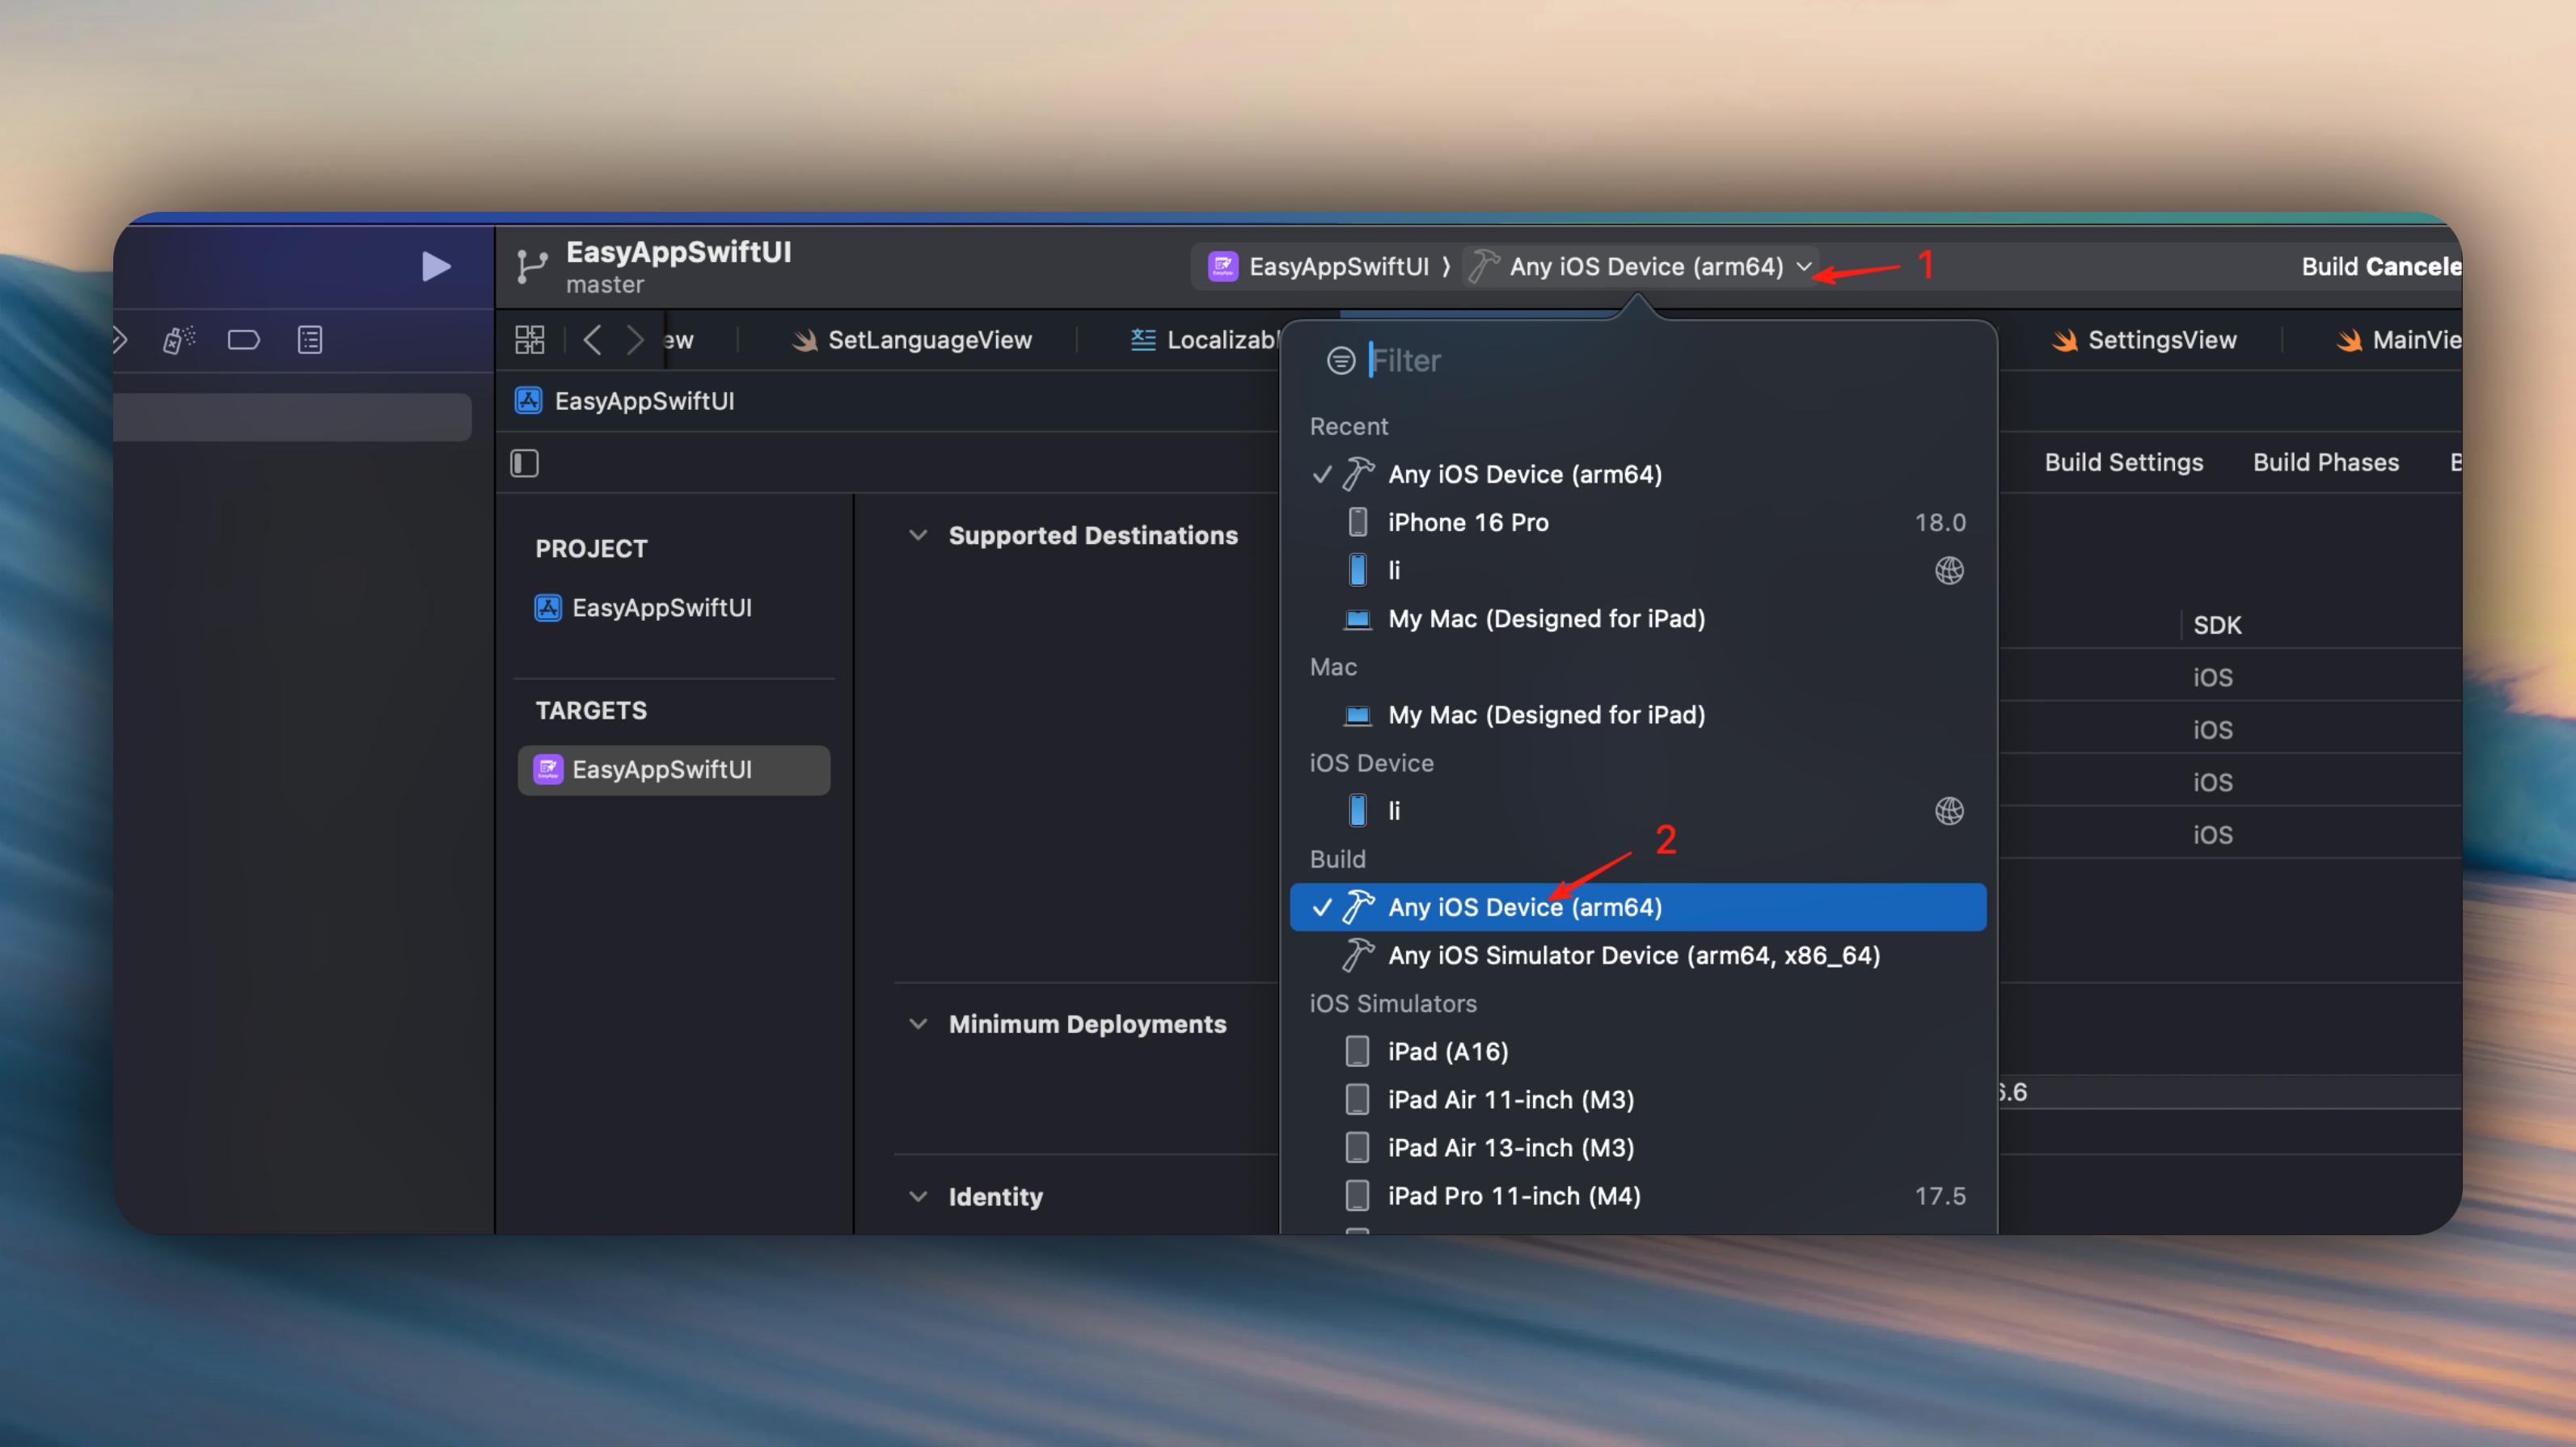
***
## 3. Execute Archive
In Xcode, select `Product` → `Archive` to build your App.
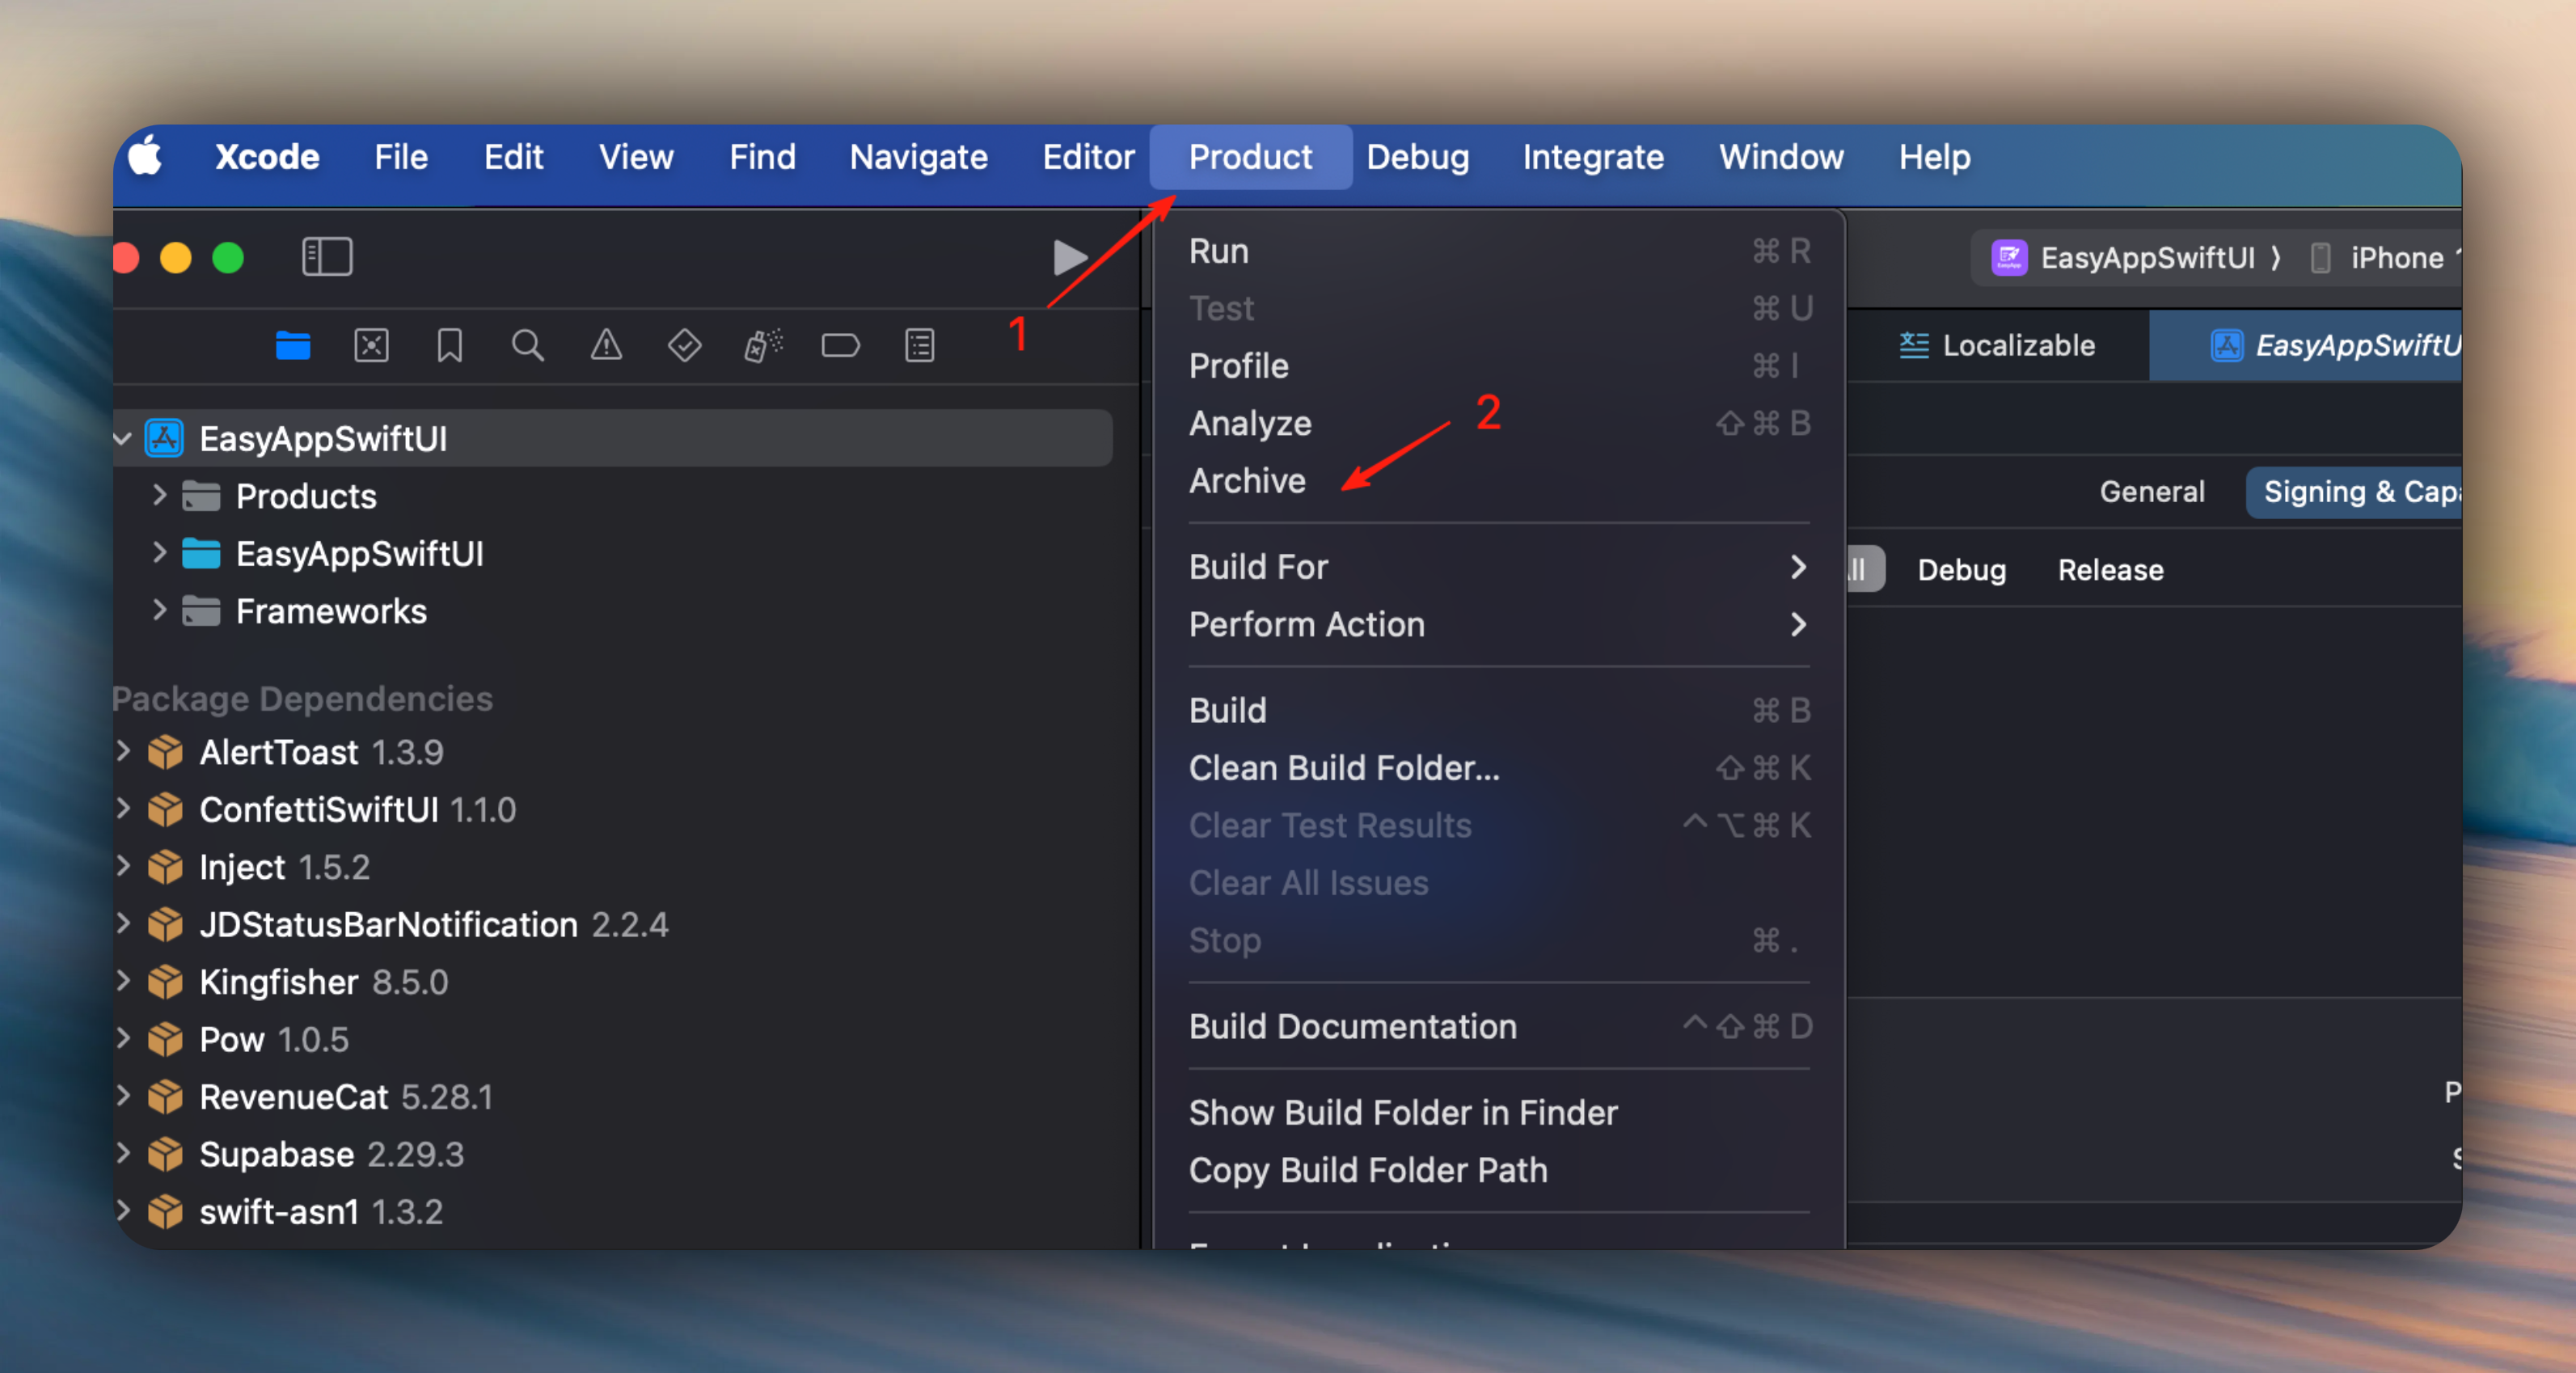
Wait for Xcode to complete the build.
***
## 4. Distribute App
After the build is complete, click `Distribute App` and choose the distribution method:
| Distribution Method | Purpose |
| :-------------------- | :---------------------------- |
| **App Store Connect** | Official release to App Store |
| **TestFlight** | Internal or public testing |
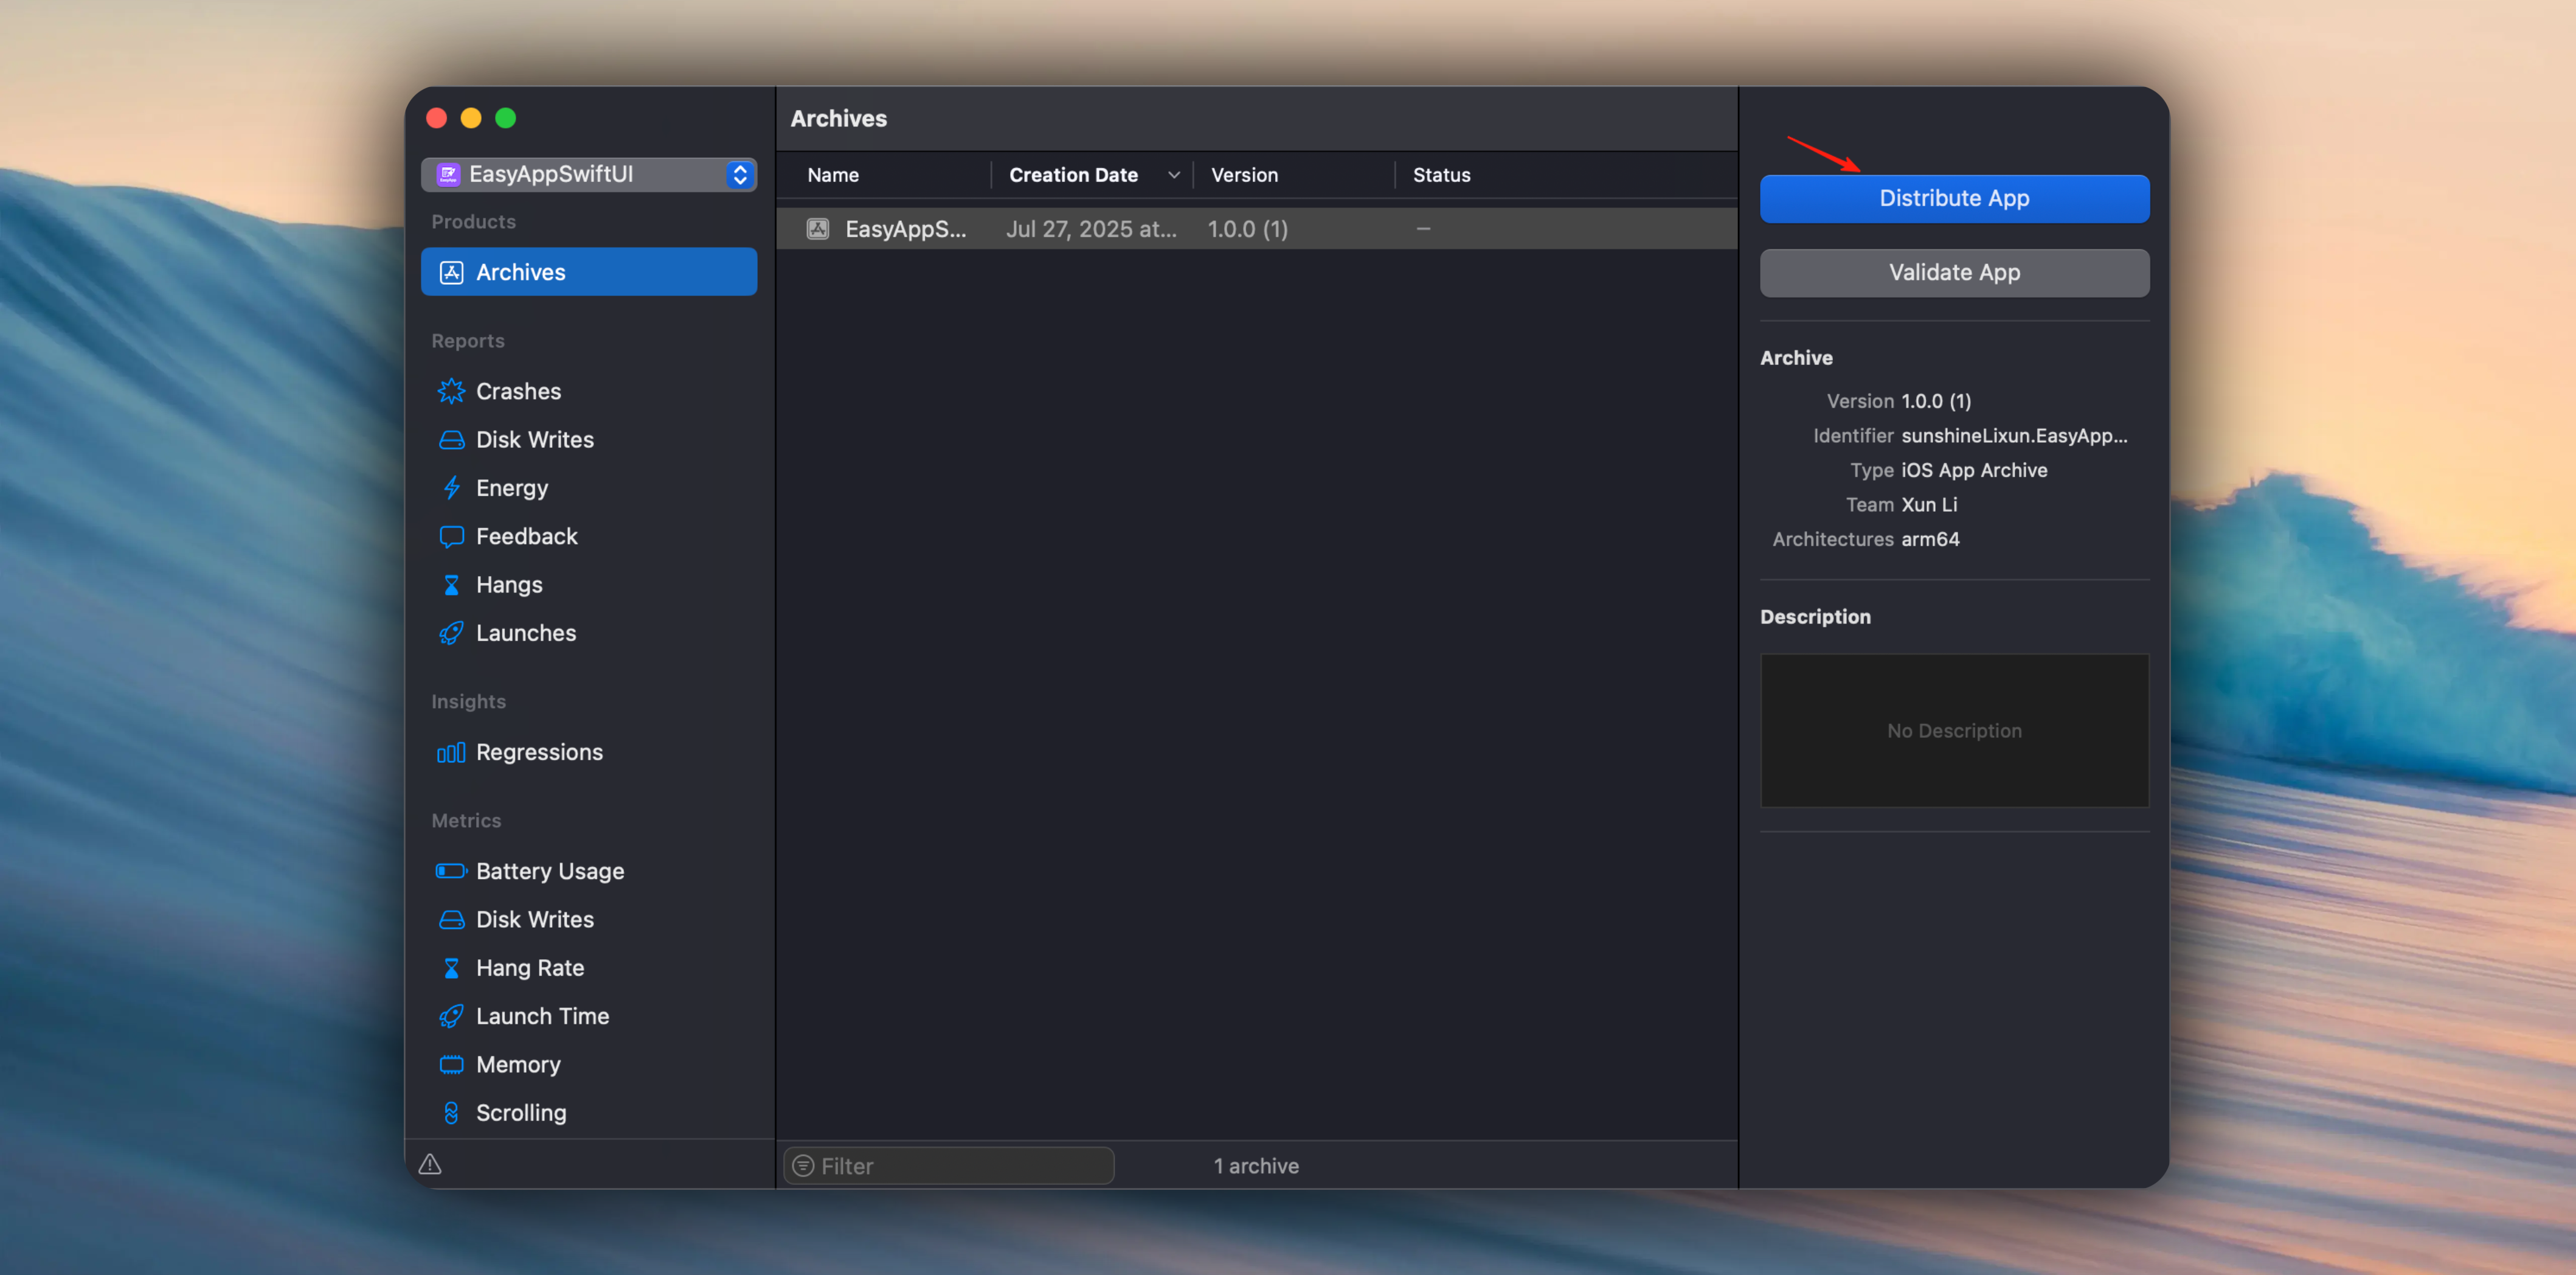
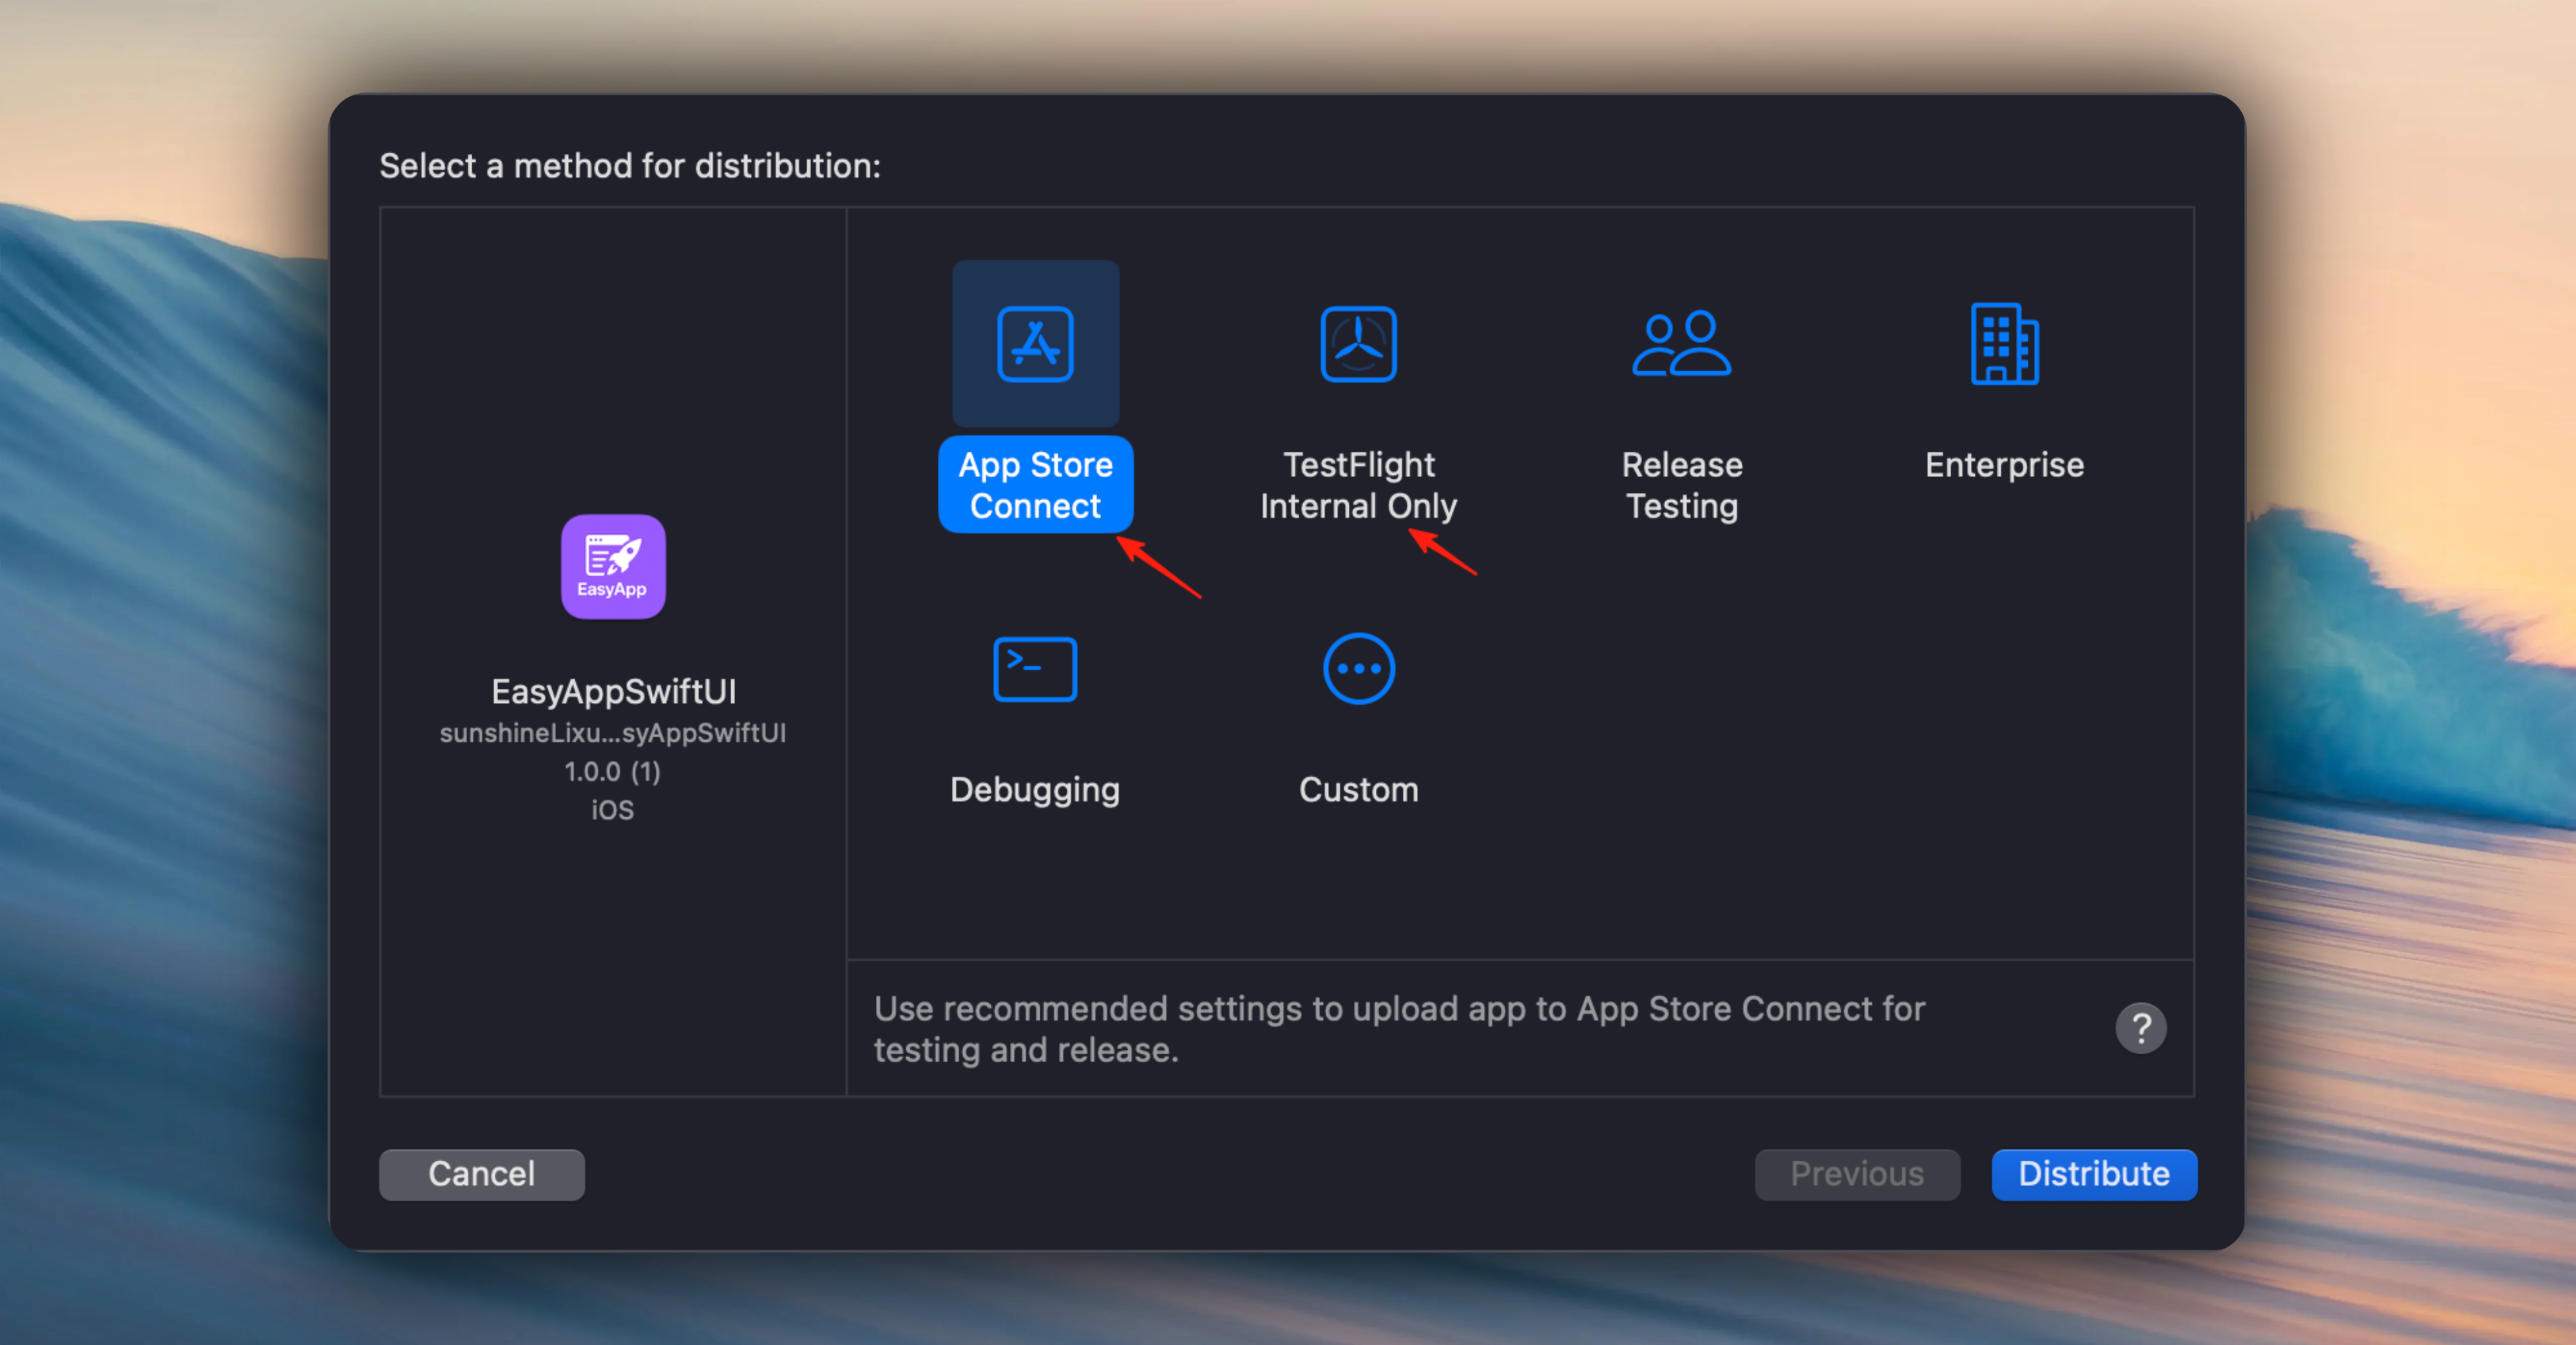
***
## Next Steps
Based on your needs, choose the corresponding publishing method:
} href="/docs/deployment/appstore">
Publish Your App to App Store
} href="/docs/deployment/testFlight">
Publish Your App to TestFlight
# Common Apple Review Rejection Solutions
URL: https://easyapp.site/en/docs/deployment/reject
Learn about common Apple review rejection solutions
***
title: Common Apple Review Rejection Solutions
description: Learn about common Apple review rejection solutions
icon: Apple
-----------
During the App Store review process, many developers encounter various rejection situations. This document summarizes the most common review rejection reasons and their corresponding solutions to help you quickly identify issues and resolve them effectively.
Click the categories below to jump to the corresponding issue:
**Technical Issues**: [Crashes/Incomplete](#app-crashes-or-incomplete-functionality-guideline-21) | [Private API](#using-private-apis-or-security-vulnerabilities-guideline-252)
**Privacy Compliance**: [Privacy Policy](#privacy-policy-non-compliance-guideline-51)
**Payment Issues**: [Payment Violations](#payment-method-violations-guideline-31) | [Subscription/EULA](#subscription-compliance-issues-guideline-312---business---payments---subscriptions)
**Content Issues**: [Copyright](#copyright-or-trademark-infringement-guideline-41) | [Too Simple](#functionality-too-simple-guideline-42) | [Misleading](#misleading-users-or-keyword-stuffing-guideline-43) | [Screenshots](#app-screenshots-inconsistent-with-actual-app-guideline-233---performance---accurate-metadata) | [UI Innovation](#intellectual-property-issues--lack-of-ui-design-innovation-guideline-525---legal---intellectual-property)
**Special Categories**: [Children's Apps](#childrens-app-non-compliance-guideline-13--514)
**Review Process**: [Test Accounts](#not-providing-test-accounts-or-poor-review-communication-guideline-56)
***
## App Crashes or Incomplete Functionality (Guideline 2.1)
* App crashes, shows white screen, or key features don't work during review
* Contains test data, unfinished placeholder content
**✅ Solutions**
* **Test coverage for all iOS versions and devices** (especially latest iPhone and iPad)
* **Remove test accounts, temporary data** to ensure reviewers can use it normally
* **Check backend service stability** to avoid API unavailability during review
***
## Privacy Policy Non-compliance (Guideline 5.1)
* No privacy policy provided, or policy doesn't clearly explain data collection methods
* Collecting sensitive information without user authorization (like location, camera, contacts)
**✅ Solutions**
* **Add privacy policy links in App Store Connect and within app** (must clearly explain data usage)
* **All permission requests must include explanations** (add NSLocationUsageDescription etc. in Info.plist)
* **Check third-party SDKs** (like ads, analytics tools) for compliance
***
## Payment Method Violations (Guideline 3.1)
* Virtual goods, subscription services don't use Apple In-App Purchase (IAP), instead use WeChat, Alipay etc.
* App guides users to bypass IAP (like suggesting "cheaper on official website")
**✅ Solutions**
* **Digital content, membership subscriptions must use Apple IAP** (Apple takes 30%/15% cut)
* **Physical goods or offline services** (like food delivery, ride-hailing) don't need IAP
* **Avoid mentioning external payment methods in app**, otherwise will be rejected
***
## Subscription Compliance Issues (Guideline 3.1.2 - Business - Payments - Subscriptions)
* Missing "Terms of Use (EULA)" link
* Paywall/subscription page doesn't display terms of use link
* App Store Connect description doesn't include terms of use link
* Subscription terms are unclear or incomplete
**✅ Solutions**
* **Add terms of use link on paywall/subscription page**, users must see it before purchasing
* **Add terms of use link in App Store Connect description**, format as follows:
```
Terms of Use: https://www.apple.com/legal/internet-services/itunes/dev/stdeula/
Privacy Policy: [Your privacy policy link]
Terms of Service: [Your terms of service link]
User Agreement: [Your user agreement link]
```
* **Use Apple Standard EULA**, link: `https://www.apple.com/legal/internet-services/itunes/dev/stdeula/`
* **Provide terms of use entry in app settings page**
1. **Paywall/Subscription Page**: Display "Terms of Use" link near the purchase button
2. **App Store Connect Description**: Add terms of use link at the end of app description
3. **In-App Settings Page**: Provide entry to view terms of use
4. **App Store Connect > App Information > License Agreement**: Fill in EULA link
***
## Copyright or Trademark Infringement (Guideline 4.1)
* App name, icon, content allegedly copies other well-known products (like "TikTok cracked version")
* Using copyrighted materials without authorization (like movies, music, game characters)
**✅ Solutions**
* **Ensure app name, icon, UI design are original**, avoid misleading users
* **Don't use unauthorized brand names** (like "ChatGPT official version")
* **If using open source materials, follow corresponding licenses** (like CC BY, MIT)
***
## Functionality Too Simple (Guideline 4.2)
* App is just a web wrapper (like pure H5 page)
* Functionality duplicates system built-in apps (like calculator, flashlight)
**✅ Solutions**
* **Add unique features** (like AI assistance, social interaction)
* **Optimize user experience**, avoid submitting "template" apps
***
## Misleading Users or Keyword Stuffing (Guideline 4.3)
* Title or description contains many irrelevant keywords (like "Free VPN 2024 best speed super fast no ads")
* Functionality doesn't match promotion (like claiming "AI drawing" but no such feature)
**✅ Solutions**
* **App Store description should be concise and authentic**, don't exaggerate features
* **Avoid keyword stuffing**, title under 30 characters is better
***
## Using Private APIs or Security Vulnerabilities (Guideline 2.5.2)
* Calling unpublished private APIs (like getting device UDID)
* Code has security vulnerabilities (like SQL injection, unencrypted transmission of sensitive data)
**✅ Solutions**
* **Use Xcode's API checking tools** (like nm or otool)
* **Ensure network requests use HTTPS**, encrypt sensitive data storage
***
## Children's App Non-compliance (Guideline 1.3 & 5.1.4)
* Not complying with COPPA (Children's Privacy Protection Act), collecting minor data
* Contains ads or content unsuitable for children
**✅ Solutions**
* **Prohibit collecting children's personal information** (like location, device ID)
* **Ad content must be suitable for children** (avoid in-game purchase inducement)
***
## Not Providing Test Accounts or Poor Review Communication (Guideline 5.6)
* Reviewers can't log in (no test account provided)
* Not responding promptly or incomplete modifications after rejection
**✅ Solutions**
* **Submit test accounts in App Store Connect** (if app has login functionality)
* **After rejection, explain modifications in detail through Resolution Center**
***
## App Screenshots Inconsistent with Actual App (Guideline 2.3.3 - Performance - Accurate Metadata)
* App Store screenshots don't match the actual app interface
* Screenshots show non-existent features or interfaces
* Content in screenshots doesn't match the current app version
* Using screenshots from other apps or template screenshots
**✅ Solutions**
* **Ensure screenshots accurately reflect current app functionality**, don't show unimplemented features
* **Use the latest version of the app for screenshots**, ensure interface consistency
* **Avoid using template screenshots or placeholder images**, use actual app interfaces
* **Screenshot order should match app usage flow**, help reviewers understand the app
* **Check that text, buttons, and features in screenshots all exist** and work properly
***
## Intellectual Property Issues / Lack of UI Design Innovation (Guideline 5.2.5 - Legal - Intellectual Property)
* App interface design is highly similar to other well-known apps
* UI layout, color scheme, and interaction methods lack innovation
* Suspected plagiarism or imitation of other apps' design styles
* Using unauthorized design elements or icons
**✅ Solutions**
* **Redesign the UI interface** to ensure unique visual style and brand characteristics
* **Modify the color scheme** to use different color combinations from competitors
* **Innovate interaction methods** to provide unique user experience rather than simple copying
* **Use original icons and design elements**, avoid using others' design resources
* **Reference design guidelines rather than plagiarize**, follow Apple design guidelines but with your own characteristics
* **Hire professional designers** to create a recognizable brand visual system
If you need to redesign the UI, you can refer to the following resources:
* **Design Inspiration**: [Dribbble](https://dribbble.com/), [Behance](https://www.behance.net/)
* **UI Component Libraries**: Use legal open-source component libraries for secondary design
* **Design Systems**: Refer to Apple's [Human Interface Guidelines](https://developer.apple.com/design/human-interface-guidelines/)
* **Color Tools**: [Coolors](https://coolors.co/)
***
This document will be continuously updated with the latest review rejection cases and solutions. Bookmark and check regularly.
## 💡 Prevention Tips
📋 Pre-submission Preparation
• Thoroughly test on various devices and iOS versions
• Remove all test data and placeholder content
• Ensure screenshots match actual app
📖 Compliance Requirements
• Regularly read Apple review guideline updates
• Maintain app originality and uniqueness
• Digital content must use IAP
🔒 Privacy & Security
• Provide clear privacy policy
• Include explanations for all permission requests
• Use HTTPS for encrypted transmission
💬 Review Communication
• Provide complete test accounts
• Respond promptly to review feedback
• Explain in detail through Resolution Center
Apple's review purpose is to ensure high-quality, secure and reliable apps in the App Store. Following these guidelines not only increases approval rates but also provides better experience for users.
# Publish Your App to TestFlight
URL: https://easyapp.site/en/docs/deployment/testFlight
Publish Your App to TestFlight
***
title: Publish Your App to TestFlight
description: Publish Your App to TestFlight
icon: TabletSmartphone
----------------------
Before your App officially goes live, you can first distribute your App to testers through TestFlight.
Refer to the App Store Connect [TestFlight Overview](https://developer.apple.com/help/app-store-connect/test-a-beta-version/testflight-overview) documentation, and you can also watch the [TestFlight video tutorial](https://developer.apple.com/videos/play/tech-talks/110343/) to learn how to use TestFlight.
# Getting Started with SwiftUI
URL: https://easyapp.site/en/docs/introduction/howToLearnSwiftUI
How to quickly get started with SwiftUI
***
title: Getting Started with SwiftUI
description: How to quickly get started with SwiftUI
icon: Book
----------
### Highly Recommended (Official Tutorial)
If you're new to SwiftUI
We highly recommend going through the official SwiftUI tutorial first. The entire tutorial is very detailed, and after completing it, you should have a good understanding of SwiftUI syntax and usage.
Official Tutorial:
[SwiftUI Getting Started](https://developer.apple.com/swiftui/get-started/)
[SwiftUI Cross-Apple Platform Development Tutorial](https://developer.apple.com/tutorials/swiftui)
### Native Component Apps Worth Downloading
Next, we recommend several apps that provide visual representations of native SwiftUI components and system libraries/properties, with code that you can use directly. These are very helpful for familiarizing yourself with SwiftUI components.
[Interactful](https://apps.apple.com/app/id1528095640)
[libraried UI](https://apps.apple.com/us/app/libraried/id1642862540)
[Fabula for SwiftUI](https://apps.apple.com/us/app/fabula-for-swiftui/id1591155142?l=zh-Hans-CN)
Among these, Fabula for SwiftUI has many animations/effects that can serve as reference when designing page UI/animations.
Online SwiftUI Native Component Effects and Code Preview
[exploreswiftui](https://exploreswiftui.com/)
### WWDC
[WWDC](https://developer.apple.com/wwdc/) is the best way to learn about Apple's latest technologies. It releases many new APIs and features every year, with subtitle support for multiple languages. Essential viewing for iOS developers.
### Worth Following Bloggers/Channels/Learning Resources
[stanford cs193p](https://cs193p.stanford.edu/)
[hackingwithswift](https://www.hackingwithswift.com/quick-start/swiftui)
[swiftbysundell](https://www.swiftbysundell.com/)
Continuously updating...
### Finally, a Recommended Book
[Thinking in SwiftUI](https://objccn.io/products/thinking-in-swiftui-2023)
This book provides a detailed introduction to SwiftUI's internal mechanisms. Highly recommended for developers who want to dive deep into SwiftUI. For EasyApp members, you can get it for free from us.
* Follow us on [X](https://x.com/ios_1261142602)
* Join us on [Discord](https://discord.gg/36UQMU6yKw)
* Contact our support team via [email](mailto:lixunemail@gmail.com)
# Repository Introduction
URL: https://easyapp.site/en/docs/introduction/repository
Introduction to all EasyApp repositories
***
title: Repository Introduction
description: Introduction to all EasyApp repositories
icon: Rocket
------------
## Repository Introduction
### EasyAppSwiftUI
[EasyAppSwiftUI](https://github.com/FastEasyApp/easyapp-swiftui) is the iOS App template for the EasyApp series, containing all App features.
### EasyAppSupabase
[EasyAppSupabase](https://github.com/FastEasyApp/easyapp-subapase) is the backend/server template for the EasyApp series, containing all database implementations.
### EasyAppComponentsKit
[EasyAppComponentsKit](https://github.com/FastEasyApp/EasyAppComponentsKit) is the component library for the EasyApp series. We continuously collect useful component libraries to help you find the ones that suit your needs. You can see the component library effects [here](https://www.easyapp.site/en/components/onboarding).
How to use?
Select the component library you need, click to view the source code, and copy it to your project.
### EasyAppNotifyKit
EasyAppNotifyKit is the notification library for EasyApp, used to implement App notification features. This library has been moved to the EasyAppSwiftUI project, located in the `EasyAppSwiftUI/Packages` directory. If you need to use notification features, you can directly modify this library to meet your requirements.
## Real Projects
### lanuch-vibe-coding
[lanuch-vibe-coding](https://github.com/FastEasyApp/lanuch-vibe-coding) is an accounting-like App based on the EasyAppSwiftUI and EasyAppSupabase templates. Free for EasyApp members.
### lovely
[lovely](https://github.com/FastEasyApp/lovely) is a couple's App based on the EasyAppSwiftUI and EasyAppSupabase templates. Features include: linking with a partner to draw on your phone and send messages, with the drawing displayed on the other person's home screen widget. Free for EasyApp members.
# What is EasyApp
URL: https://easyapp.site/en/docs/introduction/whatsEasyApp
EasyApp is the most comprehensive SwiftUI template project for building iOS Apps.
***
title: What is EasyApp
description: EasyApp is the most comprehensive SwiftUI template project for building iOS Apps.
icon: Album
-----------
## What EasyApp Can Do
Welcome to **EasyApp** template, an iOS app development template built with SwiftUI that includes built-in core features such as onboarding, user authentication, in-app purchases, database operations, and more, ready to use out of the box. It also provides advanced features like AI examples that can meet most iOS app development needs. Say goodbye to tedious and repetitive basic development work, allowing you to focus on your core business logic and save you a lot of time.
## Core Features
EasyAppSwiftUI includes the basic functionality that every modern iOS application needs:
### Latest Features
* Actively adapts to the latest iOS system and latest SwiftUI features
* Supports iOS 17+ new features like lock screen widgets, live activities, etc.
* Latest Swift concurrency programming features like async/await, Task, etc.
### Authentication & Security
* **Sign in with Apple** integration
* **Email/password** authentication flows
### User Experience
* **Interactive onboarding** flow with feature highlights
* **Dark/Light mode** support with automatic system preference detection
* Smooth animations and transitions
### In-App Purchases
* Support for both **RevenueCat** and **StoreKit2** in-app purchase integration
* Support for subscription management/one-time purchase management
### AI Examples
* Integration with domestic large language models, supporting voice TTS, image recognition and other functions, and outputting recognition results as reasonable JSON data structures for easy subsequent processing, supporting database storage
* Receipt recognition
* Voice TTS functionality (in development)
* Image recognition functionality (in development)
### Flux text to image/video
* Integrate [Replicate](https://replicate.com/) platform, support multiple models, support multiple styles, support multiple quality, support multiple sizes
### Credit System
* Support for credit system, support credit earning, spending, subscription, transaction records and anti-abuse protection features
### Developer Experience
* Development with Cursor, built-in Cursor Rules
* Works with [Inject](https://github.com/krzysztofzablocki/Inject) plugin for page hot reloading
* Each module has corresponding README.md files to detail its functionality and file structure, making it easier for AI to better understand the project structure and help you with better Vibe Coding
## Technology Stack
## Who Should Use EasyApp?
This template is perfect for:
* **Indie Developers** looking to launch apps quickly
* **Startups** needing a solid foundation for their MVP
* **Teams** wanting to standardize their iOS development approach
* **Experienced Developers** who want to skip repetitive setup tasks
* **Learning Projects** to understand modern iOS app architecture
* **Product/Design/Operations professionals and those new to iOS development** who want to quickly get started with SwiftUI development and create their own iOS app
## Getting Started
Ready to build your next iOS app? Here's how to get started:
**Follow the Installation Guide**: Complete the [Installation Guide](/docs/introduction/installation) to set up your development environment
## Community & Support
If you're stuck, here are some ways to get help:
* Follow us on [X](https://x.com/ios_1261142602)
* Join us on [Discord](https://discord.gg/36UQMU6yKw)
* Open a discussion on [GitHub Discussions](https://github.com/sunshineLixun/easyapp-swiftui/discussions)
* Contact our support team at [email](mailto:lixunemail@gmail.com)
# AI Features
URL: https://easyapp.site/en/docs/modules/AI
Learn how to use Supabase Edge Function to call AI APIs in EasyAppSwiftUI
***
title: AI Features
description: Learn how to use Supabase Edge Function to call AI APIs in EasyAppSwiftUI
icon: Brain
-----------
# AI Feature Integration Guide
This document provides a detailed guide on how to use **Supabase Edge Function** to call AI APIs in EasyAppSwiftUI, using receipt analysis functionality as an example to demonstrate the complete implementation process.
## Why Choose Supabase Edge Function?
Using Supabase Edge Function as an intermediate layer for AI services offers the following significant advantages:
No additional server maintenance costs, pay-as-you-go model
API Keys are securely stored on the server side, avoiding client-side packet capture risks
Easy access to user information for permission control and data management
**Strongly Recommended**: Store API Keys on the server side rather than the client side. Network requests from mobile apps are easily intercepted by packet capture tools, leading to API Key leakage.
### Related Resources
Want to learn more about Supabase Edge Function? Please refer to the official documentation:
* [Supabase Edge Functions Official Guide](https://supabase.com/docs/guides/functions)
For more information on how to integrate Supabase Edge Function, please refer to:
} href="/docs/Integrations/supabaseEdgeFuncton">
Introduction to Supabase Edge Function
We can combine with in-app purchases to provide different AI analysis counts, such as 10 free, 100 paid, 1000 paid, etc.
This feature is currently under development, stay tuned.
## System Architecture Overview
The AI feature adopts the following architecture design:
```
SwiftUI App → Supabase Storage → Supabase Edge Function → OpenAI API → Streaming Response → SwiftUI
```
## Demo
## Core Feature Characteristics
### Intelligent Receipt Analysis
* **Image Upload**: Support selecting receipt images from photo album or camera
* **AI Recognition**: Use OpenAI multimodal model to extract receipt information
* **Real-time Streaming Response**: Display analysis process to enhance user experience
* **Structured Data**: Automatically parse into standardized JSON format
* **Data Storage**: Analysis results saved to Supabase database
## Technical Implementation Details
### 1. Data Model Design
First, define the structured model for receipt data:
```swift
struct ReceiptModel: Identifiable, Codable, Equatable {
var id = UUID()
var userID: String?
let restaurantInfo: RestaurantInfo
let foodItems: [FoodItem]
let pricingSummary: PricingSummary
let paymentInfo: PaymentInfo
let receiptMetadata: ReceiptMetadata
}
struct RestaurantInfo: Codable {
let name: String?
let address: String?
let phone: String?
let date: String?
let time: String?
}
struct FoodItem: Codable, Identifiable {
var id = UUID()
let name: String?
let unitPrice: Double?
let quantity: Int?
let totalPrice: Double?
}
```
### 2. SwiftUI Frontend Implementation
#### Image Upload Functionality
```swift
func uploadImage(selectedImage: UIImage) async throws -> String {
isUploading = true
defer { isUploading = false }
guard let imageData = selectedImage.jpegData(compressionQuality: 0.8) else {
return ""
}
let imageName = UUID().uuidString
let imagePath = "\(imageName).jpeg"
return try await supabase.request {
let response = try await supabase.storage
.from("receipt-analysis")
.upload(
imagePath,
data: imageData,
options: FileOptions(contentType: "image/jpeg")
)
return response.fullPath
}
}
```
#### AI Analysis Call
```swift
func analyzeReceipt(imagePath: String) async {
isAnalyzing = true
analysisContent = ""
parsedReceipt = nil
let parameters = ["imgPath": imagePath]
do {
try await supabase.callStreamingFunction(
functionName: "receipt-analysis",
parameters: parameters,
onContent: { [weak self] (content: String) in
guard let self = self else { return }
self.analysisContent += content
},
onCompletion: { [weak self] in
guard let self = self else { return }
self.isAnalyzing = false
self.parseAnalysisContent()
}
)
} catch {
isAnalyzing = false
state = .result(.failure(error))
}
}
```
#### Function Entry and Authentication
```typescript
Deno.serve(async (req) => {
const userAuth = await getUserAuth(req);
if (!userAuth) {
return new Response(JSON.stringify({ error: "Unauthorized" }), {
status: 401,
});
}
return responseAIModelStream(req);
});
async function getUserAuth(req: Request) {
const supabaseClient = getSupabaseClient(req);
const authHeader = req.headers.get("Authorization");
if (!authHeader) return null;
const token = authHeader.replace("Bearer ", "");
const { data } = await supabaseClient.auth.getUser(token);
return data?.user || null;
}
```
#### AI Model Call and Streaming Response
```typescript
async function responseAIModelStream(req: Request) {
const { imgPath } = (await req.json()) as ReceiptAnalysisRequest;
// Get public URL of the image for AI analysis
const imageUrl = getImageUrl(req, imgPath);
console.log("Processing image:", imageUrl);
const stream = await openAIClient.chat.completions.create({
model: "qwen-vl-max-latest",
response_format: { type: "json_object" },
messages: [
{
role: "system",
content: "You are a professional restaurant receipt analysis expert..."
},
{
role: "user",
content: [
{
type: "image_url",
image_url: { url: imageUrl } // Use dynamically generated image URL
},
{
type: "text",
text: `Analyze this receipt and return JSON with fields:
- restaurant_info
- food_items
- pricing_summary
- payment_info
- receipt_metadata`
}
]
}
],
stream: true,
});
const readableStream = new ReadableStream({
start(controller) {
(async () => {
try {
for await (const chunk of stream) {
const content = chunk.choices[0]?.delta?.content || "";
if (content) {
const encoder = new TextEncoder();
controller.enqueue(
encoder.encode(`data: ${JSON.stringify({ content })}\n\n`)
);
}
}
const encoder = new TextEncoder();
controller.enqueue(encoder.encode("data: [DONE]\n\n"));
} catch (error) {
controller.error(error);
} finally {
controller.close();
}
})();
},
});
return new Response(readableStream, {
headers: {
"Content-Type": "text/event-stream",
"Cache-Control": "no-cache",
Connection: "keep-alive",
},
});
}
```
### 3. Data Parsing and Storage
#### JSON Parsing
```swift
func parseAnalysisContent() {
guard !analysisContent.isEmpty else {
state = .result(.failure(ParsingError.emptyAnalysisContent))
return
}
let cleanedContent = extractJSON(from: analysisContent)
guard let jsonData = cleanedContent.data(using: .utf8) else {
state = .result(.failure(ParsingError.invalidJSON))
return
}
do {
let decoder = JSONDecoder()
let receipt = try decoder.decode(ReceiptModel.self, from: jsonData)
self.parsedReceipt = receipt
} catch {
state = .result(.failure(error))
}
}
private func extractJSON(from content: String) -> String {
guard let firstBrace = content.firstIndex(of: "{"),
let lastBrace = content.lastIndex(of: "}") else {
return content
}
return String(content[firstBrace...lastBrace])
}
```
#### Database Storage
```swift
func saveReceiptAnalysisResult(receipt: ReceiptModel) async {
isSaving = true
defer { isSaving = false }
guard let user = supabase.auth.currentUser else { return }
let saveReceipt = ReceiptModel(
userID: user.id.uuidString,
restaurantInfo: receipt.restaurantInfo,
foodItems: receipt.foodItems,
pricingSummary: receipt.pricingSummary,
paymentInfo: receipt.paymentInfo,
receiptMetadata: receipt.receiptMetadata
)
do {
try await supabase.request {
try await supabase.client.from("receipt_analysis_results")
.insert(saveReceipt)
.select()
.single()
.execute()
}
} catch {
state = .result(.failure(error))
}
}
```
## Configuration Requirements
⚠️ **Important Reminder**: Please ensure to add the following content to the `.gitignore` file in your project root directory to avoid sensitive information leakage:
```bash
# Environment variable files
.env
.env.local
.env.production
.env.*.local
# Supabase
supabase/.branches
supabase/.temp
```
### 1. Supabase Configuration
#### Environment Variable Setup
Create a `.env` file in your Supabase project root directory and configure the following environment variables:
```bash
# .env file configuration example
# OpenAI API configuration (using Alibaba Cloud Tongyi Qianwen API here)
OPENAI_API_KEY=your_dashscope_api_key_here
# Supabase project configuration
SUPABASE_URL=https://your-project-ref.supabase.co
SUPABASE_SERVICE_ROLE_KEY=your_service_role_key_here
```
**Methods to obtain configuration information**:
1. **OPENAI\_API\_KEY**:
* Current code uses Alibaba Cloud Tongyi Qianwen API
* Visit [Alibaba Cloud Lingji Platform](https://dashscope.aliyun.com/)
* Register an account and create an API Key
* Can also be replaced with standard OpenAI API Key
2. **SUPABASE\_URL**:
* Login to [Supabase](https://supabase.com/dashboard/project/mutkgdbrerijqhqccalu/settings/api-keys)
* Select your project
* Find Project URL in Project Settings → Data API page
* Find Service Anon Key in Project Settings → API Keys page
### 2. Storage Bucket Setup
Create a `receipt-analysis` storage bucket to store receipt images with appropriate access permissions:
```sql
-- Create receipt analysis storage bucket
INSERT INTO storage.buckets (id, name, public)
VALUES ('receipt-analysis', 'receipt-analysis', true);
-- Set access policy: Allow authenticated users to upload
CREATE POLICY "Allow authenticated users to upload receipts"
ON storage.objects FOR INSERT
WITH CHECK (bucket_id = 'receipt-analysis' AND auth.role() = 'authenticated');
-- Set access policy: Allow authenticated users to view their own uploaded files
CREATE POLICY "Allow users to view their own receipts"
ON storage.objects FOR SELECT
USING (bucket_id = 'receipt-analysis' AND auth.role() = 'authenticated');
-- Set access policy: Allow users to delete their own files
CREATE POLICY "Allow users to delete their own receipts"
ON storage.objects FOR DELETE
USING (bucket_id = 'receipt-analysis' AND auth.role() = 'authenticated');
```
**Storage Bucket Configuration Notes**:
* `public = true`: Allow access via public URL (for AI analysis)
* Access policies ensure only authenticated users can upload, view, and delete files
* Image files automatically generate UUID filenames to avoid naming conflicts
### 3. Database Table Structure
Complete receipt analysis results table structure:
```sql
-- Create receipt analysis results table
CREATE TABLE public.receipt_analysis_results (
id UUID PRIMARY KEY DEFAULT gen_random_uuid(),
user_id UUID NOT NULL REFERENCES auth.users(id),
restaurant_info JSONB,
food_items JSONB,
pricing_summary JSONB,
payment_info JSONB,
receipt_metadata JSONB,
raw_response JSONB, -- Store original AI response for debugging
img_path TEXT, -- Image storage path
created_at TIMESTAMPTZ DEFAULT now(),
updated_at TIMESTAMPTZ DEFAULT now()
);
-- Enable row-level security policies
ALTER TABLE public.receipt_analysis_results ENABLE ROW LEVEL SECURITY;
-- Create access policy: Users can only access their own data
CREATE POLICY "Users can access their own receipt analysis results"
ON public.receipt_analysis_results
FOR ALL
USING (auth.uid() = user_id);
```
**Table Structure Notes**:
* `id`: Primary key, auto-generated UUID
* `user_id`: User ID, linked to authentication user table
* `restaurant_info`: Restaurant information (name, address, phone, date, time)
* `food_items`: Food items array (name, unit price, quantity, total price)
* `pricing_summary`: Price summary (subtotal, discount, tax, service fee, total)
* `payment_info`: Payment information (payment method, payment amount, change)
* `receipt_metadata`: Receipt metadata (receipt number, cashier, table number)
* `raw_response`: Original AI response data for debugging and auditing
* `img_path`: Receipt image path in storage
* `created_at/updated_at`: Record creation and update times
## Best Practices
### Security
* **Environment Variable Management**:
* Do not commit `.env` files to version control systems
* **User Authentication**: All API calls require valid authentication tokens
* **Data Validation**: Validate format and size of uploaded images
* **Error Handling**: Provide friendly error prompts and retry mechanisms
* **Row-Level Security**: Ensure users can only access their own analysis results
## Extended Applications
Based on this architecture, you can easily extend more AI features:
* **Document Recognition**: Extract information from ID cards, passports, and other documents
* **Text Translation**: Multi-language real-time translation functionality
* **Image Analysis**: Product recognition, scene analysis, etc.
* **Voice Processing**: Speech-to-text, etc.
This architecture provides a flexible, scalable AI integration solution that allows you to quickly build various AI application features.
# Credit System
URL: https://easyapp.site/en/docs/modules/Credits
Learn how to integrate the credit system in EasyApp
***
title: Credit System
description: Learn how to integrate the credit system in EasyApp
icon: Coins
-----------
## Overview
The EasyApp Credit System is a complete user credit management solution that provides credit earning, spending, transaction records, and anti-abuse protection features. The system supports multiple credit sources including registration bonuses, subscriptions, in-app purchases, promotional activities, and includes comprehensive anti-fraud mechanisms.
## Core Features
### 1. Credit Management
* **FIFO Consumption Mechanism**: Credits are consumed on a first-in-first-out basis, ensuring that earlier earned credits are used first
* **Validity Period Support**: Supports both permanent and temporary credits with configurable expiration times
* **Multi-source Tracking**: Detailed recording of credit sources (registration, subscription, purchase, promotion, refund, admin distribution, etc.)
* **Real-time Balance Query**: Quick retrieval of user credit balance, including permanent credits, temporary credits, and credits about to expire
### 2. Transaction System
* **Complete Transaction Records**: Detailed history of all credit operations including earning, spending, expiration, and refunds
* **Balance Tracking**: Records user balance changes after each transaction
* **Batch Management**: Supports batch credit operations for easy management and tracking
### 3. Feature Billing
* **Flexible Billing**: Set different credit consumption standards for different features
* **Dynamic Configuration**: Support for runtime adjustment of feature credit consumption costs
* **Feature Toggle**: Dynamically enable or disable billing for specific features
### 4. Anti-Abuse System
* **Email Restrictions**: Limit registration count and bonus distribution per email address
* **Device Fingerprinting**: Monitor device fingerprints to prevent multi-account abuse
* **Risk Scoring**: Calculate risk scores based on user behavior to automatically identify suspicious activities
* **Cooldown Mechanism**: Set cooldown periods for registration bonuses to prevent frequent account creation
### 5. In-App Purchase Integration
* **RevenueCat Integration**: Complete support for RevenueCat in-app purchase platform
* **One-time Purchases**: Support for credit package purchases, allowing users to directly buy credits
* **Subscription Services**: Support for monthly/yearly subscriptions with automatic credit distribution
## Database Configuration
### Credit Package Configuration (credit\_packages)
Currently only supports configuring credit packages in SQL. A management system will be implemented later to support configuring credit packages without modifying SQL code, reducing the barrier to entry.
The credit packages table is used to configure one-time credit packages available for user purchase:
```sql
CREATE TABLE credit_packages (
id UUID PRIMARY KEY,
name TEXT NOT NULL, -- Credit package name
credits INTEGER NOT NULL, -- Credit amount
price DECIMAL(10,2) NOT NULL, -- Price
product_id TEXT UNIQUE NOT NULL, -- RevenueCat product ID
is_permanent BOOLEAN DEFAULT true, -- Whether it's permanent credits
is_active BOOLEAN DEFAULT true, -- Whether enabled
sort_order INTEGER DEFAULT 0 -- Sort order
);
```
**RevenueCat In-App Purchase Product Configuration Example:**
```sql
INSERT INTO credit_packages (name, credits, price, product_id) VALUES
('Starter Pack', 1000, 9.99, 'easyapp_credits_1000'),
('Popular Pack', 5000, 39.99, 'easyapp_credits_5000'),
('Professional Pack', 10000, 69.99, 'easyapp_credits_10000'),
('Value Pack', 50000, 299.99, 'easyapp_credits_50000');
```
**Configuration Points:**
1. `product_id` must exactly match the product ID in the RevenueCat console
2. Credit packages are typically set as permanent credits (`is_permanent = true`)
3. Control display order in the app through `sort_order`
4. Temporarily disable specific credit packages through `is_active`
### Subscription Product Configuration (subscription\_products)
The subscription products table is used to configure monthly/yearly subscription services:
```sql
CREATE TABLE subscription_products (
id UUID PRIMARY KEY,
product_id TEXT UNIQUE NOT NULL, -- RevenueCat subscription product ID
product_name TEXT NOT NULL, -- Product name
subscription_type TEXT NOT NULL, -- Subscription type: 'monthly' or 'yearly'
credits_per_month INTEGER NOT NULL, -- Credits distributed per month
price DECIMAL(10,2), -- Price
currency TEXT DEFAULT 'USD', -- Currency unit
is_active BOOLEAN DEFAULT true -- Whether enabled
);
```
**RevenueCat Subscription Product Configuration Example:**
```sql
INSERT INTO subscription_products (
product_id, product_name, subscription_type, credits_per_month, price
) VALUES
('subscription_credit_monthly_basic_1', 'Premium Monthly', 'monthly', 2000, 9.99),
('subscription_credit_yearly_basic_1', 'Premium Yearly', 'yearly', 2000, 83.99);
```
**Configuration Points:**
1. `product_id` must exactly match the subscription product ID in the RevenueCat console
2. Monthly and yearly subscriptions typically set the same `credits_per_month` (yearly users get the same monthly credits)
3. Yearly subscription prices are usually cheaper than monthly price × 12 (like the 30% discount in the example)
4. The system automatically handles credit distribution cycles based on subscription type
### Feature Billing Configuration (feature\_credit\_costs)
The feature billing table defines credit consumption standards for various features:
```sql
INSERT INTO feature_credit_costs (feature_name, credit_cost, description) VALUES
('text2image', 100, 'Text to Image Generation'),
('image2image', 150, 'Image to Image Conversion'),
('receipt_analysis', 50, 'Receipt Analysis'),
('receipt_analysis_pro', 100, 'Advanced Receipt Analysis');
```
## RevenueCat Integration Configuration
### 1. Product ID Mapping
##### Credit Packages
* RevenueCat Product ID → `credit_packages.product_id`
* Used for one-time credit package purchases
* Credits are distributed immediately after successful purchase
Next, let's introduce how to create one-time credit package products.
You must have an Apple Developer account and have already created an App to create one-time credit package products.
If you forgot how to create in-app purchase products, you can refer back to
} href="/docs/Integrations/RevenueCat">
Learn how to integrate RevenueCat service
1: First, go to [App Store Connect](https://appstoreconnect.apple.com/) and select In-App Purchases.
Since we're creating one-time credit package products, select In-App Purchases, not Subscriptions.

Click `+` to create a one-time credit package product.
Select `Type` as `Consumable`, representing consumable products. (Credits are consumable products)
`Reference Name` and `Product ID`: The `Product ID` should match the `product_id` field you defined in the `credit_packages` table. It must be consistent because during purchase, it determines which credit package is being purchased based on `product_id`.
As for `Reference Name`, you can make it the same as `product_id` or different - this is your own definition.
The `Product ID` should match the `product_id` field you defined in the `credit_packages` table. It must be consistent because during purchase, it determines which credit package is being purchased.
When setting the price, also keep it consistent with the `price` field you defined in the `credit_packages` table.
The "Learn how to integrate RevenueCat" chapter provides detailed instructions on how to create in-app purchase products, including: internationalization, sales scope, and required screenshots for review. If you forgot, you can refer back. We won't repeat how to create in-app purchase products here.
} href="/docs/Integrations/RevenueCat#%E5%88%9B%E5%BB%BA%E4%B8%80%E6%AC%A1%E6%80%A7%E8%B4%AD%E4%B9%B0%E7%BB%88%E8%BA%AB%E4%BC%9A%E5%91%98">
Learn how to integrate RevenueCat service
Using `EasyApp` as an example, here's how to fill it out: According to the `credit_packages` table, 4 credit packages were created

2: Next, configure `RevenueCat`
Login to [RevenueCat](https://app.revenuecat.com/)

* Select `Product catalog`
* Select `Product`
* Select `New Product`
* Click `New Product`

It will automatically pull the in-app purchase products you just created. Select your desired credit packages.
After importing the in-app purchase products, we need to configure `Offerings`. EasyApp will pull credit packages based on `Offerings`.

Click `New Offering`

* Fill in your `Identifier`, `Display Name`, and `Packages`.
For `Packages` `Identifier`, you can choose `Custom`, and for `Product`, select the in-app purchase products you just imported.

Using `EasyApp` as an example, fill it out as follows:

Again emphasizing:
The `Product ID` should match the `product_id` field you defined in the `credit_packages` table. It must be consistent because during purchase, it determines which credit package is being purchased.
When setting the price, also keep it consistent with the `price` field you defined in the `credit_packages` table.
3: Go to the `EasyAppSwiftUI` project, and in the `Constants/Constants.swift` file, configure the `creditPackagesEntitlementID` value for `RevenueCat`.
```swift
enum RevenueCat {
// ...
/// Credit Packages entitlement ID
static let creditPackagesEntitlementID = "easyapp_credits"
// ...
}
```
At this point, the credit package configuration is completely finished.
##### Subscriptions
* RevenueCat Product ID → `subscription_products.product_id`
* Used for monthly/yearly subscription services
* Automatically distribute credits based on subscription cycle
The steps for subscription products are the same as credit packages, except you're configuring subscription products.

For the remaining steps, please refer to the article below
Fill in the subscription product's price, id, name, and subscription duration. This section is covered in detail in RevenueCat subscription product creation, please check.
} href="/docs/Integrations/RevenueCat#%E5%88%9B%E5%BB%BA%E6%9C%88%E5%BA%A6%E8%AE%A2%E9%98%85">
Learn about RevenueCat subscription product creation
Using `EasyApp` as an example, our created subscription product information is as follows:

1: After creating the subscription in App Store Connect, return to RevenueCat to configure `Offerings`.
2: In the steps above for creating credit packages, we've already detailed how to configure `Offerings`. We won't repeat it here.
3: For subscription products, in addition to creating `Offerings`, we also need to create `Entitlements`.

* Fill in `Identifier`
* Fill in `Description`
* Associate with the subscription products you created in App Store Connect
Using `EasyApp` as an example, the created `Entitlements` are filled out as follows:

4: Go to the `EasyAppSwiftUI` project, and in the `Constants/Constants.swift` file, configure the `creditSubscriptionEntitlementID` value for `RevenueCat`.
```swift
enum RevenueCat {
// ...
/// Credit Packages entitlement ID
static let creditSubscriptionEntitlementID = "subscription_credit"
// ...
}
```
When creating subscription products: The `Product ID` should match the `product_id` field you defined in the `subscription_products` table. It must be consistent because during purchase, it determines which subscription product is being purchased.
When setting the price, also keep it consistent with the `price` field you defined in the `subscription_products` table.
### 2. Webhook Configuration
The system automatically handles purchase and subscription events through RevenueCat Webhook:
**Supported Event Types:**
* `INITIAL_PURCHASE`: First purchase/subscription
* `RENEWAL`: Subscription renewal
* `CANCELLATION`: Subscription cancellation
* `EXPIRATION`: Subscription expiration
* `PRODUCT_CHANGE`: Subscription upgrade/downgrade
* `BILLING_ISSUE`: Payment issues
**Webhook URL Configuration:**
```
https://your-project.supabase.co/functions/v1/subscription-webhook
```
For development environment webhook URL configuration, we recommend using [ngrok](https://ngrok.com/) for setup.
For ngrok installation and usage, please refer to [ngrok](https://ngrok.com/).
Execute the command:
```bash
ngrok http 54321
```
Then configure RevenueCat's Webhook URL as `https://your-ngrok-url/functions/v1/subscription-webhook`.
As shown in the figure below:

When we're ready to go live, don't forget to configure the production environment Webhook URL.
RevenueCat supports configuring multiple Webhook URLs. You can add a new Webhook URL and specifically configure the production environment Webhook URL.
**Renewal Trigger Time:**
For the test environment, sandbox subscription trigger time can be configured in App Store Connect. That is, if you set it to 5-minute intervals, the Webhook URL will trigger every 5 minutes.

### 3. User ID Mapping
We have already set RevenueCat's `app_user_id` to the Supabase user's UUID during EasyApp login, ensuring the system can correctly identify user identity.
```swift
// logInRevenueCat
try await logInRevenueCat(userId: response.user.id.lowercasedString)
```
## System Configuration
### Dynamic Configuration System
The system supports runtime dynamic configuration adjustment without service restart:
**Credit System Configuration (system\_config.credit\_system):**
```json
{
"enabled": true,
"registration_bonus": 3000,
"enable_anti_abuse": true,
"refund_on_failure": true
}
```
**Feature Toggle Configuration (system\_config.features):**
```json
{
"image_generation": true,
"receipt_analysis": true
}
```
**Anti-Abuse Configuration (system\_config.anti\_abuse):**
```json
{
"max_registrations_per_email": 1,
"max_bonus_per_email": 3000,
"max_accounts_per_device": 10,
"registration_cooldown_days": 30,
"risk_score_threshold": 70,
"refund_time_limit_hours": 24
}
```
### Security Features
1. **Row Level Security (RLS)**: All data tables have RLS enabled, ensuring users can only access their own data
2. **Permission Control**: Edge Functions use Service Role for management operations
3. **Parameter Validation**: Strict parameter validation for all interfaces
4. **Duplicate Prevention**: Ensure Webhook events are not processed repeatedly through event IDs
5. **Audit Logging**: Complete audit trail for all credit operations
## Best Practices
1. **Regular Cleanup**: Recommend regular cleanup of expired credit records and transaction logs
2. **Monitoring Alerts**: Set up monitoring alerts for abnormal credit consumption and batch operations
3. **Performance Optimization**: Use pre-computed views to improve credit balance query performance
4. **Backup Strategy**: Regularly backup credit-related data to ensure data security
5. **Test Validation**: Thoroughly test in sandbox environment before production deployment
Through the above configuration and integration, you will have a fully functional, secure, and reliable credit management system that supports various business scenarios and monetization models.
# Main App Entry
URL: https://easyapp.site/en/docs/modules/EasyAppSwiftUIApp
Learn what EasyAppSwiftUI's main app entry does
***
title: Main App Entry
description: Learn what EasyAppSwiftUI's main app entry does
icon: AppWindow
---------------
# Main App Entry - ContentView
`ContentView` is the main entry point of the EasyAppSwiftUI application, responsible for initializing and configuring the application's core components, state managers, and environment objects.
## Core Architecture
### State Manager Initialization
ContentView initializes multiple key state managers:
```swift
struct ContentView: View {
/// App state - Application global state
@StateObject private var appState = AppState()
/// Auth Manager - Authentication manager
@StateObject private var authManager = AuthManager.shared
/// RevenueCat - In-app purchase management (RevenueCat)
@StateObject private var revenueCatManager = RevenueCatManager.shared
/// StoreKit2 - In-app purchase management (StoreKit2)
@StateObject private var storeKit2Manager = StoreKit2Manager.shared
}
```
### Main Function Modules
1. **Application State Management** (`AppState`)
* Manages the application's global state
* Coordinates data sharing between various modules
2. **User Authentication** (`AuthManager`)
* Handles user login, registration, and authentication
* Manages user session state
3. **In-App Purchase System**
* `RevenueCatManager`: In-app purchase management based on RevenueCat
* `StoreKit2Manager`: In-app purchase management based on StoreKit2
* Supports dual in-app purchase solutions, providing better compatibility
## View Structure
### Main View Configuration
```swift
var body: some View {
MainView()
.showAuthView() // Show authentication view
.showPaywallSheetWhenCalled() // Show paywall
.environmentObject(appState) // Inject app state
.environmentObject(authManager) // Inject authentication manager
.environment(
\.whatsNew,
.init(
versionStore: UserDefaultsWhatsNewVersionStore(),
whatsNewCollection: self
)
) // Configure new feature introduction
.environmentObject(revenueCatManager) // Inject RevenueCat manager
.environmentObject(storeKit2Manager) // Inject StoreKit2 manager
}
```
### View Modifier Explanation
* **`.showAuthView()`**: Automatically shows authentication interface when user is not logged in
* **`.showPaywallSheetWhenCalled()`**: Responds to paywall calls, displays subscription interface
* **Environment Object Injection**: Injects managers into the entire view hierarchy through `environmentObject`
## Core Modifier Details
### showAuthView() - Authentication View Manager
`showAuthView()` is a key view modifier responsible for managing the entire application's user authentication flow.
#### Implementation Principle
```swift
extension View {
/// Show Auth View
/// This function is used to show the auth view.
/// - Returns: A view with a auth view.
func showAuthView() -> some View {
modifier(AuthViewModifier())
}
}
```
#### Main Functions
1. **Automatic Authentication Detection**
* Monitors user login status changes
* Automatically pops up login interface when user is not authenticated
* Automatically hides login interface after successful authentication
2. **Seamless User Experience**
* Silently checks authentication status in the background
* Maintains continuity of user operations
* Avoids unnecessary interface jumps
3. **State Management Integration**
* Deep integration with `AuthManager`
* Responds to real-time changes in authentication status
* Supports automatic refresh and re-authentication
### showPaywallSheetWhenCalled() - Global Paywall Listener
`showPaywallSheetWhenCalled()` is a global paywall listener that works with `AuthManager.actionGoPaywall()` through the notification system.
#### Implementation Principle
```swift
extension View {
/// Show Paywall Sheet When Called
/// This function is used to show the paywall sheet when called.
/// - Returns: A view with a paywall sheet.
func showPaywallSheetWhenCalled() -> some View {
self.modifier(ShowPaywallSheetWhenCalledModifier())
}
}
```
#### Working Mechanism
1. **Notification Listening**
* Listens to `Constants.Notifications.showPaywall` notification
* Set at ContentView root level for global coverage
* Responds to paywall calls through `NotificationCenter`
2. **Integration with AuthManager**
* Works with `AuthManager.actionGoPaywall()` method
* When user has no subscription, actionGoPaywall sends notification
* Listener receives notification and displays corresponding paywall
#### AuthManager.actionGoPaywall() Method
```swift
extension AuthManager {
public func actionGoPaywall(
subscriptionType: SubscriptionType = .revenueCat,
sheetOrFullScreenCover: SheetOrFullScreenCover = .sheet,
_ closure: () -> Void
) {
if subscriptionActive {
closure() // User is subscribed, execute business logic
} else {
// Send notification to show paywall
let notificationData = PaywallNotificationData(
subscriptionType: subscriptionType,
sheetOrFullScreenCover: sheetOrFullScreenCover
)
NotificationCenter.default.post(
name: Constants.Notifications.showPaywall,
object: nil,
userInfo: notificationData.userInfo
)
}
}
}
```
#### Usage Method
You can call the paywall from anywhere in the application using the following method:
```swift
// Use in any view
Button("Use Advanced Features") {
authManager.actionGoPaywall(
subscriptionType: .revenueCat,
sheetOrFullScreenCover: .sheet
) {
// Business logic executed when user is subscribed
print("Execute advanced features")
performPremiumAction()
}
}
```
#### Architectural Advantages
* **Global Management**: Unified handling of all paywall displays at root view
* **Decoupled Design**: Complete separation of business logic from UI display
* **Flexible Calling**: Can trigger paywall from anywhere in the application
## New Feature Guide (WhatsNewKit)
ContentView implements the `WhatsNewCollectionProvider` protocol, providing new feature introductions when the app updates:
### Protocol Implementation
```swift
extension ContentView: WhatsNewCollectionProvider {
var whatsNewCollection: WhatsNewCollection {
// Current version's new feature introduction
WhatsNew(
version: .current(),
title: "News App2",
features: [
.init(
image: .init(
systemName: "apps.iphone",
foregroundColor: .black
),
title: "Welcome to the News App",
subtitle: "This is a news app that allows you to read news articles"
)
],
primaryAction: .init(
title: "OK",
hapticFeedback: .notification(.success)
),
secondaryAction: WhatsNew.SecondaryAction(
title: "Learn more",
foregroundColor: .accentColor,
hapticFeedback: .selection,
action: .openURL(
.init(string: "https://github.com/SvenTiigi/WhatsNewKit")
)
)
)
// Historical version's new feature introduction
WhatsNew(
version: "1.0.0",
title: "Welcome to the News App",
features: [
.init(
image: .init(
systemName: "newspaper",
foregroundColor: .black
),
title: "Welcome to the News App",
subtitle: "This is a news app that allows you to read news articles"
)
],
primaryAction: .init(
title: "OK",
hapticFeedback: .notification(.success)
)
)
}
}
```
### New Feature Guide Characteristics
* **Version Management**: Uses `UserDefaultsWhatsNewVersionStore` to store displayed versions
* **Haptic Feedback**: Integrates haptic feedback system to enhance user experience
* **Multi-version Support**: Can define new feature introductions for multiple versions
* **Custom Actions**: Supports primary and secondary action buttons
## Key Features
### 1. Dependency Injection Architecture
Through `@StateObject` and `environmentObject`, a clear dependency injection pattern is implemented, ensuring:
* Single data source
* State sharing
* Module decoupling
### 2. Multiple In-App Purchase Methods Support
Simultaneously integrates RevenueCat and StoreKit2, providing:
* Better platform compatibility
* Flexible monetization strategies
* Backup solution support
### 3. User Experience Optimization
* Automatic authentication flow
* Smooth paywall experience
* New feature guide system
* Haptic feedback integration
## Usage Recommendations
### 1. Authentication Flow Best Practices
```swift
// Use in views that need authentication protection
NavigationStack {
TabView {
// Main feature pages
HomeView()
.tabItem {
Label("Home", systemImage: "house")
}
ProfileView()
.tabItem {
Label("Profile", systemImage: "person")
}
}
}
.showAuthView() // Add authentication protection at the outermost layer
```
### 2. Paywall Integration Strategy
```swift
// Use actionGoPaywall for payment protection
VStack {
Text("Advanced Features")
Button("Use AI Features") {
authManager.actionGoPaywall(
subscriptionType: .revenueCat,
sheetOrFullScreenCover: .sheet
) {
// AI feature logic executed when user is subscribed
performAIFeature()
}
}
Button("Use Professional Tools") {
authManager.actionGoPaywall(
subscriptionType: .storeKit2,
sheetOrFullScreenCover: .fullScreenCover
) {
// Professional tools logic executed when user is subscribed
openProfessionalTools()
}
}
}
// Global paywall listener - add to root view
ContentView()
.showPaywallSheetWhenCalled()
```
### 3. Two Payment Protection Mechanisms
EasyAppSwiftUI provides two different payment protection mechanisms:
#### actionGoPaywall (Recommended)
```swift
// Through AuthManager's actionGoPaywall method
@EnvironmentObject private var authManager: AuthManager
Button("Advanced Features") {
authManager.actionGoPaywall(
subscriptionType: .revenueCat, // or .storeKit2
sheetOrFullScreenCover: .sheet // or .fullScreenCover
) {
// Business logic for subscribed users
executeAdvancedFeature()
}
}
```
#### requirePremium (View-level Protection)
```swift
// Apply payment protection modifier directly on view
AdvancedFeatureView()
.requirePremium(
subscriptionType: .revenueCat,
sheetOrFullScreenCover: .sheet,
onCancelPaywall: {
print("User cancelled payment")
},
onPaySuccess: {
print("User subscription successful")
}
)
```
#### Differences Between the Two Methods
* **actionGoPaywall**: Based on notification system, globally unified management, works with `showPaywallSheetWhenCalled()`
* **requirePremium**: View-level protection, applied directly on view, works independently
### 4. Development and Debugging Recommendations
#### Basic Configuration
* **Custom New Feature Introduction**: Modify content in `whatsNewCollection` to adapt to your app
* **Environment Configuration**: Add or remove environment objects as needed
* **State Management**: Use injected managers for state operations
* **Modular Development**: Access these managers through `@EnvironmentObject` in child views
#### Authentication and Payment Testing
* **Test Authentication Flow**: Test login, logout, and session expiration scenarios during development
* **actionGoPaywall Testing**: Verify logic branches under different subscription statuses
* **Notification System Verification**: Ensure `showPaywallSheetWhenCalled` correctly responds to notifications
* **Paywall Display Testing**: Verify sheet and fullScreenCover display methods
#### Debugging Tips
```swift
// Add debug information in actionGoPaywall
authManager.actionGoPaywall {
print("✅ User is subscribed, executing advanced features")
// Business logic
}
// Listen to paywall notifications (for debugging)
NotificationCenter.default.addObserver(
forName: Constants.Notifications.showPaywall,
object: nil,
queue: .main
) { notification in
print("🔔 Received paywall display notification: \(notification.userInfo ?? [:])")
}
```
## Architectural Advantages Summary
### Unified Management of Authentication and Payment
The application of `showAuthView()` and `showPaywallSheetWhenCalled()` modifiers in ContentView demonstrates the following architectural advantages:
1. **Centralized Control**
* `showAuthView()`: Unified management of user authentication status at application entry
* `showPaywallSheetWhenCalled()`: Global monitoring of paywall display requests through notification system
* Simplifies implementation complexity of various sub-modules, providing consistent user experience
2. **Loose Coupling Design**
* Authentication protection automatically applied through modifiers, child views don't need to care about specific implementation
* Paywall decoupled from UI display through `AuthManager.actionGoPaywall()` and notification system
* Complete separation of business logic from UI display, facilitating testing and maintenance
3. **Flexible Payment Protection Strategy**
* **Global Notification Method**: `actionGoPaywall()` + `showPaywallSheetWhenCalled()`
* **View-level Protection**: `requirePremium()` modifier
* Supports dual RevenueCat and StoreKit2 solutions
* Can choose different display methods (sheet/fullScreenCover) based on scenarios
### Development Efficiency Improvement
* **Quick Integration**: Just add two modifiers at root view to get complete authentication and payment infrastructure
* **Unified Management**: All authentication and payment-related states managed centrally through managers
* **Code Reuse**: Modifiers and managers can be reused across different projects
* **Debug-friendly**: Easily track paywall triggers and displays through notification system
ContentView, as the core entry point of the application, provides authentication protection through `showAuthView()`, establishes global paywall monitoring mechanism through `showPaywallSheetWhenCalled()`, and implements complete user authentication and monetization infrastructure in conjunction with `AuthManager.actionGoPaywall()`, laying a solid architectural foundation for the entire application's functional modules.
# Flux Text-to-Image Series
URL: https://easyapp.site/en/docs/modules/Flux
Learn how to integrate Flux text-to-image features in EasyApp
***
title: Flux Text-to-Image Series
description: Learn how to integrate Flux text-to-image features in EasyApp
icon: Brain
-----------
EasyApp integrates the Flux text-to-image capability through the [Replicate](https://replicate.com/docs/topics/predictions/lifecycle) platform.
For any AI feature, make sure the API token is stored on the server to avoid the risk of client-side interception.
The [Supabase Edge Function](/docs/Integrations/supabaseEdgeFuncton) guide explains how to store API tokens with Supabase Edge Functions and send requests to large language models.
We recommend building and validating everything in the local development environment first, then deploying to production once all functionality is confirmed.
For details on using the local environment, see the instructions in [SupabaseEdgeFuncton](/docs/Integrations/supabaseEdgeFuncton#5-%E6%9C%AC%E5%9C%B0%E6%B5%8B%E8%AF%95).
# Configure the [Replicate](https://replicate.com/) API Token
Within the `EasyAppSupabase` project, set `REPLICATE_API_TOKEN` in `supabase/.env.local`:
```bash
REPLICATE_API_TOKEN=your_replicate_api_token
```
Create a new token on the [Replicate API token](https://replicate.com/account/api-tokens) page.
After setting `REPLICATE_API_TOKEN`, start the local development environment. The `EasyAppSupabase` project already ships with common scripts:
```json
"scripts": {
"deploy": "./deploy.sh",
"migrate": "supabase db push",
"functions:deploy": "supabase functions deploy",
"functions:logs": "supabase functions logs",
"start": "supabase start",
"stop": "supabase stop",
"reset": "supabase db reset",
"status": "supabase status",
"dev": "./dev.sh",
"dev:functions.env.local": "supabase functions serve --env-file ./supabase/.env.local",
"dev:functions": "supabase functions serve",
"dev:migration": "supabase migration up"
},
```
For development, simply run `npm run dev`.
The `dev.sh` script handles all prerequisites for you:
```bash
# Start Supabase
echo "Starting Supabase..."
supabase start
# Apply migrations to local database
echo "Applying migrations to local database..."
supabase migration up
# if you want to reset the database, uncomment the following line
# supabase db reset
# Run the function locally
echo "Running the function locally..."
# supabase functions serve --env-file ./supabase/.env.local
supabase functions serve
```
# Cloud Functions Overview
The Flux text-to-image flow relies on the following cloud functions:
```
image-generation
image-generation-history
image-generation-status
```
`image-generation` is the primary function that creates images.
`image-generation-history` returns the generation history.
`image-generation-status` reports the current status. The client polls this function to retrieve real-time task updates.
With `image-generation-status`, the client gains task-state management that stays in sync with the database. Even after leaving and re-entering the app, the latest task status remains accessible.
# Result Preview
# Deploy Cloud Functions and Database
Once development is complete, deploy the `EasyAppSupabase` project to production.
The project already includes common deployment scripts. Run either command:
```bash
cd EasyAppSupabase
npm run deploy
```
or:
```bash
cd EasyAppSupabase
./deploy.sh
```
Finally, configure the `REPLICATE_API_TOKEN` environment variable inside the Supabase Dashboard:

AI features typically tie into the credit system. Refer to the related chapter for integration details:
} href="/docs/modules/Credits">
Credits System
# Native and H5 Interaction
URL: https://easyapp.site/en/docs/modules/H5
Learn how to interact with H5 in your app
***
title: Native and H5 Interaction
description: Learn how to interact with H5 in your app
icon: MousePointerClick
-----------------------
EasyApp includes a built-in WebView component that makes it easy to interact with H5.
### Basic Usage
#### 1. Load a remote webpage
```swift
struct ContentView: View {
var body: some View {
WebView(request: URLRequest(url: URL(string: "https://example.com/")!))
}
}
```
#### 2. Load an offline webpage
```swift
struct LocalWeb: View {
@StateObject var viewModel = LocalWebViewModel()
var body: some View {
WebViewReader { proxy in
VStack {
WebView(configuration: viewModel.configuration)
}
.onAppear {
proxy.loadHTMLString(viewModel.htmlString, baseURL: viewModel.htmlURL)
}
}
}
}
class LocalWebViewModel: CommonEAWebViewModel {
let htmlURL = Bundle.main.url(forResource: "sample", withExtension: "html")!
let htmlString: String
override init() {
htmlString = try! String(contentsOf: htmlURL, encoding: .utf8)
super.init()
}
}
```
You need to add the `sample.html` file to your project.
For a fully featured offline H5 experience, you may need incremental updates and server-delivered H5 content. This is beyond the scope of this guide—please research as needed.
### Native ↔ H5 Interaction
#### 1. How can H5 call native capabilities?
We provide an example here: [EasyApp-WebView-Debugger](https://github.com/sunshineLixun/easyapp_webview_debugger)
The example demonstrates:
* Calling native Alert
* Calling native Confirm
* Calling native Alert Input
* Initiating a phone call
* Initiating an SMS
* Initiating FaceTime
* Sending an email
* And more that you can implement yourself in the example project
* Selecting files/photos
* Analyzing photos
* Getting current location
* Accessing camera/microphone
Note: EasyApp does not include the following permissions by default. If your app does not use these capabilities, per Apple’s review rules, you should not request them. To keep review simple, EasyApp omits them by default.
If you need camera, microphone, or location from H5, add the following permissions to your Info.plist:
```xml
NSCameraUsageDescriptionWe need access to your camera to let you share them with your friends.
```
Microphone
```xml
NSMicrophoneUsageDescriptionWe need access to your microphone to let you share them with your friends.
```
Location
```xml
NSLocationWhenInUseUsageDescriptionWe need access to your location to let you share them with your friends.
```
As shown below:

#### 2. How does native inject scripts?
See `ScriptMessageHandler.swift` for an example:
```swift title="EasyAppSwiftUI/App/Developer/SubPages/OnlineWeb/ViewModel/ScriptMessageHandler.swift"
/// Setup WebView JavaScript bridge
private func setupWebViewBridge() {
let source = """
injectYourScriptHere
"""
let userScript = WKUserScript(
source: source,
injectionTime: .atDocumentStart,
forMainFrameOnly: true
)
userContentController.addUserScript(userScript)
}
```
In `setupWebViewBridge`, you can inject a `source` script before H5 loads.
For example, inject a function that H5 can call:
```js
window.easyapp = {
alert: function(message) {
alert(message);
}
}
```
Typically, attach functions to `window` so JavaScript can call `window.easyapp.alert` directly.
#### 3. How to inject cookies
The template provides a common class `CommonEAWebViewModel` with a built-in method:
About `CommonEAWebViewModel`:
This class abstracts common native-H5 interaction logic such as alerts, internal WebView delegates, cookie injection, etc.
Simply inherit from this class.
```swift
/// Set Cookie
/// - Parameters:
/// - request: The request to set the cookie for
/// - name: Cookie name
/// - value: Cookie value
func setCookie(request: URLRequest, name: String, value: String) {
if let domain = request.url?.host(),
let cookie = HTTPCookie(properties: [
HTTPCookiePropertyKey.name: name,
HTTPCookiePropertyKey.value: value,
HTTPCookiePropertyKey.domain: domain,
HTTPCookiePropertyKey.path: "/",
])
{
configuration.websiteDataStore.httpCookieStore.setCookie(cookie)
}
}
```
You can inherit from `CommonEAWebViewModel` and call `setCookie` in `init`:
```swift
class OnlineWebViewModel: CommonEAWebViewModel {
/// Request to the webview
let request = URLRequest(url: URL(string: "https://easyapp-webview-debugger.vercel.app/")!)
/// Init
override init() {
super.init()
setCookie(request: request, name: "SampleKey", value: "SampleValue")
}
}
```
Why inject cookies?
For example, if the user has logged in within the app, you may want H5 to recognize that login state. Inject a cookie in the app; once H5 reads it, H5 can use the login state.
#### 4. How does native call H5 functions / send messages?
First, H5 must provide the function. In our example project [EasyApp-WebView-Debugger](https://github.com/sunshineLixun/easyapp_webview_debugger/blob/master/src/script/script-config.ts),
you can see we register `showSwiftUIMessage` on `window.sample` in `registerReceiveMessageFunctions`:
```js
/**
* The functions registered here are specifically for SwiftUI client to call
*/
export function registerReceiveMessageFunctions() {
//@ts-ignore
window.sample.showSwiftUIMessage = showSwiftUIMessage;
// If you want to receive messages from SwiftUI, you can register your functions here
}
```
Recommended approach:
Since JavaScript lacks namespaces, we recommend organizing by business modules. If you attach everything to `window`, ensure names do not collide.
In the example, we register `showSwiftUIMessage` on `sample`. Here, `sample` acts as your business module, preventing name collisions.
If you later add a `user` module, you can also register a `showSwiftUIMessage` method there. Module scoping avoids conflicts.
Once JS functions are ready, the client can call them like this:
```swift
Task {
do {
try await proxy.evaluateJavaScript(
"window.sample.showSwiftUIMessage('Hello from SwiftUI')")
} catch {
print("error: \(error)")
}
}
```
See `EasyAppSwiftUI/App/Developer/SubPages/OnlineWeb/View/OnlineView.swift` for usage.
#### 5. How does JS call native functions / send messages?
Similarly, we use the global `window` object. We attach a `sample` object on `window` and register a `doSomething` function.
You can name functions as you like. We still recommend using a business module as a namespace for maintainability.
```js
/**
* common post message to SwiftUI
* @param message message to send to SwiftUI
*/
function commonPostMessage(message: string) {
// @ts-ignore
webkit.messageHandlers.sample.postMessage({
message: message,
});
}
/**
* The functions registered here are specifically for sending messages to the SwiftUI client
*/
export function registerSendMessageFunctions() {
//@ts-ignore
window.sample.doSomething = function (message: string) {
// @ts-ignore
commonPostMessage(message);
};
// if your SwiftUI has a function that you want to call, you can register it here
}
```
After registration, you can call native via `window.sample.doSomething`:
```js
export function sendSomethisToSwiftUI() {
// @ts-ignore
if (window.sample && typeof window.sample.doSomething === "function") {
// @ts-ignore
window.sample.doSomething("Hello from H5");
}
}
```
You can find the complete usage in our example project: [EasyApp-WebView-Debugger](https://github.com/sunshineLixun/easyapp_webview_debugger/blob/master/src/script/script-config.ts).
On the client side, we use another class, `ScriptMessageHandler`, dedicated to JS interaction. Script injection is also handled there.
When the client receives a message from H5, this method is triggered:
```swift
/// Handle messages from the webview
/// - Parameters:
/// - userContentController: The user content controller
/// - message: The message from the webview
func userContentController(
_ userContentController: WKUserContentController,
didReceive message: WKScriptMessage
) {
// Here, name is the H5 namespace
guard message.name == "sample" else {
print("⚠️ Received message from unknown handler: \(message.name)")
return
}
let json = JSON(message.body)
let formattedJSON = json.rawString() ?? "{}"
messageHandler?(formattedJSON)
}
```
Note:
`message.name` is the H5 namespace. It must match the namespace used on the H5 side. This mismatch is a common source of issues—align it explicitly.
You can extract the message sent from H5 here, and then proceed with your own business logic.
### Summary
For client-side best practices:
* You may have multiple modules needing WebView capabilities. We recommend creating a dedicated `ViewModel` per module, each inheriting from `CommonEAWebViewModel` to gain shared WebView functionality.
* Load the WebView URL in the corresponding `ViewModel`:
```swift
/// Request to the webview
let request = URLRequest(url: URL(string: "https://easyapp-webview-debugger.vercel.app/")!)
```
* For native/H5 interactions, create a module-specific `XXX_ScriptMessageHandler` class. Do not put all logic into the provided `ScriptMessageHandler`; that class is just an example.
* Each module’s `ScriptMessageHandler` should be associated with its `ViewModel`. Set up the association in the `ViewModel`:
```swift
/// Message handler
let messageHandler = ScriptMessageHandler.shared
configuration.defaultWebpagePreferences.preferredContentMode = .mobile
configuration.userContentController = messageHandler.userContentController
```
* Let `ScriptMessageHandler` notify the `ViewModel` via a closure when receiving messages:
```swift
/// Start listening to messages from ScriptMessageHandler
private func startListeningToMessages() {
messageHandler.messageHandler = { [weak self] message in
guard let self = self else { return }
// do your business logic here
}
}
```
* On the H5 side, remember: since JS has no namespaces, organize by business modules instead of hanging everything directly under `window` to avoid name collisions as modules grow.
# In-App Purchase
URL: https://easyapp.site/en/docs/modules/InAppPurchase
Learn how to use In-App Purchase in your app
***
title: In-App Purchase
description: Learn how to use In-App Purchase in your app
icon: CircleDollarSign
----------------------
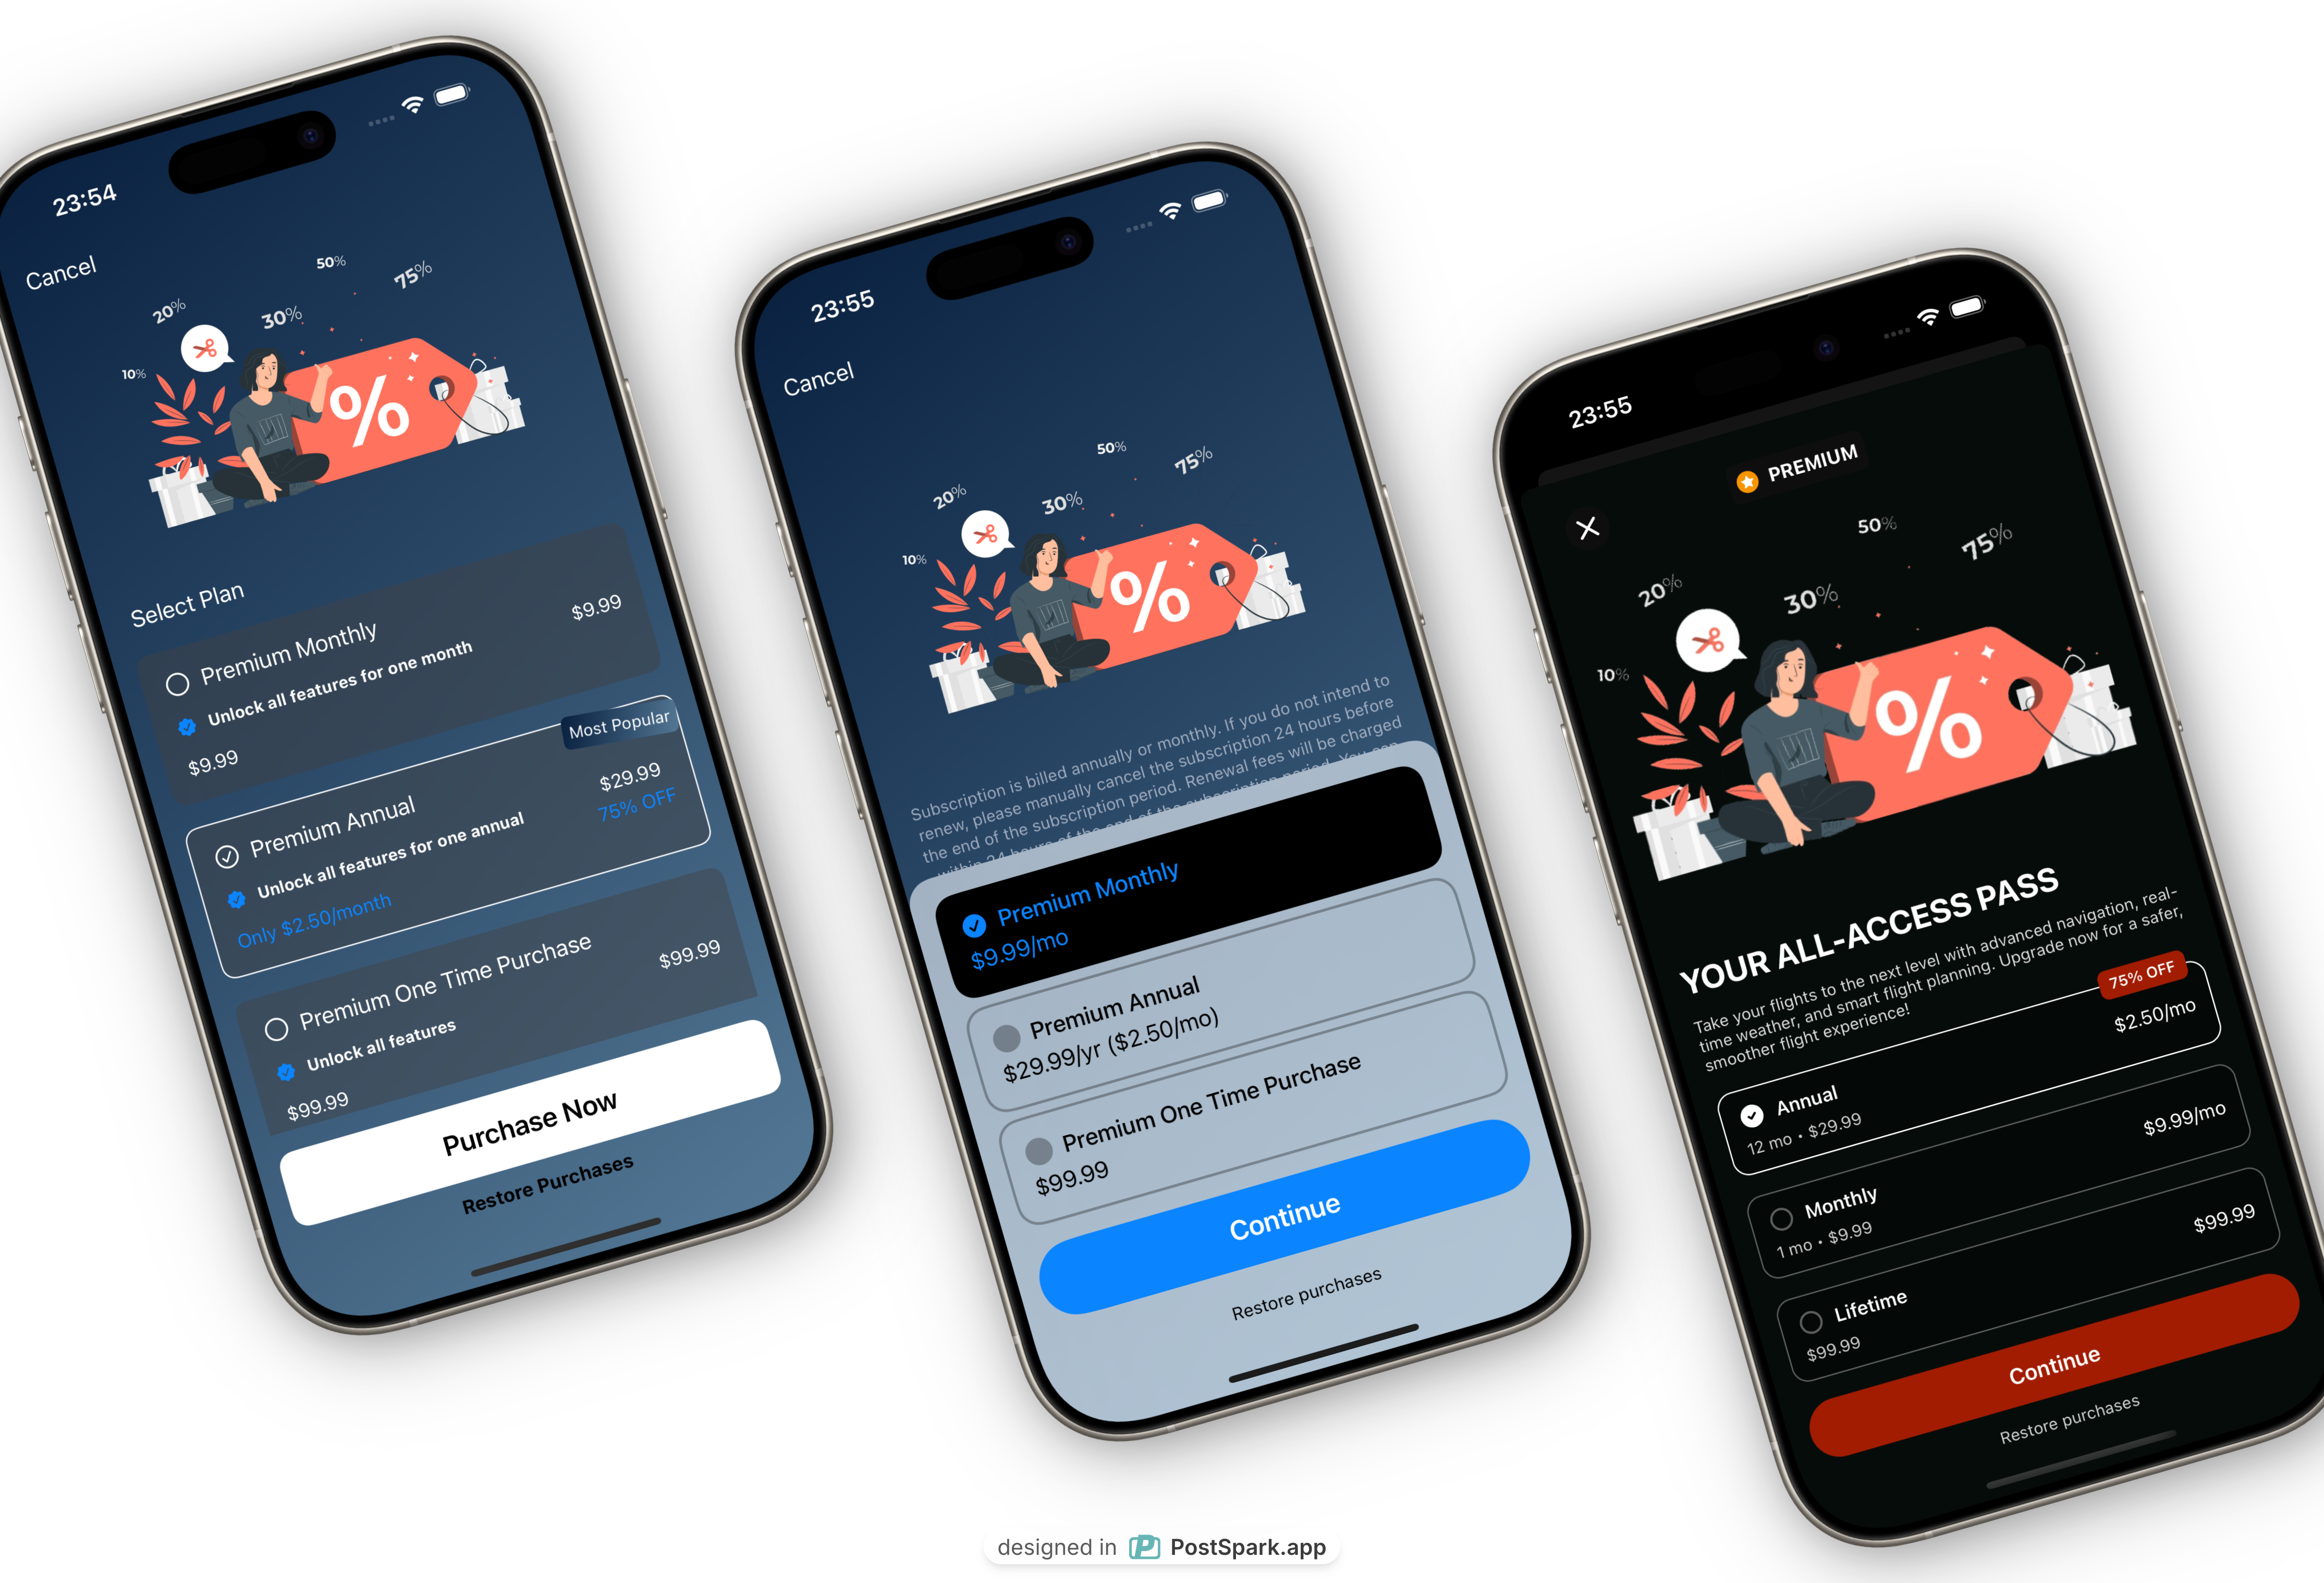
# In-App Purchase Module
The InAppPurchases module provides a comprehensive in-app purchase solution, supporting multiple implementation approaches including both RevenueCat and StoreKit2 complete subscription management systems.
We will provide more beautiful in-app purchase UI implementations in the future, so stay tuned.
## Module Structure
```
InAppPurchases/
├── View/
│ ├── InAppPurchasesView.swift # Main entry page
│ ├── CustomAPWithRevenueCatPaywallView.swift # RevenueCat fully custom
│ ├── ASemiCustomWithRevenueCatPaywallView.swift # RevenueCat semi-custom
│ └── CustomStoreKit2PaywallView.swift # StoreKit2 fully custom
└── TestPremium/
├── TestRequirePremium.swift # Test Premium access control
└── TestActionGoPaywall.swift # Test Paywall trigger
```
## Four In-App Purchase Implementation Options
### 1. Fully Custom RevenueCat Paywall
Implement a fully customized paywall interface using RevenueCat SDK API:
**Core Features:**
* Automatically calculate savings between subscription packages
* Display monthly average price for annual subscriptions
* Centralized pricing logic handling
```swift
struct CustomAPWithRevenueCatPaywallView: View {
@EnvironmentObject private var revenueCatManager: RevenueCatManager
@EnvironmentObject private var authManager: AuthManager
@State private var selectedPackage: Package?
var body: some View {
NavigationStack {
ScrollView {
VStack {
// Subscription info display
if let productTitle = authManager.storeProduct?.localizedTitle,
let entitlement = authManager.customerInfo?.entitlements[
Constants.RevenueCat.entitlementID], entitlement.isActive {
SubscriptionInfoView(
productTitle: productTitle,
expirationDate: entitlement.expirationDate
)
}
// Package selection interface
if let offerings = revenueCatManager.currentOfferings,
let currentOffering = offerings.current {
// Render package selection UI
}
}
}
}
}
}
```
### 2. Semi-Custom RevenueCat Paywall
Use RevenueCat's `.paywallFooter()` API, allowing custom design content:
```swift
struct ASemiCustomWithRevenueCatPaywallView: View {
var body: some View {
// Custom top content
CustomPaywallContent()
.paywallFooter() // RevenueCat provided purchase button logic
}
}
```
### 3. Fully Custom StoreKit2 Paywall
Implement a fully customized paywall using StoreKit2 API:
```swift
struct CustomStoreKit2PaywallView: View {
@EnvironmentObject private var storeKit2Manager: StoreKit2Manager
@EnvironmentObject private var authManager: AuthManager
@State private var selectedProduct: Product?
var body: some View {
NavigationStack {
ScrollView {
VStack {
// Current subscription status
if let productTitle = authManager.storeKitProduct?.displayName,
let transaction = authManager.storeKitTransaction {
SubscriptionInfoView(
productTitle: productTitle,
expirationDate: transaction.expirationDate
)
}
// Product list
ForEach(storeKit2Manager.products, id: \.id) { product in
ProductView(
product: product,
isSelected: selectedProduct?.id == product.id
) {
selectedProduct = product
}
}
}
}
}
}
}
```
### 4. RevenueCatUI PaywallView
Directly use the standard paywall component provided by RevenueCatUI:
```swift
.sheet(isPresented: $displayPaywall) {
PaywallView(
displayCloseButton: true,
performPurchase: { package in
print("Purchase started: \(package.identifier)")
HapticsEngine.impact()
paySuccessCount += 1
syncPurchases()
return (userCancelled: false, error: nil)
},
performRestore: {
print("Restore started")
HapticsEngine.impact()
paySuccessCount += 1
syncPurchases()
return (success: true, error: nil)
}
)
}
```
## Premium Access Control
### 1. Declarative Access Control
Use the `.requirePremium()` modifier to protect subscription-required content:
```swift
struct TestRequirePremium: View {
@EnvironmentObject private var authManager: AuthManager
var body: some View {
VStack {
Text("This is Premium-only content")
.requirePremium(
subscriptionType: .storeKit2,
sheetOrFullScreenCover: .fullScreenCover,
onCancelPaywall: {
print("User cancelled subscription")
},
onPaySuccess: {
print("Subscription successful")
}
)
}
}
}
```
### 2. Action-Triggered Access Control
Trigger subscription checks through button clicks and other actions:
```swift
struct TestActionGoPaywall: View {
@EnvironmentObject private var authManager: AuthManager
var body: some View {
VStack {
// RevenueCat implementation
Button("Use RevenueCat Paywall") {
authManager.actionGoPaywall(
subscriptionType: .revenueCat,
sheetOrFullScreenCover: .sheet
) {
// Actions to execute when user has subscription
print("Execute Premium feature")
}
}
// StoreKit2 implementation
Button("Use StoreKit2 Paywall") {
authManager.actionGoPaywall(
subscriptionType: .storeKit2,
sheetOrFullScreenCover: .fullScreenCover
) {
// Actions to execute when user has subscription
print("Execute Premium feature")
}
}
}
}
}
```
## Core Feature Characteristics
### 1. **Dual Subscription System Support**
* **RevenueCat** - Feature-rich subscription management platform
* **StoreKit2** - Apple's native subscription API
* Choose one based on project requirements
### 2. **Price Calculation and Display**
* Automatically calculate savings between different packages
* Display monthly average price for annual subscriptions
* Support multi-currency and localized price display
### 3. **Subscription Status Management**
* Real-time display of current subscription status
* Support for restore purchase functionality
### 4. **User Experience Optimization**
* Celebration animations (Confetti effects)
* Haptic feedback
* Loading state indicators
* Error handling and retry mechanisms
### 5. **Flexible Display Options**
* Sheet modal mode
* FullScreenCover full-screen mode
## Manager Integration
### RevenueCat Manager
```swift
@EnvironmentObject private var revenueCatManager: RevenueCatManager
// Get subscription products
let offerings = revenueCatManager.currentOfferings
let packages = offerings?.current?.availablePackages
// Purchase handling
try await revenueCatManager.purchase(package: selectedPackage)
```
### StoreKit2 Manager
```swift
@EnvironmentObject private var storeKit2Manager: StoreKit2Manager
// Get product list
let products = storeKit2Manager.products
// Purchase handling
try await storeKit2Manager.purchase(product: selectedProduct)
```
## Testing and Debugging
The module provides complete testing components:
1. **Test Premium Access** - Verify access control logic
2. **Test Paywall Trigger** - Verify paywall display logic
3. **Simulate Purchase Flow** - Sandbox testing
During development, in-app purchases are tested in the sandbox environment. No actual charges occur during purchases.
Please use a real device for testing, not the simulator.
* First, we need to create a sandbox test account in App Store Connect's [`Users and Access`](https://appstoreconnect.apple.com/access/users/sandbox)
If you already have a test account, follow the image below:

Click the `+` button to create a sandbox test account.
If you don't have a test account and are creating one for the first time, follow the image below:

In the subsequent popup, enter your test account information and click the `Create` button to save.

* Run the app on a real device for in-app purchase testing
How to view subscription data in real-time?
Return to RevenueCat's [Dashboard](https://app.revenuecat.com/projects/306cfb83/overview) page, where you can see all your subscription information.
In the sandbox environment, you need to turn on the `Sandbox data` switch.

Native StoreKit2 revenue needs to be viewed in [App Store Connect](https://appstoreconnect.apple.com/itc/payments_and_financial_reports#/). Data is usually delayed, typically N+1 days.
## Localization Support
* Multi-language price display
* Localized error messages
* Regionalized currency formatting
Through the InAppPurchases module, you can quickly implement professional-grade in-app purchase functionality, supporting multiple technical solutions and display methods to meet the needs of different application scenarios.
## For More Learning Resources, Please Refer To:
A/B Test Your Paywall and PricingMaximize Paywall Conversion Rates
# Login and Sign Up
URL: https://easyapp.site/en/docs/modules/loginAndSignUp
Learn how to implement login and sign up in your app
***
title: Login and Sign Up
description: Learn how to implement login and sign up in your app
icon: User
----------
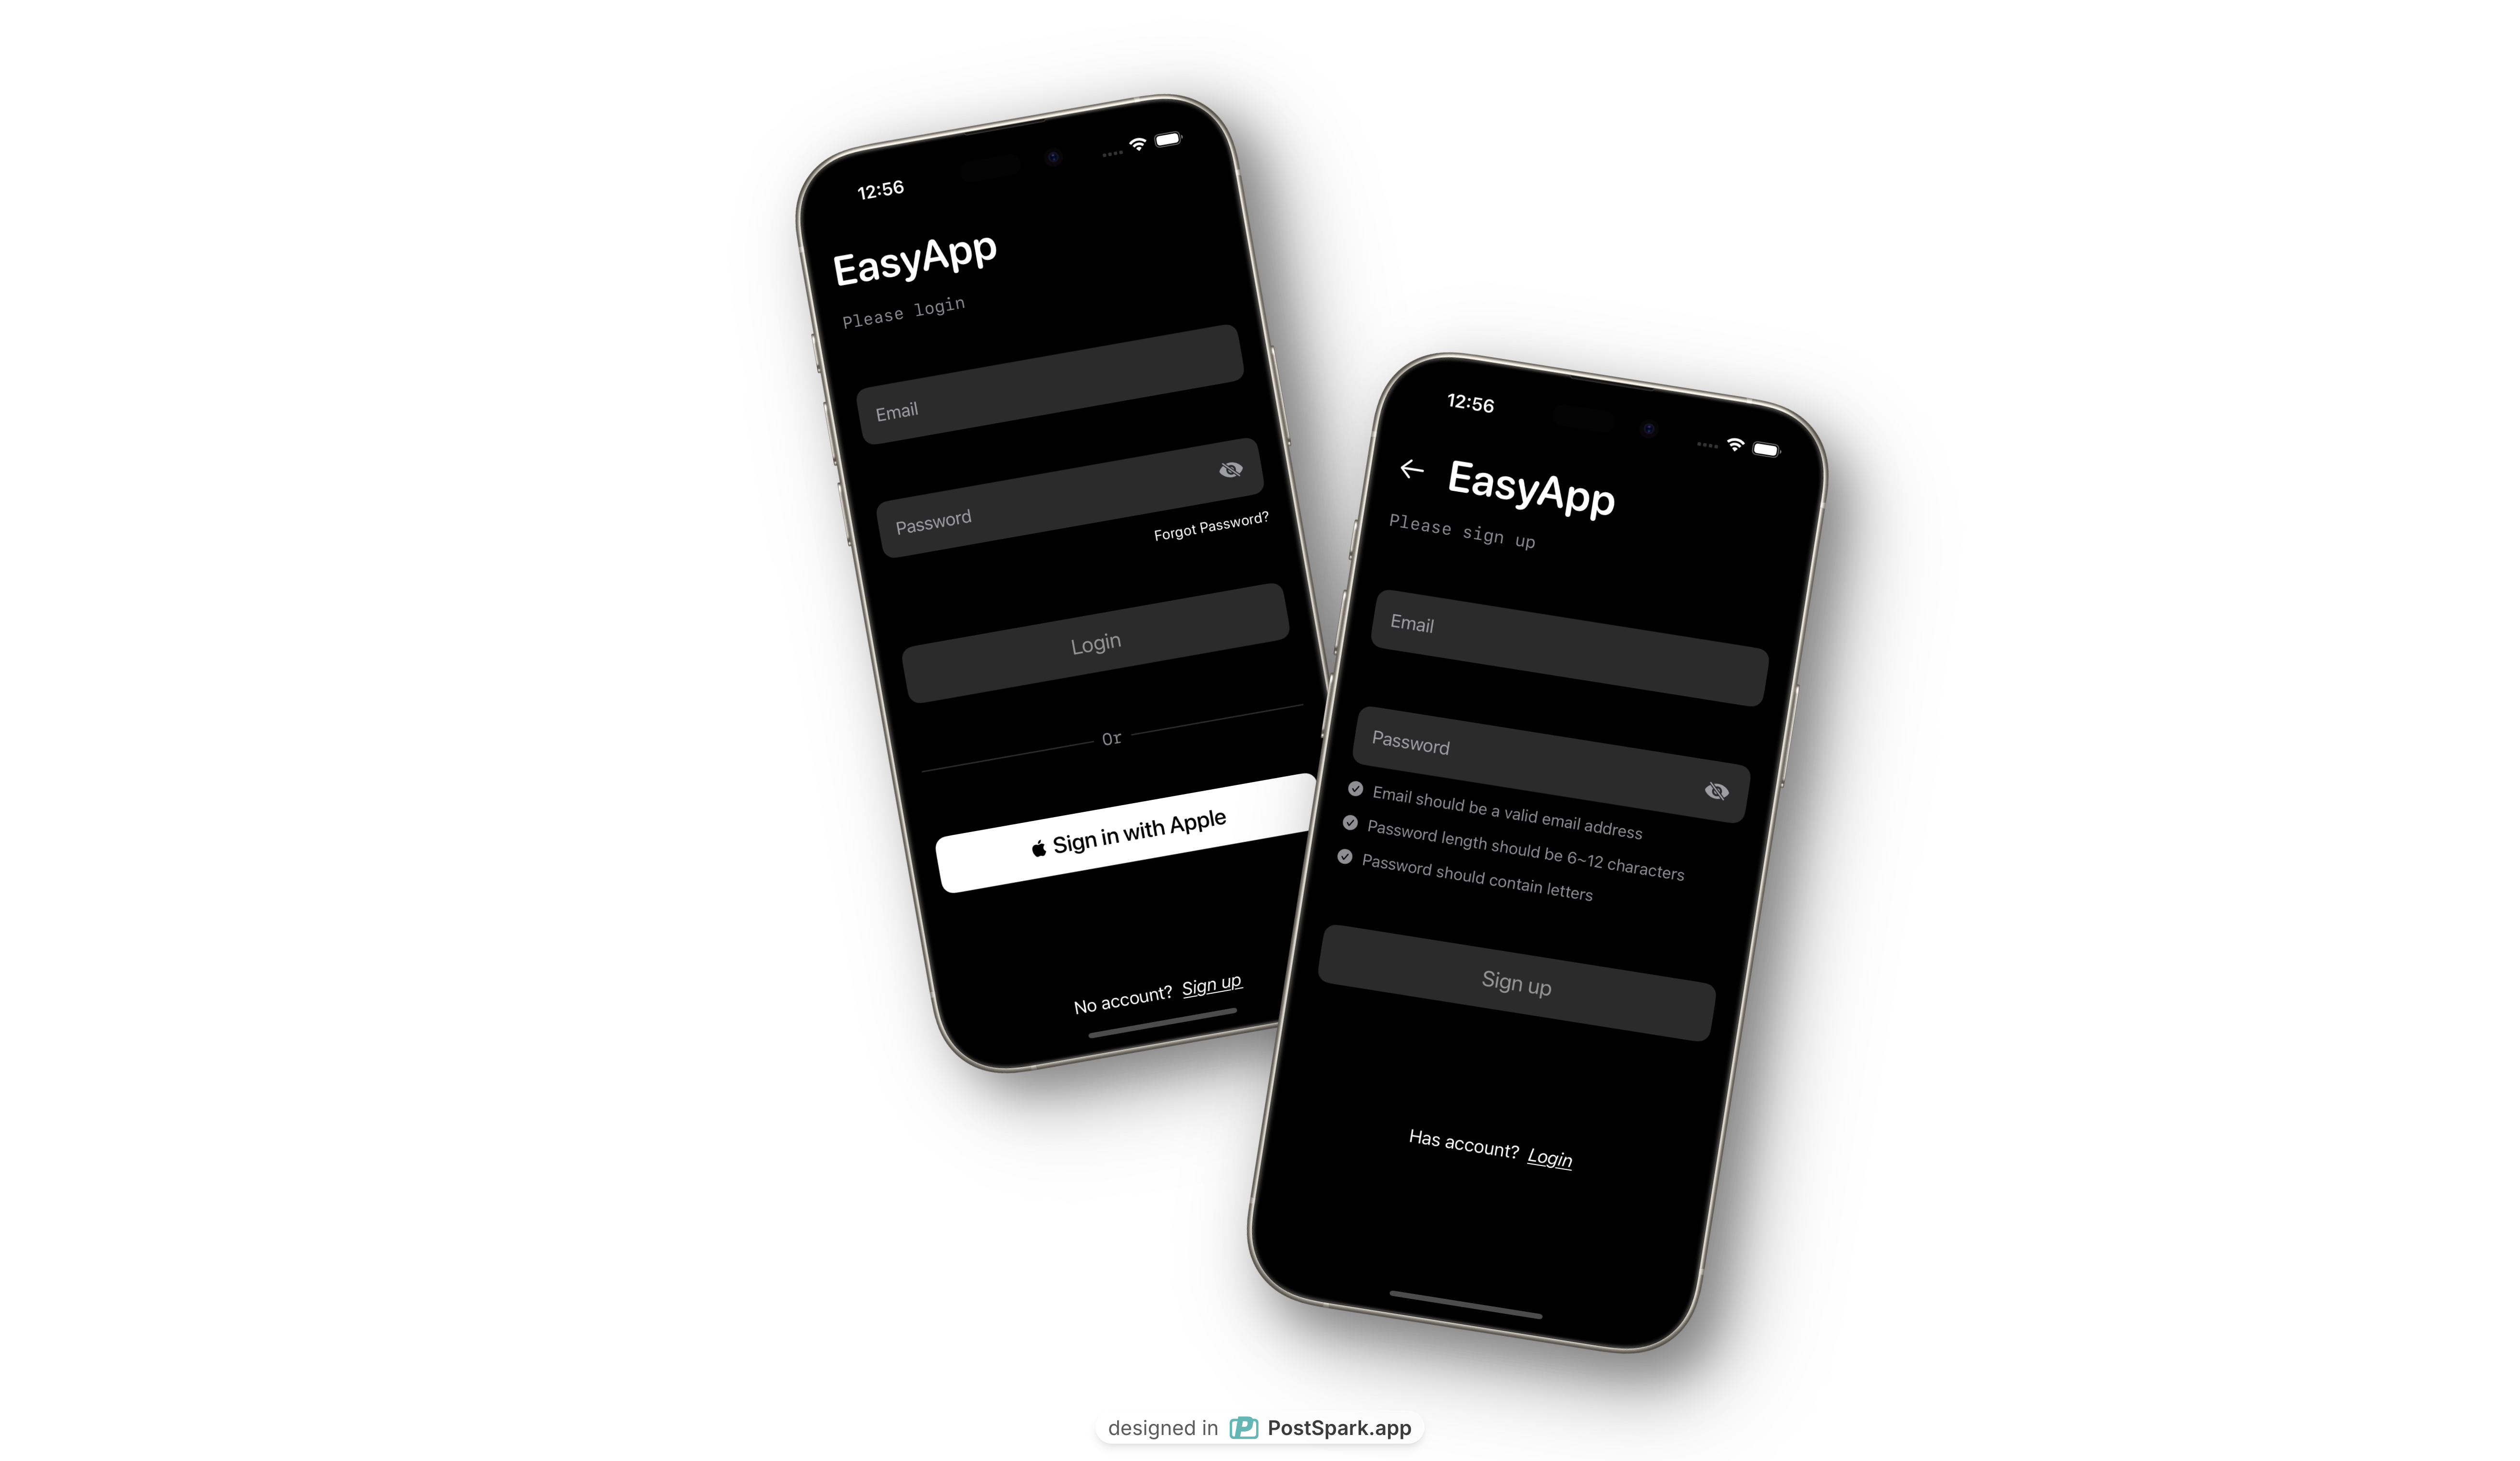
# Login and Sign Up Module
The LoginAndSignUp module is a complete user authentication solution, providing login, registration, forgot password, and email verification functionality.
We will provide more beautiful login and registration pages in the future, so stay tuned.
## Module Structure
```
LoginAndSignUp/
├── View/
│ └── LoginAndSignUp.swift # Main view, manages login/signup switching
└── SubPages/
├── SignIn/View/
│ └── SignInView.swift # Login interface
├── SignUp/View/
│ └── SignUpView.swift # Registration interface
├── ForgotPwd/View/
│ └── ForgotPwdView.swift # Forgot password
└── VerifyEmailView/View/
└── VerifyEmailView.swift # Email verification
```
## Core Features
### 1. Main View Switching
The main view uses state management to switch between login and registration interfaces, providing smooth sliding animations:
```swift
struct LoginAndSignUp: View {
@State private var showSignUp = false
var body: some View {
if showSignUp {
SignUpView(showSignIn: $showSignUp)
.transition(.asymmetric(
insertion: .move(edge: .trailing),
removal: .move(edge: .trailing)
))
} else {
SignInView(showSignUp: $showSignUp)
.transition(.asymmetric(
insertion: .move(edge: .leading),
removal: .move(edge: .leading)
))
}
}
}
```
### 2. Login Functionality
**Supports two login methods:**
* Email and password login
* Apple ID login
**Key Features:**
* Real-time input validation (email format, password strength)
* Forgot password link
* Loading state indicators
* Toast message notifications
```swift
func signInWithEmail() {
Task {
do {
try await authManager.signIn(email: account, password: password)
} catch {
print("signInWithEmailError:\(error)")
}
}
}
func signInWithApple(idToken: String) {
Task {
do {
try await authManager.signInWithApple(idToken: idToken)
} catch {
print("signInWithAppleError:\(error)")
}
}
}
```
### 3. Registration Functionality
**Registration Flow:**
1. User enters email and password
2. Real-time input format validation
3. Submit registration request
4. Automatically redirect to login page on success
**Input Validation Rules:**
* Email format validation
* Password length (6-12 characters)
* Password must contain letters
```swift
func onSignUp() {
Task {
do {
try await authManager.signUp(email: account, password: password)
} catch {
print("onSignUpError:\(error)")
}
}
}
```
### 4. Forgot Password
Provides password reset functionality, allowing users to:
* Enter email address
* Set new password
* Validate input validity
* Send reset request
### 5. Email Verification
When users need to verify their email after registration, displays verification interface:
* Prompts user to check email
* Provides resend verification email functionality
* Monitors application state changes
```swift
Button(action: {
isLoading = true
Task {
do {
try await authManager.resendVerificationEmail(email: email)
isLoading = false
} catch {
isLoading = false
}
}
}) {
Text("resend_verification_email")
.font(.title3)
}
```
## Authentication Management
The module handles all authentication logic through `AuthManager`:
* **Supabase Integration**: Uses Supabase as backend authentication service
* **State Management**: Automatically manages user login state
* **Session Handling**: Handles token refresh and expiration
* **Subscription Integration**: Supports RevenueCat and StoreKit2
## User Interface Features
### 1. **Smooth Transitions**
* Sliding animations between login and registration
* Loading state indicators
* Visual feedback for user actions
### 2. **Input Validation**
* Real-time email format checking
* Password strength requirements
* Clear error messaging
### 3. **Apple Sign-In Integration**
* Native Apple ID authentication
* Seamless user experience
* Privacy-focused approach
### 4. **Responsive Design**
* Adapts to different screen sizes
* Keyboard-aware interface
* Accessibility support
## Authentication Flow
### 1. Login Process
```swift
struct SignInView: View {
@EnvironmentObject private var authManager: AuthManager
@State private var account = ""
@State private var password = ""
@State private var isLoading = false
var body: some View {
VStack(spacing: 20) {
// Email input
TextField("Email", text: $account)
.textFieldStyle(RoundedBorderTextFieldStyle())
.keyboardType(.emailAddress)
.autocapitalization(.none)
// Password input
SecureField("Password", text: $password)
.textFieldStyle(RoundedBorderTextFieldStyle())
// Sign in button
Button("Sign In") {
signInWithEmail()
}
.disabled(account.isEmpty || password.isEmpty || isLoading)
// Apple Sign In
SignInWithAppleButton { request in
request.requestedScopes = [.fullName, .email]
} onCompletion: { result in
handleAppleSignIn(result)
}
}
}
}
```
### 2. Registration Process
```swift
struct SignUpView: View {
@EnvironmentObject private var authManager: AuthManager
@State private var account = ""
@State private var password = ""
@State private var isLoading = false
var body: some View {
VStack(spacing: 20) {
// Email input with validation
TextField("Email", text: $account)
.textFieldStyle(RoundedBorderTextFieldStyle())
.keyboardType(.emailAddress)
.autocapitalization(.none)
.overlay(
RoundedRectangle(cornerRadius: 8)
.stroke(isValidEmail ? Color.green : Color.red, lineWidth: 1)
)
// Password input with strength indicator
SecureField("Password", text: $password)
.textFieldStyle(RoundedBorderTextFieldStyle())
PasswordStrengthIndicator(password: password)
// Sign up button
Button("Sign Up") {
onSignUp()
}
.disabled(!isValidInput || isLoading)
}
}
private var isValidEmail: Bool {
account.contains("@") && account.contains(".")
}
private var isValidInput: Bool {
isValidEmail && password.count >= 6 && password.count <= 12
}
}
```
## Error Handling
### 1. Authentication Errors
```swift
enum AuthError: LocalizedError {
case invalidCredentials
case emailNotVerified
case networkError
case unknownError(String)
var errorDescription: String? {
switch self {
case .invalidCredentials:
return "Invalid email or password"
case .emailNotVerified:
return "Please verify your email address"
case .networkError:
return "Network connection error"
case .unknownError(let message):
return message
}
}
}
```
### 2. User Feedback
```swift
.alert("Error", isPresented: $showError) {
Button("OK") { }
} message: {
Text(errorMessage)
}
.toast(isPresented: $showToast, message: toastMessage, isSuccess: isSuccess)
```
## Security Features
### 1. Input Sanitization
```swift
private func sanitizeInput(_ input: String) -> String {
return input.trimmingCharacters(in: .whitespacesAndNewlines)
}
private func validateEmail(_ email: String) -> Bool {
let emailRegex = "[A-Z0-9a-z._%+-]+@[A-Za-z0-9.-]+\\.[A-Za-z]{2,64}"
let emailPredicate = NSPredicate(format:"SELF MATCHES %@", emailRegex)
return emailPredicate.evaluate(with: email)
}
```
### 2. Password Requirements
```swift
private func validatePassword(_ password: String) -> Bool {
return password.count >= 6 &&
password.count <= 12 &&
password.rangeOfCharacter(from: .letters) != nil
}
```
## Best Practices
### 1. User Experience
```swift
// Provide immediate feedback
.onChange(of: account) { newValue in
validateInput()
}
// Show loading states
.disabled(isLoading)
.overlay(
ProgressView()
.opacity(isLoading ? 1 : 0)
)
```
### 2. Accessibility
```swift
.accessibilityLabel("Email input field")
.accessibilityHint("Enter your email address")
.accessibilityIdentifier("emailTextField")
```
### 3. Keyboard Management
```swift
.onSubmit {
if isValidInput {
signInWithEmail()
}
}
.submitLabel(.go)
```
## Integration with Other Modules
### 1. Onboarding Integration
```swift
// Show onboarding for new users
if authManager.isAuthenticated && !hasCompletedOnboarding {
OnboardingView()
}
```
### 2. Subscription Integration
```swift
// Check subscription status after login
.onReceive(authManager.$isAuthenticated) { isAuthenticated in
if isAuthenticated {
revenueCatManager.checkSubscriptionStatus()
}
}
```
## Featured Functions
### 1. **Multi-Authentication Support**
* Email/password authentication
* Apple Sign-In integration
* Social login extensibility
### 2. **Real-time Validation**
* Input format checking
* Password strength indicators
* Immediate user feedback
### 3. **Smooth User Experience**
* Animated transitions
* Loading states
* Toast notifications
### 4. **Security First**
* Input sanitization
* Secure password handling
* Session management
The Login and Sign Up module provides a complete, secure, and user-friendly authentication system that integrates seamlessly with the rest of your EasyAppSwiftUI application.
# Launch Screen
URL: https://easyapp.site/en/docs/modules/lunchScreen
Learn how to customize your App's Launch Screen
***
title: Launch Screen
description: Learn how to customize your App's Launch Screen
icon: Smartphone
----------------
Every iOS app must provide a launch screen, which is the interface displayed when the app starts. The launch screen appears immediately when the app launches and is quickly replaced by the app's first interface.
In EasyAppSwiftUI, implementing the launch screen is very simple.
## Customizing Launch Screen
In `AppLaunchScreen.storyboard`, you can customize the launch screen style. Replace your logo, or add your brand colors, titles, etc.
For more information about launch screen settings, please refer to [Apple Documentation - Specifying your app's launch screen](https://developer.apple.com/documentation/xcode/specifying-your-apps-launch-screen)
# Onboarding
URL: https://easyapp.site/en/docs/modules/onboarding
Learn how to onboard users to your app
***
title: Onboarding
description: Learn how to onboard users to your app
icon: Pointer
-------------
# Onboarding Module
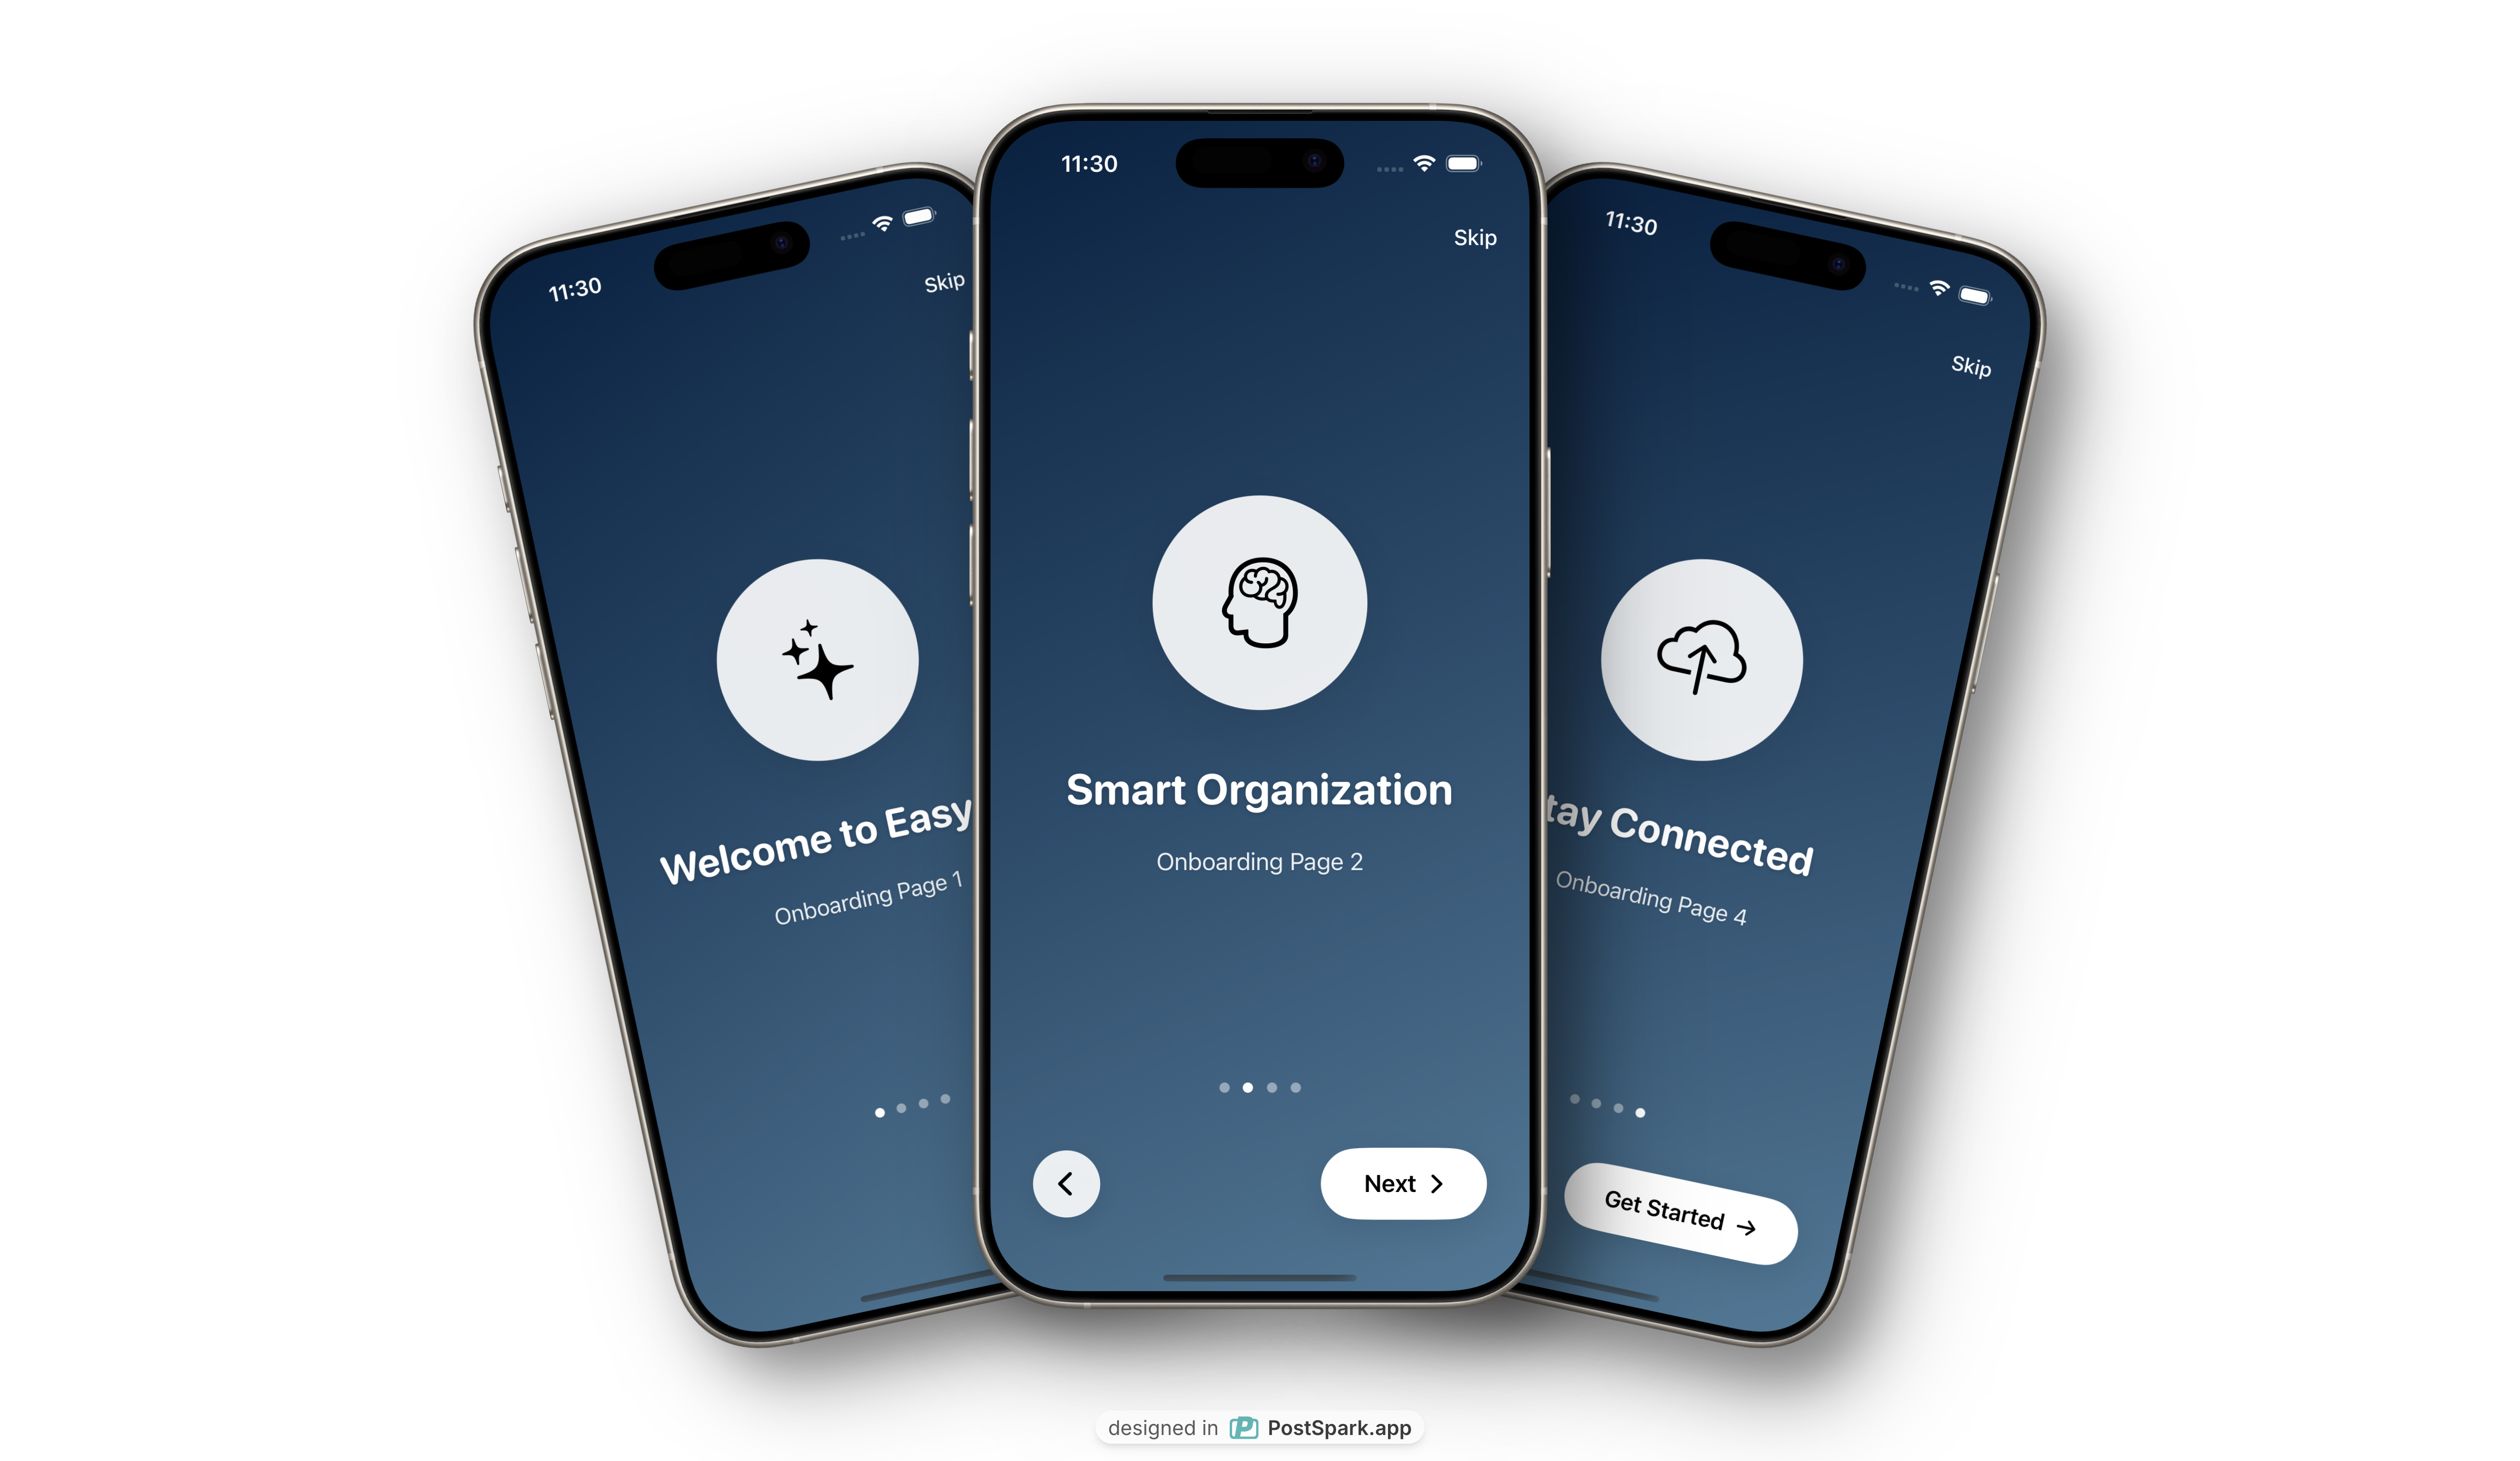
Onboarding is the welcome interface that users see when they first open the app, used to introduce the app's core features and characteristics. EasyAppSwiftUI provides a default onboarding implementation.
We will provide more beautiful onboarding implementations in the future, stay tuned.
## Architecture Overview
The onboarding module uses MVVM architecture and includes the following main components:
* **Feature Model**: Defines feature data structure
* **Features Data**: Provides static feature data
* **OnboardingView**: Main onboarding view
* **OnboardingPageView**: Individual feature page view
## Core Components
### 1. Feature Model
```swift
struct Feature: Identifiable {
let id = UUID()
let title: String
let description: String
let image: String
}
```
The Feature model defines the data structure for each onboarding page:
* `id`: Unique identifier for SwiftUI list identification
* `title`: Feature title
* `description`: Detailed feature description
* `image`: SF Symbol icon name
### 2. Features Data
```swift
struct Features {
static let features: [Feature] = [
Feature(
title: "Welcome to EasyApp",
description: "Onboarding Page 1",
image: "sparkles"
),
Feature(
title: "Smart Organization",
description: "Onboarding Page 2",
image: "brain.head.profile"
),
Feature(
title: "Secure & Private",
description: "Onboarding Page 3",
image: "lock.shield"
),
Feature(
title: "Stay Connected",
description: "Onboarding Page 4",
image: "icloud.and.arrow.up"
)
]
}
```
## Main Features
### 1. Page Navigation
The onboarding uses `TabView` to implement horizontal swipe navigation:
```swift
TabView(selection: $currentPage) {
ForEach(Array(Features.features.enumerated()), id: \.element.id) {
index, feature in
OnboardingPageView(feature: feature)
.tag(index)
}
}
.tabViewStyle(PageTabViewStyle(indexDisplayMode: .always))
```
### 2. State Management
```swift
@State private var currentPage = 0
@EnvironmentObject private var appState: AppState
```
* `currentPage`: Current page index
* `appState`: Global app state for saving onboarding completion status
## Integration Instructions
### 1. Basic Usage
```swift
OnboardingView {
// Callback after onboarding completion
print("Onboarding completed")
}
```
### 2. Integration with App State
The onboarding automatically integrates with `AppState`, and after completion, it updates `onboardingState` to track whether the user has completed onboarding.
### 3. Display Logic
The onboarding display logic is controlled through `OnboardingViewModifier`:
```swift
struct OnboardingViewModifier: ViewModifier {
@EnvironmentObject private var appState: AppState
func body(content: Content) -> some View {
Group {
if appState.onboardingState == "INIT" {
OnboardingView {
withAnimation(.bouncy) {
appState.onboardingState = AppData.appVersion
}
}
.transition(.opacity)
} else {
content
.transition(.opacity)
}
}
.animation(.easeInOut(duration: 0.5), value: appState.onboardingState)
}
}
```
**Display Conditions**:
* `onboardingState == "INIT"`: Show onboarding
* `onboardingState != "INIT"`: Show main app interface
**State Flow**:
1. On first app launch, `onboardingState` defaults to `"INIT"`
2. After user completes onboarding, state updates to `AppData.appVersion`
3. On subsequent launches, since state is not `"INIT"`, main interface is shown directly
## Best Practices
1. **Concise Content**: Each feature description should be concise and clear, highlighting core value
2. **Icon Selection**: Use representative SF Symbol icons
3. **Page Count**: Recommend keeping between 3-5 pages to avoid being too long
4. **Localization**: Support multilingual titles and description text
5. **Skippable**: Always provide skip option, respecting user choice
# Setting
URL: https://easyapp.site/en/docs/modules/setting
Learn how to implement setting page in your app
***
title: Setting
description: Learn how to implement setting page in your app
icon: Settings
--------------
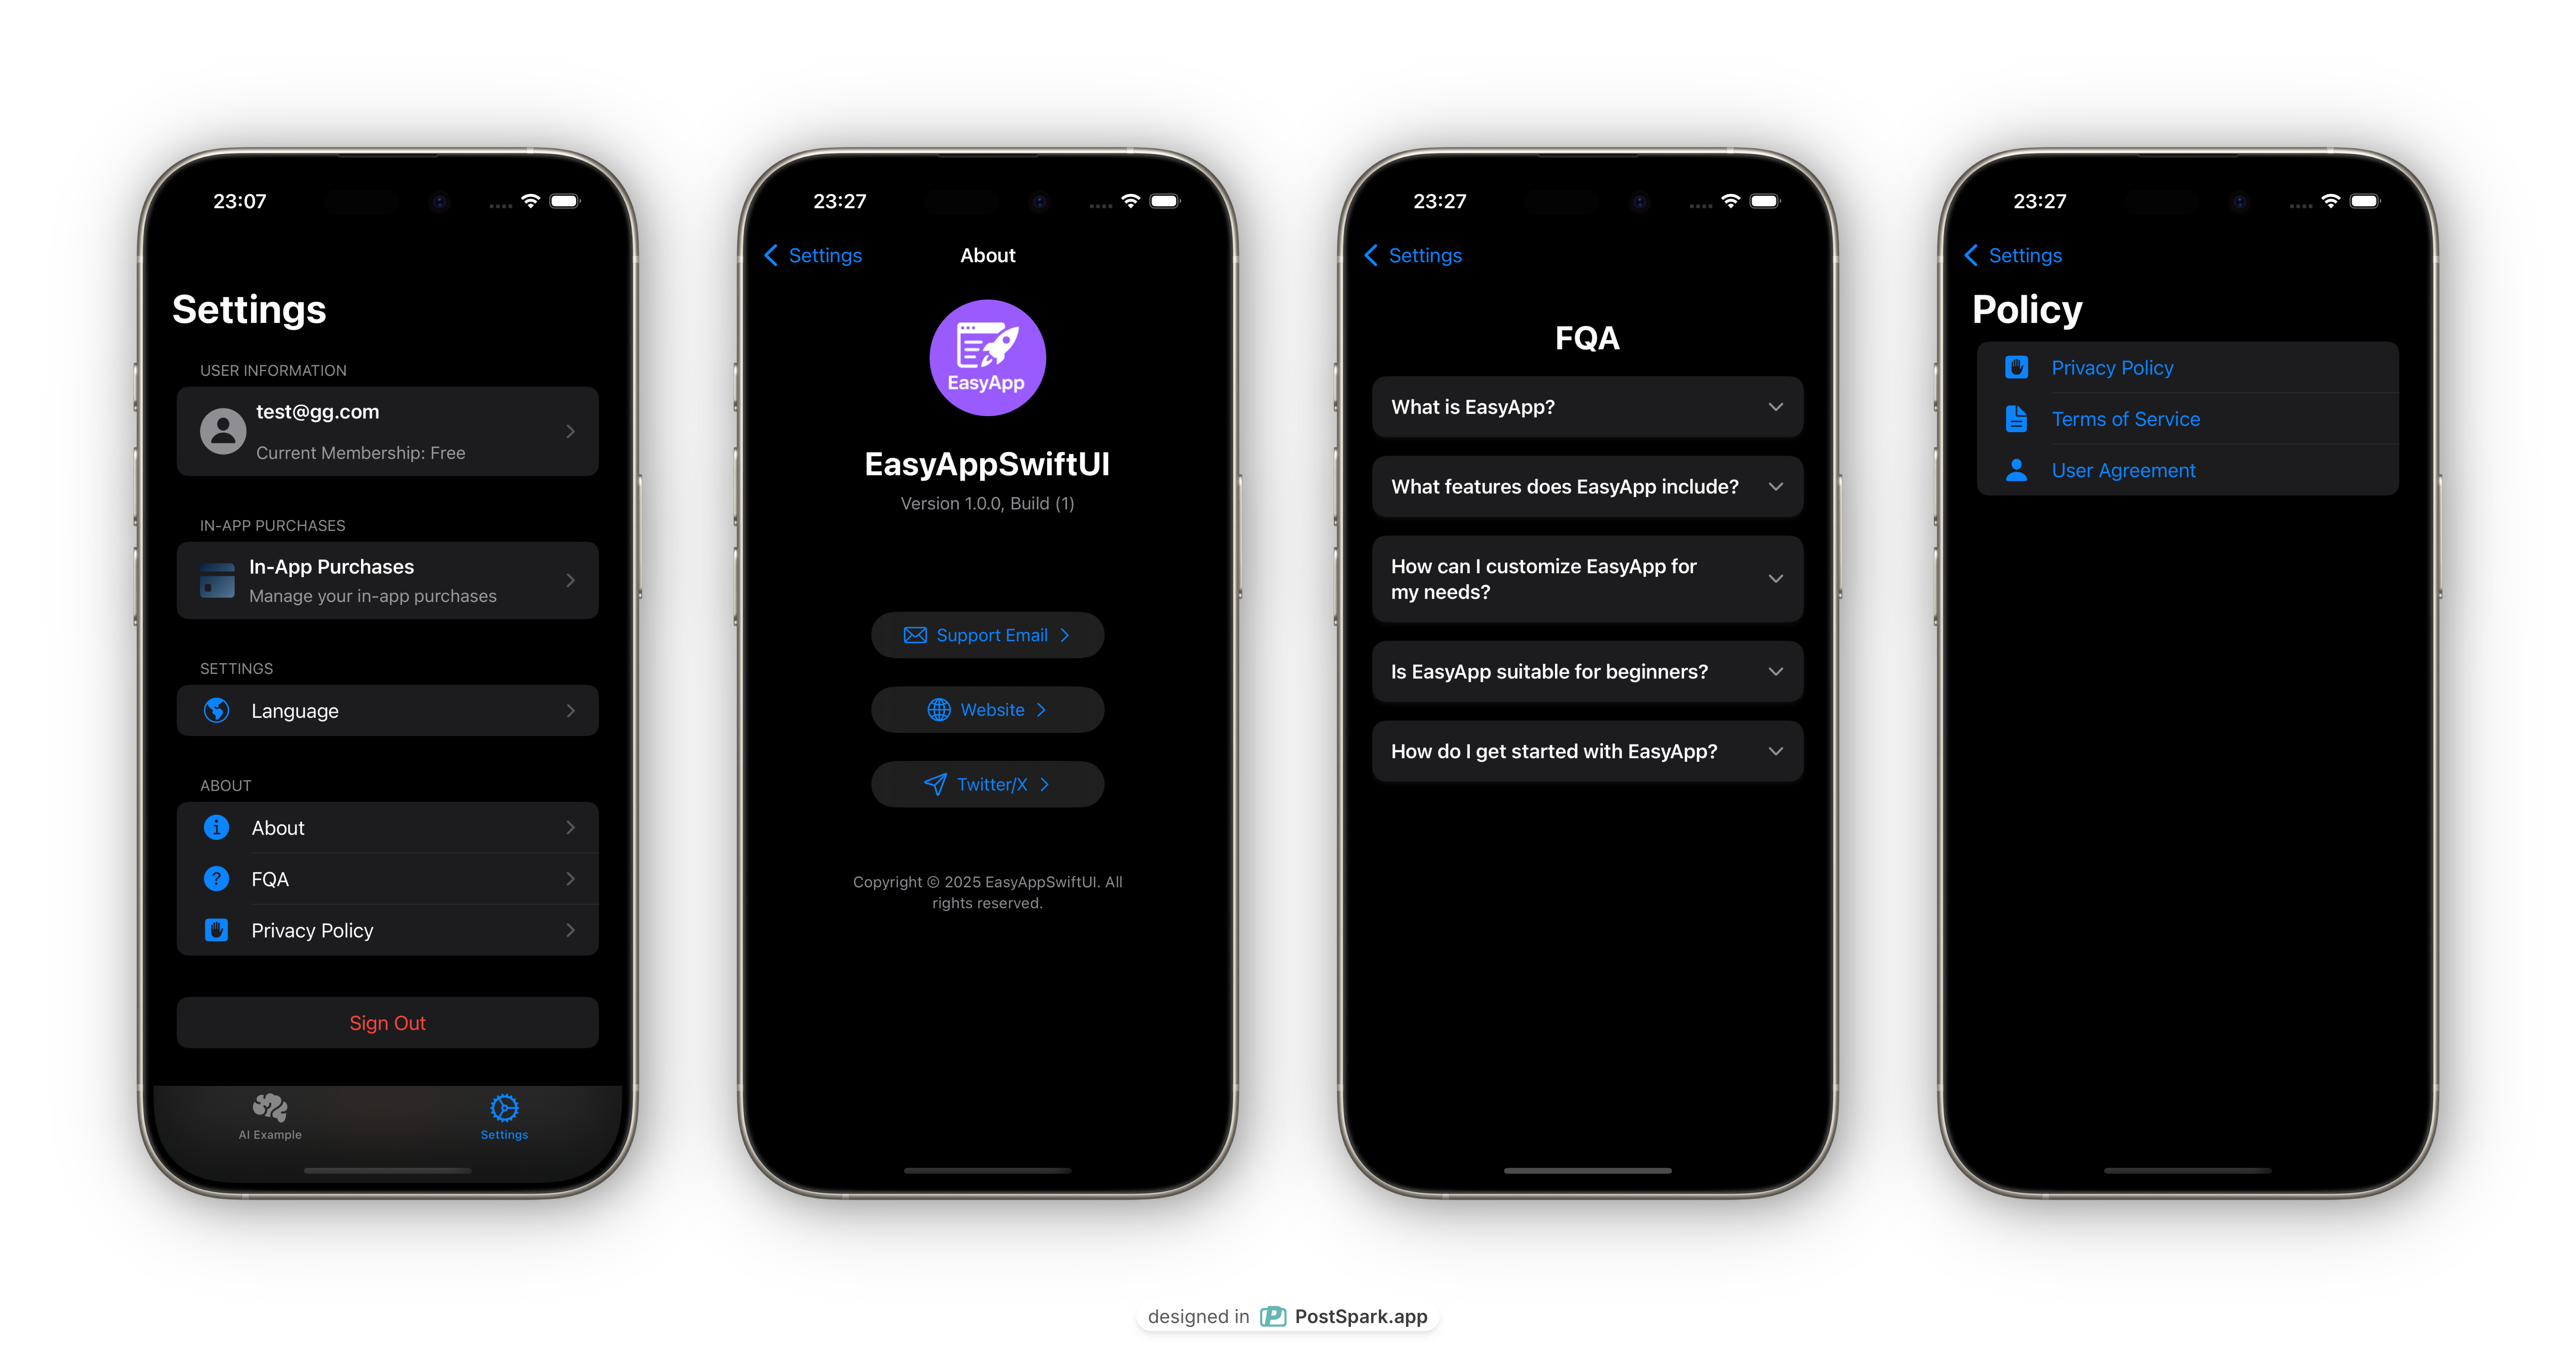
# Settings Page Module
The Settings module provides complete app settings functionality, including user profile management, subscription status, system configuration, help information, and other core features.
## Module Structure
```
Settings/
├── View/
│ └── SettingsView.swift # Main settings page
└── SubPages/
├── UserProfile/ # User profile management
│ ├── View/UserProfile.swift
│ ├── ViewModel/
│ └── Model/
├── About/ # About page
│ └── View/AboutView.swift
├── Policy/ # Privacy policy
│ └── View/PrivacyPolicyView.swift
└── FQA/ # Frequently asked questions
├── View/FQAView.swift
├── Model/
└── Datas/
```
## Core Features
### 1. User Information Management
**Feature Characteristics:**
* User avatar display and updates
* Username and email information
* Subscription status display
* Personal profile editing
```swift
struct UserInfoView: View {
@EnvironmentObject private var authManager: AuthManager
var viewModel: UserProfileVM
var body: some View {
HStack {
AvatarImage(data: viewModel.avatarData, width: 40)
VStack(alignment: .leading) {
Text(viewModel.email)
.font(.headline)
Text(viewModel.username)
.font(.subheadline)
.foregroundColor(.secondary)
// Subscription status display
Text(
String(
format: String(localized: "current_membership_format"),
authManager.storeKitProduct?.displayName ?? String(localized: "free")
)
)
.font(.subheadline)
.foregroundColor(.secondary)
}
}
}
}
```
### 2. Navigation Routing System
Use enums to define clear navigation paths:
```swift
enum SettingsPath: Hashable, Equatable {
case userInfo // User information
case inAppPurchases // In-app purchases
case policy // Privacy policy
case about // About page
case fqa // FAQ
}
```
### 3. Grouped Settings Layout
**User Information Section**
```swift
Section(header: Text("user_information")) {
EANavigationLink(value: SettingsPath.userInfo) {
UserInfoView(viewModel: viewModel)
.redacted(if: viewModel.state.isLoading)
}
}
```
**In-App Purchase Management**
```swift
Section(header: Text("in_app_purchases")) {
EANavigationLink(value: SettingsPath.inAppPurchases) {
HStack(spacing: 12) {
Image(systemName: "creditcard.fill")
.resizable()
.frame(width: 30, height: 30)
.foregroundStyle(Color.onboardingBackground)
VStack(alignment: .leading, spacing: 6) {
Text("in_app_purchases")
.font(.headline)
Text("manage_in_app_purchases")
.font(.subheadline)
.foregroundColor(.secondary)
}
}
}
}
```
### 4. System Settings Integration
**Language Settings**
```swift
EANavigationLink(action: {
OpenApp.openUrlOutsideApp(UIApplication.openSettingsURLString)
}) {
HStack {
Label("language", systemImage: "globe.americas.fill")
Spacer()
Image(systemName: "chevron.right")
.foregroundColor(Color(UIColor.tertiaryLabel))
}
}
```
### 5. User Profile Page
Supports complete user profile management:
```swift
struct UserProfileView: View {
@StateObject private var viewModel = UserProfileVM()
@EnvironmentObject private var authManager: AuthManager
var body: some View {
List {
// Avatar selection area
Section {
HStack {
Spacer()
Group {
if viewModel.uploadLoading {
ProgressView()
.frame(width: 100, height: 100)
} else {
AvatarImage(data: viewModel.avatarData, width: 100)
.onTapGesture {
viewModel.showPhotosPicker = true
}
}
}
Spacer()
}
}
// User information editing area
// ...
}
.photosPicker(
isPresented: $viewModel.showPhotosPicker,
selection: $viewModel.imageSelection,
matching: .images
)
}
}
```
### 6. About Page
Display app basic information and contact details:
```swift
struct AboutView: View {
var body: some View {
ScrollView {
VStack(spacing: 24) {
// App icon
if let logo = UIImage(named: "appicon") {
Image(uiImage: logo)
.resizable()
.frame(width: 100, height: 100)
.circle()
.shadowCompat(radius: 2)
}
// App information
VStack(spacing: 8) {
Text(AppData.appName)
.font(.title)
.bold()
Text(
String(
format: "version_build",
AppData.appVersion,
AppData.appBuildNumber
)
)
.font(.subheadline)
.foregroundColor(.secondary)
}
// Contact information
SocialLinkView(
url: "mailto:\(AppData.supportEmail)",
image: "envelope",
title: "Support Email"
)
SocialLinkView(
url: AppData.websiteURL,
image: "globe",
title: "Website"
)
}
}
}
}
```
### 7. Account Management Features
**Sign Out Function**
```swift
Section {
Button(action: {
showSignOutAlert.toggle()
}) {
Text("sign_out")
.multilineTextAlignment(.center)
.frame(maxWidth: .infinity)
}
.tint(.red)
}
```
**Delete Account Function**
```swift
Section {
Button(action: {
showDeleteUserAlert.toggle()
}) {
Text("delete_user")
.multilineTextAlignment(.center)
.frame(maxWidth: .infinity)
}
.tint(.red)
}
```
### 8. Security Confirmation Dialogs
```swift
.alert("delete_user", isPresented: $showDeleteUserAlert) {
Button("cancel", role: .cancel) {
showDeleteUserAlert.toggle()
}
Button("ok", role: .destructive) {
Task {
await authManager.deleteUser()
}
}
}
```
## Page Navigation System
Use SwiftUI's NavigationStack to implement page navigation:
```swift
.navigationDestination(for: SettingsPath.self) { path in
switch path {
case .userInfo:
UserProfileView()
case .inAppPurchases:
InAppPurchasesView()
case .policy:
PrivacyPolicyView()
case .about:
AboutView()
case .fqa:
FQAView()
}
}
```
## Featured Functions
### 1. **Subscription Status Integration**
* Support for both RevenueCat and StoreKit2 subscription management
* Real-time display of user's current subscription status
### 2. **Avatar Management**
* Support for selecting avatar from photo library
* Avatar caching and optimized display
### 3. **Multi-language Support**
* Complete internationalization support
* System language settings navigation
* Localized string management
### 4. **State Management**
* Uses MVVM architecture
* Reactive data binding
* Error handling and retry mechanisms
# Shared Tools
URL: https://easyapp.site/en/docs/modules/sharedTools
Common tools, view modifiers, extensions, components, and public functions in EasyAppSwiftUI
***
title: Shared Tools
description: Common tools, view modifiers, extensions, components, and public functions in EasyAppSwiftUI
icon: Wrench
------------
# Shared Tools
EasyAppSwiftUI provides a rich collection of utility tools, including view modifiers, extension methods, and utility functions to help you quickly build feature-complete SwiftUI applications.
We continuously update our utility toolkit to help you rapidly build fully-featured SwiftUI applications.
## Overview
* **12 Custom View Modifiers** - For authentication, paywalls, loading states, etc.
* **Extension Methods** - Enhance SwiftUI views and basic type functionality
* **Utility Functions** - Validation, haptic feedback, app navigation, and other practical features
* **Cross-Version Compatibility** - Support for compatibility across different iOS versions
***
## View Modifiers
### 1. Authentication Modifier
Automatically manages user authentication state, displaying different content based on login status.
```swift
ContentView()
.modifier(AuthViewModifier())
// Or use extension method
ContentView()
.showAuthView()
```
**Key Features:**
* Automatically checks user login status
* Shows login/registration interface for unauthenticated users
* Shows main app interface for authenticated users
* Smooth state transition animations
### 2. Paywall Modifier
Locks content behind a paywall and manages subscription verification.
```swift
// Basic usage
PremiumContentView()
.modifier(RequirePremiumViewModifier())
// Advanced usage
PremiumContentView()
.requirePremium(
subscriptionType: .revenueCat,
sheetOrFullScreenCover: .sheet,
onCancelPaywall: {
print("User cancelled payment")
},
onPaySuccess: {
print("Payment successful")
}
)
```
**Core Implementation:**
```swift
struct RequirePremiumViewModifier: ViewModifier {
@EnvironmentObject private var authManager: AuthManager
@State private var showPaywall = false
let subscriptionType: SubscriptionType
let sheetOrFullScreenCover: SheetOrFullScreenCover
let onCancelPaywall: () -> Void
let onPaySuccess: () -> Void
func body(content: Content) -> some View {
content
.onAppear {
showPaywall = !authManager.subscriptionActive
}
.sheet(isPresented: sheetOrFullScreenCover == .sheet ? $showPaywall : .constant(false)) {
paywallContent()
}
}
}
```
### 3. Loading State Modifier
Displays full-screen loading indicator with optional message overlay.
```swift
@State private var isLoading = false
ContentView()
.modifier(FullScreenToastViewModifier(
isPresenting: $isLoading,
message: "Processing your request...",
backgroundColor: Color.black.opacity(0.7)
))
// Or use extension method
ContentView()
.fullScreenLoading(isPresenting: $isLoading)
```
### 4. Shimmer Effect Modifier
Adds animated shimmer effect to views, commonly used for loading states.
```swift
LoadingView()
.modifier(ShimmerViewModifier(duration: 2.0, autoreverse: true))
// Or use extension method
LoadingView()
.shimmering(enable: true, duration: 1.5)
```
### 5. Keyboard Management Modifier
Automatically dismisses keyboard when user drags.
```swift
FormView()
.modifier(ResignKeyboardOnDragGesture())
// Or use extension method
FormView()
.dismissKeyboard()
```
***
## Extension Methods
### Color Extensions
Support for creating colors from hexadecimal strings.
```swift
extension Color {
init(hex: String) {
let hex = hex.trimmingCharacters(in: CharacterSet.alphanumerics.inverted)
var int: UInt64 = 0
Scanner(string: hex).scanHexInt64(&int)
let a, r, g, b: UInt64
switch hex.count {
case 3: // RGB (12-bit)
(a, r, g, b) = (255, (int >> 8) * 17, (int >> 4 & 0xF) * 17, (int & 0xF) * 17)
case 6: // RGB (24-bit)
(a, r, g, b) = (255, int >> 16, int >> 8 & 0xFF, int & 0xFF)
case 8: // ARGB (32-bit)
(a, r, g, b) = (int >> 24, int >> 16 & 0xFF, int >> 8 & 0xFF, int & 0xFF)
default:
(a, r, g, b) = (1, 1, 1, 0)
}
self.init(
.sRGB,
red: Double(r) / 255,
green: Double(g) / 255,
blue: Double(b) / 255,
opacity: Double(a) / 255
)
}
}
```
**Usage Examples:**
```swift
let primaryColor = Color(hex: "007AFF") // 6-digit RGB
let redColor = Color(hex: "F00") // 3-digit RGB
let transparentBlue = Color(hex: "80007AFF") // 8-digit ARGB
```
### String Extensions
Provides string content validation functionality.
```swift
extension String {
var containsLetter: Bool {
let letterRegex = ".*[A-Za-z]+.*"
let passwordTest = NSPredicate(format: "SELF MATCHES %@", letterRegex)
return passwordTest.evaluate(with: self)
}
var containsNumber: Bool {
let numberRegex = ".*[0-9]+.*"
let passwordTest = NSPredicate(format: "SELF MATCHES %@", numberRegex)
return passwordTest.evaluate(with: self)
}
}
```
**Usage Examples:**
```swift
let password = "password123"
let hasLetters = password.containsLetter // true
let hasNumbers = password.containsNumber // true
```
### Date Extensions
Provides user-friendly date formatting.
```swift
extension Date {
var friendlyLocalFormat: String {
return self.formatted(date: .abbreviated, time: .omitted)
}
}
```
**Usage Examples:**
```swift
let now = Date()
let formattedDate = now.friendlyLocalFormat // "Jan 15, 2024"
```
### View Extensions
Provides rich view enhancement functionality.
#### Loading States
```swift
// Button loading state
Button("Submit") { }
.loading($isLoading)
// Toast notifications
someView.showToast($showToast, message: "Operation successful", isSuccess: true)
// Full-screen loading
someView.fullScreenLoading(isPresenting: $isLoading, message: "Loading...")
```
#### Styling and Appearance
```swift
// Rounded corners
someView.roundedCorners(radius: 12)
someView.cardRoundedCorners() // Predefined card corners
someView.circle() // Circular clipping
// Shadow effects
someView.shadowCompat()
someView.colorSchemeShadow(
light: Color.gray.opacity(0.3),
dark: Color.white.opacity(0.1),
radius: 4
)
// Background handling
someView.viewBackground() // Adaptive system background
```
#### Interaction Enhancements
```swift
// Enhanced tap gesture
CustomView()
.tappable {
// Tap action
}
// Web view presentation
someView.webViewSheet(
isPresented: $showWebView,
url: URL(string: "https://example.com"),
title: "Web Page Title"
)
```
***
## Utility Functions
### Haptic Feedback Engine
Provides simple haptic feedback functionality.
```swift
enum HapticsEngine {
static func impact(style: UIImpactFeedbackGenerator.FeedbackStyle = .light) {
UIImpactFeedbackGenerator(style: style).impactOccurred()
}
}
```
**Usage Examples:**
```swift
// Light vibration
HapticsEngine.impact(style: .light)
// Medium vibration
HapticsEngine.impact(style: .medium)
// Heavy vibration
HapticsEngine.impact(style: .heavy)
```
### Validation Tools
Provides common input validation functionality.
```swift
enum Validate {
// Email validation
static func validateEmail(_ email: String) -> Bool {
let emailPattern = #"^[a-zA-Z0-9._%+-]+@[a-zA-Z0-9.-]+\.[a-zA-Z]{2,}$"#
let emailPredicate = NSPredicate(format: "SELF MATCHES %@", emailPattern)
return emailPredicate.evaluate(with: email)
}
// Password length validation
static func validatePasswordLength(_ password: String) -> Bool {
return password.count >= 6 && password.count <= 12 && !password.isEmpty
}
// Password letter validation
static func validatePasswordLetter(_ password: String) -> Bool {
return password.containsLetter && !password.isEmpty
}
// Password number validation
static func validatePasswordNumber(_ password: String) -> Bool {
return password.containsNumber && !password.isEmpty
}
// Complete password validation
static func validatePassword(_ password: String) -> Bool {
return validatePasswordLength(password) &&
validatePasswordLetter(password) &&
validatePasswordNumber(password)
}
}
```
**Usage Examples:**
```swift
let email = "user@example.com"
let password = "password123"
let isValidEmail = Validate.validateEmail(email) // true
let isValidPassword = Validate.validatePassword(password) // true
```
### App Navigation Tools
Provides in-app and external URL navigation functionality.
```swift
enum OpenApp {
// Open URL in external browser
static func openUrlOutsideApp(_ url: String) {
guard let url = URL(string: url) else { return }
UIApplication.shared.open(url)
}
// Open URL within app
static func openUrlInApp(_ url: String) {
guard let url = URL(string: url) else { return }
let safariViewController = SFSafariViewController(url: url)
if let windowScene = UIApplication.shared.connectedScenes.first as? UIWindowScene,
let rootViewController = windowScene.windows.first?.rootViewController {
rootViewController.present(safariViewController, animated: true)
}
}
}
```
**Usage Examples:**
```swift
// Open in external browser
OpenApp.openUrlOutsideApp("https://www.apple.com")
// Open within app
OpenApp.openUrlInApp("https://developer.apple.com")
```
***
## Compatibility Features
### Cross-Version Compatibility
```swift
// iOS 17+ compatible onChange modifier
someView.onChangeCompat(of: value) { oldValue, newValue in
// Handle value changes, automatically adapts to iOS 17+ and earlier versions
}
// Haptic feedback compatibility
someView.sensoryFeedbackCompat(trigger: triggerValue)
```
### Enum Definitions
```swift
// Button style types
enum ButtonStyleType {
case common // Common button style
case text // Text button style
}
// Subscription types
enum SubscriptionType: String, CaseIterable {
case revenueCat // RevenueCat subscription
case storeKit2 // StoreKit2 subscription
}
// Presentation styles
enum SheetOrFullScreenCover: String, CaseIterable {
case sheet // Sheet presentation
case fullScreenCover // Full screen cover
}
```
***
## Dependencies
This module requires the following external libraries:
* **JDStatusBarNotification** - Status bar notifications
* **WhatsNewKit** - "What's New" presentation
* **AlertToast** - Toast notifications
* **RevenueCat** (optional) - Subscription management
* **SafariServices** - In-app browser
***
## Best Practices
### 1. Modular Usage
```swift
// Combine multiple modifiers
ContentView()
.cardRoundedCorners()
.cardShadow()
.requirePremium()
.showToast($showToast, message: "Success!", isSuccess: true)
```
### 2. State Management
```swift
@State private var isLoading = false
@State private var showError = false
Button("Submit") {
isLoading = true
// Perform operation
}
.loading($isLoading)
.showToast($showError, message: "Operation failed", isSuccess: false)
```
### 3. Theme Adaptation
```swift
// Automatically adapt to dark/light mode
CardView()
.colorSchemeShadow(
light: .gray.opacity(0.3),
dark: .white.opacity(0.1)
)
.viewBackground()
```
# User Authentication
URL: https://easyapp.site/en/docs/modules/userAuth
Learn how to use User Authentication in your app
***
title: User Authentication
description: Learn how to use User Authentication in your app
icon: Shield
------------
Building 🚧 ...
# What's New
URL: https://easyapp.site/en/docs/modules/whatsNews
Learn how to implement what's new in your app
***
title: What's New
description: Learn how to implement what's new in your app
icon: Newspaper
---------------

# What's New Module
The WhatsNews module is implemented based on [WhatsNewKit](https://github.com/SvenTiigi/WhatsNewKit) and is used to showcase new features and updates to users. When users update the app, it automatically displays the new feature introduction page for the corresponding version.
## Why Do We Need WhatsNews Functionality?
### 1. **Enhance User Experience**
* Let users understand the latest features and improvements of the app
* Reduce user confusion about new features
* Increase usage and discovery rates of new features
### 2. **Product Promotion Value**
* Highlight core feature updates
* Enhance user perception of product iterations
* Improve user retention after app updates
### 3. **User Education**
* Guide users to use new features
* Explain interface changes and operation processes
* Reduce user learning costs
## Core Features
* **Automatic Display** - Automatically determines whether to display based on app version
* **Version Management** - Intelligently records displayed versions to avoid repeated displays
* **Flexible Configuration** - Supports multi-version content configuration
* **Beautiful Interface** - Provides elegant native SwiftUI interface
* **Rich Interactions** - Supports primary and secondary action buttons
## Integration Implementation
### 1. Environment Configuration
Configure WhatsNew environment in the main view:
```swift
struct ContentView: View {
var body: some View {
MainView()
.environment(
\.whatsNew,
.init(
versionStore: UserDefaultsWhatsNewVersionStore(),
whatsNewCollection: self
)
)
}
}
```
### 2. Content Configuration
Implement the `WhatsNewCollectionProvider` protocol to define new feature content for each version:
```swift
extension ContentView: WhatsNewCollectionProvider {
var whatsNewCollection: WhatsNewCollection {
// Current version's new features
WhatsNew(
version: .current(),
title: "Welcome to the New Version",
features: [
.init(
image: .init(
systemName: "apps.iphone",
foregroundColor: .black
),
title: "New Interface Design",
subtitle: "We've redesigned the app interface to bring better user experience"
)
],
primaryAction: .init(
title: "Get Started",
hapticFeedback: .notification(.success)
),
secondaryAction: WhatsNew.SecondaryAction(
title: "Learn More",
foregroundColor: .accentColor,
hapticFeedback: .selection,
action: .openURL(
.init(string: "https://example.com")
)
)
)
// Historical version configuration
WhatsNew(
version: "1.0.0",
title: "Welcome to the App",
features: [
.init(
image: .init(
systemName: "newspaper",
foregroundColor: .black
),
title: "Core Features Launch",
subtitle: "The app's basic features are ready"
)
],
primaryAction: .init(
title: "Start Exploring",
hapticFeedback: .notification(.success)
)
)
}
}
```
## Feature Configuration Details
### Version Management
* **Auto Version** - Use `.current()` to get the current app version
* **Specified Version** - Manually specify version number like `"1.0.0"`
* **Version Storage** - Use `UserDefaultsWhatsNewVersionStore` to record displayed versions
### Content Elements
**Title**
```swift
title: "App Update"
```
**Features**
```swift
.init(
image: .init(systemName: "star.fill", foregroundColor: .orange),
title: "New Feature Title",
subtitle: "Feature detailed description"
)
```
**Primary Action**
```swift
primaryAction: .init(
title: "Continue",
backgroundColor: .accentColor,
foregroundColor: .white,
hapticFeedback: .notification(.success)
)
```
**Secondary Action**
```swift
secondaryAction: WhatsNew.SecondaryAction(
title: "Learn More",
action: .openURL(.init(string: "https://example.com"))
)
```
## Display Logic
1. **App Launch** - Automatically check if the current version has displayed the new features page
2. **Version Comparison** - Compare with stored displayed versions
3. **Content Display** - If it's a new version, automatically pop up new feature introduction
4. **Status Recording** - Automatically record that the version has been displayed after user views
## Customization Options
### Storage Methods
```swift
// Local storage (default)
UserDefaultsWhatsNewVersionStore()
// iCloud sync storage
NSUbiquitousKeyValueWhatsNewVersionStore()
// In-memory storage (for testing)
InMemoryWhatsNewVersionStore()
```
### Layout Customization
```swift
.environment(
\.whatsNew,
.init(
defaultLayout: WhatsNew.Layout(
showsScrollViewIndicators: true,
featureListSpacing: 35,
contentPadding: EdgeInsets(top: 20, leading: 16, bottom: 20, trailing: 16)
),
versionStore: UserDefaultsWhatsNewVersionStore(),
whatsNewCollection: self
)
)
```
## Best Practices
### 1. **Content Strategy**
* Highlight the most important 3-5 new features
* Use concise and clear descriptive text
* Pair with meaningful icons or illustrations
### 2. **Version Planning**
* Major version updates must configure new feature pages
* Minor version updates can be optionally configured
* Maintain completeness of historical version configurations
### 3. **User Experience**
* Provide skip or quick browse options
* Avoid overly frequent new feature prompts
* Ensure accuracy of new feature introductions
Through the WhatsNews module, you can easily add professional version update introduction functionality to your app, enhancing user experience and product value perception.
# ASO
URL: https://easyapp.site/en/docs/propagation/aso
App Store Optimization (ASO) is a key strategy to increase app visibility and downloads
***
title: ASO
description: "App Store Optimization (ASO) is a key strategy to increase app visibility and downloads"
icon: Globe
-----------
## What is ASO?
ASO (App Store Optimization) is a strategy to increase app visibility, rankings, and downloads by optimizing how your app is presented in app stores. It is similar to SEO for websites, but targets mobile app stores such as Apple App Store and Google Play Store.
## Core Elements of ASO
### 1. Keyword Optimization
* **Keyword Research**: Analyze user search behavior to find high-volume, low-competition keywords
* **Title Optimization**: Incorporate primary keywords into your app title to improve search rankings
* **Subtitle/Description**: Leverage subtitle and description fields to include relevant keywords
* **Keyword Tags**: Add relevant terms in the app store's keyword field
### 2. App Metadata Optimization
* **App Icon**: Design an attractive icon that increases click-through rate (CTR)
* **App Screenshots**: Showcase core features with clear copy and visual effects
* **App Preview Video**: Create short, high-quality demonstration videos
* **App Description**: Clearly and concisely explain your app's value proposition and main features
### 3. Ratings and Reviews Management
* **Improve Ratings**: Encourage satisfied users to leave positive reviews
* **Reply to Reviews**: Respond promptly and professionally to user feedback, demonstrating excellent customer service
* **Handle Negative Reviews**: Actively address user concerns and improve app quality
### 4. Localization Strategy
* **Multi-language Support**: Provide localized app descriptions and keywords for different regions
* **Cultural Adaptation**: Consider cultural differences and user preferences in different markets
* **Region-specific Optimization**: Customize optimization for different countries/regions' app stores
## ASO Tools and Platforms
### App Radar
**Website**: [https://appradar.com/](https://appradar.com/)
App Radar is a comprehensive ASO management platform offering:
* **Market Data Analysis**: Get accurate app performance data and market trends
* **Maximize App Visibility**: Use data-driven strategies to increase app exposure in stores
* **Streamline ASO Process**: Centrally manage multiple app stores and localized versions
* **Keyword Ranking Tool**: Cover 45M+ keywords with ranking tracking and optimization suggestions
* **Competitor Analysis**: Analyze competitors' strategies, creatives, and localization approaches
* **Ratings and Reviews Management**: Track ratings across regions with AI-powered review reply functionality
* **AI-Powered Optimization**: Automated AI suggestions and translations to accelerate optimization
* **Centralized Management**: Manage multiple app store listings on one platform, saving up to 50% of your time
### DianDian (点点数据)
**Website**: [https://app.diandian.com/](https://app.diandian.com/)
DianDian is a leading app data analytics platform in China, specializing in:
* **Real-time App Monitoring**: Monitor real-time data on app launches, removals, and chart clearances
* **Ranking Analysis**: Track ranking changes across free charts, paid charts, and top-grossing charts
* **App Market Insights**: Provide market statistics including total app count and newly launched apps
* **Developer Tracking**: Analyze developer portfolios and market performance
* **Competitor Monitoring**: Real-time tracking of competitor app rankings and performance
### QiMai (七麦数据)
**Website**: [https://www.qimai.cn/](https://www.qimai.cn/)
QiMai is a professional mobile product business analytics platform covering both iOS and Android:
* **Keyword Optimization**: Provide keyword analysis and optimization recommendations
* **Apple Ads Optimization**: Professional Apple Search Ads management and optimization
* **Data Analytics**: Multi-dimensional app market data analysis
* **ASO Case Studies**: Provide industry best practices and success stories
* **Technical Resources**: Share professional knowledge on ASO and app promotion
* **Data Reports**: Regularly publish industry data reports and market analysis
## ASO Optimization Process
1. **Research Phase**: Analyze target market, competitors, and user needs
2. **Planning Phase**: Develop keyword strategy and optimization plan
3. **Implementation Phase**: Optimize app metadata, keywords, and descriptions
4. **Monitoring Phase**: Track rankings, downloads, and user feedback
5. **Iteration Phase**: Continuously optimize based on data analysis results
## ASO Best Practices
* **Continuous Optimization**: ASO is an ongoing process requiring regular monitoring and adjustments
* **Data-Driven Decisions**: Use analytics tools to gather data and make informed decisions
* **User Experience**: Optimize the app itself and user experience, which is the foundation for long-term success
* **Localization**: Customize optimization for different markets rather than using a one-size-fits-all approach
* **A/B Testing**: Test different titles, descriptions, and screenshots to find the optimal solution
* **Competitive Analysis**: Regularly analyze competitor strategies and learn from best practices
## Learning Resources
### Podcasts and Case Studies
#### 1. 玩转ASO (Global App Growth & Monetization)
**Link**: [https://www.xiaoyuzhoufm.com/podcast/68a473247ab267be39f889ad](https://www.xiaoyuzhoufm.com/podcast/68a473247ab267be39f889ad)
A podcast focused on global mobile app growth and monetization, providing in-depth analysis of Google Play and App Store growth strategies, covering the full-funnel approach from ASO, ASA to KOL marketing.
**Recommended Episode**: [How an App Grew from $0 to $40K Monthly Revenue: Three-Stage Practical Framework Breakdown](https://www.xiaoyuzhoufm.com/episode/68e87bc9525f51df388d212a)
* **Core Content**: Introduces a three-stage marketing framework that scaled the app Puff Count to $44,000 in monthly recurring revenue
* **Stage 1 - Market Research**: Analyze viral content on platforms like TikTok to discover and validate app ideas
* **Stage 2 - Organic Content Creation**: Publish videos in bulk based on research insights, using "Hook-Problem-Solution" structure to seek viral distribution
* **Stage 3 - Paid Advertising Scale**: Expand successful organic videos through creator hiring or tools like Posted, using Mobile Measurement Partners (MMP) to optimize campaigns
#### 2. 硬地骇客 (Hard Hacker) EP102
**Link**: [https://www.xiaoyuzhoufm.com/episode/682b26c8457b22ce0d793267](https://www.xiaoyuzhoufm.com/episode/682b26c8457b22ce0d793267)
**Guest**: Una - App Store Operations Lead at XMind (global leading mind mapping app), iOS app growth expert
**Core Topics**:
* ASO overview and objectives
* Differences between ASO and SEO
* Keyword selection strategies and analysis tools
* Keyword writing techniques and Chinese word segmentation
* Keyword performance tracking and App Store Connect data analysis
* ASO optimization frequency and keyword weighting
* App screenshot optimization and rating/review strategies
* In-app marketing strategies and Google Play ASO
### Key Learning Takeaways
* **Marketing-First Mindset**: Start with market research rather than direct development
* **Content-Driven Growth**: Leverage social media platforms to validate app ideas and discover growth opportunities
* **Data Tracking**: Use MMP and App Store Connect tools to track keyword performance
* **Continuous Iteration**: ASO is not a one-time task; it requires regular optimization and adjustment
* **Multi-Channel Strategy**: Combine organic growth and paid advertising for sustainable expansion
## Summary
ASO is an important strategy for increasing app downloads and user growth. By using professional ASO tools (such as App Radar, DianDian, and QiMai), combined with data analysis and continuous optimization, you can significantly improve your app's visibility and competitiveness in app stores. Additionally, learning from industry experts' practical experience and case studies can help you quickly discover growth paths suitable for your app.
# Social Media
URL: https://easyapp.site/en/docs/propagation/socialMedia
Learn how to promote your app on social media
***
title: Social Media
description: Learn how to promote your app on social media
icon: Twitter
-------------
# Social Media Promotion Guide
In today's digital age, social media is one of the most effective channels for promoting mobile applications. This guide will introduce you to various social media platforms and their promotion strategies.
## Major Social Media Platforms
### 1. Twitter/X
**Suitable for**: Tech, news, and utility apps
**Promotion Strategies**:
* Share app development progress and updates
* Participate in relevant topic discussions (#AppDev, #iOS, #SwiftUI)
* Engage with the developer community
* Share app screenshots and feature demos
**Best Practices**:
* Use relevant hashtags to increase exposure
* Regularly post valuable content
* Reply to user comments and feedback
### 2. Instagram
**Suitable for**: Visual, lifestyle, and creative apps
**Promotion Strategies**:
* Post beautiful app interface screenshots
* Create Stories showcasing app features
* Use Reels to create short demo videos
* Collaborate with influencers for promotion
**Content Suggestions**:
* App interface design showcases
* User scenarios
* Behind-the-scenes development content
* User-generated content (UGC)
### 3. TikTok/Douyin
**Suitable for**: Entertainment, utility, and educational apps
**Promotion Strategies**:
* Create 15-60 second app demo videos
* Follow trending topics and challenges
* Showcase unique app features
* Create tutorial content
**Video Content Types**:
* Quick feature demonstrations
* Problem-solving showcases
* User feedback and reviews
* Developer daily life
### 4. LinkedIn
**Suitable for**: Business, productivity, and professional tool apps
**Promotion Strategies**:
* Publish professional app introduction articles
* Share development experience and technical insights
* Participate in industry discussions
* Build professional networks
**Content Focus**:
* App's business value
* Technical innovation points
* User success stories
* Industry trend analysis
### 5. YouTube
**Suitable for**: All types of apps
**Promotion Strategies**:
* Create detailed app demo videos
* Create tutorials and usage guides
* Share development processes
* User reviews and feedback
**Video Types**:
* Complete app demonstrations
* Detailed feature introductions
* Development tutorials
* User case sharing
### 6. Reddit
**Suitable for**: Tech and niche interest apps
**Promotion Strategies**:
* Share apps in relevant subreddits
* Participate in community discussions
* Provide valuable content
* Answer user questions
**Recommended Subreddits**:
* r/iOSProgramming
* r/SwiftUI
* r/AppDev
* r/SideProject
* r/Entrepreneur
### 7. Facebook
**Suitable for**: Mass market and localized apps
**Promotion Strategies**:
* Create app pages
* Post updates and news
* Create user groups
* Run targeted ads
**Content Strategy**:
* Regular app updates
* Share user stories
* Host online events
* Customer service support
## Chinese Social Media Platforms
### WeChat
**Promotion Strategies**:
* Create WeChat official accounts
* Publish technical articles and app introductions
* Build user groups
* Share in Moments
### Weibo
**Promotion Strategies**:
* Post app-related updates
* Participate in trending topics
* Collaborate with KOLs
* Host retweet giveaway events
### Xiaohongshu (Little Red Book)
**Promotion Strategies**:
* Post app usage notes
* Share design inspiration
* Collaborate with bloggers for promotion
* Create topic hashtags
## Promotion Strategies and Tips
### Content Creation Suggestions
1. **Maintain Consistency**
* Unified brand image and tone
* Regular content publishing
* Maintain professionalism
2. **Interactive Engagement**
* Respond promptly to comments and messages
* Participate in relevant discussions
* Share other developers' content
3. **Data Analysis**
* Track posting times and engagement rates
* Analyze which content is most popular
* Adjust strategies to optimize results
### Cross-Platform Strategy
1. **Content Reuse**
* Adapt one piece of content for multiple platforms
* Adjust format according to platform characteristics
* Keep core message consistent
2. **Platform Integration**
* Drive traffic between different platforms
* Create unified topic hashtags
* Cross-promote content
### Time Planning
**Posting Times**:
* Weekdays: 9:00-11:00, 14:00-16:00, 19:00-21:00
* Weekends: 10:00-12:00, 15:00-17:00, 20:00-22:00
* Adjust according to target user groups
**Content Planning**:
* Monday: New feature introductions
* Wednesday: User case sharing
* Friday: Development progress updates
* Weekend: Light and fun content
## Success Case References
### Independent Developer Success Stories
1. **Flighty** - Gained massive attention by sharing development process on Twitter
2. **Apollo for Reddit** - Built loyal user base using Reddit community
3. **Halide** - Attracted users by showcasing photography work on Instagram
### Promotion Effectiveness Evaluation
**Key Metrics**:
* Follower growth rate
* Engagement rate (likes, comments, shares)
* Click-through conversion rate
* App download volume
* User retention rate
**Recommended Tools**:
* Google Analytics
* Built-in analytics tools from social media platforms
* Third-party analytics tools (like Hootsuite, Buffer)
## Important Considerations
### Compliance Requirements
* Follow each platform's community guidelines
* Pay attention to copyright and intellectual property
* Avoid over-marketing
* Protect user privacy
### Common Pitfalls
* Focusing only on follower count while ignoring quality
* Posting too frequently or infrequently
* Ignoring user feedback
* Lack of long-term planning
## Reference Resources
* [App Store Marketing Guidelines](https://developer.apple.com/app-store/marketing/guidelines/)
* [Social Media Marketing for Apps - Apptentive](https://www.apptentive.com/blog/social-media-marketing-for-apps/)
* [Mobile App Marketing Guide - Branch](https://branch.io/resources/guide/mobile-app-marketing/)
* [App Marketing Stack - App Marketing Stack](https://appmarketingstack.com/)
## Summary
Social media promotion requires long-term persistence and careful planning. Choose platforms suitable for your app type, create valuable content, and build genuine connections with users. Remember, successful social media promotion is not just about getting downloads, but more importantly about building brand awareness and user loyalty.
By properly utilizing these platforms and strategies, your app will be able to gain more exposure and user attention, ultimately achieving business success.
# Withdrawal
URL: https://easyapp.site/en/docs/propagation/withdrawal
Learn how to withdraw your earnings from the App Store to your bank account
***
title: Withdrawal
description: Learn how to withdraw your earnings from the App Store to your bank account
icon: HandCoins
---------------
Coming soon...
# StoreKit2 In-App Purchases
URL: https://easyapp.site/en/docs/quickstart/StoreKit2
Learn how to integrate StoreKit2 in-app purchases
***
title: StoreKit2 In-App Purchases
description: Learn how to integrate StoreKit2 in-app purchases
icon: WalletCards
-----------------
# Adding In-App Purchases in App Store Connect
## First Create a New App
Before adding in-app purchases, you need to create your App first, this is required.
We log in to [App Store Connect](https://appstoreconnect.apple.com/apps), click "Apps" at the top, then click the "+" button to create your App.

In the New App popup, you need to fill in the following information:
1. Platform: Select your App's platform
The platform you expect to launch on. Choose iOS, which can be downloaded on both iPhone and iPad ( the premise is that you need to adapt for iPad)
2. App Name: Your App's name
3. Bundle ID: Your App's Bundle ID
You can select from the dropdown. Please select the Bundle ID corresponding to your XCode project.

4. Fill in SKU information ( this information is only visible to you) can be filled with the App name
5. Access selection: Full Access
6. Click the Create button
Auto-renewable subscriptions depend on subscription groups, so you need to create a subscription group first.
## Create Subscription Group
1. Select `Subscriptions` on the left, click the `Create` button to create a new subscription group

2. Fill in your subscription group name, mostly names like `Pro`, `Plus`, `VIP`, `Premium`, `Unlimited`, etc. Then click the `Create` button

3. Fill in subscription group internationalization information. We'll use English/Chinese as an example, fill in the English subscription group name and subscription group description.

Subscription group internationalization information will automatically display the corresponding language in the AppStore based on the user's region.
The image below shows subscription group related information

* First step: Localization: Select the corresponding language
* Second step: Fill in the subscription group name
* Third step: App Name Display Options select: Use Custom Name, because you might modify the App name later, so choose Use Custom Name here
* Fourth step: Create to save

Taking Chinese as an example

After creation is complete, you can view and manage internationalization information here

## Create Subscriptions under Subscription Group
In most cases, the subscriptions we create are auto-renewable subscriptions, which are the common annual subscriptions ( annual payment/membership), monthly subscriptions( monthly payment/membership), or weekly subscriptions( weekly payment/membership).
So we'll take annual subscription and monthly subscription as examples. Similarly, you can create weekly subscriptions. The steps are all the same
### Create Annual Subscription
#### 1. Create Subscription Type

Next, the system will ask you to provide a reference name and product ID
We need to explain Reference Name and Product ID to help you better understand App Store Connect related knowledge
* Reference Name: The Reference Name will be used in App Store Connect and Apple's Sales and Trends reports, but will not be displayed to users in the App Store. It's recommended to use an easy-to-understand product description as the name, and the length must not exceed 64 characters.
* Product ID: The product ID is a unique alphanumeric identifier used to access your product in development and sync with RevenueCat. Once you use a product ID for a product in App Store Connect, that ID cannot be used for any other applications you create in the future, even if the product is deleted. It's recommended to stay organized from the start—we recommend using a consistent naming scheme for all product identifiers, such as:
`___`
Let's further explain the above specification:
* app (application prefix): This is a unique prefix exclusive to your application, because the same product ID cannot be used for any other applications you create in the future.
* price (price): The fee you plan to charge for this product in the default currency.
* duration (subscription duration): The duration of the regular subscription cycle.
* intro duration ( trial duration): If there's a trial period, this represents the duration of the trial period.
* intro price ( trial price): If there's a trial period, this represents the trial price in the default currency.
In this example, I want to set up an annual subscription priced at $69. Following this format, I set the product identifier to:
`easyappswiftui_69_1y`

Using a consistent naming scheme for product identifiers in App Store Connect will save you time in the future and make it easier to organize and understand your products just by their identifiers.
#### 2. Set Subscription Duration
After clicking Save in the previous step, we need to set the subscription duration. For annual membership, we select 1 year validity period
Then set `Availability`
`Availability` means selecting which countries/regions your subscription service is effective in.

We of course hope that all countries/regions can use our subscription service, so here we check all by default.
Click the `Save` button to save

#### 3. Set Subscription Price
Scroll the webpage to find `Subscription Prices`, click the `Add Subscription Prices` button to set subscription prices

In the popup, we need to set 2 pieces of information
* First part: Select country/region
* Second part: Select price

For country, we first choose the United States, settled in US dollars
For price, we choose $69
If you want to find more price options, click the `See Additional Prices` button and select your desired price

Then click the `Next` button

Next, you'll see another popup
In this popup, you can set different prices based on country/region. For example, I set it to ¥128 RMB for mainland China region

Similarly, you can also click the `See Additional Prices` button and select your desired price
Here, App Store Connect is very thoughtful and will automatically calculate corresponding prices for other countries/regions based on the US dollar price you set combined with current exchange rates.
After setting is complete, click the `Next` button and click the `Confirm` button
#### 4. Set Subscription Internationalization Information
Next, you need to set the App Store localization information. These are the in-app purchase names and descriptions that users will see.
Continue scrolling down the webpage, find `Localization`, click the `Add Localization` button

We need to provide subscription display name and description. The subscription display name and description will be displayed in the App Store and user's subscription management settings.
Taking the annual subscription we just created as an example: Our subscription name is `Annual Subscription`, and the subscription description is `Unlimited access unlocks all features`
In the document, we'll use English and Chinese as examples
First, set the English subscription display name and description
After filling in, click the `Add` button

Now set the Chinese subscription display name and description
* Select Chinese
* Subscription display name: 年度订阅
* Subscription description: 解锁所有高级功能

After filling in, click the `Add` button
After creation is complete, you can view and manage internationalization information here

#### 5. Add Review Information
Continue scrolling down the webpage to find `Review Information`
The final step in setting up in-app purchases in iOS is to add information for reviewers. This includes a screenshot and optional review notes. Developers often overlook the screenshot, but without it, the product cannot be submitted for review.
* Screenshot: The in-app purchase paywall for reviewers to view. During testing, you can upload any 640×920 blank image here. Before submitting for review, be sure to replace it with the actual paywall interface image.
* Review Notes: This is optional and used to explain anything related to in-app purchases to reviewers. ( Most cases don't need to fill this in)

During testing, you can download this image and upload it as a placeholder. Before submitting for review, be sure to replace it with the actual paywall image.

After setting is complete, click the `Save` button in the top right corner to save. At this point, the annual subscription creation is complete.
Next, we'll follow the steps for creating annual subscriptions to create monthly subscriptions.
### Create Monthly Subscription
We return to the subscription group preview page, click the `Subscriptions` + button to create a monthly subscription

At this point, the steps are exactly the same as [Create Annual Subscription](#create-annual-subscription).
You can refer to the steps for [Create Annual Subscription](#create-annual-subscription) to create monthly subscriptions
Of course, you can also create weekly subscriptions, quarterly subscriptions, semi-annual subscriptions. Their steps are all the same.
Remember to select the correct subscription duration here 😄

If you complete the entire process smoothly, you should see the following page. All subscriptions you create will be displayed here.

If you want to modify subscription information, you can click the subscription name to enter the subscription details page. Then modify the information you expect.

We cannot modify the subscription's `Product ID`. Even if the product is deleted, this ID cannot be used for any other applications you create in the future. This is the unique identifier for obtaining subscription information. If you're not sure, please refer to the `Product ID` explanation in [here](#1-create-subscription-type).
### Create One-Time Purchase ( Lifetime Membership)
Creating one-time purchases does not depend on subscription groups. We return to the preview App homepage, click `In-App Purchases`, click the `Create` button to create a one-time purchase

In the popup, we need to fill in the following information:

* Type: Select `Non-Consumable`, representing non-consumable products
Let me give you an example to help you understand:
Non-consumable products can be understood this way: for example, we develop an image recognition app, after users purchase lifetime membership, they can use this feature permanently. No usage limits, no time limits.
Consumable products: for example, we set that users can purchase 100 recognition opportunities, then after users purchase, they can use this feature permanently. But when the usage is exhausted, users need to purchase again.
* The filling of `Reference Name` and `Product ID` follows the same rules as in [Create Annual Subscription](#create-annual-subscription).
* Click the `Create` button to create a one-time purchase and enter the one-time purchase details page
Similarly, we need to set the one-time purchase's `Availability`, `Price Schedule`, `App Store Localization`, `Review Information` according to the rules for [Create Annual Subscription](#create-annual-subscription)

Finally, don't forget to click the `Save` button in the top right corner to save
After success, you can view and manage one-time purchases here

Congratulations 🎉🎉🎉, at this point, you have completed the creation of subscription in-app purchases and one-time purchases in App Store Connect.
## Configuring StoreKit2 in EasyApp
After completing the in-app purchase configuration in App Store Connect, you need to configure StoreKit2's productIDs in EasyApp.
Open the `EasyAppSwiftUI/Constants/Constants.swift` file, find the `Constants` -> `StoreKit2` enum, and configure your productIDs.
Where `productIDs` are the in-app purchase productIDs you configured in App Store Connect.


```swift title="EasyAppSwiftUI/Constants/Constants.swift"
enum Constants {
// ... other configurations
/// StoreKit2 product IDs
/// Enter the product ID from App Store Connect here
enum StoreKit2 {
static let productIDs = ["your product ids"]
}
// ... other configurations
}
```
There's another place where errors can easily occur - the [agreement](https://appstoreconnect.apple.com/business/atb/95c7eacb-a537-4036-9c21-ff4c032d3f94) configured in App Store Connect must be correct.

Please ensure that the information in the screenshot such as \[Paid Apps Agreement], \[Bank Account], \[Tax Forms] are all correct, otherwise it will lead to review failure and in-app purchase integration failure.
### Testing In-App Purchases
During the development phase, in-app purchases are all tested in the sandbox environment. When making purchases, no actual charges will be made.
Please use a real device for testing, do not use the simulator.
* First, we need to create a sandbox test account in App Store Connect's [`Users and Access`](https://appstoreconnect.apple.com/access/users/sandbox)
If you already have a test account, follow the image below:

Click the `+` button to create a sandbox test account,
If you don't have a test account and are creating for the first time, please follow the image below:

In the subsequent popup, enter your test account related information, then click the `Create` button to save.

* Run the App on a real device, in-app purchase testing
We have only completed the configuration steps for in-app purchases. At this time, when users make purchases, there is no interaction with the backend, such as updating user membership status, updating user subscription information, etc. You need to handle this accordingly in the supabase backend.
Regarding this part, the template implements this functionality using the credits feature. If you have business needs in this area in the future, you can refer to the implementation of the credits feature in the template.
} href="/docs/modules/Credits">
Learn about credits feature implementation
# App-side Integration with Supabase Services
URL: https://easyapp.site/en/docs/quickstart/Supabase
Learn how the EasyAppSwiftUI project integrates Supabase services
***
title: App-side Integration with Supabase Services
description: Learn how the EasyAppSwiftUI project integrates Supabase services
icon: Database
--------------
EasyApp uses [Supabase](https://supabase.com/) as its backend/database service. [Supabase](https://supabase.com/) is an open-source PostgreSQL database that includes user authentication, database, real-time data synchronization, permission management, data analysis, and many other powerful features.
You don't need to pay for servers or databases, nor worry about server maintenance issues. The free tier is sufficient for your initial use. Even if you exceed the free tier, you can choose to pay for usage. The cost is not very expensive.
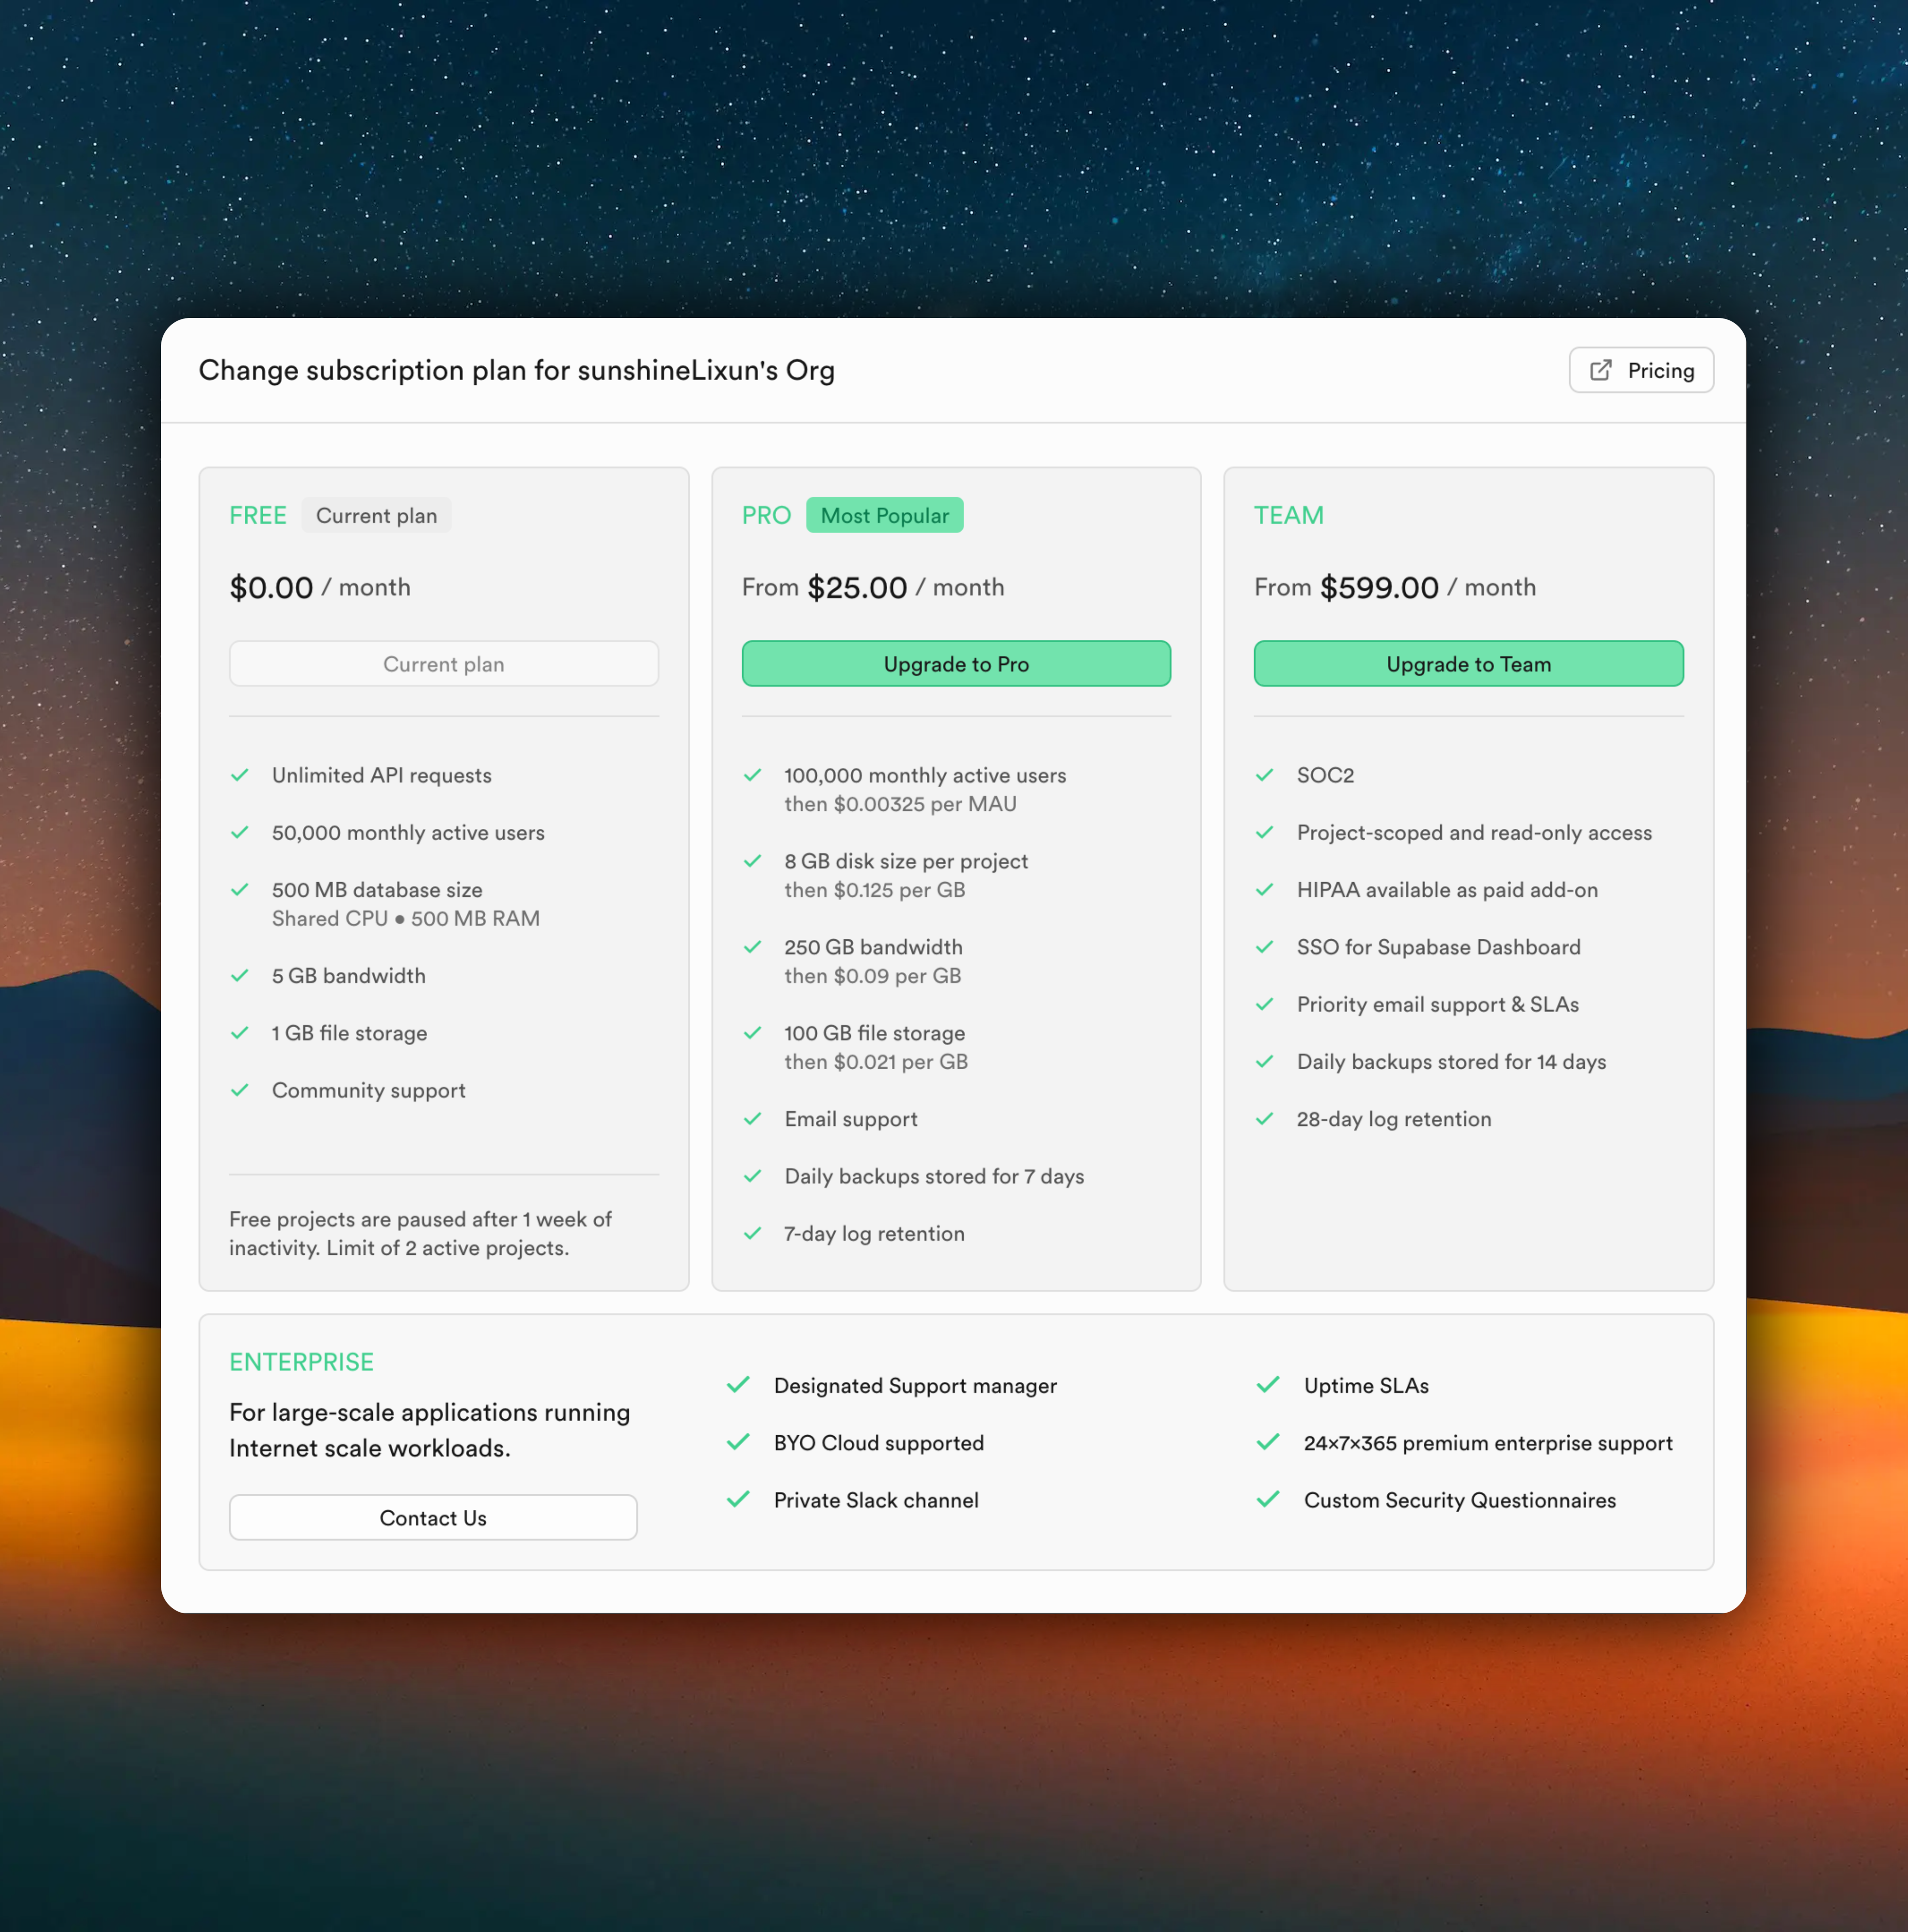
Next, follow me step by step to integrate Supabase services. It's very easy.
# Create Your Supabase Project
### Register a Supabase Account
If you don't have a Supabase account, you need to register one first. [Registration link](https://supabase.com/sign-up)
After registration, you need to create an organization. If you already have an organization, you can skip the organization creation step and directly [create a project](#create-project).
### Create Organization
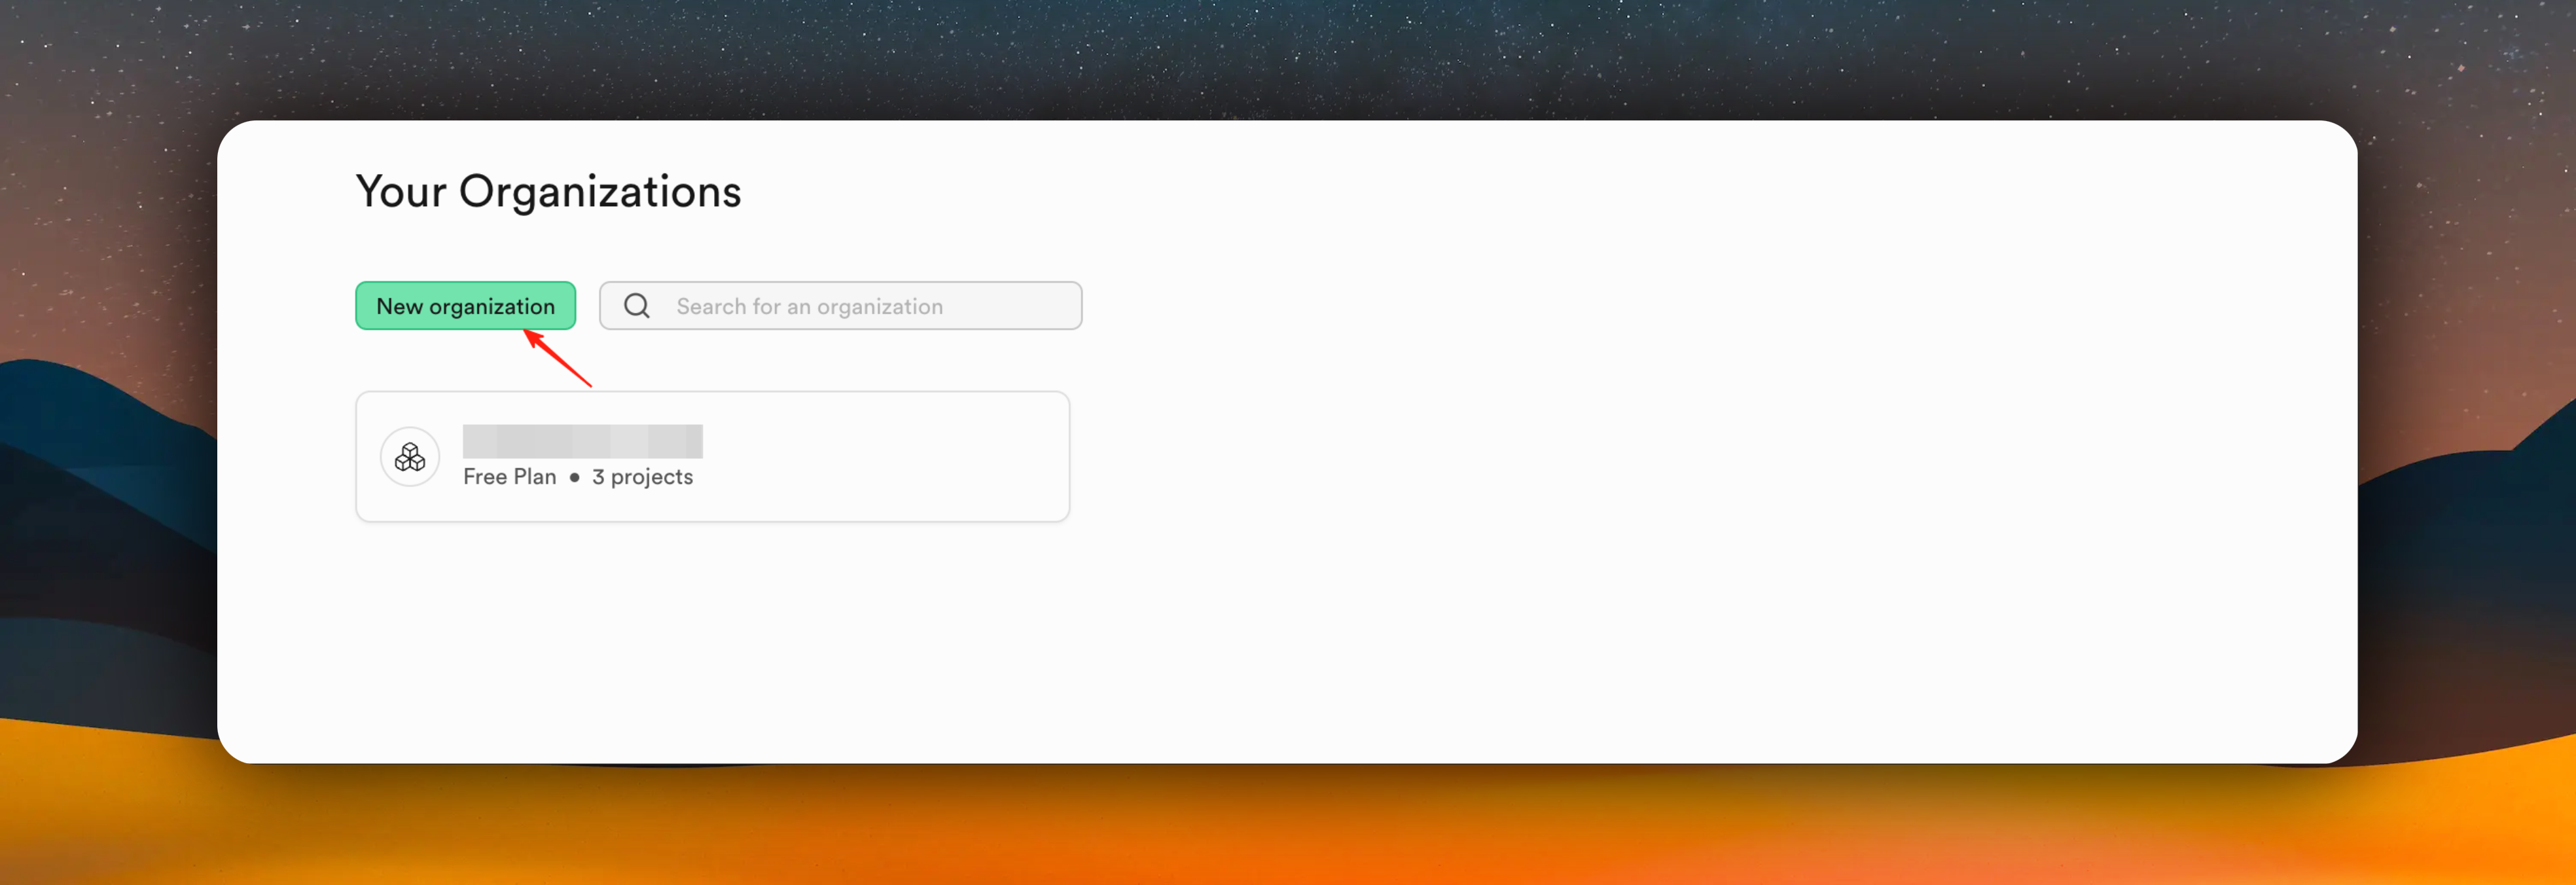
Enter the organization name, select `Personal` for Type, and choose `Free` for Plan. Click the `Create Organization` button. The example is shown below.
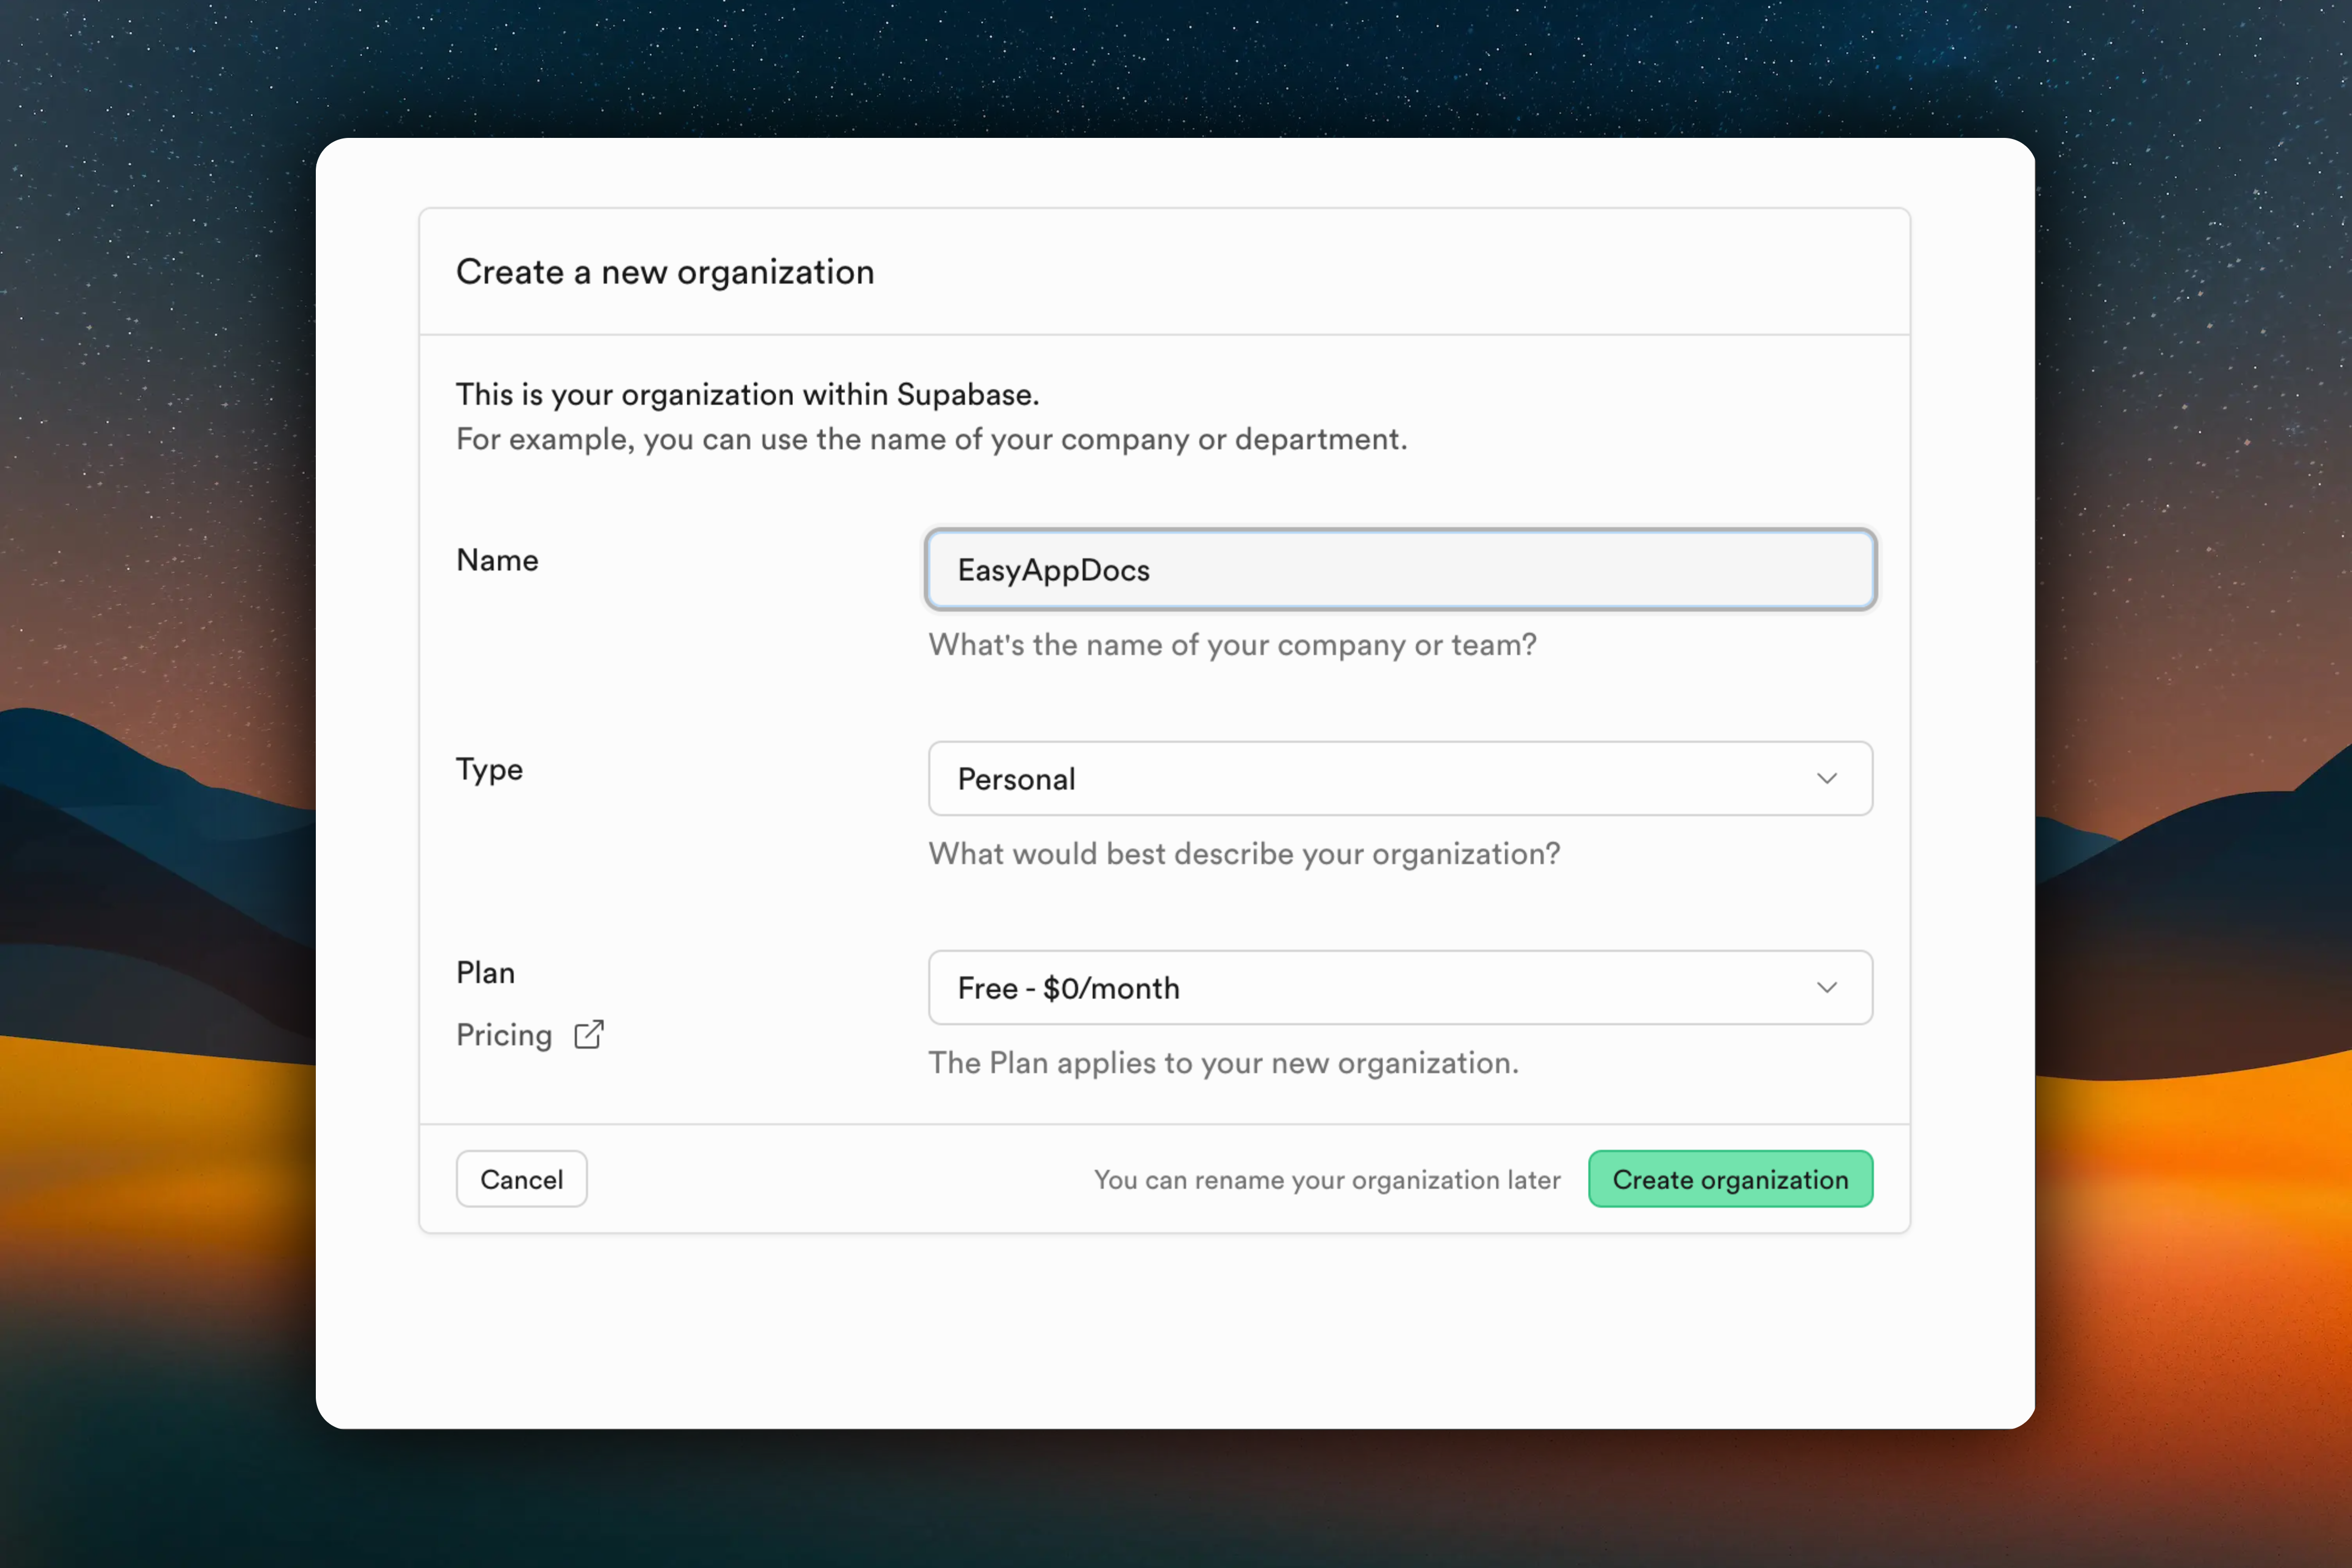
### Create Project
After creating the organization, click into the organization and you need to create a project. The example is shown below.
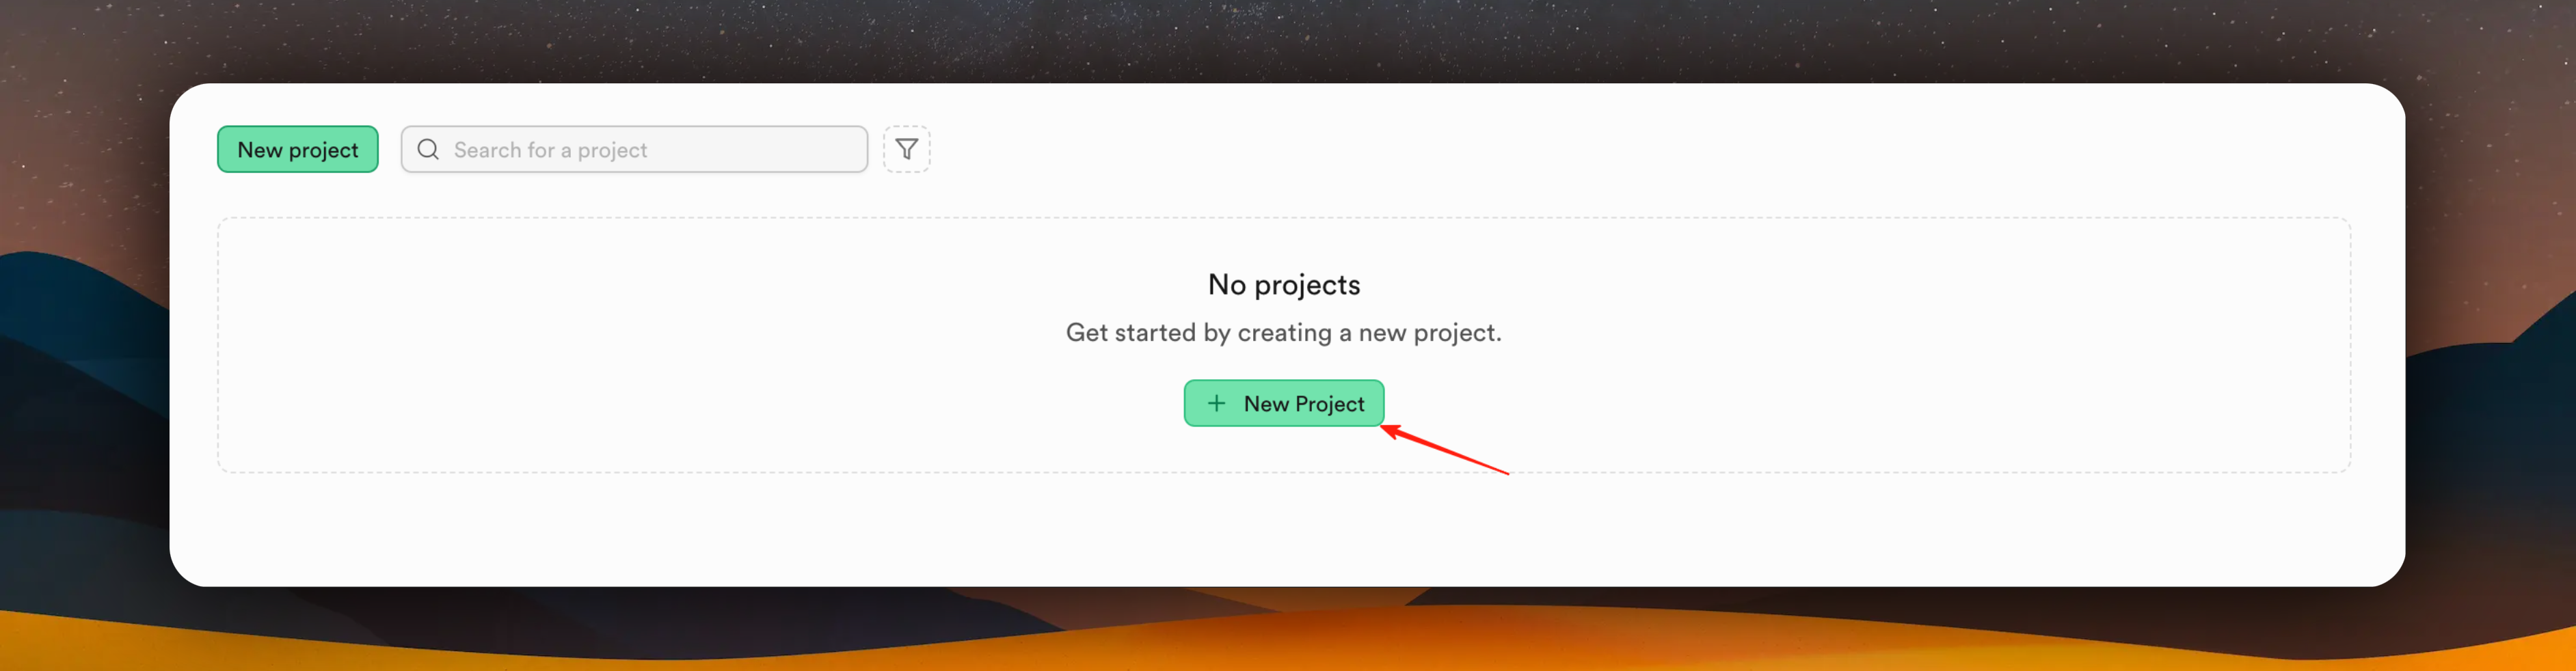
Since I already have an organization, I'll add a new project to the existing organization as an example:
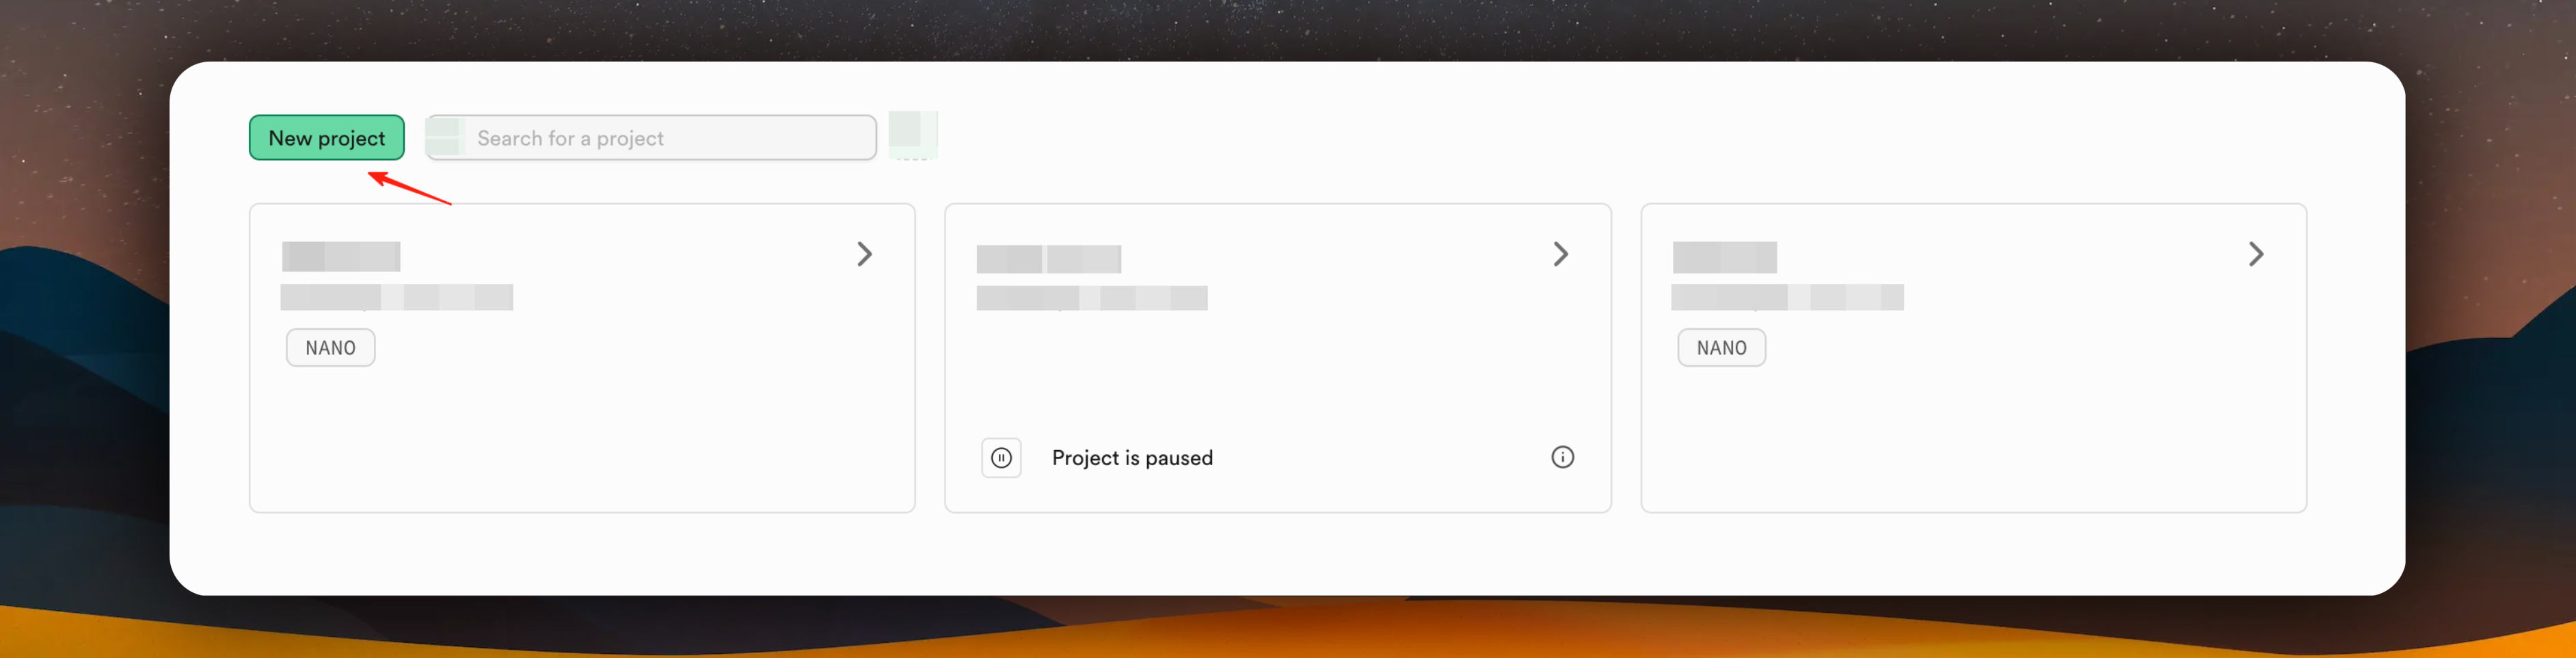
Enter the project name, create a database password (please save it securely!), select a region, and then click the "Create new project" button. Wait for a while until the project is created.
The database password is very important, please save it securely!
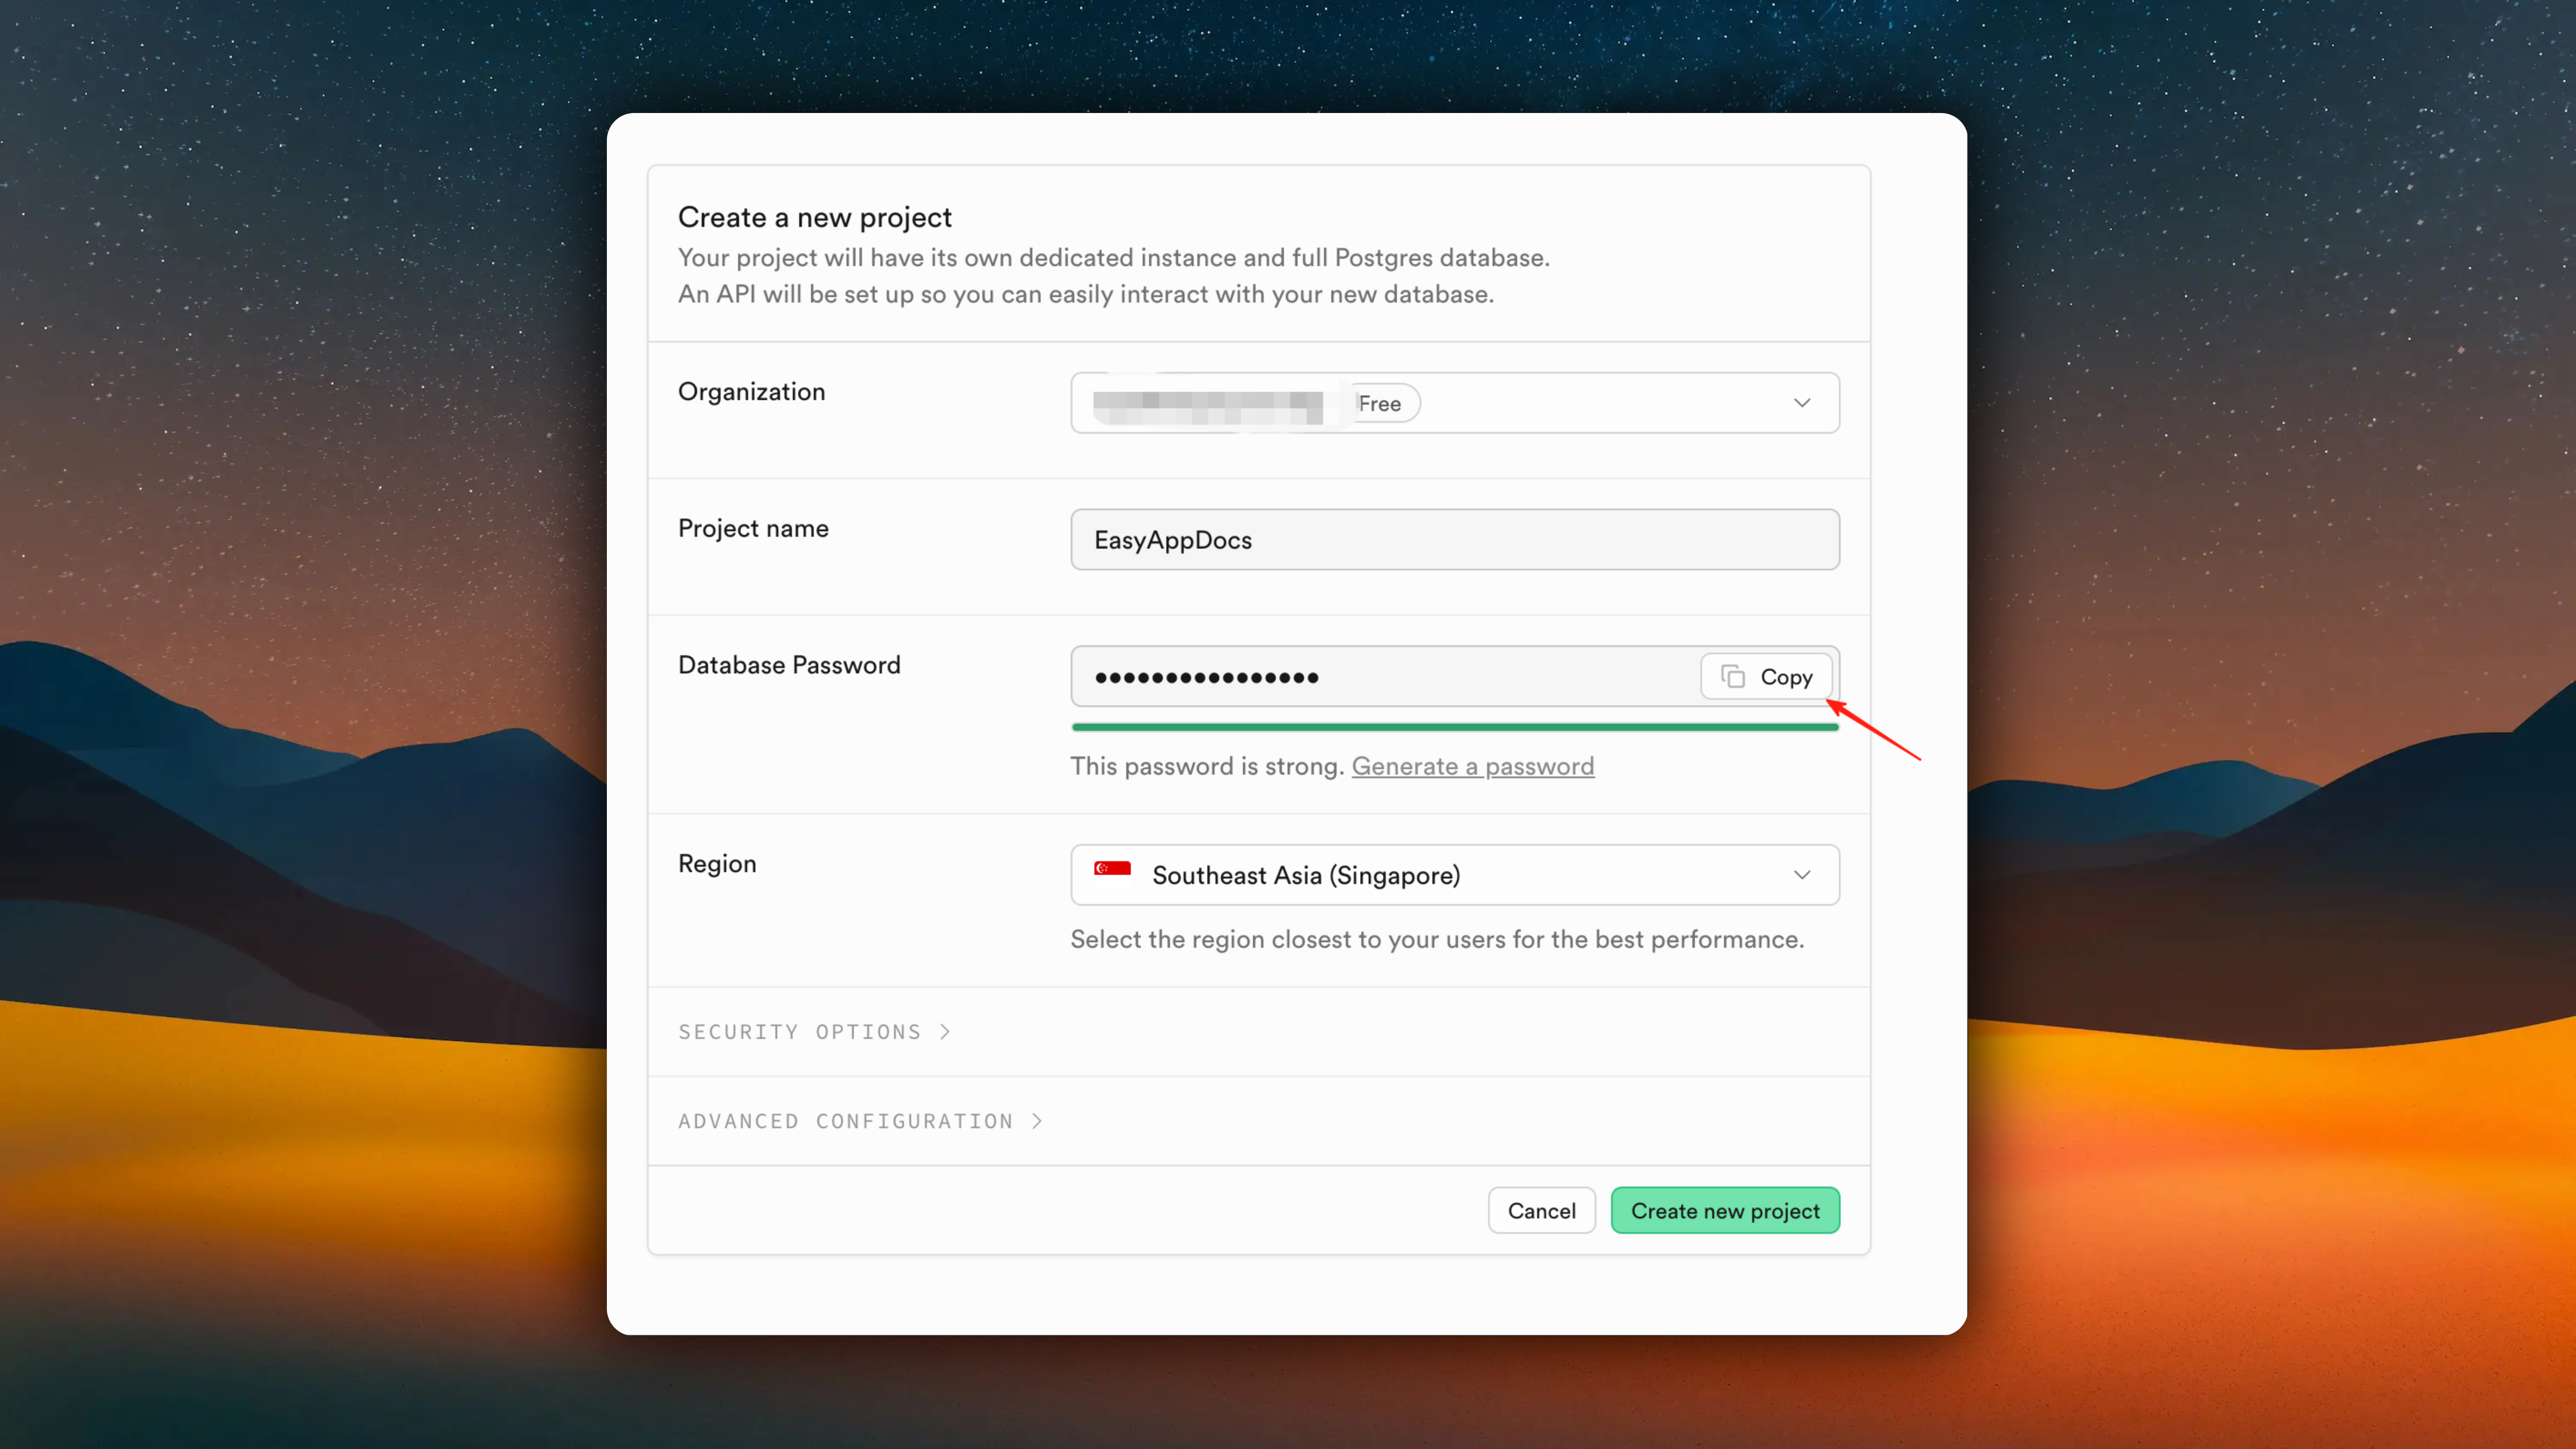
{/*
# Create Database (Optional)
We recommend you use the EasyAppSupabase template to create databases and manage server-side APIs. This will be more convenient.
You can refer to:
How to use the EasyAppSupabase template
The content below is just to inform you how to create databases, table structures, and table fields in the Supabase visual interface.
EasyApp uses Supabase user authentication functionality to manage users. Including user registration, login, Apple login, password reset, user information management, etc.
Therefore, we need to first create a database, along with the corresponding table structure and table fields, to store user information.
You have two methods to create tables:
- Use the visual interface provided by Supabase to create table structure.
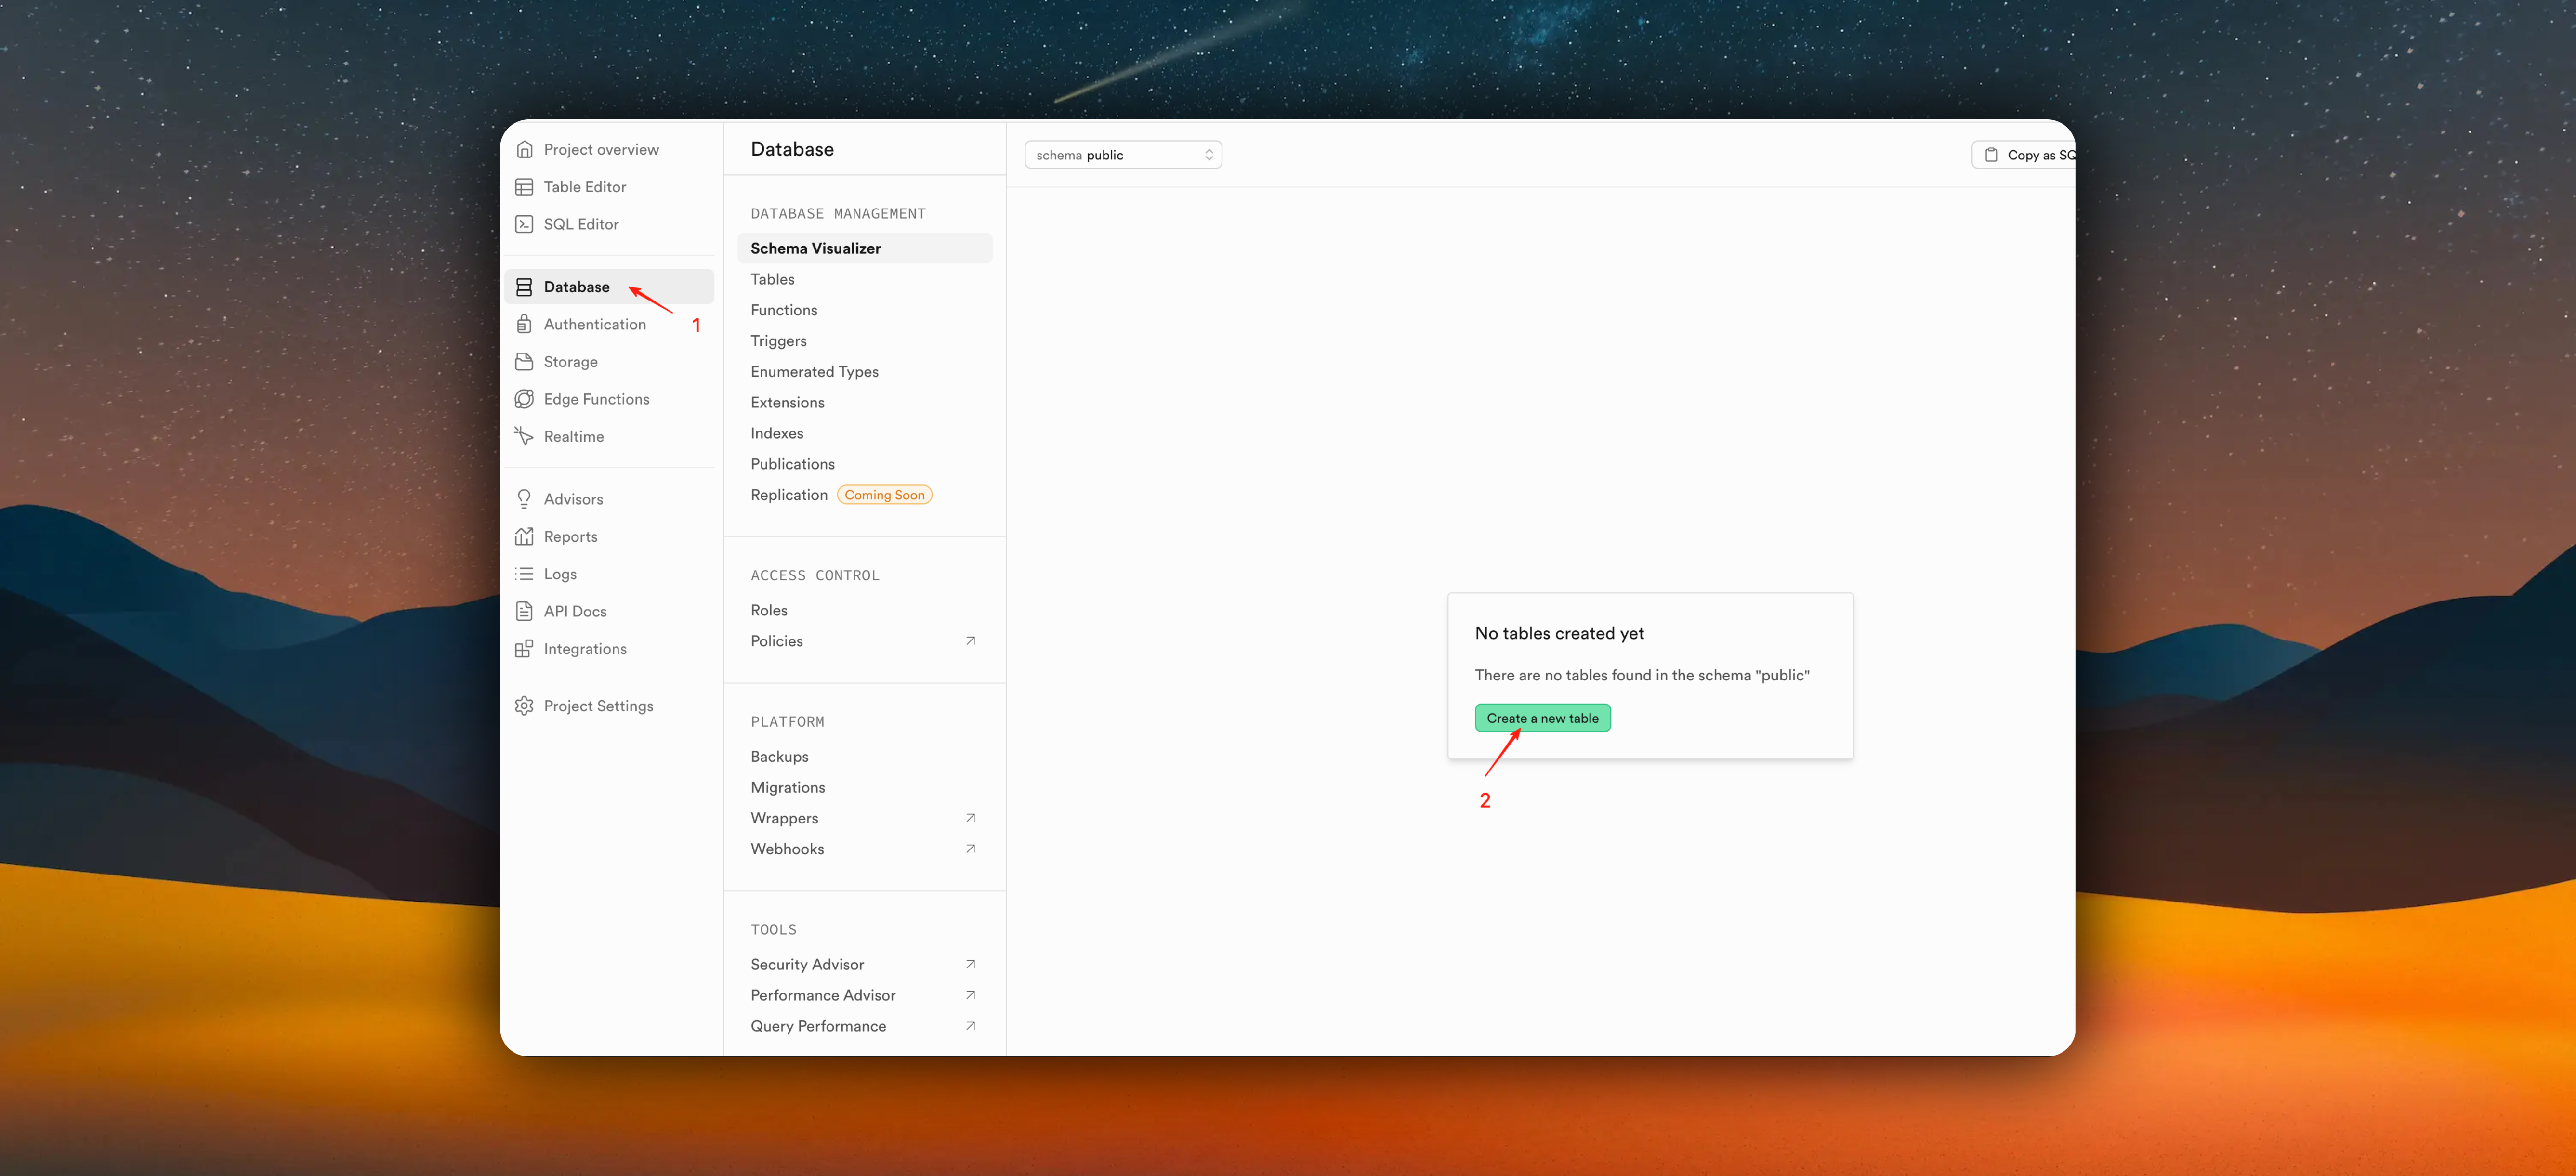
- Use the SQL editor provided by Supabase to create table structure. It also provides many SQL template statements for different business logic. Very convenient.
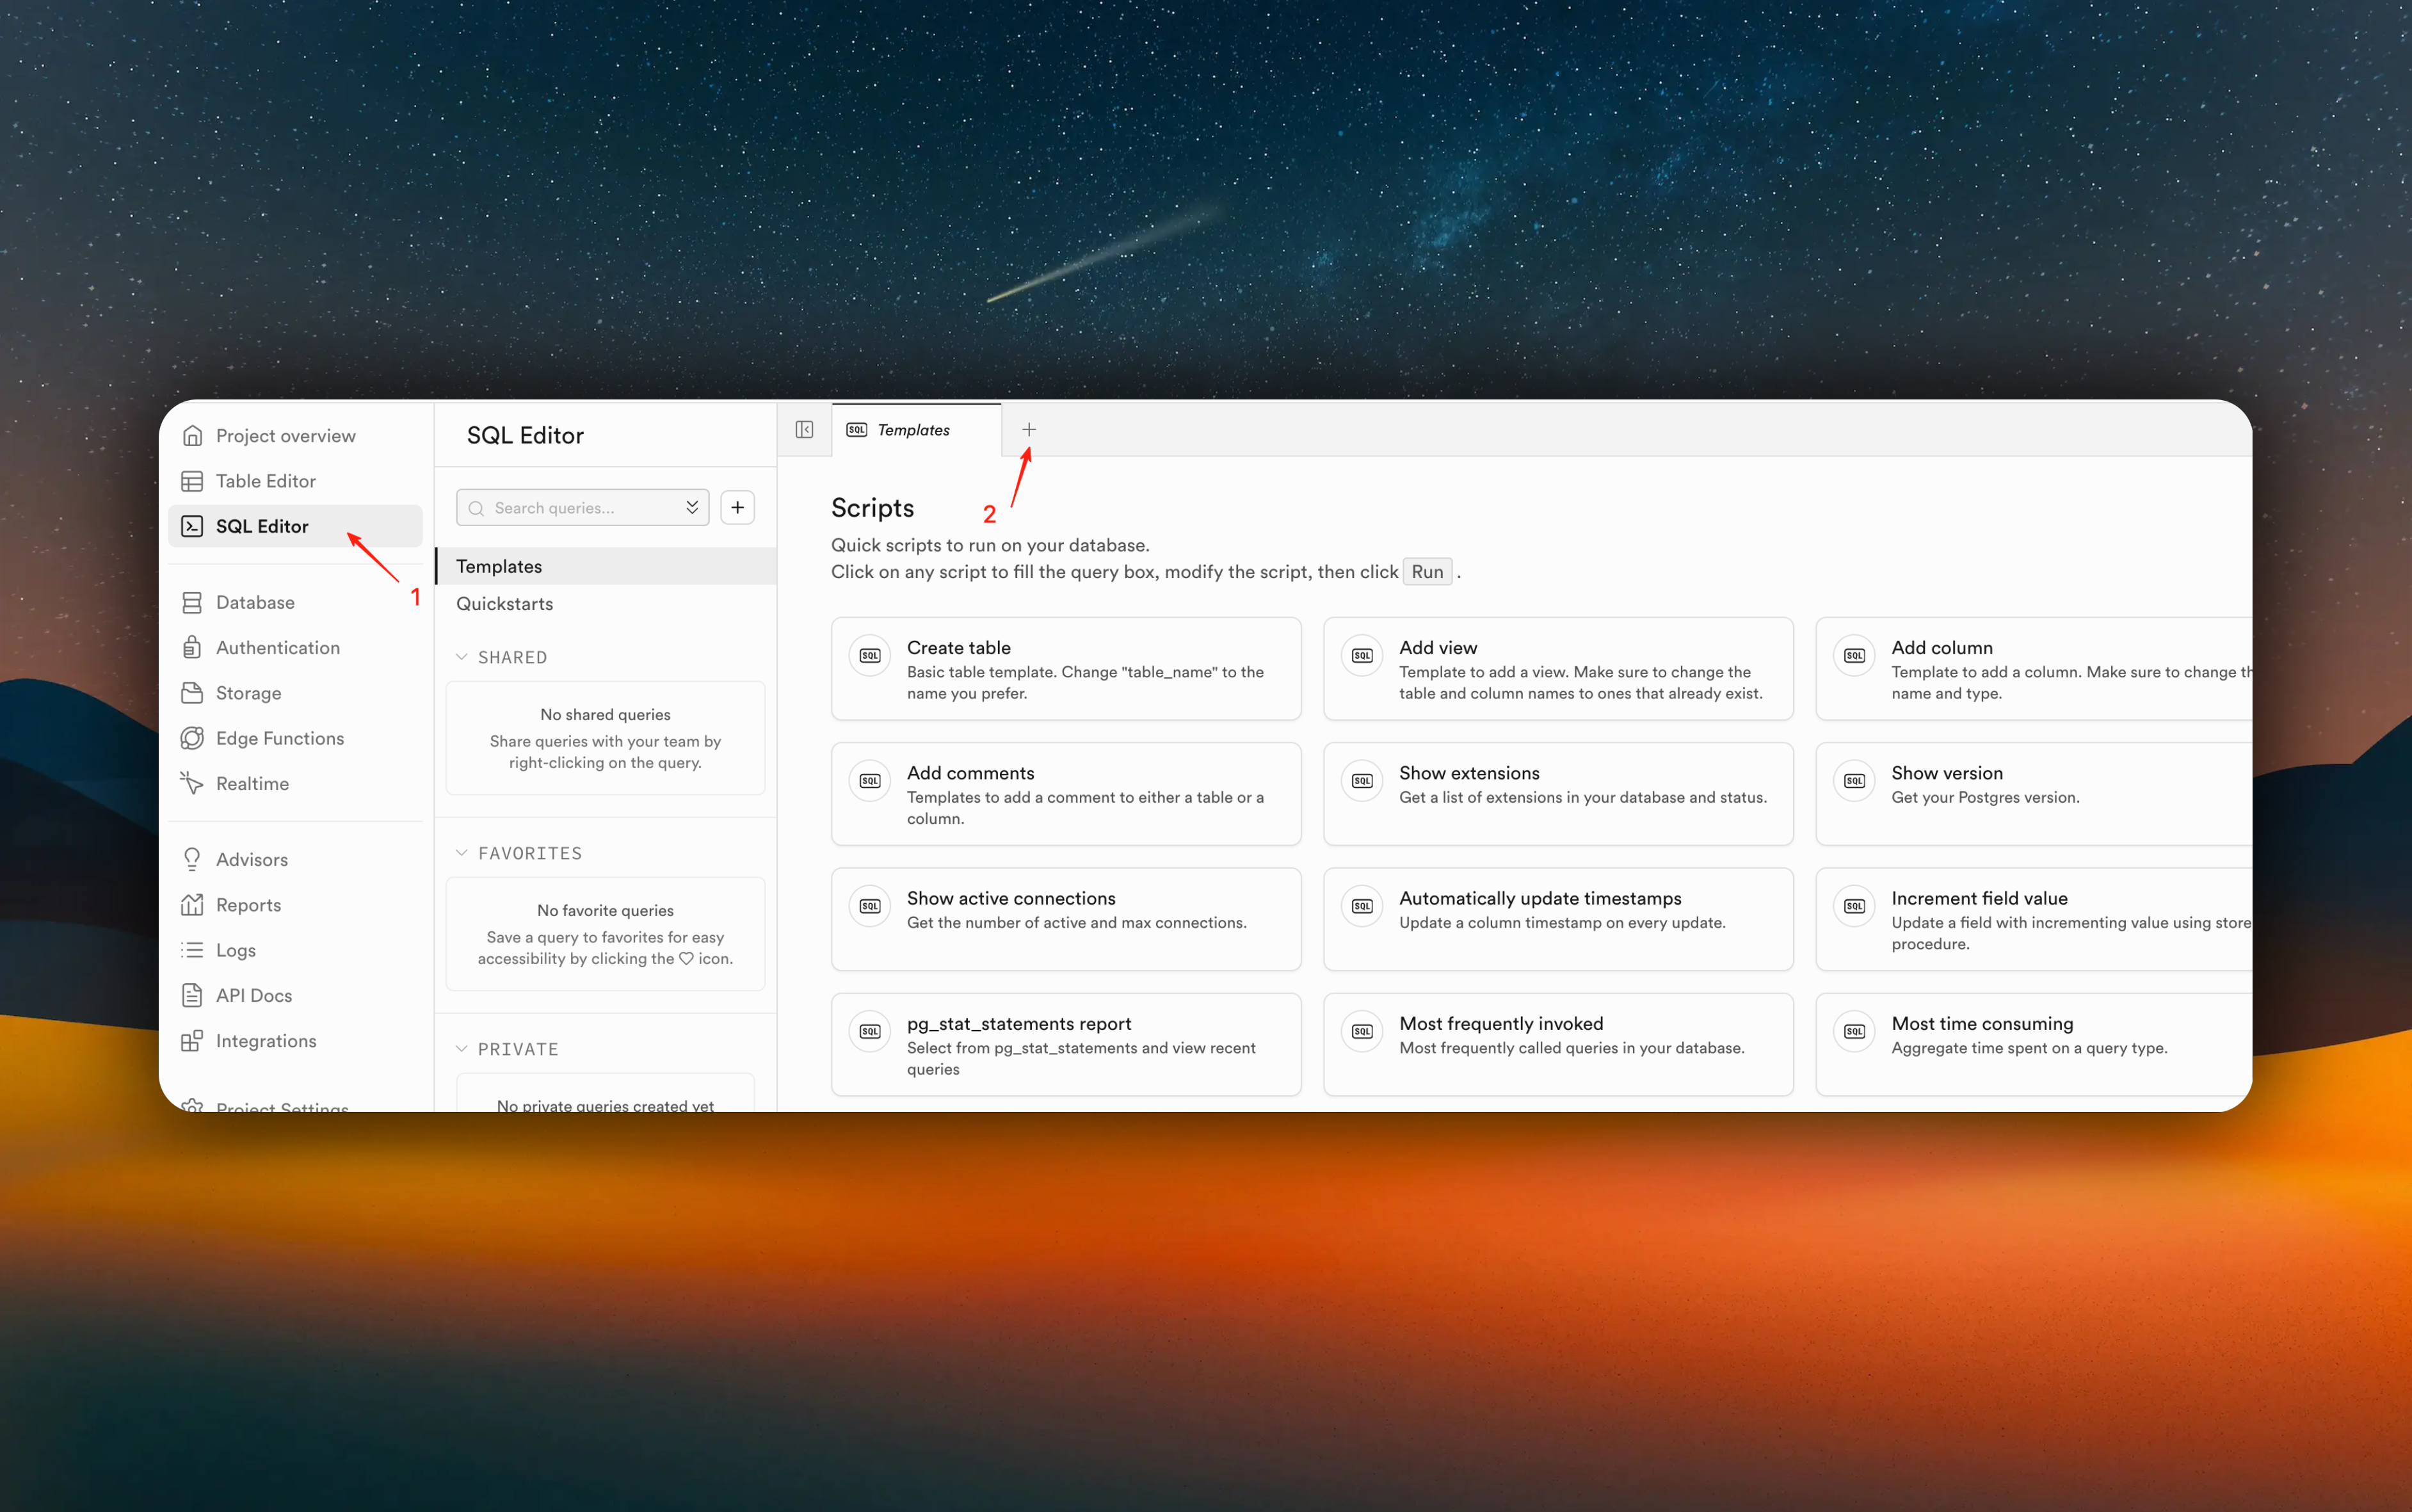
In this example, we'll use SQL statements to create the table structure, which will greatly simplify the process.
### Create Table Structure with SQL Statements
You can completely copy and paste the following SQL statement into the SQL
editor, then click the "Run" button to create the table structure.
```sql
-- Create a table for public profiles
create table profiles (
id uuid references auth.users on delete cascade not null primary key,
updated_at timestamp with time zone,
username text unique,
full_name text,
avatar_url text,
website text,
email text
constraint username_length check (char_length(username) >= 3)
);
-- Set up Row Level Security (RLS)
-- See https://supabase.com/docs/guides/auth/row-level-security for more details.
alter table profiles
enable row level security;
create policy "Public profiles are viewable by everyone." on profiles
for select using (true);
create policy "Users can insert their own profile." on profiles
for insert with check ((select auth.uid()) = id);
create policy "Users can update own profile." on profiles
for update using ((select auth.uid()) = id);
-- This trigger automatically creates a profile entry when a new user signs up via Supabase Auth.
-- See https://supabase.com/docs/guides/auth/managing-user-data#using-triggers for more details.
create function public.handle_new_user()
returns trigger
set search_path = ''
as $$
begin
insert into public.profiles (id, email, full_name, avatar_url)
values (new.id, new.email, new.raw_user_meta_data->>'full_name', new.raw_user_meta_data->>'avatar_url');
return new;
end;
$$ language plpgsql security definer;
create trigger on_auth_user_created
after insert on auth.users
for each row execute procedure public.handle_new_user();
-- Set up Storage!
insert into storage.buckets (id, name)
values ('avatars', 'avatars');
-- Set up access controls for storage.
-- See https://supabase.com/docs/guides/storage/security/access-control#policy-examples for more details.
create policy "Avatar images are publicly accessible." on storage.objects
for select using (bucket_id = 'avatars');
create policy "Anyone can upload an avatar." on storage.objects
for insert with check (bucket_id = 'avatars');
create policy "Anyone can update their own avatar." on storage.objects
for update using ((select auth.uid()) = owner) with check (bucket_id = 'avatars');
```
### SQL Statement Explanation
Let me explain what this SQL does:
1. Create profiles table
```sql
create table profiles (
id uuid references auth.users on delete cascade not null primary key,
updated_at timestamp with time zone,
username text unique,
full_name text,
avatar_url text,
website text,
email text,
constraint username_length check (char_length(username) >= 3)
);
```
- Create a table named `profiles` to store user public profiles
- Primary key `id` references the Supabase Auth system's `auth.users` table with cascade delete
- Contains username (unique), full name, avatar URL, website, and email fields
- Set constraint for username length at least 3 characters
2. Row Level Security (RLS)
```sql
alter table profiles enable row level security;
create policy "Public profiles are viewable by everyone." on profiles
for select using (true);
create policy "Users can insert their own profile." on profiles
for insert with check ((select auth.uid()) = id);
create policy "Users can update own profile." on profiles
for update using ((select auth.uid()) = id);
```
- Enable row level security
- Set three policies:
1. Everyone can view all public profiles
2. Users can only create their own profile
3. Users can only update their own profile
3. New user registration trigger
```sql
create function public.handle_new_user()
returns trigger as $$
begin
insert into public.profiles (id, email, full_name, avatar_url)
values (new.id, new.email, new.raw_user_meta_data->>'full_name', new.raw_user_meta_data->>'avatar_url');
return new;
end;
$$ language plpgsql security definer;
create trigger on_auth_user_created
after insert on auth.users
for each row execute procedure public.handle_new_user();
```
- Create a trigger function that automatically executes when a new user registers in the `auth.users` table
- Insert new user's basic information into the `profiles` table
- Extract full name and avatar URL from user metadata
4. Storage setup (avatar storage)
```sql
insert into storage.buckets (id, name)
values ('avatars', 'avatars');
create policy "Avatar images are publicly accessible." on storage.objects
for select using (bucket_id = 'avatars');
create policy "Anyone can upload an avatar." on storage.objects
for insert with check (bucket_id = 'avatars');
create policy "Anyone can update their own avatar." on storage.objects
for update using ((select auth.uid()) = owner) with check (bucket_id = 'avatars');
```
- Create a storage bucket named 'avatars' for storing user avatars
- Set storage policies:
1. Avatar images are publicly accessible
2. Anyone can upload avatars
3. Users can only update their own avatars
### Run SQL Statements
Creation steps:
1. First click the "SQL Editor" button,
2. Then click the "+" button,
3. Then paste the SQL statement,
4. Finally click the "Run" button.
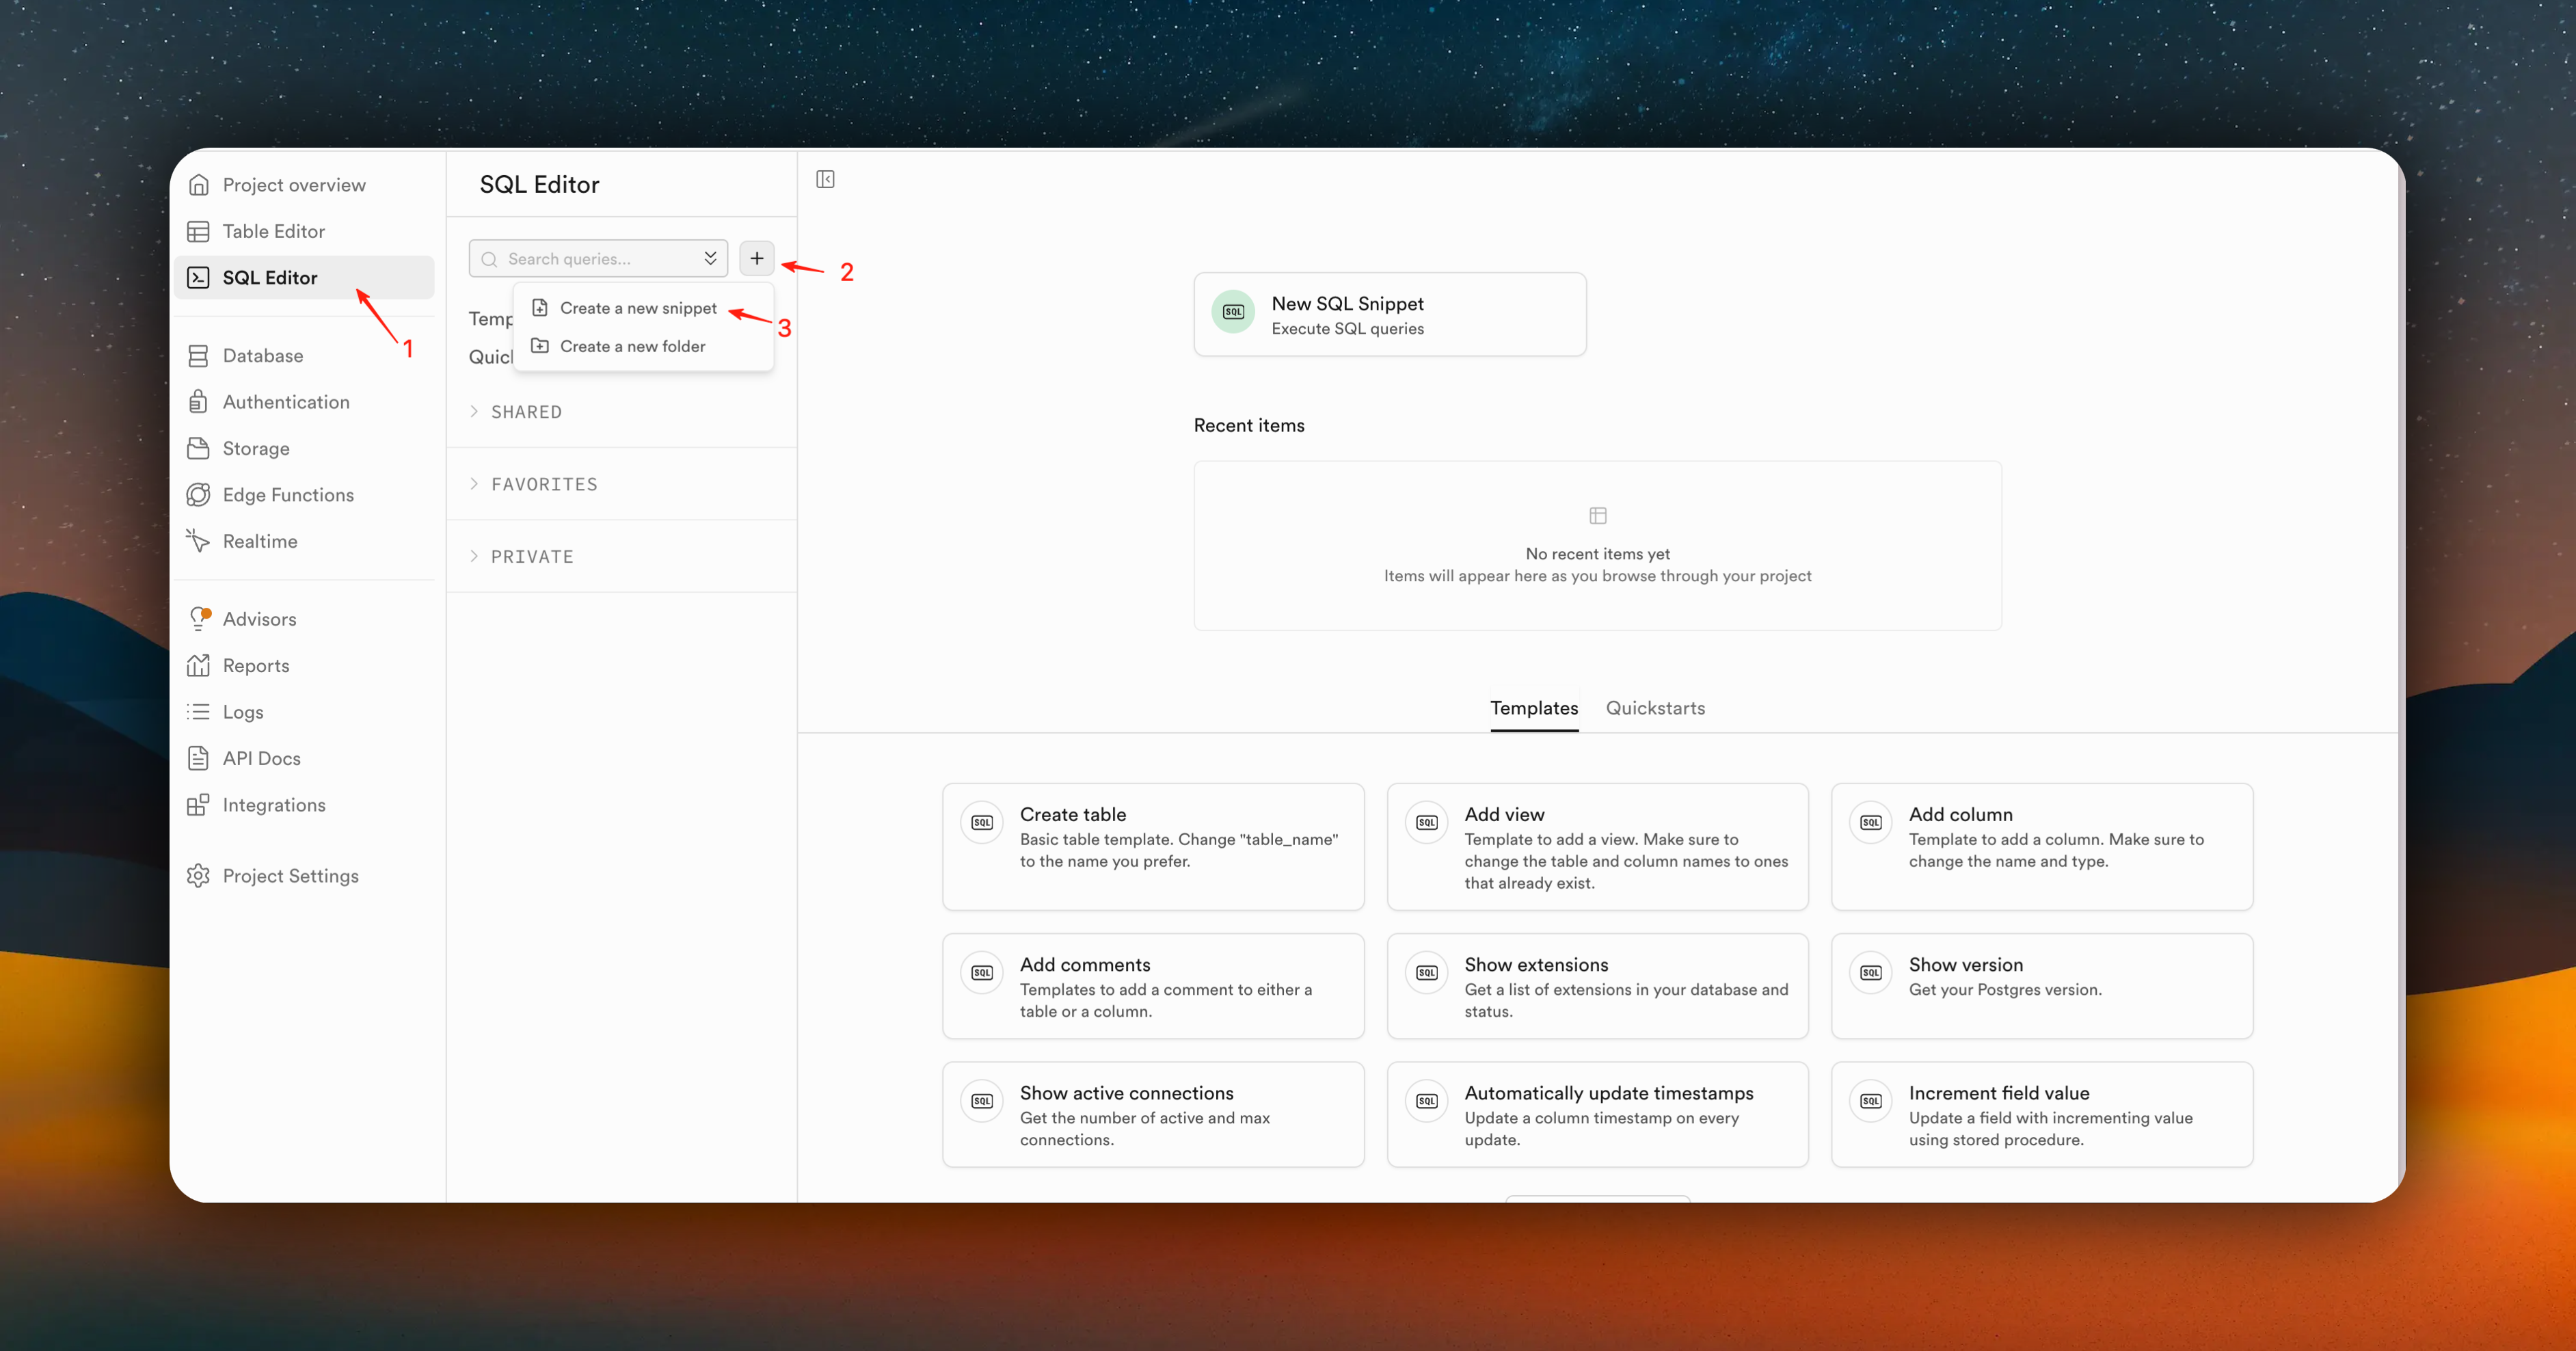
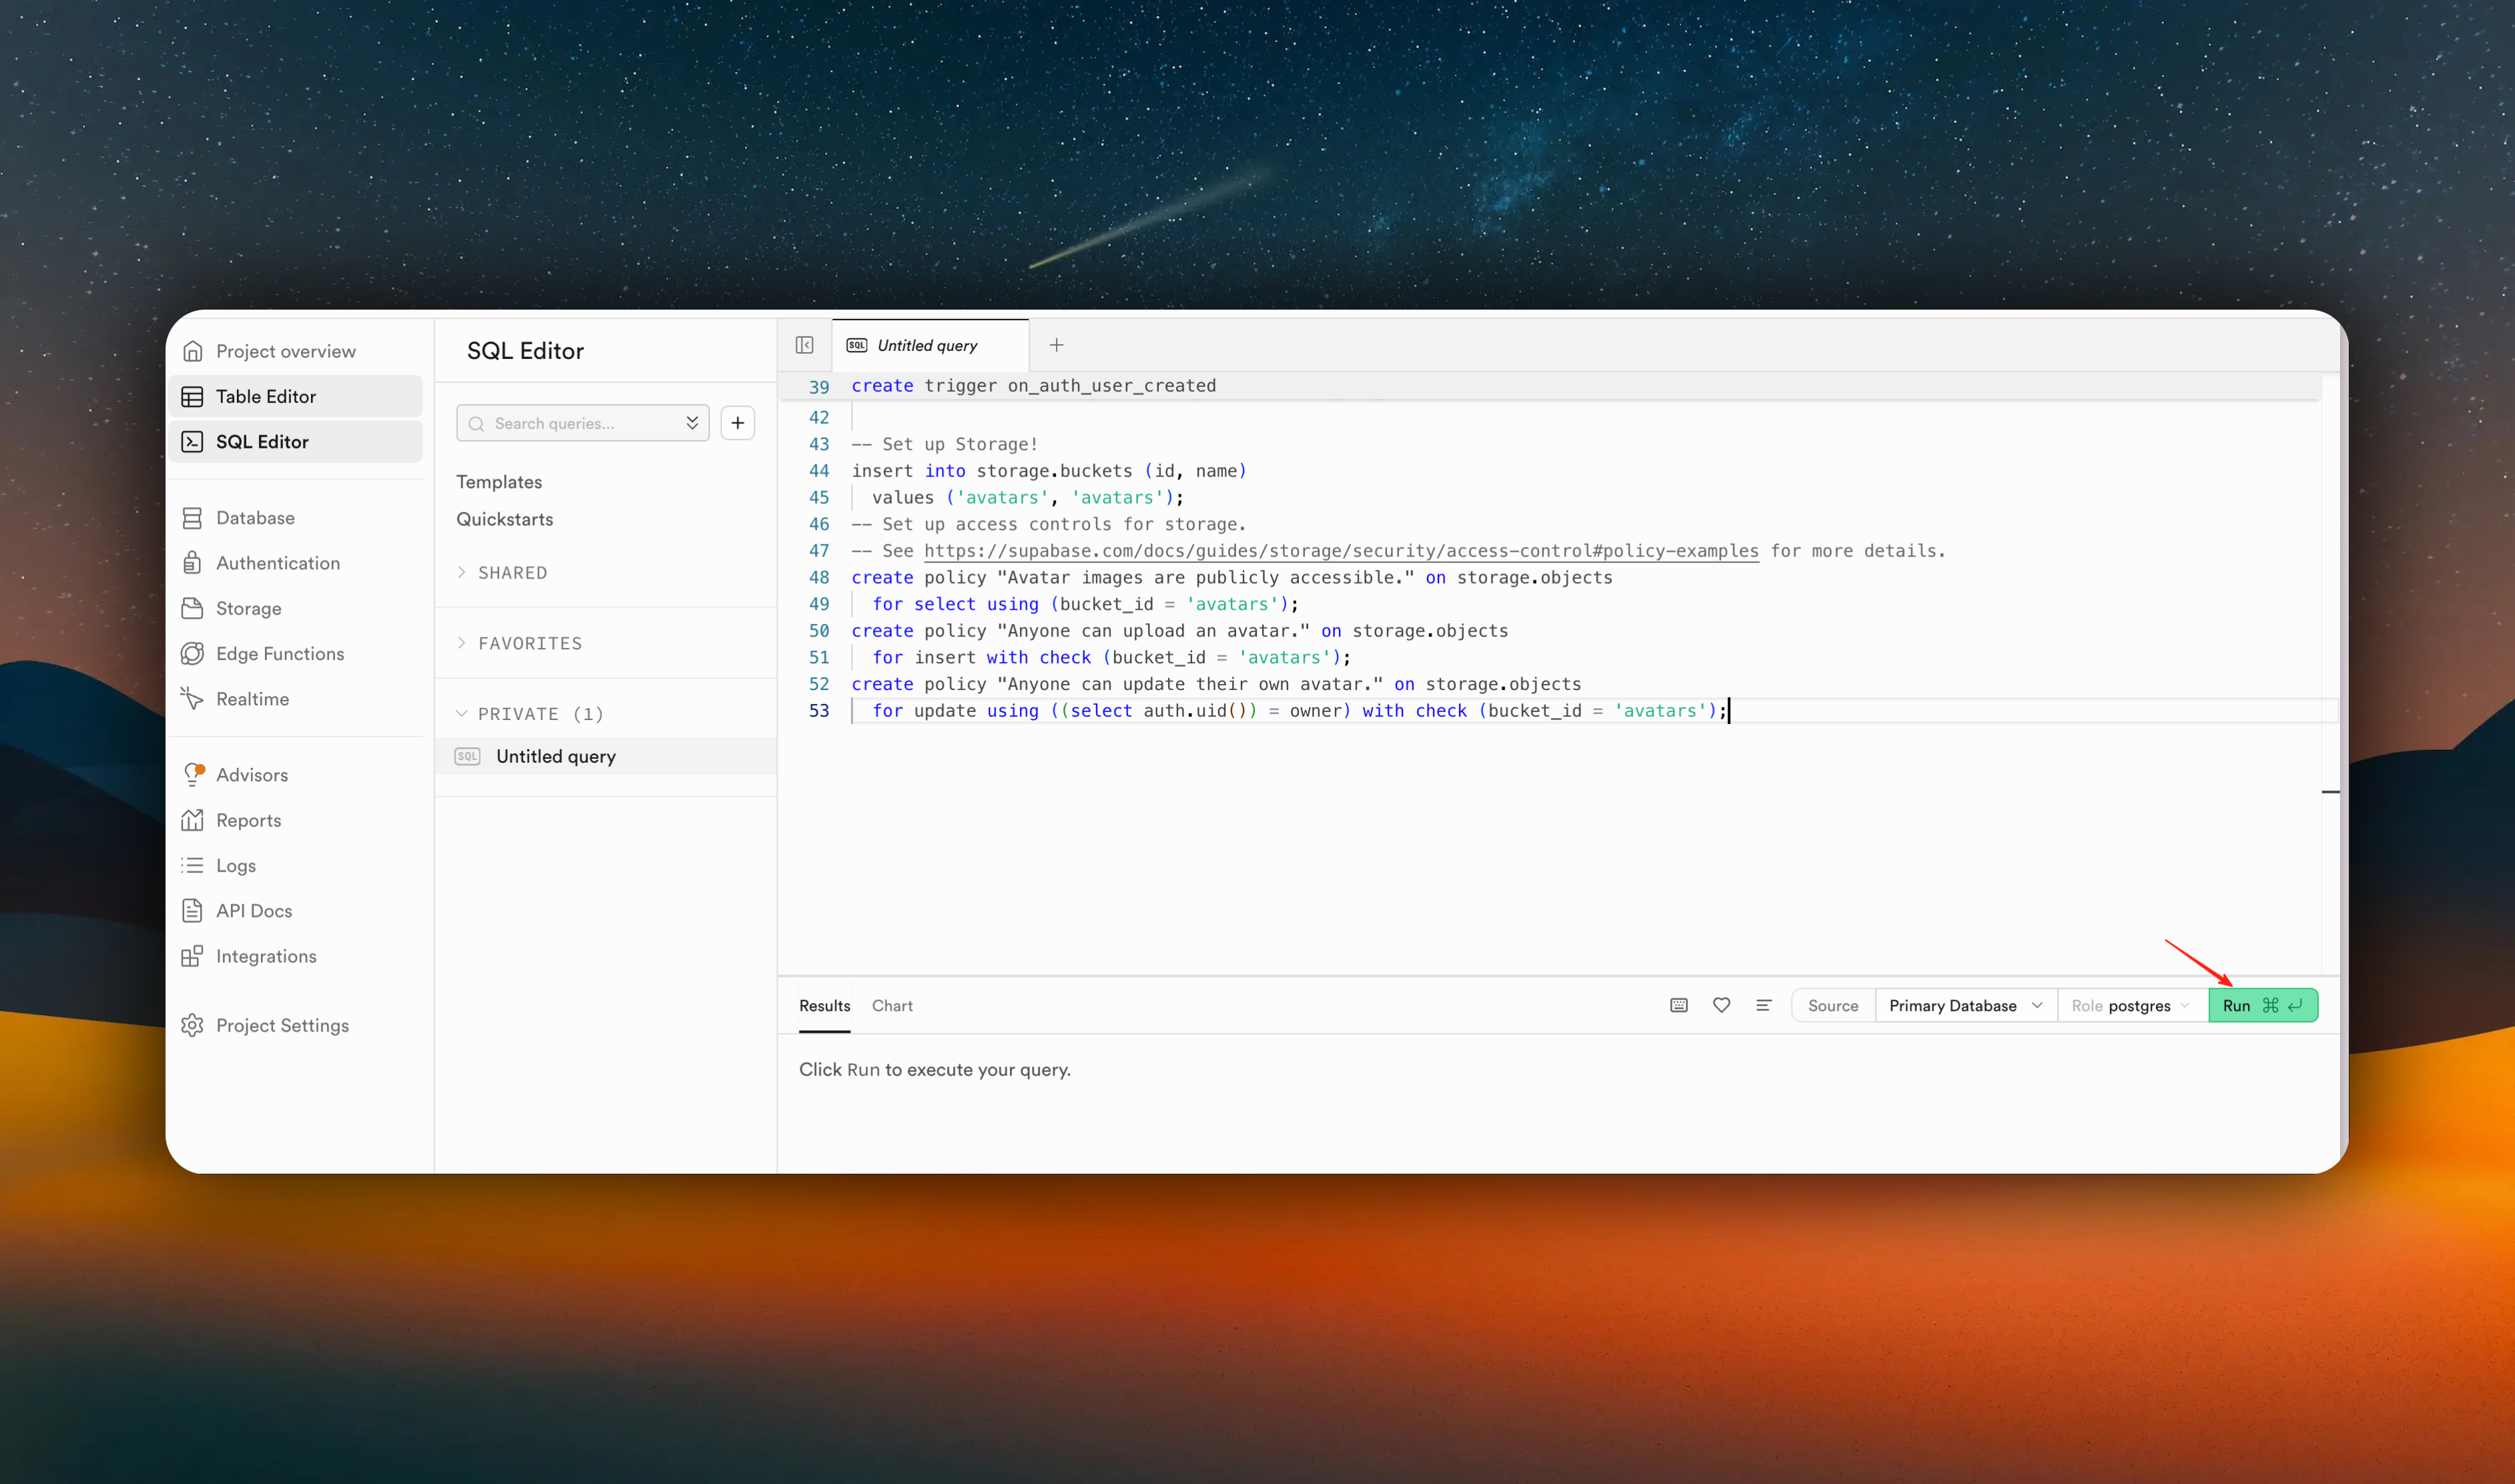
Wait for the execution to complete, you can see the following results:
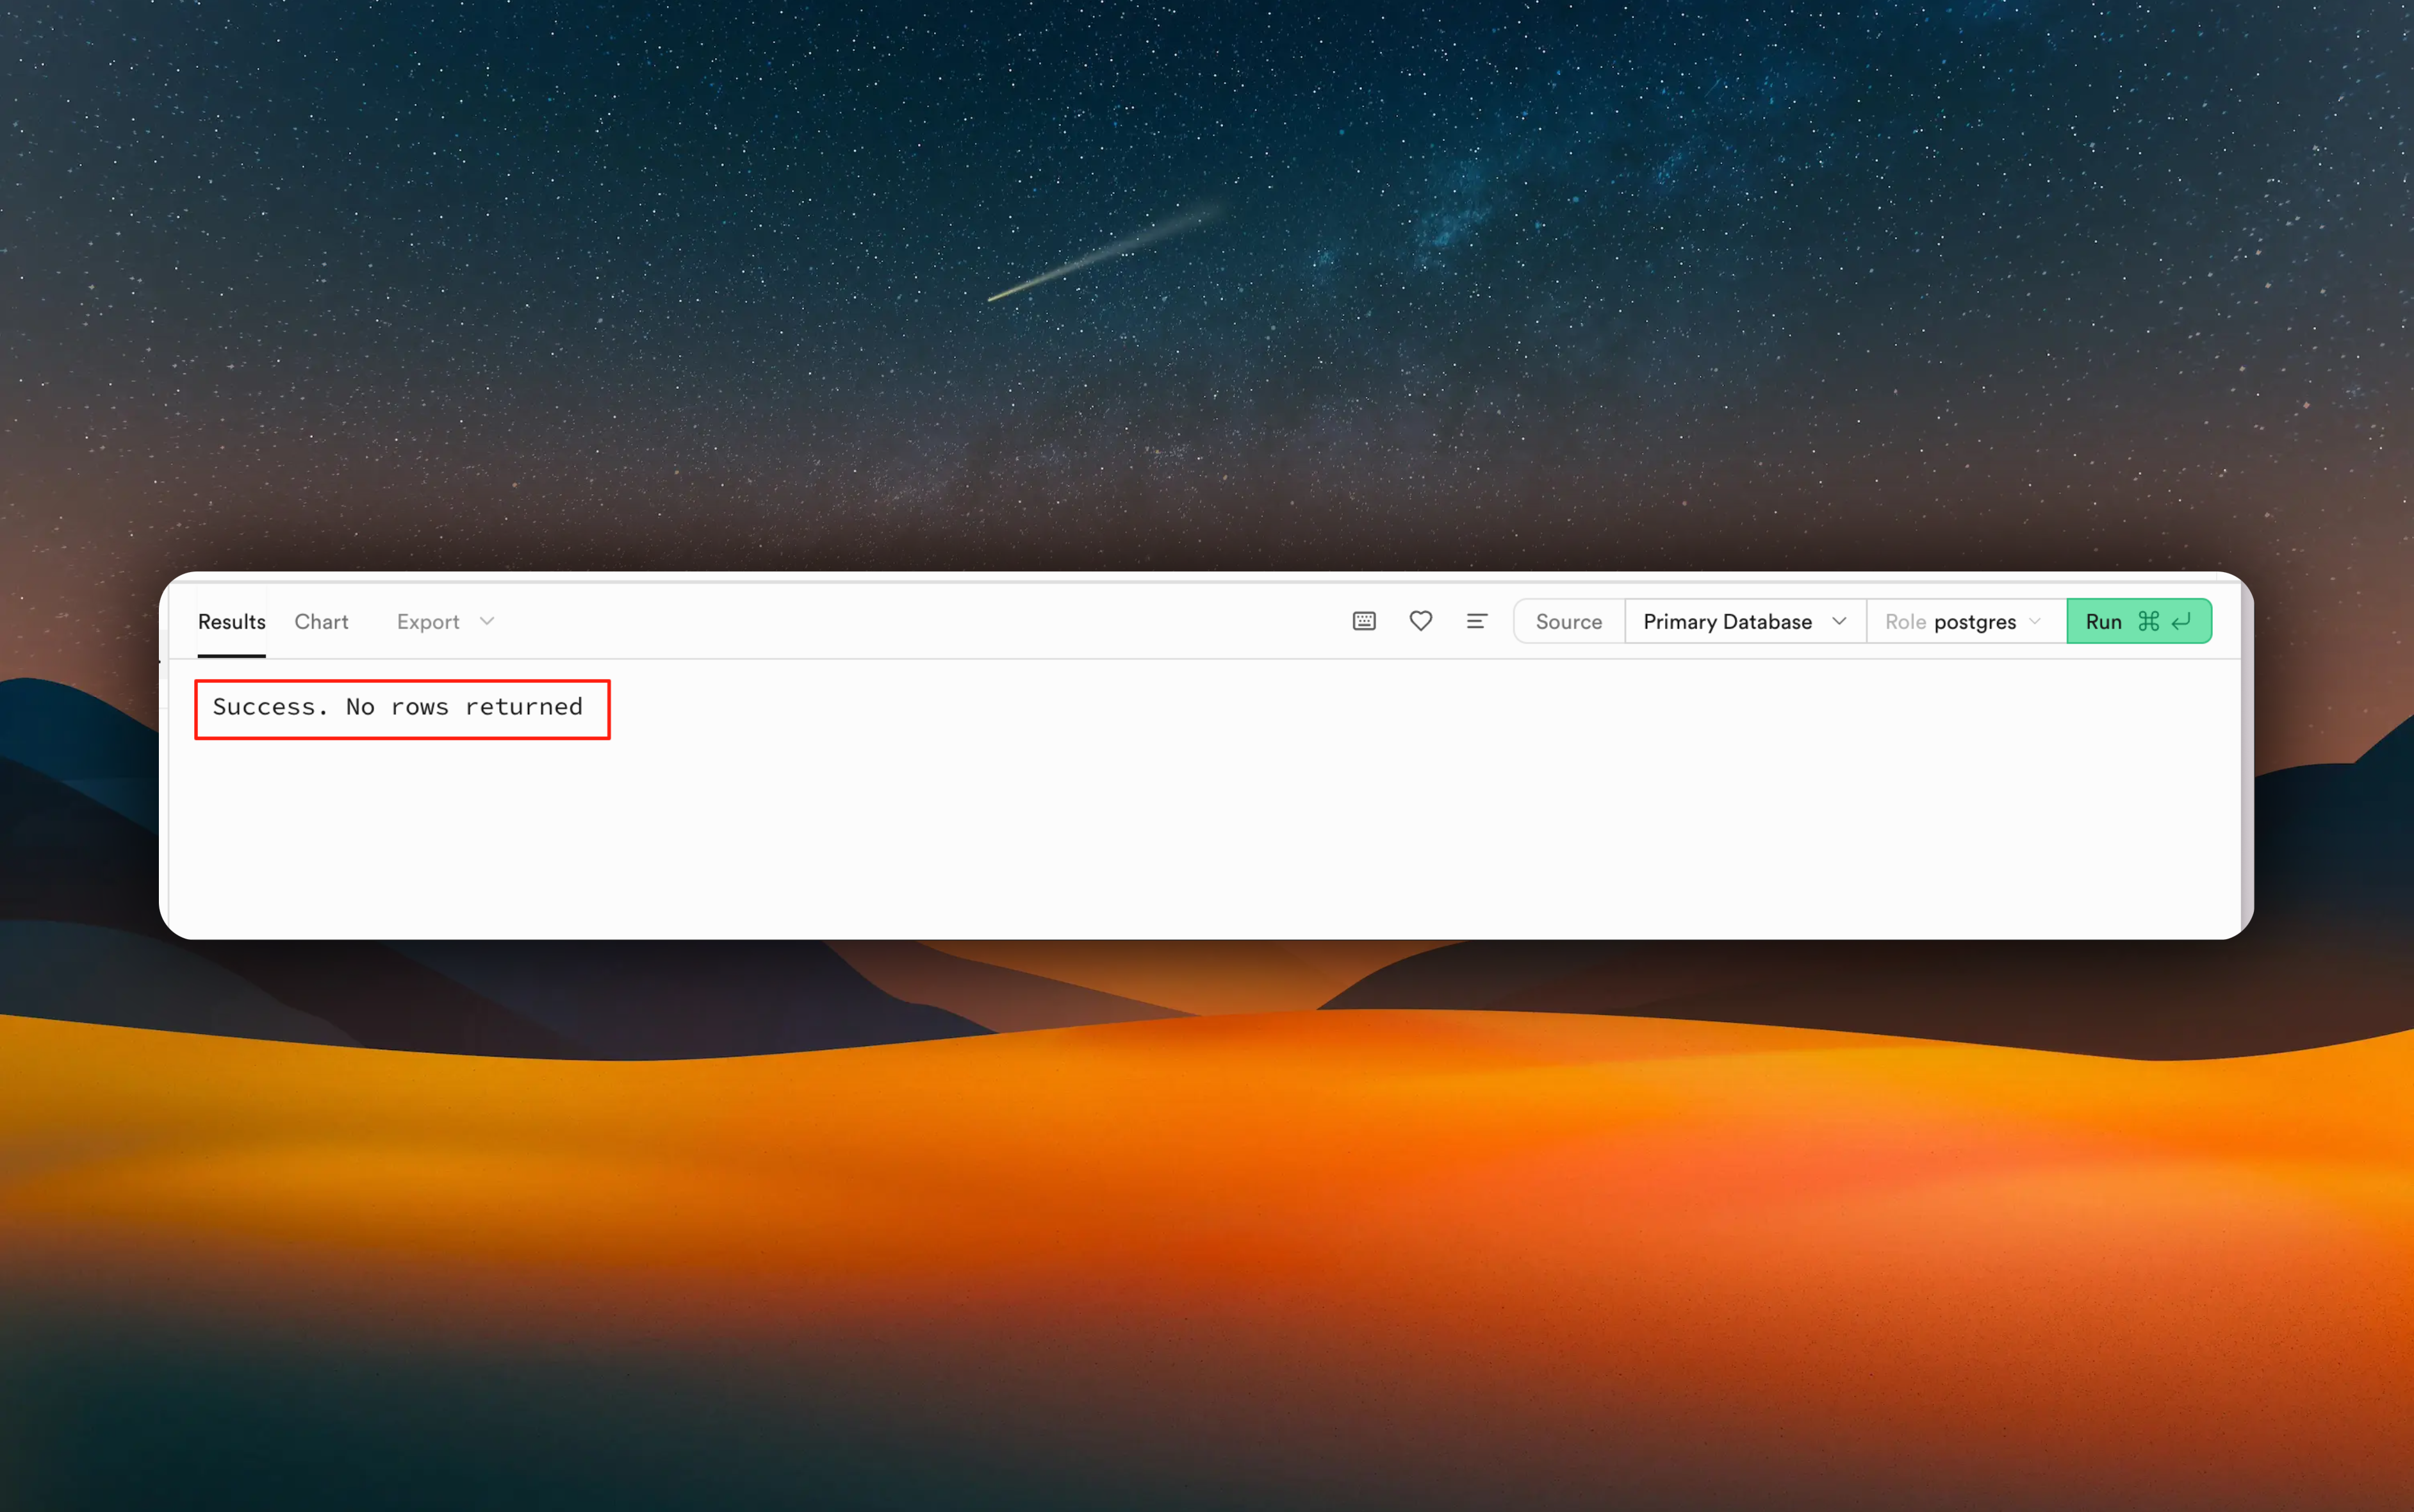
Congratulations 🎉🎉, you have successfully created the database table structure.
Eager to see the effect? [Let's configure Supabase's url and api key](#configure-supabase-url-and-api-key)
*/}
{/*
# Set up Apple Sign In (Recommended)
We recommend using Apple Sign In. Compared to traditional registration and login processes, Apple Sign In provides a better overall user experience. Of course, if you don't plan to use Apple Sign In, you can skip this step.
### Configure Apple Sign In
First, make sure you have an available Apple Developer account. If you haven't registered yet, please refer to the [official documentation](https://developer.apple.com/help/account/membership/enrolling-in-the-app) to register.
After registration, log in to your developer account and go to the [`Identifiers`](https://developer.apple.com/account/resources/identifiers/list) page, click the `+` button
#### Step 1: Register Services ID


Select `Services IDs` and click the `Continue` button

`Description` can be named using your app name + Services ID.
`Identifier` is recommended to be named as bundleID.ServicesID. Where bundleID is your app's unique identifier.
Click the `Continue` button

You can find bundleID in your Xcode project here.

Click the `Register` button

After completion, return to the `Identifiers` page and click the `Services IDs` we just created

If you can't find the `Services IDs` we just created, filter as shown below

Enable `Sign in with Apple` function and click the `Configure` button

In the popup window, you need to configure the following options:
1. In `Primary App ID`, select your App's `Bundle Identifier` from the dropdown.
2. In the `Domains and Subdomains` field, enter `supabase.co,SUPABASE_PROJECT_ID.supabase.co`
3. In the `Return URLs` field, enter `https://SUPABASE_PROJECT_ID.supabase.co/auth/v1/callback`
4. Click the `Next` button and `Done` button

Please replace `SUPABASE_PROJECT_ID` with your Supabase project ID. You can find it here

In the documentation example, our `SUPABASE_PROJECT_ID` is `mutkgdbrerijqhqccalu`.
Click the `Continue` button and click the `Save` button


#### Step 2: Create .8 Authentication Key for Apple Sign In
Go to the [`Keys`](https://developer.apple.com/account/resources/authkeys/list) page and click the `+` button

1. Enter your `Key Name`, for easier identification later, we recommend naming it with your app name + Keys.
2. Select `Sign in with Apple` function and click the `Configure` button.
3. After clicking the `Configure` button, select your `App ID` from the `Primary App ID` dropdown.
4. Click the `Save` button


Then click the `Continue` button and click the `Register` button


#### Step 3: Integrate Apple Sign In with Supabase
Go to your [`Supabase`](https://supabase.com/dashboard/project/mutkg233333dbrerijqhq22ccalu/auth/providers) project, click the sidebar `Authentication`, click `Sign In/Providers`, click the `Apple` button.

In the popup window, you need to configure the following information:
1. Enable `Enable Sign in with Apple` function
2. In the `Client IDs` field, enter your `Services ID` and your app's unique identifier `bundleID`. (separated by commas, no spaces)

The `Secret Key (for OAuth)` field can be left empty.
3. Click save
Forgot `Services ID` and `bundleID`? No problem, let's review again.
1. On the [`Identifiers`](https://developer.apple.com/account/resources/identifiers/list) page, find the `Services IDs` we just created.

2. In your Xcode project, find `Bundle Identifier`.

Or on the [`Identifiers`](https://developer.apple.com/account/resources/identifiers/list) page, you can also find it

#### Step 4: Test Apple Sign In
Before this, you need to configure [Supabase's url and api key](#configure-supabase-url-and-api-key)
Apple Sign In testing needs to be done on a real device.
Go back to the `Supabase` console and check the `Users` table, you can see the user information from your Apple Sign In.

Congratulations 🎉🎉🎉, you have successfully integrated the Apple Sign In function.
### Support Email Verification Function
Supabase enables email authentication by default, and EasyApp of course supports it. But you need to configure Deep Linking. The configuration process is very simple.
1. Set `URL Type` in Xcode

In the screenshot, you need to fill in `identifier` and `URL Schemas`
- `identifier` is recommended to use Bundle Identifier.
- `URL Schemas` is recommended to use your App name.
2. Configure `Deep Linking` in Supabase
Next, go to the Supabase `Authentication` page and click the `URL Configuration` button.

Click the `Add URL` button and enter your App's URL.
When filling in Deep Linking, we recommend using the format `YourAppName://user?type=sign_up`.
Let me explain why we set it up this way, where `user` represents the module name, `type` represents the type, and `sign_up` represents email verification.
The user module has the following types:
- `sign_up`: email verification
- `reset_password`: password reset
So we use `type` to distinguish.
In `SwiftUI`, we distinguish through module name + `type`.
```swift
.onOpenURL { url in
let value = url.getEaspAppDeepLinkUrlParam(hostKey: "user", name: "type")
guard value == "reset_password" else { return }
/// Handle password reset logic
}
```
```swift
.onOpenURL { url in
let value = url.getEaspAppDeepLinkUrlParam(hostKey: "user", name: "type")
guard value == "sign_up" else { return }
/// Handle email verification logic
}
```
Add URL filling rules: URL Schemas + ://
The EasyApp template has already configured the email verification/password reset Deep Linking rules. You need to configure `identifier` and `URL Schemas` in Xcode.
Then configure `Deep Linking` in your `Supabase` as shown in the figure.
If you have other needs later, just follow this rule to configure
At this point, you can normally use Email authentication function.
Process: User registration successful -> Supabase sends email -> User clicks link in email -> Directly returns to the App -> Login successful.
3. Resend verification email
For user experience, we have made the following optimizations:
- After successful user registration, assuming the user does not verify the email in time, when they reopen the app at some point, we will check whether the current user has verified the email
If the user has not verified the email, we will prompt the user to verify the email.
So we provide a `VerifyEmailView`
This component will automatically pop up when the user has not verified the email and supports users to resend verification emails.
The Supabase platform provides a default email sending service for you to try. This service is limited to 2 emails per hour and only provides best-effort availability. For production use, we recommend configuring a custom SMTP server.
For specific operation guidelines, please refer to [Custom SMTP Configuration Guide](https://supabase.com/docs/guides/auth/auth-smtp)
### Disable Email Verification Function
If you don't plan to use Email authentication function, you can disable them.


If you disable the email verification function, after user registration is completed, to optimize the shortest login process: we will let the user log in directly successfully.
*/}
# Configure Supabase URL and API Key
### Step 1: Get Supabase URL and API Key
* Get Supabase URL. Click the "Connect" button in the top navigation bar. In the popup, select Mobile Framework, select Swift from Framework. Copy supabaseURL.


* Get Supabase API key. Click the "Project Settings" button in the sidebar, click the "API Keys" button. Click the "Copy" button.
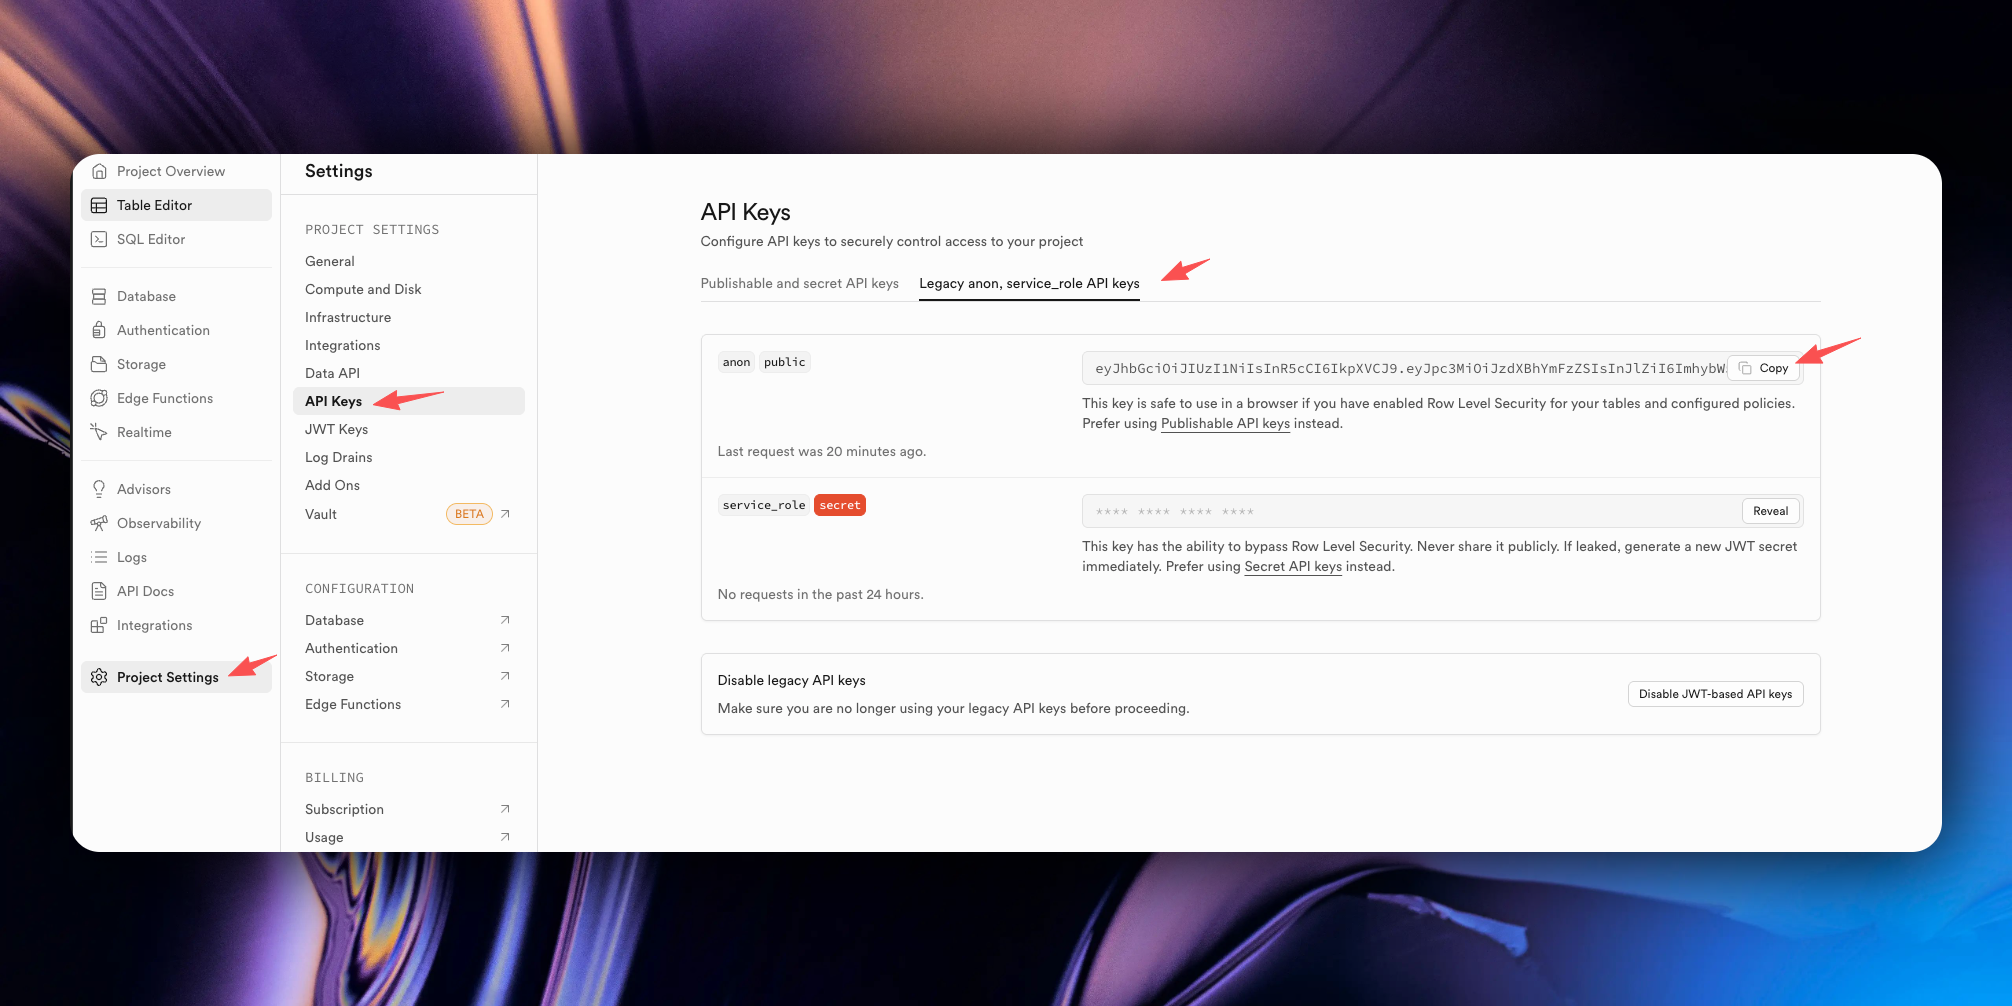
### Step 2: Configure Supabase URL and API Key in the `EasyAppSwiftUI/Constants/Constants.swift` file
Forgot? No problem, let's review again.
} href="/docs/configuration/supabase">
Supabase URL and API key
Paste the URL and API key we just obtained into the `EasyAppSwiftUI/Constants/Constants.swift` file.
```swift
enum Supabase {
#if DEBUG
/// Development supabase url
static let url = "http://192.168.124.134:54321"
/// The anon key
static let key = "your_local_anon_key"
#else
/// Production supabase url
/// WARNING: Replace with your production supabase url, only test environment
static let url = "your_production_supabase_url"
/// The anon key
/// WARNING: Replace with your production supabase anon key, only test environment
static let key = "your_production_supabase_anon_key"
#endif
}
```
Here we can see there is environment judgment, `#if DEBUG` means development environment, `#else` means production environment.
For better understanding, you should replace the content in both `#if DEBUG` and `#else` here. That is:
```swift
#if DEBUG
static let url = "your_production_supabase_url"
static let key = "your_production_supabase_anon_key"
#else
static let url = "your_production_supabase_url"
static let key = "your_production_supabase_anon_key"
#endif
```
Replace all with your Supabase online url and api key.
{/*
# Test Your Results
### Registration
You can use a real device/simulator to run the EasyApp application. Open the Xcode project and press "Command + R".
On the registration page, you can enter your email and password, then click the "Sign Up" button.
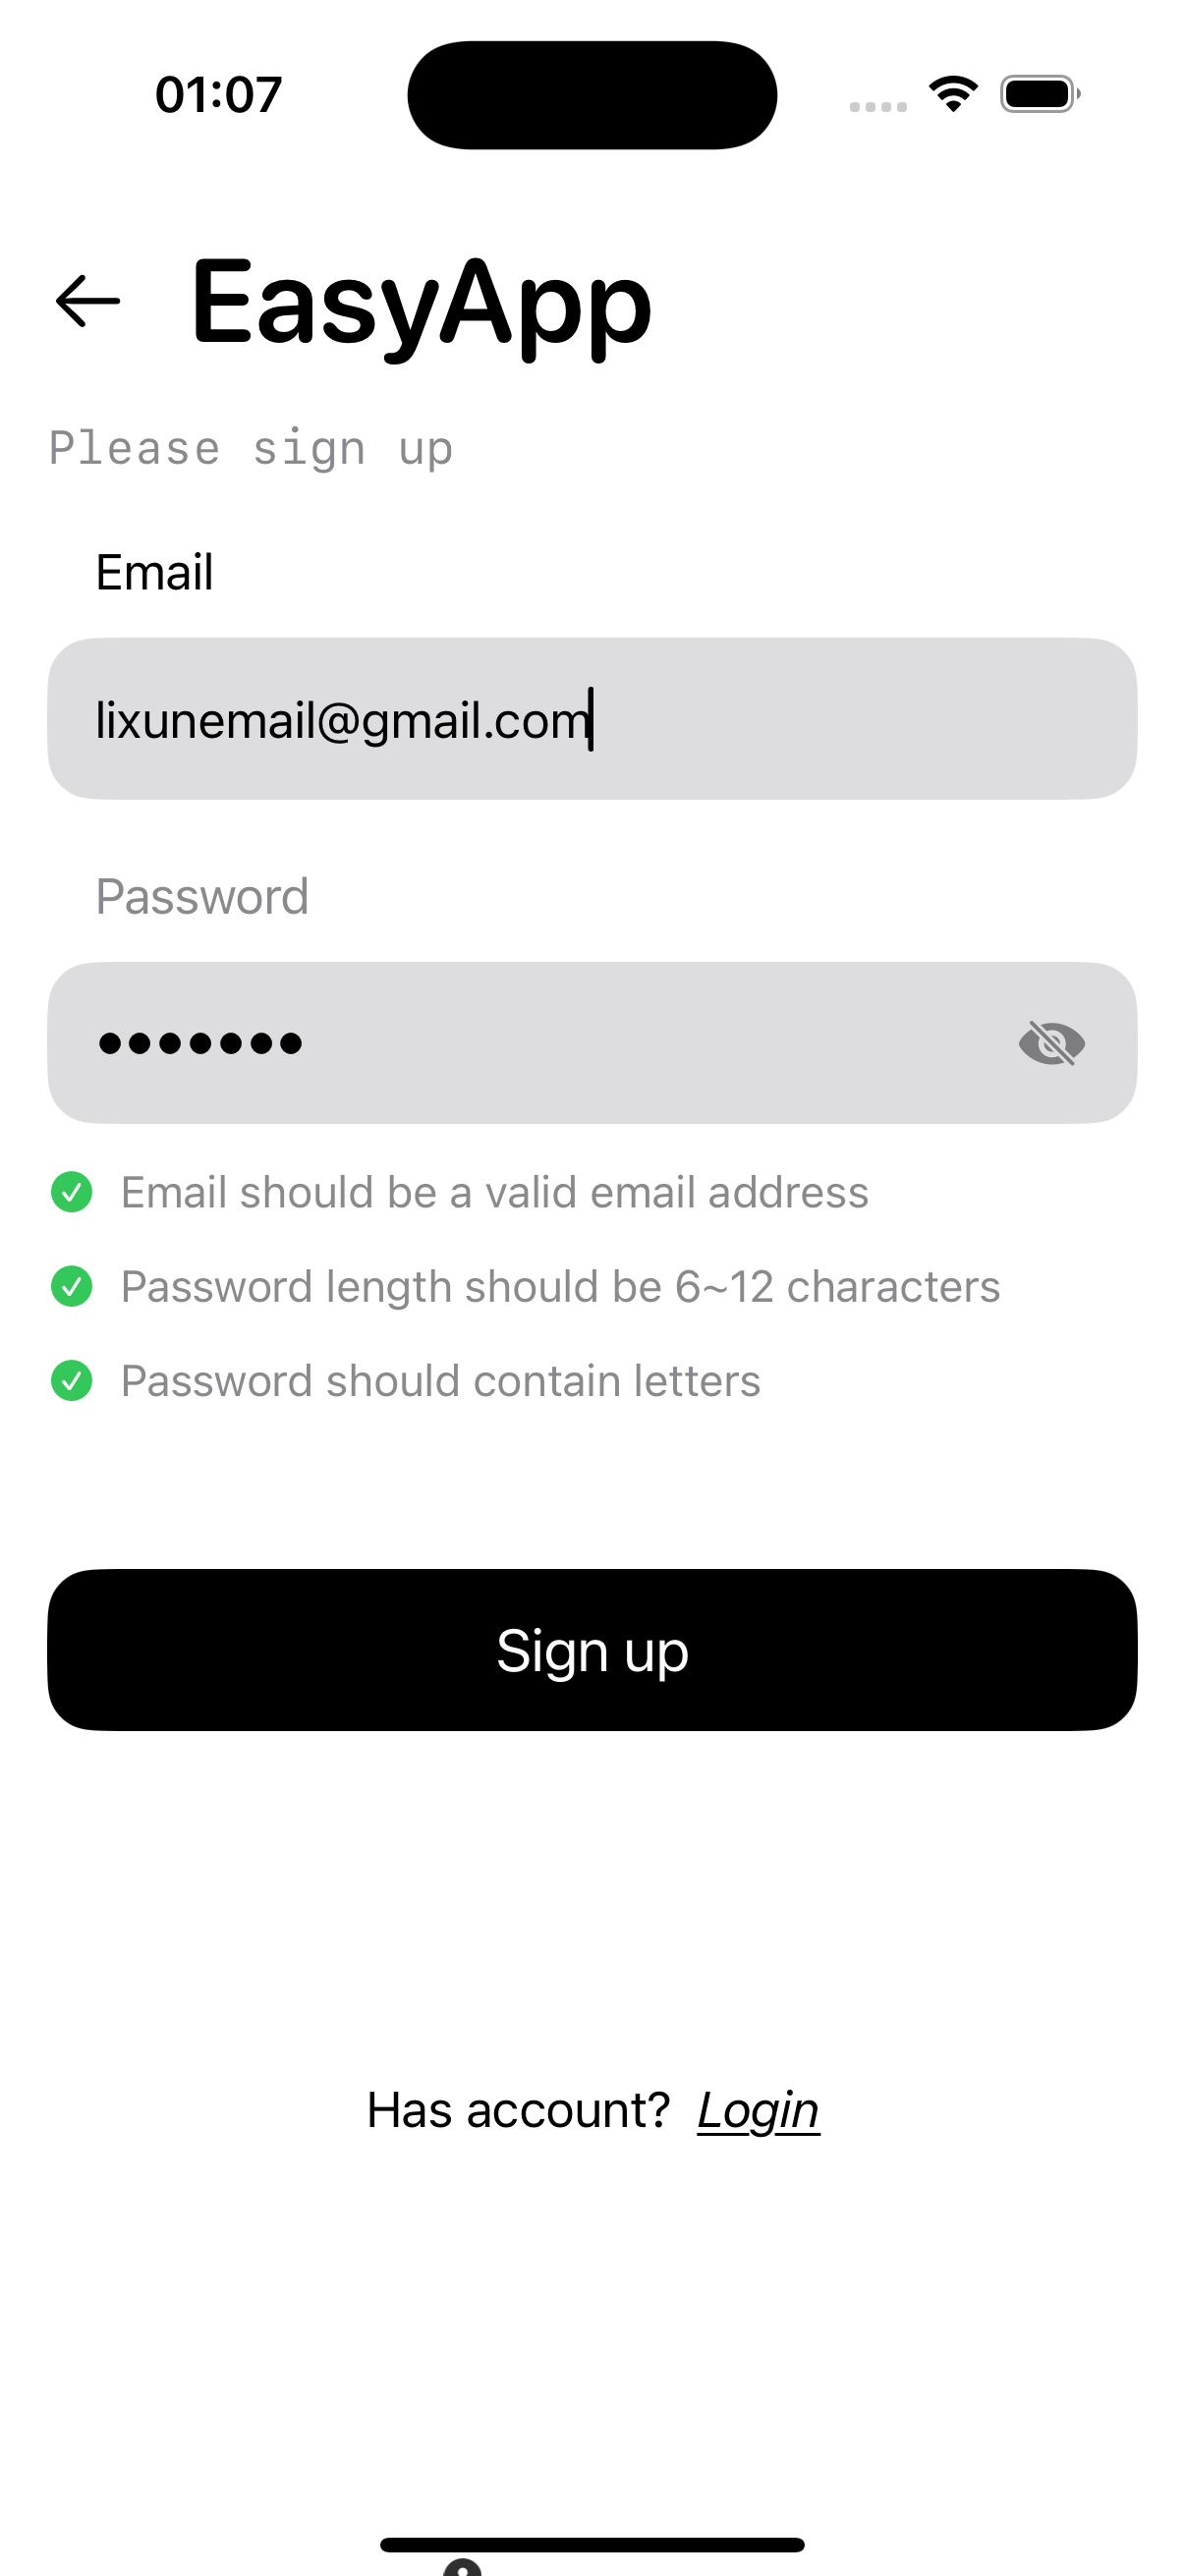
After successful registration, we can see your user information in Supabase's "Users" table.
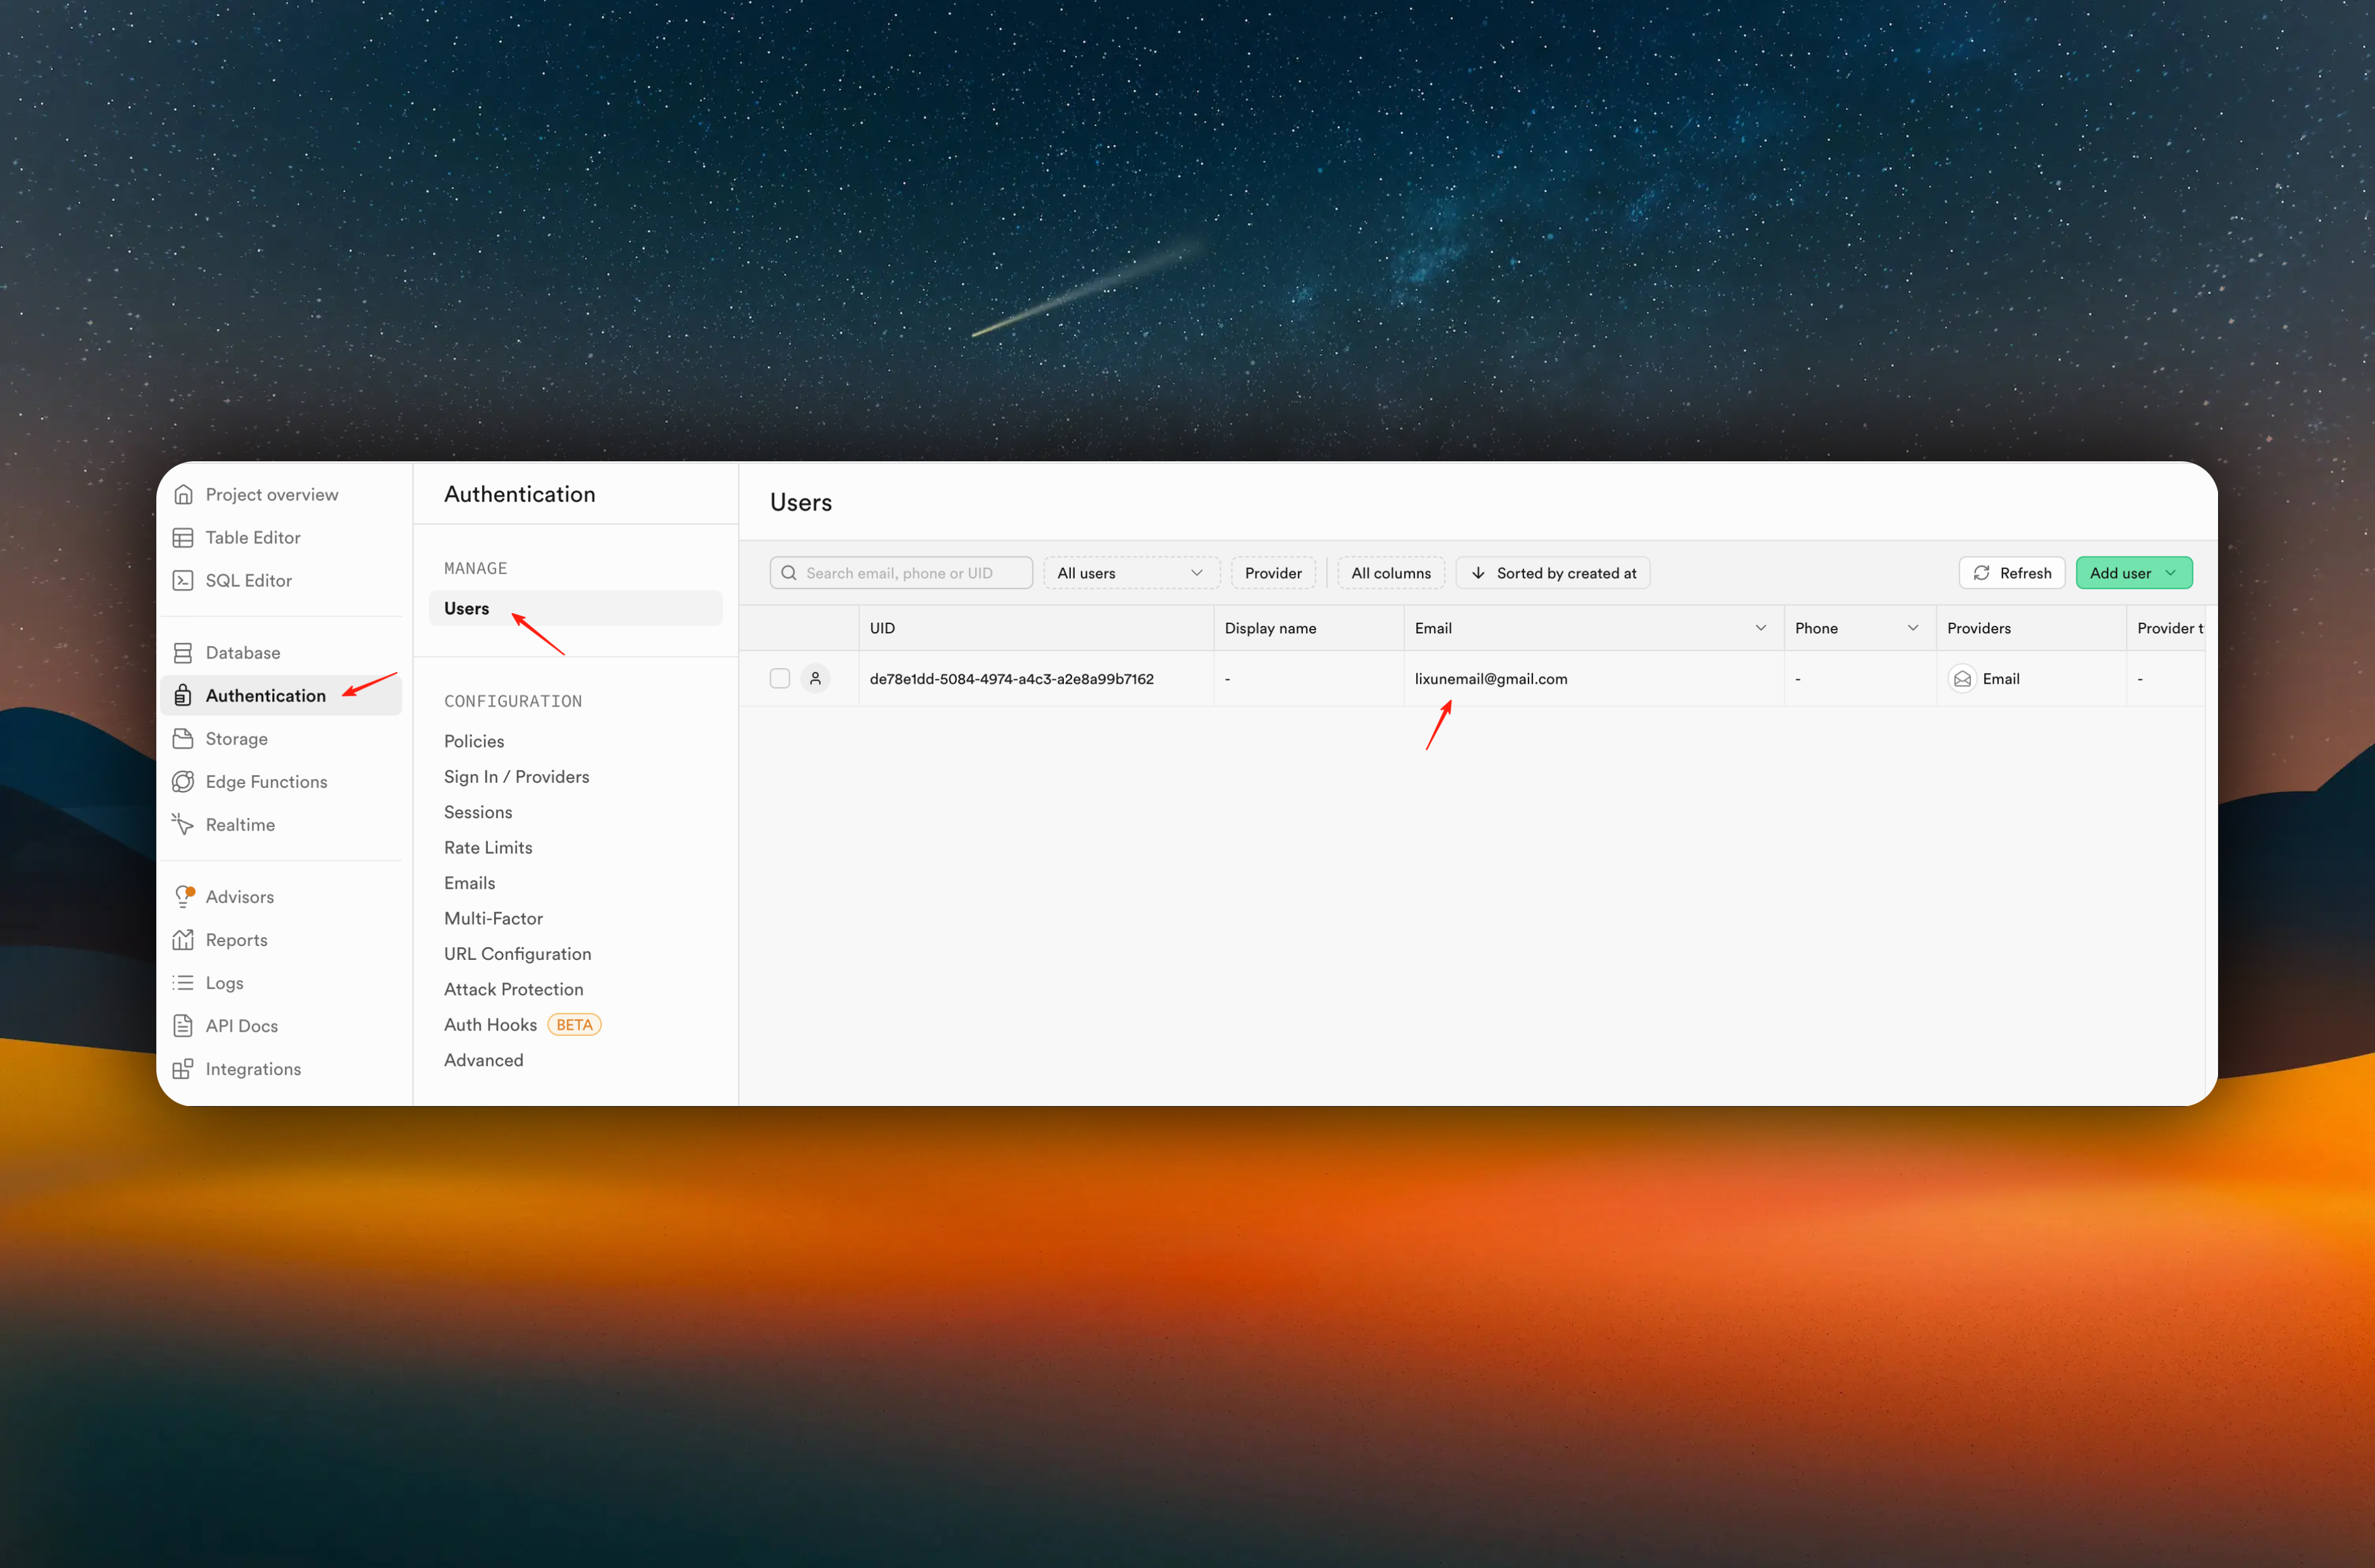
### Login
Next, let's perform the login operation
Congratulations 🎉🎉, you have successfully integrated Supabase user authentication service.
*/}
### Step 3: Deploy Supabase Backend Service
At this point, you have completed the integration of the Supabase service on the app side. Next, you need to configure the Supabase backend service, because the Supabase backend service includes user authentication, database, storage service, backend API, etc. All functions in the App depend on the Supabase backend service.
} href="/docs/Integrations/supabaseEdgeFuncton" />
# How to Register Apple Developer Account
URL: https://easyapp.site/en/docs/quickstart/appleDeveloper
Learn how to quickly register an Apple Developer account
***
title: How to Register Apple Developer Account
description: Learn how to quickly register an Apple Developer account
icon: Apple
-----------
The registration tutorial reference [official documentation](https://developer.apple.com/programs/enroll/)
Without a developer account, there are the following limitations. (This is an Apple requirement, not related to the template).
* Cannot use Apple Sign-In
* Cannot use in-app purchases
* Cannot use push notifications
Other features have no restrictions for now.
Solutions:
You can first run it on the simulator. For login, use regular email/password login. Remember to turn off Supabase email authentication, as email verification logic is difficult to test on the simulator. How to disable email verification functionality is documented in the Supabase integration chapter.
} href="/docs/Integrations/Supabase#disable-email-verification">
Disable email verification functionality
There's no need to comment out the code for now. First, complete your core business development, and when you're about to launch, pay for a developer account and integrate Apple Sign-In and in-app purchases. After development is complete, you can directly delete template code for features you don't need, which can also reduce some issues encountered during review.
If you still encounter other problems, you can contact us on [Discord](https://discord.gg/36UQMU6yKw) or [GitHub](https://github.com/FastEasyApp/easyapp-swiftui).
# Apple Login/Email Login
URL: https://easyapp.site/en/docs/quickstart/appleLogin
Learn how EasyAppSwiftUI project integrates Apple Login/Email Login
***
title: Apple Login/Email Login
description: Learn how EasyAppSwiftUI project integrates Apple Login/Email Login
icon: Apple
-----------
# Set up Apple Sign In (Recommended)
We recommend you use Apple Sign In. Compared to traditional registration and login processes, Apple Sign In provides a better overall user experience. of course, if you don't plan to use Apple Sign In, you can skip this step.
### Configure Apple Sign In
First, make sure you have an available Apple Developer account. If you haven't registered yet, please refer to the [official documentation](https://developer.apple.com/cn/help/account/membership/enrolling-in-the-app) to register.
After registration, log in to your developer account and go to the [`Identifiers`](https://developer.apple.com/account/resources/identifiers/list) page, click the `+` button
#### Step 1: Register Services ID


Select `Services IDs` and click the `Continue` button

`Description` can be named using your app name + Services ID.
`Identifier` is recommended to be named as bundleID.ServicesID. Where bundleID is your app's unique identifier.
Click the `Continue` button

You can find bundleID in your Xcode project here.

Click the `Register` button

After completion, return to the `Identifiers` page and click the `Services IDs` we just created

If you can't find the `Services IDs` we just created, filter as shown below

Enable `Sign in with Apple` function and click the `Configure` button

In the popup window, you need to configure the following options:
Please replace `SUPABASE_PROJECT_ID` with your Supabase project ID. You can find it here

In the documentation example, our `SUPABASE_PROJECT_ID` is `mutkgdbrerijqhqccalu`.
1. In `Primary App ID`, select your App's `Bundle Identifier` from the dropdown.
2. In the `Domains and Subdomains` field, enter `supabase.co,SUPABASE_PROJECT_ID.supabase.co`
3. In the `Return URLs` field, enter `https://SUPABASE_PROJECT_ID.supabase.co/auth/v1/callback`
4. Click the `Next` button and `Done` button

Click the `Continue` button and click the `Save` button


#### Step 2: Create .p8 Authentication Key for Apple Sign In
Go to the [`Keys`](https://developer.apple.com/account/resources/authkeys/list) page and click the `+` button

1. Enter your `Key Name`, for easier identification later, we recommend naming it with your app name + Keys.
2. Select `Sign in with Apple` function and click the `Configure` button.
3. After clicking the `Configure` button, select your `App ID` from the `Primary App ID` dropdown.
4. Click the `Save` button


Then click the `Continue` button and click the `Register` button


#### Step 3: Integrate Apple Sign In with Supabase
Go to your [`Supabase`](https://supabase.com/dashboard/project/mutkg233333dbrerijqhq22ccalu/auth/providers) project, click the sidebar `Authentication`, click `Sign In/Providers`, click the `Apple` button.

In the popup window, you need to configure the following information:
1. Enable `Enable Sign in with Apple` function
2. In the `Client IDs` field, enter your `Services ID` and your app's unique identifier `bundleID`. (separated by commas, no spaces)

The `Secret Key (for OAuth)` field can be left empty.
3. Click save
Forgot `Services ID` and `bundleID`? No problem, let's review again.
1. On the [`Identifiers`](https://developer.apple.com/account/resources/identifiers/list) page, find the `Services IDs` we just created.

2. In your Xcode project, find `Bundle Identifier`.

Or on the [`Identifiers`](https://developer.apple.com/account/resources/identifiers/list) page, you can also find it

#### Step 4: Test Apple Sign In
Apple Sign In testing needs to be done on a real device.
Go back to the `Supabase` console and check the `Users` table, you can see the user information from your Apple Sign In.

Congratulations 🎉🎉🎉, you have successfully integrated the Apple Sign In function.
### Support Email Verification Function
Supabase enables email authentication by default, and EasyApp of course supports it. But you need to configure Deep Linking. The configuration process is very simple.
1. Set `URL Type` in Xcode

In the screenshot, you need to fill in `identifier` and `URL Schemas`
* `identifier` is recommended to use Bundle Identifier.
* `URL Schemas` is recommended to use your App name.
2. Configure `Deep Linking` in Supabase
Next, go to the Supabase `Authentication` page and click the `URL Configuration` button.

Click the `Add URL` button and enter your App's URL.
When filling in Deep Linking, we recommend using the format `YourAppName://user?type=sign_up`.
Let me explain why we set it up this way, where `user` represents the module name, `type` represents the type, and `sign_up` represents email verification.
The user module has the following types:
* `sign_up`: email verification
* `reset_password`: password reset
So we use `type` to distinguish.
In `SwiftUI`, we distinguish through module name + `type`.
```swift
.onOpenURL { url in
let value = url.getEaspAppDeepLinkUrlParam(hostKey: "user", name: "type")
guard value == "reset_password" else { return }
/// Handle password reset logic
}
```
```swift
.onOpenURL { url in
let value = url.getEaspAppDeepLinkUrlParam(hostKey: "user", name: "type")
guard value == "sign_up" else { return }
/// Handle email verification logic
}
```
Add URL filling rules: URL Schemas + ://
The EasyApp template has already configured the email verification/password reset Deep Linking rules. You need to configure `identifier` and `URL Schemas` in Xcode.
Then configure `Deep Linking` in your `Supabase` as shown in the figure.
If you have other needs later, just follow this rule to configure
At this point, you can normally use Email authentication function.
Process: User registration successful -> Supabase sends email -> User clicks link in email -> Directly returns to the App -> Login successful.
3. Resend verification email
For user experience, we have made the following optimizations:
* After successful user registration, assuming the user does not verify the email in time, when they reopen the app at some point, we will check whether the current user has verified the email
If the user has not verified the email, we will prompt the user to verify the email.
So we provide a `VerifyEmailView`
This component will automatically pop up when the user has not verified the email and supports users to resend verification emails.
The Supabase platform provides a default email sending service for you to try. This service is limited to 2 emails per hour and only provides best-effort availability. For production use, we recommend configuring a custom SMTP server.
For specific operation guidelines, please refer to [Custom SMTP Configuration Guide](https://supabase.com/docs/guides/auth/auth-smtp)
### Disable Email Verification Function
If you don't plan to use Email authentication function, you can disable them.


If you disable the email verification function, after user registration is completed, to optimize the shortest login process: we will let the user log in directly successfully.
Next, we will configure App In-App purchase
} href="/docs/quickstart/StoreKit2">
In-App purchase Document
# Installation Guide
URL: https://easyapp.site/en/docs/quickstart/installation
How to set up EasyApp in your development environment.
***
title: Installation Guide
description: How to set up EasyApp in your development environment.
icon: Rocket
------------
## Prerequisites
Before you begin, ensure you have the following requirements met:
* **[macOS](https://www.apple.com/macos/ventura/)**: 15.0 Sequoia or later
* **[Xcode](https://developer.apple.com/xcode/)**: 16.4 or later
* **[Apple Developer Program](https://developer.apple.com/)**: Active membership required
* **[Github](https://github.com/) account**: Access to the code repository
* **[Git](https://git-scm.com/)**: For downloading/cloning the repository
* **iPhone device**: For real device testing/debugging, in-app purchase testing must use real device
* **Internet connection**: For downloading third-party dependency repositories
Xcode 16.1/16.2 versions have issues with pulling SPM dependencies. Even with TUN mode enabled, this problem persists. It is recommended to use Xcode 16.4 or above.
Xcode 16.4 has a simulator [WebKit](https://bugs.webkit.org/show_bug.cgi?id=293831) bug. Since EasyApp has built-in WebView functionality, running the App on Xcode 16.4 simulator will cause the program to crash. Two solutions:
1: Temporarily use [Xcode 16.3 version](https://xcodereleases.com/) for development; or the latest Xcode 26 is also fine.
2: Use real device debugging. Real devices don't have this problem on any version.
2.1: Real device running must log in to your Apple ID, as shown below:
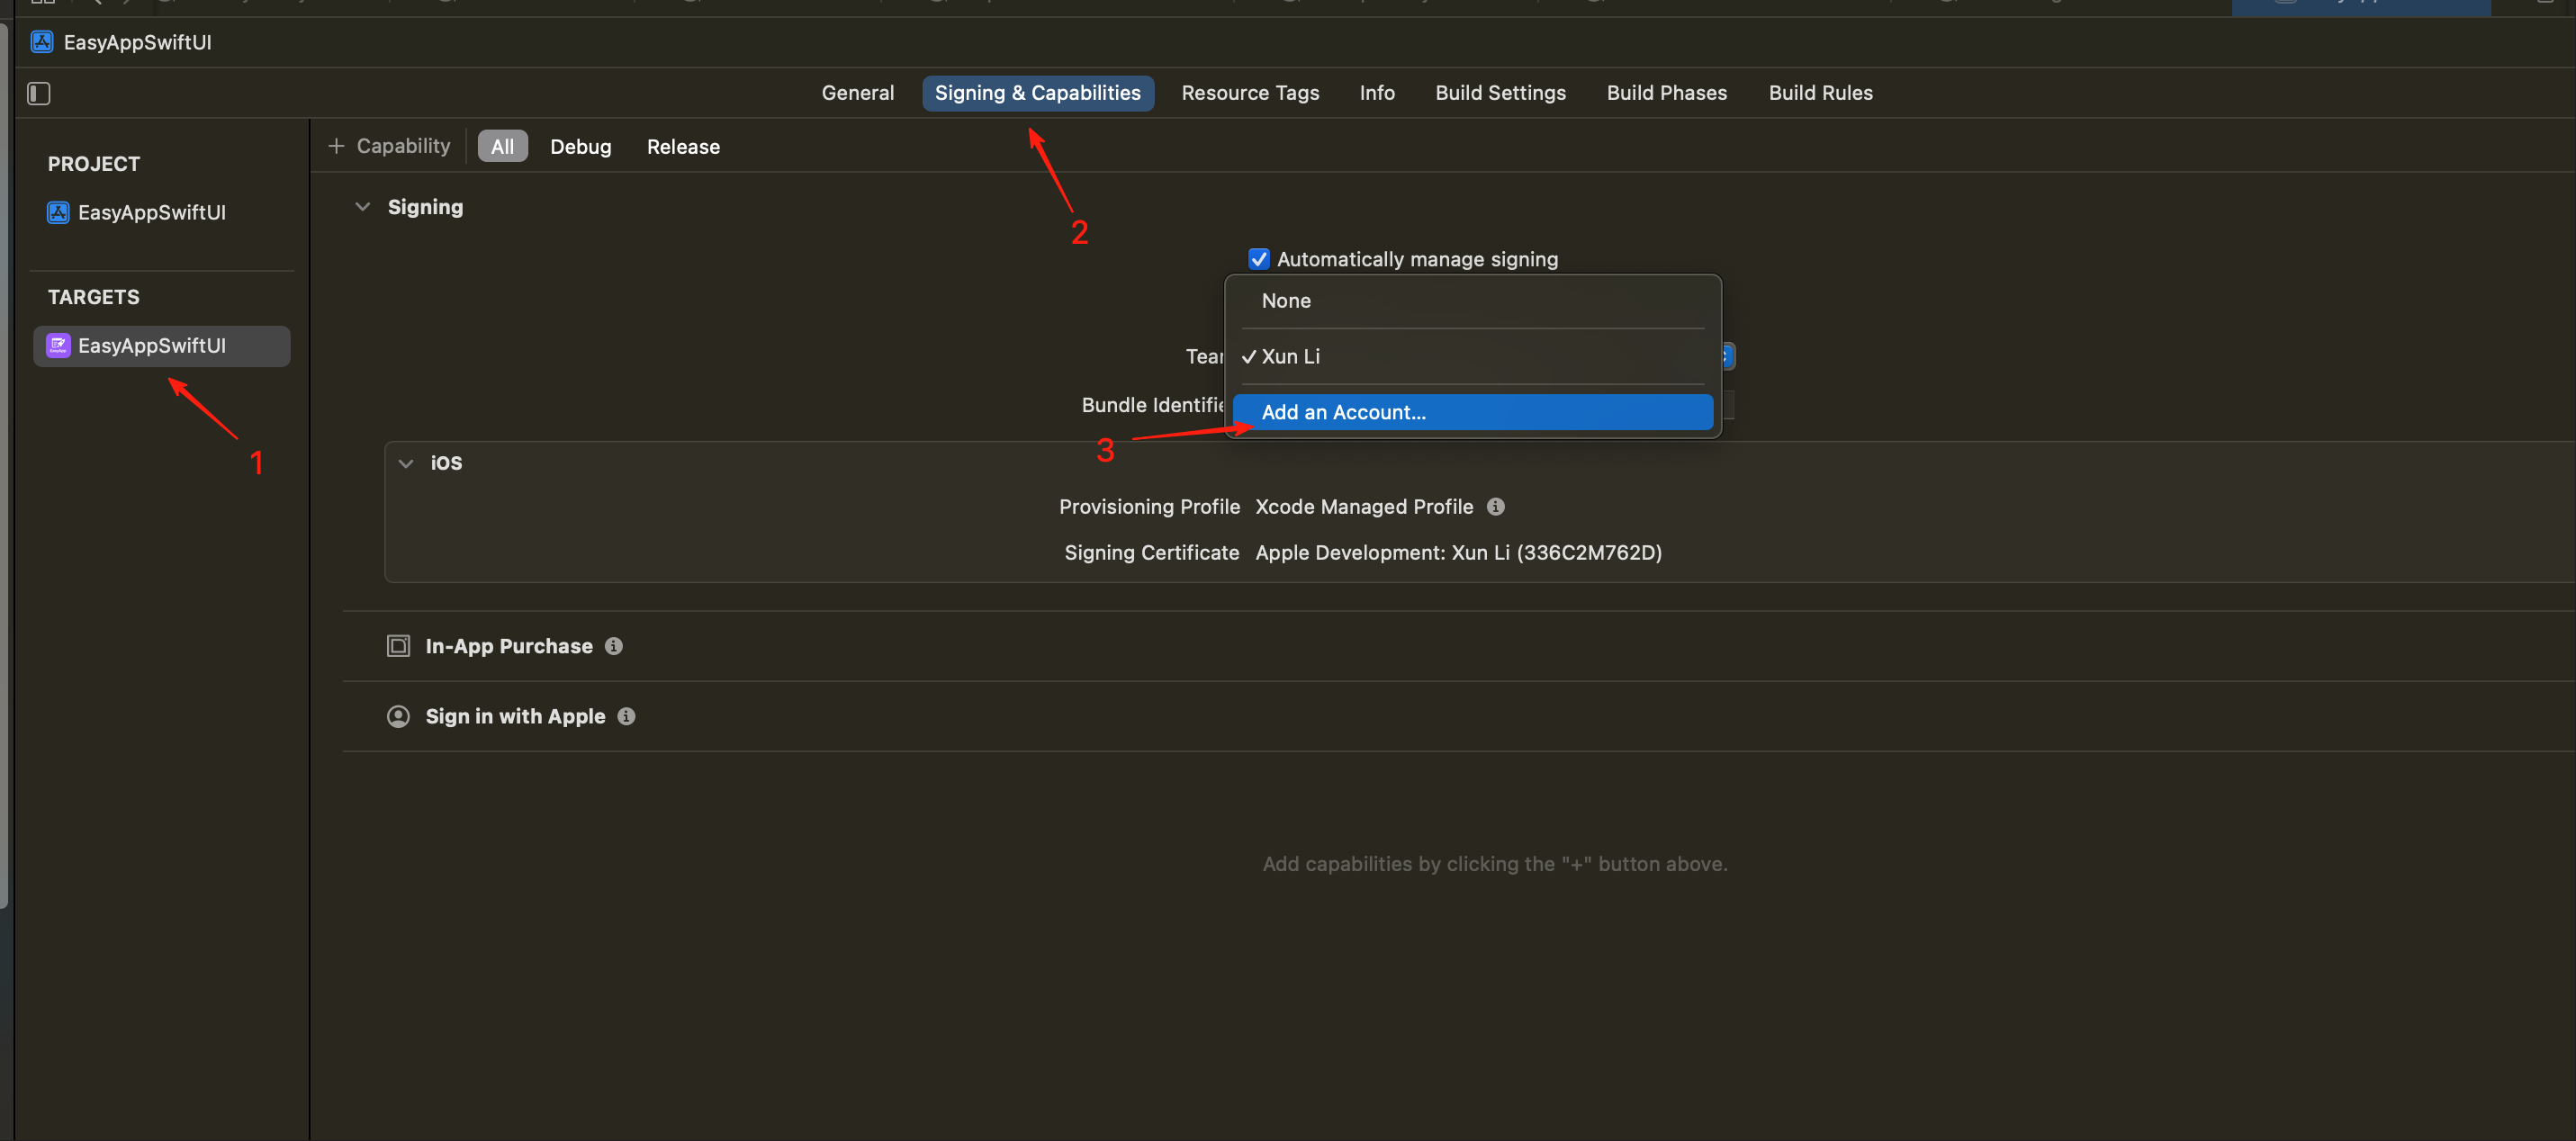
Reference official documentation: [Apple Developer Account Registration](https://developer.apple.com/cn/help/account/membership/enrolling-in-the-app)
First, when you purchase EasyApp, you will receive an email with access invitations to EasyApp's frontend and backend code repositories. You need to accept these invitations to have permission to access the code repositories. Next, you need to clone the code repositories locally and configure the Xcode project.
## Clone Repository
Recommended to fork the repository, then clone the forked repository locally. This way the repository you clone is also private, and you can pull from the main repository to update code at any time.

Then execute the following code according to your cloned repository:
* Replace your-username with your Github username
* Replace your-project-name with your project name
```bash
git clone https://github.com/your-username/easyapp-swiftui.git your-project-name
```
You can also directly clone the code repository
* Replace your-project-name with your project name
```bash
git clone https://github.com/FastEasyApp/easyapp-swiftui your-project-name
cd your-project-name
git remote remove origin
```
You can also directly download the ZIP file
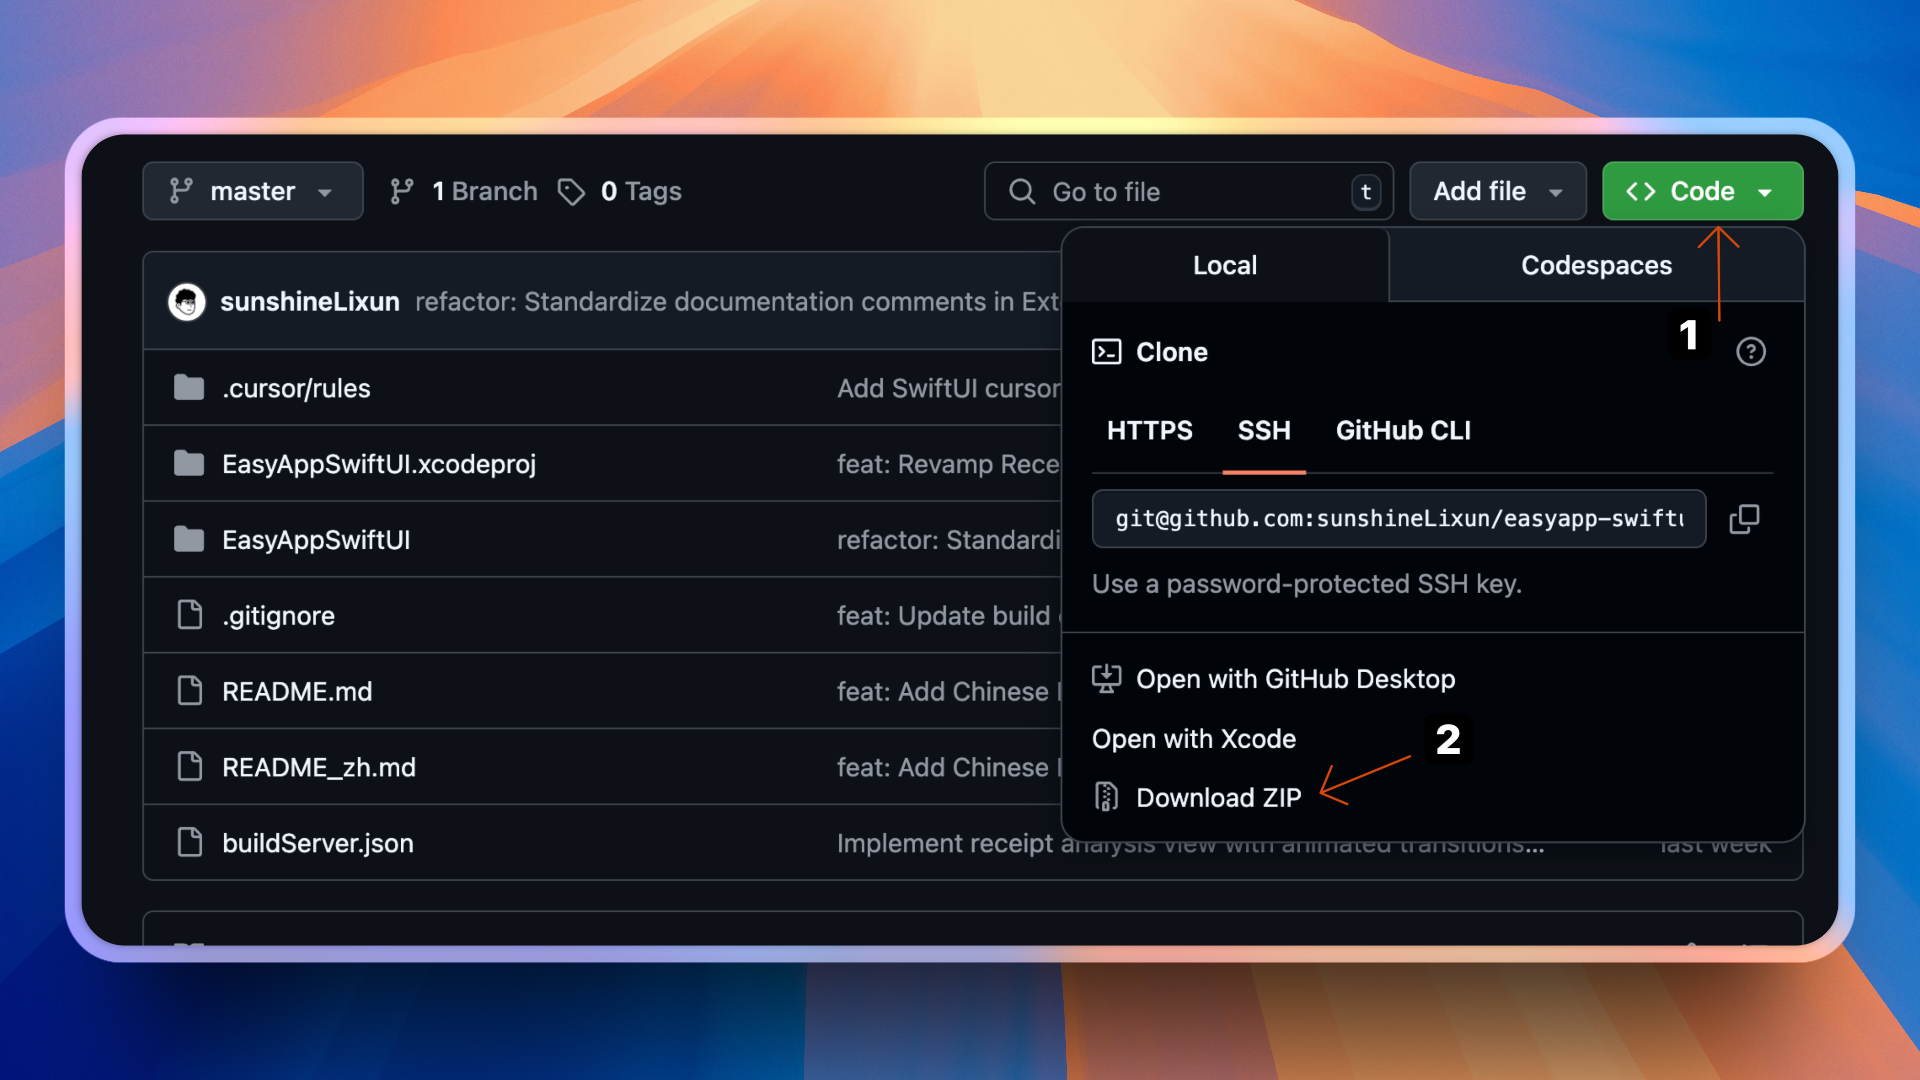
You can also directly open the project with Xcode (need to install [Xcode](https://developer.apple.com/xcode/) first)

## Configure Xcode
* For mainland China, installing [SPM](https://www.swift.org/documentation/package-manager/) dependencies requires enabling proxy TUN mode to make normal requests.
* Or use [Proxifier](https://www.proxifier.com/) tool to enable proxy. For how to use Proxifier, please search by yourself. Compared to the cumbersome configuration of using Proxifier tool, it is strongly recommended to enable proxy TUN mode.
* For how to enable proxy TUN mode, please search by yourself.
* Recommend using [Clash Verge](https://www.clashverge.dev/) tool to enable proxy.
There's another alternative method:
1: Make Xcode use the system's built-in git:
```bash
defaults write com.apple.dt.Xcode IDEPackageSupportUseBuiltinSCM YES
```
2: Then set global proxy for git or set terminal proxy, Xcode will use the proxy.
```bash
git config --global http.https://github.com.proxy {yourproxy} && git config --global https.https://github.com.proxy {yourproxy}
```
Replace yourproxy with your proxy, usually [http://127.0.0.1:7897](http://127.0.0.1:7897), the port may be different.
3: Check git proxy
```bash
git config --list --global
```
```
http.https://github.com.proxy=http://127.0.0.1:7897
https.https://github.com.proxy=http://127.0.0.1:7897
```
4: After setting up, you need to re-pull dependencies
There are 2 methods:
1: Close Xcode and reopen it, it will automatically re-pull dependencies
2: Right-click Package Dependencies, click Reset Package Caches, it will automatically re-pull dependencies
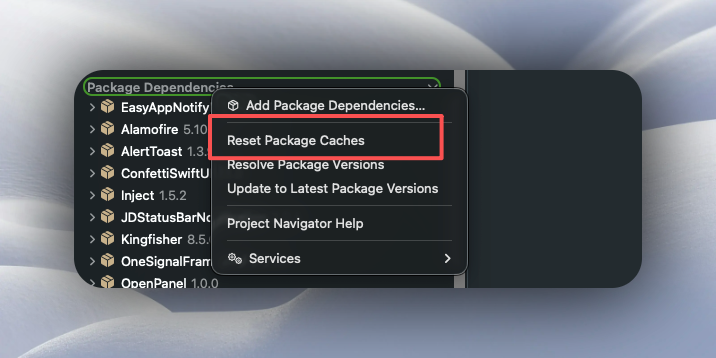
**1. Open project in Xcode**:
Go to your cloned code repository, double-click the `EasyAppSwiftUI.xcodeproj` file to open the project.
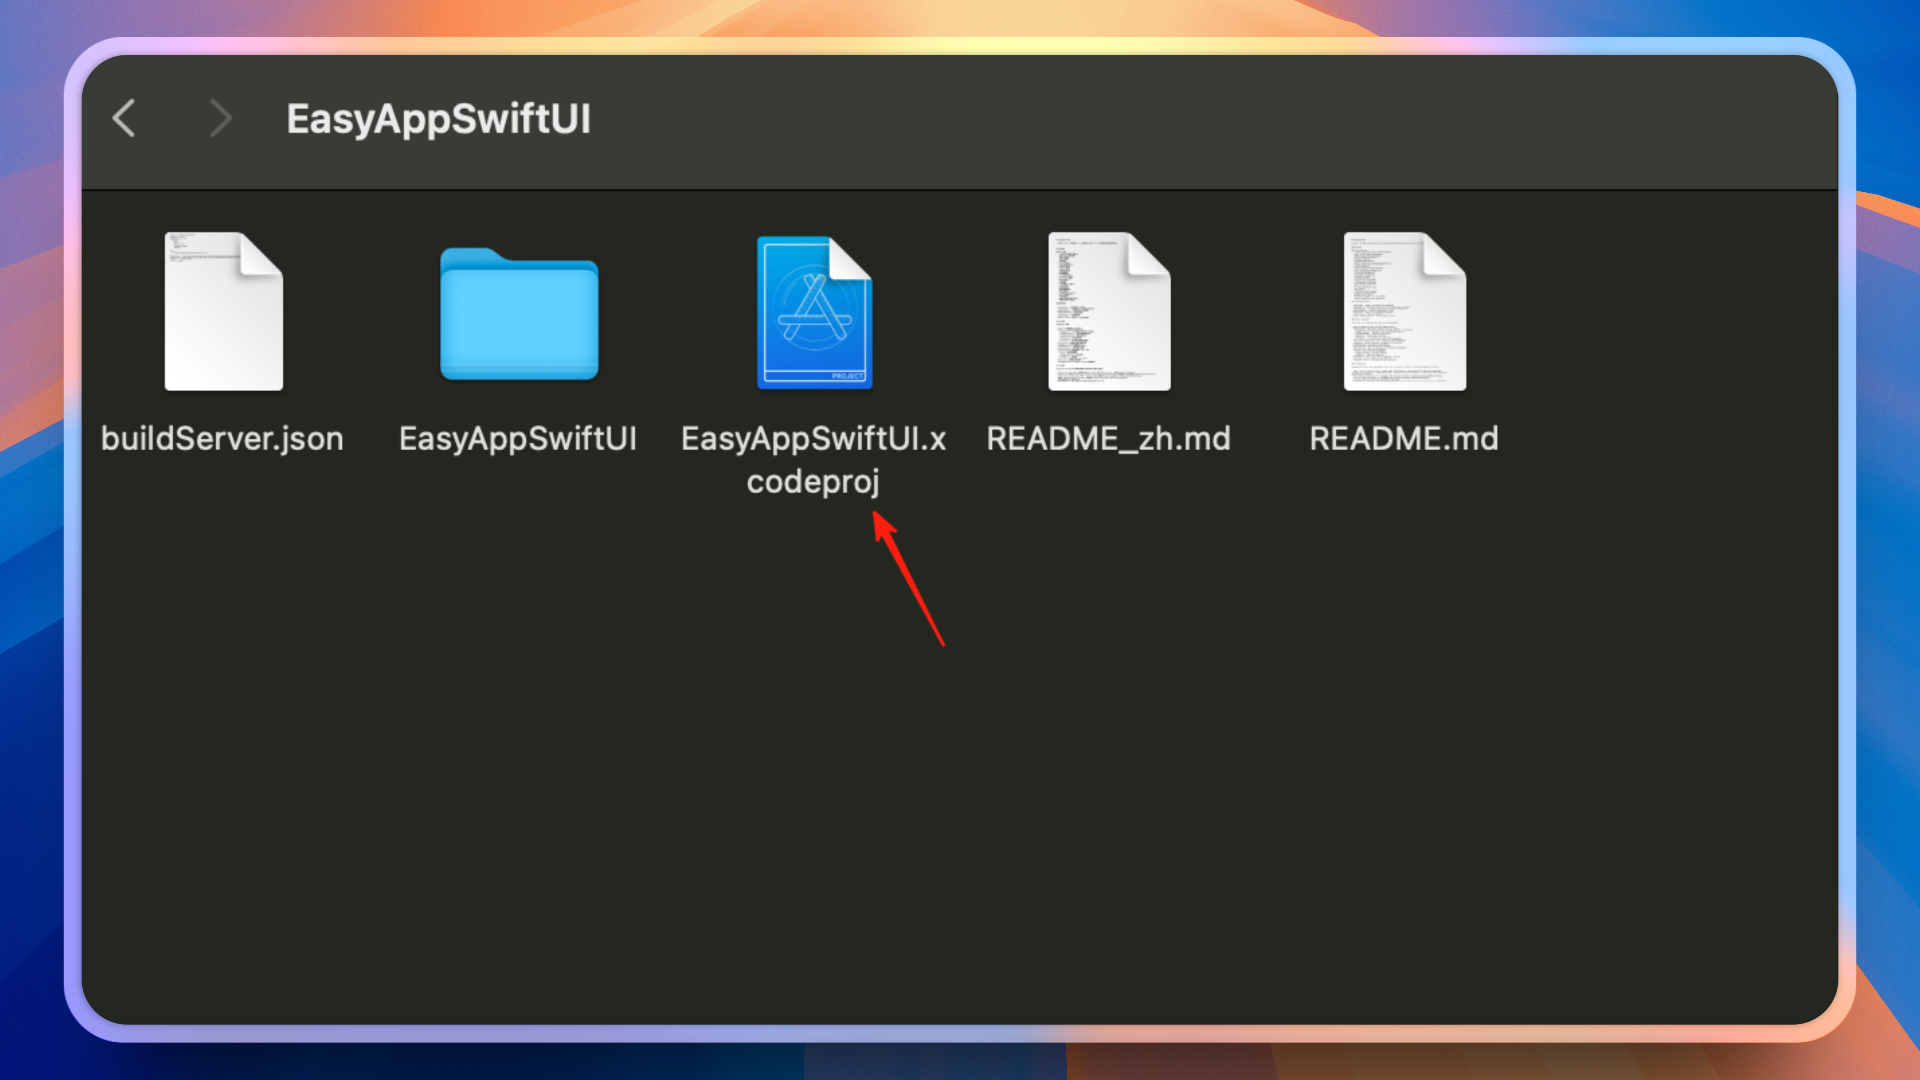
**2. Select development team (as shown below)**:
* In Xcode, select the project file (steps 1 and 2)
* Go to "Signing & Capabilities" (step 3)
* Select your Apple developer team (step 4)
If you haven't registered an Apple developer account yet, please refer to the [official documentation](https://developer.apple.com/help/account/membership/enrolling-in-the-app) to register. This is mandatory, otherwise you won't be able to proceed with subsequent development work.
**3. Update Bundle Identifier**:
* Change bundle identifier to match your developer account (step 5)
* Example: `com.yourcompany.easyappswiftui`
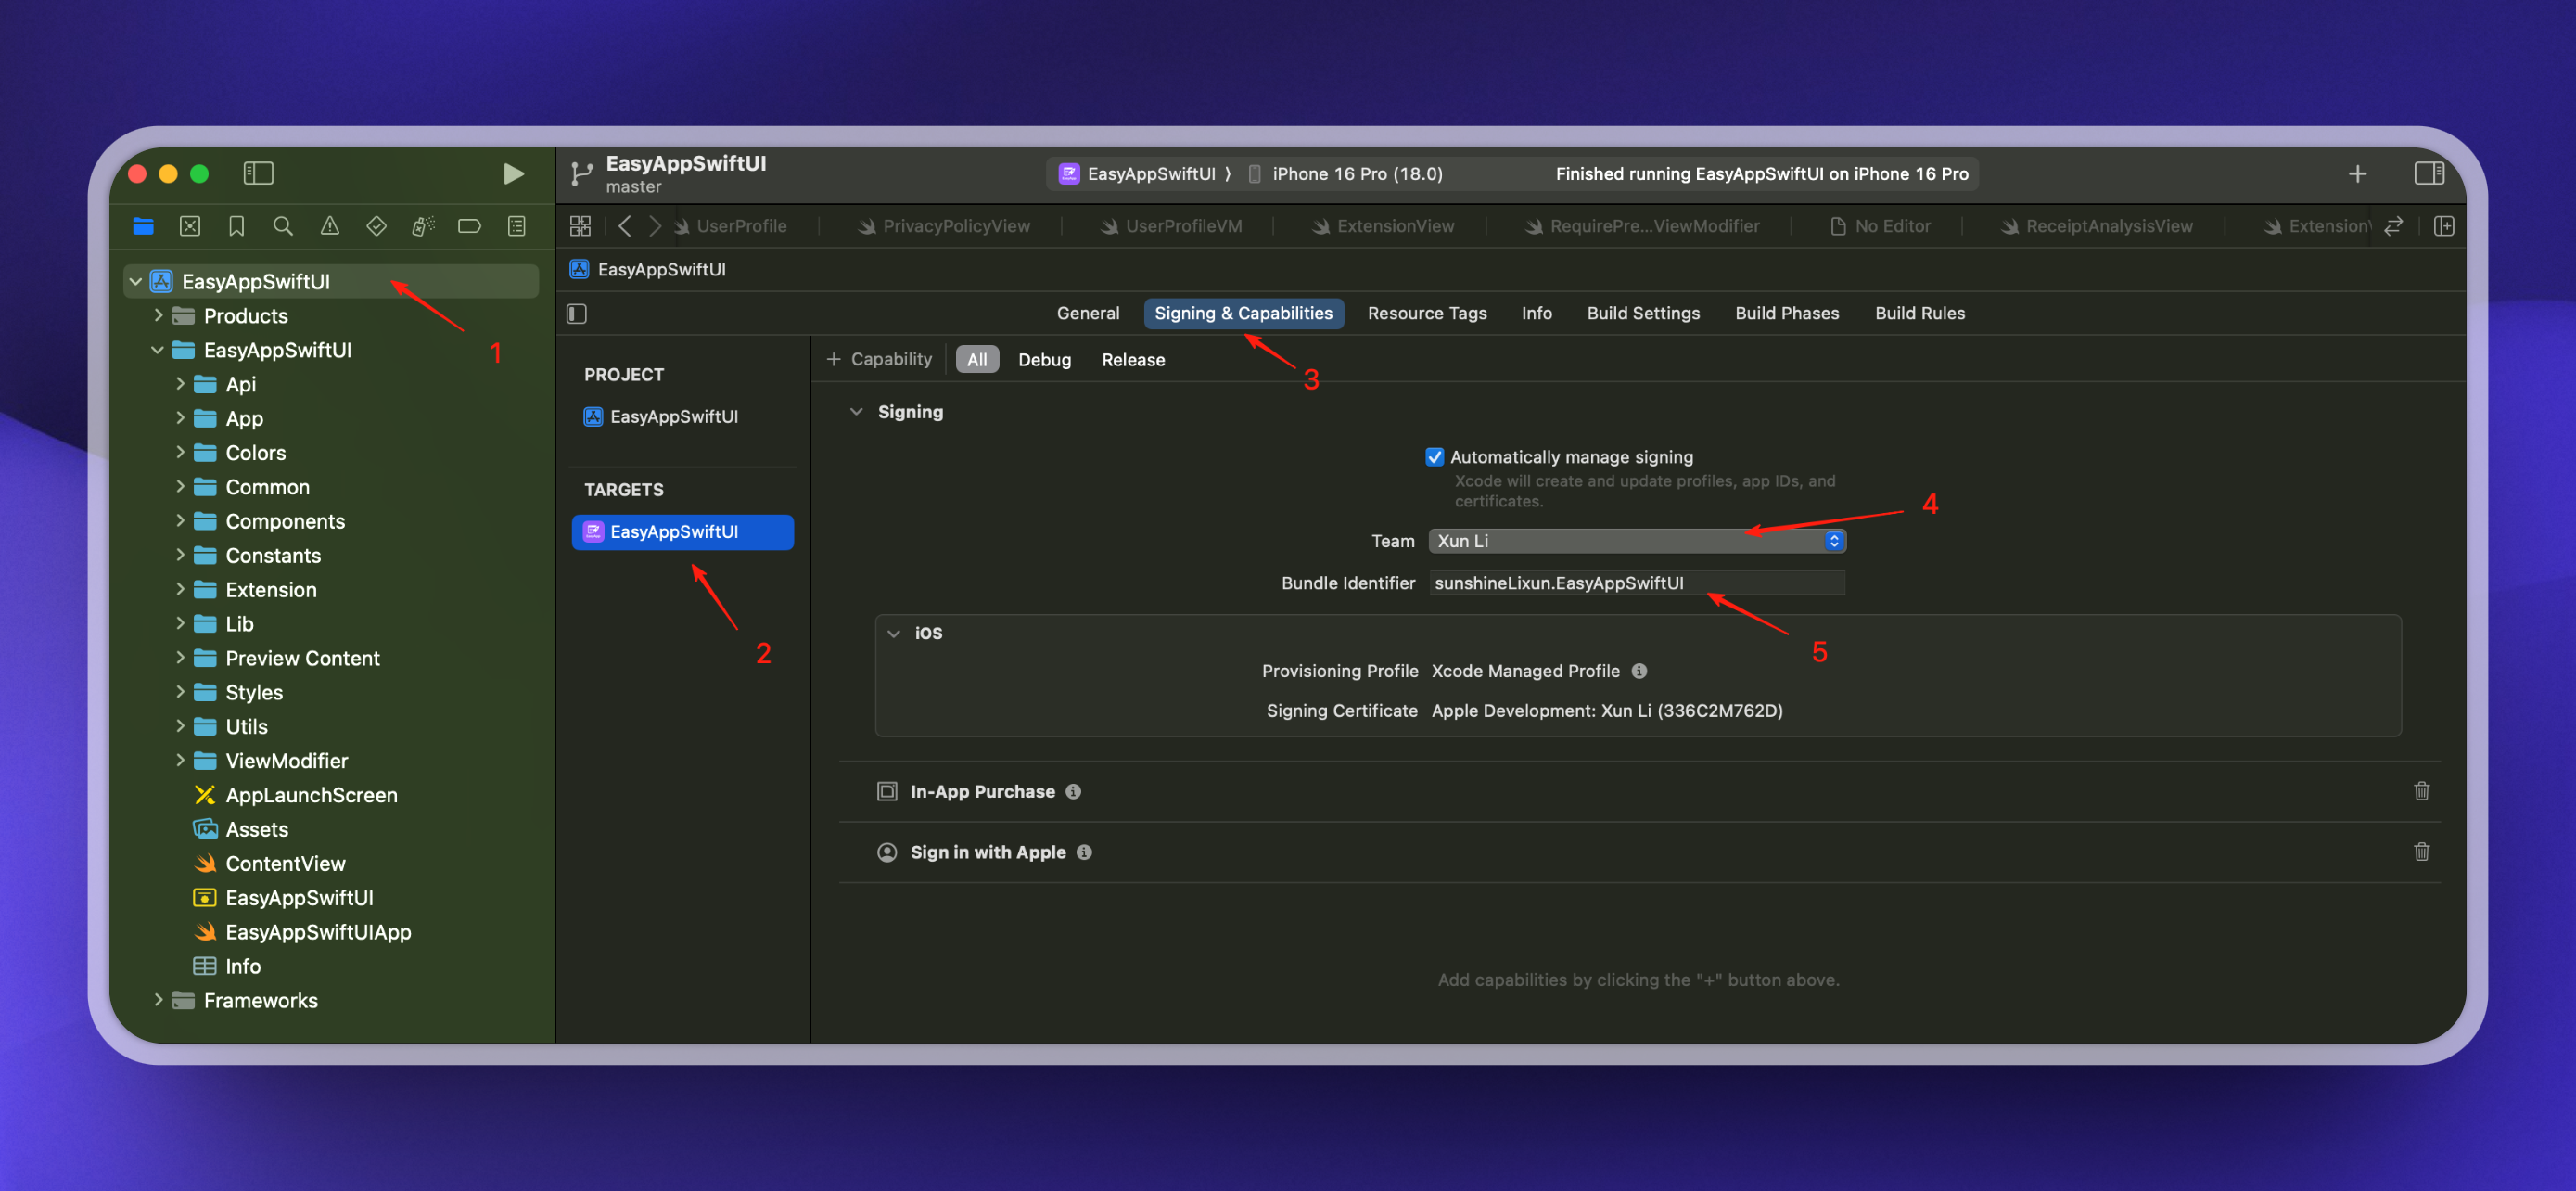
Be sure to update your `Bundle Identifier`. Each App's `Bundle Identifier` is unique. You'll need to use this `Bundle Identifier` to configure various services later: Supabase, RevenueCat, Apple Sign-In, etc.
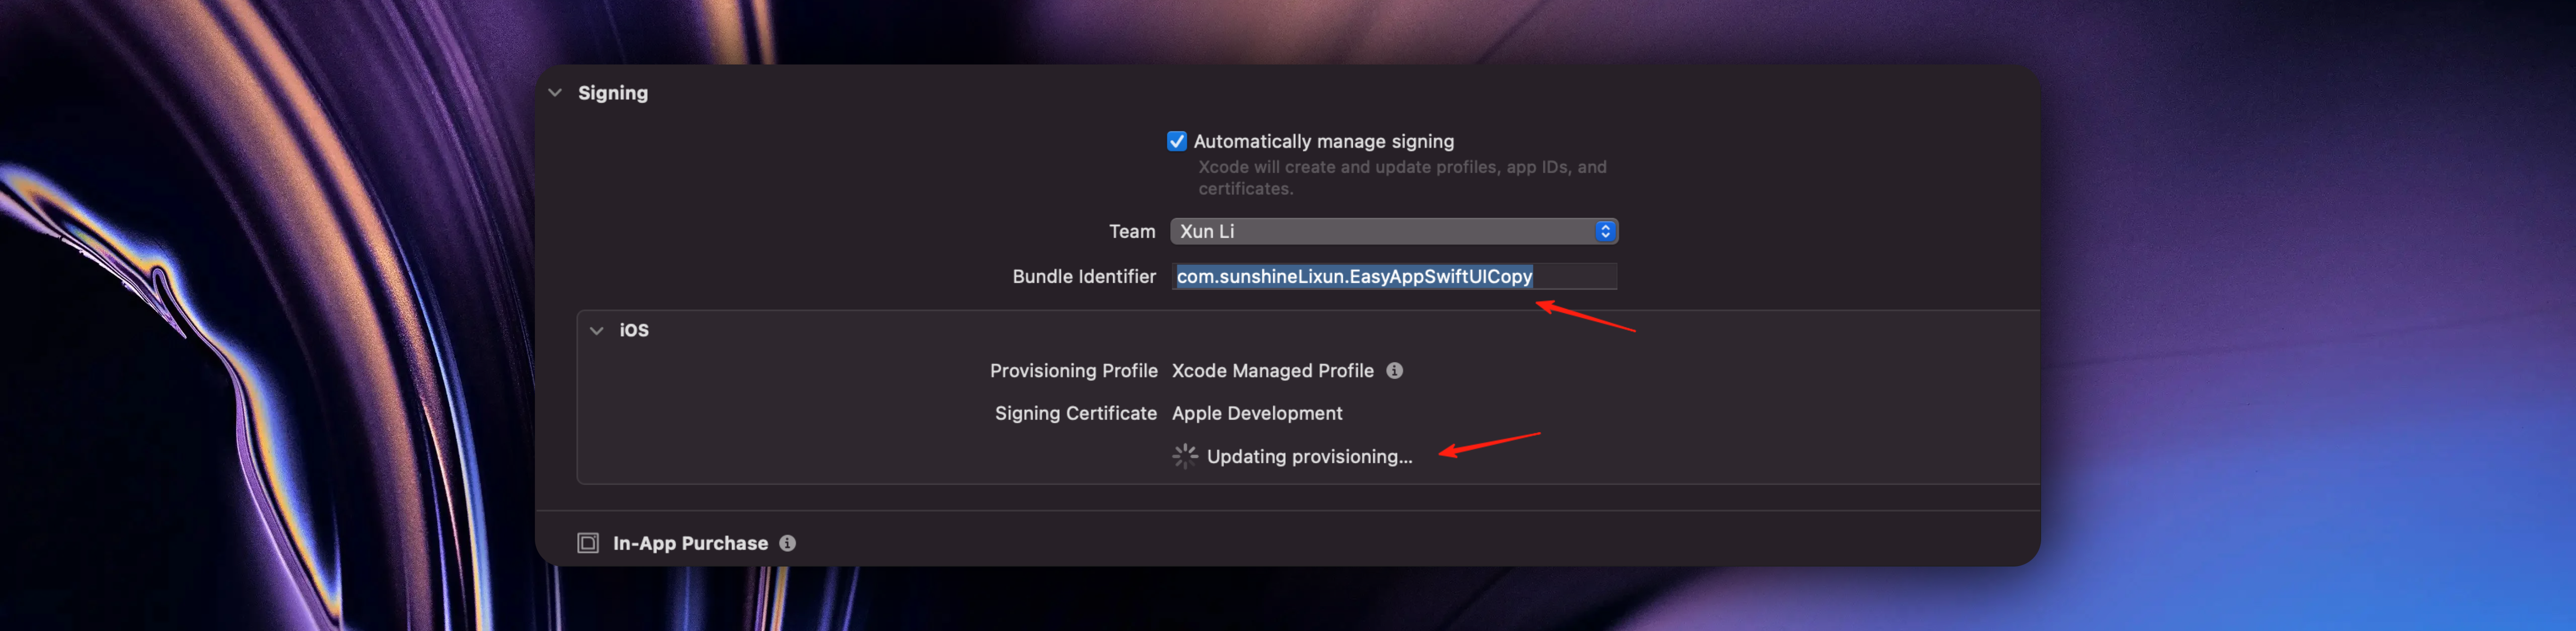
When you update the `Bundle Identifier`, Xcode will automatically update your Profile file and sync it to the Apple Developer website.
The template enables desktop widgets, lock screen widgets, and Dynamic Island functionality by default. Since you modified the main App's `Bundle Identifier`, you also need to modify the Widget and push notification's `Bundle Identifier`.
If you temporarily don't need widget and notification features, you can refer to [this documentation](/docs/FQA/removeWidgetNoti) to delete related configurations and code. After deletion, if the program has no errors, you can directly skip this step. Then run the App and proceed with subsequent project renaming operations.
Their relationship is as follows:
When your iOS app contains any of the following components, Apple requires that the Bundle ID of these components must be prefixed with the main app's Bundle ID:
* App Extensions (application extensions, such as Today Widget, Share Extension, etc.)
* WatchKit App (Apple Watch app)
* App Clips
* Other embedded frameworks and binaries
Example:
Correct configuration:
* Main app: com.example.myapp
* Extension: com.example.myapp.share-extension ✅
* Widget: com.example.myapp.widget ✅
Incorrect configuration:
* Main app: com.example.myapp
* Extension: com.example.share-extension ❌ (missing myapp. prefix)
* Widget: com.anothercompany.widget ❌ (completely different prefix)
Clean and rebuild:
Xcode menu bar -> Product → Clean Build Folder
Or shortcut: (Shift + Cmd + K)
Rebuild the project
Specific steps are as follows:
### Configure Widget-related settings
1. Modify Widget's `Bundle Identifier`
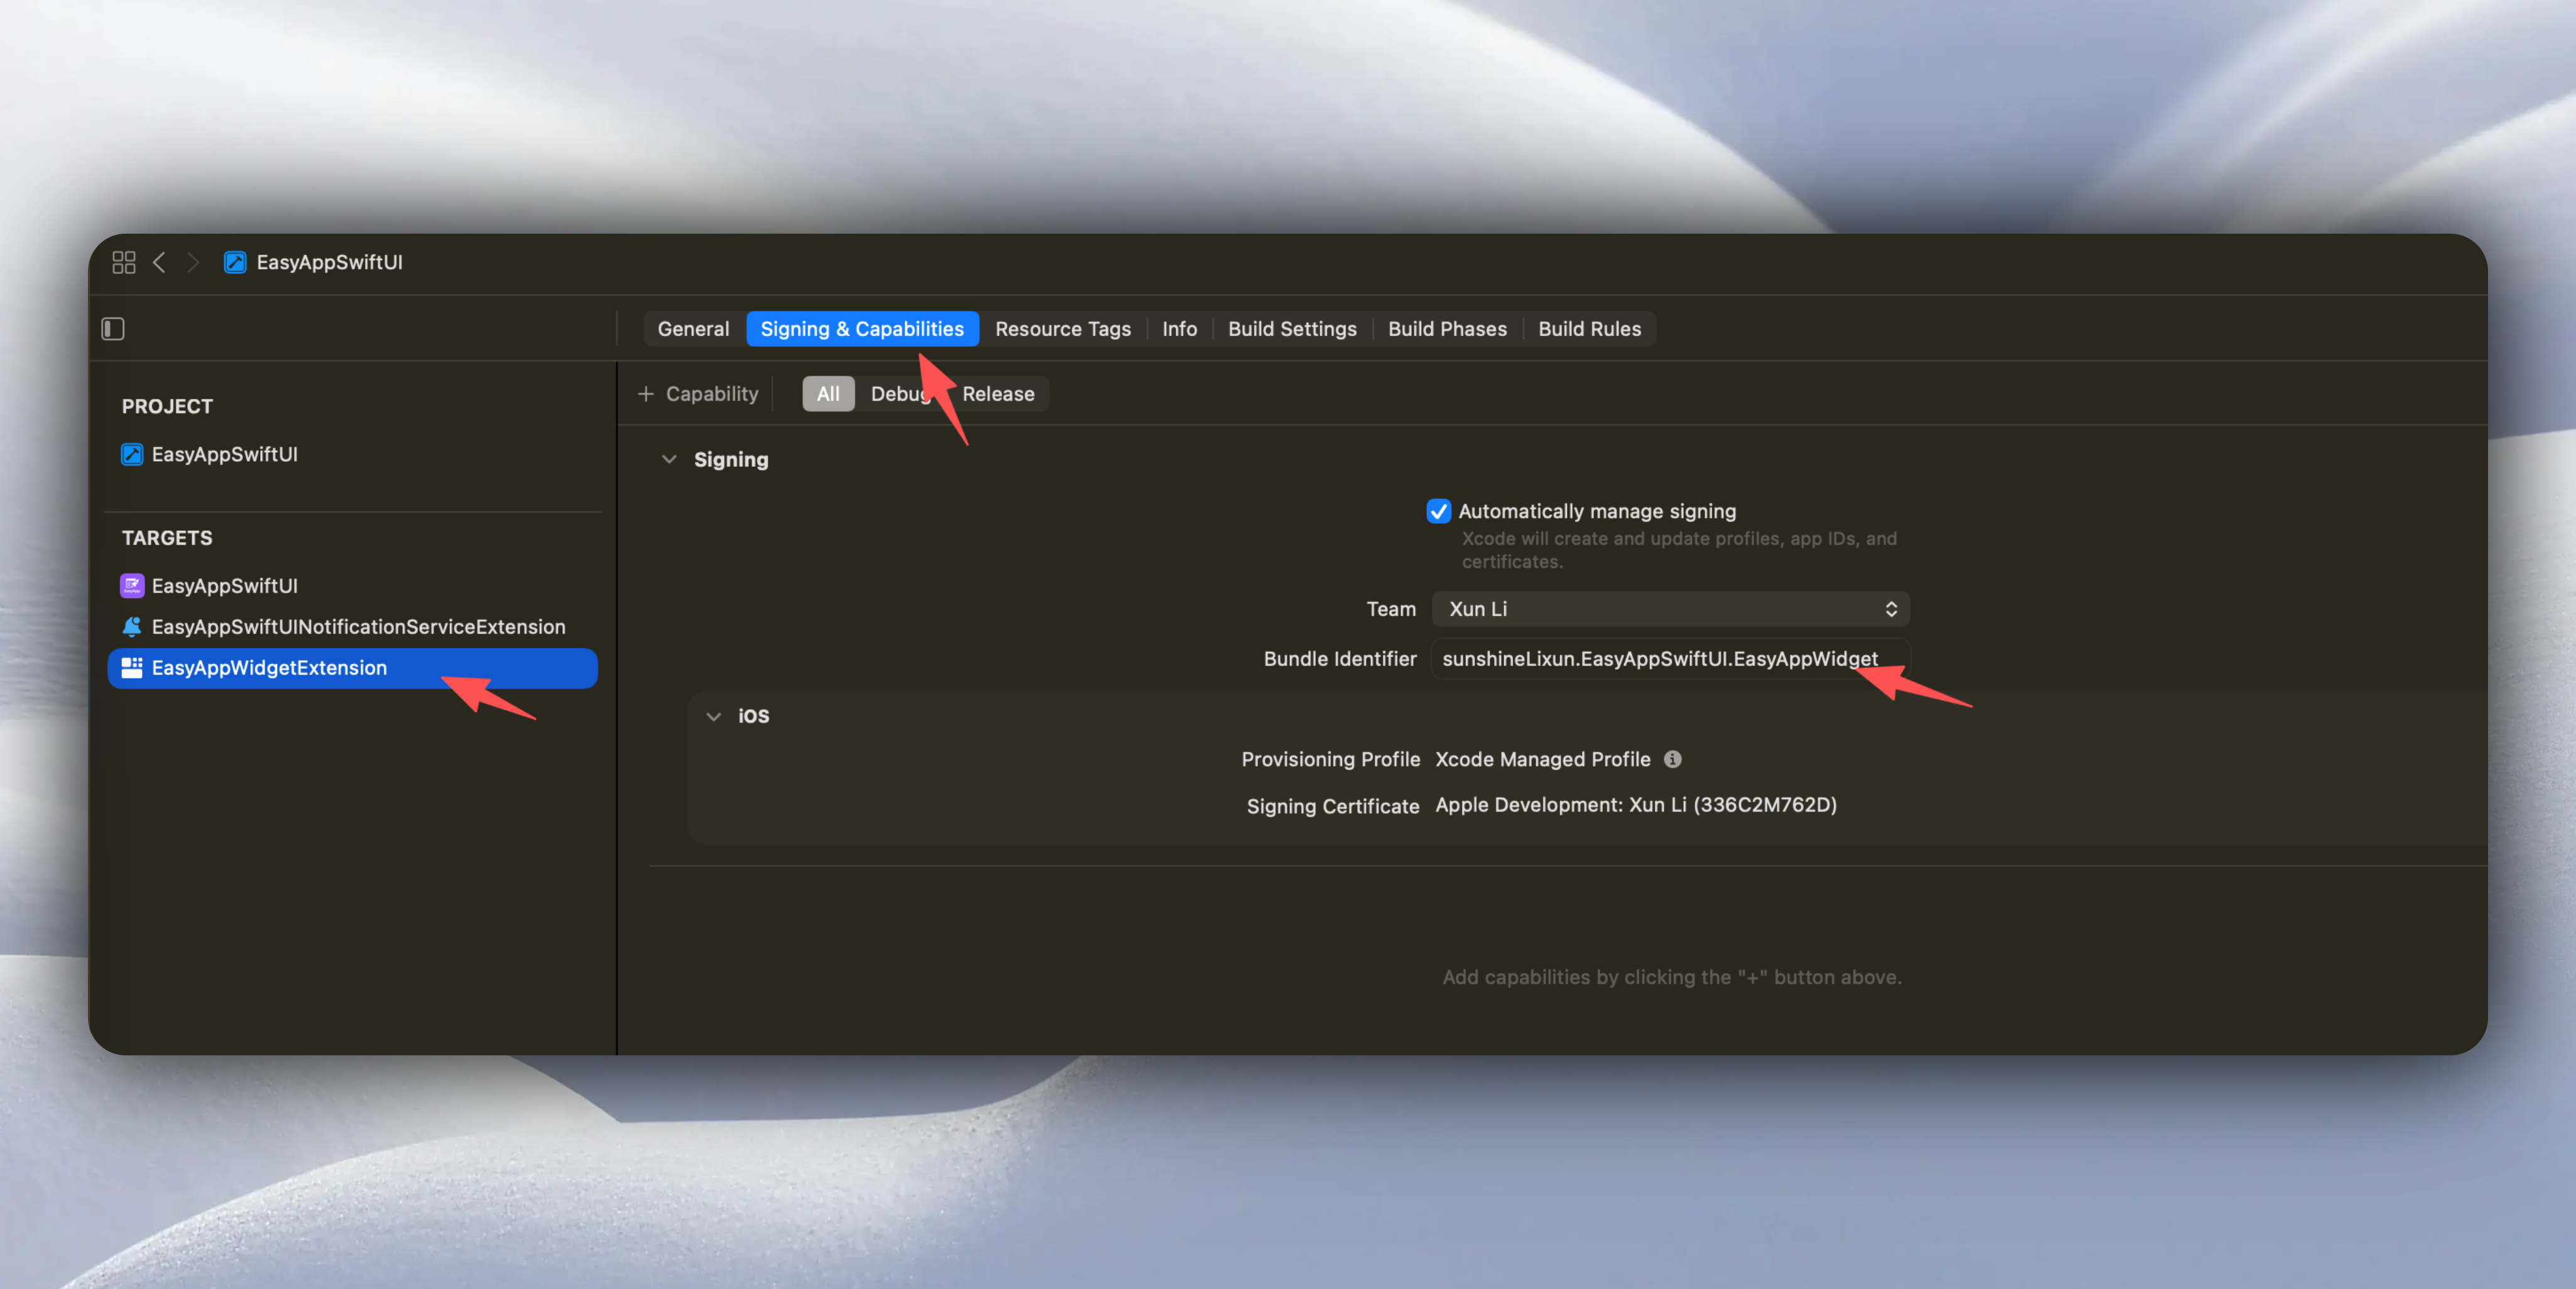
The format must be modified according to the main App's `Bundle Identifier` + `.widget`,
Example:
* Main app: com.example.myapp
* Widget: com.example.myapp.widget ✅
When you update the Widget's `Bundle Identifier`, Xcode will automatically update your Profile file and sync it to the Apple Developer website.
Next, modify the `kind` in the `EasyAppWidgetControl` file, as shown below. This value is the Widget's `Bundle Identifier` you just modified.
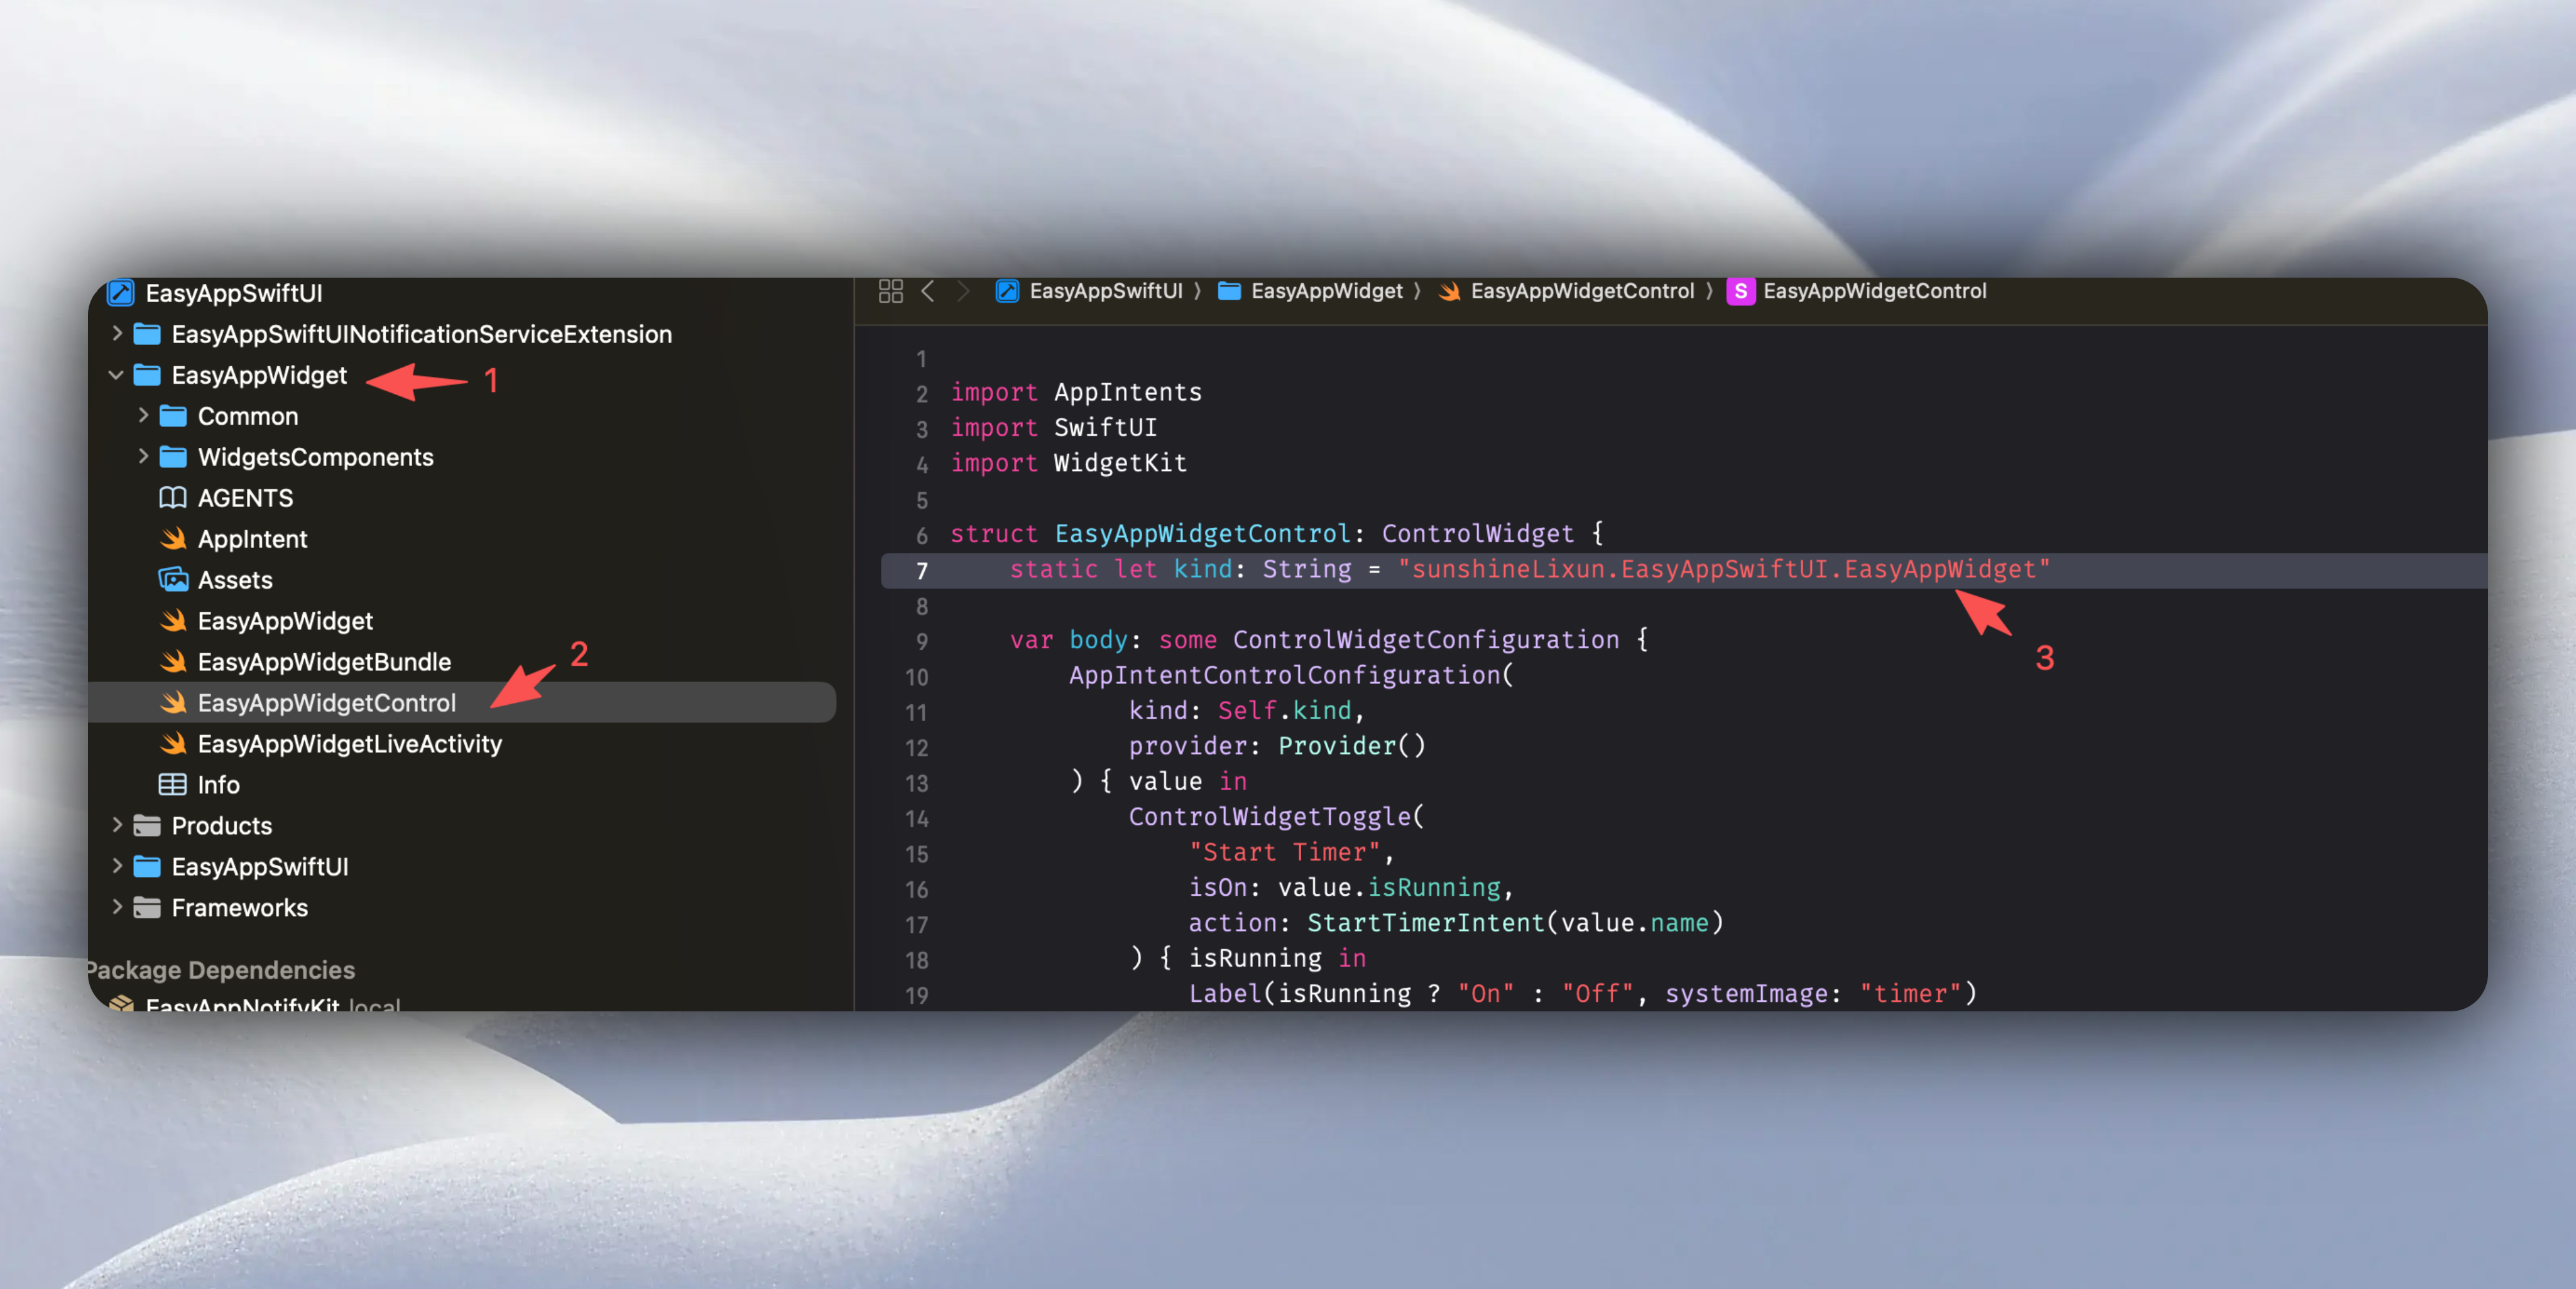
2. Add App Group identifier
Desktop widgets and the main App share data through App Group identifier. They share data through the App Group identifier. Let's go to the main App:
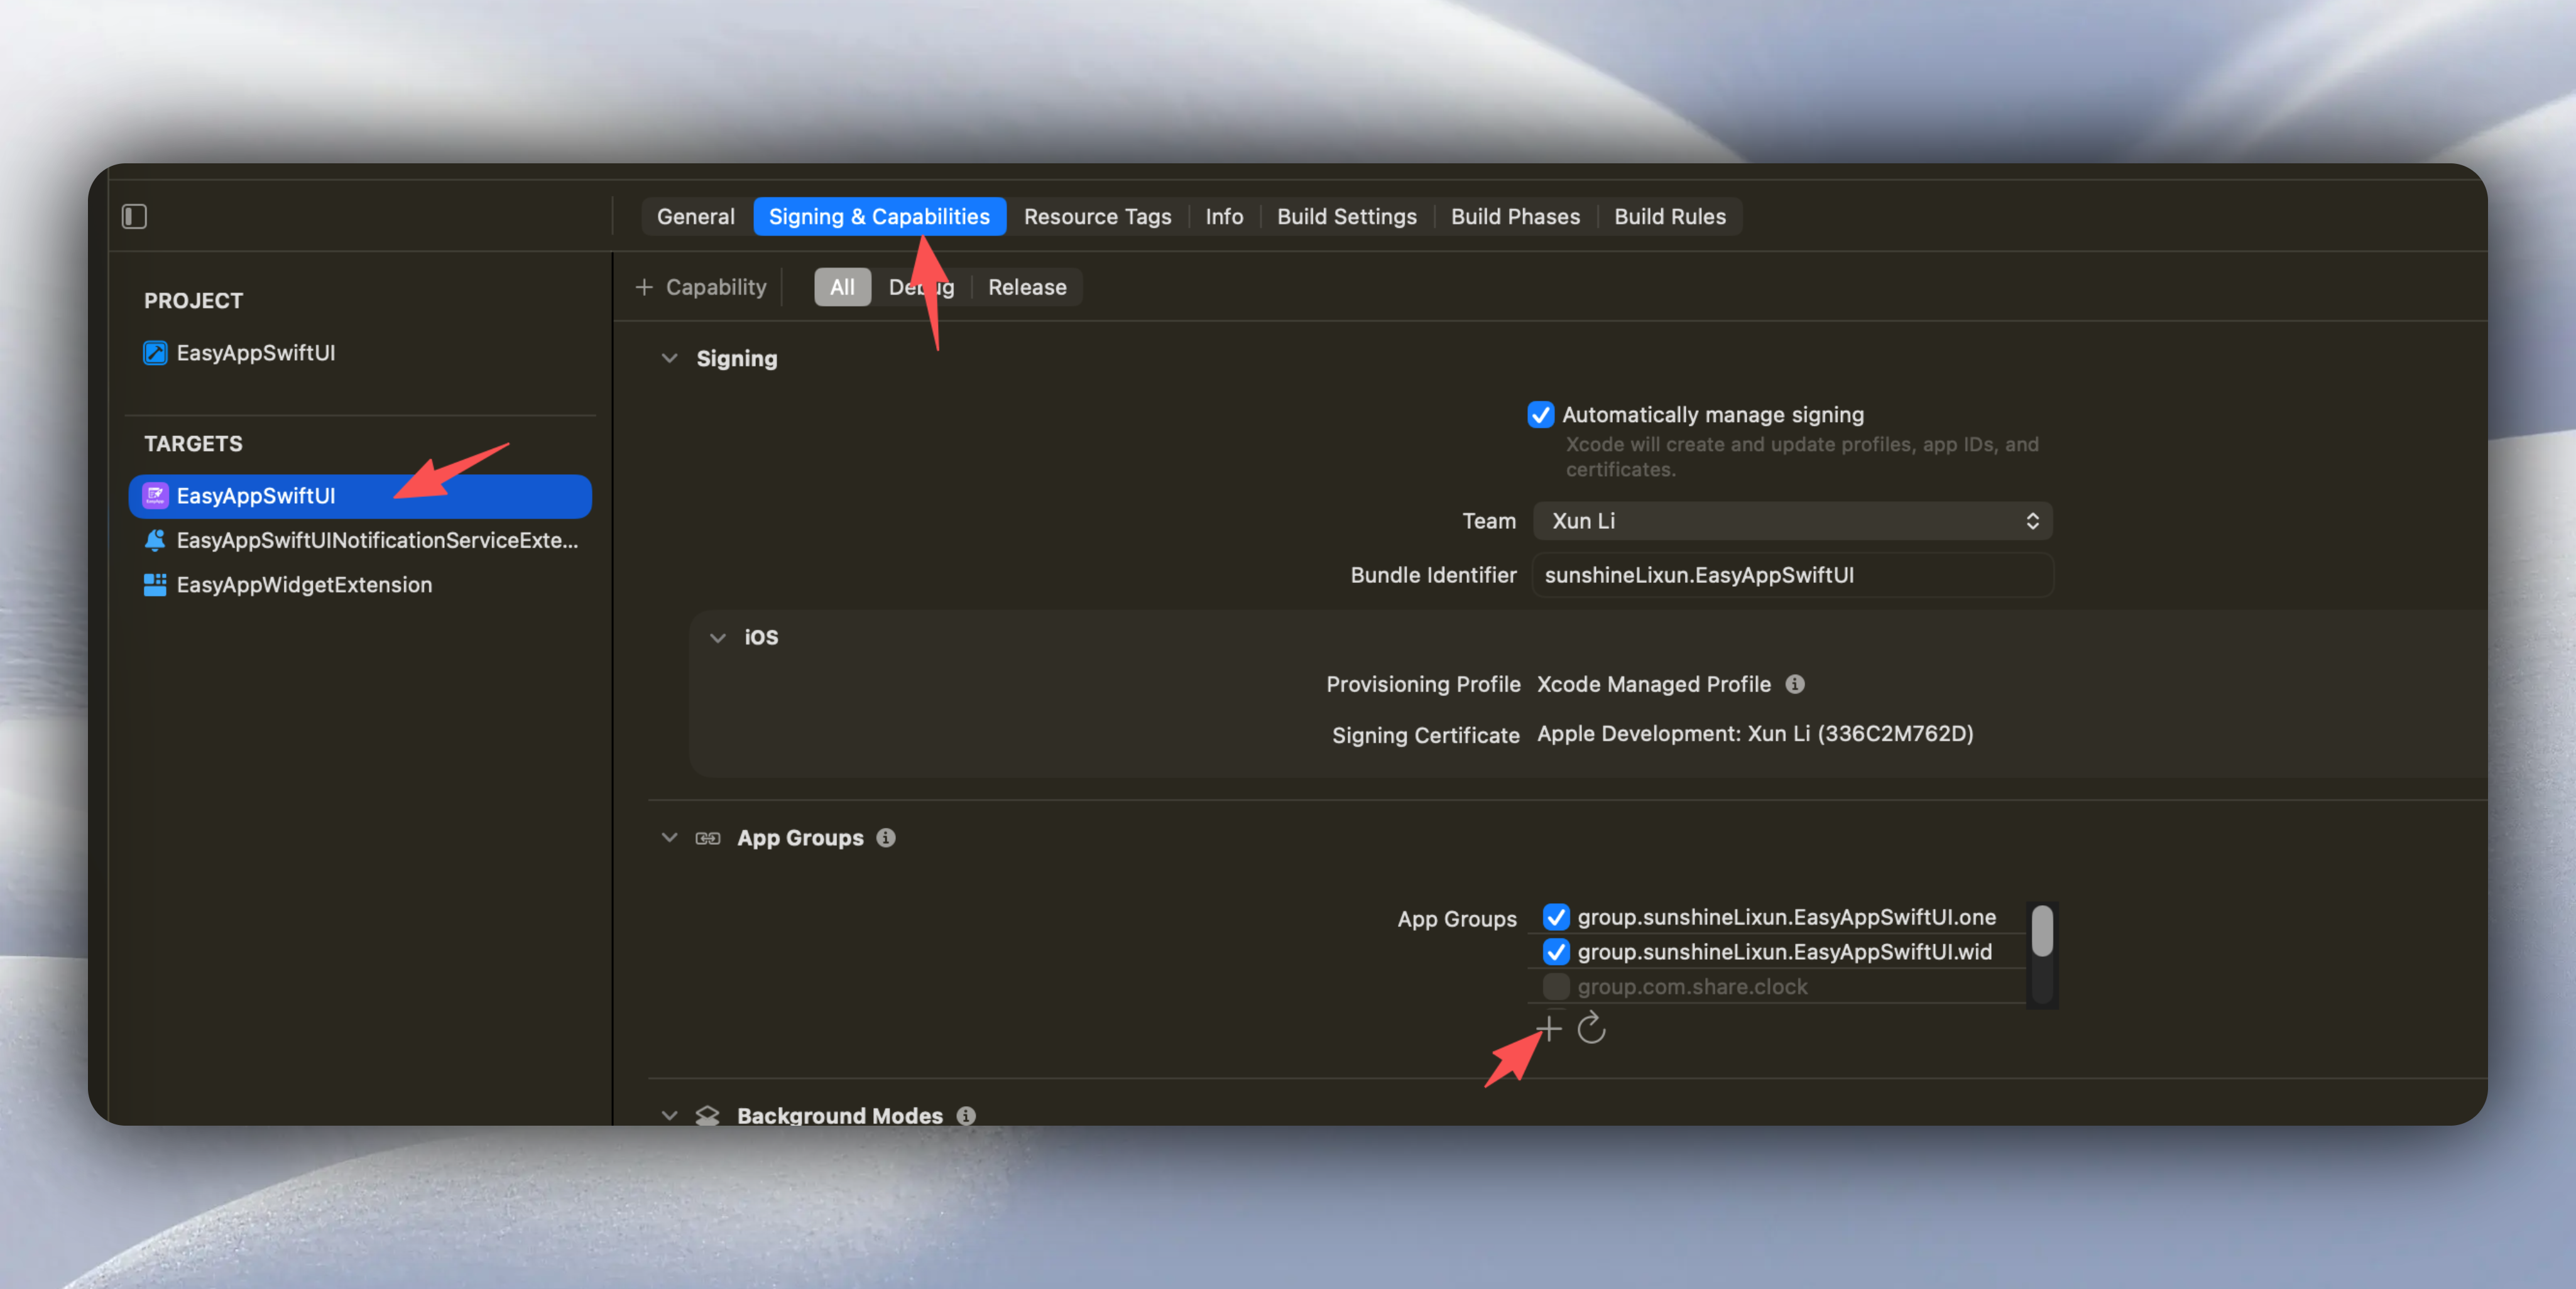
Click the `+` button, enter your App Group identifier, recommended format: `group.` + `widget's Bundle Identifier`. For example: `group.com.yourcompany.easyappswiftui.widget`.
After setting your App Group identifier, please uncheck the template's built-in App Group identifier. As shown below, since you have configured your exclusive App Group identifier, the template's built-in App Group identifier is no longer necessary.
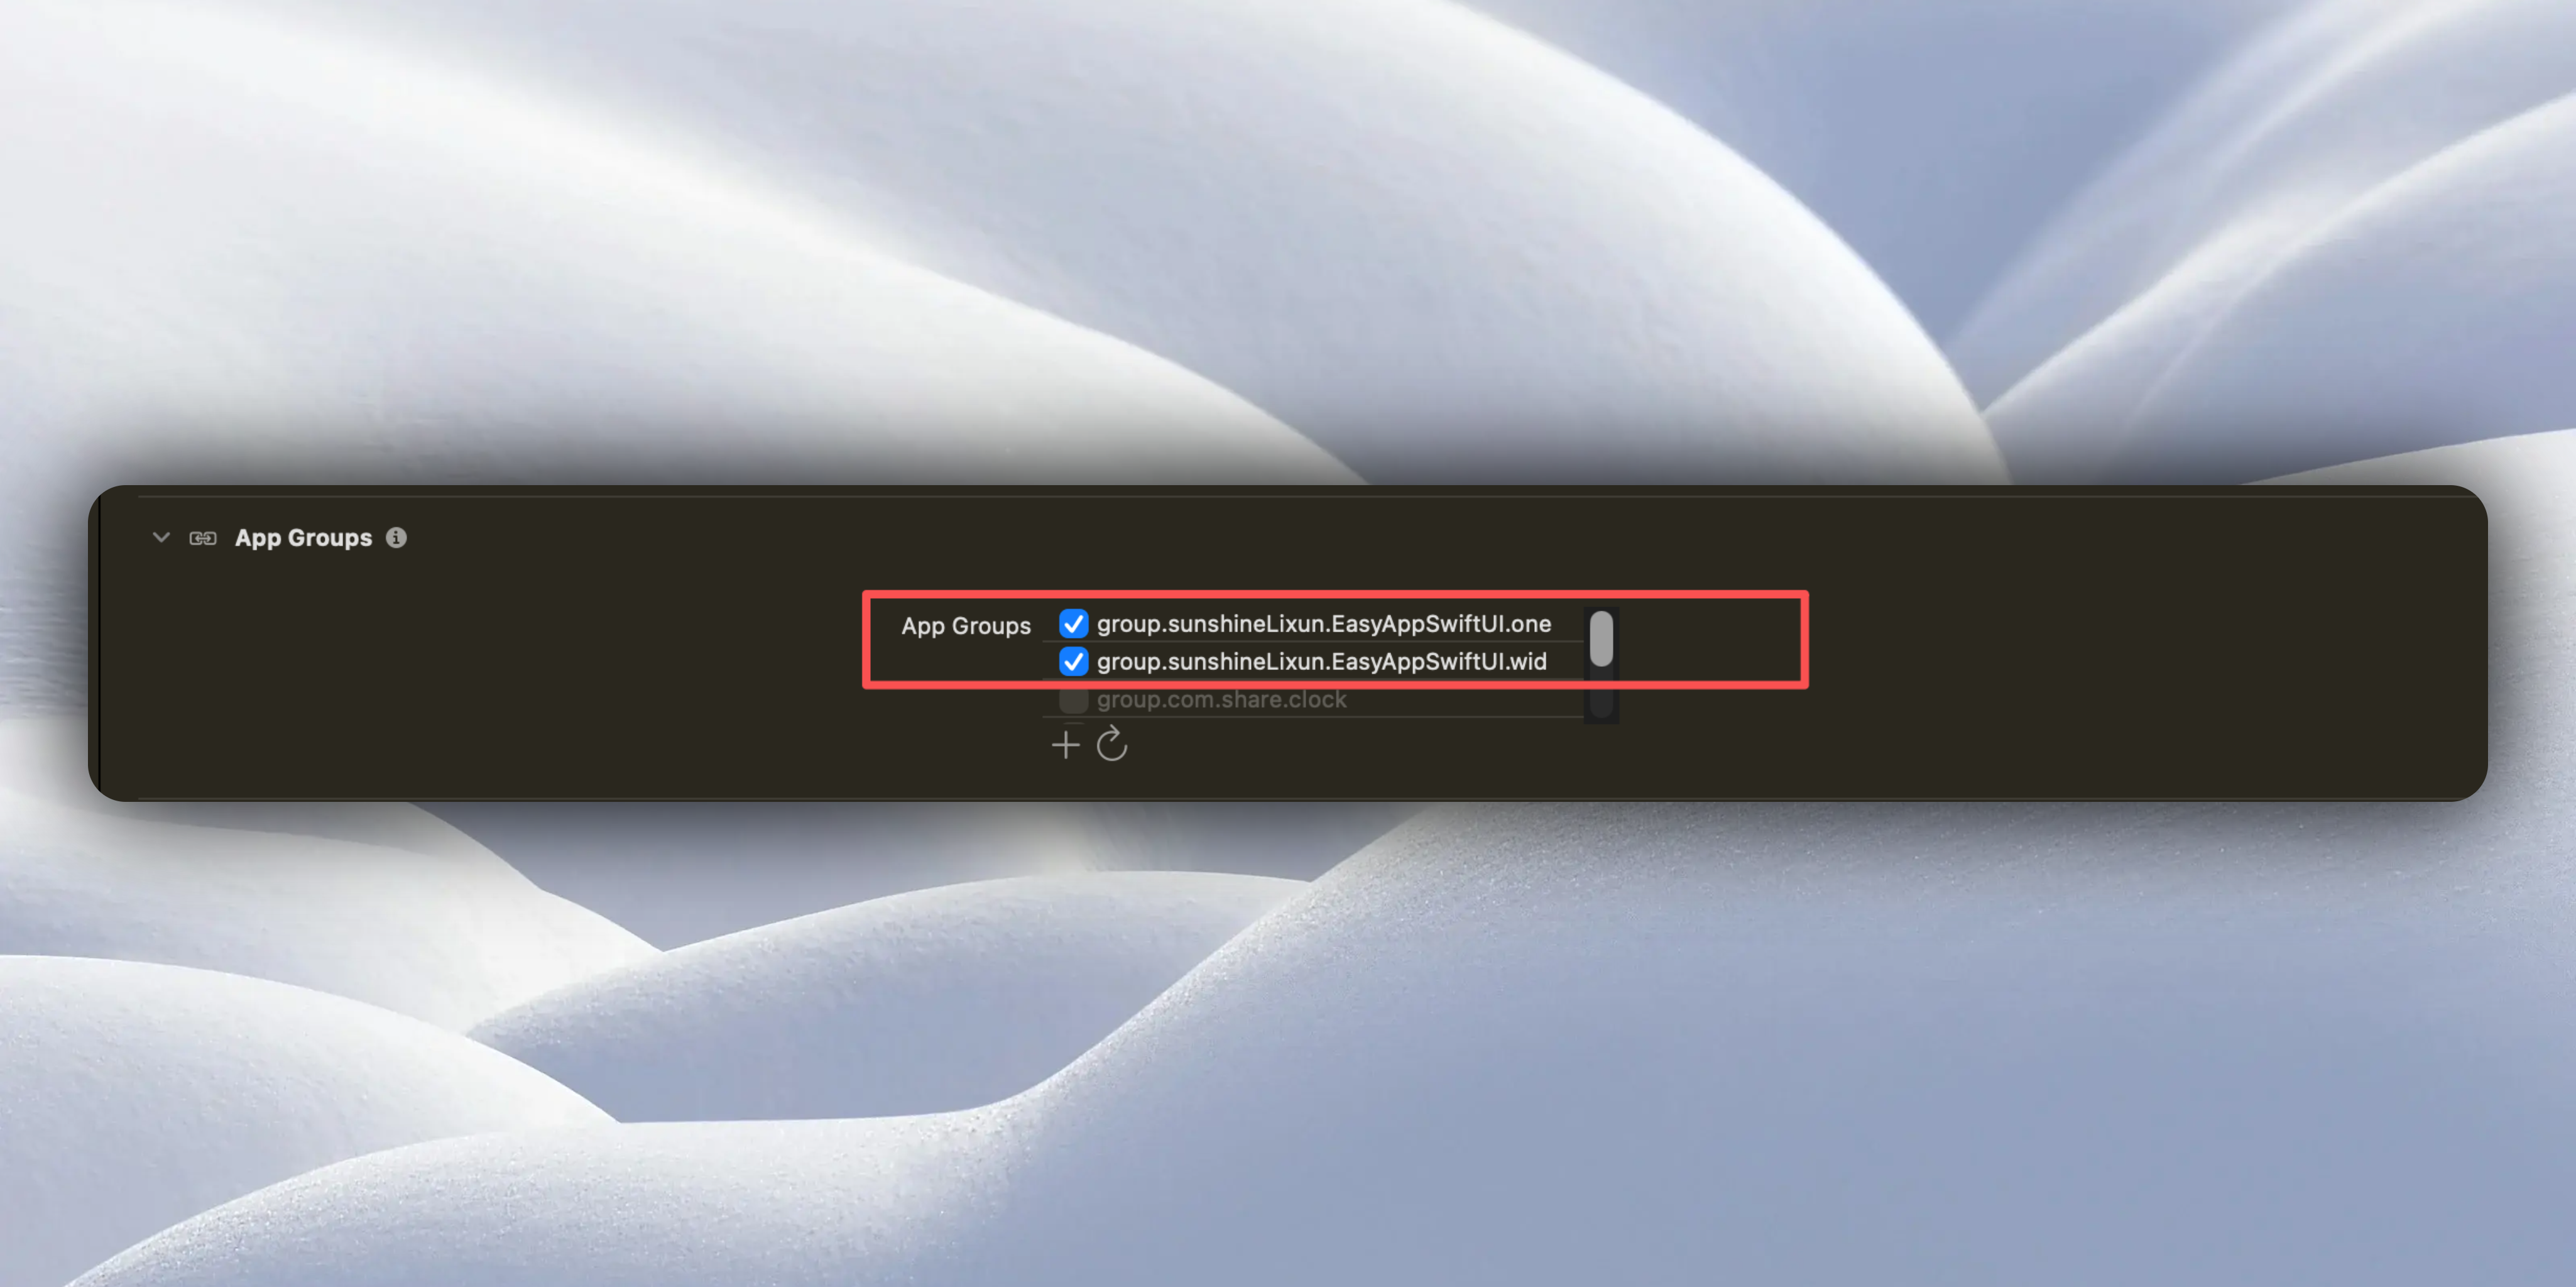
3. After configuring the main App, let's go to the Widget:
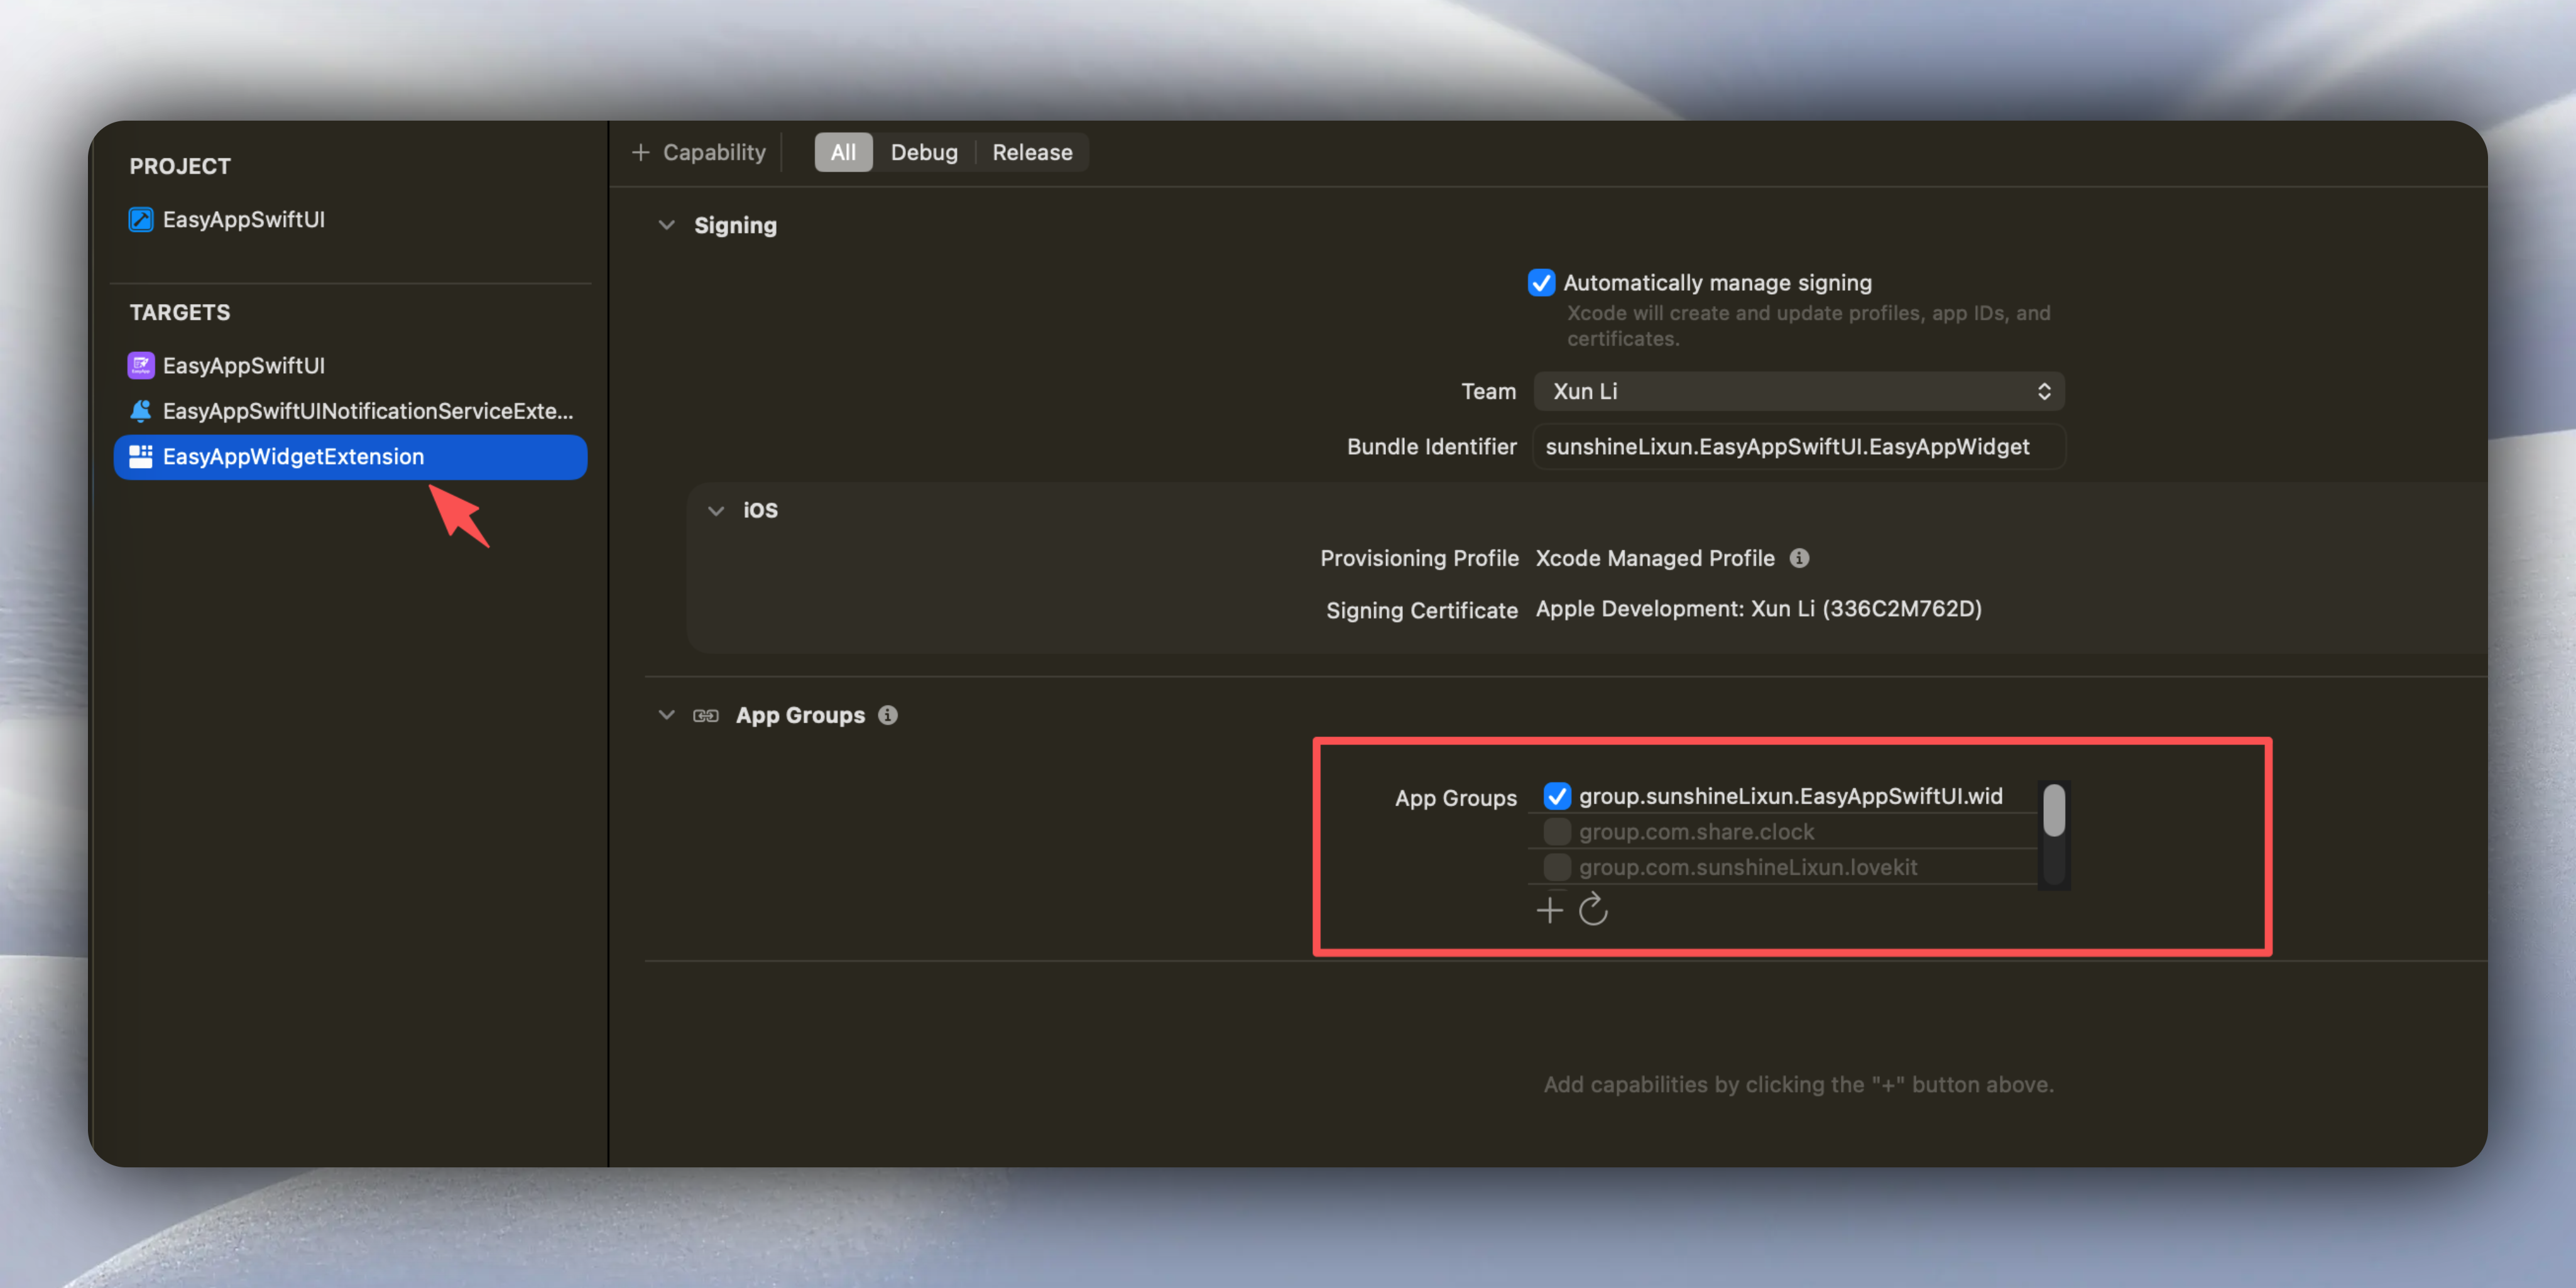
The Widget's App Group will automatically pull the main App's App Group identifier. Just select it. If it's not pulled, you can click the `refresh` button next to it to pull again.
### Configure Push Notification related settings
The template comes with push notification functionality. Push notifications are similar to widgets overall, first configure `Bundle Identifier`, then configure `App Group`.
1. Modify push notification's `Bundle Identifier`, as shown below:
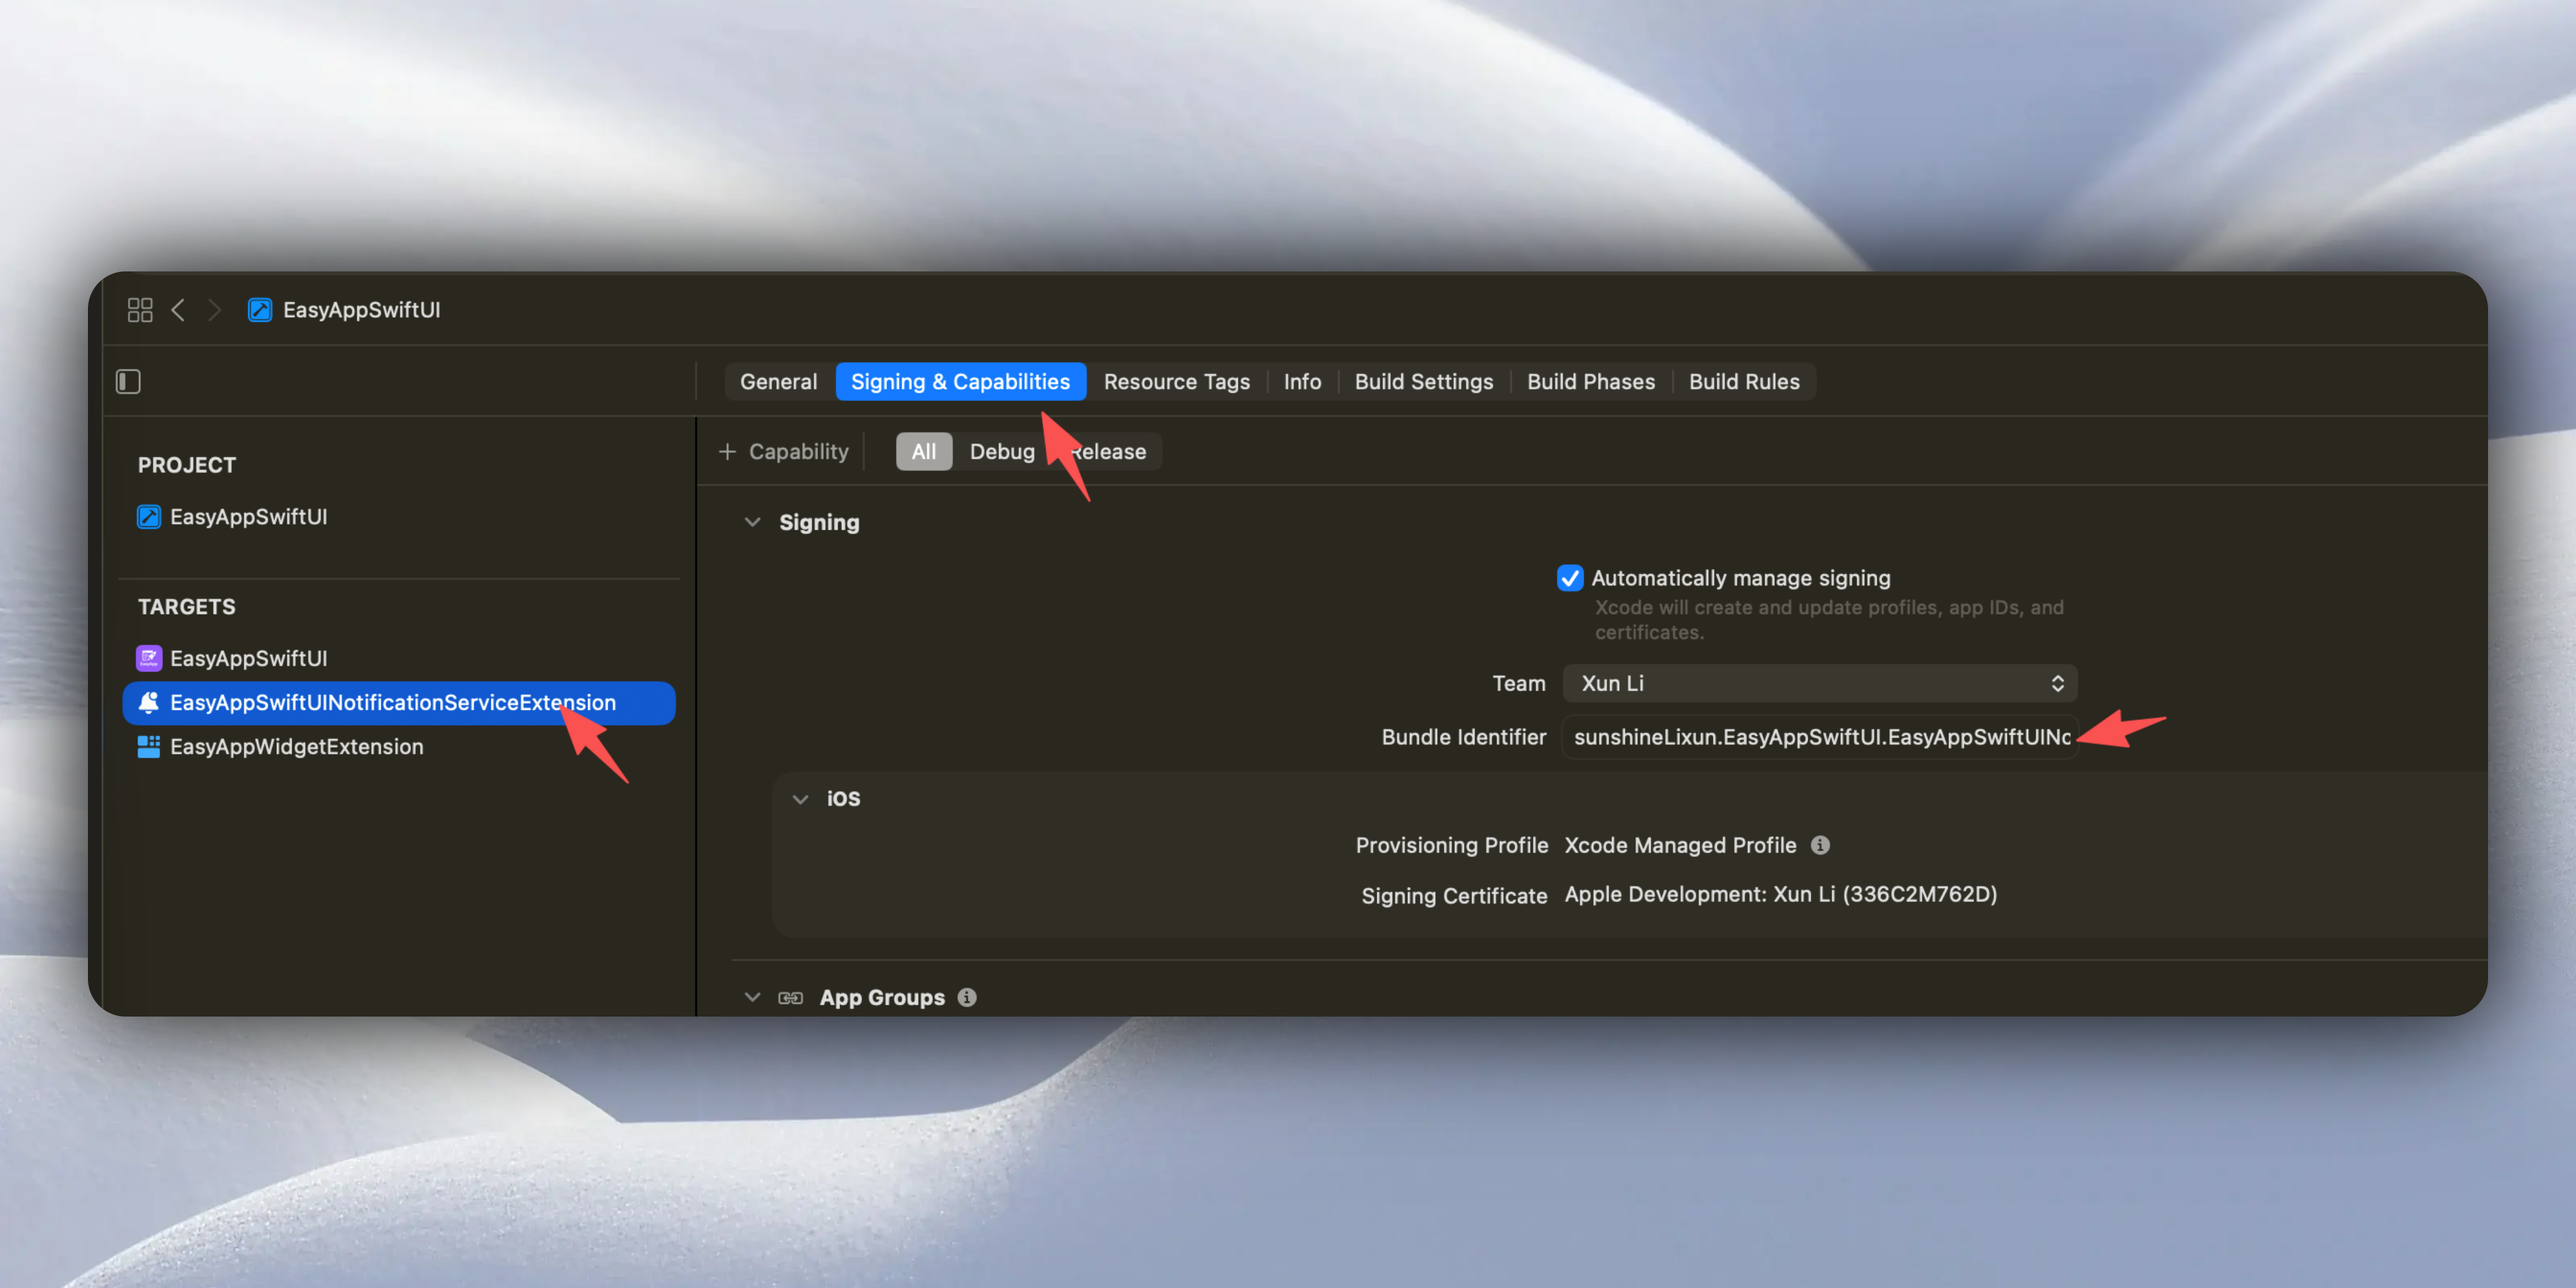
The format must be modified according to the main App's `Bundle Identifier` + `.EasyAppSwiftUINotificationServiceExtension`,
Example:
* Main app: com.example.myapp
* Push notification: com.example.myapp.EasyAppSwiftUINotificationServiceExtension ✅
2. Add App Group identifier
Similarly, go to the main App:

Click `+`, enter your App Group identifier, recommended format: `group.` + `push notification's Bundle Identifier`. For example: `group.com.yourcompany.easyappswiftui.EasyAppSwiftUINotificationServiceExtension`.
After setting your App Group identifier, please uncheck the template's built-in App Group identifier. As shown below, since you have configured your exclusive App Group identifier, the template's built-in App Group identifier is no longer necessary.

3. After configuring the main App, let's go to push notifications:
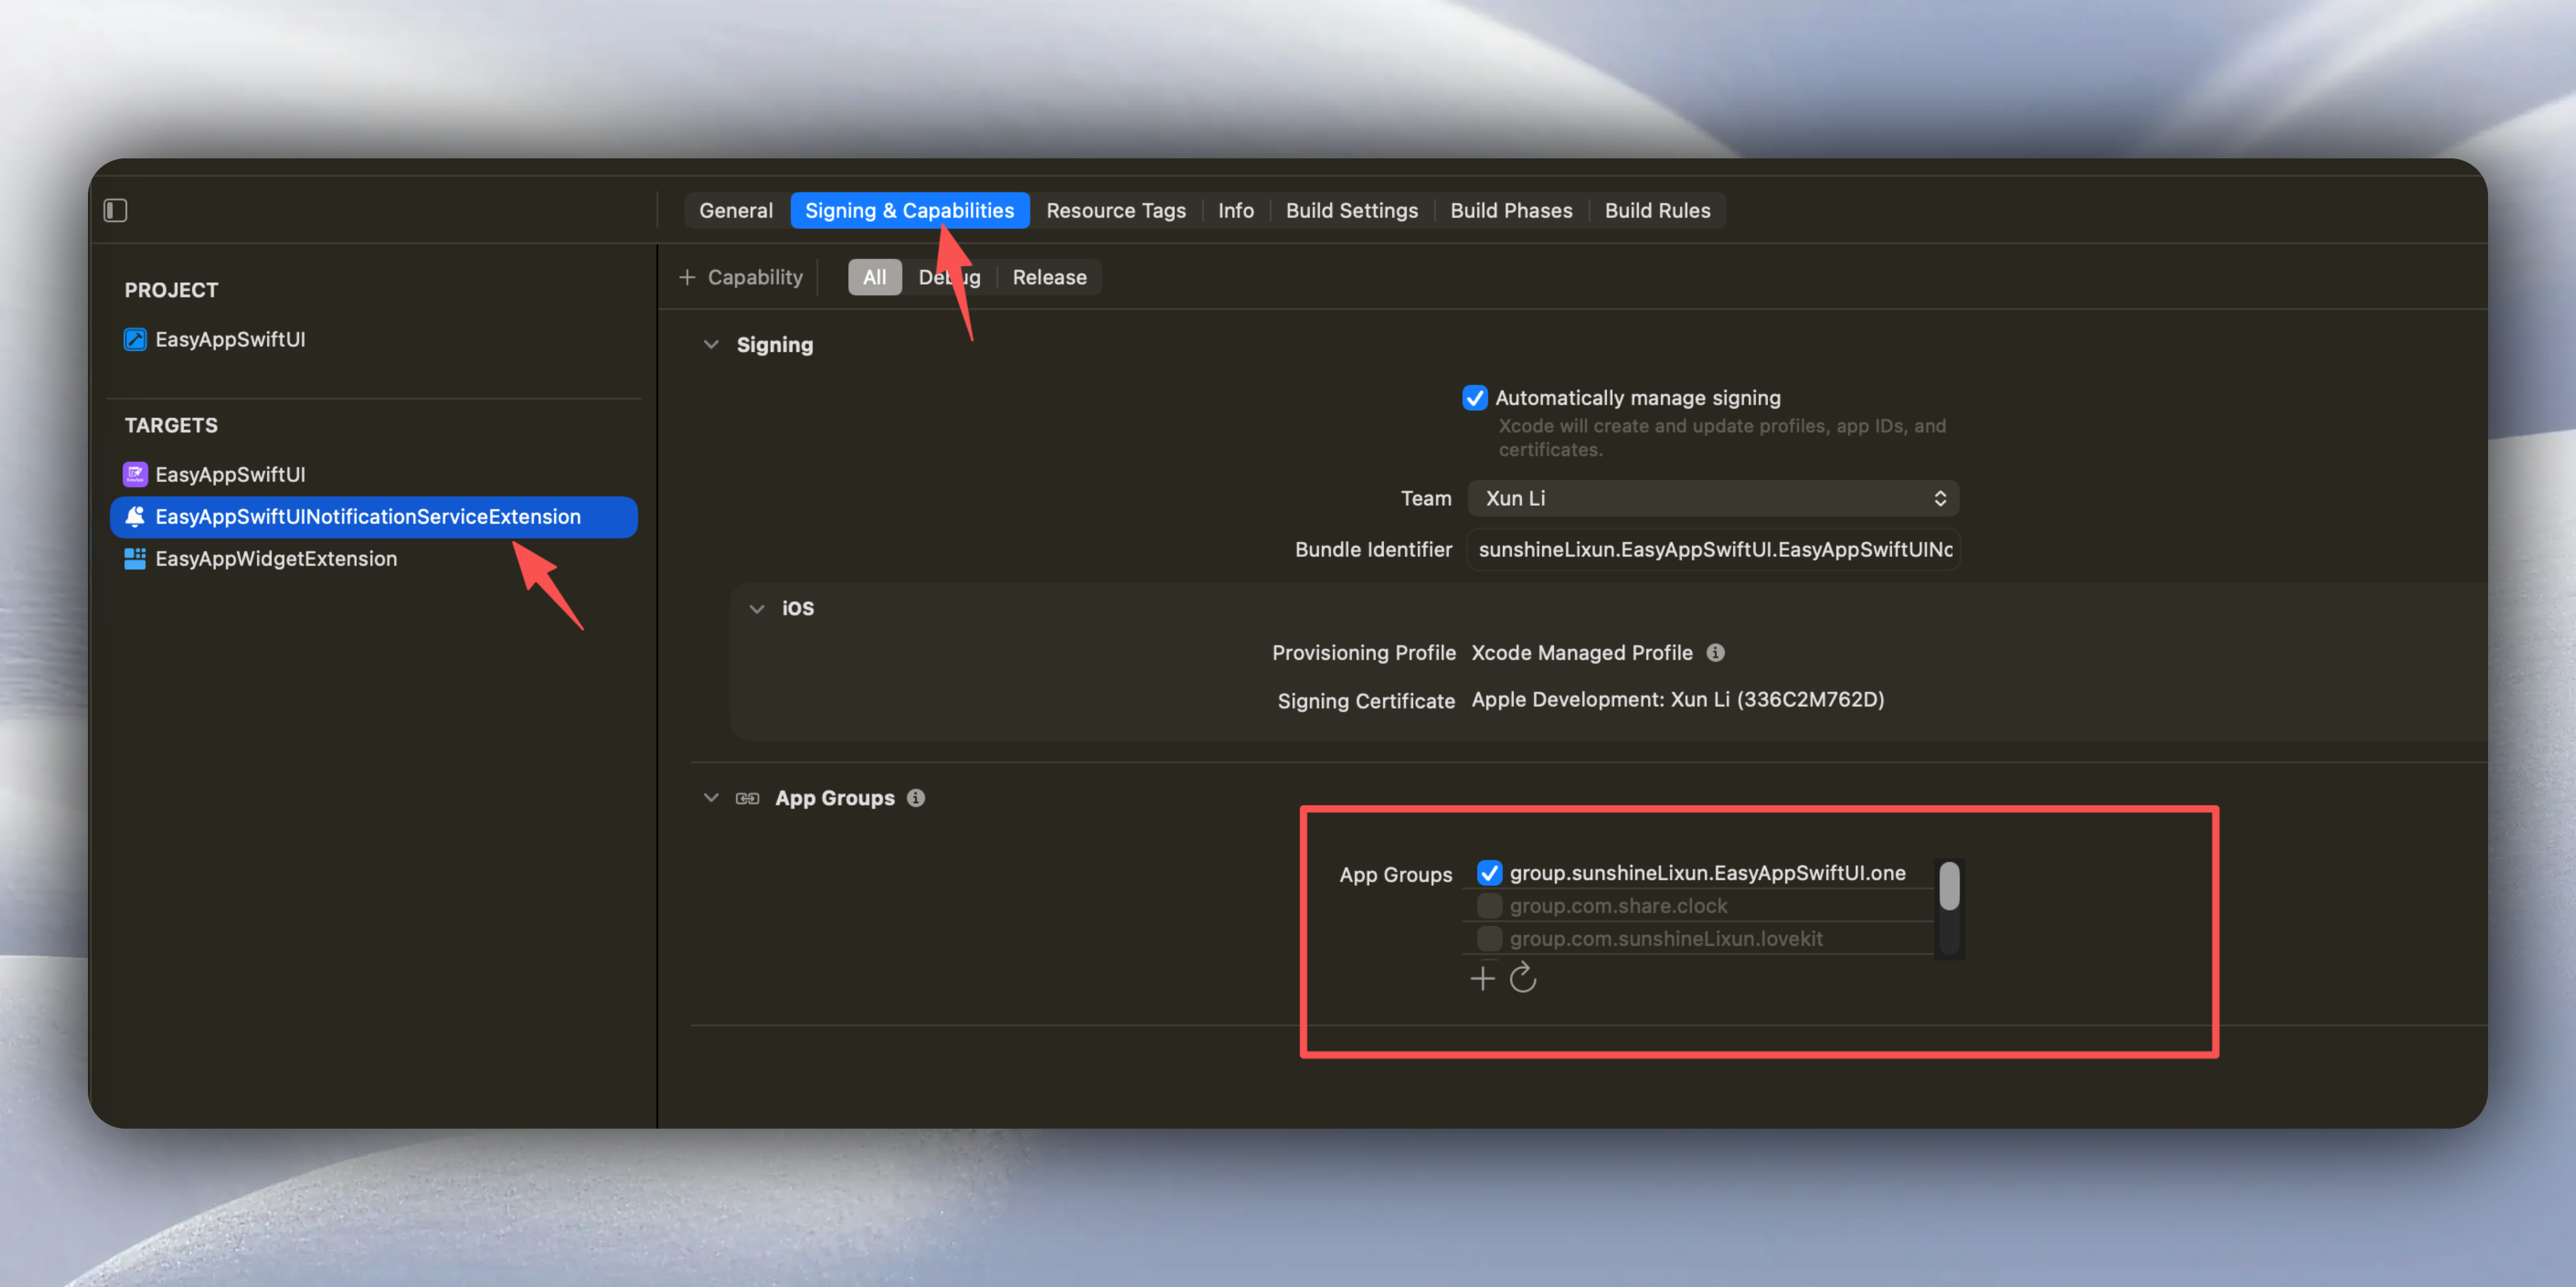
The push notification's App Group will automatically pull the main App's App Group identifier. Just select it. If it's not pulled, you can click the `refresh` button next to it to pull again.
### Run App
* Execute `Command + R` to run the App.
* At this point you should see the App has been installed on the desktop and the App name has been changed to `EasyAppCopy`.
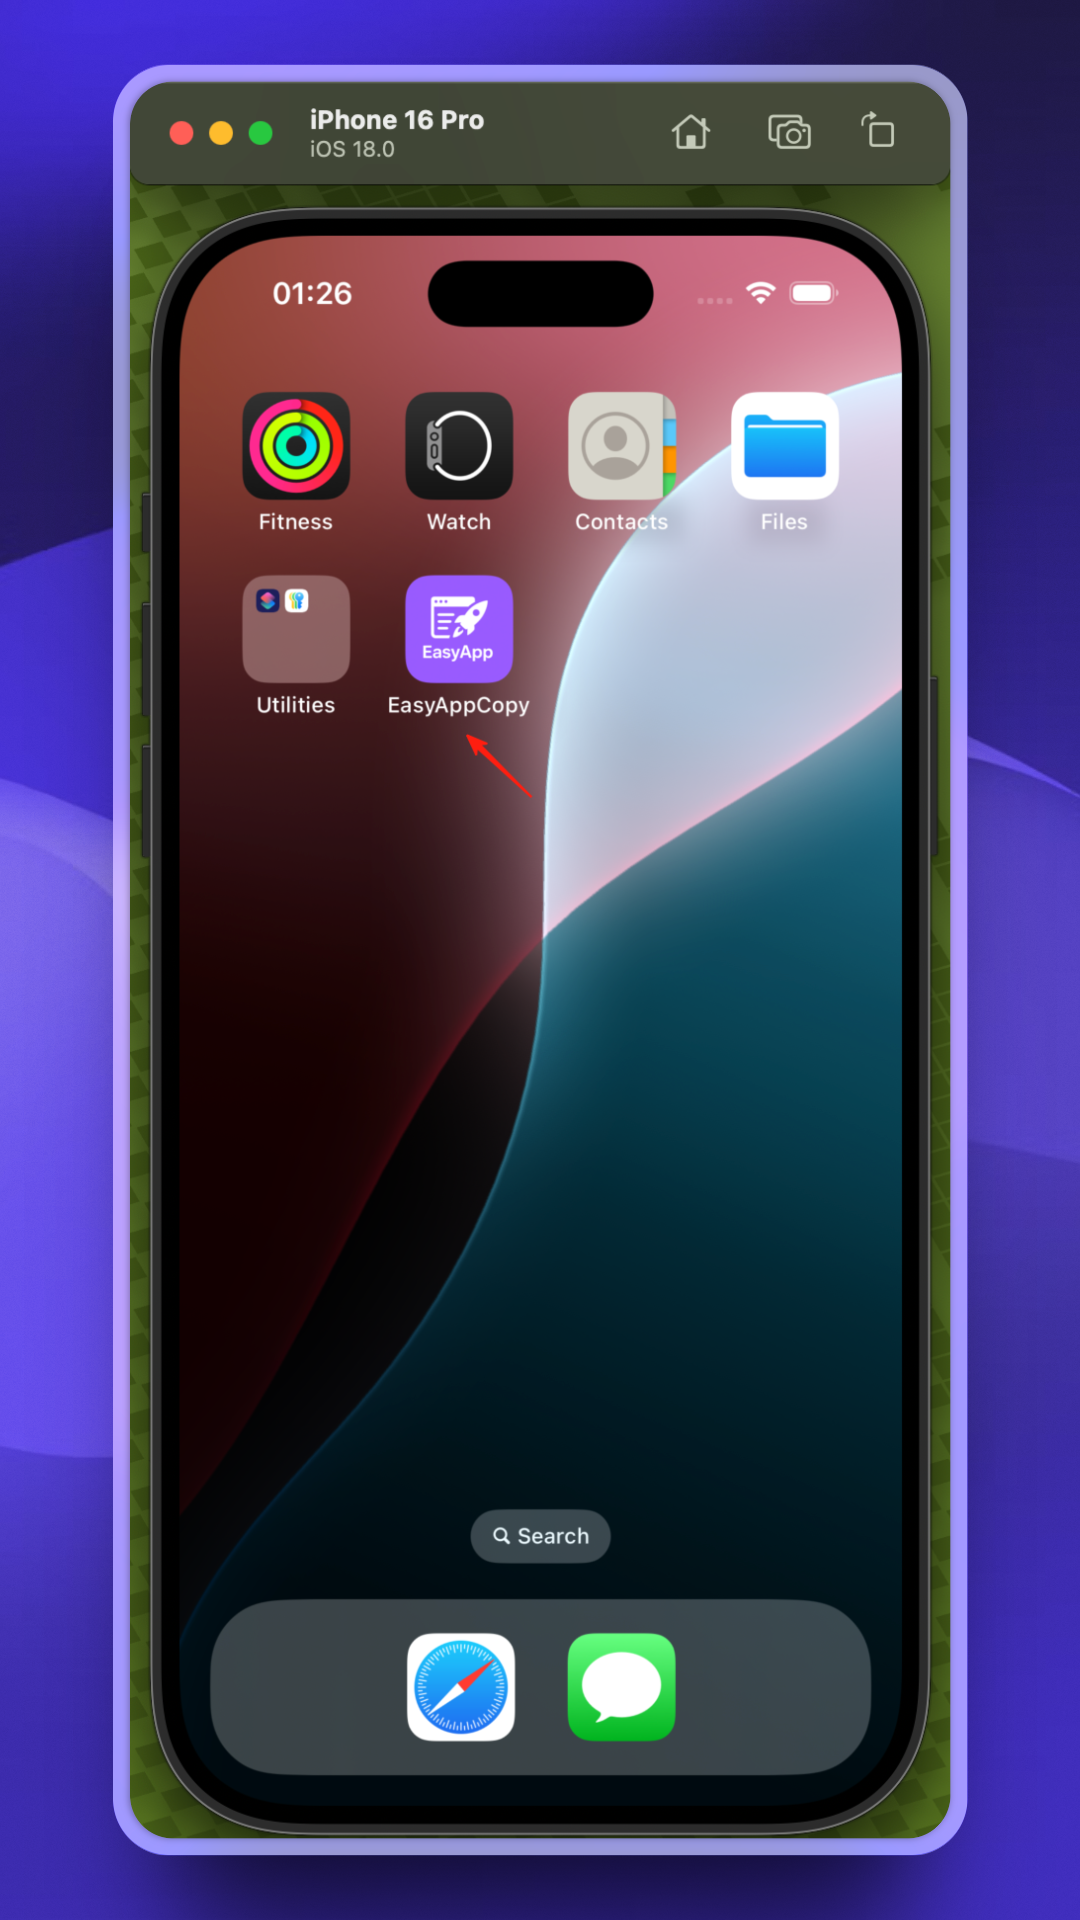
* Next, you'll enter the onboarding flow. Congratulations, you have successfully run EasyApp 🎉🎉🎉🎉🎉
### Rename Project (this step is optional)
* Since this only modifies the project name, not the App name. If you don't care, you can skip this step.
* After selecting the project name, click again or press Enter to enter edit mode (as shown below)
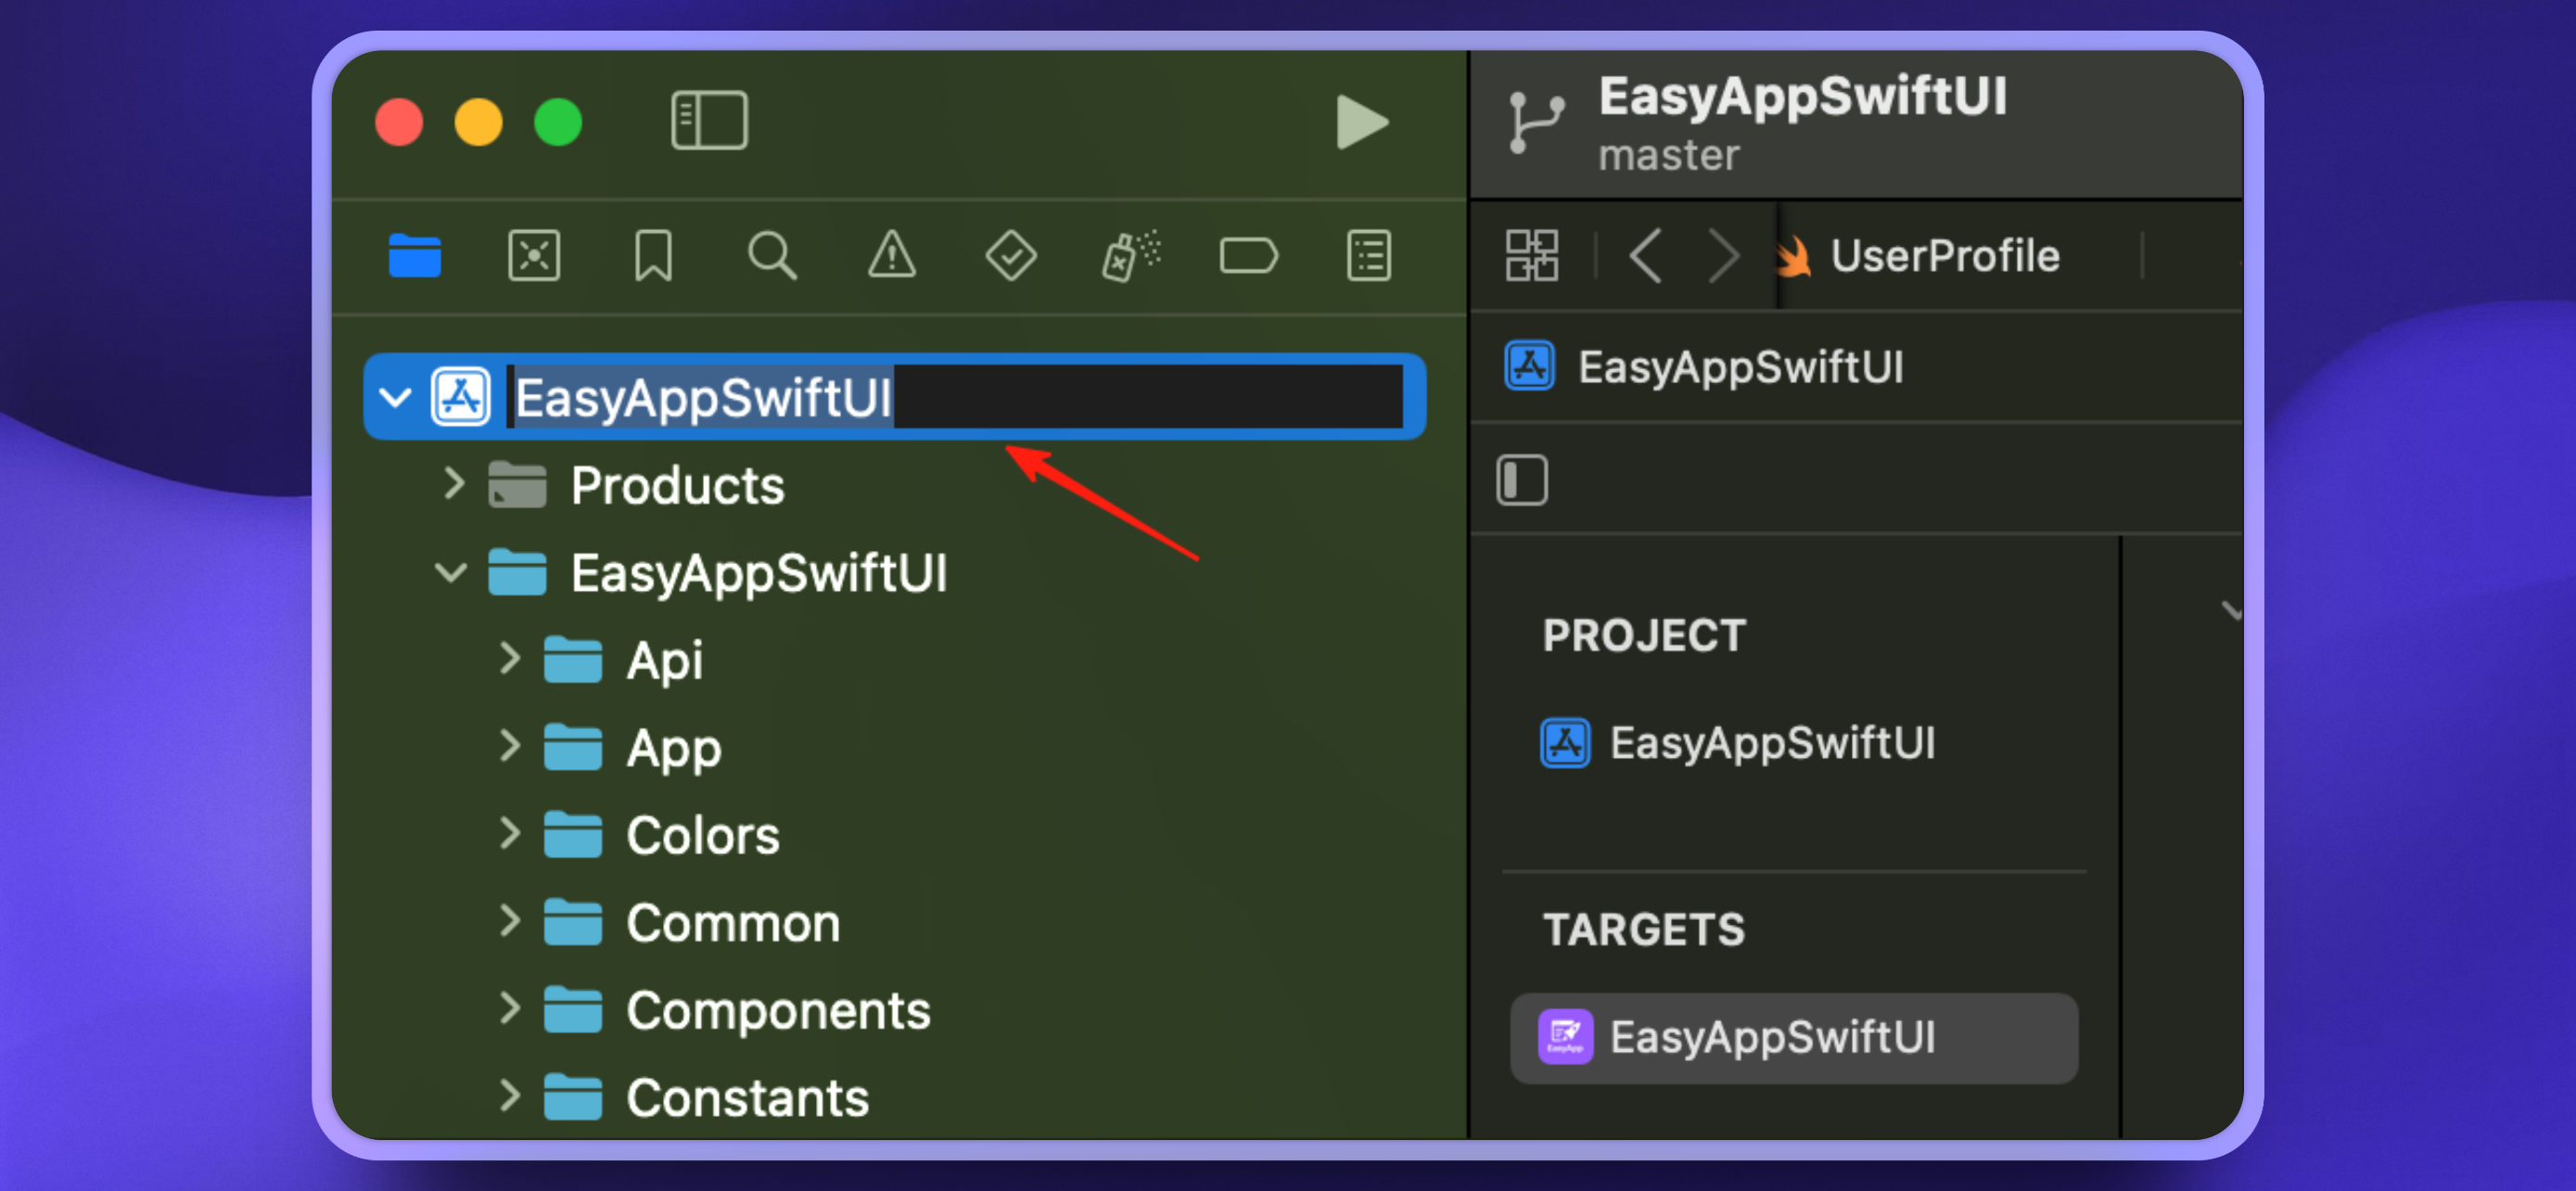
* Taking this project as an example, we modify it to `EasyAppSwiftUI_Copy` (as shown below),
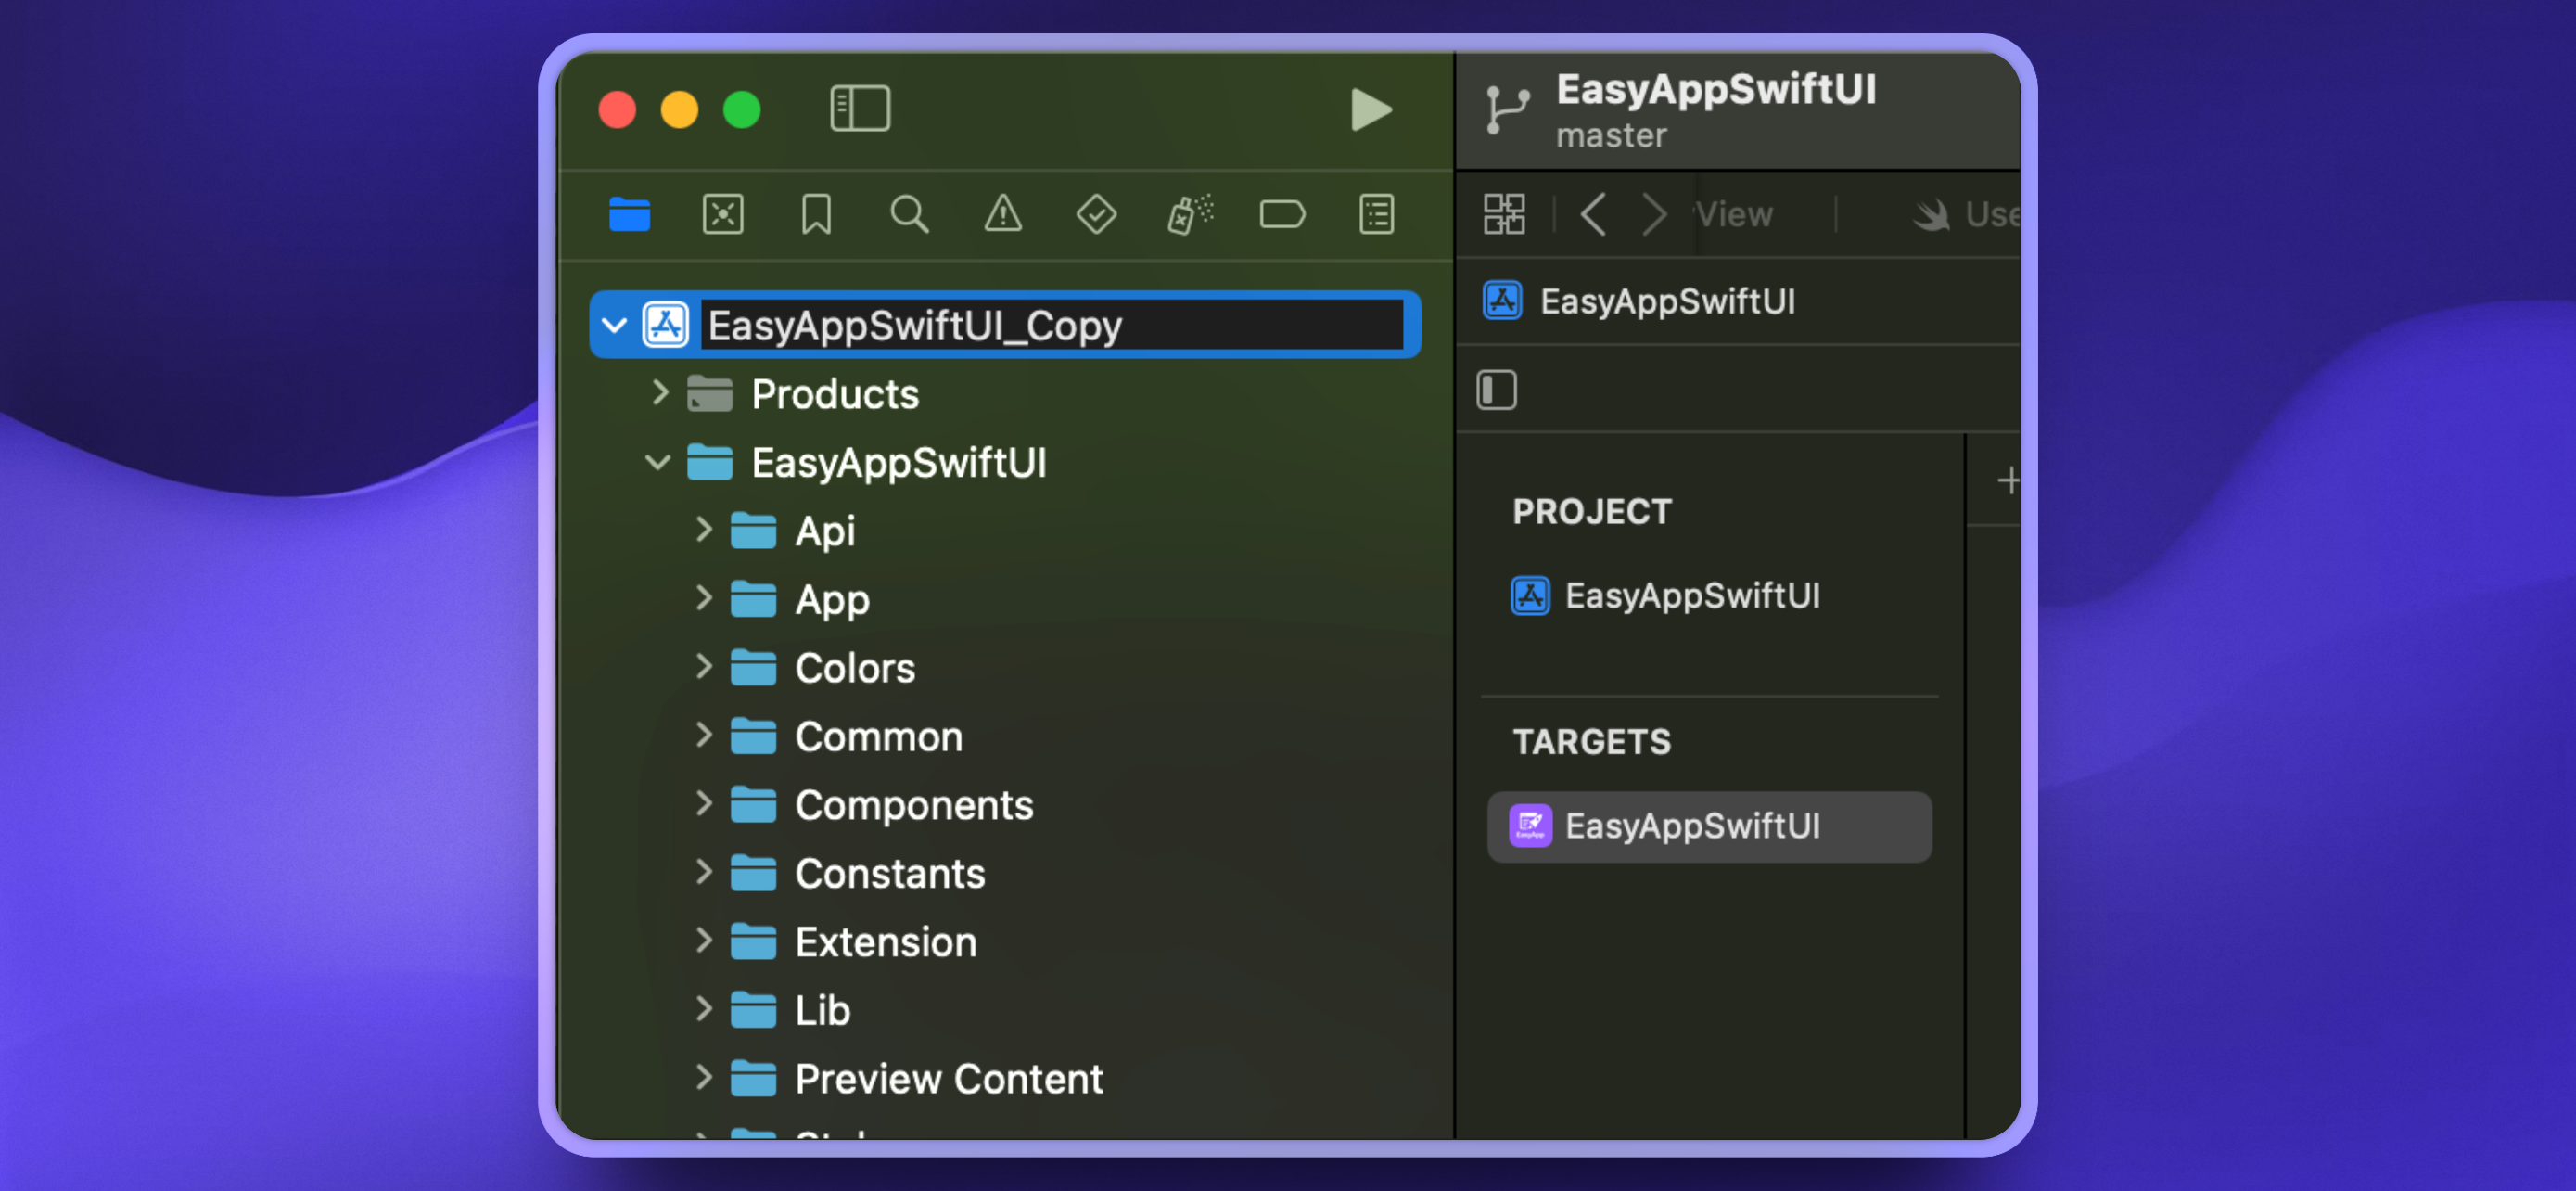
* After modification, click/press Enter to complete the modification. A popup will remind you, click rename and continue.
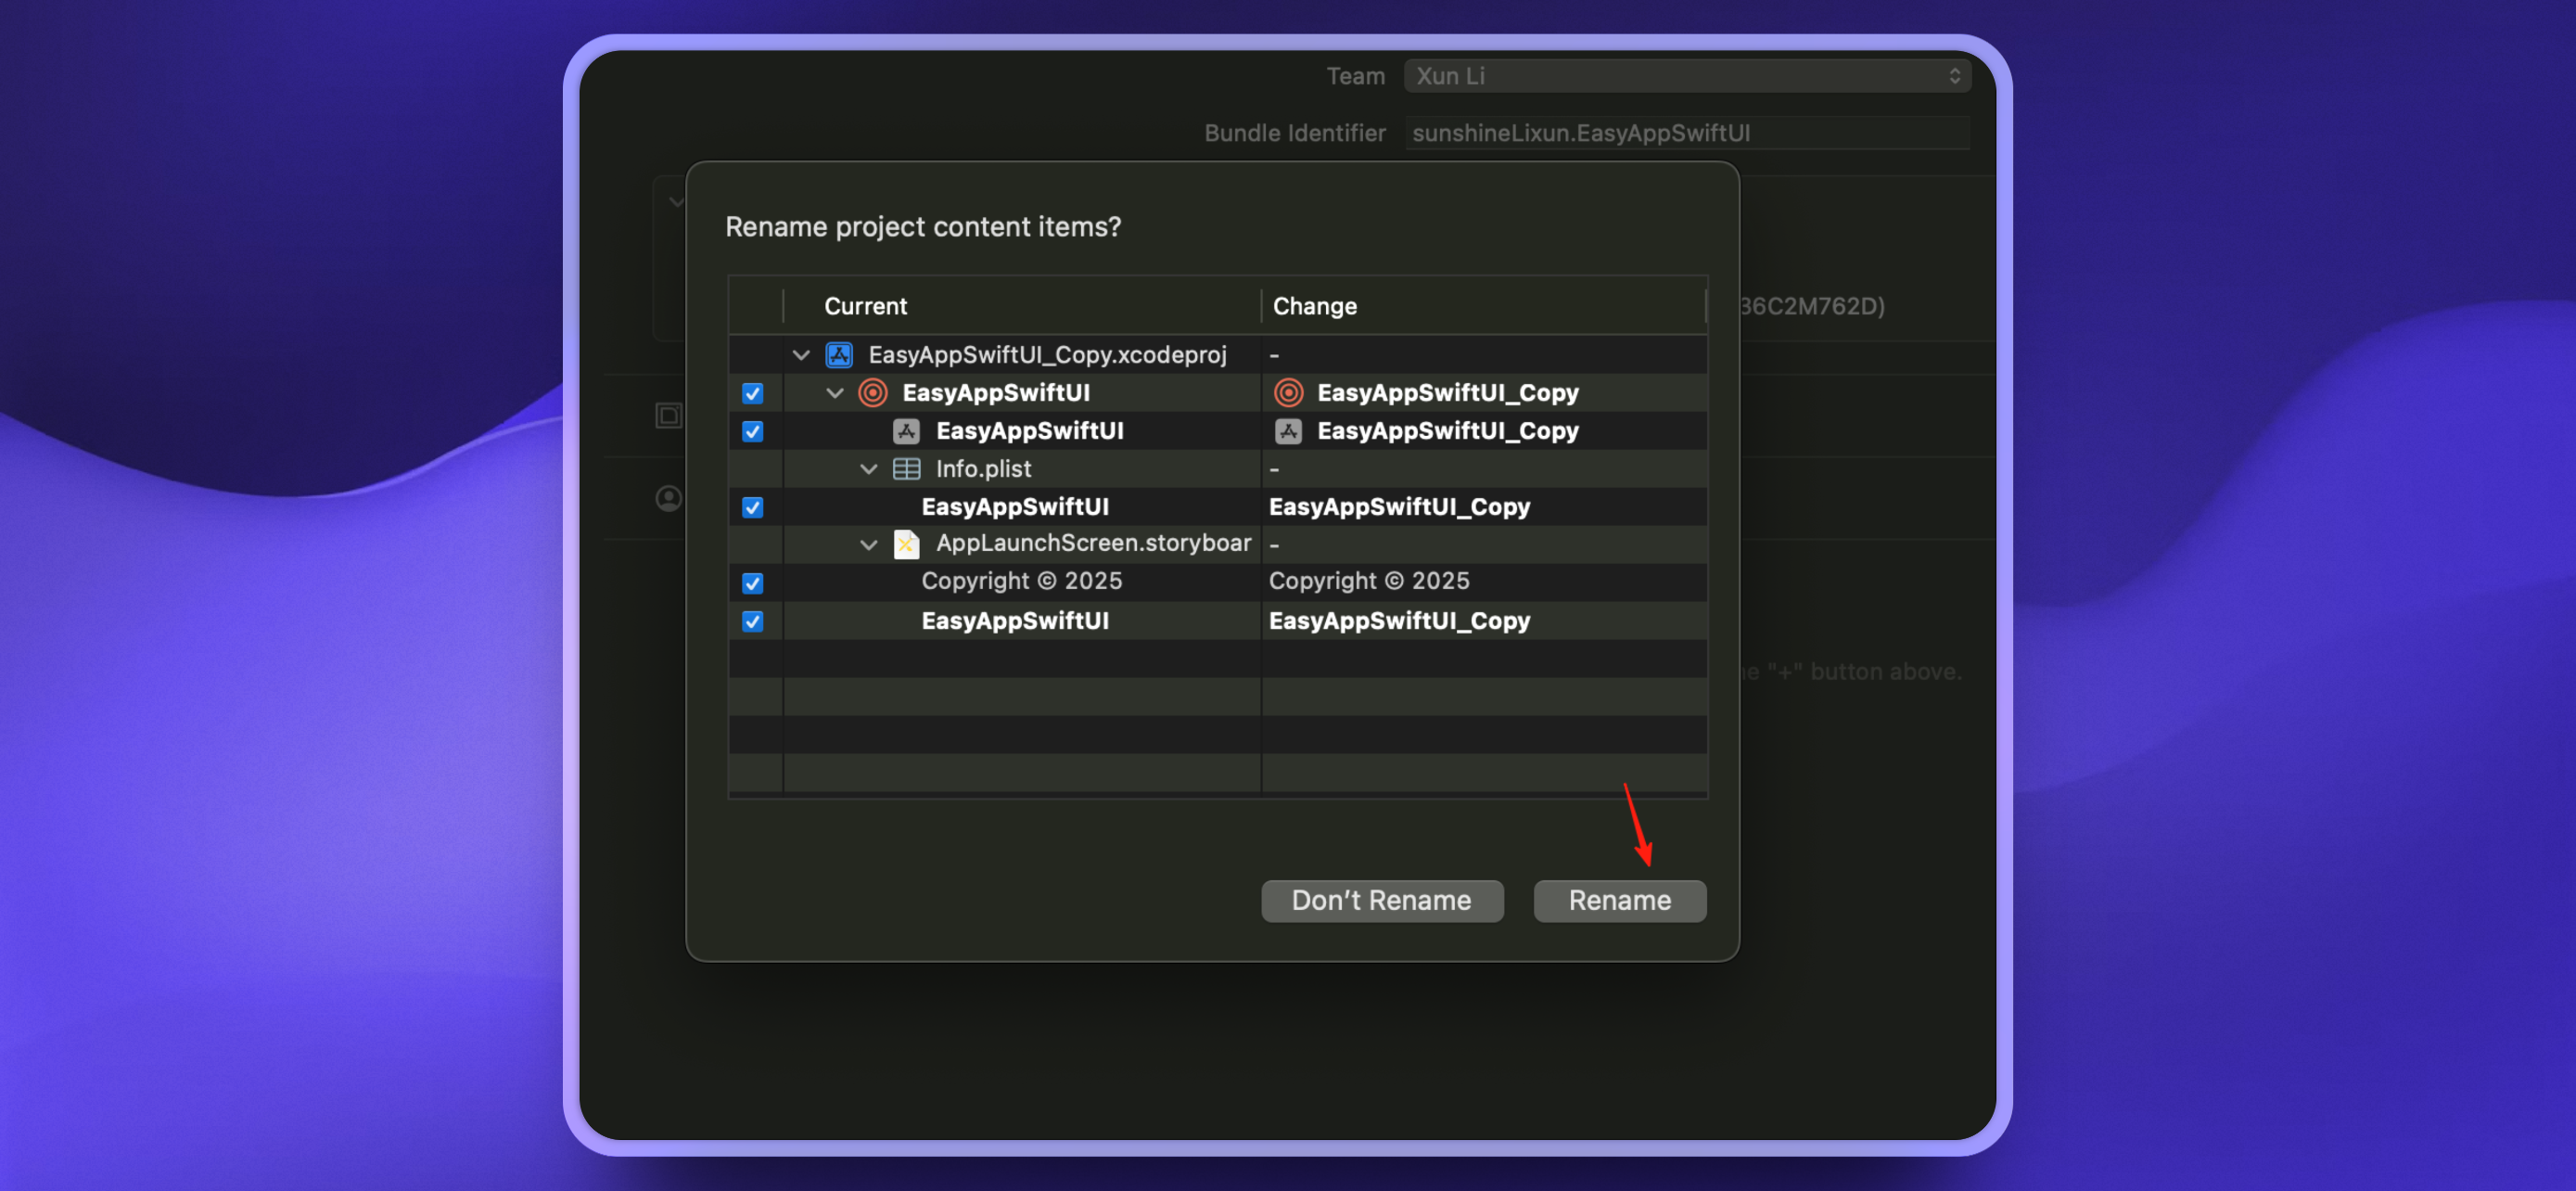
* After renaming, Xcode will re-index the entire project.
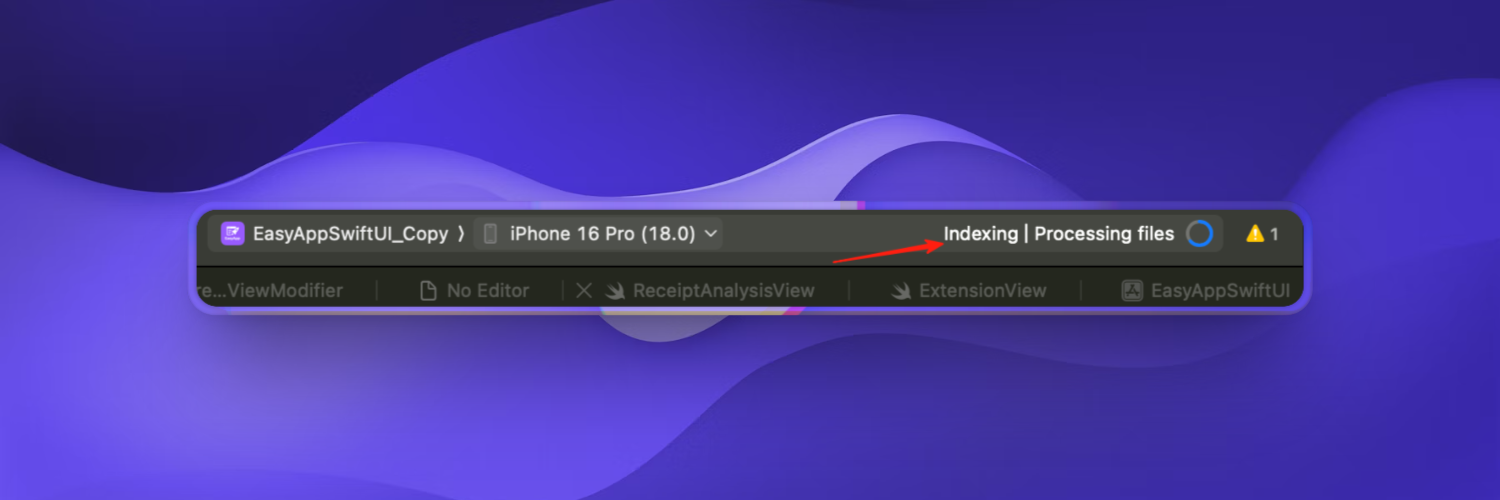
* If we reopen the project, it will re-request all SPM dependencies.
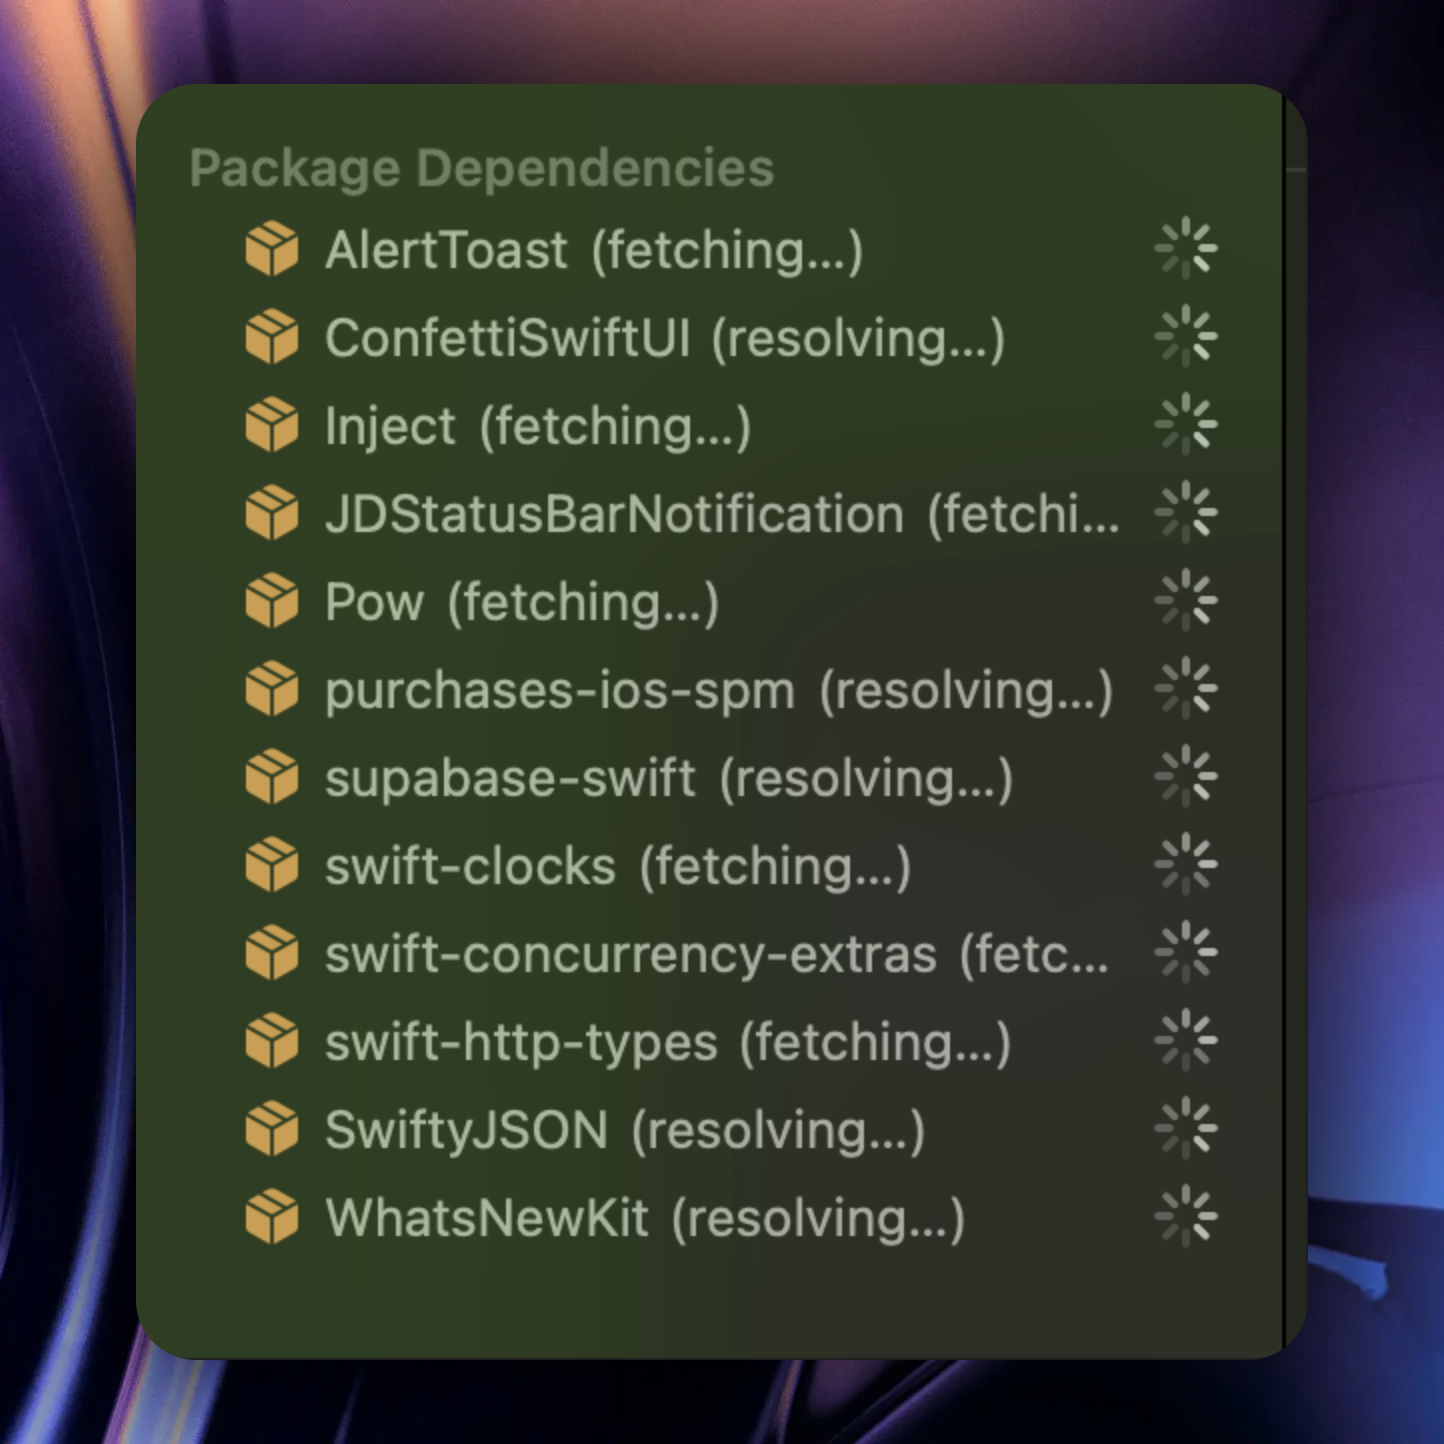
**5. Verify project runs normally**
* After you get the project, or if you performed step 4, it's recommended to execute `Command + B` to verify the project builds normally.
* If everything is normal, you'll see a Build Success prompt.
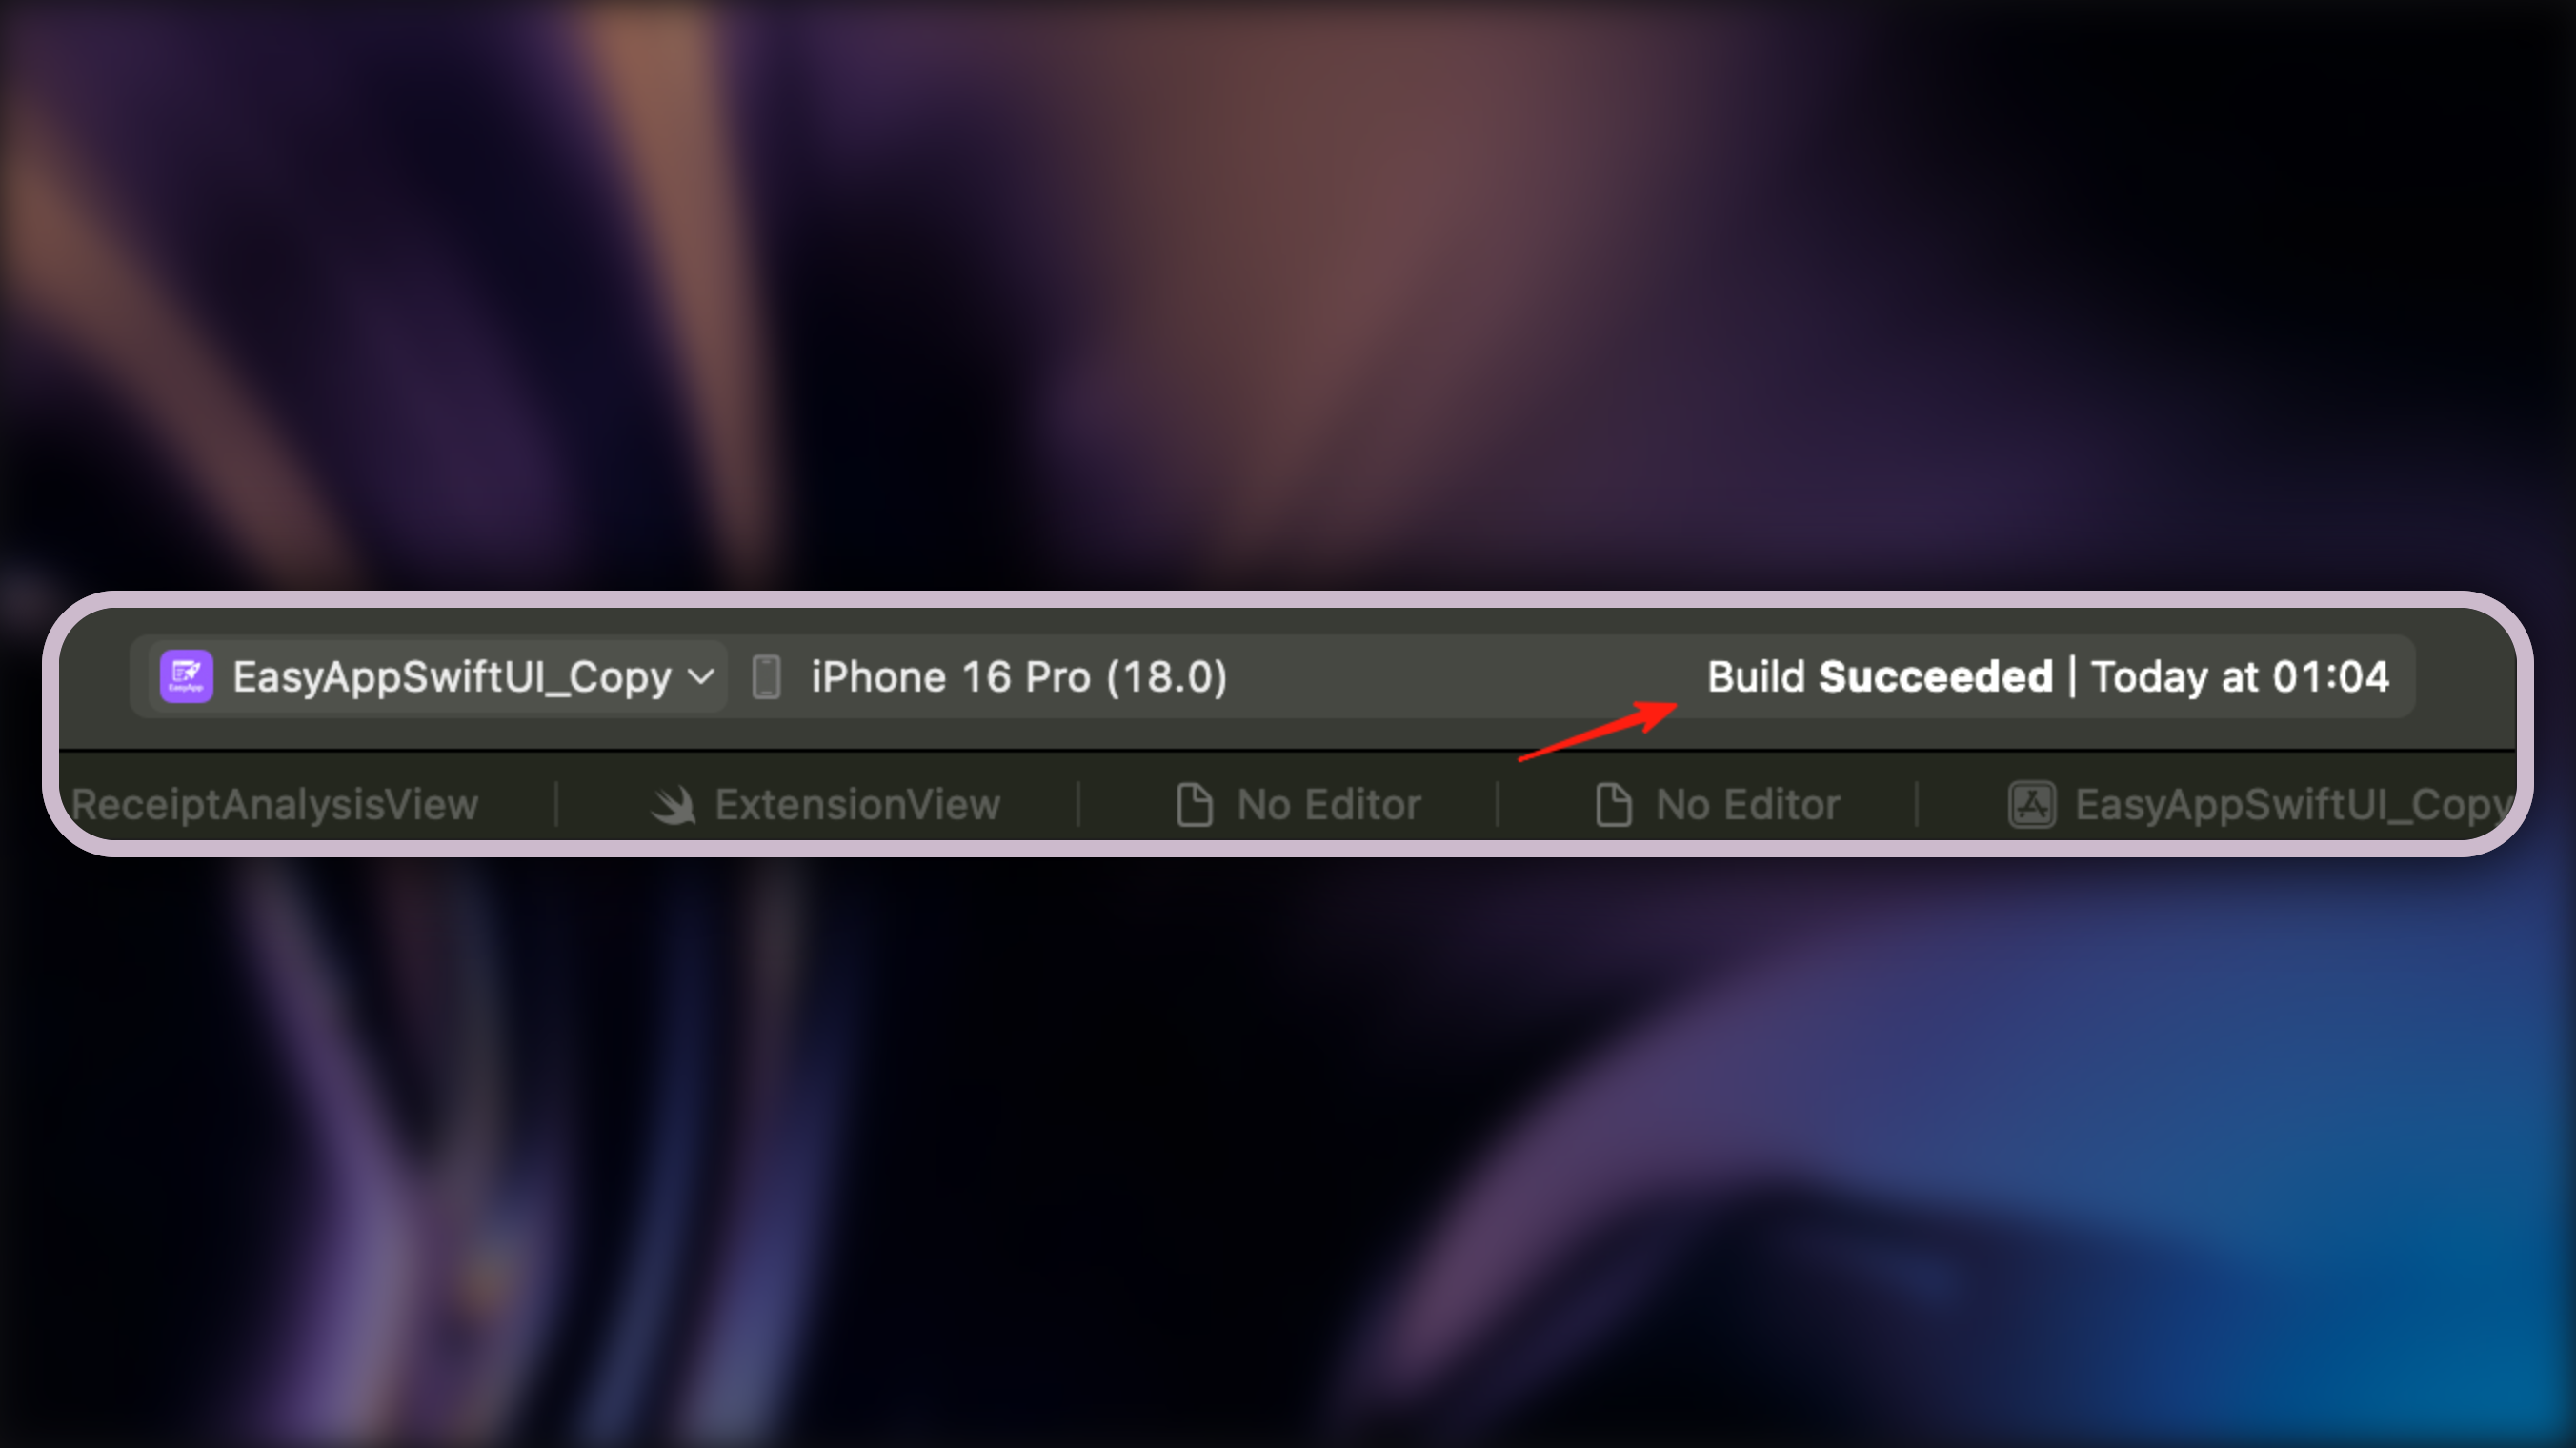
* If project build fails due to dependency errors, it might be Xcode having issues during project renaming. Please try the following:
* Execute `Command + Shift + K` to clean cache
* Execute File > Packages > Reset Package Caches
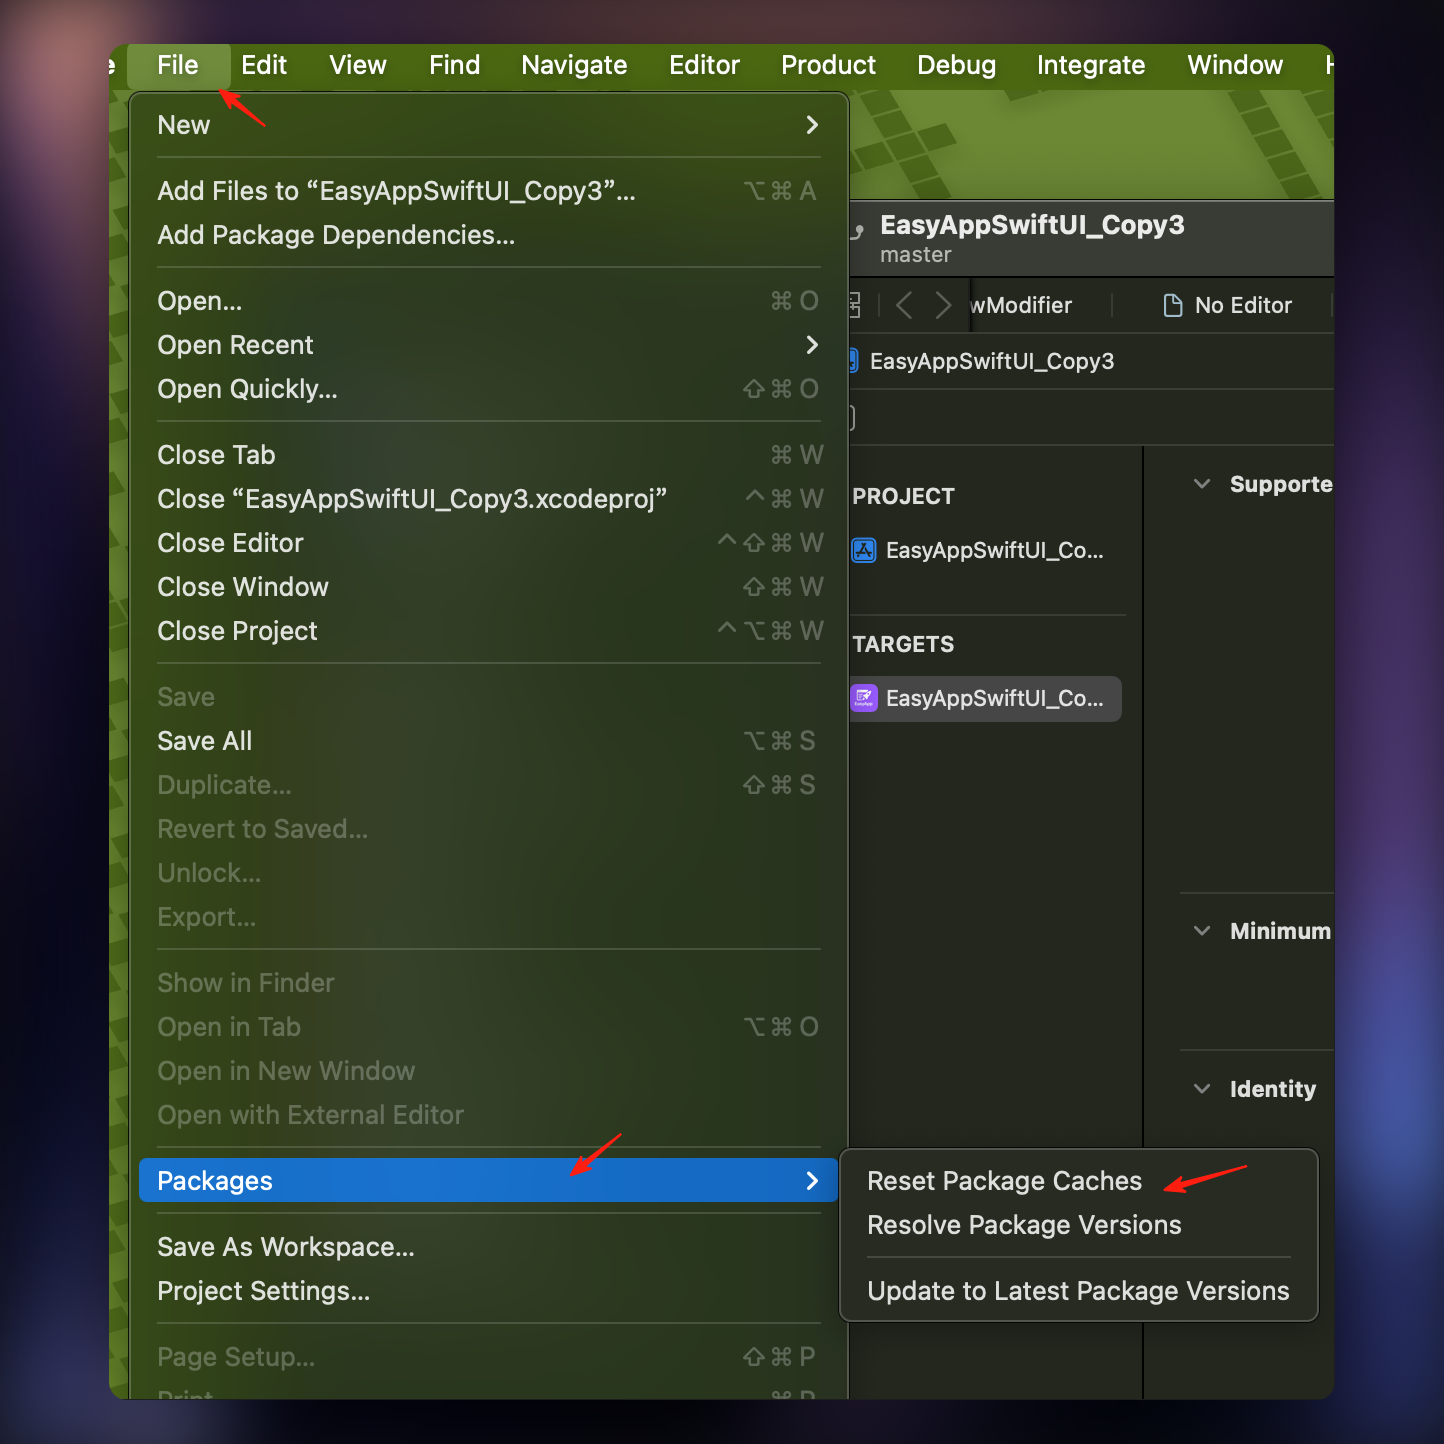
* Wait for Xcode to complete dependency download processing
* If still not resolved, try completely exiting Xcode then restarting and executing:
* `Command + Shift + K` to clean cache
* File > Packages > Reset Package Caches
* Allow/trust any popups that appear
* If dependency errors still exist, your `Package.resolved` file might be corrupted. Please delete that file and let Xcode regenerate it. [See this Stack Overflow issue](https://stackoverflow.com/questions/67185817/package-resolved-file-is-corrupted-or-malformed/69389411#69389411)
* Generally, this situation won't occur. If you really encounter it and have tried all the above methods but still can't resolve it, [please contact us](https://discord.gg/36UQMU6yKw)
If you can't find the main App after changing the project name, as shown below:
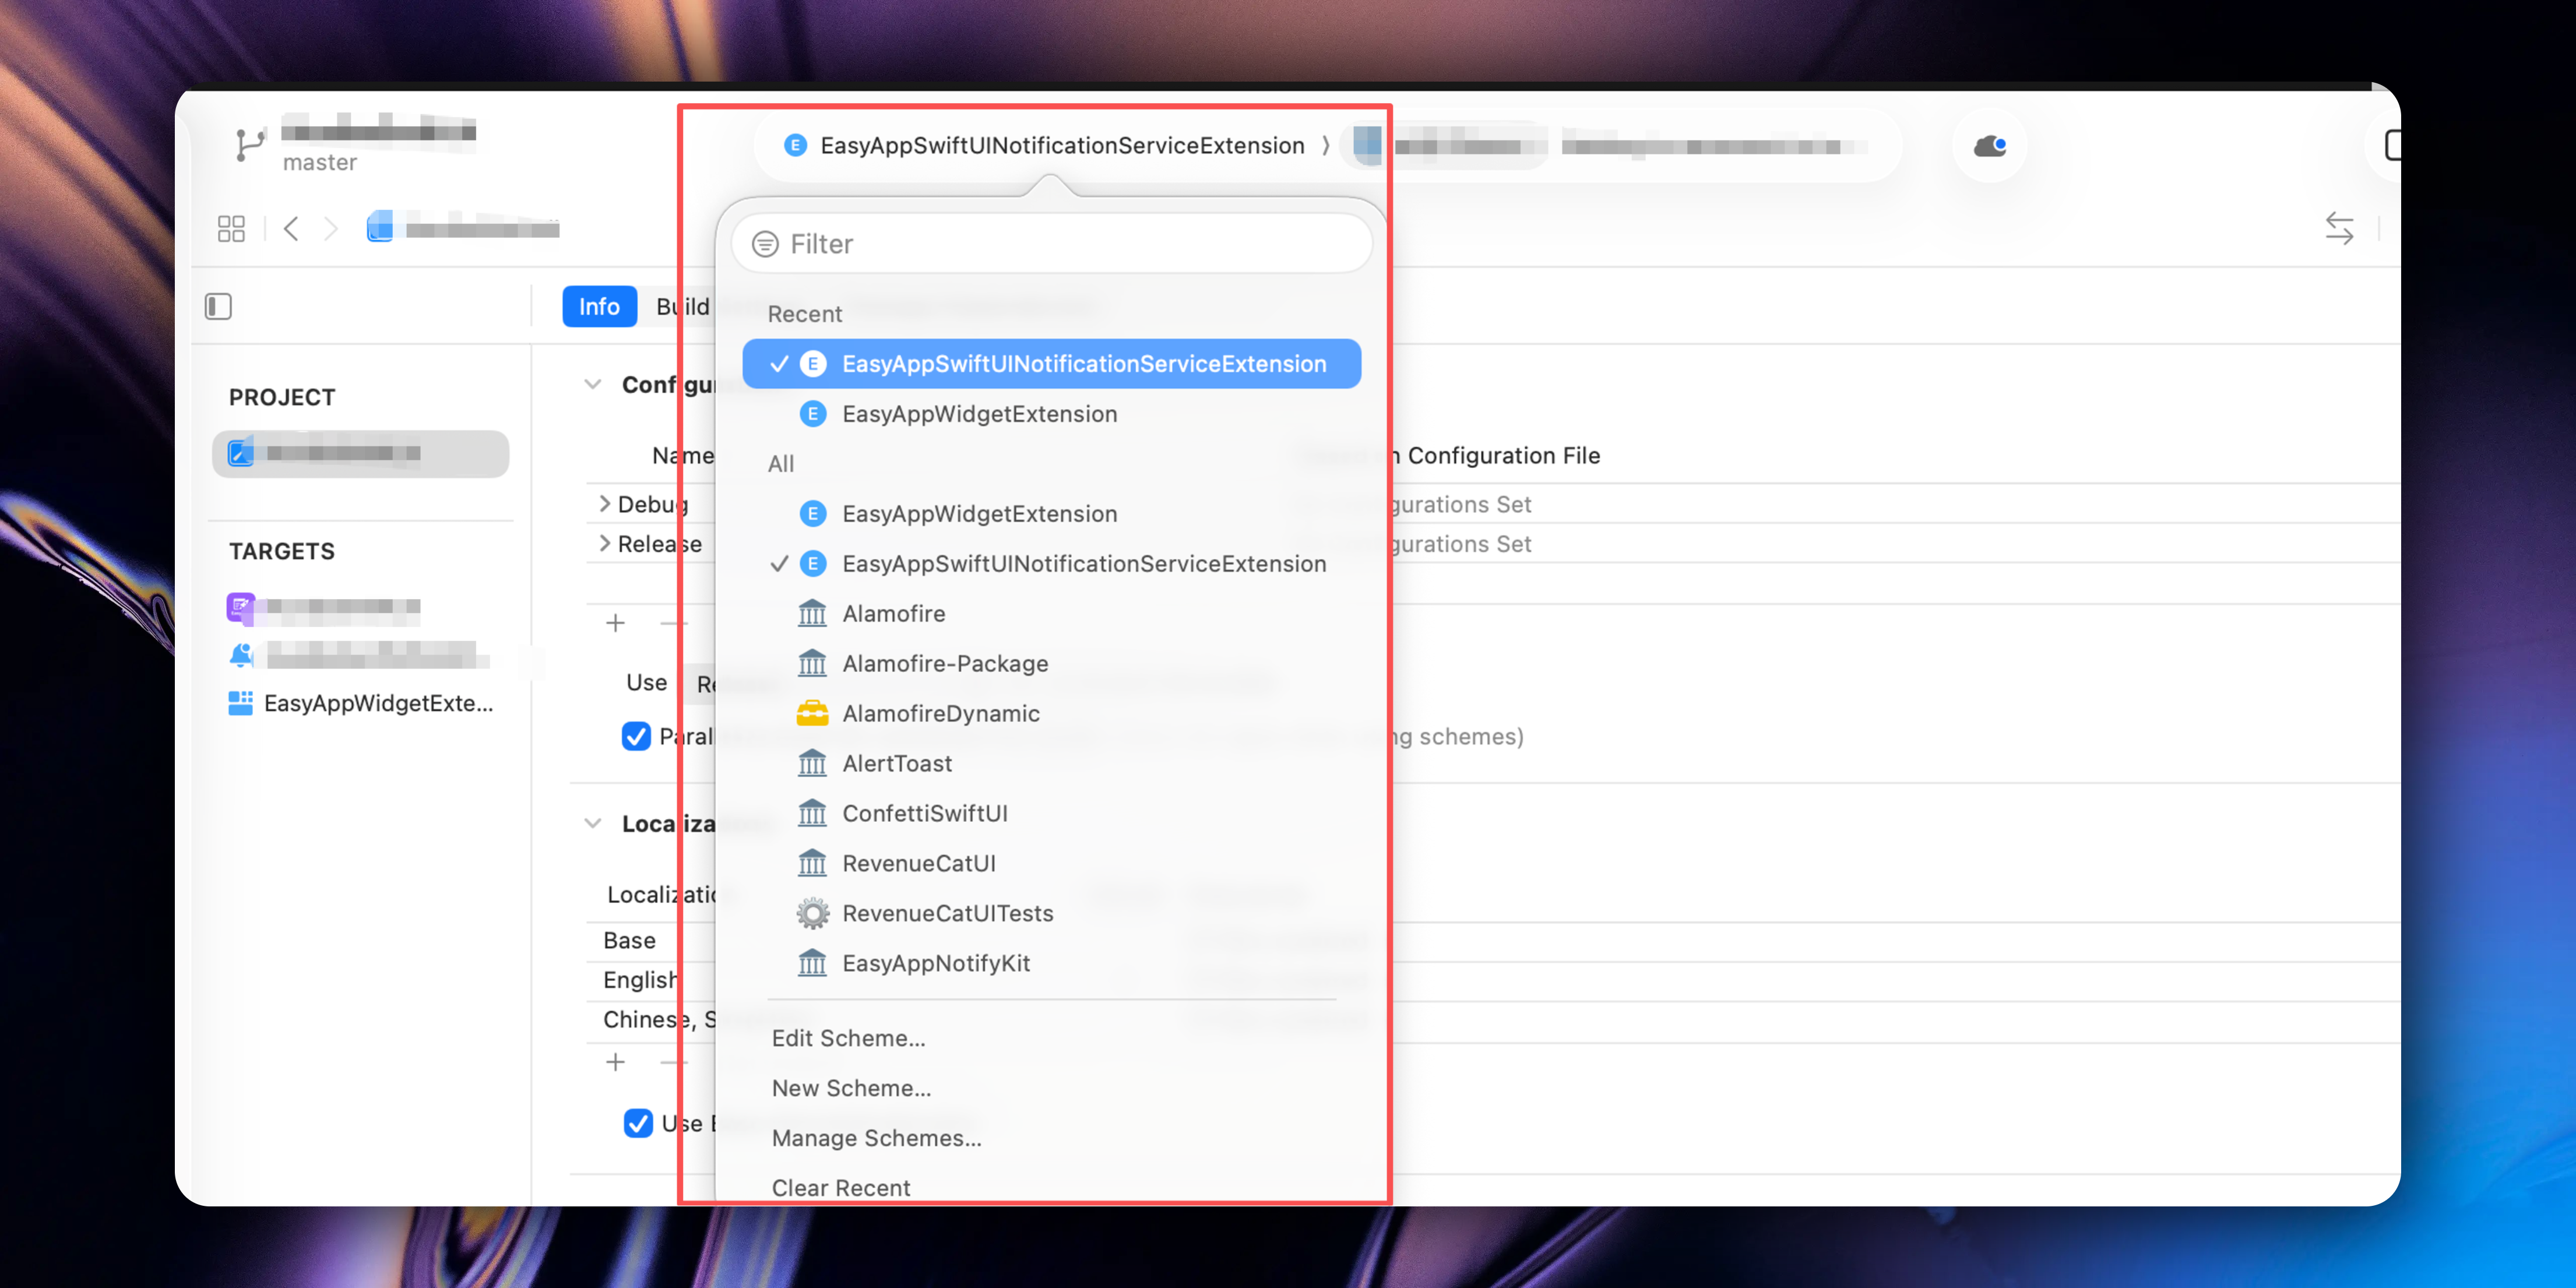
If you encounter this situation, please follow the steps below, operate according to the arrows from top to bottom:
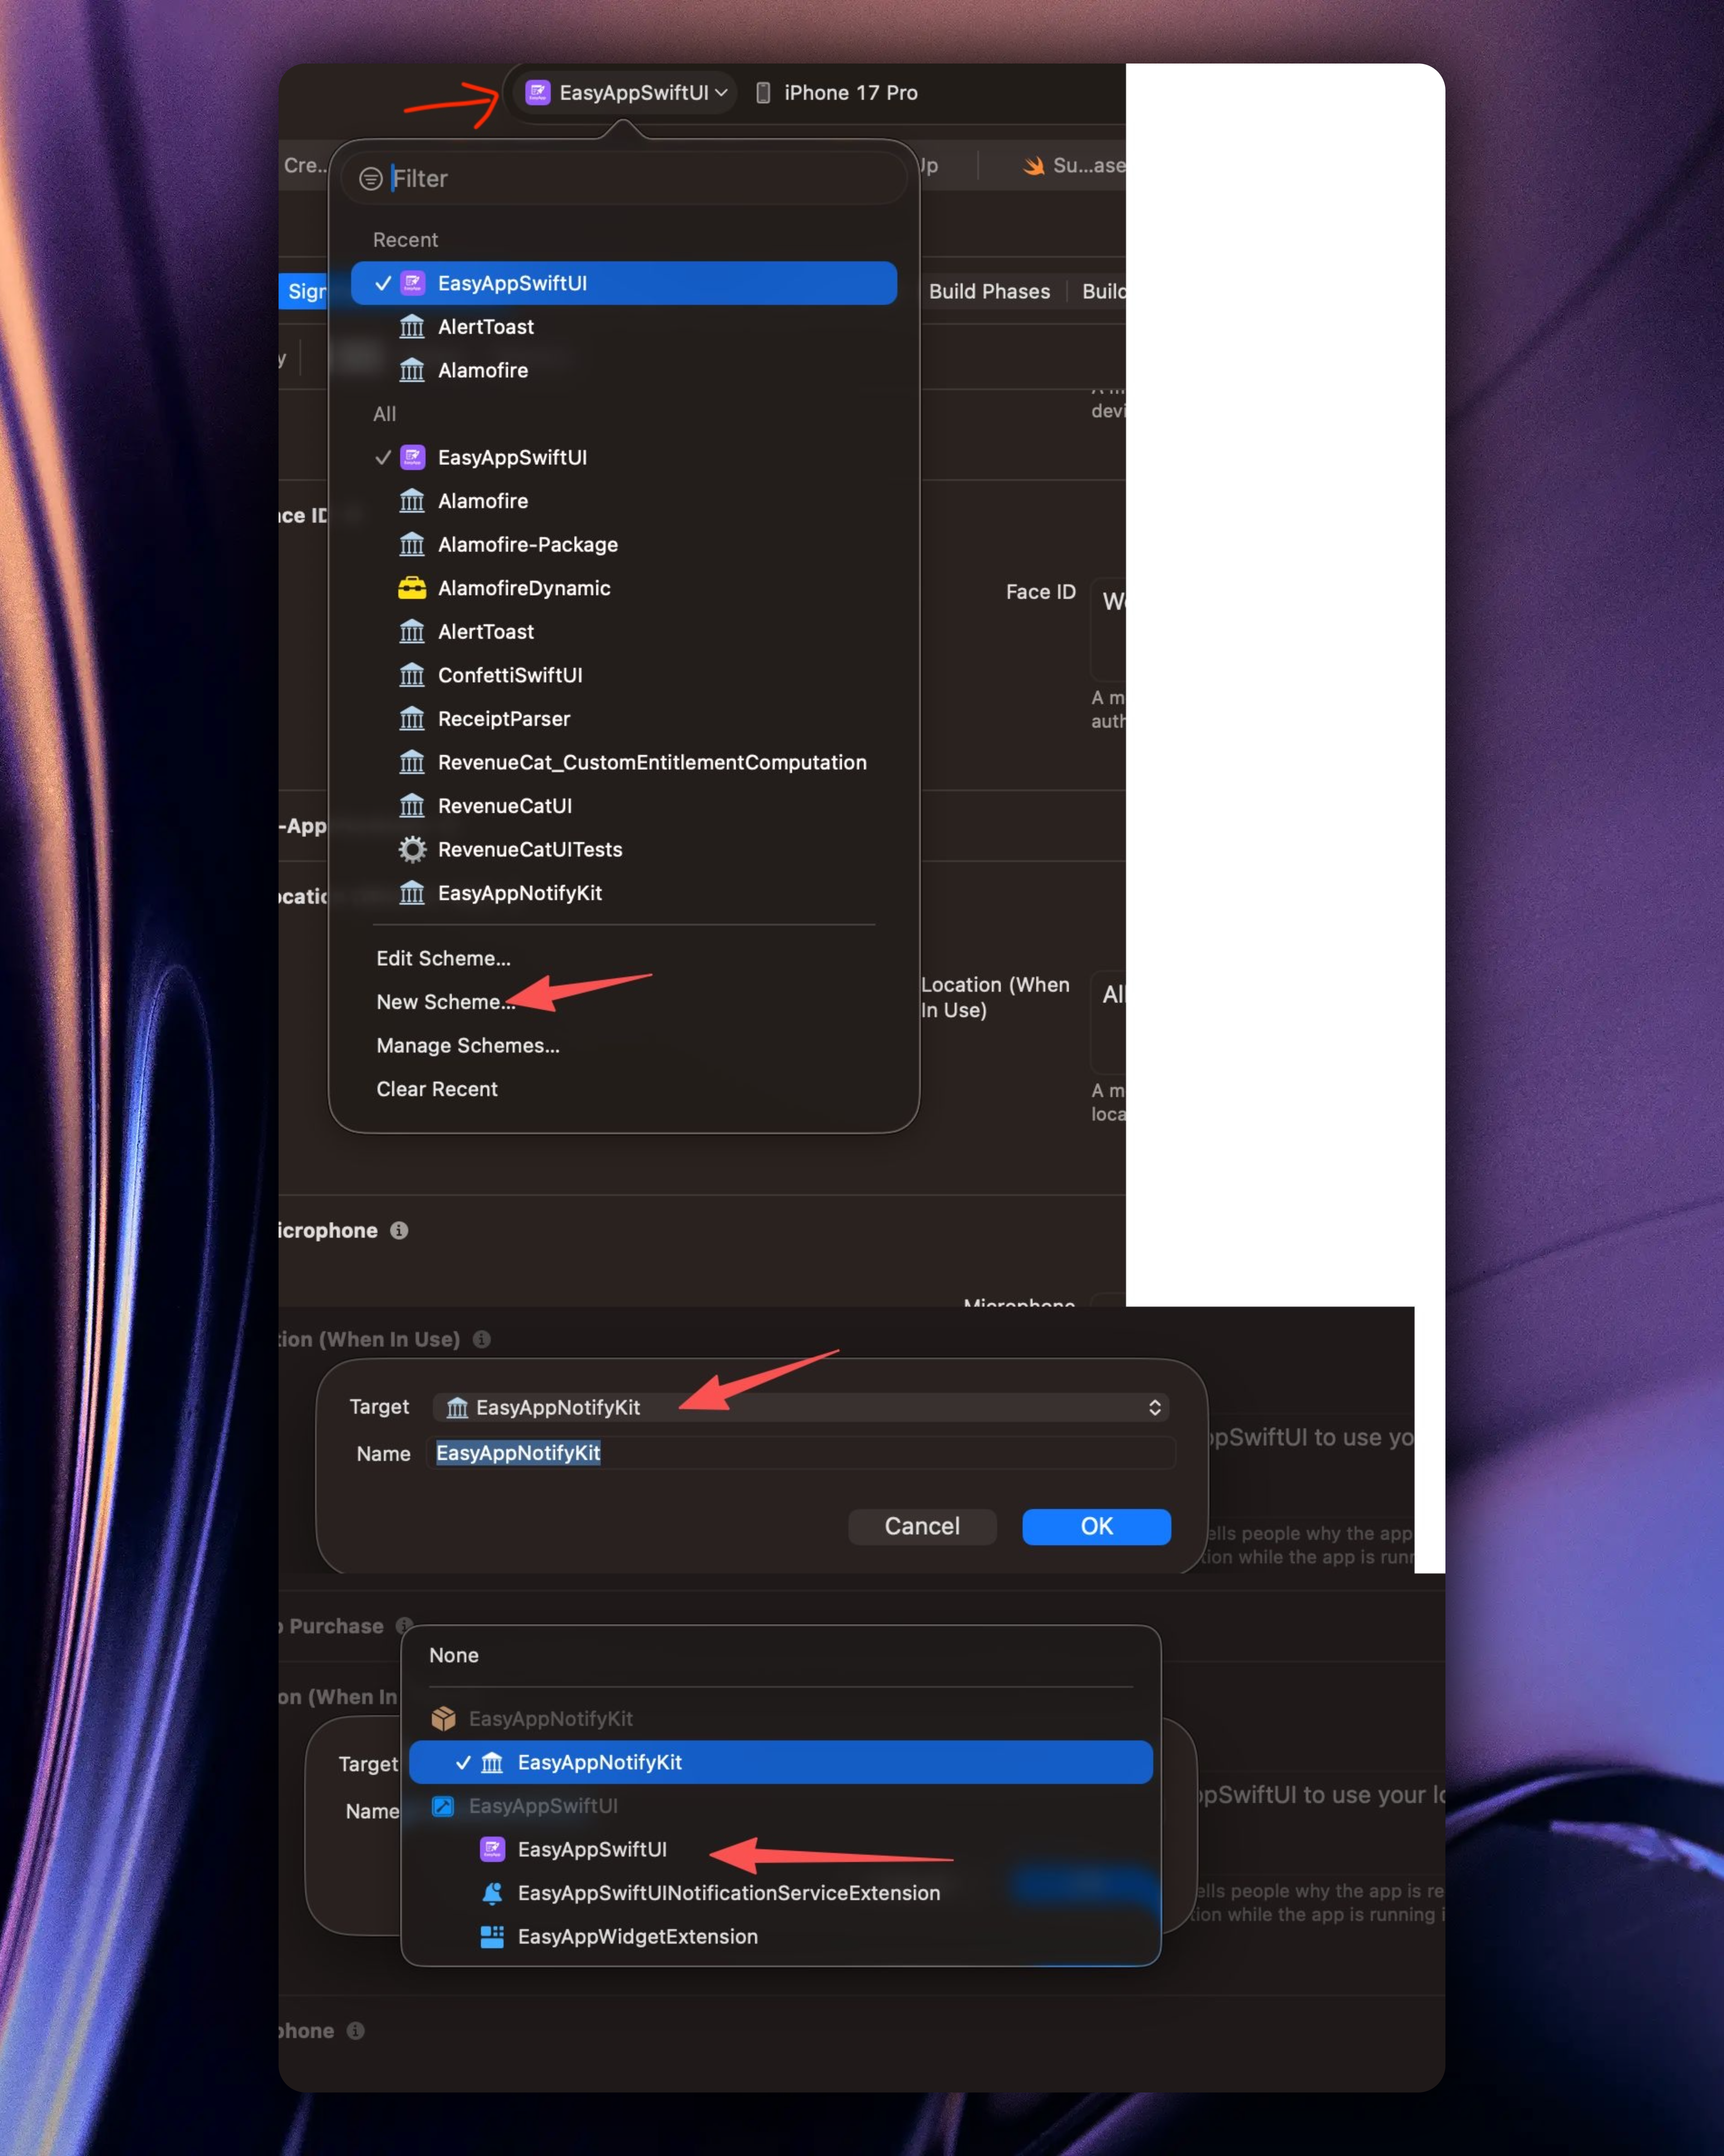
**6. Modify App name**
* If all the above steps went smoothly, you can start modifying your App name (as shown below).
* Select step 1, find `Display Name`, modify to your App name (step 2). For example, we change the App name to `EasyAppCopy`.
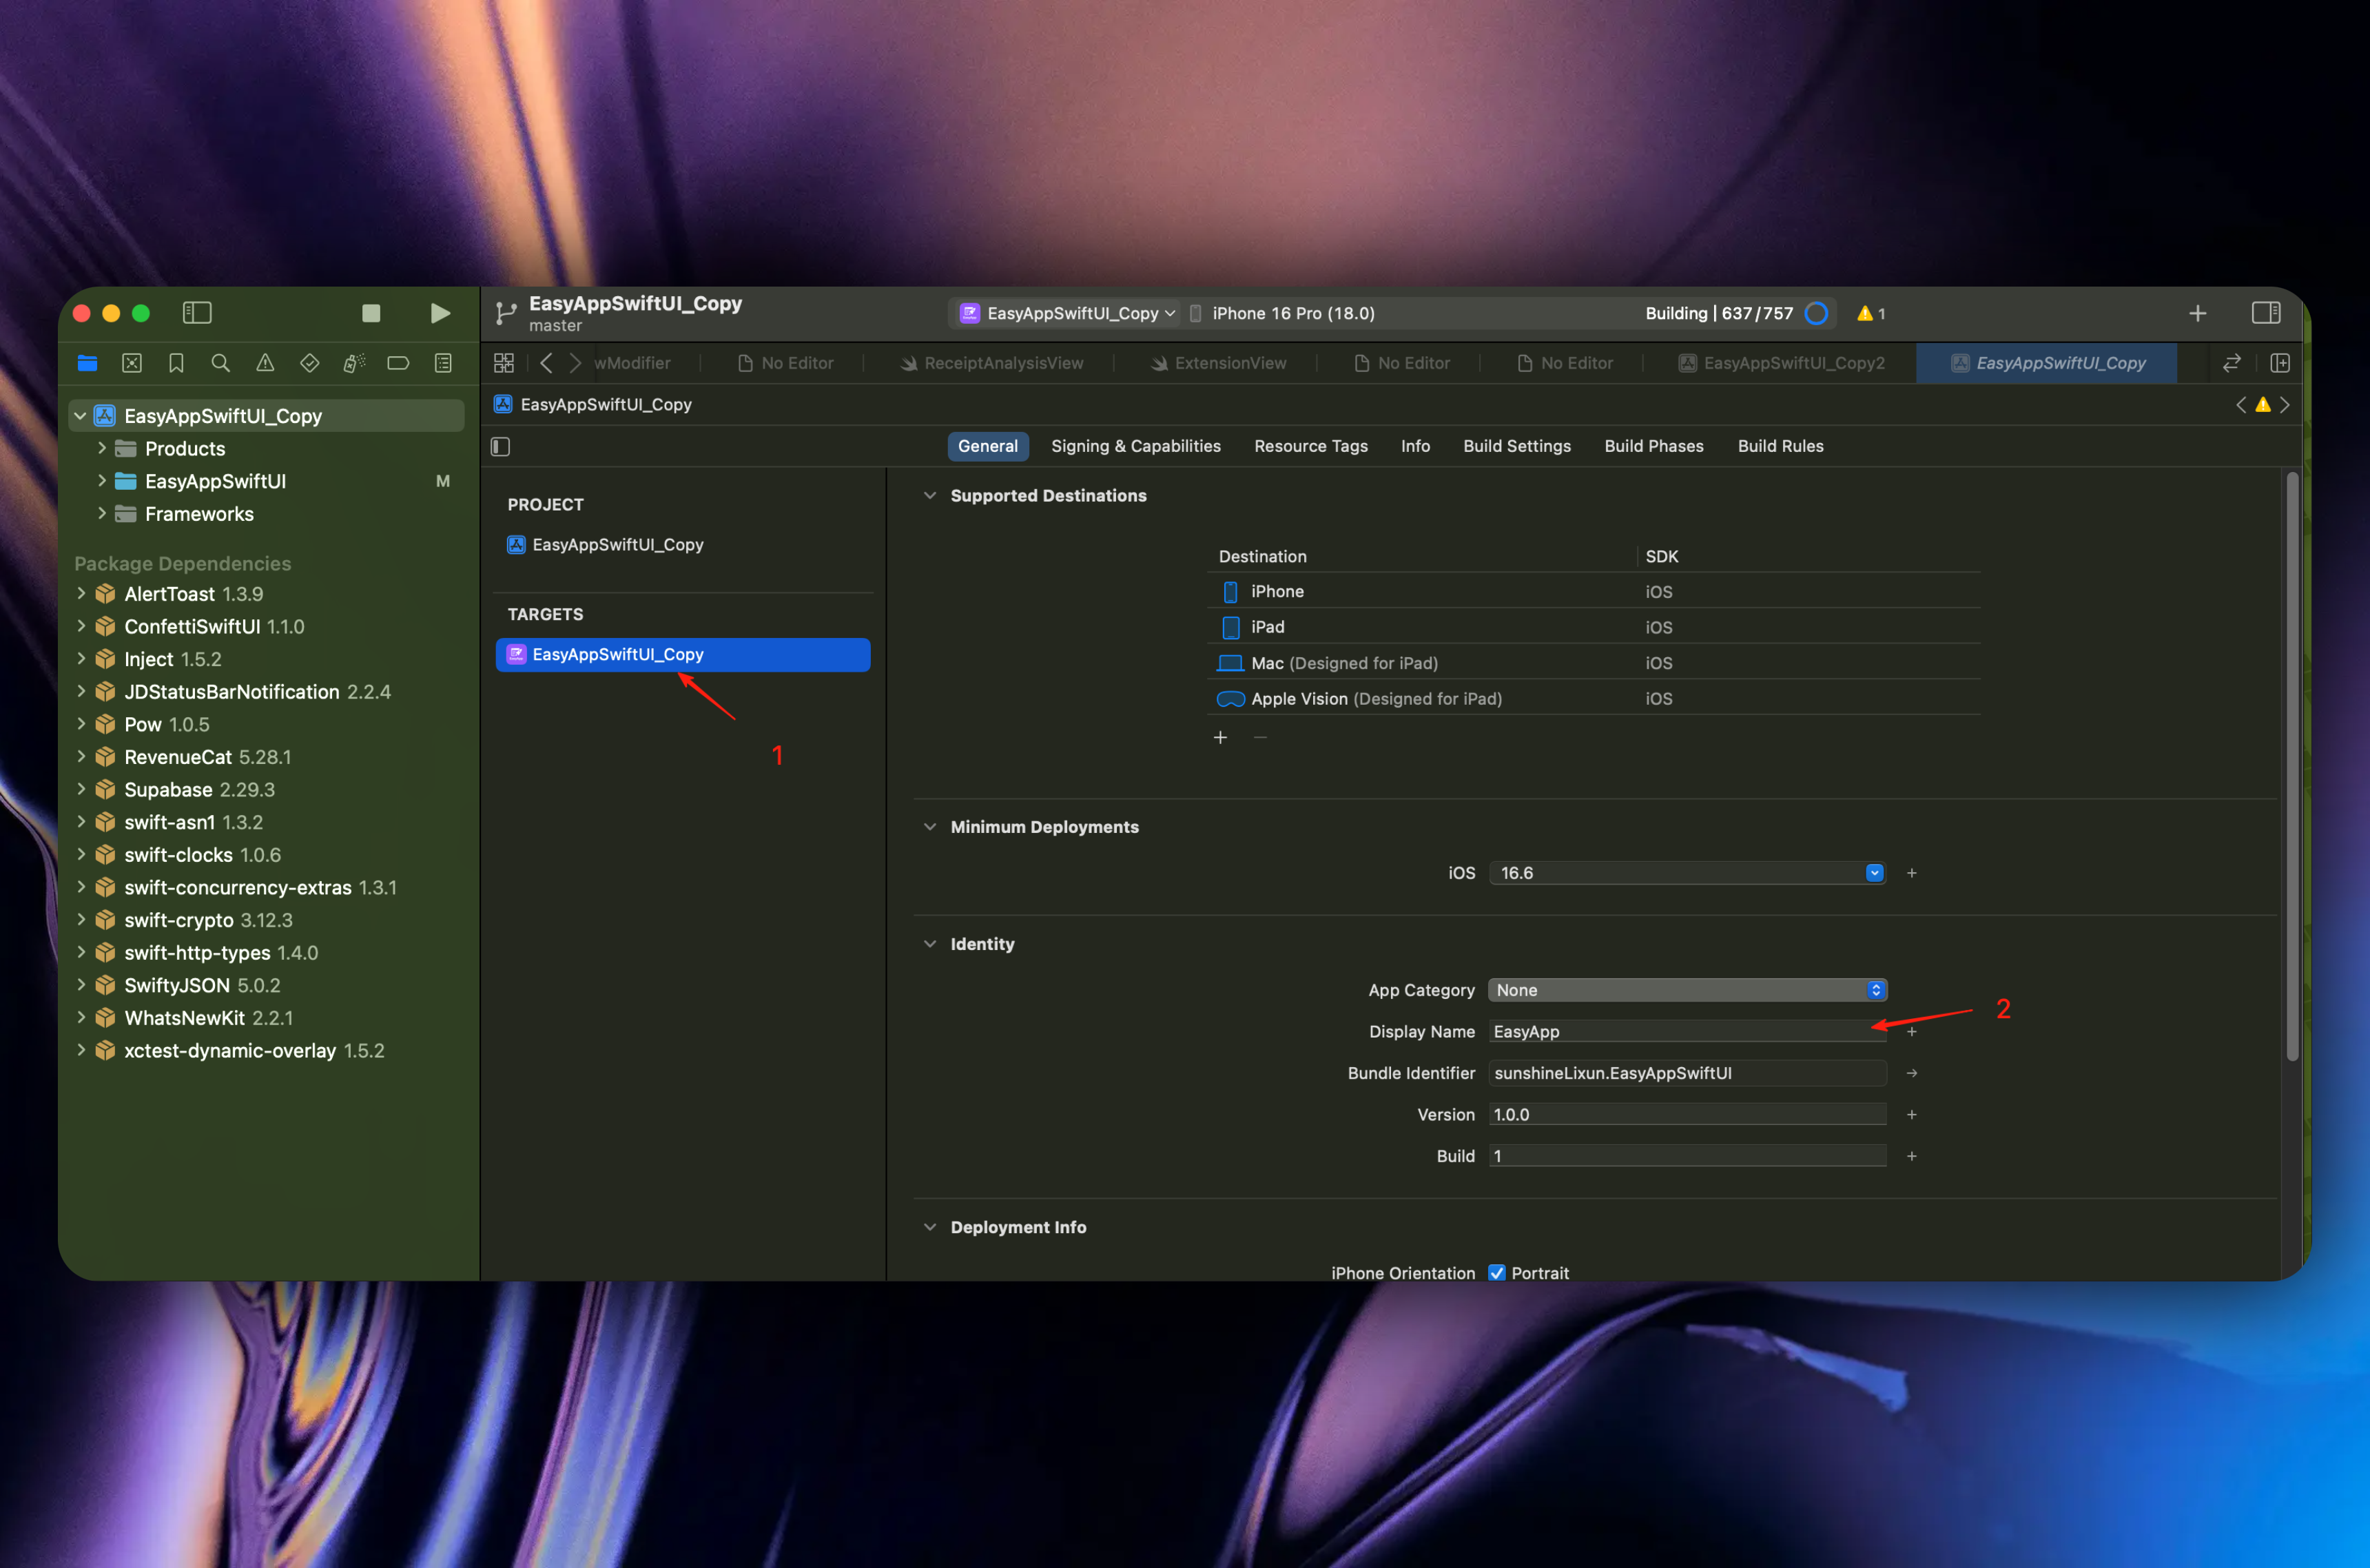
Next, you need to configure how to connect to Supabase services.
}>
Learn how to connect Supabase backend service on App-end
### Permissions Configuration (this step is optional)
The template enables some permissions by default to demonstrate related features. All permissions can be viewed here

If your App doesn't need a certain permission, please click the arrow icon to delete the corresponding permission.
During Apple review, if your App requests a certain permission but doesn't use it, it may be rejected. Please verify once before launching.
# Summary
URL: https://easyapp.site/en/docs/quickstart/summarize
Congratulations! You have completed the EasyApp quick start section
***
title: Summary
description: Congratulations! You have completed the EasyApp quick start section
icon: Sticker
-------------
### Summary
At this point, you have completed the EasyApp quick start section. If you didn't encounter any issues along the way, you can go through the complete process from login to purchase to experience EasyApp's functionality.
Next, we recommend you set up an AI IDE, so you can directly develop Swift/SwiftUI projects in the AI IDE.
} href="/docs/codebase/IDESetup">
Quickly understand configuring AI IDE for Swift/SwiftUI development
# Deploy Supabase Backend Service
URL: https://easyapp.site/en/docs/quickstart/supabaseEdgeFuncton
Learn how to configure Supabase backend service
***
title: Deploy Supabase Backend Service
description: Learn how to configure Supabase backend service
icon: DatabaseBackup
--------------------
## Why Choose Supabase Cloud Functions?
Using Supabase Cloud Functions as a middleware layer for AI services has the following significant advantages:
No additional server maintenance costs, pay-as-you-go model
API Keys are securely stored on the server side, avoiding client-side packet capture risks
Easy access to user information, facilitating permission control and data management
## Introduction
The EasyAppSupabase template, as the backend/server-side template for EasyAppSwiftUI, has already integrated Supabase Cloud Functions. This guide will show you how to integrate, develop, test, and deploy Edge Functions in your EasyAppSupabase project.
The Supabase Cloud Functions project is located in the [`EasyAppSupabase`](https://github.com/FastEasyApp/easyapp-subapase) repository.
Similarly, you can follow the EasyAppSwiftUI approach to download the project. First fork the repository, then clone the project to your computer.
This template provides very convenient deployment features, database migration features, and Edge Function development, testing, and deployment features.
## Project Structure
The EasyAppSupabase project is already configured with Supabase and has the following structure:
Supabase configuration fileLocal environment variables configurationEach server interfaceDatabase migration files
EasyApp has built-in all the required tables, storage buckets, and APIs for the EasyAppSwiftUI App. You can directly execute the following command to deploy to production. Before that, you need to install [Supabase CLI](#1-environment-setup).
```bash
cd EasyAppSupabase
npm run deploy
```
## 1. Environment Setup
### Install Supabase CLI
We recommend using Supabase CLI to manage Supabase services.
```bash
npm install supabase --save-dev
```
For more Supabase CLI usage, please refer to [Supabase CLI documentation](https://supabase.com/docs/guides/local-development).
### Verify Installation
```bash
npx supabase --version
```
### Login to Supabase
```bash
npx supabase login
```
Please follow the prompts during the login process.
### View Project List
```bash
npx supabase projects list
```
### Connect to Project
```bash
npx supabase link --project-ref YOUR_PROJECT_ID
```
YOUR\_PROJECT\_ID is your project ID on the Supabase Dashboard, which can be found here

If you are not familiar with Supabase Cloud Functions, we strongly recommend deploying directly to production and testing in the online environment. This way you can avoid the complexity of local development and test directly in production.
## 2. Deploy to Production (Recommended)
1. Automatic Deployment (Recommended)
In EasyAppSupabase, we have built-in deployment scripts. You just need to execute the following command to deploy the Supabase template features to production.
```bash
cd EasyAppSupabase
npm run deploy
```
`npm run deploy` will automatically deploy all Edge Functions and database to production.
We also provide other deployment commands you can refer to:
```bash
"migrate": "supabase db push", // Migrate database
"functions:deploy": "supabase functions deploy", // Deploy functions
"functions:logs": "supabase functions logs", // View function logs
"start": "supabase start", // Start local service (if not started)
"stop": "supabase stop", // Stop local service
"reset": "supabase db reset", // Reset database
"status": "supabase status" // View service status
```
Whenever you modify tables or database, you need to execute the following command to migrate the database.
```bash
npm run migrate
```
Whenever you modify/add Edge Functions, you need to execute the following command to deploy functions.
```bash
npm run functions:deploy
```
Or you can directly execute `npm run deploy` to deploy both the database and functions at the same time.
After successful deployment, you also need to add environment variables in Edge Functions.

How to obtain them, see below:
* Get Supabase URL. Click the "Connect" button in the top navigation bar. In the popup, select Mobile Framework, select Swift in Framework. Copy supabaseURL.


* Get Supabase API key. Click the "Project Settings" button in the sidebar, click the "API Keys" button. Click the "Copy" button.
Copy `service_role`.

After obtaining `url` and `service_role`, fill in the corresponding `SUPABASE_URL` and `SUPABASE_SERVICE_ROLE_KEY`.
{/* For other environment variables, you need to set them according to your needs. If you use OpenAI service, you need to add `OPENAI_API_KEY`.
If you use OneSignal push service, you need to add `ONESIGNAL_REST_API_KEY`, `ONESIGNAL_APP_ID`, and `ONESIGNAL_APP_KEY`.
How to integrate OneSignal? Please refer to
}
href="/docs/Integrations/notifications"
>
OneSignal integration documentation
If you use CF R2 storage service, you need to add `CLOUDFLARE_ACCOUNT_ID`, `R2_ACCESS_KEY_ID`, `R2_SECRET_ACCESS_KEY`, `R2_BUCKET_NAME`, and `R2_PUBLIC_URL`. */}
At this point, you have started the backend service in your Supabase project. You don't need to read the following content. Next, we need to configure Apple login and user registration/login process.
} href="/docs/quickstart/appleLogin">
Apple login integration documentation
# Control Center Widget
URL: https://easyapp.site/en/docs/widgets/controlWidget
Learn how EasyAppSwiftUI integrates Control Center widgets
***
title: Control Center Widget
description: Learn how EasyAppSwiftUI integrates Control Center widgets
icon: Smartphone
----------------
# Overview
`EasyAppWidgetControl` targets iOS 18 Control Center widgets, enabling users to toggle an in-app timer from Control Center or the Lock Screen. This guide explains the control configuration, value provider, and how to extend the control with more actions.
## Core Structure
* **Control entry** `EasyAppWidgetControl` conforms to `ControlWidget` and registers through `AppIntentControlConfiguration`.
* **Value model** The nested `Value` struct keeps track of the control state (`isRunning`, `name`).
* **Intent setup** `TimerConfiguration` and `StartTimerIntent` let users edit the timer name and push state updates into the system.
Key implementation resides in `EasyAppSwiftUI/EasyAppWidget/EasyAppWidgetControl.swift`:
```swift
struct EasyAppWidgetControl: ControlWidget {
static let kind: String = "sunshineLixun.EasyAppSwiftUI.EasyAppWidget"
var body: some ControlWidgetConfiguration {
AppIntentControlConfiguration(
kind: Self.kind,
provider: Provider()
) { value in
ControlWidgetToggle(
"Start Timer",
isOn: value.isRunning,
action: StartTimerIntent(value.name)
) { isRunning in
Label(isRunning ? "On" : "Off", systemImage: "timer")
}
}
.displayName("Timer")
.description("A an example control that runs a timer.")
}
}
```
## Provider & State
* `Provider` conforms to `AppIntentControlValueProvider`, returning the widget value for previews and live usage.
* `currentValue` currently returns `true` to represent an active timer—replace this stub with real logic that checks application state.
```swift
struct Provider: AppIntentControlValueProvider {
func previewValue(configuration: TimerConfiguration) -> Value {
EasyAppWidgetControl.Value(isRunning: false, name: configuration.timerName)
}
func currentValue(configuration: TimerConfiguration) async throws -> Value {
let isRunning = true // Check if the timer is running
return EasyAppWidgetControl.Value(isRunning: isRunning, name: configuration.timerName)
}
}
```
## Intent Definitions
* `TimerConfiguration` allows customization of the timer name within the Control Center editor.
* `StartTimerIntent` implements `SetValueIntent` to perform the side effect of toggling the timer (currently a stub returning `.result()`; integrate your business logic here).
```swift
struct StartTimerIntent: SetValueIntent {
static let title: LocalizedStringResource = "Start a timer"
@Parameter(title: "Timer Name")
var name: String
@Parameter(title: "Timer is running")
var value: Bool
func perform() async throws -> some IntentResult {
// Start the timer…
return .result()
}
}
```
## Integration Steps
1. Use Xcode 16 or later and enable the Control Center Widgets capability on the target.
2. Include `EasyAppWidgetControl()` in `EasyAppWidgetBundle.swift` to register the control:
```swift
@main
struct EasyAppWidgetBundle: WidgetBundle {
var body: some Widget {
EasyAppWidget()
EasyAppWidgetLiveActivity()
EasyAppWidgetControl()
}
}
```
3. Build and install the app on a device running iOS 18, then open the Control Center or Settings editor to add the **Timer** control.
4. Tapping the control triggers `StartTimerIntent`, allowing you to execute timer logic in the intent handler.
## Customization Tips
* Adjust the `ControlWidgetToggle` strings or swap in `ControlWidgetButton` for other interaction patterns.
* Extend the `Value` struct to surface additional state (e.g., remaining time) and return it from the provider.
* Utilize `LocalizedStringResource` to localize the display name and description; update localization files accordingly.
## Debugging & Known Issues
* **Control missing:** ensure the widget extension targets iOS 18+ and test on physical hardware (Control Center widgets are not available in the simulator yet).
* **State not refreshing:** verify the real data source and call the forthcoming Control Center APIs or `WidgetCenter.shared.reloadAllTimelines()` when appropriate.
* **Intent not firing:** double-check `StartTimerIntent.perform()` and confirm App Intents entitlements are enabled in the main app.
* **Kind collisions:** keep `kind` unique to avoid conflicts with other widgets in the bundle.
By integrating `EasyAppWidgetControl`, you can extend the EasyApp experience into the Control Center, complementing the Home Screen, Lock Screen, and Dynamic Island widgets.
# Dynamic Island
URL: https://easyapp.site/en/docs/widgets/dynamicIsland
Learn how EasyAppSwiftUI builds Dynamic Island experiences
***
title: Dynamic Island
description: Learn how EasyAppSwiftUI builds Dynamic Island experiences
icon: RectangleHorizontal
-------------------------
# Overview
`EasyAppWidgetLiveActivity` leverages ActivityKit to deliver Lock Screen banners and Dynamic Island experiences. This guide covers how `EasyAppWidgetAttributes` and reusable components power the Dynamic Island layout and how to keep the main app and extension in sync.
## Architecture
* **Widget configuration** `EasyAppWidgetLiveActivity` declares an `ActivityConfiguration`, supplying views for both Lock Screen and `dynamicIsland` contexts.
* **View components** Live Island regions live in `EasyAppSwiftUI/EasyAppWidget/WidgetsComponents/LiveActivityComponents.swift`.
* **Data model** `EasyAppWidgetAttributes` and `EasyAppWidgetAttributes.ContentState` must remain identical between the main app and widget extension; a mismatch leads to decoding failures.
## Key Structure
```swift
struct EasyAppWidgetLiveActivity: Widget {
var body: some WidgetConfiguration {
ActivityConfiguration(for: EasyAppWidgetAttributes.self) { context in
LiveActivityLockScreen(
attributes: context.attributes,
state: context.state
)
.activityBackgroundTint(.clear)
.activitySystemActionForegroundColor(.primary)
} dynamicIsland: { context in
DynamicIsland {
DynamicIslandExpandedRegion(.leading) {
LiveActivityExpandedLeading(
attributes: context.attributes,
state: context.state
)
}
DynamicIslandExpandedRegion(.trailing) {
LiveActivityExpandedTrailing(
attributes: context.attributes,
state: context.state
)
}
DynamicIslandExpandedRegion(.bottom) {
LiveActivityExpandedBottom(
attributes: context.attributes,
state: context.state
)
}
} compactLeading: {
LiveActivityCompactLeading(attributes: context.attributes, state: context.state)
} compactTrailing: {
LiveActivityCompactTrailing(attributes: context.attributes, state: context.state)
} minimal: {
LiveActivityMinimal(attributes: context.attributes, state: context.state)
}
.widgetURL(URL(string: "easyapp://live-activity?path=live-activity"))
.keylineTint(.blue)
}
}
}
```
* `.widgetURL` provides a tap target that can be replaced with your own deep link.
* `.keylineTint` controls the keyline color; align this with brand accents.
## Region Components
* **Expanded regions (`LiveActivityExpandedLeading/Trailing/Bottom`)** present primary content, metrics, and actions; customize them using data from attributes and state.
* **Compact regions (`LiveActivityCompactLeading/Trailing`)** condense information into icons and short labels for the collapsed island.
* **Minimal region (`LiveActivityMinimal`)** uses an animated gradient background with the emoji for subtle status feedback.
* **Lock Screen banner (`LiveActivityLockScreen`)** shares the same attributes and offers space for additional action cards.
## Data & Updates
* `EasyAppWidgetAttributes` describes static details such as the user name or task label.
* `EasyAppWidgetAttributes.ContentState` carries live fields (emoji, progress). Update the state via `Activity.update(using:)` to refresh the island.
* Keep the following files synchronized across targets:
* `EasyAppSwiftUI/Common/EasyAppWidgetAttributes.swift`
* `EasyAppWidget/Common/EasyAppWidgetAttributes.swift`
Consistency is critical; the Live Activity will fail if either side changes fields without matching the other (see previous fix experience).
## Launch & Debug
1. Request a Live Activity from the main app:
```swift
let activity = try Activity.request(
attributes: EasyAppWidgetAttributes(name: "World"),
contentState: EasyAppWidgetAttributes.ContentState(emoji: "😀"),
pushType: nil
)
```
2. Run the `EasyAppWidgetExtension` scheme on hardware or a simulator that supports Dynamic Island (iPhone 14 Pro or later).
3. Use `#Preview` blocks with `.dynamicIsland(.compact/.expanded/.minimal)` in Xcode to verify layouts.
4. Call `activity.update(using:)` to push state changes and observe Dynamic Island animations.
## Design Tips
* Follow Human Interface Guidelines: keep compact labels to \~6–8 characters to prevent clipping.
* Use helpers like `AnimatedProgressBar` and `PulsingStatusIndicator` to show real-time metrics.
* Apply `.buttonStyle(PlainButtonStyle())` to action buttons so Dynamic Island commands blend with the glassmorphic look.
* Prepare localized strings in `EasyAppWidgetAttributes` or via `LocalizedStringResource` when supporting multiple locales.
## Troubleshooting
* **Live Activity fails to start:** ensure `NSSupportsLiveActivities = true` is set in the main app `Info.plist` and test on real devices when possible.
* **Decoding errors:** confirm `EasyAppWidgetAttributes.ContentState` matches between app and extension (past issues arose from mismatched fields).
* **Missing actions:** verify `DynamicIslandExpandedRegion` closures actually return the desired buttons and that they trigger logic.
* **Preview build failures:** supply mock data or guard runtime-only code with `#if DEBUG`.
Refer to the multiple `#Preview` blocks at the bottom of `LiveActivityComponents.swift` for compact, expanded, and Lock Screen samples.
# Lock Screen Widgets
URL: https://easyapp.site/en/docs/widgets/lockScreenWidget
Learn how EasyAppSwiftUI implements Lock Screen widgets
***
title: Lock Screen Widgets
description: Learn how EasyAppSwiftUI implements Lock Screen widgets
icon: Smartphone
----------------
# Overview
`EasyAppWidget` Lock Screen widgets rely on WidgetKit accessory families and cover the circular, rectangular, and inline formats. This guide explains the layouts, data sources, and customization tips for the Lock Screen experience.
## Widget Types
* **Circular (`AccessoryCircularWidgetView`)** uses a `Link` to launch the `easyapp://microphone` deep link. Ideal for a single icon shortcut.
* **Rectangular (`AccessoryRectangularWidgetView`)** displays an emoji, brand text, and the current time; well suited for conveying immediate status or progress.
* **Inline (`AccessoryInlineWidgetView`)** places concise status text alongside the clock for quick glanceable information.
All views live in `EasyAppSwiftUI/EasyAppWidget/WidgetsComponents/AccessoryWidgetViews.swift`, where you can adjust layout and copy as needed.
## Data Source
* All accessory views share the `SimpleEntry` structure provided by `Provider.timeline`.
* The emoji comes from `ConfigurationAppIntent.favoriteEmoji`, while time is taken from `TimelineEntry.date`, keeping the Lock Screen synchronized with Home Screen widgets.
## Key Snippets
```swift
struct AccessoryCircularWidgetView: View {
let entry: SimpleEntry
var body: some View {
Link(
destination: URL(string: "easyapp://microphone?path=microphone")!,
label: {
Image(systemName: "microphone.fill")
.font(.system(size: 20, weight: .medium))
.foregroundStyle(.blue)
})
}
}
```
* Replace the `destination` URL to open other in-app features.
* Wrap additional text inside the `Link` if needed, but keep the content minimal.
```swift
struct AccessoryRectangularWidgetView: View {
let entry: SimpleEntry
var body: some View {
HStack(spacing: 8) {
Text(entry.configuration.favoriteEmoji)
.font(.system(size: 24))
VStack(alignment: .leading, spacing: 2) {
Text("EasyApp")
.font(.system(.caption2, design: .rounded))
.fontWeight(.semibold)
.foregroundStyle(.primary)
Text(entry.date, style: .time)
.font(.system(.subheadline, design: .rounded))
.fontWeight(.bold)
.foregroundStyle(.secondary)
}
}
.padding(.horizontal, 8)
}
}
```
* Add indicators or messages (e.g., “Next meeting 10:30”) by extending the `VStack`.
* Adjust `spacing` and `padding` to keep the Lock Screen footprint compact.
```swift
struct AccessoryInlineWidgetView: View {
let entry: SimpleEntry
var body: some View {
HStack(spacing: 4) {
Text(entry.configuration.favoriteEmoji)
.font(.system(size: 16))
Text("EasyApp")
.font(.system(.caption, design: .rounded))
.fontWeight(.medium)
Text("•")
.foregroundStyle(.secondary)
Text(entry.date, style: .time)
.font(.system(.caption, design: .rounded))
.fontWeight(.medium)
}
}
}
```
* Use `lineLimit(1)` if the inline text becomes too long.
* Replace the time with other status fields (for example `Text(entry.configuration.customStatus)`).
## Usage & Setup
1. Confirm `.supportedFamilies` in `EasyAppWidget.swift` includes `.accessoryCircular`, `.accessoryRectangular`, and `.accessoryInline`.
2. Add the desired accessory in the system Lock Screen customization:
* Circular: top-left/right status indicators.
* Rectangular: the wide area below the clock.
* Inline: text next to the clock.
3. Configure `ConfigurationAppIntent` parameters to customize emojis or status strings.
## Design Guidelines
* Prefer system colors such as `.primary` and `.secondary` to maintain contrast on diverse wallpapers.
* Keep layouts simple; Lock Screen accessories allow tap-to-launch only—no complex interactivity.
* Respect WidgetKit font and size constraints to avoid clipped text.
## Troubleshooting
* **Widget missing:** ensure the extension is enabled in the main app `Info.plist` and reinstall the build.
* **Tap does nothing:** verify the custom URL scheme is registered, then reload timelines with `WidgetCenter.shared.reloadAllTimelines()` if needed.
* **Text truncated:** shorten copy or apply `lineLimit`/`minimumScaleFactor` in `AccessoryRectangularWidgetView`.
* **Low contrast:** switch to `.foregroundStyle(.primary)` or brighter system colors.
Preview each accessory in `AccessoryWidgetViews.swift` using the `#Preview` blocks to validate layouts across the three sizes.
# Home Screen Widgets
URL: https://easyapp.site/en/docs/widgets/widgets
Learn how EasyAppSwiftUI implements Home Screen widgets
***
title: Home Screen Widgets
description: Learn how EasyAppSwiftUI implements Home Screen widgets
icon: Smartphone
----------------
# Overview
`EasyAppWidget` delivers consistent brand presence and quick entry points on the iOS Home Screen. This guide focuses on the four system families supported on the Home Screen (Small, Medium, Large, Extra Large) and explains how to extend the EasyApp experience on the Home Screen.
## Feature Highlights
* `EasyAppWidgetEntryView` selects `SmallWidgetView`, `MediumWidgetView`, `LargeWidgetView`, or `ExtraLargeWidgetView` according to the active `WidgetFamily`.
* `Provider` leverages `AppIntentTimelineProvider` to supply `SimpleEntry` data shared across all Home Screen families.
* Each size uses `Link` with the `easyapp://` URL scheme to launch in-app features such as the microphone and camera.
* `.containerBackground(for: .widget)` adopts the system background to maintain the glassmorphism look and dark-mode compatibility.
## Directory Map
* `EasyAppWidget.swift` — entry point that registers the widget configuration and supported families.
* `EasyAppWidgetControl.swift` — defines `SimpleEntry` and the `ConfigurationAppIntent` used only for timeline data.
* `WidgetsComponents/` — hosts Home Screen SwiftUI views: `SmallWidgetView.swift`, `MediumWidgetView.swift`, `LargeWidgetView.swift`, `ExtraLargeWidgetView.swift`.
* Other documents cover Lock Screen, Dynamic Island, and Control Center implementations.
## Getting Started
1. Run the `EasyAppWidgetExtension` scheme in Xcode to install the extension onto a simulator or device.
2. Long press the Home Screen, tap the **+** button, search for **EasyApp Widget**.
3. Choose the desired size (Small, Medium, Large, Extra Large) and place it on the Home Screen.
## Key Code Snippet
`EasyAppWidget.swift` defines the Home Screen widget configuration:
```swift
struct EasyAppWidget: Widget {
let kind: String = "EasyAppWidget"
var body: some WidgetConfiguration {
AppIntentConfiguration(
kind: kind,
intent: ConfigurationAppIntent.self,
provider: Provider()
) { entry in
EasyAppWidgetEntryView(entry: entry)
.containerBackground(for: .widget) {
Color(UIColor.systemBackground)
}
}
.configurationDisplayName("EasyApp Widget")
.description("A customizable widget for quick actions and time display.")
.supportedFamilies([
.systemSmall,
.systemMedium,
.systemLarge,
.systemExtraLarge
])
}
}
```
Adjust `supportedFamilies` to limit the widget to specific sizes. When introducing a new size, add the corresponding SwiftUI view under `WidgetsComponents/`.
## Size Guidelines
* **Small (`SmallWidgetView`)** presents the brand emoji and current time in a vertical stack for concise messaging.
* **Medium (`MediumWidgetView`)** shows time and date on the left with two quick actions on the right. Update `Link` destinations to point at any in-app deep link.
* **Large (`LargeWidgetView`)** provides sectional layout space for quick actions or data cards.
* **Extra Large (`ExtraLargeWidgetView`)** targets iPad Home Screens; display multiple data sets or charts while preserving spacing and corner styling.
Reuse existing `RoundedRectangle`, `Circle`, and `.quaternary`/`.secondary` color treatments to keep visuals consistent.
## Preview & Debug
* `#Preview(as: ...)` blocks at the bottom of each view file let you inspect every size in the Xcode Canvas.
* Verify both light and dark mode to ensure `Color(UIColor.systemBackground)` and system colors remain legible.
* When adjusting `Provider.timeline`, generate future `entryDate` values and call `WidgetCenter.shared.reloadAllTimelines()` during debugging to force reloads.
## Troubleshooting
* **Widget missing:** confirm the extension ships with the app and the target toggles "Include in Application Bundle".
* **Incorrect time/date:** rely on the `TimelineEntry.date` provided by the timeline or regenerate entries with `Date.now`.
* **Quick actions not working:** ensure the main app registers the `easyapp://` scheme and handles incoming URLs.
* **Visual inconsistencies:** avoid opaque backgrounds; prefer system materials and existing styling helpers.